

What this is
Cleverpush is a web-based platform that lets website owners and developers send to users who have subscribed to receive them. Integrated with Zeotap CDP, it lets marketers engage their customers in real time and at scale, across mobile applications, websites and email. This page covers the batch Cleverpush destination, which you configure once per Cleverpush channel and then reuse for every audience you link to it. If you want to activate users from a Journeys workflow as they qualify rather than on a scheduled audience refresh, see Cleverpush Real Time Integration instead.Supported identifiers and actions
This integration supports Subscription ID. The destination exposes a single action:
The action does not support ID Extension, Delete or Delta Upload.
Prerequisites
Before you configure the destination, make sure you have the following:- A Cleverpush source in Zeotap CDP. The destination matches users on their Cleverpush Subscription ID, so that identifier has to already be present in Zeotap CDP. You get it either by connecting a Cleverpush source or by ingesting a flat file.
- Your Cleverpush Private API key. Found in the Cleverpush console under Settings > API. See Private API key below.
- The Channel ID of the push notification channel you want to send to. Found in the Cleverpush console under Channels > Platforms > General. See Channel ID below.
Get your Cleverpush credentials
Gather both values from the Cleverpush console before you start the destination form in Zeotap CDP.Private API key
A Private API key is a unique identifier associated with your Cleverpush account. Cleverpush uses it to authenticate and authorise access to certain features and APIs.1
Log into the Cleverpush console and navigate to Settings.
2
In the left panel, click API and copy the Private API key shown on the screen.
3
To restrict a key to particular channels, click Add additional API key and select the channels where you intend to use it.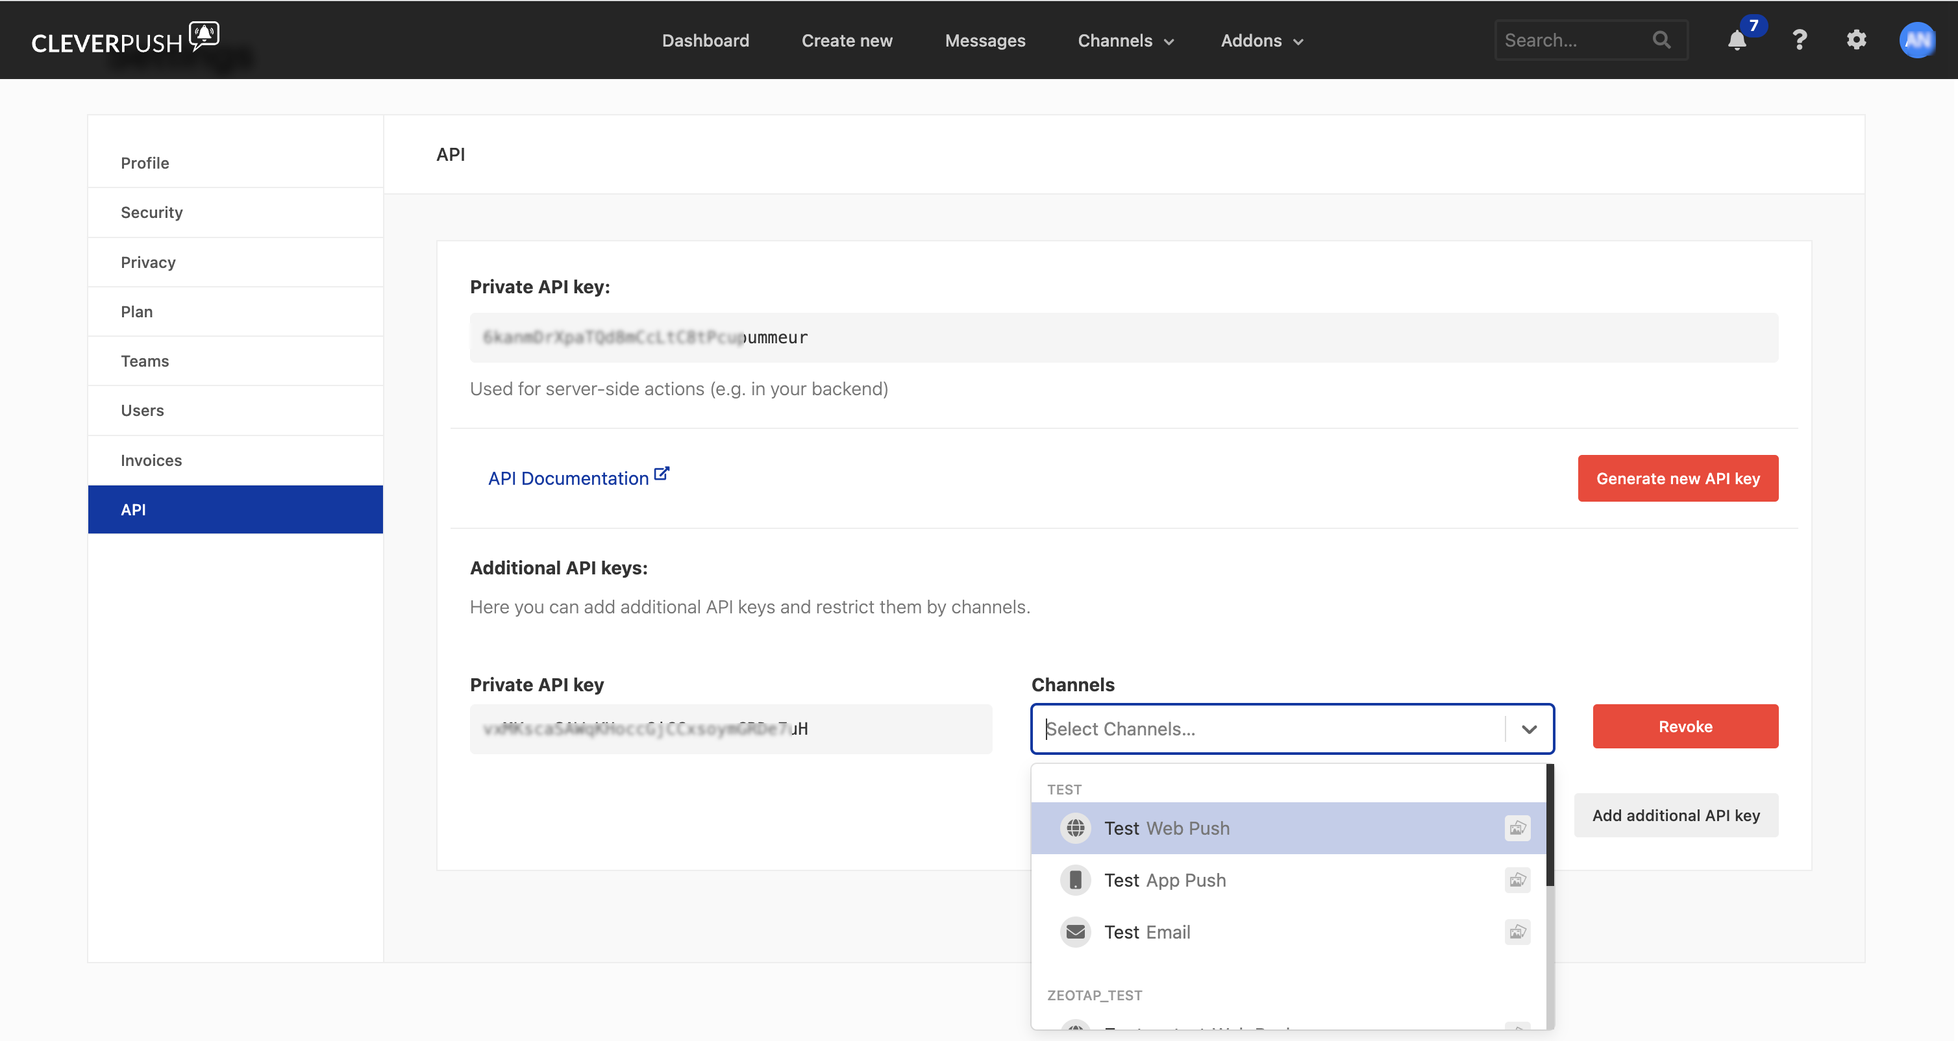
Channel ID
A Channel ID is a unique identifier assigned to a push notification channel you create within Cleverpush.1
Log into the Cleverpush console and open Channels on the top navigation bar.
2
Click the channel you want to send push notifications to. If it does not exist yet, create one by clicking Add Channel in the drop-down menu. For the full steps, see Create a new channel in Cleverpush.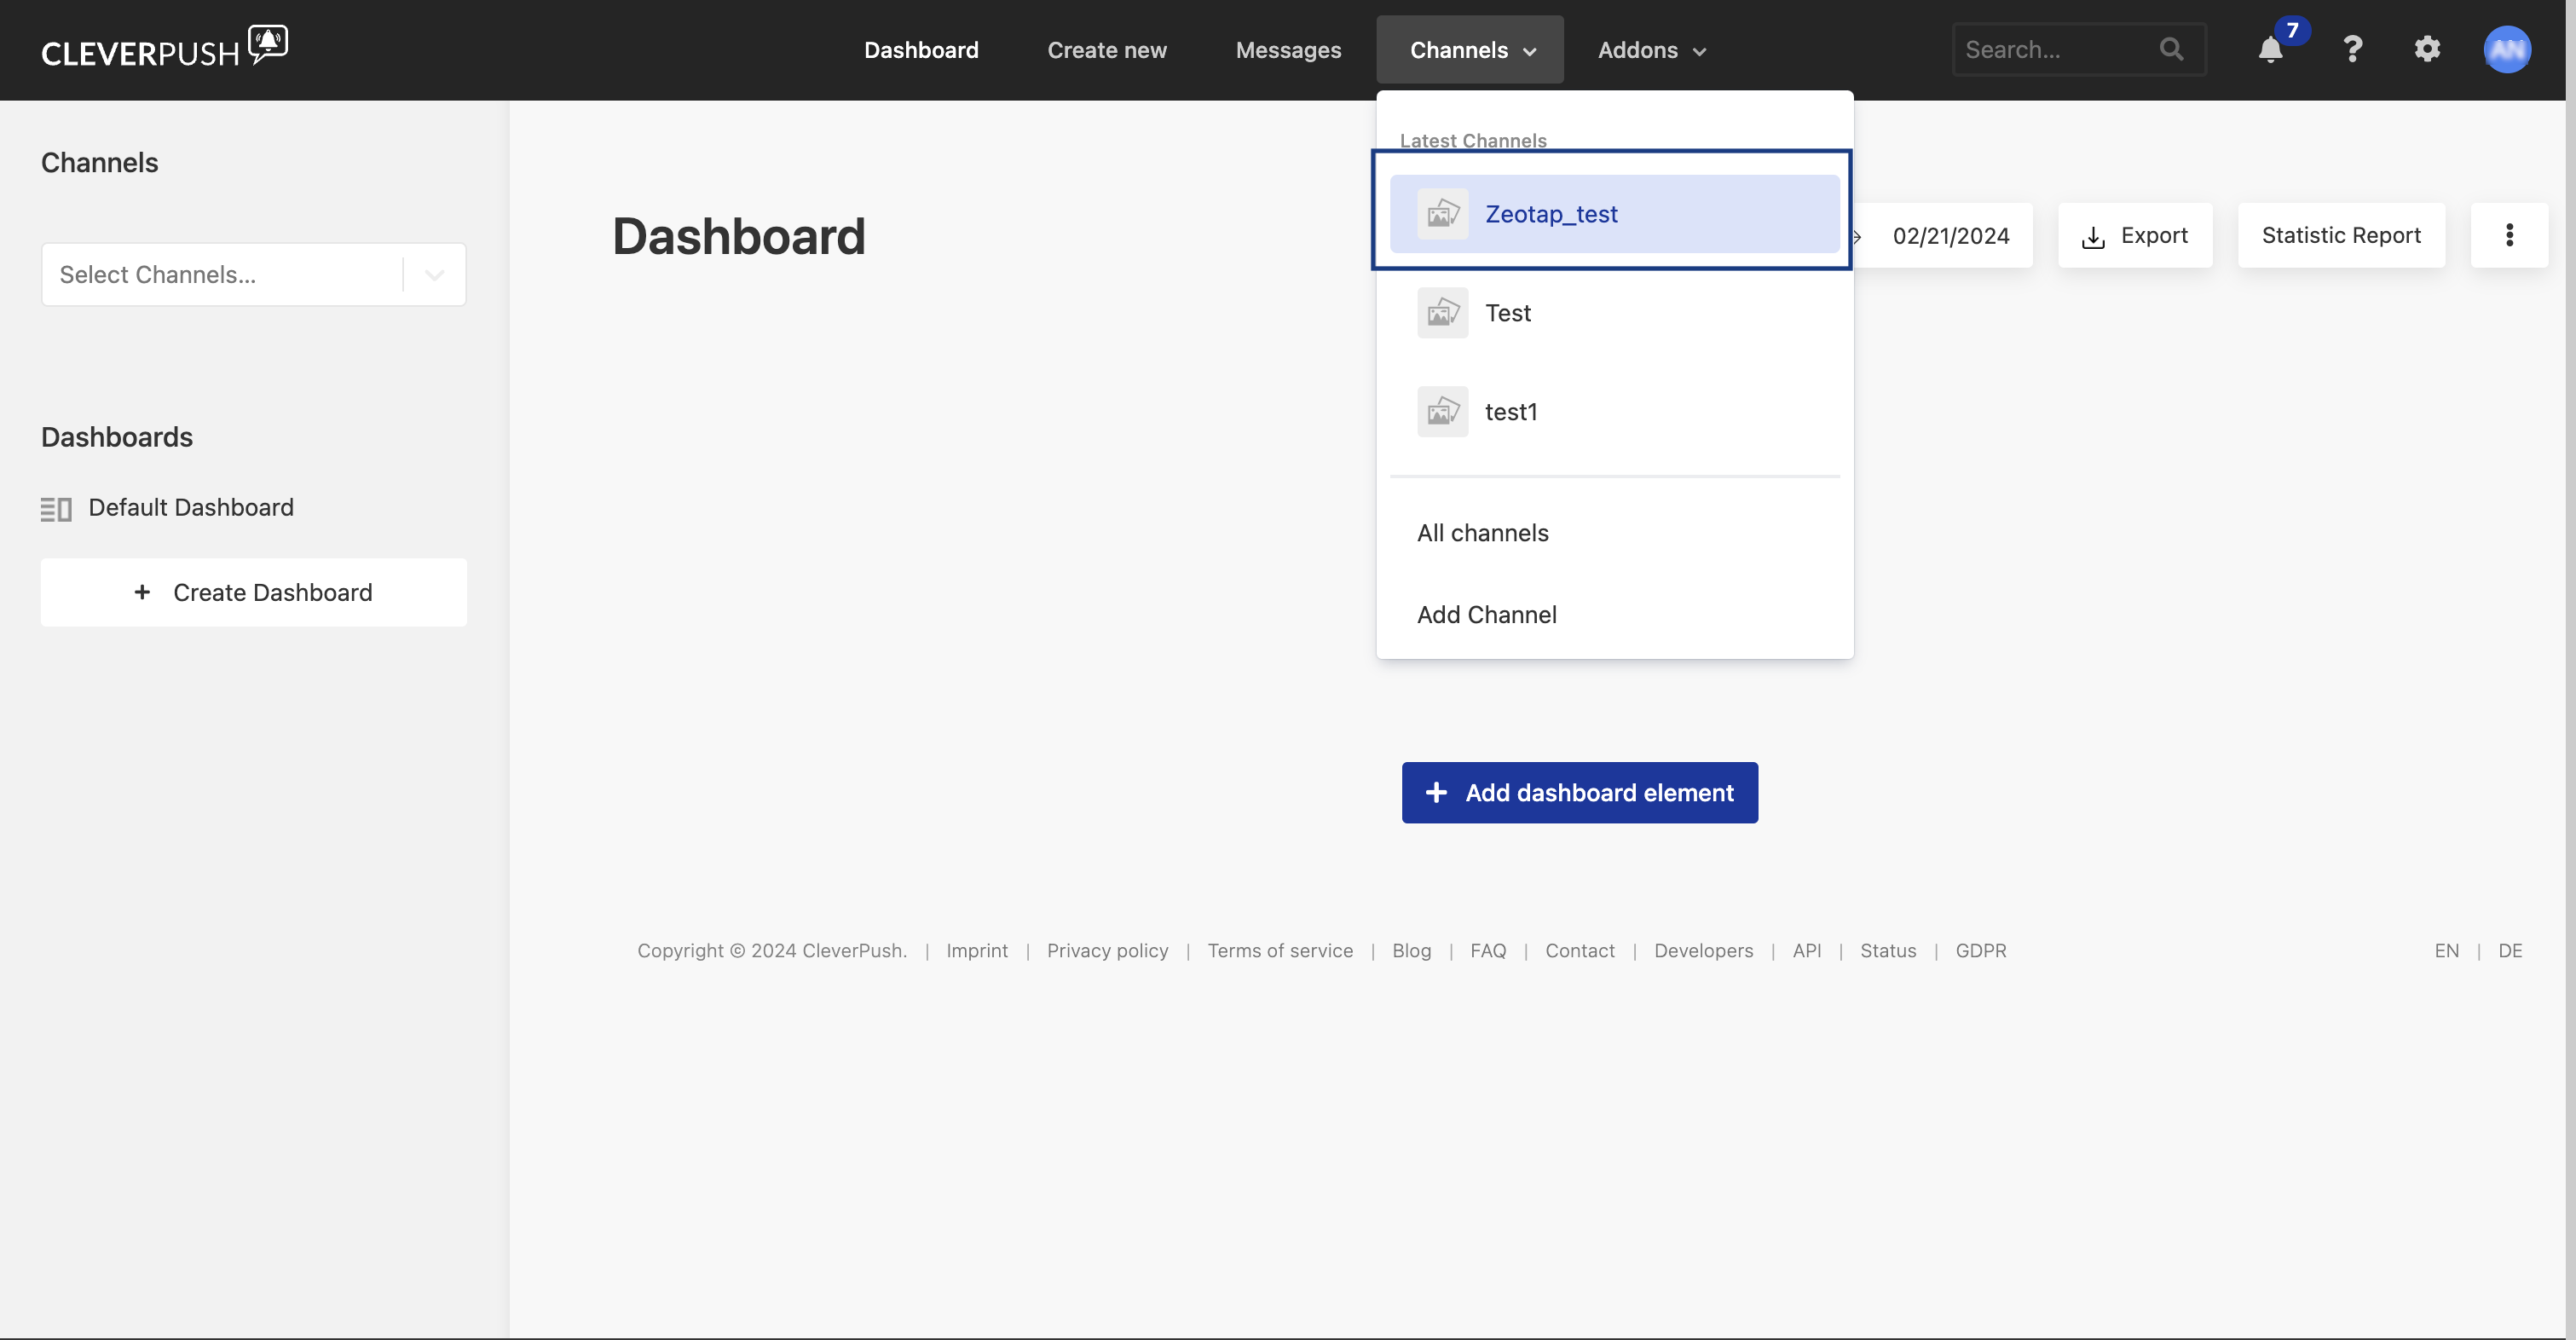
3
Set up the platforms you want to send notifications on. Zeotap CDP supports: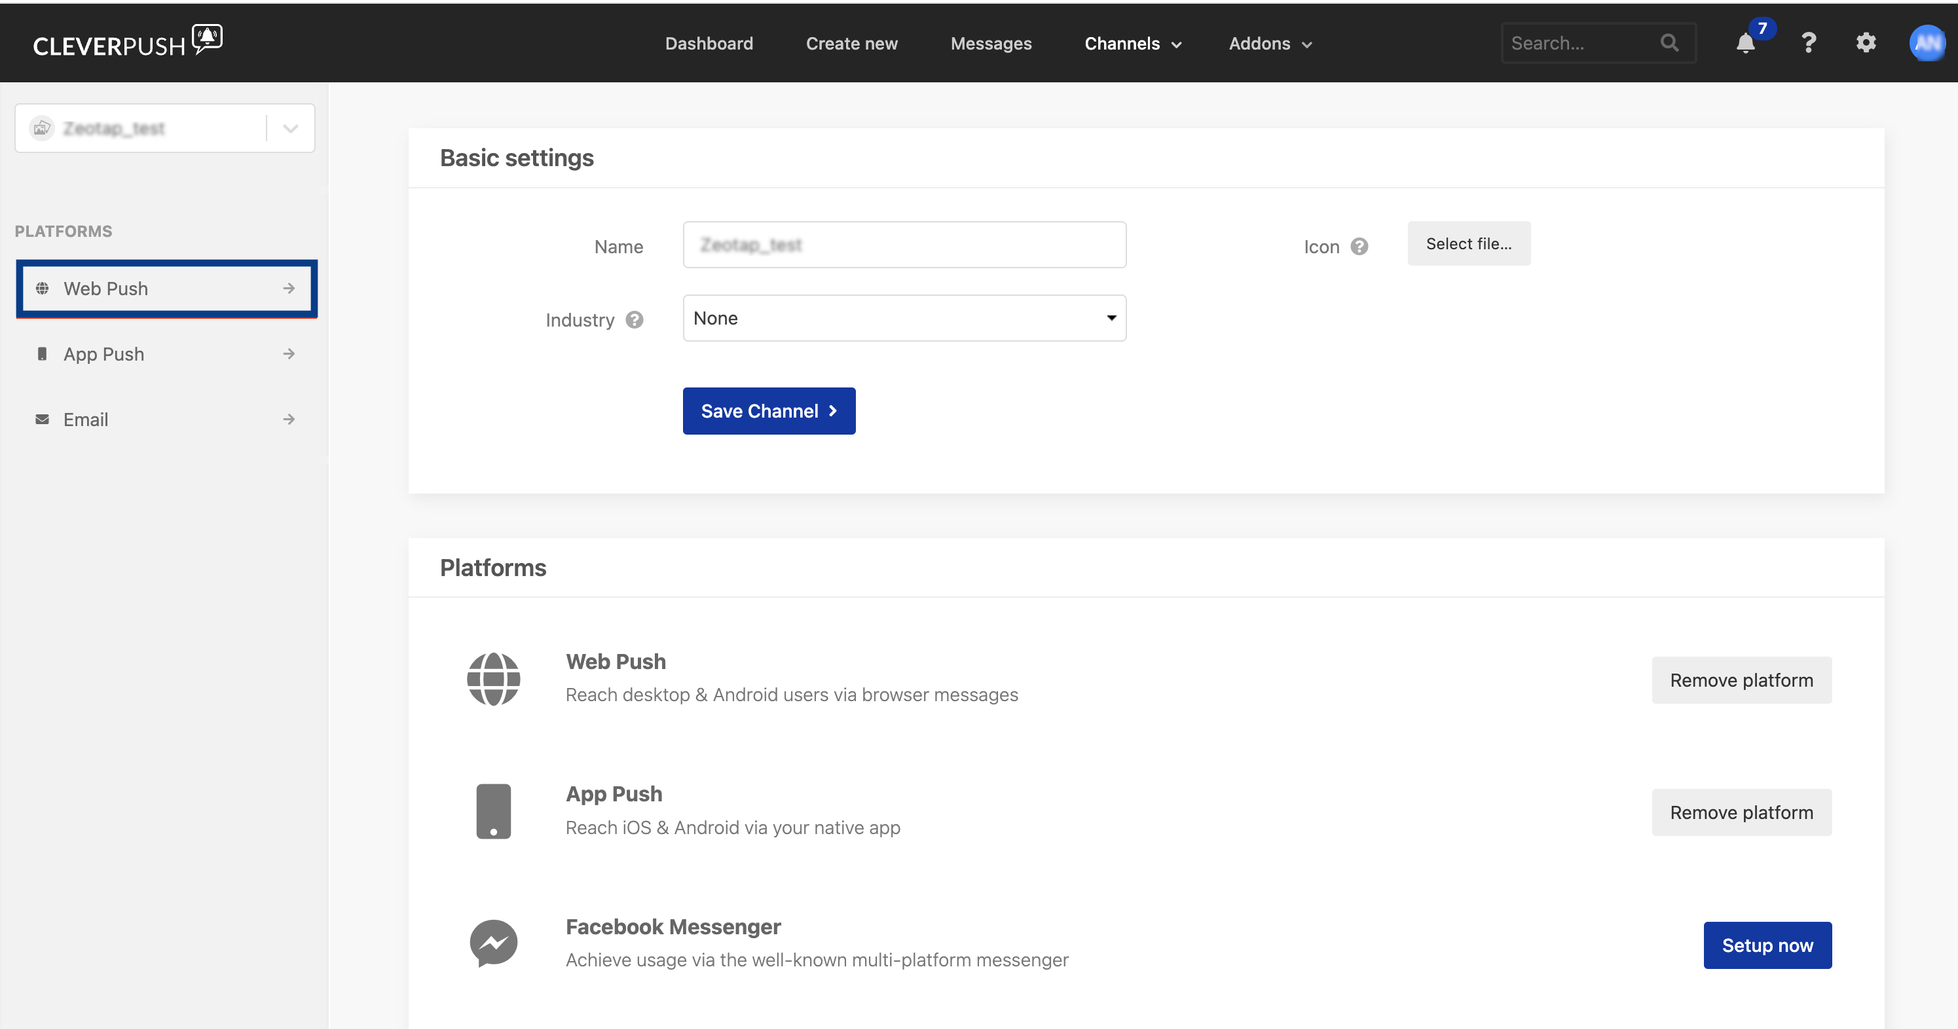
- Web Push
- App Push
- Email Push
For the setup steps for each platform, see Setup Web Push, Setup App Push and Setup Email Push.
4
Open the platform you want to use and go to General > Advanced settings. The Channel ID is the first row of that panel.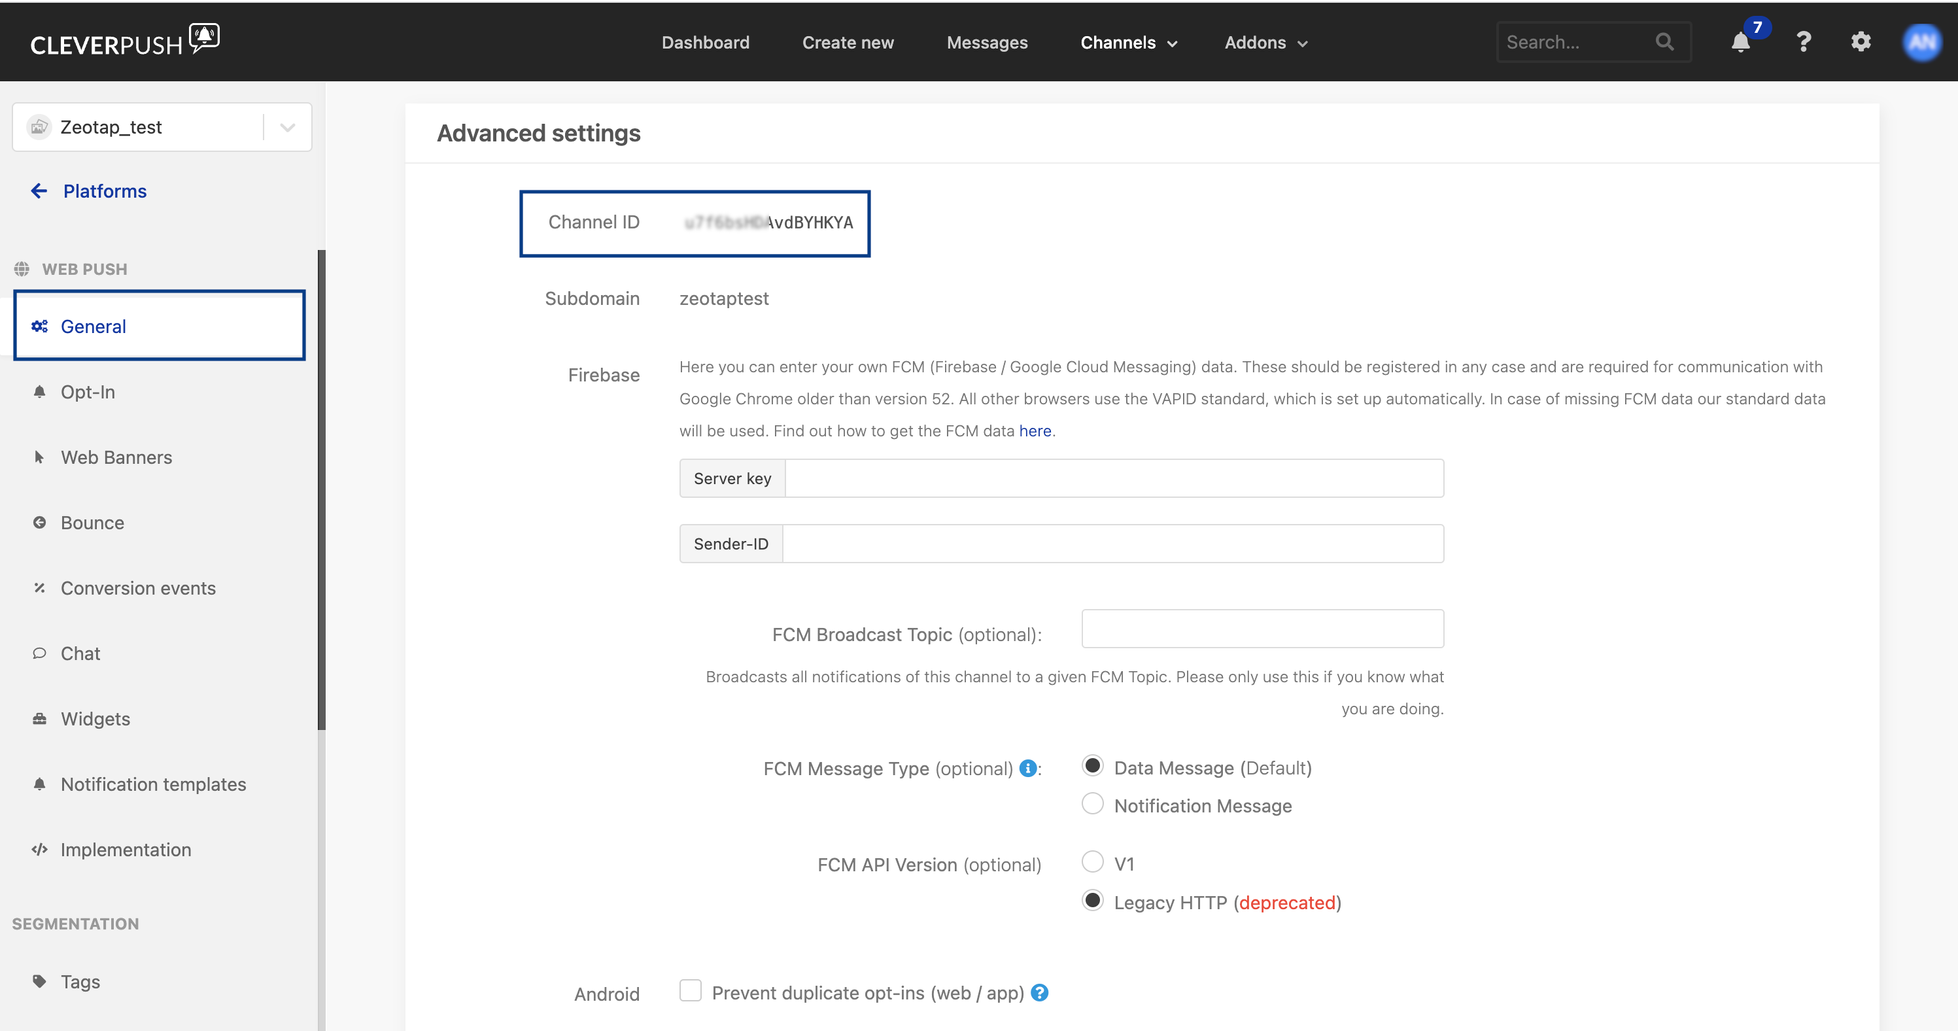
Create the Cleverpush destination
1
In the Zeotap CDP app, go to Integrate > Destinations.
2
Click + Create Destination.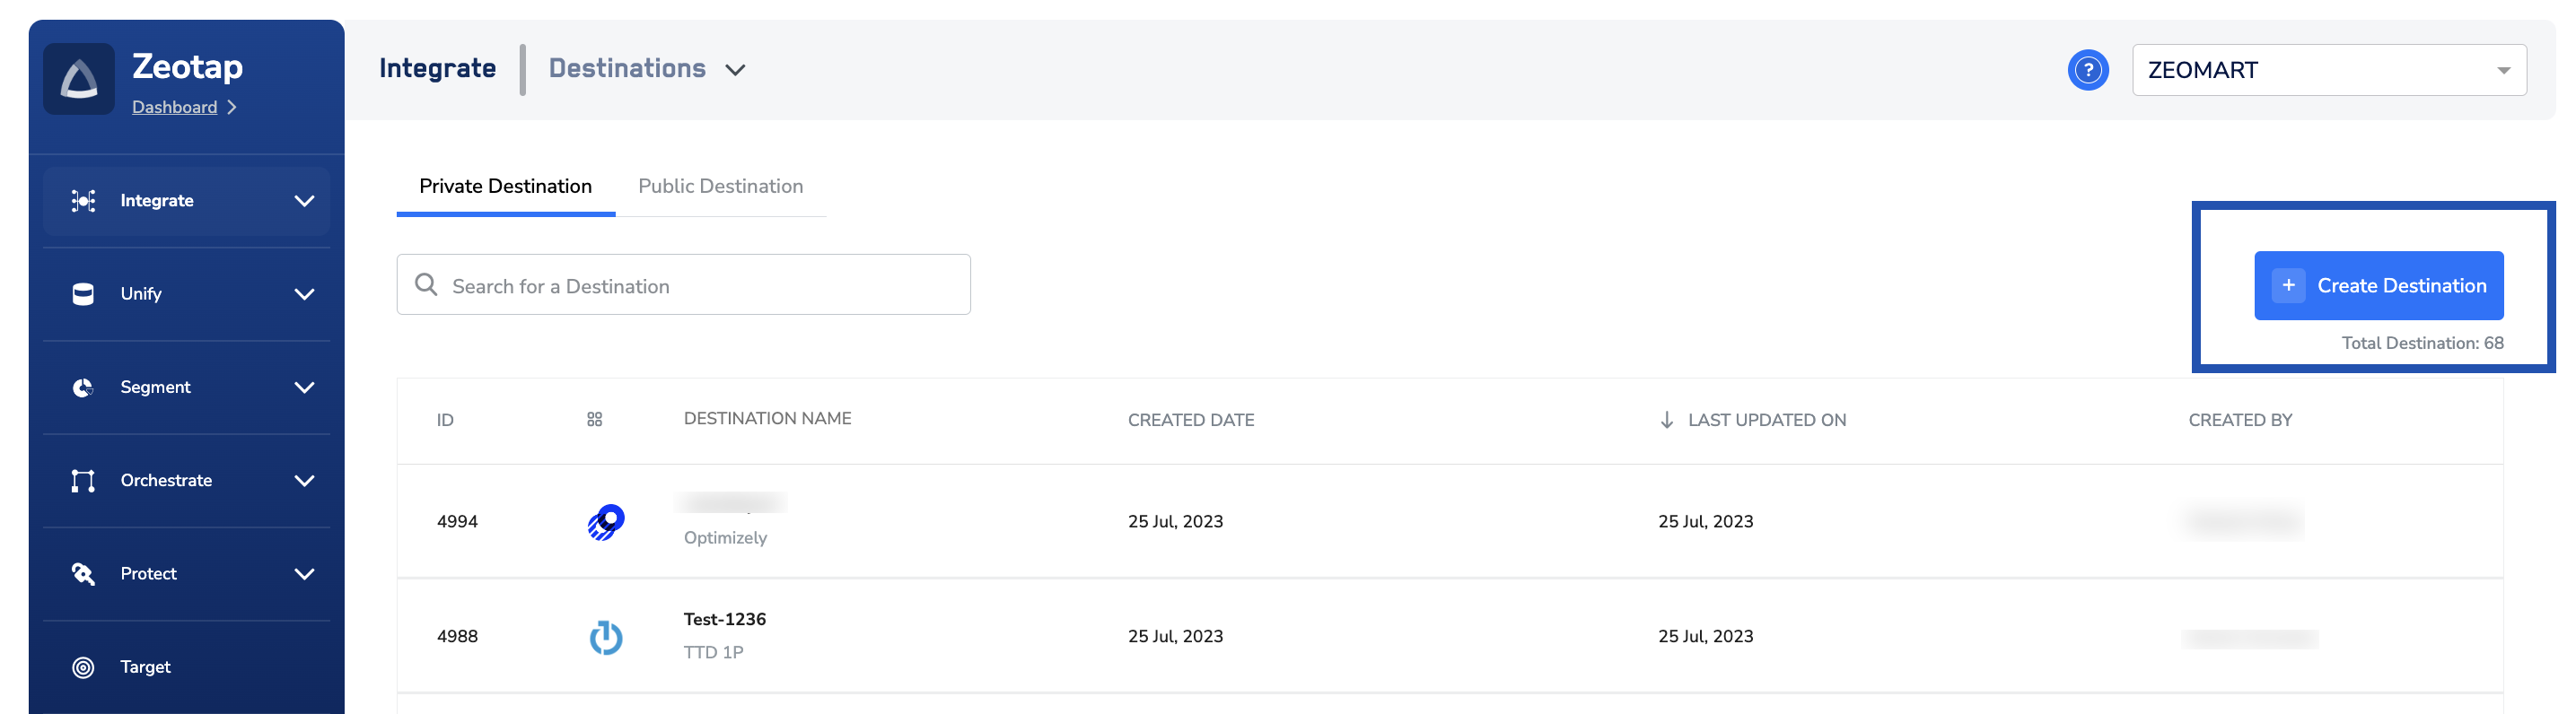
3
Under All Destinations, search for Cleverpush.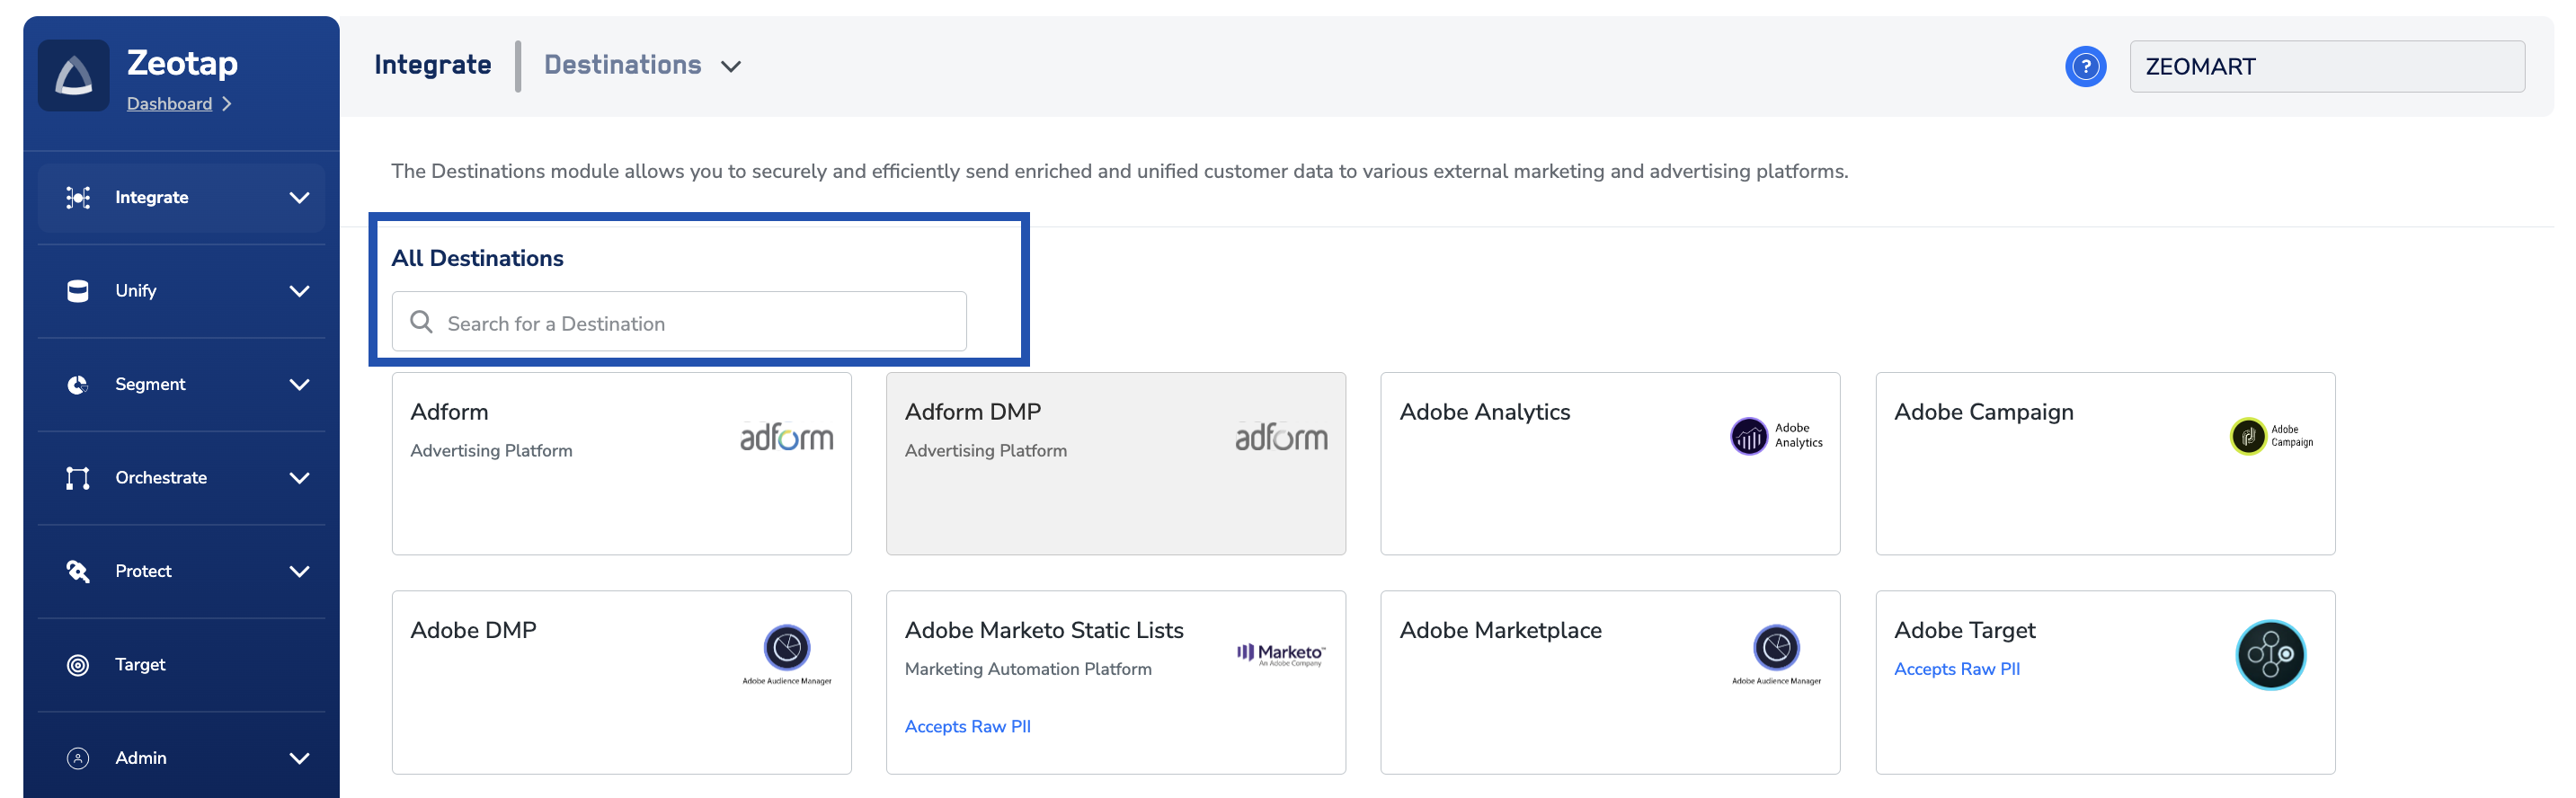
4
Click Cleverpush. The destination opens on the Destination Details step, with a description of the integration on the left and the configuration fields on the right. Fill in:a. Destination Name — a short, descriptive name that identifies the Cleverpush channel this destination sends to, so it is easy to find when you link an audience.b. Private Key — the Private API key you copied from the Cleverpush console.c. Channel Id — the Channel ID of the push notification channel you want to send to.d. Review the fields and click Next.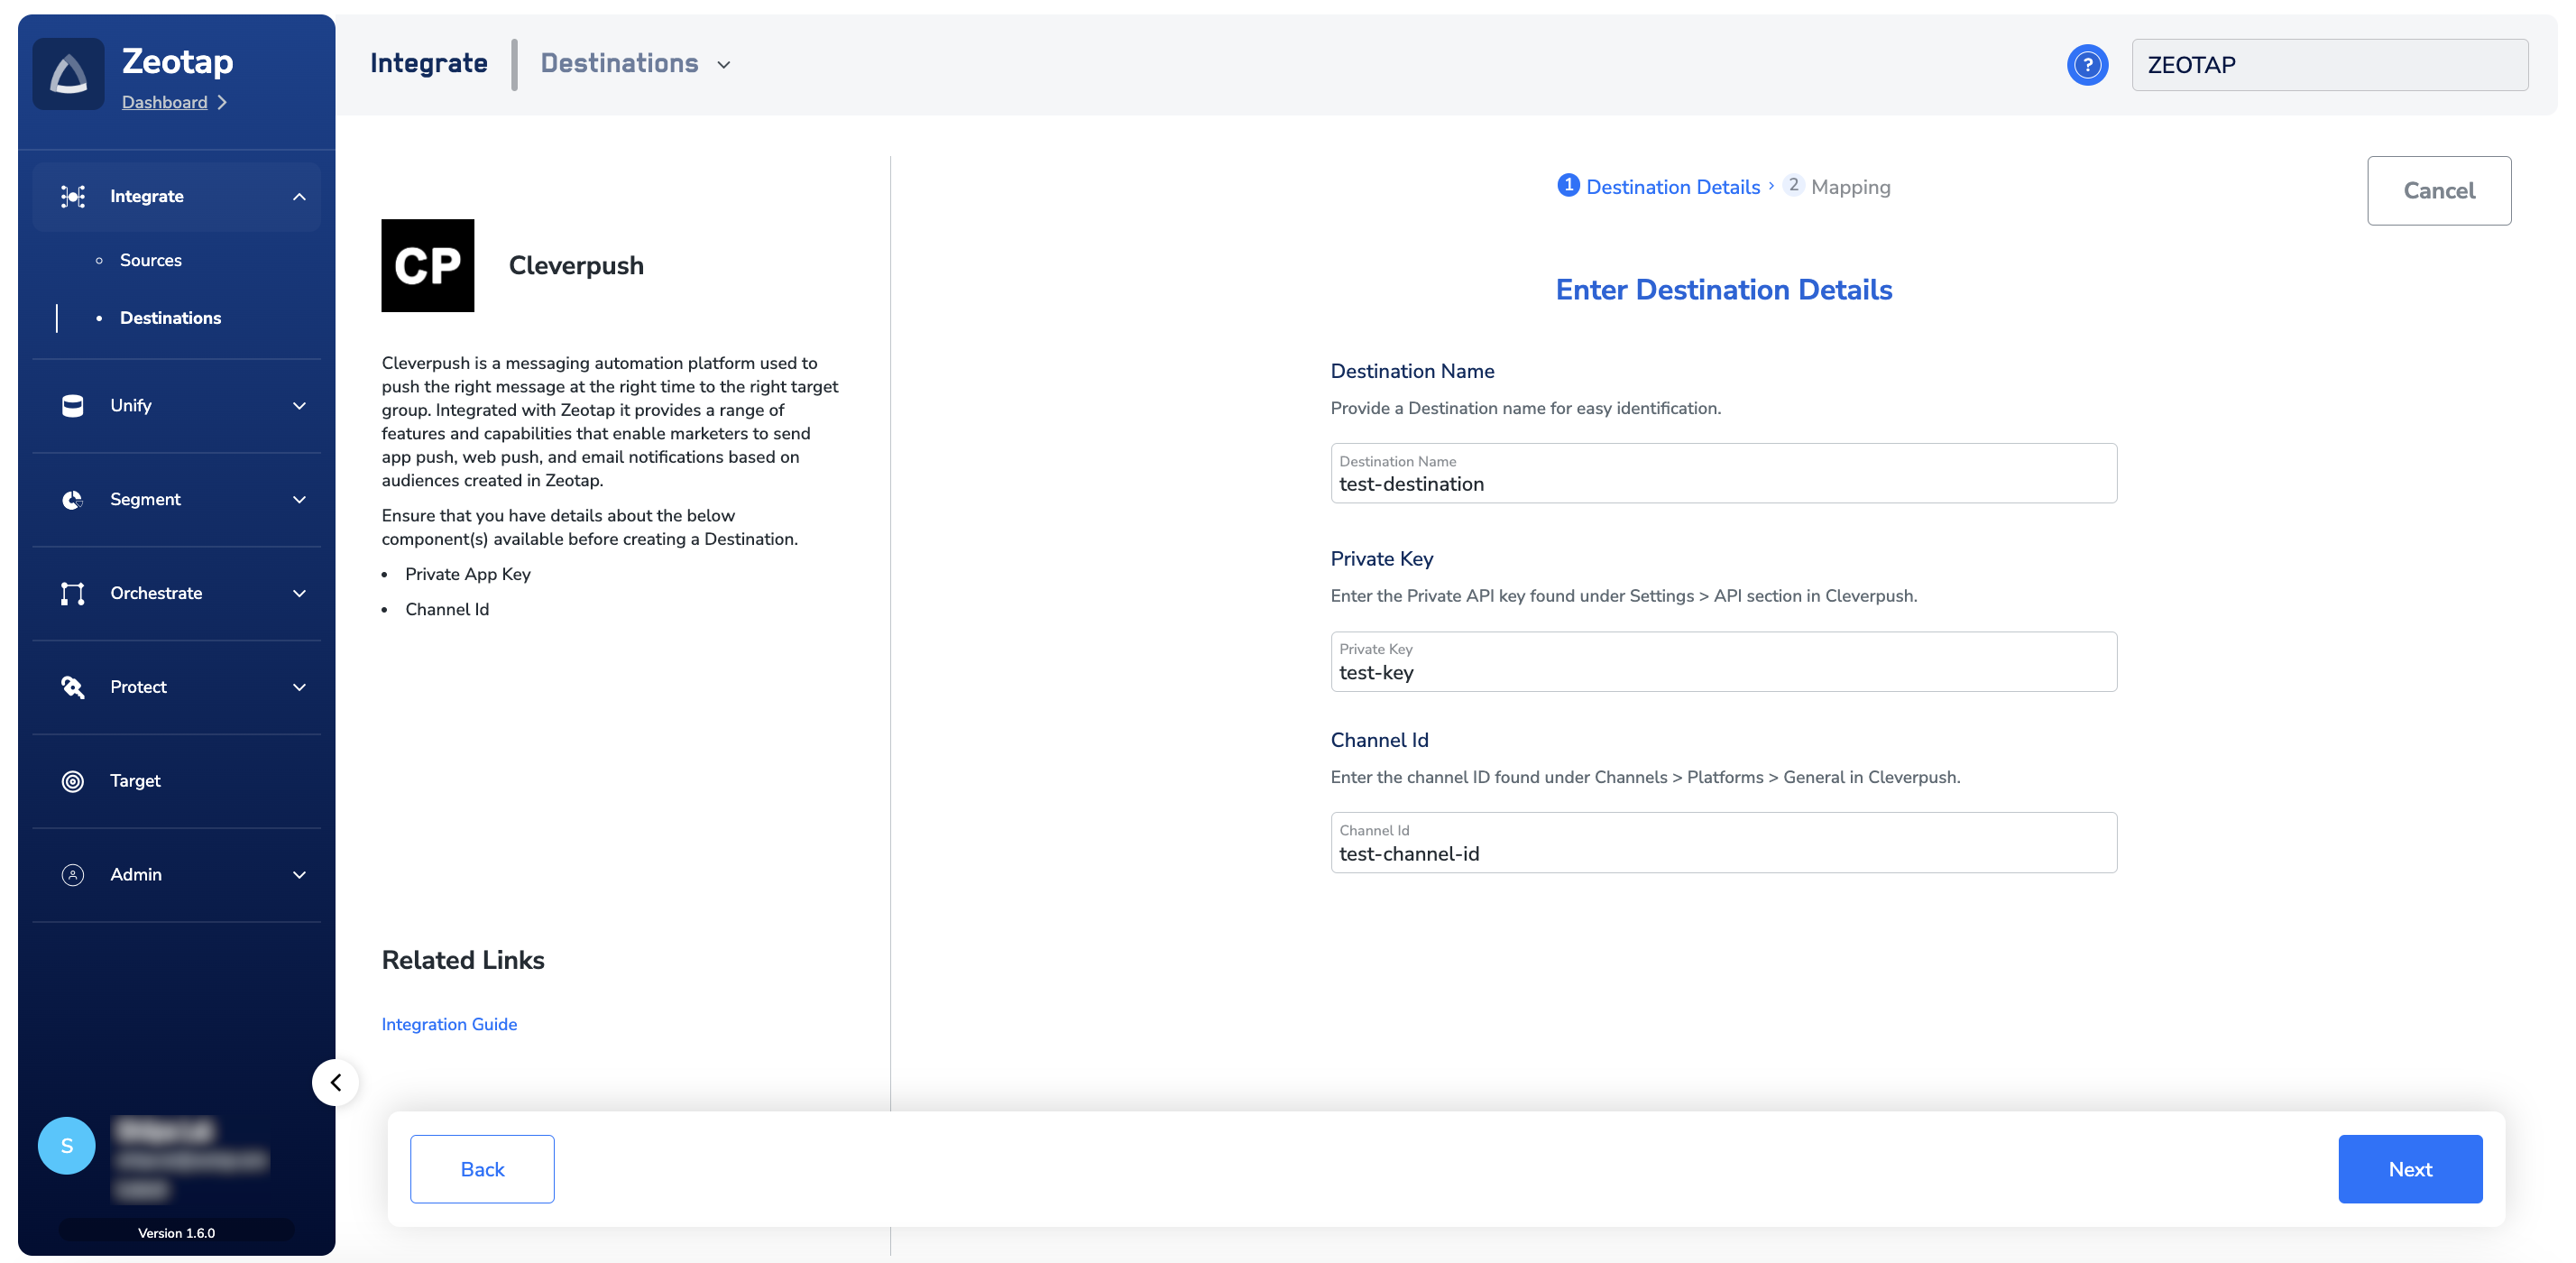
To open the help documentation for this integration from inside the product, click Integration Guide under Related Links.
5
On the Mapping step, choose the action and the field mapping:a. Under Choose your Action, select Send identifiers to Cleverpush. Then, under Map the Fields, map the catalogue field that holds each user’s Cleverpush Subscription ID to the Subscription Id destination field. The output identifiers accepted by the platform are offered by default, and you can edit that selection so that only the identifiers you intend to send are mapped to Subscription Id. For more on how mapping works across destinations, see Define the mapping.b. Click Create Destination. The destination is now available in the Audiences application and can be linked to an audience.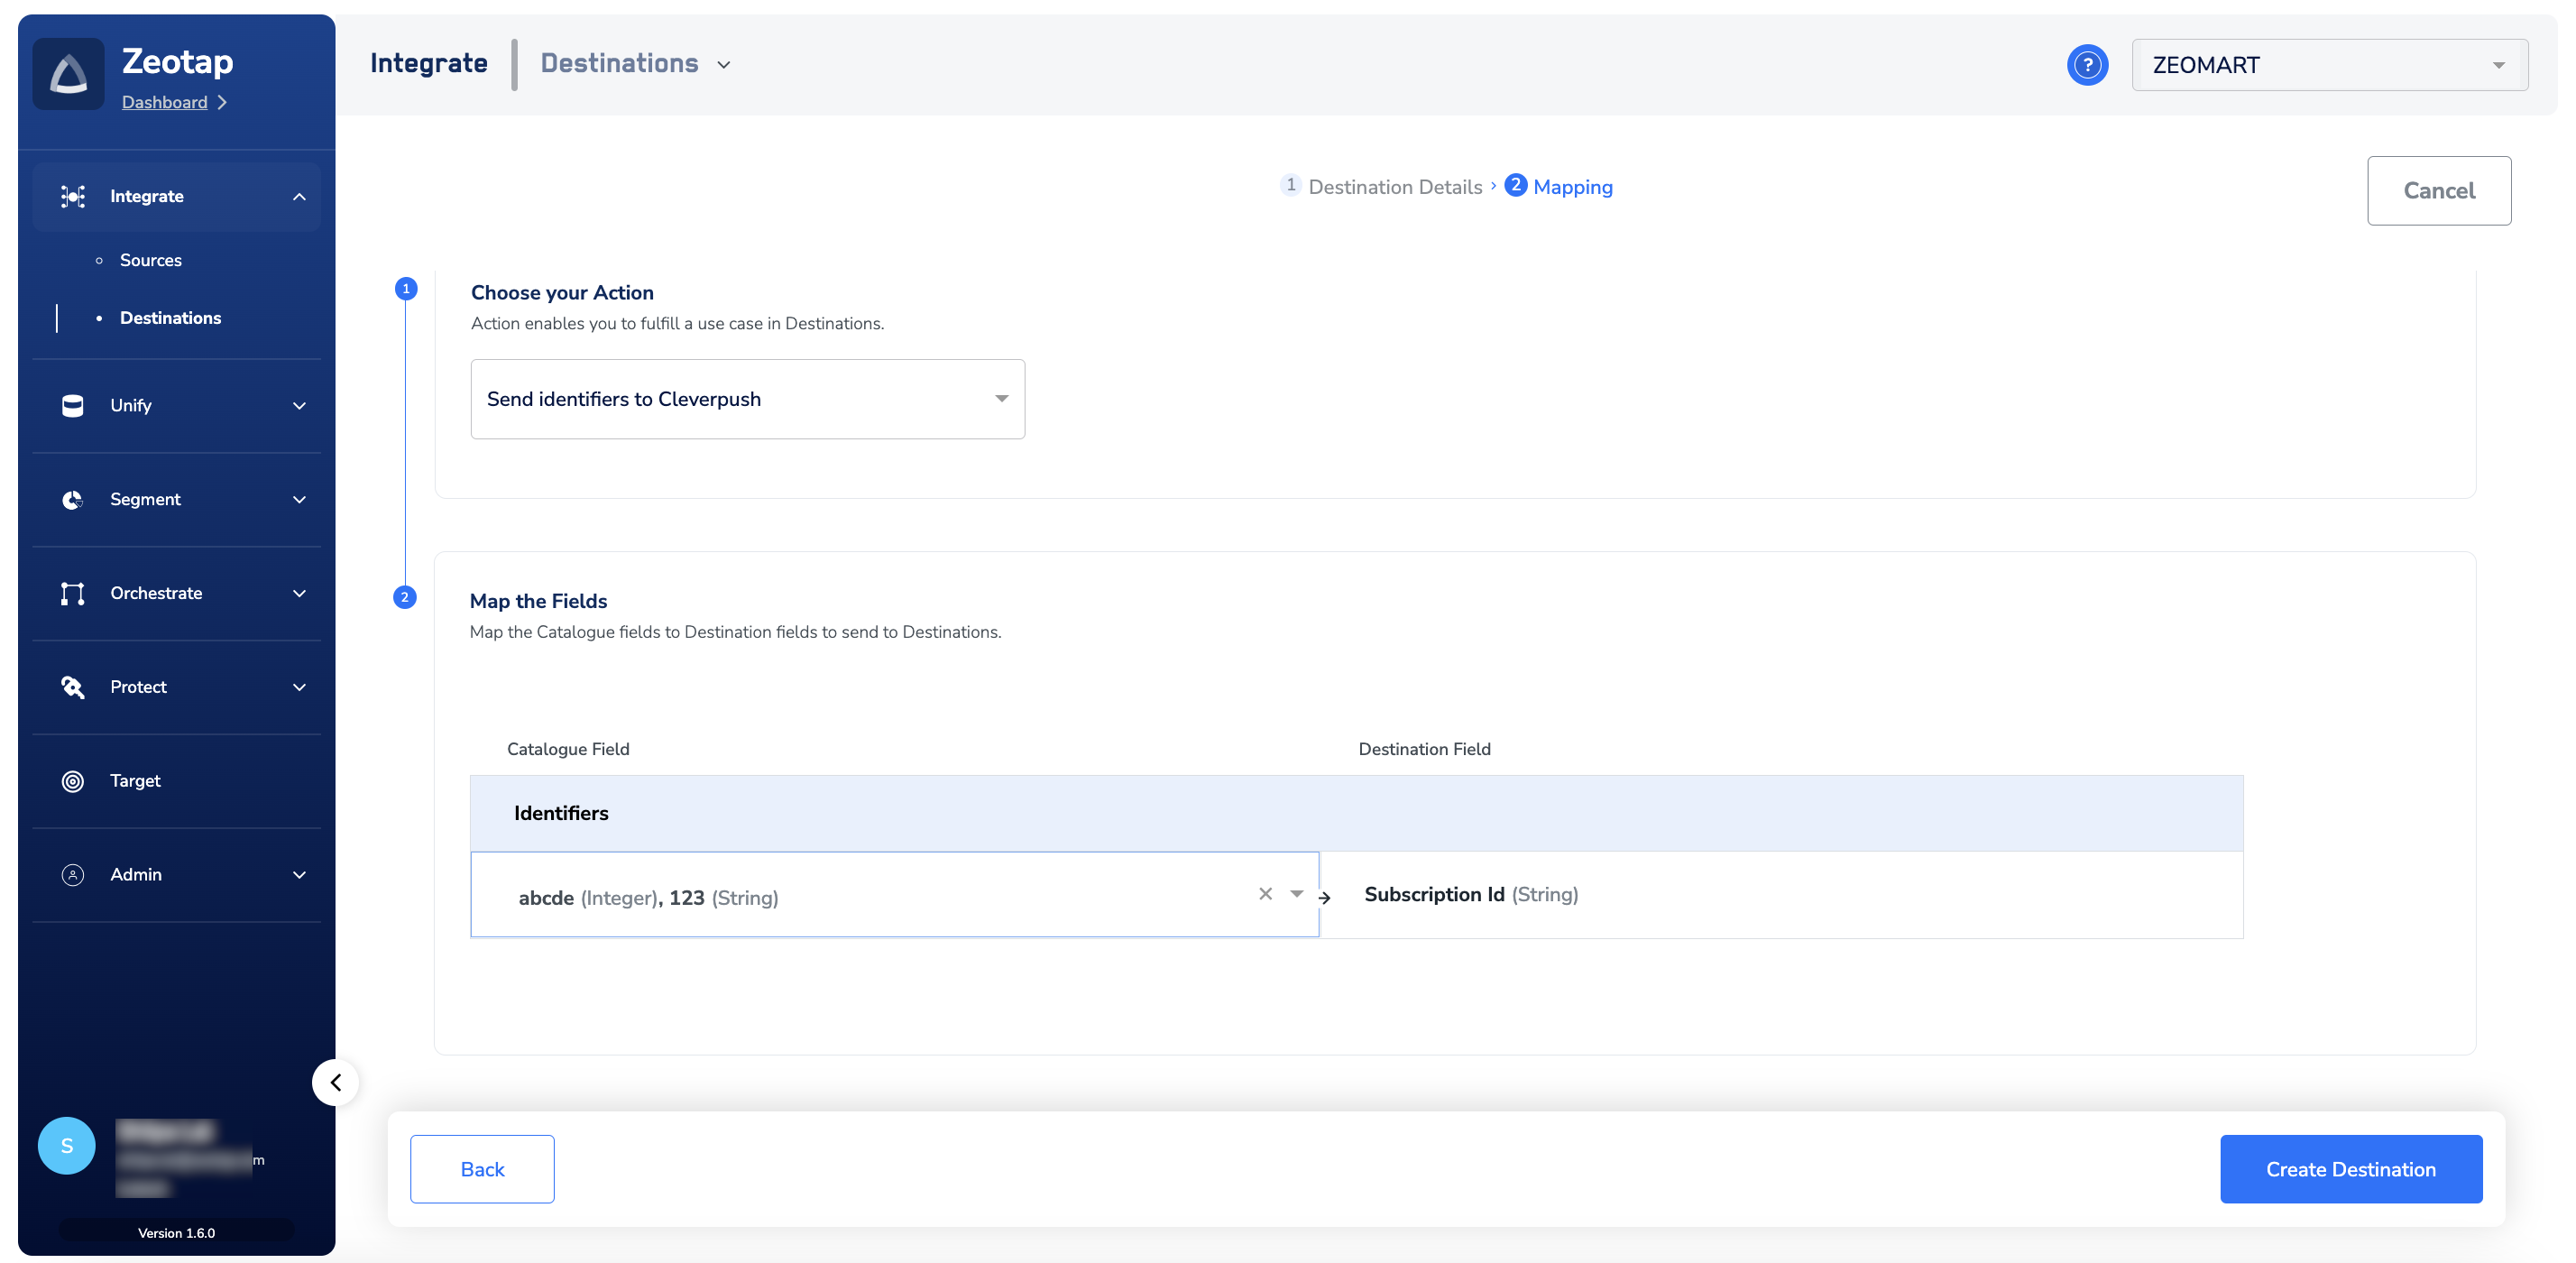
Link an audience to the destination
For the steps to link an audience to a created destination, see Link an audience to the destination. It can take up to two hours for the audience to become available in your Cleverpush seat.The terms Audiences and Segments are used interchangeably to refer to customer cohorts belonging to a specific category. For example, an audience or a segment could be a specific group of customers who are over 18 years of age and who have performed an
addToCart event within the last 30 days.Verify the audience reached Cleverpush
Confirm the delivery from both sides:- In Zeotap CDP — open the destination and review its activity. A successful delivery records a run with a non-zero qualified count and a completed status; a failed run records an error message. See Verify the activation worked for what to check, and Why deliveries fail for the errors that surface on an audience–destination pair and what to do about them.
- In Cleverpush — open Create new, select your channel, and open the Tags drop-down. The activated audience appears there as a tag. Selecting it updates the Will be sent to subscriber count shown alongside the target group, which tells you how many of your Cleverpush subscribers matched.
Send a campaign to the audience in Cleverpush
1
Log into the Cleverpush console and click Create new.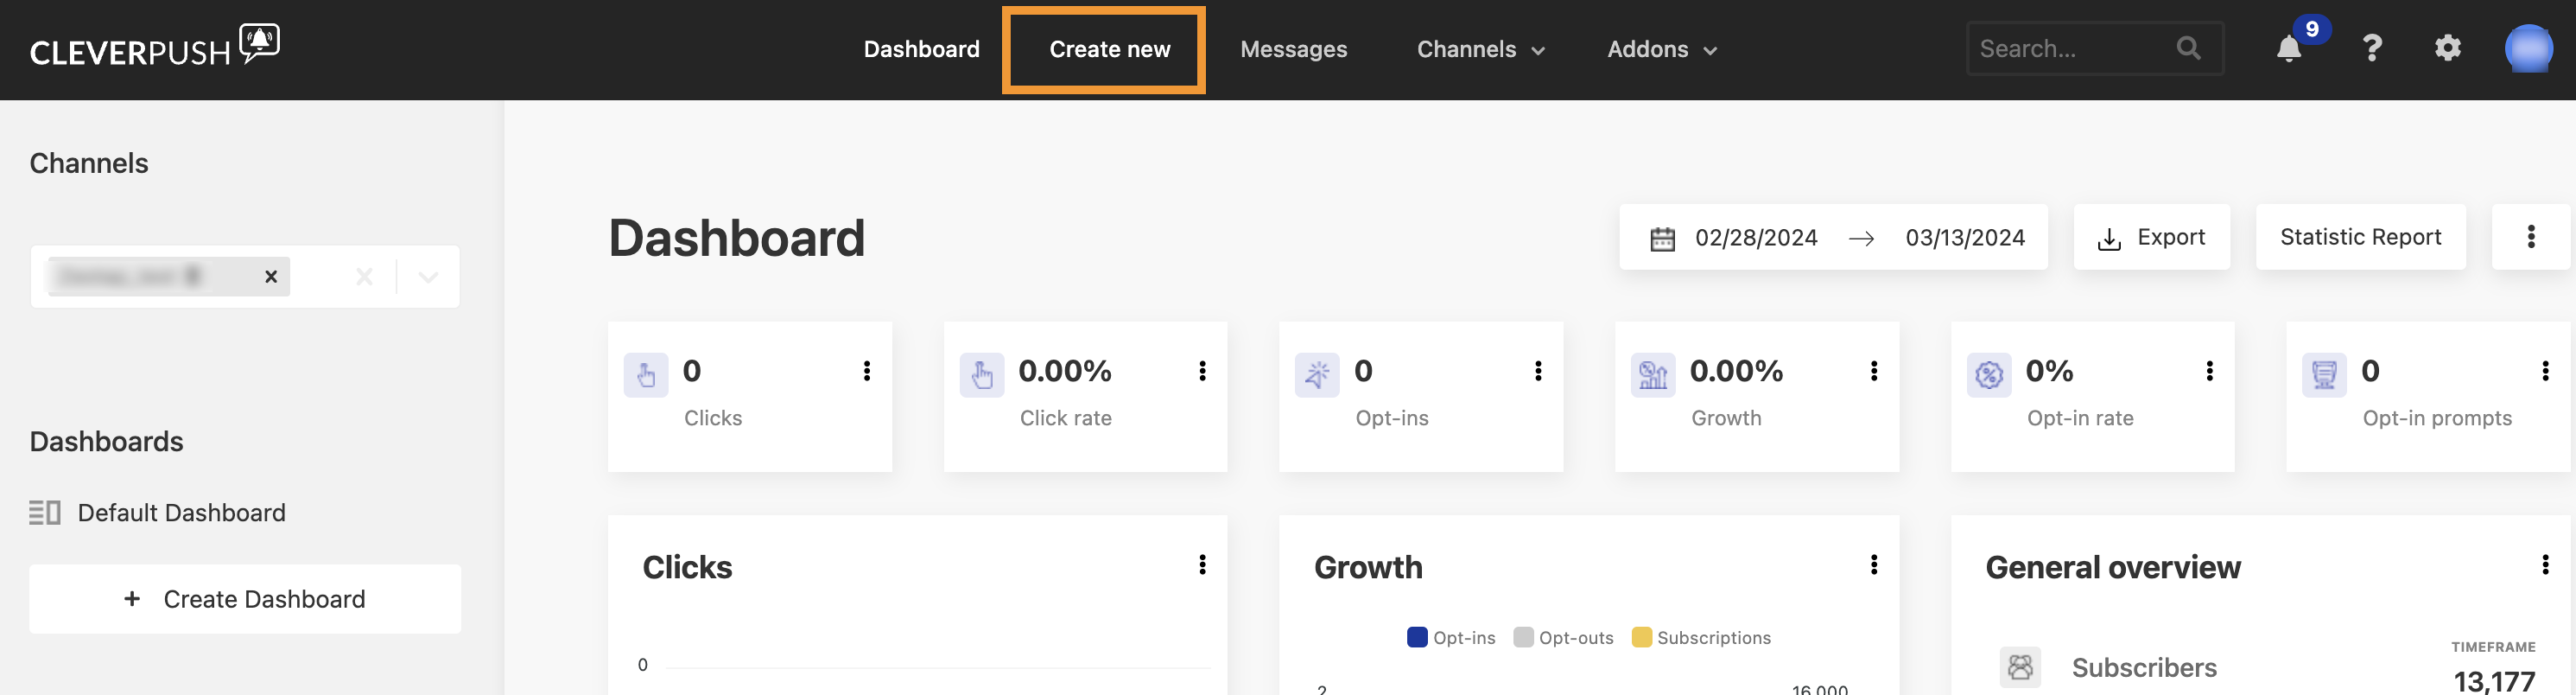
2
In the Channels drop-down, choose the channel you created, matching the type of push notification you want to send. To create a new channel first, see Create a new channel in Cleverpush.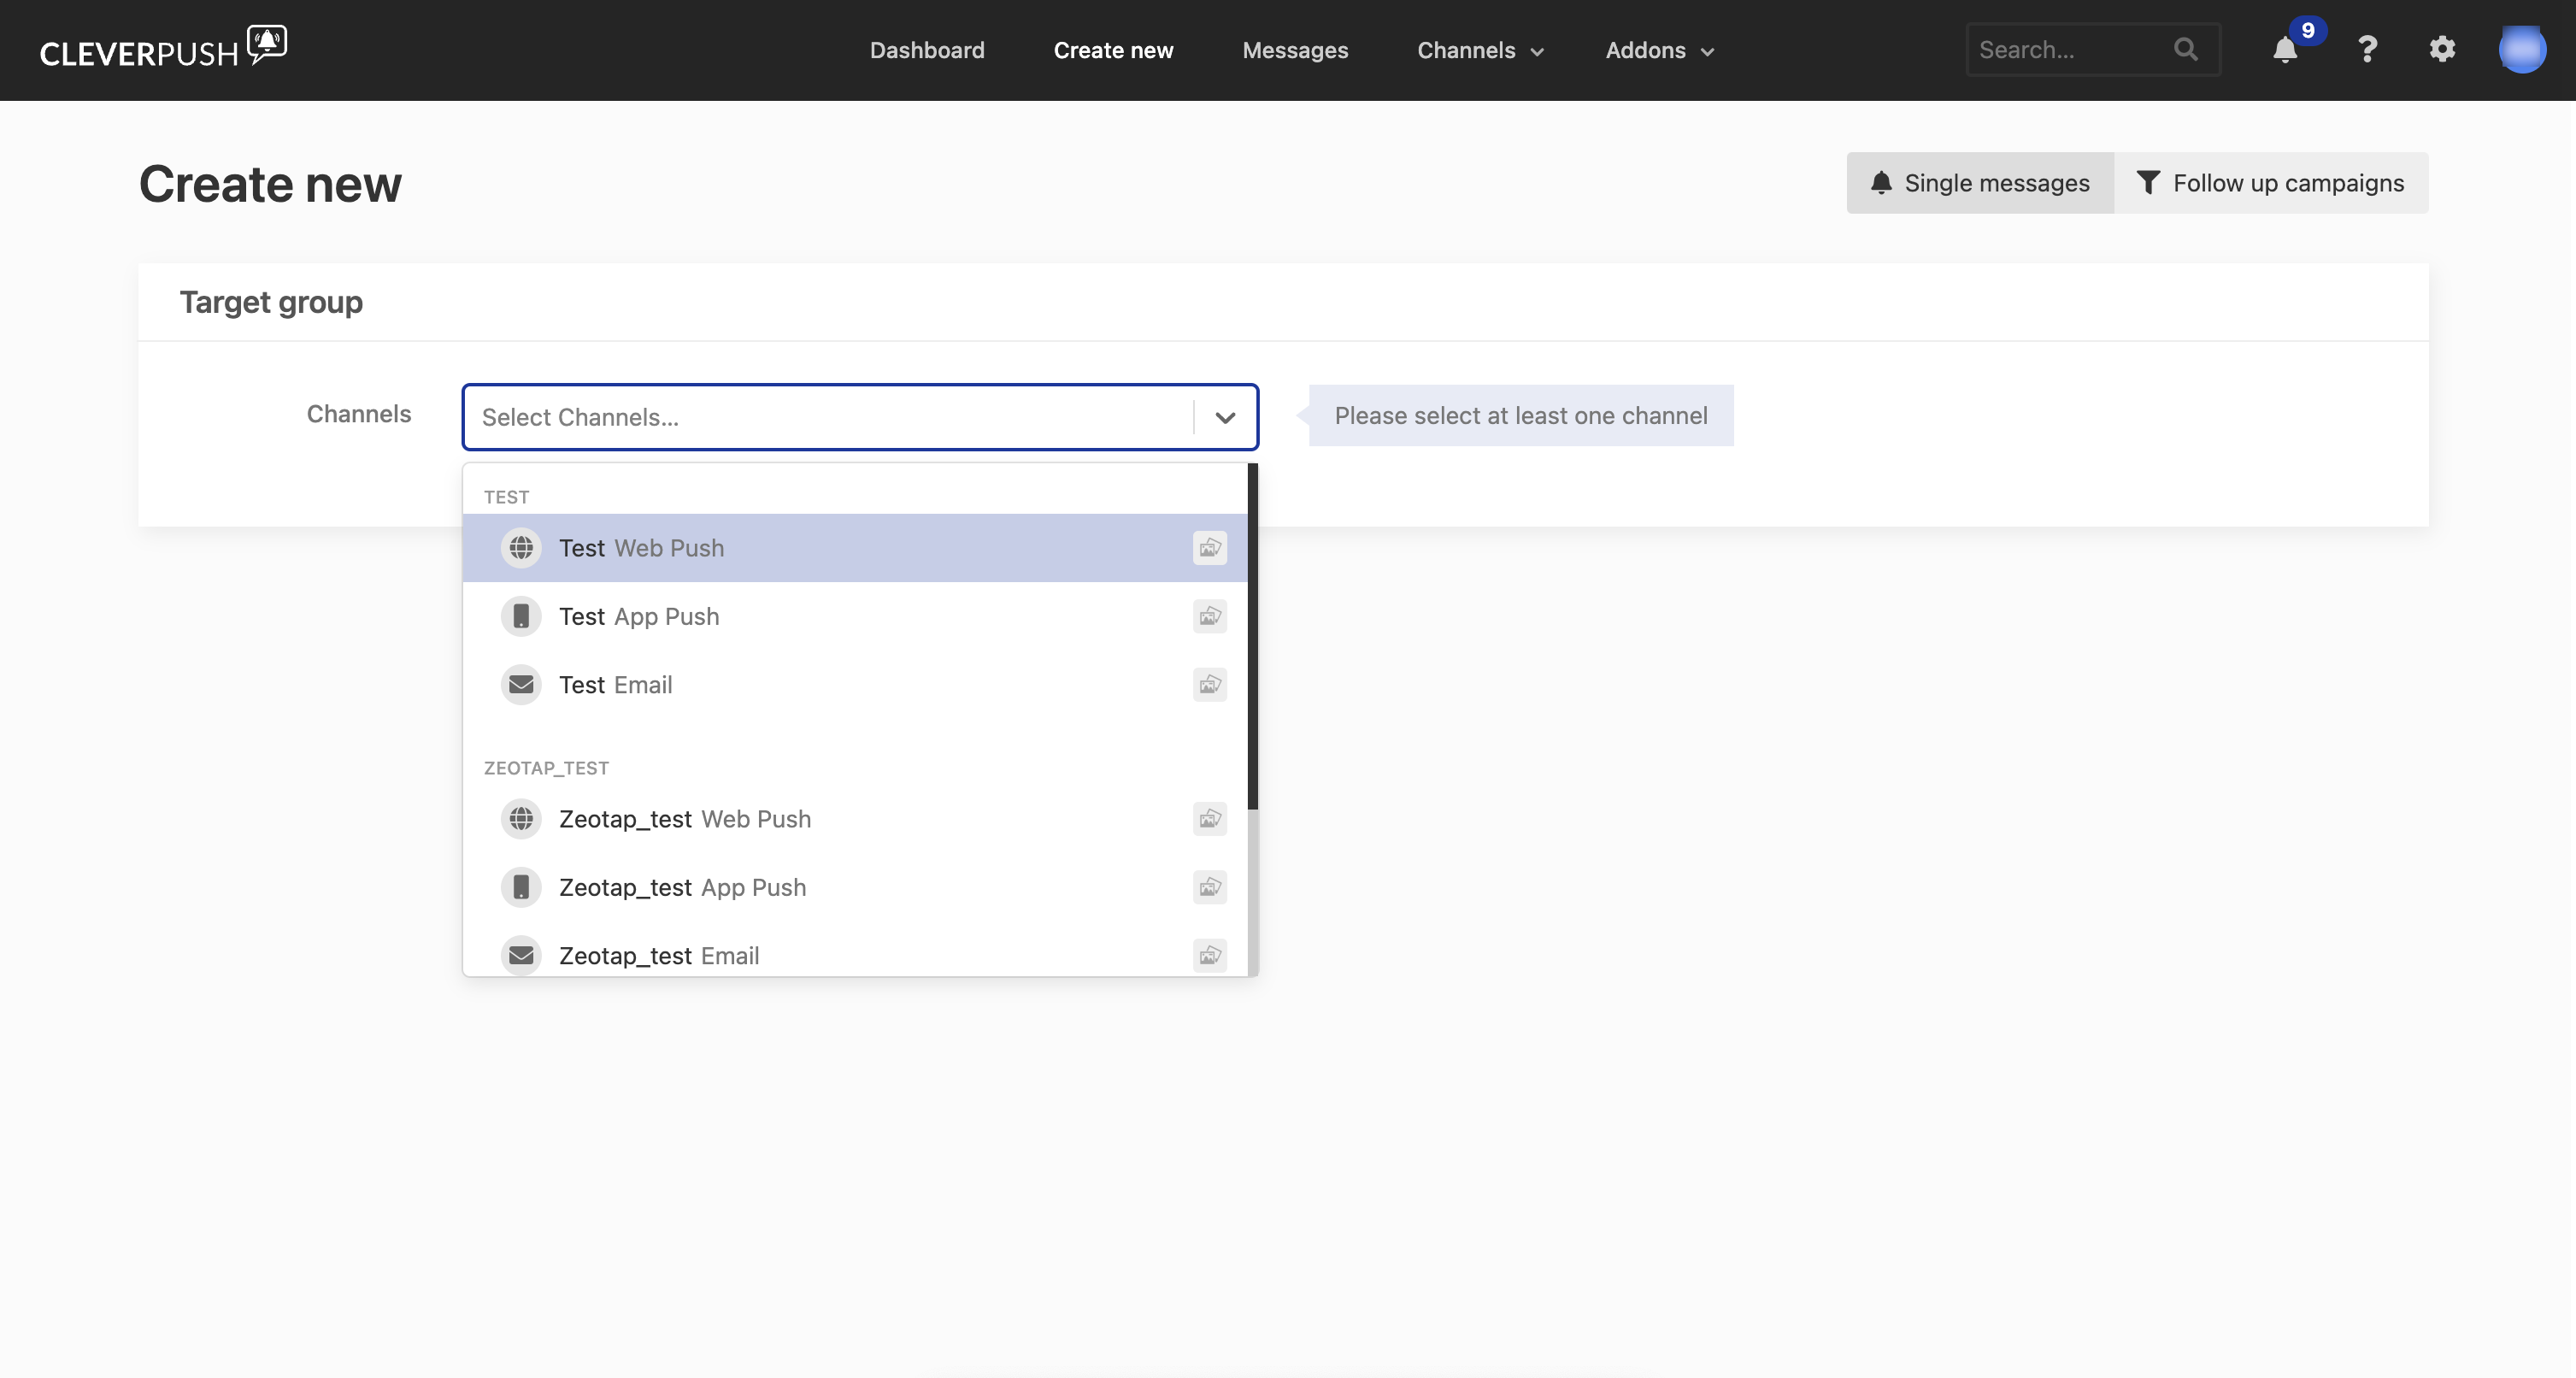
3
Use the Tags drop-down to choose the audience you want to target. The Will be sent to count updates to show how many subscribers the selection reaches..png?fit=max&auto=format&n=vhXLMoMLYK9r9Ts7&q=85&s=4c16450f6ab542a4f3a02b6ff0df1c0a)
4
Under Message, enter the headline and text of the push notification you want to send. A live preview of the notification appears alongside.
5
Review all the fields and click Send notification..png?fit=max&auto=format&n=vhXLMoMLYK9r9Ts7&q=85&s=159db98af897e35b138c706d4e4cce67)
Next steps
- Bring Cleverpush subscriber data into Zeotap CDP with the batch source →
- Bring Cleverpush subscriber data into Zeotap CDP in real time →
- Activate from a Journeys workflow with the Cleverpush real-time integration →
- Set up Cleverpush channels and platforms →
- Understand how destinations work in Zeotap CDP →