

What this is
Meta Custom Audience pushes a Zeotap CDP audience into a Facebook Ad Account as a Custom Audience, so you can target or suppress those users in Meta campaigns. It delivers the same audiences as the Facebook 1P destination. The difference is how the destination is authorised: Meta Custom Audience uses an OAuth Connect flow, so you sign in to Facebook once and Zeotap holds the connection, rather than generating an access token in the Facebook Developers portal and pasting it in. Both destinations are supported — pick whichever authorisation model suits your team.Supported actions, identifiers, and features
Facebook External ID
A Facebook External ID is a unique string that represents a user on an advertiser’s system — for example, a loyalty membership ID, internal user ID, or external cookie ID. For a given event, Facebook uses theexternal_id to match a record to a user on its platform. Before sending an External ID to Facebook, add the identifier in your Zeotap Catalogue, then map it when you create the destination.
For background, see Meta’s Custom Audiences External Identifiers guide. See How External IDs flow between a brand and Facebook for the end-to-end capture flow.
Prerequisites
Complete the following before you create the destination in Zeotap CDP:- Full Access to a Facebook Ad Account — the 16-digit Facebook Ad Account ID linked to your Facebook Business Manager, with People with full control access for the user who will authorise the connection.
- Accepted Facebook Audiences Terms of Service — the ad account has accepted the Custom Audiences ToS at business.facebook.com/ads/manage/customaudiences/tos/. This has been mandatory since September 2021.
- Your Facebook Graph API version — for example,
23.0. Enter only the numerical part when configuring the destination; do not include thevprefix.
The destination screen still lists Access Token among its components, and the API Version hint still refers to finding the version “along with the Access Token”. Both are carried over from the token-based destination and do not apply here — there is no Access Token field on this form.
Grant Full Access to the Ad Account
Confirm your Facebook user has full control of the Ad Account that will receive audience data. From Facebook Business Manager at business.facebook.com, select the business portfolio in the top-right corner, open Settings → Accounts → Ad Accounts, select the ad account, and open Ad Account Access. Under People with full control, your account must appear. To grant Full Access to another user, click Manage next to their name, then Assign People, and select them from the people with access to your Meta Business portfolio.Accept the Facebook Audiences Terms of Service
Sign in to your Facebook Ad Account at adsmanager.facebook.com, confirm the correct ad account is selected in the ad account selector at the top of the page, and open Audiences from the left navigation. If the ToS has not been accepted, you are prompted to accept it. If it has already been accepted, you see options to create new audiences.Create the destination in Zeotap CDP
1
Open the Destinations application
Sign in to the Zeotap CDP app and go to Integrate → Destinations.
2
Select the Meta Custom Audience destination
Click + Create Destination. Under All Destinations, search for 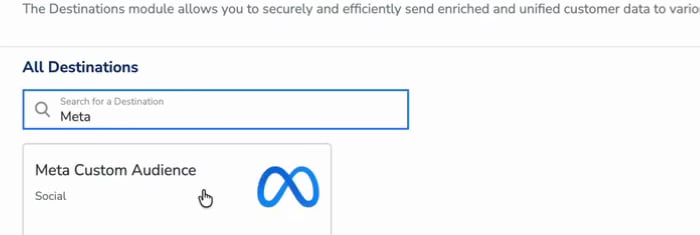
Meta and select Meta Custom Audience.3
Enter the destination details
On the Enter Destination Details screen: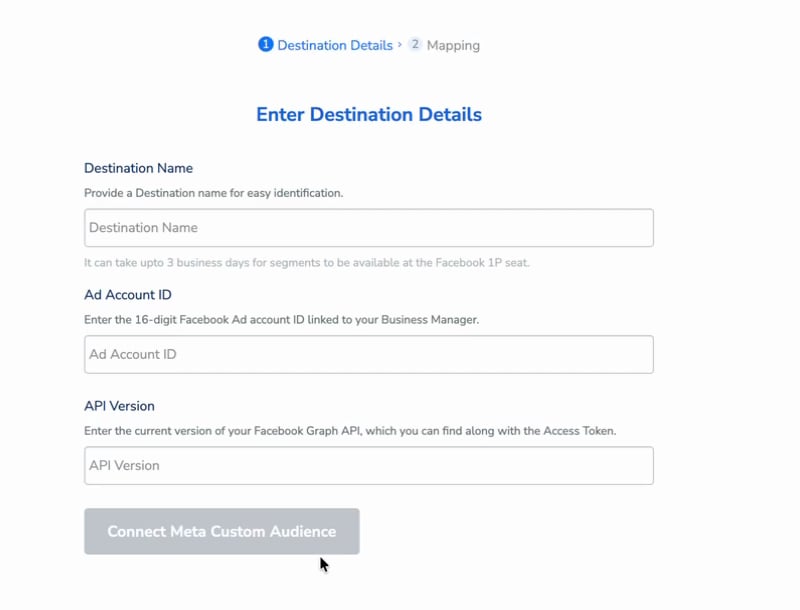
- In Destination Name, enter a name that identifies this destination in your Destinations list.
- In Ad Account ID, enter the 16-digit Facebook Ad Account ID linked to your Business Manager.
- In API Version, enter the Facebook Graph API version this destination should target — the numerical part only, for example
23.0. If you are unsure which version to use, check with your Zeotap representative.
4
Connect to Facebook
Click Connect Meta Custom Audience. You are redirected to Facebook — sign in with the user that has full control of the ad account, and grant the requested permissions.
Authorise with the Facebook user identified in Prerequisites. The connection inherits that user’s access, so an account without full control of the ad account cannot activate audiences to it.
5
Confirm the connection
Once connected, the form records who established the connection and when, and shows the date on which the refresh token expires.
6
Choose the action and map identifiers
Name the mapping, select an action under Choose your Action, then map your Catalogue fields to the destination fields under Map the Fields.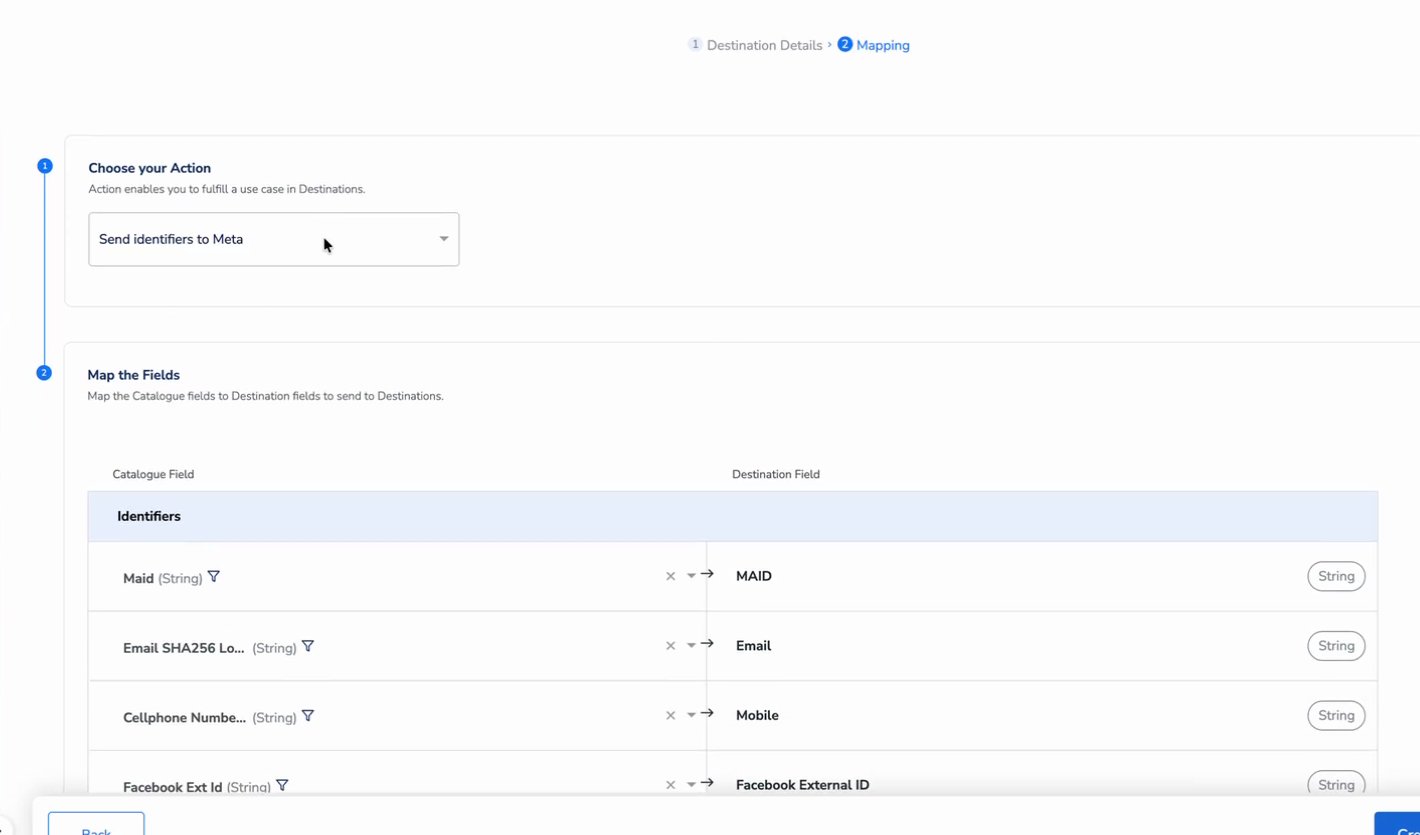
7
Create the destination
Click Create Destination. The destination appears in the Audiences application, ready to be linked.
How Zeotap formats each attribute for Facebook
Facebook requires specific formatting and hashing for each attribute. Zeotap CDP performs the transformations listed below, so you only need to ingest the source attribute into your Zeotap Catalogue.Maintain the connection
The OAuth connection is held by a refresh token with a fixed expiry. The destination form shows the expiry date once connected, and records the user who authorised it. When the refresh token expires, Zeotap can no longer push audiences to this destination and activations fail with an authentication error. The connection has to be re-authorised before that date to avoid an interruption — if you are unsure how to re-authorise an existing destination, contact Zeotap support. The connection inherits the access of the user who authorised it. If that user loses full control of the ad account, the destination has to be re-authorised by a user who has it.Link an audience to the destination
In the Audiences application, link the audience or segment to the Meta Custom Audience destination. The terms audience and segment are used interchangeably for a customer cohort — for example, customers over 18 who performed anaddToCart event in the last 30 days. For the linking procedure, see Link an Audience to the Destination.
- Segments are created directly in your Facebook account, so they do not appear under Zeotap’s Ad accounts.
- The Facebook Custom Audience limit of 500 applies per Ad Account that you use — it does not apply to Zeotap’s account.
- Facebook compares the data Zeotap uploads against the segment using their encrypted user data; matched IDs are added to the Custom Audience and ads are delivered to those users.
- Meta documents Custom Audience behaviour in its Custom Audiences guide.
Verify the audience reached Facebook
Allow up to 24 hours (one business day) after linking for a Zeotap CDP audience to sync to Facebook. The destination form additionally notes that segments can take up to 3 business days to become available at the Facebook 1P seat, so allow for that longer window before investigating. To confirm:- Sign in to Facebook Ads Manager and select the ad account configured in the destination, using the ad account selector at the top of the page.
- Open Audiences from the left navigation.
- Confirm the Custom Audience appears in the Audience list with a populated Estimated audience size. The audience name matches the one configured in Zeotap CDP.
Troubleshooting
Common errors
If the 400 BAD_REQUEST error persists
If the 400 error continues after the Audiences ToS has been accepted, allow time for the Facebook permissions to propagate before retrying. If the error still appears after several days, confirm the authorising user still has People with full control access to the ad account.How External IDs flow between a brand and Facebook
When you target Facebook users by a brand-side identifier (loyalty ID, internal user ID, cookie), the flow is:-
The brand places the Facebook pixel on its website and configures the tag to pass the Facebook cookie (or any custom identifier) as
extern_idto Facebook. See Meta’s Pixel implementation guide. The pixel push pattern: -
Facebook builds an internal mapping between the
extern_idand its own user ID. -
The brand also passes the Facebook cookie to Zeotap as
id_mid_62, using Google Tag Manager, JavaScript, or another tag implementation. - The brand builds an audience in the Audiences application using the Facebook cookies.
- Zeotap uploads the Facebook cookie as an External ID to Facebook. Facebook uses its internal mapping to resolve the External ID to the corresponding user on its platform.
Accepting the Custom Audiences Terms of Service (mandatory since September 2021) is required for this flow.
FAQ
How is Meta Custom Audience different from the Facebook 1P destination?
How is Meta Custom Audience different from the Facebook 1P destination?
Both push audiences into a Facebook Ad Account as a Custom Audience, and both send the same identifiers. They differ only in authorisation. Meta Custom Audience collects a Destination Name, Ad Account ID and API Version, then authorises through the Connect Meta Custom Audience OAuth flow — no access token, and no app in the Facebook Developers portal. Facebook 1P collects the same three values plus an Access Token you generate yourself. Both are supported; choose the one that fits how your team manages credentials.
Which action should I pick — Send identifiers or Send Multiple User Identifiers?
Which action should I pick — Send identifiers or Send Multiple User Identifiers?
Pick Send Multiple User Identifiers to Facebook 1P when you have more than one identifier per profile. All identifiers map to a single user record on Facebook’s side, which raises the match rate. Pick Send identifiers to Meta only when each identifier needs to be sent as its own user profile.
Do I need to hash identifiers before ingesting them into Zeotap?
Do I need to hash identifiers before ingesting them into Zeotap?
For email, phone, name, gender, date of birth, address fields, and country code, Zeotap CDP performs the hashing and formatting Facebook requires — you ingest the source value into the matching Catalogue field. For Mobile Advertising IDs and External IDs, no hashing is required and Zeotap sends them as-is. See the attribute table for the per-attribute Catalogue mapping.
How long until my audience appears in Facebook Ads Manager?
How long until my audience appears in Facebook Ads Manager?
Allow up to 24 hours (one business day) after linking for a Zeotap CDP audience to fully sync with Facebook, and up to 3 business days for it to become available at the Facebook 1P seat — the destination form states the longer figure. If it has not appeared after that window, confirm the audience link is active in Zeotap CDP and that the destination’s refresh token has not expired.
What happens when the refresh token expires?
What happens when the refresh token expires?
Activations to the destination fail with an authentication error. The connection has to be re-authorised — see Maintain the connection. The expiry date is shown on the destination once it is connected.
Next steps
- Explore the Facebook 1P destination → for the access-token-authenticated variant of this destination
- Explore linking an audience to a destination →
- Explore Audience Insights to measure match rate and reach →