Send Zeotap CDP audiences out to LaunchDarkly as segments, so a feature flag can serve a variation to the customers who qualified.
What this is
The LaunchDarkly destination sends audiences out of Zeotap CDP and into LaunchDarkly, where each audience arrives as a segment that a feature flag can target. Nothing flows back the other way: the Integrations Master List records LaunchDarkly as a Destination only, so there is no LaunchDarkly source page to read alongside this one.LaunchDarkly is a feature management platform that lets development teams deliver, control and measure their software through feature flags, and run experiments on any flag. A feature flag — also called a feature toggle or feature switch — turns a feature of an application on or off at runtime, so a team can control who sees a feature without deploying new code. Once a Zeotap CDP audience has arrived as a segment, you can add a targeting rule on a flag that serves a particular variation to everyone in that segment.Zeotap CDP ships two separate LaunchDarkly destinations:
LaunchDarkly — this page. A batch destination, linked to an audience in the Audiences application, that sends the audience as a segment.
LaunchDarkly Real Time Integration — a real-time destination, attached to a Send to Destinations node in a journey, that sends identifiers as customers flow through.
Both send data in the same direction — out of Zeotap CDP to LaunchDarkly. Choose the one that matches where you are activating from, Audiences or Journeys.
The destination catalogue in Zeotap CDP lists this integration as Launch Darkly, as two words. Search for it that way when you create the destination.
Supported identifiers and actions
This integration supports Custom IDs — any ID that is activated within LaunchDarkly, such as User IDs, CRM IDs or any other ID you hold for the same person on both sides.
The destination exposes a single action. Because delta upload and delete are not supported, each refresh sends the audience membership as it stands when the refresh runs.
Prerequisites
In Zeotap CDP:
An account with permission to create and edit destinations. For the wider destination model — platforms, actions and mappings — see Destinations.
An audience holding the customers you want to target.
In LaunchDarkly:
A LaunchDarkly account.
Access to Settings → Authorization, so you can create the access token described below.
Access to Settings → All projects, so you can read the Client-side ID of the environment you want to send to.
A feature flag to hang the targeting rule on, in the project and environment you are sending to.
Gather both LaunchDarkly values — the access token and the Client-side ID — before you start creating the destination, because the destination form asks for both.
Get the LaunchDarkly details you need
Access token
An access token in LaunchDarkly authenticates calls and controls what they may do. Create one for this integration as follows.
1
Log into the LaunchDarkly console and navigate to Settings → Authorization.
2
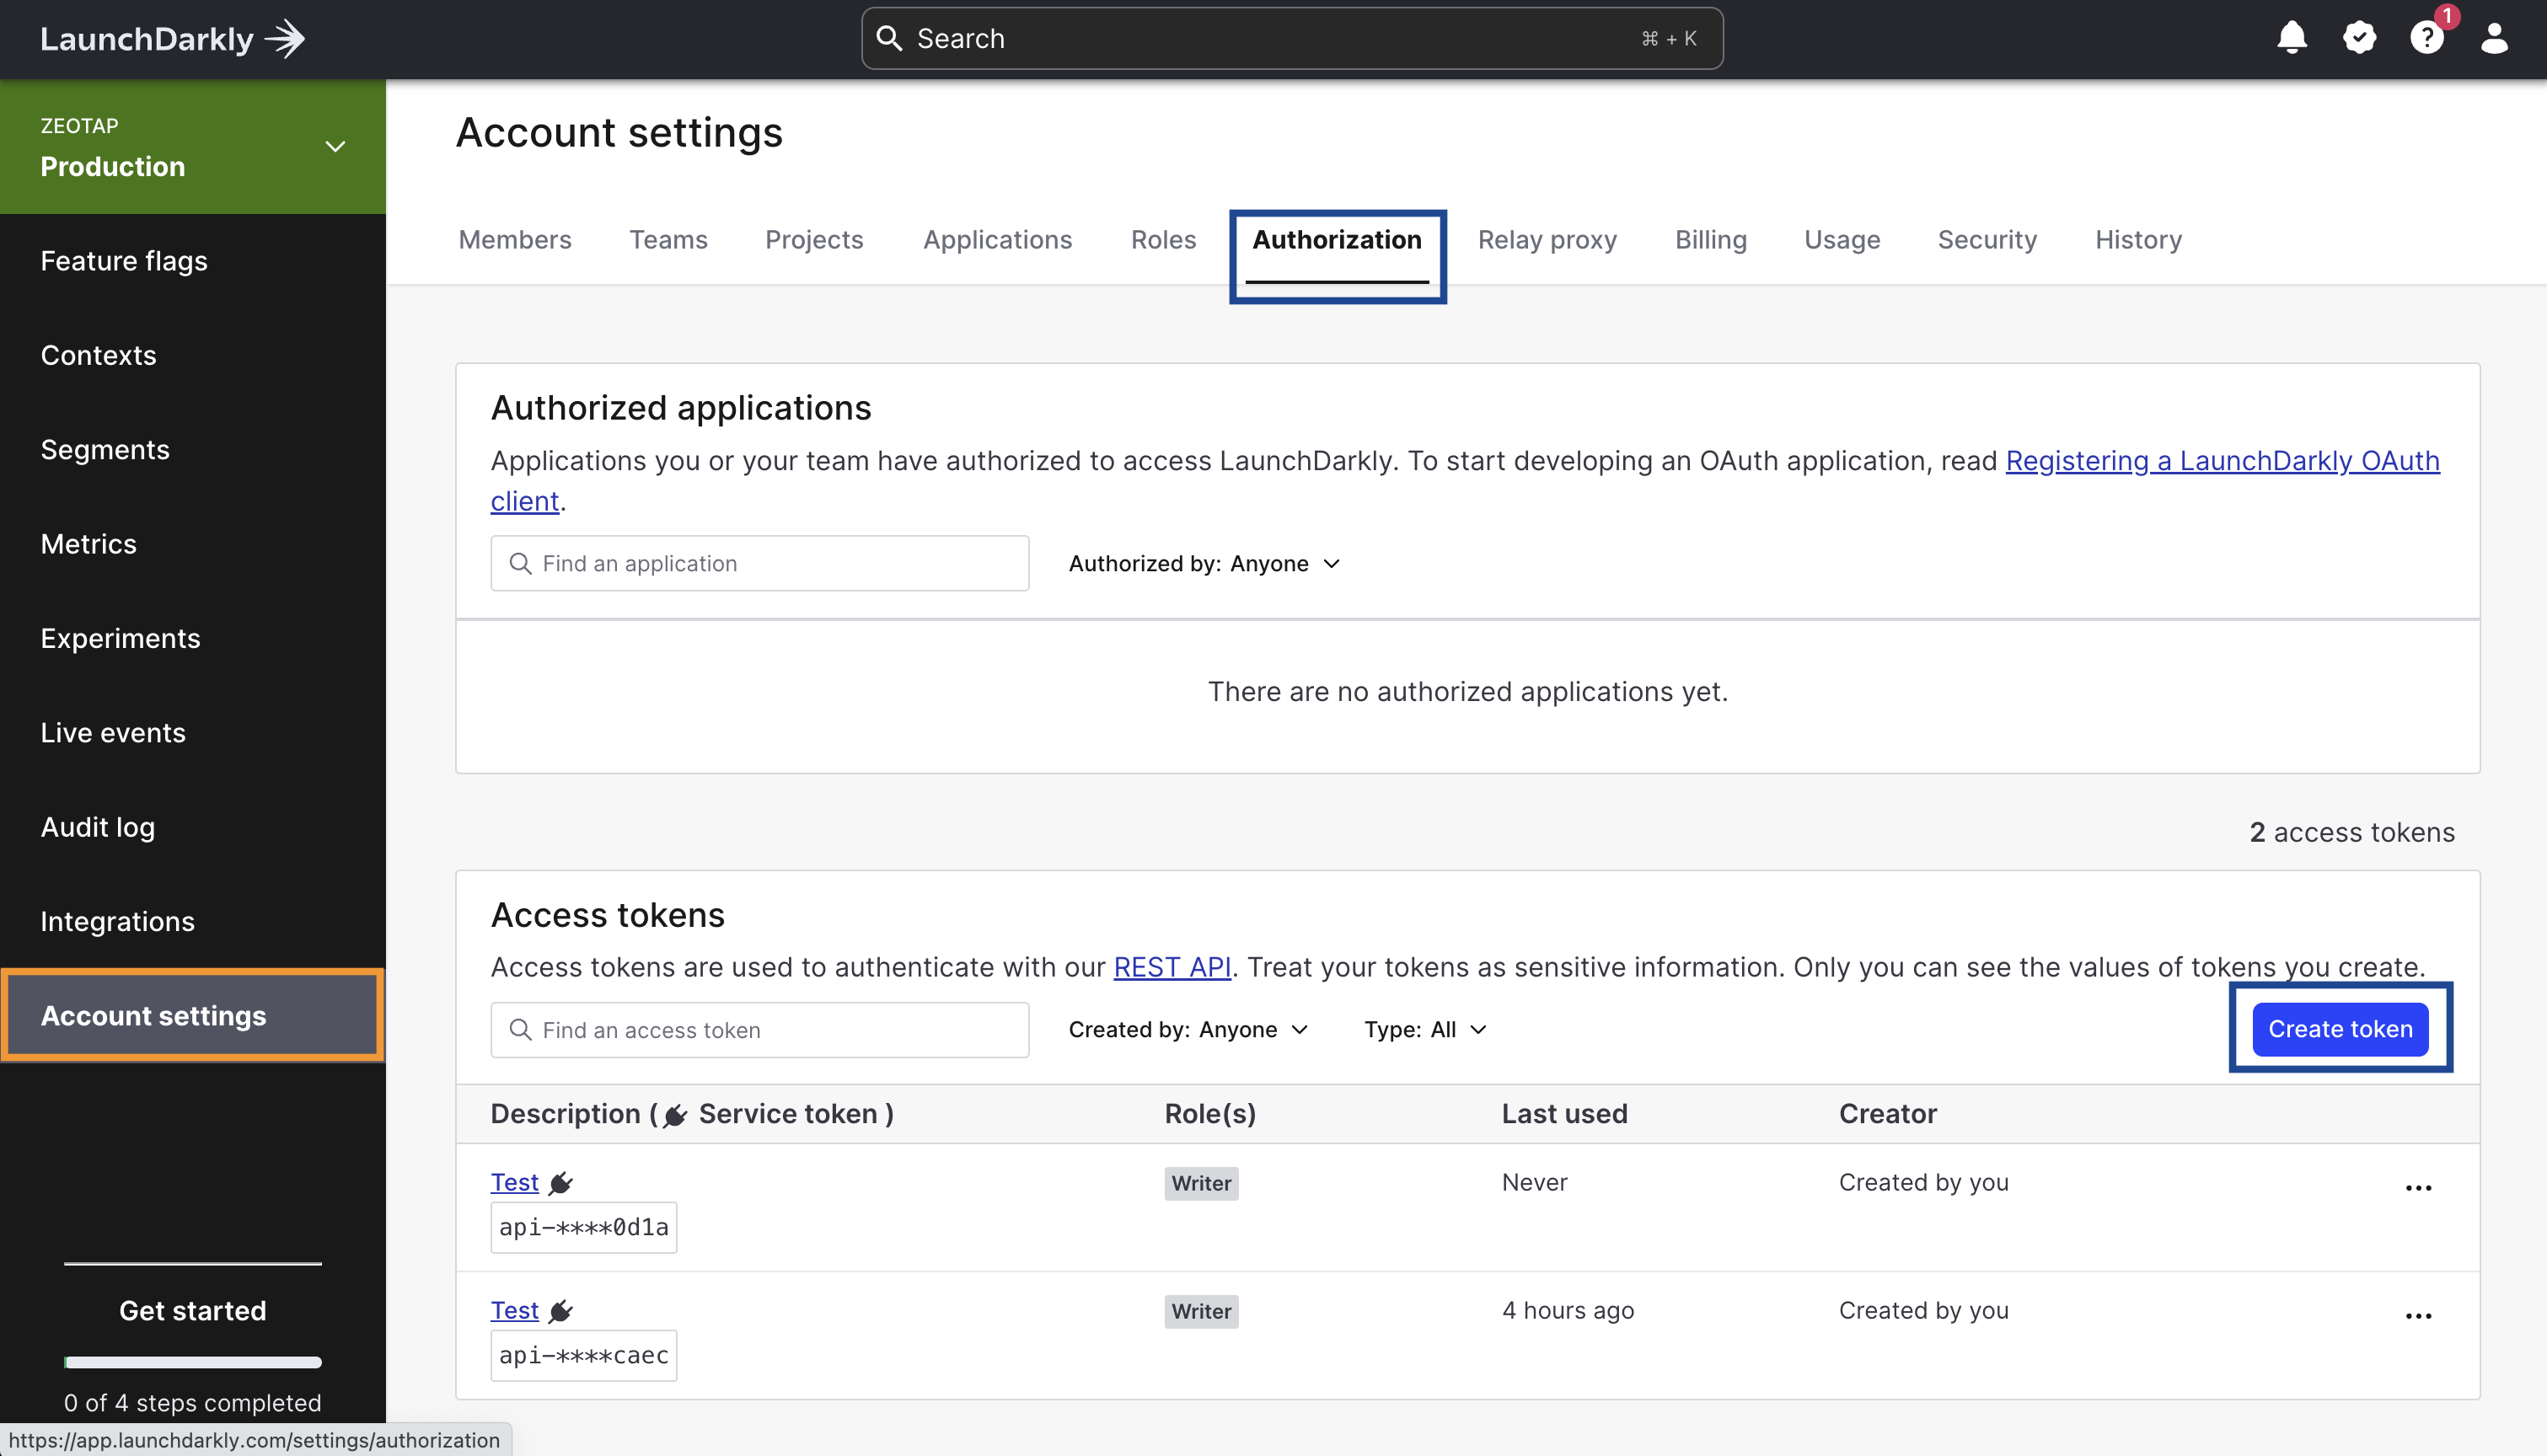
Under Access tokens, click Create token.
The Authorization page of LaunchDarkly Settings, with Create token highlighted
3
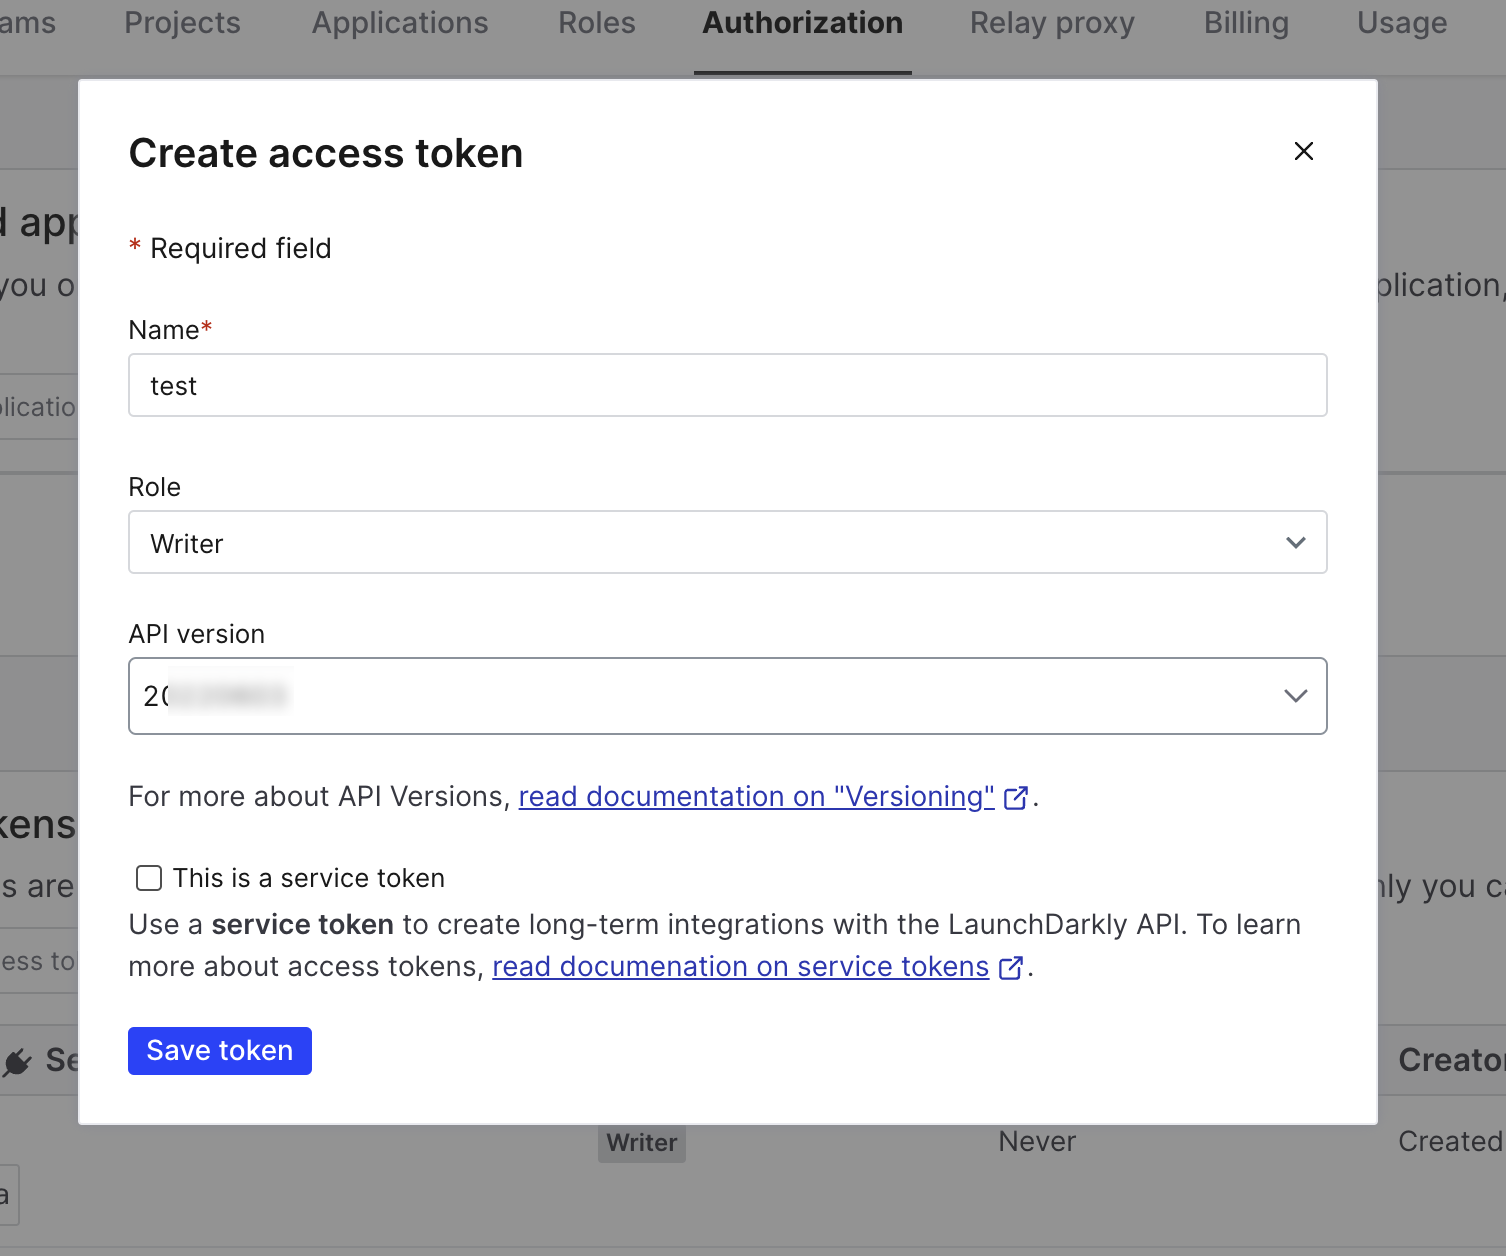
In the Create access token window that appears, provide the following details:a. Enter a Name for your access token.b. Choose Writer as the Role for the token from the drop-down menu.c. Choose the API version for the token from the drop-down menu. By default, API requests you send using this token use this API version. For how API versioning works in LaunchDarkly, see LaunchDarkly’s own Versioning documentation.d. If you are an Enterprise customer, select the This is a service token checkbox if you want to create a service token.
The Create access token dialog, with the Name, Role and API version fields and the service token checkbox
4
Review the details and click Save token. The new token is listed on the Authorization page.Copy the token and store it somewhere safe now — LaunchDarkly hides the value once you leave the page, and you enter it in the Access Token field when you create the destination in Zeotap CDP. If you lose it, create a replacement token rather than trying to read the old one back.
The Access tokens list after saving, with the new token's Copy and save this token callout
Client-side ID
The Client-side ID identifies one environment of one LaunchDarkly project, so the value you copy decides which environment your audiences land in. Obtain it as follows.
1
Log into your LaunchDarkly account and navigate to Settings → All projects.
2
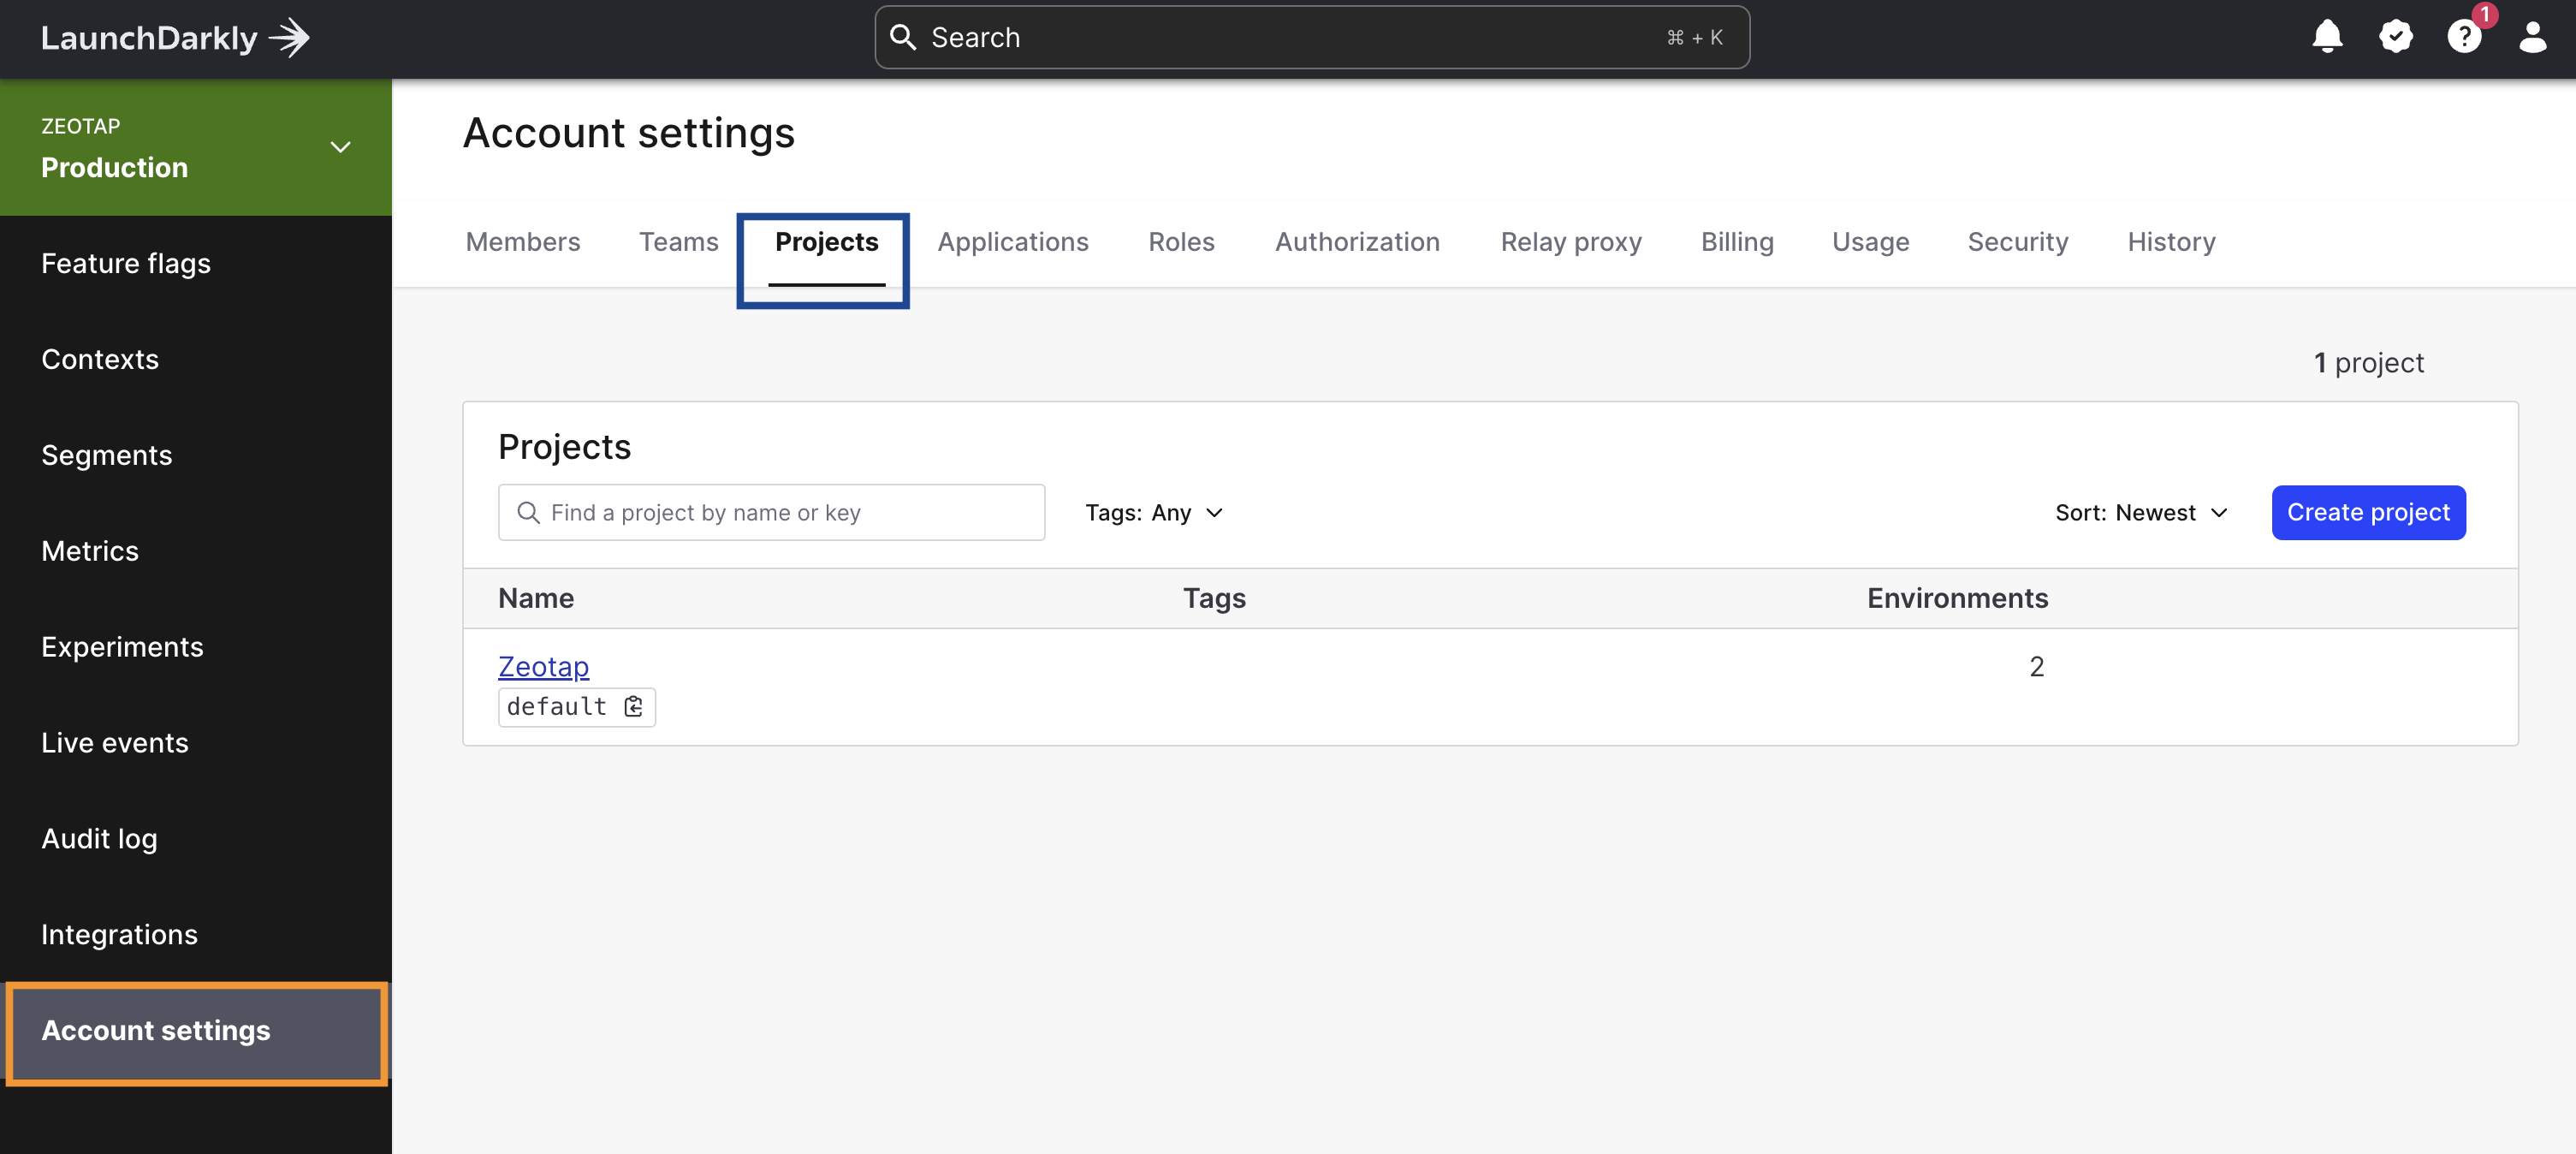
Select the project you want to link to Zeotap CDP. It opens on All environments.
The LaunchDarkly project list, reached from Settings
3
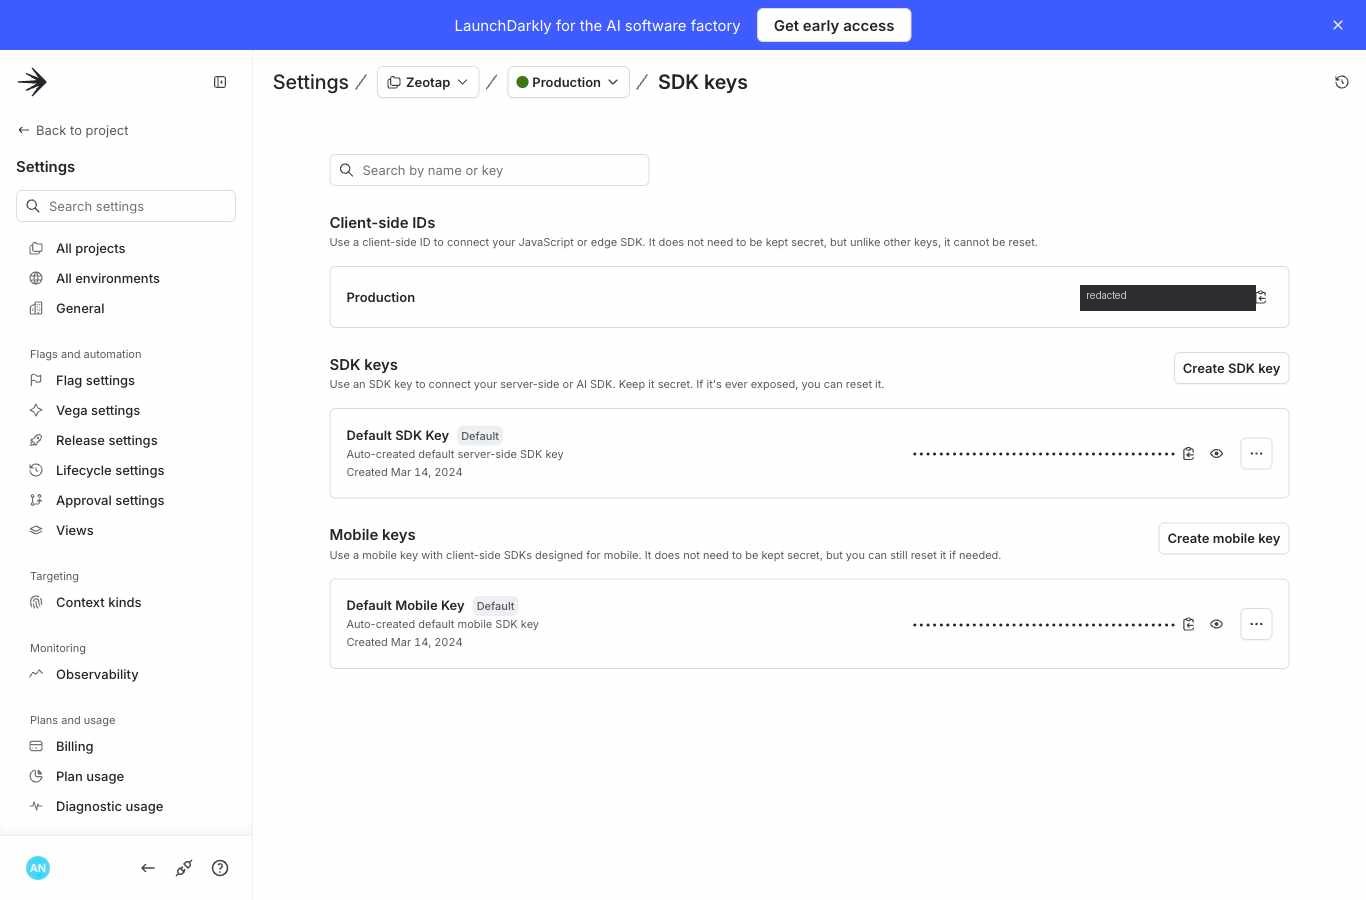
Click the … menu next to the environment you want to link with Zeotap CDP, select View SDK keys, and copy the value under Client-side IDs. You enter it in the Client Side ID field when you create the destination.
The SDK keys page of a LaunchDarkly environment, with the Client-side IDs section at the top
A project can hold several environments, and each one has its own Client-side ID. Copy the ID of the environment whose feature flags you intend to target — a production audience sent with a test environment’s ID will only ever appear in that test environment.
Create the LaunchDarkly destination
1
Log in to the Zeotap CDP app and go to Integrate → Destinations.
2
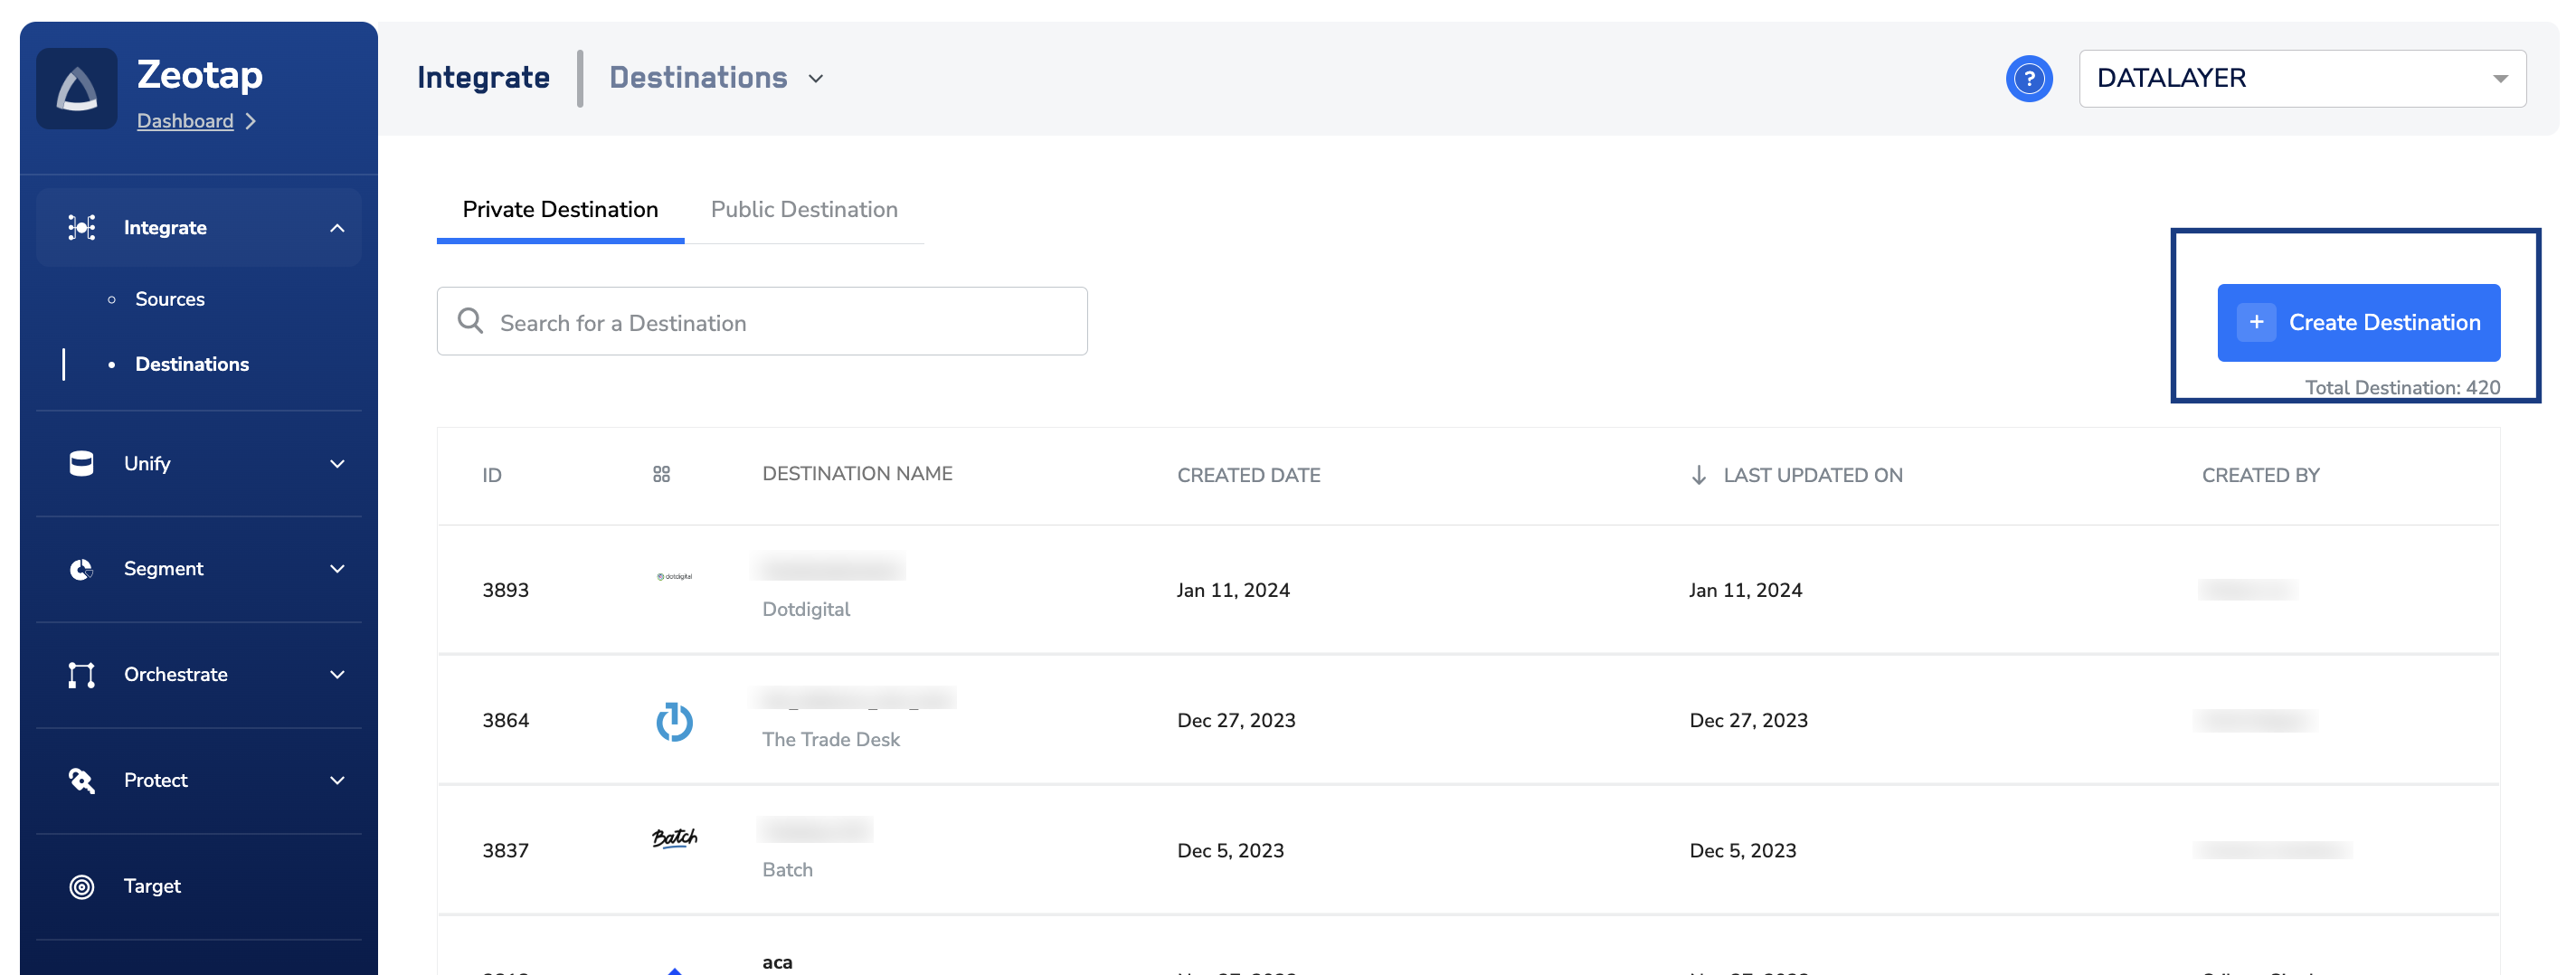
Click + Create Destination.
The Zeotap CDP Destinations listing, with Create Destination highlighted
3
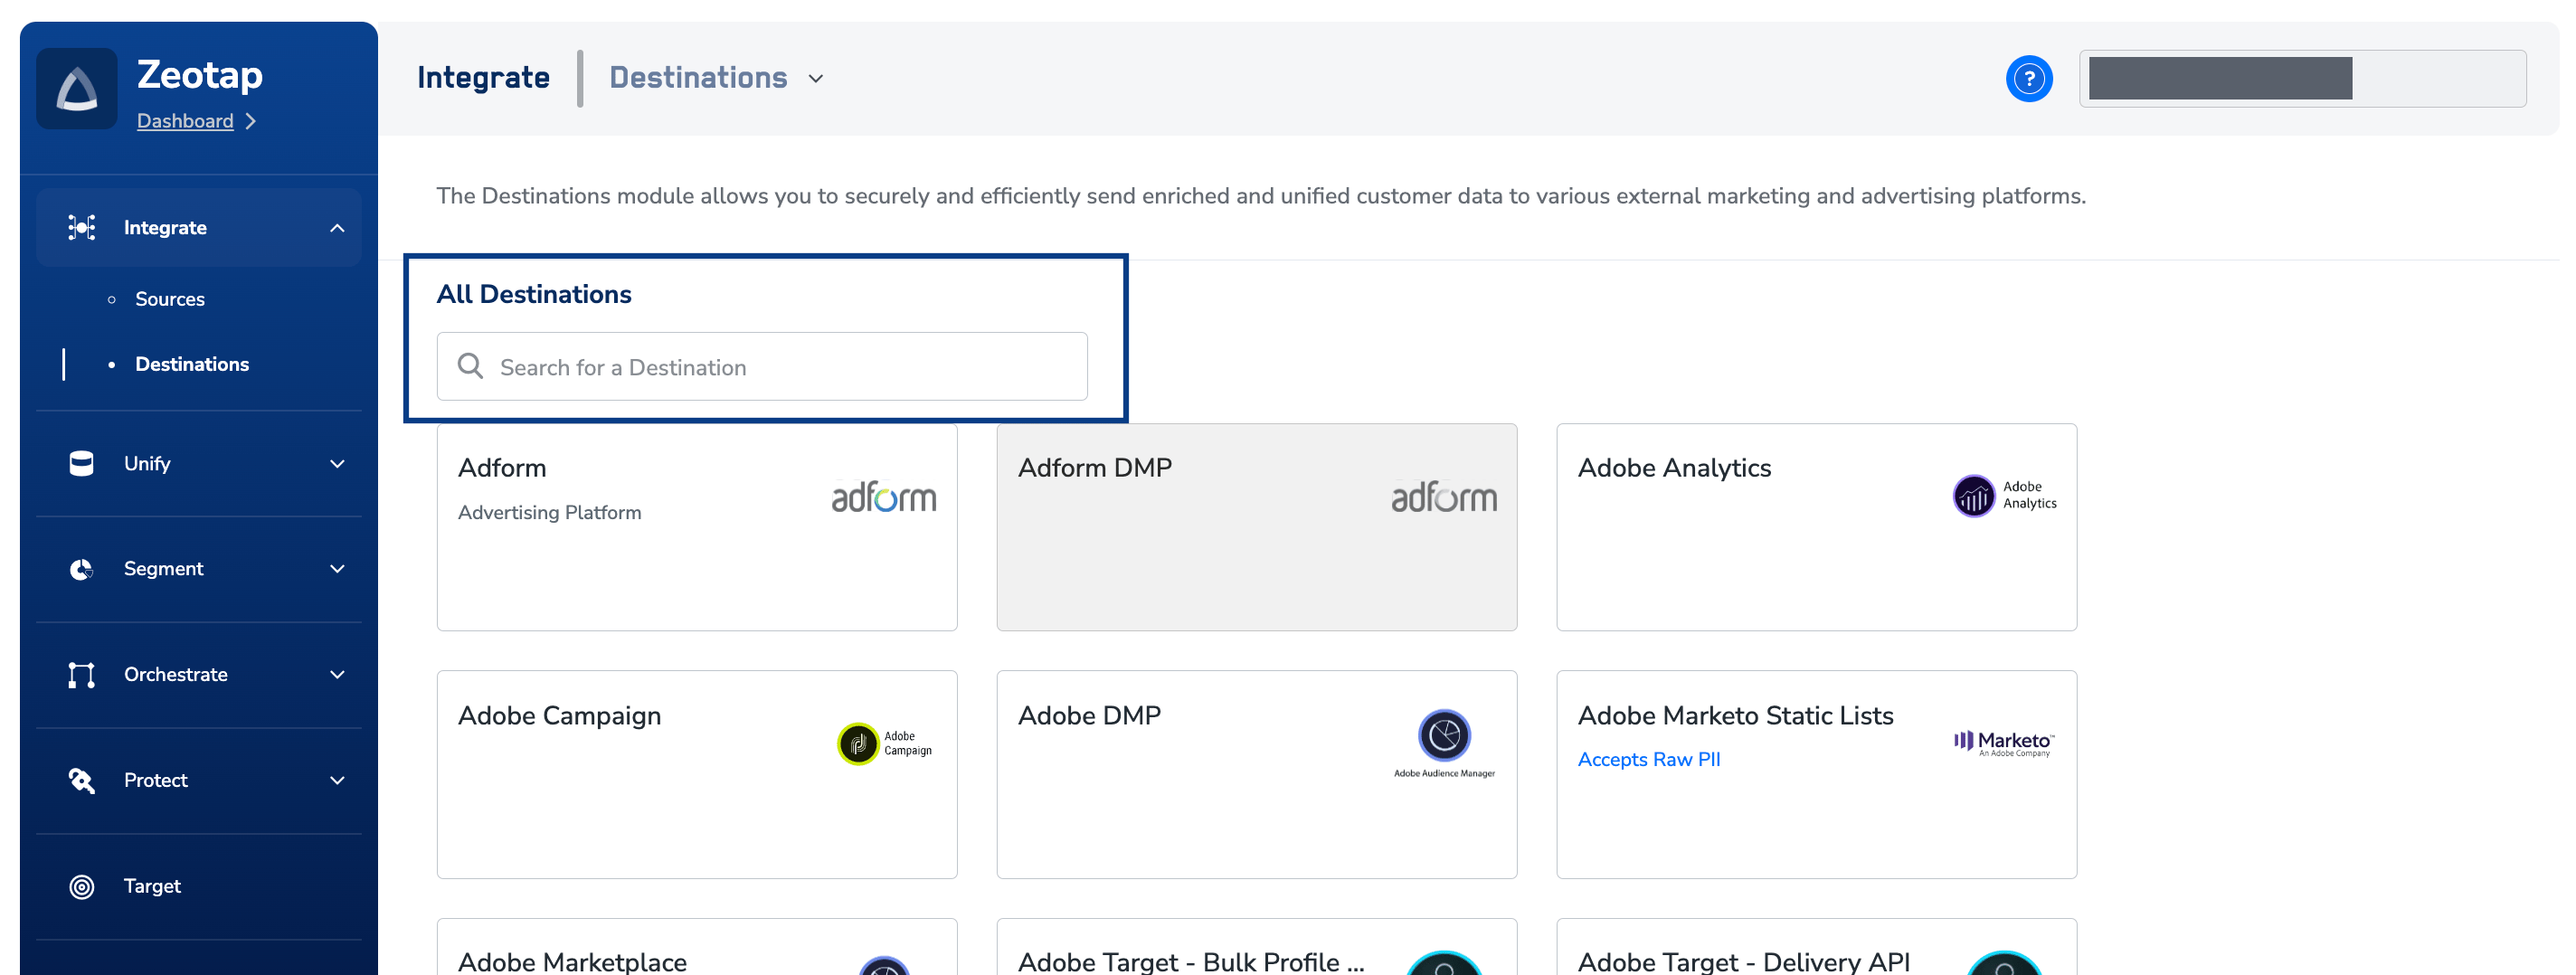
Under All Destinations, search for Launch Darkly.
The All Destinations catalogue, with the Search for a Destination box highlighted
4
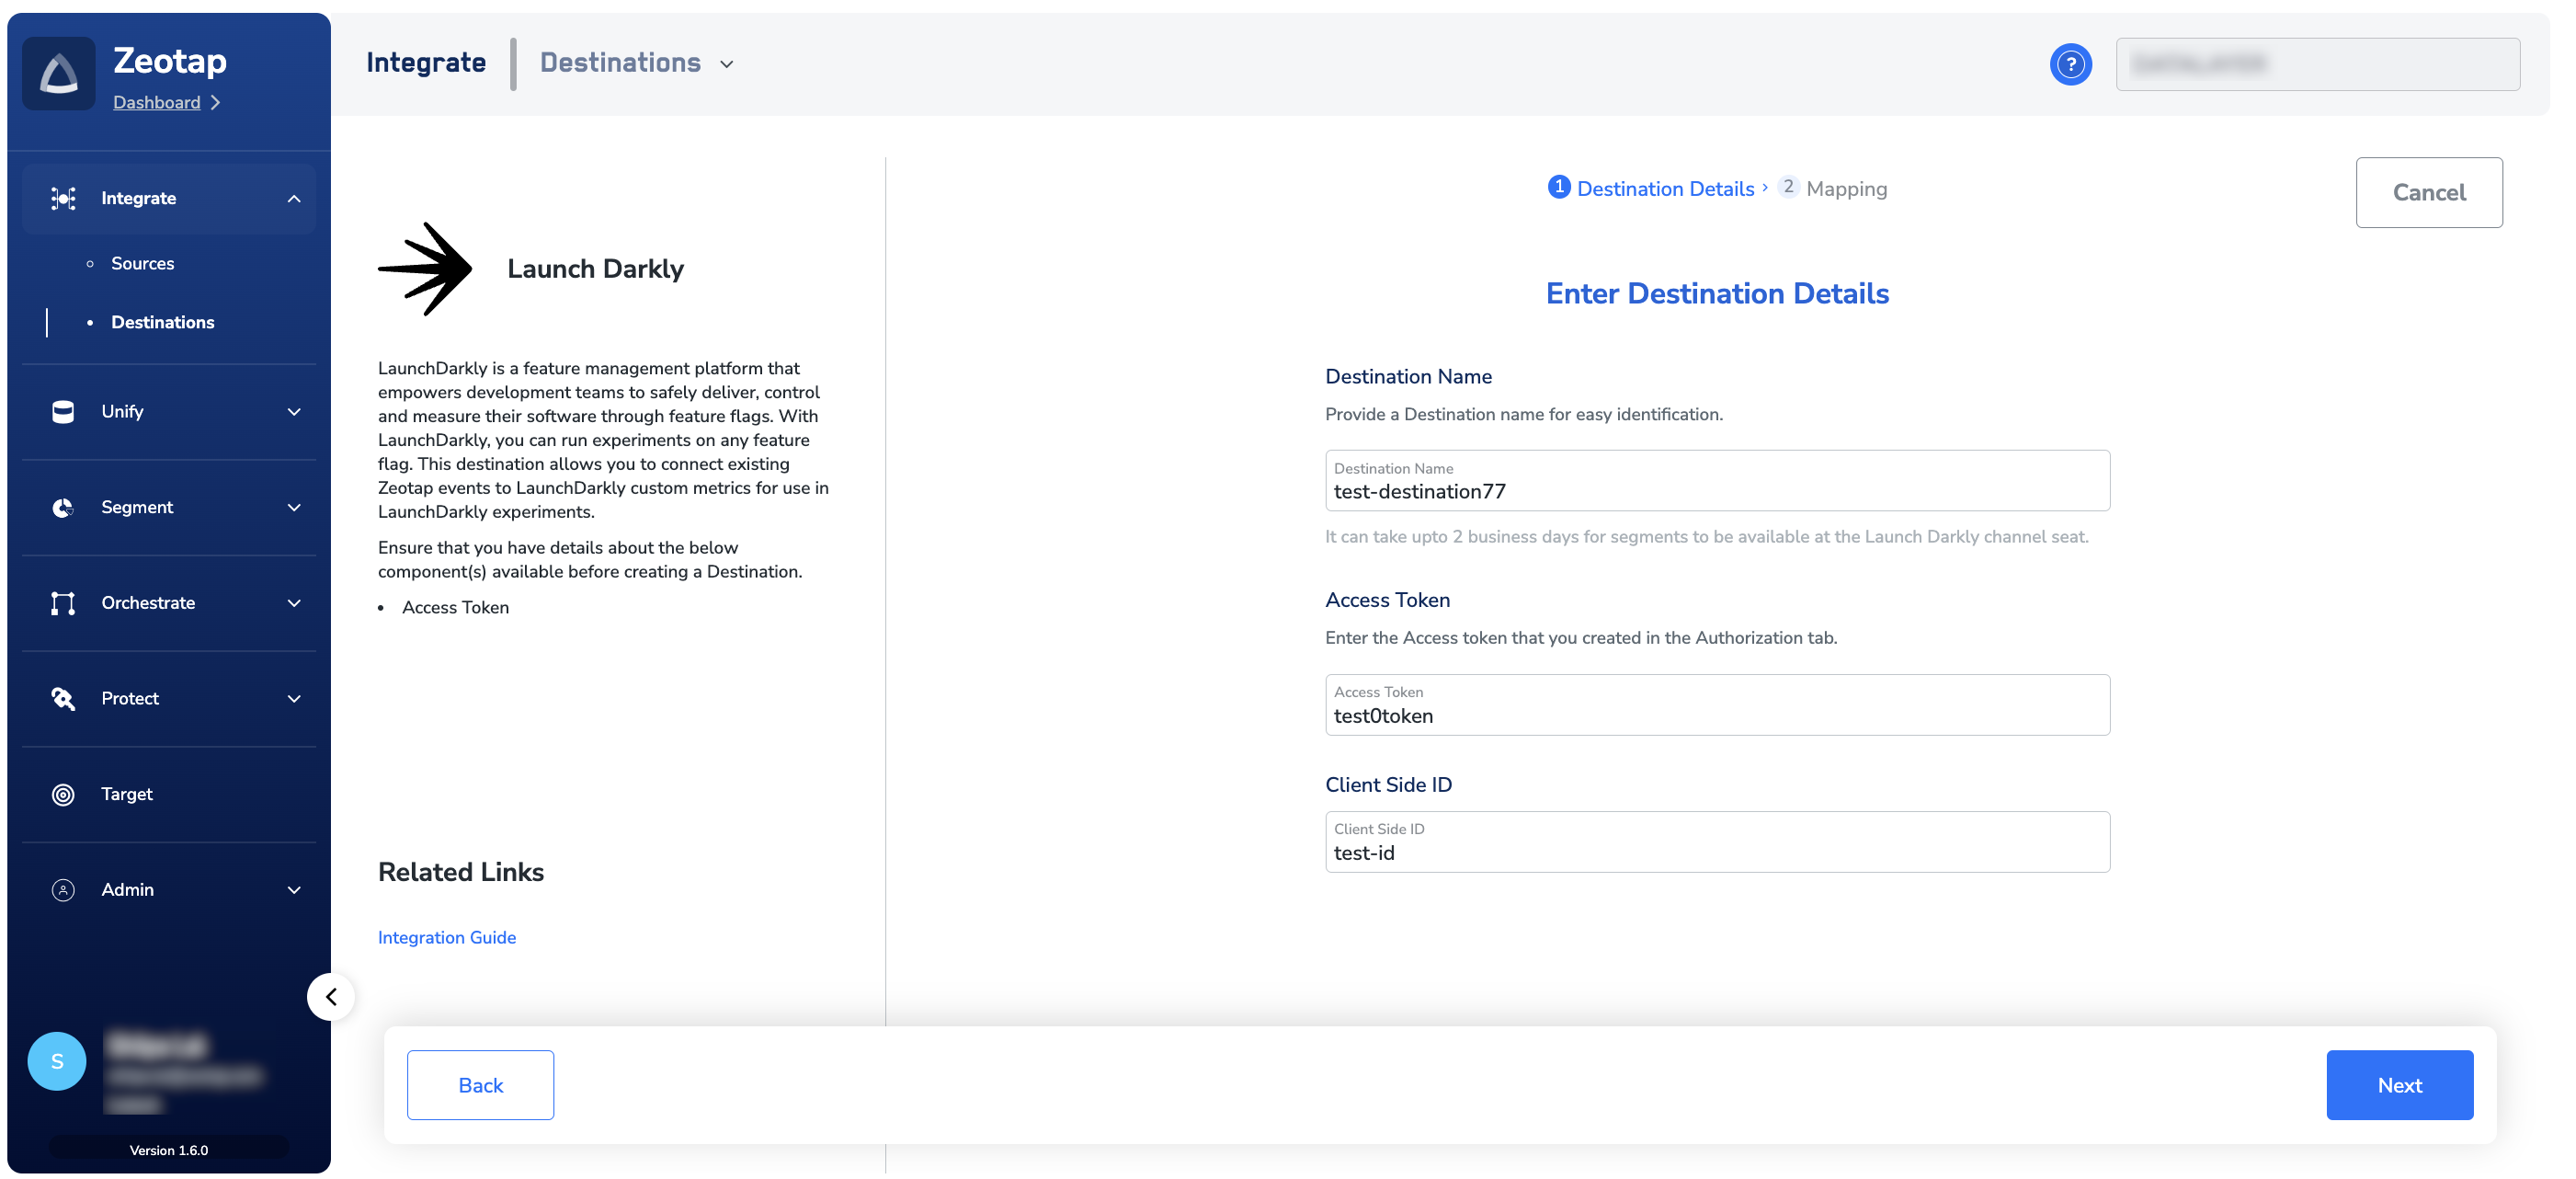
Click the Launch Darkly tile. A panel describing the destination appears on the left, and the fields the integration needs appear on the right. Enter:a. A Destination Name. Choose a name that identifies the LaunchDarkly account and environment it connects to, so the destination is easy to pick out when you link an audience.b. The Access Token you created in the Authorization tab of your LaunchDarkly account — see Access token.c. The Client Side ID of the LaunchDarkly environment you want to send to — see Client-side ID.d. Review the values you entered, then click Next.
The Enter Destination Details step for Launch Darkly, with the Destination Name, Access Token and Client Side ID fields
5
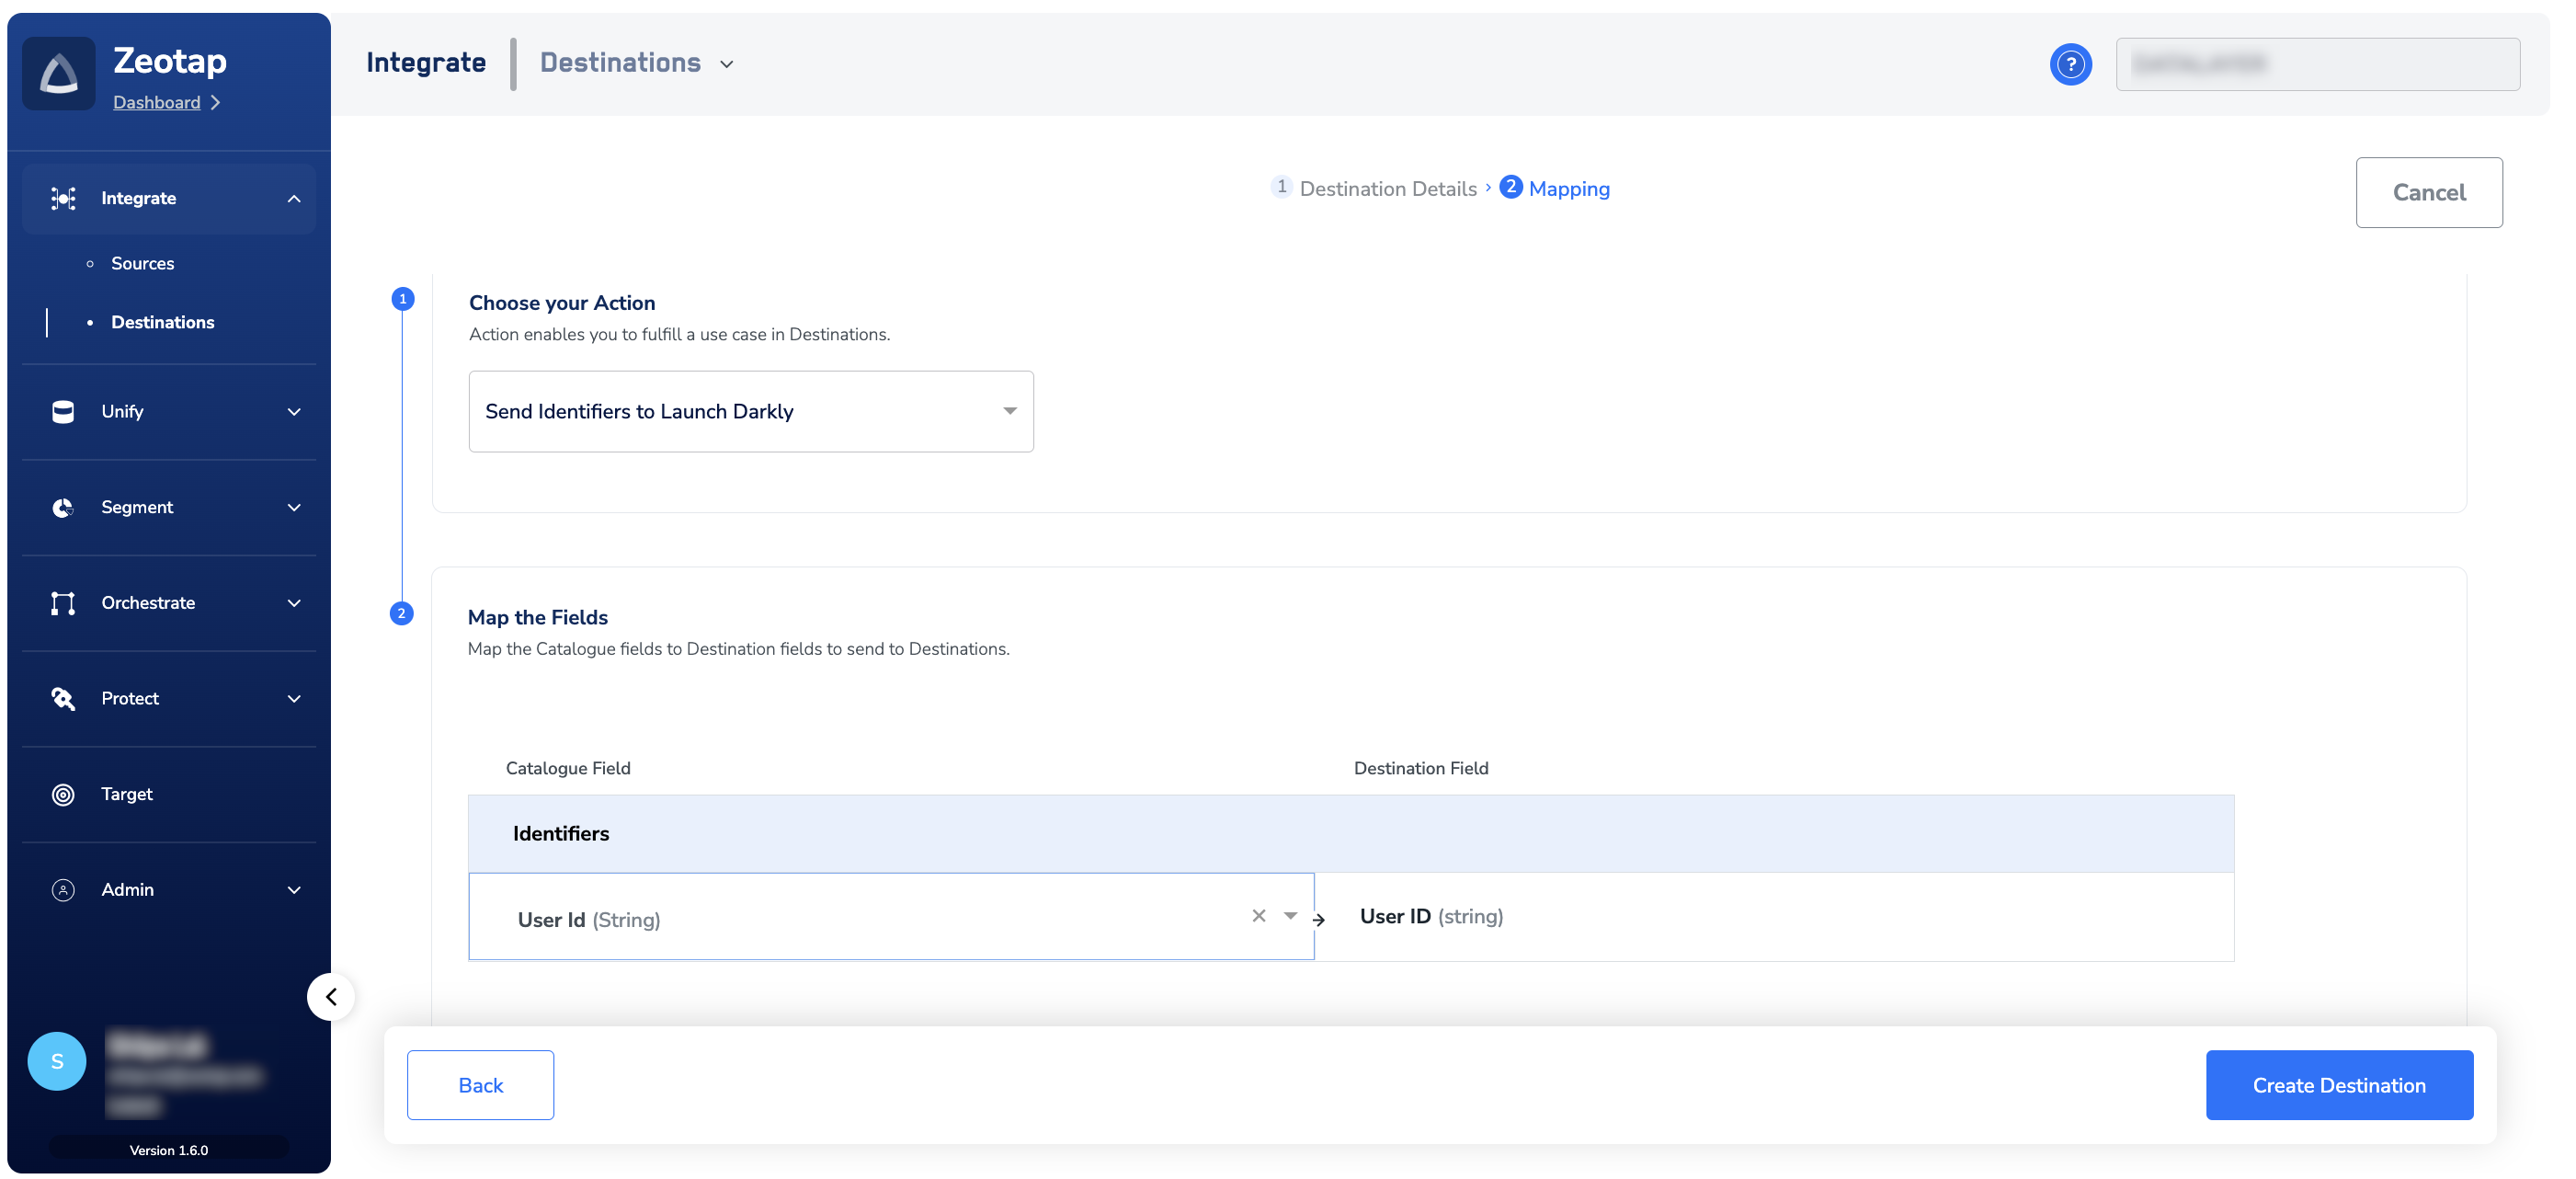
On the Mapping screen, choose the action and the field mapping:a. Under Choose your Action, select Send Identifiers to Launch Darkly.b. Under Map the Fields, map the Catalogue field that carries the ID to the matching LaunchDarkly destination field — in the capture below, the Catalogue field User Id is mapped to the destination field User ID under Identifiers. The output identifiers the platform accepts are shown by default, and you can edit, add or remove an identifier from the list; for the rules that govern actions and mappings across every destination, see Define the mapping.
The Mapping step, with Send Identifiers to Launch Darkly chosen and a Catalogue field mapped to a LaunchDarkly destination field
6
Click Create Destination. The destination is then listed in the Audiences application, ready to be linked to an audience.
For the two entry points into destination configuration and what each part of the configuration does, see Configure a destination.
Link an audience to the destination
Once the destination is created, link it to the audience you want to activate from the Audiences application — see Activate in Audiences for the end-to-end workflow, including refresh frequency and the output identifier mapping.
The terms Audiences and Segments are used interchangeably to refer to customer cohorts belonging to a specific category. For example, an audience or a segment can be a specific group of customers who are over 18 years of age and have performed an addToCart event within the last 30 days.
The destination form notes that segments can take up to two business days to become available on the LaunchDarkly side. Allow for that before treating a missing segment as a failure.
Target the segment on a feature flag
Once an audience has been linked to the destination and the segment has arrived, add a targeting rule in LaunchDarkly so a flag serves a variation to the people in it.
1
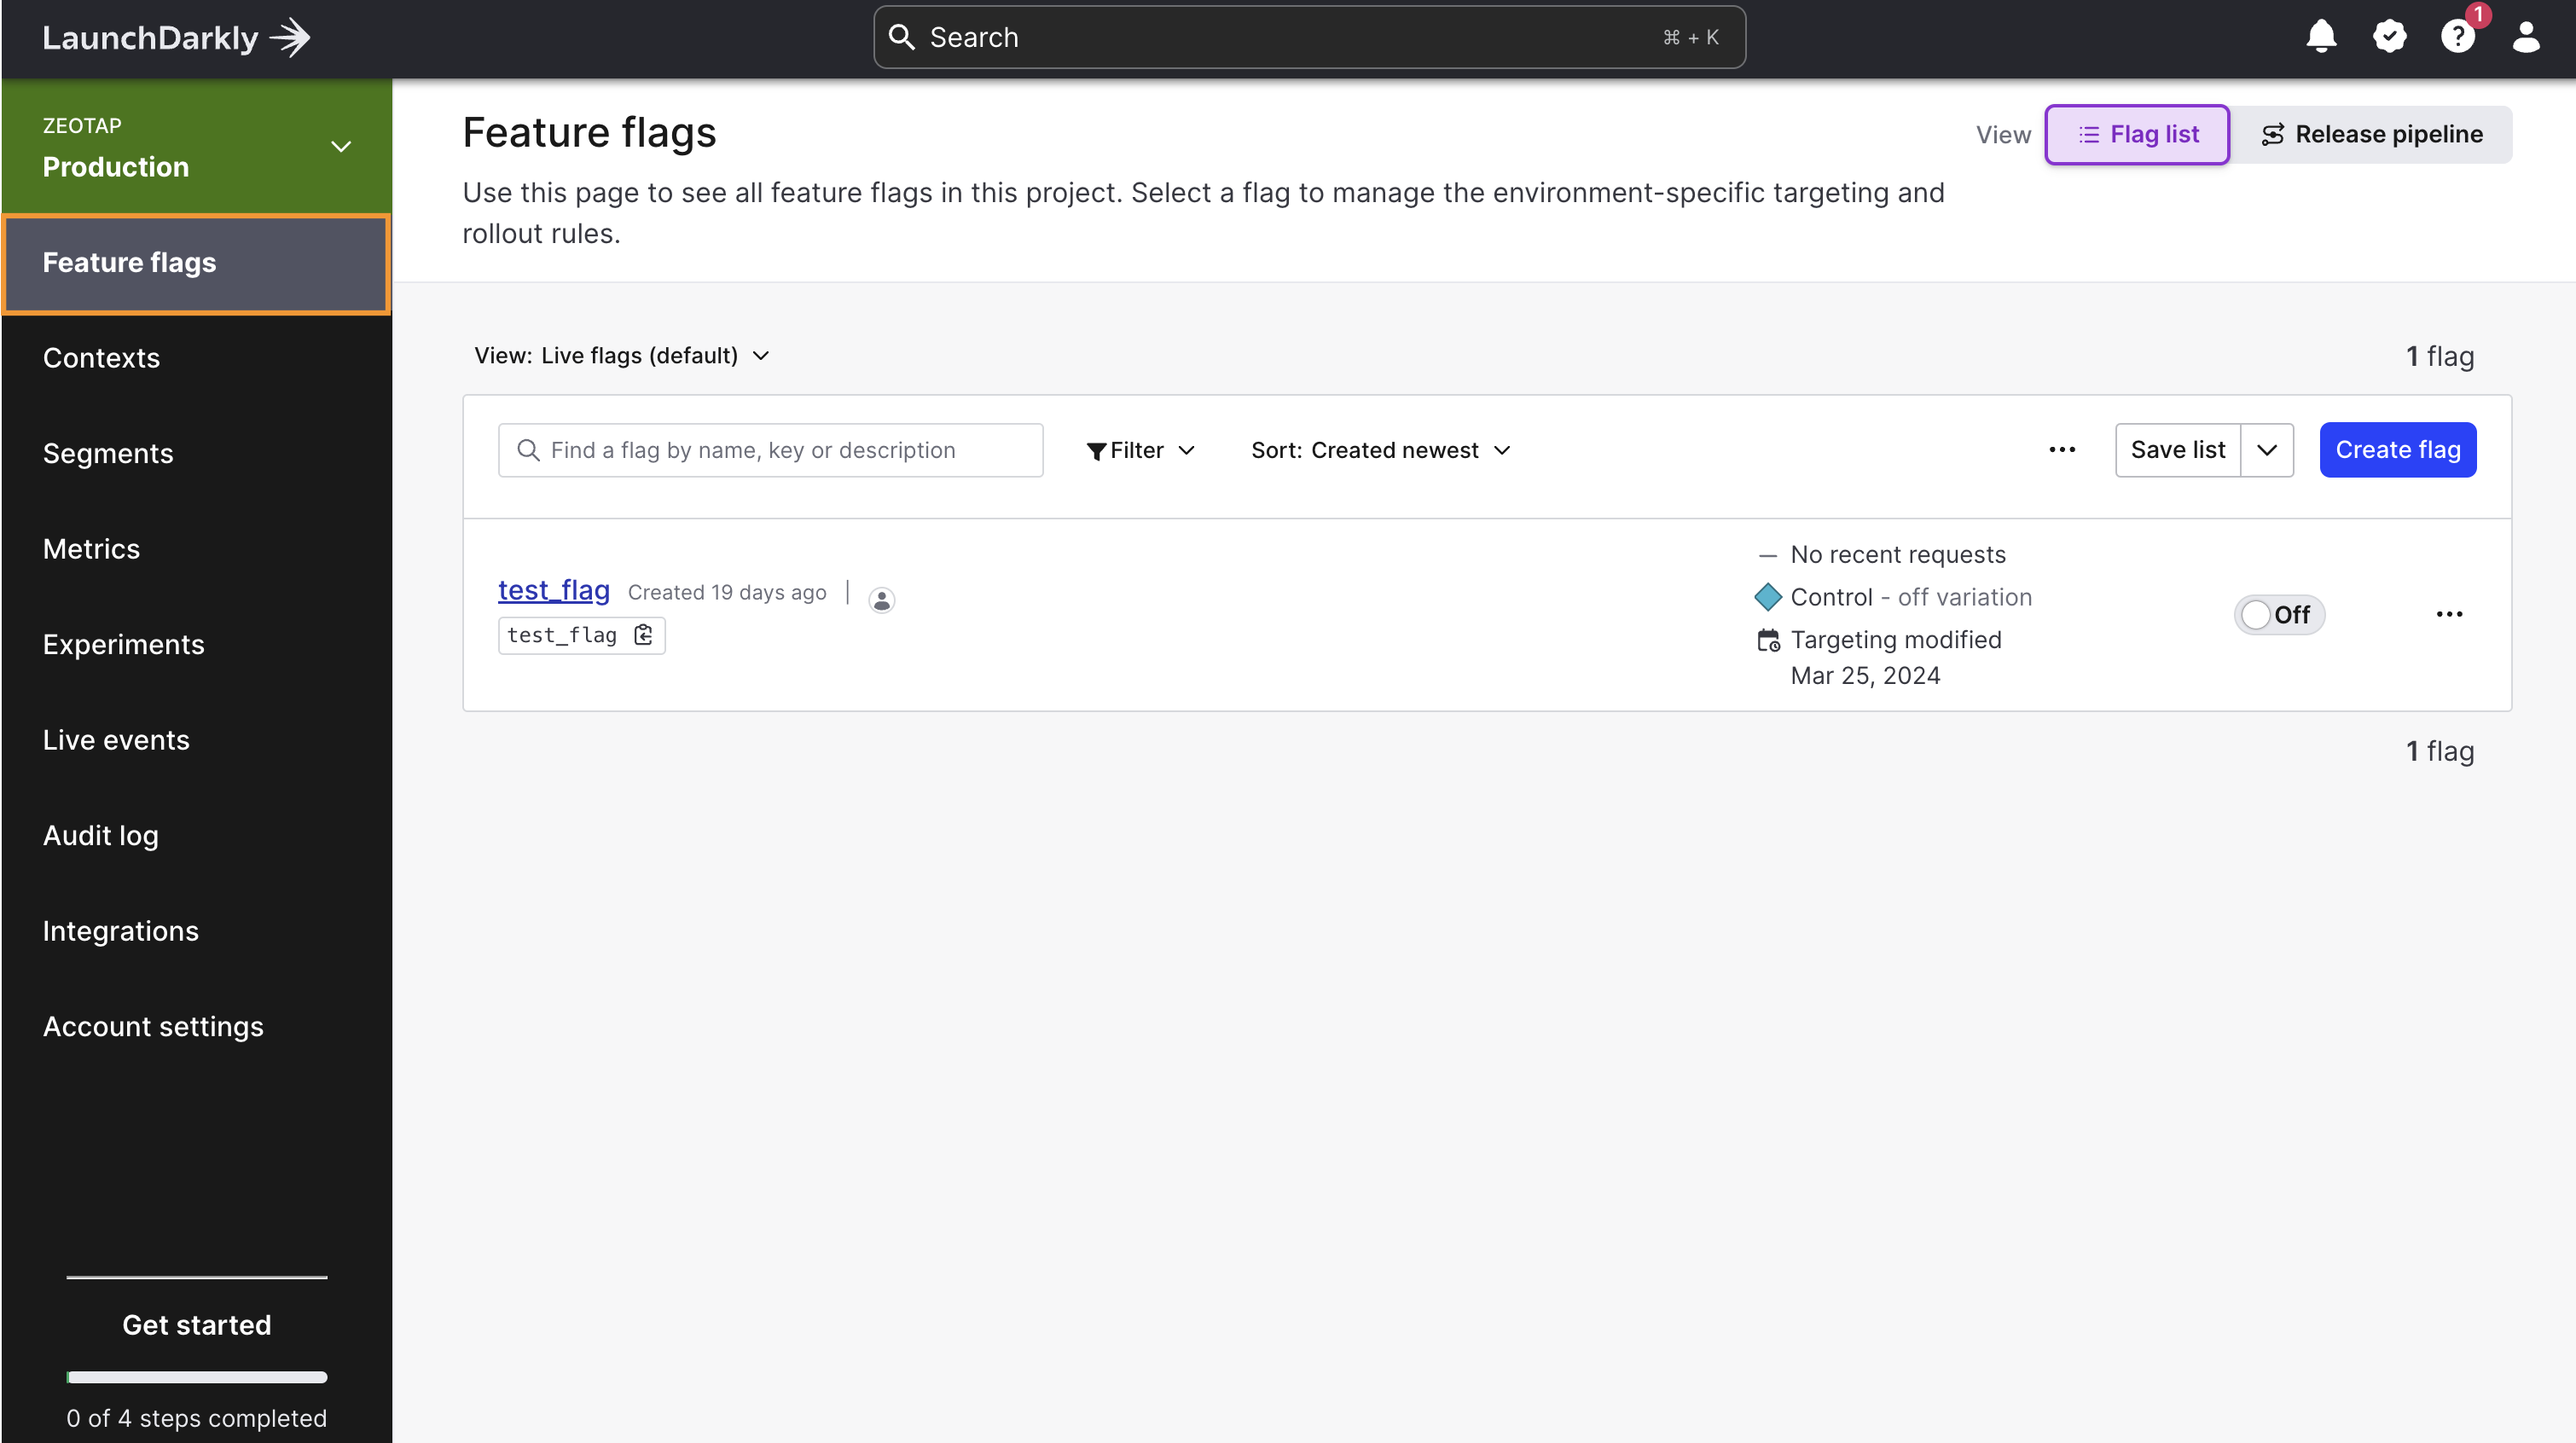
Log into LaunchDarkly and navigate to Feature flags.
2
Choose the feature flag you want to target from the list.
The LaunchDarkly Feature flags list
3
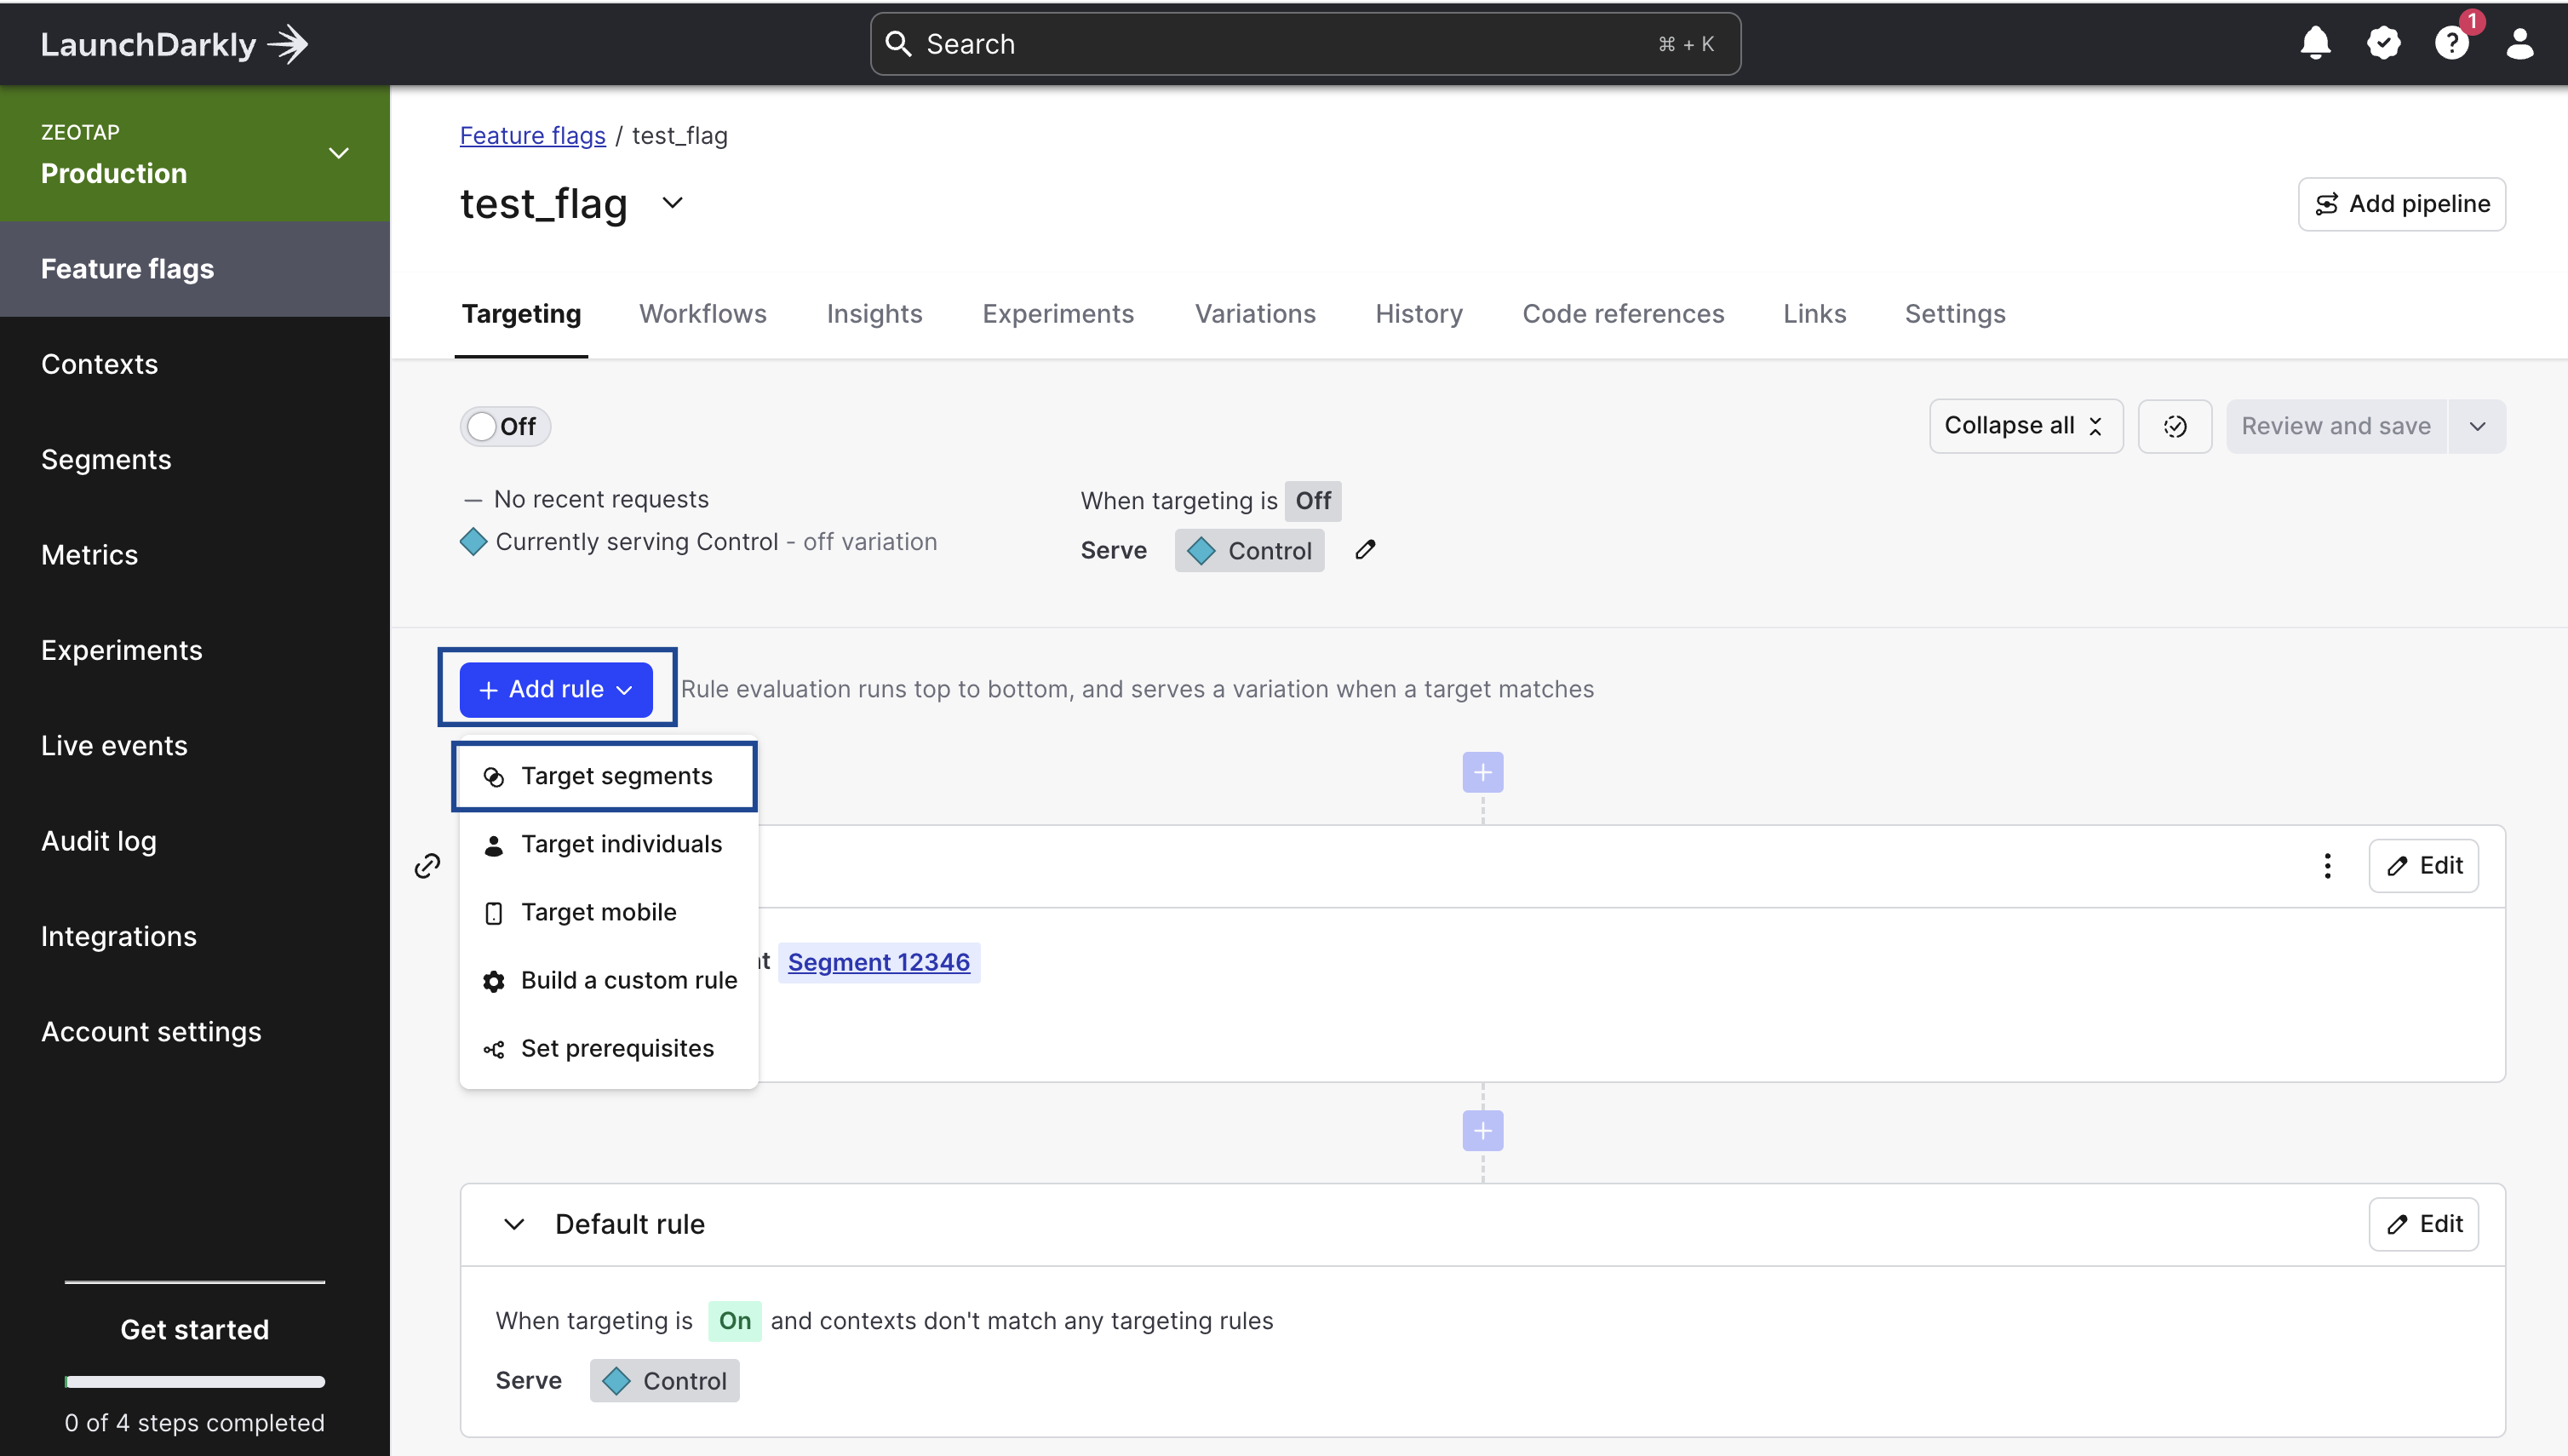
On the flag’s Targeting tab, click the Add rule drop-down and choose Target segments. This creates a new rule section.
The Add rule drop-down on a flag's Targeting tab, with Target segments highlighted
4
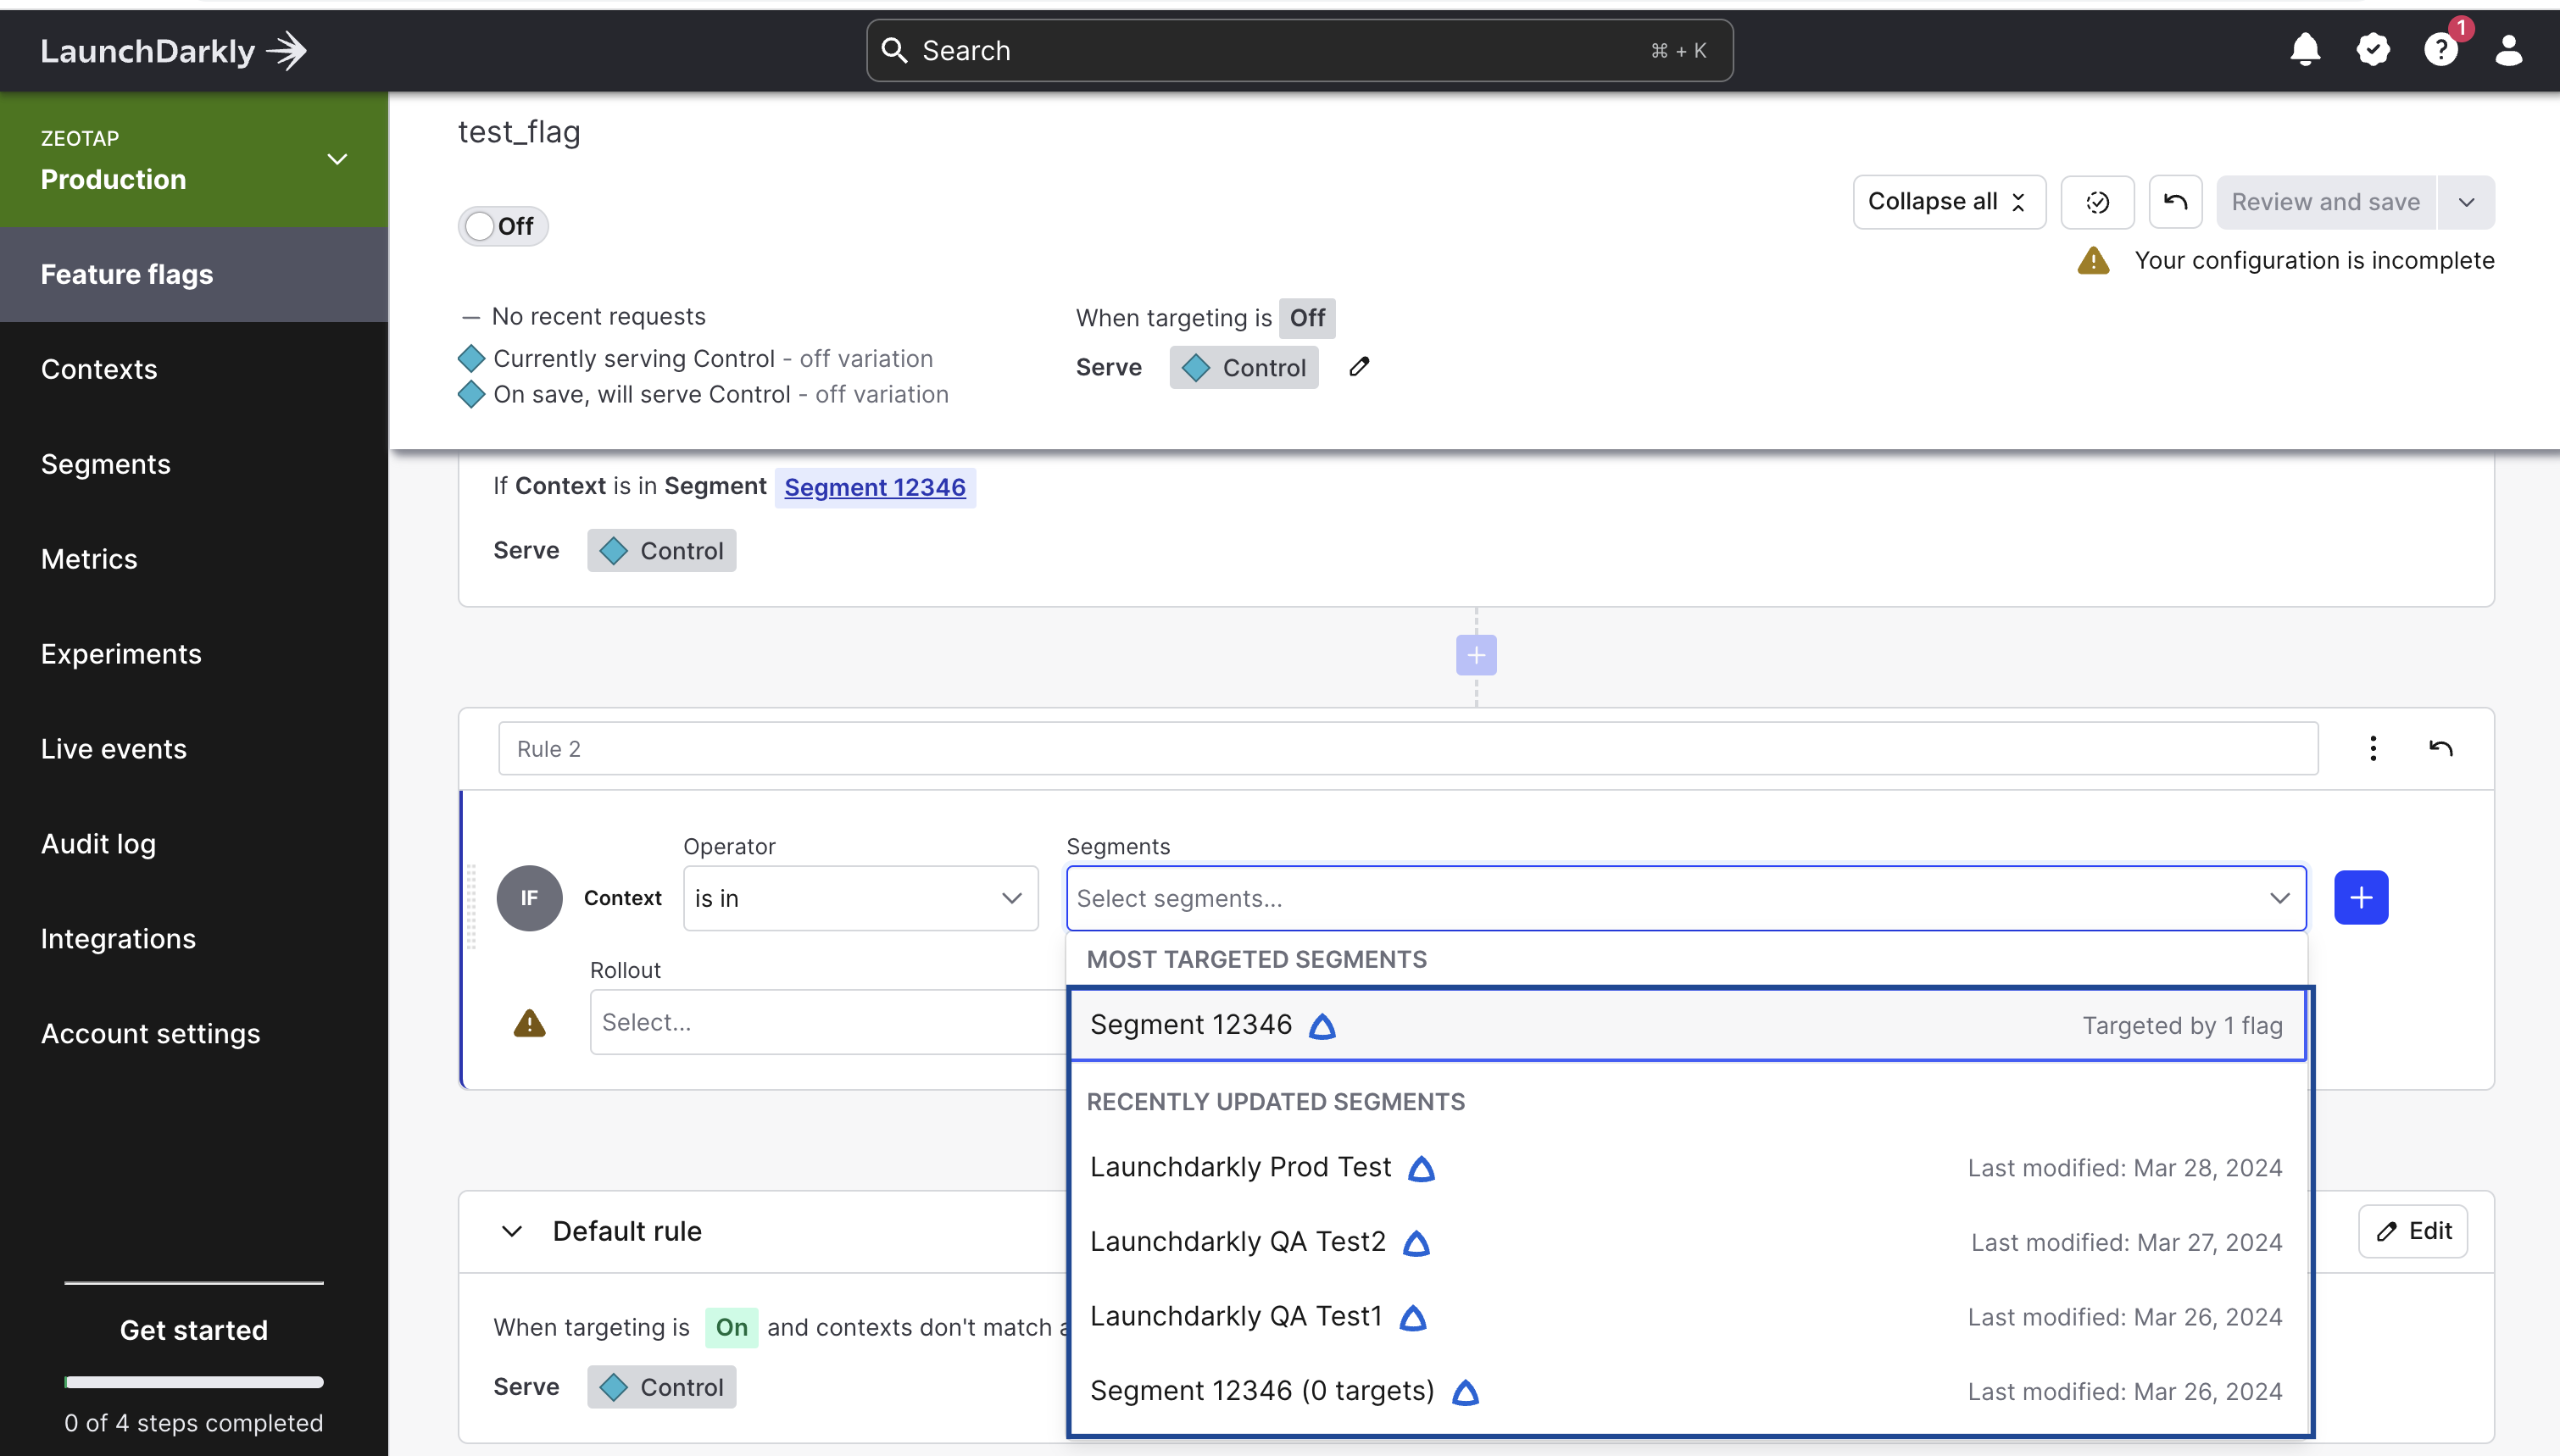
In the new rule, open the Segments drop-down to see the audiences pushed from Zeotap CDP.
A Zeotap CDP audience only appears in this list once the LaunchDarkly destination has been created and linked to at least one audience.
5
Choose the audience you want the flag to apply to, set the variation the rule serves, and save the flag.
The Segments drop-down on a targeting rule, listing the segments available to the flag
Verify the audience reached LaunchDarkly
Check both sides after the first refresh has run.
In Zeotap CDP — open the audience–destination pair in the Audiences application and confirm the run has completed with a non-zero qualified count. For what the statuses mean across destinations, see Verify the activation worked.
In LaunchDarkly — open a feature flag in the target environment, add or edit a rule that targets segments, and confirm the audience is listed in the Segments drop-down. The list groups the most targeted segments above the recently updated ones, with the date each was last modified, so you can tell a fresh delivery from a stale one.
Allow up to two business days between a successful Zeotap CDP run and the segment appearing in LaunchDarkly.
Troubleshoot the LaunchDarkly destination
Symptom
What it means
What to do
The audience does not appear in the Segments drop-down
The destination has not been linked to an audience yet, or the delivery has not surfaced on the LaunchDarkly side
Confirm the destination is linked to at least one audience in the Audiences application and that the run completed, then allow up to two business days before treating it as a failure
The segment appears in a different LaunchDarkly environment from the one you are looking at
The Client Side ID on the destination belongs to another environment of the project — each environment has its own
Re-read the Client-side ID under View SDK keys for the environment you intend to target, and correct it on the destination
The destination fails to authenticate
The access token recorded on the destination is no longer valid — it may have been deleted or replaced in Settings → Authorization
Create a new token with the Writer role, copy it at creation time, and update the Access Token on the destination. LaunchDarkly hides a token’s value after creation, so an old token cannot be read back
The run completes but far fewer people are matched than the audience holds
The Custom ID mapped on the destination is not the ID LaunchDarkly knows those users by
Review the destination’s mapping and confirm the mapped Catalogue field carries the same ID that is activated within LaunchDarkly
A change to the audience is not reflected in LaunchDarkly
Delta upload is not supported on this integration, so changes arrive with the next full refresh rather than immediately
For delivery errors that are not specific to LaunchDarkly — no customers qualified, a terminated refresh, a rejected payload — see Why deliveries fail and When to contact support.
FAQ
Why are there two LaunchDarkly entries in the destination catalogue?
They are two integrations for the same vendor, distinguished by where you activate from. LaunchDarkly — this page — is a batch destination linked to an audience in the Audiences application. LaunchDarkly Real Time Integration is a real-time destination attached to a Send to Destinations node in a journey. Both send data out of Zeotap CDP to LaunchDarkly.
Which LaunchDarkly environment do my audiences land in?
The one whose Client-side ID you entered on the destination. A LaunchDarkly project can hold several environments and each has its own Client-side ID, so the value on the destination decides where the segments appear. To send to more than one environment, create a separate destination for each.
Do I have to create the segment in LaunchDarkly before linking an audience?
No. Link the audience to the destination and the segment becomes available to target on the LaunchDarkly side; you then add the targeting rule on the flag that should use it.
Does this destination support ID extension, delta upload or delete?
No. None of the three is supported on this integration, so each refresh sends the audience as it stands at that moment. See Delta upload and delete functions for the destinations where delta upload and delete are available.
Can one destination serve several audiences?
Yes. The destination stores the LaunchDarkly credential, the environment and the mapping, so it can be linked to as many audiences as you need. Each audience arrives as its own segment and can be targeted by a different flag.
{"docsConfig":{"theme":"mint","$schema":"https://mintlify.com/docs.json","name":"Zeotap docs","colors":{"primary":"#174efb","light":"#174efb","dark":"#174efb"},"logo":{"light":"https://mintcdn.com/zeotap/pbiFRnrYXBNUsbba/logo/light.svg?fit=max\u0026auto=format\u0026n=pbiFRnrYXBNUsbba\u0026q=85\u0026s=c566b5af653699d3bcf4d8efb4f678d1","dark":"https://mintcdn.com/zeotap/pbiFRnrYXBNUsbba/logo/dark.svg?fit=max\u0026auto=format\u0026n=pbiFRnrYXBNUsbba\u0026q=85\u0026s=ae6e1d27d3d2e409f9e86c089b64e224","href":"https://zeotap.com/"},"favicon":"https://mintcdn.com/zeotap/Tg-jPUQrcrgXsHVA/favicon.svg?fit=max\u0026auto=format\u0026n=Tg-jPUQrcrgXsHVA\u0026q=85\u0026s=f5b2731a91bf6cad0fe370680ebae4fe","appearance":{"default":"light"},"background":{"decoration":"gradient","color":{"light":"#eaf0fe"}},"navbar":{"links":[{"href":"https://login.zeotap.com/","label":"Login"}],"primary":{"type":"button","label":"Book a Demo","href":"https://zeotap.com/demo/"}},"footer":{"socials":{"linkedin":"https://www.linkedin.com/company/zeotap"}},"seo":{"indexing":"all"},"integrations":{"ga4":{"measurementId":"G-XXXXXXXXXX"}},"banner":{"content":"New: [Support \u0026 Diagnostics](/articles/support-diagnostics-customer/support-diagnostics) troubleshooting guides are now live.","dismissible":true},"contextual":{"options":["copy","view","chatgpt","claude","perplexity","mcp","cursor","vscode"],"display":"header"},"metadata":{"timestamp":true},"styling":{"latex":true},"navigation":{"global":{},"pages":[]}},"deployment":{"deploymentMetadataValue":{"subdomain":"zeotap","hasAudioNarration":false,"actualSubdomain":"zeotap","customDomains":["docs.zeotap.com"],"gitSource":{"type":"github","owner":"zeotap","repo":"zeotap-docs","deployBranch":"main","contentDirectory":"","isPrivate":true,"mountPath":"","label":""},"feedback":{"thumbs":true},"entitlements":{"AI_CHAT":{"status":"ENABLED"},"WEB_MCP":{"status":"ENABLED"},"NARRATION":{"status":"ENABLED"}},"buildId":"6afd9644333f0ea064070171","clientVersion":"0.0.4227","searchFilterCounts":[{"language":"default","tag":"Products","count":357},{"language":"default","tag":"Integrate","count":215},{"language":"default","tag":"SDKs","count":157},{"language":"default","tag":"Destinations","count":150},{"language":"default","tag":"Batch Integrations","count":97},{"language":"default","tag":"Sources","count":65},{"language":"default","tag":"Unify","count":65},{"language":"default","tag":"Source Integrations (Batch+Real-Time)","count":54},{"language":"default","tag":"Release Notes","count":54},{"language":"default","tag":"Catalogue","count":48}]},"assistantConfig":{"enableAskAiButton":false,"enableStarterQuestions":false,"enableAskAiSearchBar":true},"basePath":"","hasChatPermissions":true,"hasWebMcpPermissions":true,"toggles":[{"name":"kill-isr","enabled":true,"variant":{"name":"disabled","enabled":false,"feature_enabled":true},"impressionData":false},{"name":"custom-rbac-roles","enabled":true,"variant":{"name":"disabled","enabled":false,"feature_enabled":true},"impressionData":false},{"name":"agent-mintlify-slack","enabled":true,"variant":{"name":"disabled","enabled":false,"feature_enabled":true},"impressionData":false},{"name":"agent-integrations-settings","enabled":true,"variant":{"name":"disabled","enabled":false,"feature_enabled":true},"impressionData":false},{"name":"rbac-expansion","enabled":true,"variant":{"name":"disabled","enabled":false,"feature_enabled":true},"impressionData":false},{"name":"automations-pr-grouping","enabled":true,"variant":{"name":"disabled","enabled":false,"feature_enabled":true},"impressionData":false},{"name":"custom-prefix","enabled":true,"variant":{"name":"disabled","enabled":false,"feature_enabled":true},"impressionData":false},{"name":"analytics-v7","enabled":true,"variant":{"name":"disabled","enabled":false,"feature_enabled":true},"impressionData":false},{"name":"user-flows-analytics","enabled":true,"variant":{"name":"disabled","enabled":false,"feature_enabled":true},"impressionData":false},{"name":"no-publish-flow","enabled":true,"variant":{"name":"disabled","enabled":false,"feature_enabled":true},"impressionData":false},{"name":"workos-onboarding","enabled":true,"variant":{"name":"disabled","enabled":false,"feature_enabled":true},"impressionData":false},{"name":"snapshot-serving-live","enabled":true,"variant":{"name":"disabled","enabled":false,"feature_enabled":true},"impressionData":false},{"name":"stripTemperatureMiddleware","enabled":true,"variant":{"name":"disabled","enabled":false,"feature_enabled":true},"impressionData":false},{"name":"support-platform-pylon-zendesk","enabled":true,"variant":{"name":"disabled","enabled":false,"feature_enabled":true},"impressionData":false},{"name":"snapshot-serving","enabled":true,"variant":{"name":"disabled","enabled":false,"feature_enabled":true},"impressionData":false},{"name":"instant-rollback","enabled":true,"variant":{"name":"disabled","enabled":false,"feature_enabled":true},"impressionData":false},{"name":"granular-notifications-server","enabled":true,"variant":{"name":"disabled","enabled":false,"feature_enabled":true},"impressionData":false},{"name":"granular-notifications","enabled":true,"variant":{"name":"disabled","enabled":false,"feature_enabled":true},"impressionData":false},{"name":"automations-fable","enabled":true,"variant":{"name":"disabled","enabled":false,"feature_enabled":true},"impressionData":false},{"name":"fixed-ai-action-pricing","enabled":true,"variant":{"name":"disabled","enabled":false,"feature_enabled":true},"impressionData":false},{"name":"automation-resolve-merge-conflict","enabled":true,"variant":{"name":"disabled","enabled":false,"feature_enabled":true},"impressionData":false},{"name":"scoped-publishing","enabled":true,"variant":{"name":"disabled","enabled":false,"feature_enabled":true},"impressionData":false},{"name":"mintql","enabled":true,"variant":{"name":"disabled","enabled":false,"feature_enabled":true},"impressionData":false},{"name":"page-level-analytics","enabled":true,"variant":{"name":"disabled","enabled":false,"feature_enabled":true},"impressionData":false},{"name":"editor-version-history-v2","enabled":true,"variant":{"name":"disabled","enabled":false,"feature_enabled":true},"impressionData":false},{"name":"billing-page-v2","enabled":true,"variant":{"name":"disabled","enabled":false,"feature_enabled":true},"impressionData":false},{"name":"full-page-search","enabled":true,"variant":{"name":"disabled","enabled":false,"feature_enabled":true},"impressionData":false},{"name":"workspace-projects","enabled":true,"variant":{"name":"disabled","enabled":false,"feature_enabled":true},"impressionData":false},{"name":"assistant-v5","enabled":true,"variant":{"name":"disabled","enabled":false,"feature_enabled":true},"impressionData":false},{"name":"fork-pr-previews","enabled":true,"variant":{"name":"disabled","enabled":false,"feature_enabled":true},"impressionData":false},{"name":"revalidation-jwt","enabled":true,"variant":{"name":"disabled","enabled":false,"feature_enabled":true},"impressionData":false},{"name":"workos-sso-scim","enabled":true,"variant":{"name":"disabled","enabled":false,"feature_enabled":true},"impressionData":false},{"name":"hobby-abuse-scan","enabled":true,"variant":{"name":"disabled","enabled":false,"feature_enabled":true},"impressionData":false},{"name":"dashboard-inbox","enabled":true,"variant":{"name":"disabled","enabled":false,"feature_enabled":true},"impressionData":false},{"name":"workos-signup","enabled":true,"variant":{"name":"disabled","enabled":false,"feature_enabled":true},"impressionData":false},{"name":"turbopuffer-dual-write","enabled":true,"variant":{"name":"disabled","enabled":false,"feature_enabled":true},"impressionData":false},{"name":"workos-enabled","enabled":true,"variant":{"name":"disabled","enabled":false,"feature_enabled":true},"impressionData":false},{"name":"approve-review-flow","enabled":true,"variant":{"name":"disabled","enabled":false,"feature_enabled":true},"impressionData":false},{"name":"editor-metadata","enabled":true,"variant":{"name":"disabled","enabled":false,"feature_enabled":true},"impressionData":false},{"name":"sso-setup-deadline-banner","enabled":true,"variant":{"name":"disabled","enabled":false,"feature_enabled":true},"impressionData":false},{"name":"turbopuffer-serve","enabled":true,"variant":{"name":"disabled","enabled":false,"feature_enabled":true},"impressionData":false},{"name":"live-agents","enabled":true,"variant":{"name":"disabled","enabled":false,"feature_enabled":true},"impressionData":false},{"name":"starter-pricing","enabled":true,"variant":{"name":"control","enabled":true,"payload":{"type":"string","value":"control"},"feature_enabled":true},"impressionData":false},{"name":"llms-txt-v2","enabled":true,"variant":{"name":"disabled","enabled":false,"feature_enabled":true},"impressionData":false},{"name":"wildcard-email-auth","enabled":true,"variant":{"name":"disabled","enabled":false,"feature_enabled":true},"impressionData":false}],"googleFontsInlined":false},"customCss":[]}
{"page":{"pagePath":"articles/integrate-customer/launchdarkly","slug":"/articles/integrate-customer/launchdarkly","pageMetadata":{"title":"LaunchDarkly","description":"Send Zeotap CDP audiences out to LaunchDarkly as segments, so a feature flag can serve a variation to the customers who qualified.","sidebarTitle":"LaunchDarkly","last_validated":"2026-09-29T00:00:00.000Z","href":"/articles/integrate-customer/launchdarkly"},"description":{"compiledSource":"\"use strict\";\nconst {jsx: _jsx} = arguments[0];\nconst {useMDXComponents: _provideComponents} = arguments[0];\nfunction _createMdxContent(props) {\n const _components = {\n p: \"p\",\n ..._provideComponents(),\n ...props.components\n };\n return _jsx(_components.p, {\n children: \"Send Zeotap CDP audiences out to LaunchDarkly as segments, so a feature flag can serve a variation to the customers who qualified.\"\n });\n}\nfunction MDXContent(props = {}) {\n const {wrapper: MDXLayout} = {\n ..._provideComponents(),\n ...props.components\n };\n return MDXLayout ? _jsx(MDXLayout, {\n ...props,\n children: _jsx(_createMdxContent, {\n ...props\n })\n }) : _createMdxContent(props);\n}\nreturn {\n default: MDXContent\n};\n","frontmatter":{},"scope":{}},"pageType":"default","mdx":{"mdxSource":{"compiledSource":"\"use strict\";const{Fragment:_Fragment,jsx:_jsx,jsxs:_jsxs}=arguments[0];const{useMDXComponents:_provideComponents}=arguments[0];function _createMdxContent(props){const _components={a:`a`,code:`code`,em:`em`,li:`li`,ol:`ol`,p:`p`,strong:`strong`,tbody:`tbody`,td:`td`,th:`th`,thead:`thead`,tr:`tr`,ul:`ul`,..._provideComponents(),...props.components},{Accordion,AccordionGroup,Frame,Heading,Note,OptimizedImage,Step,Steps,Table}=_components;if(!Accordion)_missingMdxReference(`Accordion`,true);if(!AccordionGroup)_missingMdxReference(`AccordionGroup`,true);if(!Frame)_missingMdxReference(`Frame`,true);if(!Heading)_missingMdxReference(`Heading`,true);if(!Note)_missingMdxReference(`Note`,true);if(!OptimizedImage)_missingMdxReference(`OptimizedImage`,true);if(!Step)_missingMdxReference(`Step`,true);if(!Steps)_missingMdxReference(`Steps`,true);if(!Table)_missingMdxReference(`Table`,true);return _jsxs(_Fragment,{children:[_jsx(Heading,{level:`2`,id:`what-this-is`,children:`What this is`}),`\n`,_jsxs(_components.p,{children:[`The LaunchDarkly destination sends audiences `,_jsx(_components.strong,{children:`out of`}),` Zeotap CDP and into LaunchDarkly, where each audience arrives as a segment that a feature flag can target. Nothing flows back the other way: the `,_jsx(_components.a,{href:`/articles/integrations-master-list-publication/integrations-master-list`,children:`Integrations Master List`}),` records LaunchDarkly as a Destination only, so there is no LaunchDarkly source page to read alongside this one.`]}),`\n`,_jsx(_components.p,{children:`LaunchDarkly is a feature management platform that lets development teams deliver, control and measure their software through feature flags, and run experiments on any flag. A feature flag — also called a feature toggle or feature switch — turns a feature of an application on or off at runtime, so a team can control who sees a feature without deploying new code. Once a Zeotap CDP audience has arrived as a segment, you can add a targeting rule on a flag that serves a particular variation to everyone in that segment.`}),`\n`,_jsx(_components.p,{children:`Zeotap CDP ships two separate LaunchDarkly destinations:`}),`\n`,_jsxs(_components.ul,{children:[`\n`,_jsxs(_components.li,{children:[_jsx(_components.strong,{children:`LaunchDarkly`}),` — this page. A batch destination, linked to an audience in the `,_jsx(_components.strong,{children:`Audiences`}),` application, that sends the audience as a segment.`]}),`\n`,_jsxs(_components.li,{children:[_jsx(_components.strong,{children:_jsx(_components.a,{href:`/articles/integrate-customer/launchdarkly-real-time-integration`,children:`LaunchDarkly Real Time Integration`})}),` — a real-time destination, attached to a `,_jsx(_components.strong,{children:`Send to Destinations`}),` node in a journey, that sends identifiers as customers flow through.`]}),`\n`]}),`\n`,_jsx(_components.p,{children:`Both send data in the same direction — out of Zeotap CDP to LaunchDarkly. Choose the one that matches where you are activating from, Audiences or Journeys.`}),`\n`,_jsx(Note,{children:_jsxs(_components.p,{children:[`The destination catalogue in Zeotap CDP lists this integration as `,_jsx(_components.strong,{children:`Launch Darkly`}),`, as two words. Search for it that way when you create the destination.`]})}),`\n`,_jsx(Heading,{level:`2`,id:`supported-identifiers-and-actions`,children:`Supported identifiers and actions`}),`\n`,_jsx(_components.p,{children:`This integration supports Custom IDs — any ID that is activated within LaunchDarkly, such as User IDs, CRM IDs or any other ID you hold for the same person on both sides.`}),`\n`,_jsxs(Table,{children:[_jsx(_components.thead,{children:_jsxs(_components.tr,{children:[_jsx(_components.th,{style:{textAlign:`left`},children:`Action`}),_jsx(_components.th,{style:{textAlign:`left`},children:_jsx(_components.a,{href:`/articles/segment-customer/extend-your-audience#id-extension`,children:`ID extension`})}),_jsx(_components.th,{style:{textAlign:`left`},children:_jsx(_components.a,{href:`/articles/segment-customer/delta-upload-and-delete-functions`,children:`Delete`})}),_jsx(_components.th,{style:{textAlign:`left`},children:_jsx(_components.a,{href:`/articles/segment-customer/delta-upload-and-delete-functions`,children:`Delta upload`})})]})}),_jsx(_components.tbody,{children:_jsxs(_components.tr,{children:[_jsx(_components.td,{style:{textAlign:`left`},children:_jsx(_components.strong,{children:`Send Identifiers to Launch Darkly`})}),_jsx(_components.td,{style:{textAlign:`left`},children:`Not supported`}),_jsx(_components.td,{style:{textAlign:`left`},children:`Not supported`}),_jsx(_components.td,{style:{textAlign:`left`},children:`Not supported`})]})})]}),`\n`,_jsx(_components.p,{children:`The destination exposes a single action. Because delta upload and delete are not supported, each refresh sends the audience membership as it stands when the refresh runs.`}),`\n`,_jsx(Heading,{level:`2`,id:`prerequisites`,children:`Prerequisites`}),`\n`,_jsx(_components.p,{children:`In Zeotap CDP:`}),`\n`,_jsxs(_components.ul,{children:[`\n`,_jsxs(_components.li,{children:[`An account with permission to create and edit destinations. For the wider destination model — platforms, actions and mappings — see `,_jsx(_components.a,{href:`/articles/integrate-customer/destinations#prerequisites`,children:`Destinations`}),`.`]}),`\n`,_jsxs(_components.li,{children:[`An `,_jsx(_components.a,{href:`/articles/segment-customer/create-an-audience`,children:`audience`}),` holding the customers you want to target.`]}),`\n`]}),`\n`,_jsx(_components.p,{children:`In LaunchDarkly:`}),`\n`,_jsxs(_components.ul,{children:[`\n`,_jsx(_components.li,{children:`A LaunchDarkly account.`}),`\n`,_jsxs(_components.li,{children:[`Access to `,_jsx(_components.strong,{children:`Settings → Authorization`}),`, so you can create the access token described below.`]}),`\n`,_jsxs(_components.li,{children:[`Access to `,_jsx(_components.strong,{children:`Settings → All projects`}),`, so you can read the Client-side ID of the environment you want to send to.`]}),`\n`,_jsx(_components.li,{children:`A feature flag to hang the targeting rule on, in the project and environment you are sending to.`}),`\n`]}),`\n`,_jsxs(_components.p,{children:[`Gather both LaunchDarkly values — the `,_jsx(_components.a,{href:`#access-token`,children:`access token`}),` and the `,_jsx(_components.a,{href:`#client-side-id`,children:`Client-side ID`}),` — before you start creating the destination, because the destination form asks for both.`]}),`\n`,_jsx(Heading,{level:`2`,id:`get-the-launchdarkly-details-you-need`,children:`Get the LaunchDarkly details you need`}),`\n`,_jsx(Heading,{level:`3`,id:`access-token`,children:`Access token`}),`\n`,_jsx(_components.p,{children:`An access token in LaunchDarkly authenticates calls and controls what they may do. Create one for this integration as follows.`}),`\n`,_jsxs(Steps,{children:[_jsx(Step,{children:_jsxs(_components.p,{children:[`Log into the LaunchDarkly console and navigate to `,_jsx(_components.strong,{children:`Settings → Authorization`}),`.`]})}),_jsxs(Step,{children:[_jsxs(_components.p,{children:[`Under `,_jsx(_components.strong,{children:`Access tokens`}),`, click `,_jsx(_components.strong,{children:`Create token`}),`.`]}),_jsx(Frame,{caption:`The Authorization page of LaunchDarkly Settings, with Create token highlighted`,children:_jsx(OptimizedImage,{src:`https://mintcdn.com/zeotap/N2x6le2iGwMeelJt/articles/integrate-customer/Storage/integrate-customer/launchdarkly/Dark_access_token_1.png?fit=max\u0026auto=format\u0026n=N2x6le2iGwMeelJt\u0026q=85\u0026s=e03f830172d42ddd2e51980c69260db1`,alt:`The LaunchDarkly Authorization page, showing an empty Authorized applications panel above an Access tokens panel that lists two existing service tokens with the Writer role, with Authorization highlighted in the left navigation and the Create token button highlighted on the right`,\"data-og-width\":`3022`,width:`3022`,\"data-og-height\":`1728`,height:`1728`,\"data-path\":`articles/integrate-customer/Storage/integrate-customer/launchdarkly/Dark_access_token_1.png`,\"data-optimize\":`true`,\"data-opv\":`3`,srcset:`https://mintcdn.com/zeotap/N2x6le2iGwMeelJt/articles/integrate-customer/Storage/integrate-customer/launchdarkly/Dark_access_token_1.png?w=280\u0026fit=max\u0026auto=format\u0026n=N2x6le2iGwMeelJt\u0026q=85\u0026s=70fa9a25378c7b5f413c354a9cdbc4d2 280w, https://mintcdn.com/zeotap/N2x6le2iGwMeelJt/articles/integrate-customer/Storage/integrate-customer/launchdarkly/Dark_access_token_1.png?w=560\u0026fit=max\u0026auto=format\u0026n=N2x6le2iGwMeelJt\u0026q=85\u0026s=5e33bdd58bfd0d96a47de6e9f1700b2c 560w, https://mintcdn.com/zeotap/N2x6le2iGwMeelJt/articles/integrate-customer/Storage/integrate-customer/launchdarkly/Dark_access_token_1.png?w=840\u0026fit=max\u0026auto=format\u0026n=N2x6le2iGwMeelJt\u0026q=85\u0026s=4b41b90d1c4d6e28ee15411c8bcab25e 840w, https://mintcdn.com/zeotap/N2x6le2iGwMeelJt/articles/integrate-customer/Storage/integrate-customer/launchdarkly/Dark_access_token_1.png?w=1100\u0026fit=max\u0026auto=format\u0026n=N2x6le2iGwMeelJt\u0026q=85\u0026s=7e87d3c692757c6cd11a945d5b46c036 1100w, https://mintcdn.com/zeotap/N2x6le2iGwMeelJt/articles/integrate-customer/Storage/integrate-customer/launchdarkly/Dark_access_token_1.png?w=1650\u0026fit=max\u0026auto=format\u0026n=N2x6le2iGwMeelJt\u0026q=85\u0026s=e788b9471a1c31069a2e0cc83424e8b2 1650w, https://mintcdn.com/zeotap/N2x6le2iGwMeelJt/articles/integrate-customer/Storage/integrate-customer/launchdarkly/Dark_access_token_1.png?w=2500\u0026fit=max\u0026auto=format\u0026n=N2x6le2iGwMeelJt\u0026q=85\u0026s=79f3a0519f059b67fe7000c49d02adb7 2500w`})})]}),_jsxs(Step,{children:[_jsxs(_components.p,{children:[`In the `,_jsx(_components.strong,{children:`Create access token`}),` window that appears, provide the following details:`]}),_jsxs(_components.p,{children:[`a. Enter a `,_jsx(_components.strong,{children:`Name`}),` for your access token.`]}),_jsxs(_components.p,{children:[`b. Choose `,_jsx(_components.strong,{children:`Writer`}),` as the `,_jsx(_components.strong,{children:`Role`}),` for the token from the drop-down menu.`]}),_jsxs(_components.p,{children:[`c. Choose the `,_jsx(_components.strong,{children:`API version`}),` for the token from the drop-down menu. By default, API requests you send using this token use this API version. For how API versioning works in LaunchDarkly, see LaunchDarkly’s own `,_jsx(_components.a,{href:`https://apidocs.launchdarkly.com/#section/Overview/Versioning`,children:`Versioning documentation`}),`.`]}),_jsxs(_components.p,{children:[`d. If you are an Enterprise customer, select the `,_jsx(_components.strong,{children:`This is a service token`}),` checkbox if you want to create a service token.`]}),_jsx(Frame,{caption:`The Create access token dialog, with the Name, Role and API version fields and the service token checkbox`,children:_jsx(OptimizedImage,{src:`https://mintcdn.com/zeotap/N2x6le2iGwMeelJt/articles/integrate-customer/Storage/integrate-customer/launchdarkly/dark_access_token_2.png?fit=max\u0026auto=format\u0026n=N2x6le2iGwMeelJt\u0026q=85\u0026s=41a2fd425960c4d57a591ebc34ff68f3`,alt:`LaunchDarkly Create access token dialog showing a Name field containing the placeholder entry test, a Role drop-down set to Writer, an API version drop-down, a This is a service token checkbox with explanatory text, and a Save token button`,\"data-og-width\":`1506`,width:`1506`,\"data-og-height\":`1256`,height:`1256`,\"data-path\":`articles/integrate-customer/Storage/integrate-customer/launchdarkly/dark_access_token_2.png`,\"data-optimize\":`true`,\"data-opv\":`3`,srcset:`https://mintcdn.com/zeotap/N2x6le2iGwMeelJt/articles/integrate-customer/Storage/integrate-customer/launchdarkly/dark_access_token_2.png?w=280\u0026fit=max\u0026auto=format\u0026n=N2x6le2iGwMeelJt\u0026q=85\u0026s=1ec1fac7a89e09f56f75c4056bcbe0fe 280w, https://mintcdn.com/zeotap/N2x6le2iGwMeelJt/articles/integrate-customer/Storage/integrate-customer/launchdarkly/dark_access_token_2.png?w=560\u0026fit=max\u0026auto=format\u0026n=N2x6le2iGwMeelJt\u0026q=85\u0026s=0a9c69d0f40226922cbb030605109bb6 560w, https://mintcdn.com/zeotap/N2x6le2iGwMeelJt/articles/integrate-customer/Storage/integrate-customer/launchdarkly/dark_access_token_2.png?w=840\u0026fit=max\u0026auto=format\u0026n=N2x6le2iGwMeelJt\u0026q=85\u0026s=96759b6bf58ec01f892451ae53704407 840w, https://mintcdn.com/zeotap/N2x6le2iGwMeelJt/articles/integrate-customer/Storage/integrate-customer/launchdarkly/dark_access_token_2.png?w=1100\u0026fit=max\u0026auto=format\u0026n=N2x6le2iGwMeelJt\u0026q=85\u0026s=2b456f35333f87b8ee519861d0675dc5 1100w, https://mintcdn.com/zeotap/N2x6le2iGwMeelJt/articles/integrate-customer/Storage/integrate-customer/launchdarkly/dark_access_token_2.png?w=1650\u0026fit=max\u0026auto=format\u0026n=N2x6le2iGwMeelJt\u0026q=85\u0026s=681f87bad7819118f4477db44f7ca073 1650w, https://mintcdn.com/zeotap/N2x6le2iGwMeelJt/articles/integrate-customer/Storage/integrate-customer/launchdarkly/dark_access_token_2.png?w=2500\u0026fit=max\u0026auto=format\u0026n=N2x6le2iGwMeelJt\u0026q=85\u0026s=78c25d21ce6e95c74918f5a12ee1906a 2500w`})})]}),_jsxs(Step,{children:[_jsxs(_components.p,{children:[`Review the details and click `,_jsx(_components.strong,{children:`Save token`}),`. The new token is listed on the `,_jsx(_components.strong,{children:`Authorization`}),` page.`]}),_jsxs(_components.p,{children:[`Copy the token and store it somewhere safe now — LaunchDarkly hides the value once you leave the page, and you enter it in the `,_jsx(_components.strong,{children:`Access Token`}),` field when you create the destination in Zeotap CDP. If you lose it, create a replacement token rather than trying to read the old one back.`]}),_jsx(Frame,{caption:`The Access tokens list after saving, with the new token's Copy and save this token callout`,children:_jsx(OptimizedImage,{src:`https://mintcdn.com/zeotap/N2x6le2iGwMeelJt/articles/integrate-customer/Storage/integrate-customer/launchdarkly/dark_launchly_access_token_3_(1).png?fit=max\u0026auto=format\u0026n=N2x6le2iGwMeelJt\u0026q=85\u0026s=e643cfaed57d2abe61630b51e6049653`,alt:`LaunchDarkly Access tokens list showing three service token rows, each carrying the Writer role and a Created by you creator, with the newest row highlighted and a Copy and save this token callout below it warning that the token is hidden after you leave the page`,\"data-og-width\":`2436`,width:`2436`,\"data-og-height\":`996`,height:`996`,\"data-path\":`articles/integrate-customer/Storage/integrate-customer/launchdarkly/dark_launchly_access_token_3_(1).png`,\"data-optimize\":`true`,\"data-opv\":`3`,srcset:`https://mintcdn.com/zeotap/N2x6le2iGwMeelJt/articles/integrate-customer/Storage/integrate-customer/launchdarkly/dark_launchly_access_token_3_(1).png?w=280\u0026fit=max\u0026auto=format\u0026n=N2x6le2iGwMeelJt\u0026q=85\u0026s=58e3ea76d402a5c7b62e1425f2ff2ca0 280w, https://mintcdn.com/zeotap/N2x6le2iGwMeelJt/articles/integrate-customer/Storage/integrate-customer/launchdarkly/dark_launchly_access_token_3_(1).png?w=560\u0026fit=max\u0026auto=format\u0026n=N2x6le2iGwMeelJt\u0026q=85\u0026s=523e5d43b53709e6868d97b6574213ca 560w, https://mintcdn.com/zeotap/N2x6le2iGwMeelJt/articles/integrate-customer/Storage/integrate-customer/launchdarkly/dark_launchly_access_token_3_(1).png?w=840\u0026fit=max\u0026auto=format\u0026n=N2x6le2iGwMeelJt\u0026q=85\u0026s=382be508e250216a47dfd79ab60252b7 840w, https://mintcdn.com/zeotap/N2x6le2iGwMeelJt/articles/integrate-customer/Storage/integrate-customer/launchdarkly/dark_launchly_access_token_3_(1).png?w=1100\u0026fit=max\u0026auto=format\u0026n=N2x6le2iGwMeelJt\u0026q=85\u0026s=a8f1ed924e1bbccd97296087dff65266 1100w, https://mintcdn.com/zeotap/N2x6le2iGwMeelJt/articles/integrate-customer/Storage/integrate-customer/launchdarkly/dark_launchly_access_token_3_(1).png?w=1650\u0026fit=max\u0026auto=format\u0026n=N2x6le2iGwMeelJt\u0026q=85\u0026s=15dff0d0213ed36f22f9eae611b82b9b 1650w, https://mintcdn.com/zeotap/N2x6le2iGwMeelJt/articles/integrate-customer/Storage/integrate-customer/launchdarkly/dark_launchly_access_token_3_(1).png?w=2500\u0026fit=max\u0026auto=format\u0026n=N2x6le2iGwMeelJt\u0026q=85\u0026s=9b8646ae36bd7bd573e81473f4b4ac07 2500w`})})]})]}),`\n`,_jsx(Heading,{level:`3`,id:`client-side-id`,children:`Client-side ID`}),`\n`,_jsx(_components.p,{children:`The Client-side ID identifies one environment of one LaunchDarkly project, so the value you copy decides which environment your audiences land in. Obtain it as follows.`}),`\n`,_jsxs(Steps,{children:[_jsx(Step,{children:_jsxs(_components.p,{children:[`Log into your LaunchDarkly account and navigate to `,_jsx(_components.strong,{children:`Settings → All projects`}),`.`]})}),_jsxs(Step,{children:[_jsxs(_components.p,{children:[`Select the project you want to link to Zeotap CDP. It opens on `,_jsx(_components.strong,{children:`All environments`}),`.`]}),_jsx(Frame,{caption:`The LaunchDarkly project list, reached from Settings`,children:_jsx(OptimizedImage,{src:`https://mintcdn.com/zeotap/N2x6le2iGwMeelJt/articles/integrate-customer/Storage/integrate-customer/launchdarkly/launch_darkly_client_side_id_1.png?fit=max\u0026auto=format\u0026n=N2x6le2iGwMeelJt\u0026q=85\u0026s=77bbc95dca3c2a47bd49875b5a9cfee5`,alt:`The LaunchDarkly project list, showing a projects table with Name, Tags and Environments columns and one project row`,\"data-og-width\":`3010`,width:`3010`,\"data-og-height\":`1348`,height:`1348`,\"data-path\":`articles/integrate-customer/Storage/integrate-customer/launchdarkly/launch_darkly_client_side_id_1.png`,\"data-optimize\":`true`,\"data-opv\":`3`,srcset:`https://mintcdn.com/zeotap/N2x6le2iGwMeelJt/articles/integrate-customer/Storage/integrate-customer/launchdarkly/launch_darkly_client_side_id_1.png?w=280\u0026fit=max\u0026auto=format\u0026n=N2x6le2iGwMeelJt\u0026q=85\u0026s=e4d77b76d0d15d016108f44e97e3781b 280w, https://mintcdn.com/zeotap/N2x6le2iGwMeelJt/articles/integrate-customer/Storage/integrate-customer/launchdarkly/launch_darkly_client_side_id_1.png?w=560\u0026fit=max\u0026auto=format\u0026n=N2x6le2iGwMeelJt\u0026q=85\u0026s=bf21ede3ef928e20dcfaa54ac2b5e065 560w, https://mintcdn.com/zeotap/N2x6le2iGwMeelJt/articles/integrate-customer/Storage/integrate-customer/launchdarkly/launch_darkly_client_side_id_1.png?w=840\u0026fit=max\u0026auto=format\u0026n=N2x6le2iGwMeelJt\u0026q=85\u0026s=1ce93ebe6db51bdf445abfa75c922c1f 840w, https://mintcdn.com/zeotap/N2x6le2iGwMeelJt/articles/integrate-customer/Storage/integrate-customer/launchdarkly/launch_darkly_client_side_id_1.png?w=1100\u0026fit=max\u0026auto=format\u0026n=N2x6le2iGwMeelJt\u0026q=85\u0026s=ec7017491d85fb53bd7cdd653d4b5714 1100w, https://mintcdn.com/zeotap/N2x6le2iGwMeelJt/articles/integrate-customer/Storage/integrate-customer/launchdarkly/launch_darkly_client_side_id_1.png?w=1650\u0026fit=max\u0026auto=format\u0026n=N2x6le2iGwMeelJt\u0026q=85\u0026s=c4e519c53ac9439d39934ccfb4e9e12e 1650w, https://mintcdn.com/zeotap/N2x6le2iGwMeelJt/articles/integrate-customer/Storage/integrate-customer/launchdarkly/launch_darkly_client_side_id_1.png?w=2500\u0026fit=max\u0026auto=format\u0026n=N2x6le2iGwMeelJt\u0026q=85\u0026s=881e6d2517efd36828174998799124a5 2500w`})})]}),_jsxs(Step,{children:[_jsxs(_components.p,{children:[`Click the `,_jsx(_components.strong,{children:`…`}),` menu next to the environment you want to link with Zeotap CDP, select `,_jsx(_components.strong,{children:`View SDK keys`}),`, and copy the value under `,_jsx(_components.strong,{children:`Client-side IDs`}),`. You enter it in the `,_jsx(_components.strong,{children:`Client Side ID`}),` field when you create the destination.`]}),_jsx(Frame,{caption:`The SDK keys page of a LaunchDarkly environment, with the Client-side IDs section at the top`,children:_jsx(OptimizedImage,{src:`https://mintcdn.com/zeotap/uk9W2o5jwT8Od0S5/articles/integrate-customer/Storage/integrate-customer/launchdarkly/launchdarkly-sdk-keys-2026-10-30.png?fit=max\u0026auto=format\u0026n=uk9W2o5jwT8Od0S5\u0026q=85\u0026s=e47a68e84bc734890bbb92b43e2040c3`,alt:`The LaunchDarkly SDK keys page for the Production environment, reached from Settings, showing a Client-side IDs section above the SDK keys and Mobile keys sections, with the client-side ID value redacted`,\"data-og-width\":`1366`,width:`1366`,\"data-og-height\":`900`,height:`900`,\"data-path\":`articles/integrate-customer/Storage/integrate-customer/launchdarkly/launchdarkly-sdk-keys-2026-10-30.png`,\"data-optimize\":`true`,\"data-opv\":`3`,srcset:`https://mintcdn.com/zeotap/uk9W2o5jwT8Od0S5/articles/integrate-customer/Storage/integrate-customer/launchdarkly/launchdarkly-sdk-keys-2026-10-30.png?w=280\u0026fit=max\u0026auto=format\u0026n=uk9W2o5jwT8Od0S5\u0026q=85\u0026s=976f1635463902887c1d2f3e3aff90ac 280w, https://mintcdn.com/zeotap/uk9W2o5jwT8Od0S5/articles/integrate-customer/Storage/integrate-customer/launchdarkly/launchdarkly-sdk-keys-2026-10-30.png?w=560\u0026fit=max\u0026auto=format\u0026n=uk9W2o5jwT8Od0S5\u0026q=85\u0026s=86a01302e26c5e44d9ed22ee5a198dd6 560w, https://mintcdn.com/zeotap/uk9W2o5jwT8Od0S5/articles/integrate-customer/Storage/integrate-customer/launchdarkly/launchdarkly-sdk-keys-2026-10-30.png?w=840\u0026fit=max\u0026auto=format\u0026n=uk9W2o5jwT8Od0S5\u0026q=85\u0026s=c480550e39b338288c39ab61c17e0558 840w, https://mintcdn.com/zeotap/uk9W2o5jwT8Od0S5/articles/integrate-customer/Storage/integrate-customer/launchdarkly/launchdarkly-sdk-keys-2026-10-30.png?w=1100\u0026fit=max\u0026auto=format\u0026n=uk9W2o5jwT8Od0S5\u0026q=85\u0026s=c181a2c35741b6041cc99661a0b2bd79 1100w, https://mintcdn.com/zeotap/uk9W2o5jwT8Od0S5/articles/integrate-customer/Storage/integrate-customer/launchdarkly/launchdarkly-sdk-keys-2026-10-30.png?w=1650\u0026fit=max\u0026auto=format\u0026n=uk9W2o5jwT8Od0S5\u0026q=85\u0026s=6f4ec3300875a4b6679902c447defd52 1650w, https://mintcdn.com/zeotap/uk9W2o5jwT8Od0S5/articles/integrate-customer/Storage/integrate-customer/launchdarkly/launchdarkly-sdk-keys-2026-10-30.png?w=2500\u0026fit=max\u0026auto=format\u0026n=uk9W2o5jwT8Od0S5\u0026q=85\u0026s=257c7b06e132adf8e9738576e0e6f7f1 2500w`})})]})]}),`\n`,_jsx(Note,{children:_jsx(_components.p,{children:`A project can hold several environments, and each one has its own Client-side ID. Copy the ID of the environment whose feature flags you intend to target — a production audience sent with a test environment’s ID will only ever appear in that test environment.`})}),`\n`,_jsx(Heading,{level:`2`,id:`create-the-launchdarkly-destination`,children:`Create the LaunchDarkly destination`}),`\n`,_jsxs(Steps,{children:[_jsx(Step,{children:_jsxs(_components.p,{children:[`Log in to the Zeotap CDP app and go to `,_jsx(_components.strong,{children:`Integrate → Destinations`}),`.`]})}),_jsxs(Step,{children:[_jsxs(_components.p,{children:[`Click `,_jsx(_components.strong,{children:`+ Create Destination`}),`.`]}),_jsx(Frame,{caption:`The Zeotap CDP Destinations listing, with Create Destination highlighted`,children:_jsx(OptimizedImage,{src:`https://mintcdn.com/zeotap/sBMx_EDYCwiX_b1v/articles/integrate-customer/Storage/integrate-customer/rtb-house/RTB_H1.png?fit=max\u0026auto=format\u0026n=sBMx_EDYCwiX_b1v\u0026q=85\u0026s=989bf48b86088d10e9d6c3b3b8bc0448`,alt:`Zeotap CDP Integrate Destinations screen listing existing destinations in a table, with the Create Destination button highlighted at the top right`,\"data-og-width\":`2848`,width:`2848`,\"data-og-height\":`1078`,height:`1078`,\"data-path\":`articles/integrate-customer/Storage/integrate-customer/rtb-house/RTB_H1.png`,\"data-optimize\":`true`,\"data-opv\":`3`,srcset:`https://mintcdn.com/zeotap/sBMx_EDYCwiX_b1v/articles/integrate-customer/Storage/integrate-customer/rtb-house/RTB_H1.png?w=280\u0026fit=max\u0026auto=format\u0026n=sBMx_EDYCwiX_b1v\u0026q=85\u0026s=5eb74b2459c362285df23229c49eff12 280w, https://mintcdn.com/zeotap/sBMx_EDYCwiX_b1v/articles/integrate-customer/Storage/integrate-customer/rtb-house/RTB_H1.png?w=560\u0026fit=max\u0026auto=format\u0026n=sBMx_EDYCwiX_b1v\u0026q=85\u0026s=1a7ea6433da1b538de8b3d2b8fa911bd 560w, https://mintcdn.com/zeotap/sBMx_EDYCwiX_b1v/articles/integrate-customer/Storage/integrate-customer/rtb-house/RTB_H1.png?w=840\u0026fit=max\u0026auto=format\u0026n=sBMx_EDYCwiX_b1v\u0026q=85\u0026s=4b790fc5b4da59c0dccb4d2aa3820261 840w, https://mintcdn.com/zeotap/sBMx_EDYCwiX_b1v/articles/integrate-customer/Storage/integrate-customer/rtb-house/RTB_H1.png?w=1100\u0026fit=max\u0026auto=format\u0026n=sBMx_EDYCwiX_b1v\u0026q=85\u0026s=e6d26bb4fb9393c0fa84210fd5b86db9 1100w, https://mintcdn.com/zeotap/sBMx_EDYCwiX_b1v/articles/integrate-customer/Storage/integrate-customer/rtb-house/RTB_H1.png?w=1650\u0026fit=max\u0026auto=format\u0026n=sBMx_EDYCwiX_b1v\u0026q=85\u0026s=389b91831ab114c1cbd4623e06cf6939 1650w, https://mintcdn.com/zeotap/sBMx_EDYCwiX_b1v/articles/integrate-customer/Storage/integrate-customer/rtb-house/RTB_H1.png?w=2500\u0026fit=max\u0026auto=format\u0026n=sBMx_EDYCwiX_b1v\u0026q=85\u0026s=be1d98589650a5af8abed10e6b8fa974 2500w`})})]}),_jsxs(Step,{children:[_jsxs(_components.p,{children:[`Under `,_jsx(_components.strong,{children:`All Destinations`}),`, search for `,_jsx(_components.strong,{children:`Launch Darkly`}),`.`]}),_jsx(Frame,{caption:`The All Destinations catalogue, with the Search for a Destination box highlighted`,children:_jsx(OptimizedImage,{src:`https://mintcdn.com/zeotap/eToLLIFlmf1QY4Al/articles/integrate-customer/Storage/integrate-customer/rtb-house/RTB_H2.png?fit=max\u0026auto=format\u0026n=eToLLIFlmf1QY4Al\u0026q=85\u0026s=4c1d1c71f84cc22f0a9975e76200c682`,alt:`Zeotap CDP All Destinations catalogue with the Search for a Destination box highlighted above a grid of destination tiles`,\"data-og-width\":`2848`,width:`2848`,\"data-og-height\":`1078`,height:`1078`,\"data-path\":`articles/integrate-customer/Storage/integrate-customer/rtb-house/RTB_H2.png`,\"data-optimize\":`true`,\"data-opv\":`3`,srcset:`https://mintcdn.com/zeotap/eToLLIFlmf1QY4Al/articles/integrate-customer/Storage/integrate-customer/rtb-house/RTB_H2.png?w=280\u0026fit=max\u0026auto=format\u0026n=eToLLIFlmf1QY4Al\u0026q=85\u0026s=223e35184ea65d1a01536d39b264fc22 280w, https://mintcdn.com/zeotap/eToLLIFlmf1QY4Al/articles/integrate-customer/Storage/integrate-customer/rtb-house/RTB_H2.png?w=560\u0026fit=max\u0026auto=format\u0026n=eToLLIFlmf1QY4Al\u0026q=85\u0026s=b290533419209efa86afd2f3dff75dd5 560w, https://mintcdn.com/zeotap/eToLLIFlmf1QY4Al/articles/integrate-customer/Storage/integrate-customer/rtb-house/RTB_H2.png?w=840\u0026fit=max\u0026auto=format\u0026n=eToLLIFlmf1QY4Al\u0026q=85\u0026s=6e7e3fac46ee6fa90e6aebcdacdaafd1 840w, https://mintcdn.com/zeotap/eToLLIFlmf1QY4Al/articles/integrate-customer/Storage/integrate-customer/rtb-house/RTB_H2.png?w=1100\u0026fit=max\u0026auto=format\u0026n=eToLLIFlmf1QY4Al\u0026q=85\u0026s=9dc12c9d9199addf554fe020f8173814 1100w, https://mintcdn.com/zeotap/eToLLIFlmf1QY4Al/articles/integrate-customer/Storage/integrate-customer/rtb-house/RTB_H2.png?w=1650\u0026fit=max\u0026auto=format\u0026n=eToLLIFlmf1QY4Al\u0026q=85\u0026s=63cff6e1c114fce6743ae570da4722aa 1650w, https://mintcdn.com/zeotap/eToLLIFlmf1QY4Al/articles/integrate-customer/Storage/integrate-customer/rtb-house/RTB_H2.png?w=2500\u0026fit=max\u0026auto=format\u0026n=eToLLIFlmf1QY4Al\u0026q=85\u0026s=adb586351bac0de4c472d12f907011e6 2500w`})})]}),_jsxs(Step,{children:[_jsxs(_components.p,{children:[`Click the `,_jsx(_components.strong,{children:`Launch Darkly`}),` tile. A panel describing the destination appears on the left, and the fields the integration needs appear on the right. Enter:`]}),_jsxs(_components.p,{children:[`a. A `,_jsx(_components.strong,{children:`Destination Name`}),`. Choose a name that identifies the LaunchDarkly account and environment it connects to, so the destination is easy to pick out when you link an audience.`]}),_jsxs(_components.p,{children:[`b. The `,_jsx(_components.strong,{children:`Access Token`}),` you created in the `,_jsx(_components.strong,{children:`Authorization`}),` tab of your LaunchDarkly account — see `,_jsx(_components.a,{href:`#access-token`,children:`Access token`}),`.`]}),_jsxs(_components.p,{children:[`c. The `,_jsx(_components.strong,{children:`Client Side ID`}),` of the LaunchDarkly environment you want to send to — see `,_jsx(_components.a,{href:`#client-side-id`,children:`Client-side ID`}),`.`]}),_jsxs(_components.p,{children:[`d. Review the values you entered, then click `,_jsx(_components.strong,{children:`Next`}),`.`]}),_jsx(Frame,{caption:`The Enter Destination Details step for Launch Darkly, with the Destination Name, Access Token and Client Side ID fields`,children:_jsx(OptimizedImage,{src:`https://mintcdn.com/zeotap/N2x6le2iGwMeelJt/articles/integrate-customer/Storage/integrate-customer/launchdarkly/Launchdarkly_11.png?fit=max\u0026auto=format\u0026n=N2x6le2iGwMeelJt\u0026q=85\u0026s=9299a76cfde8d3487326c218be438f09`,alt:`Zeotap CDP Enter Destination Details screen for Launch Darkly, showing Destination Name, Access Token and Client Side ID fields holding placeholder entries, a description panel for the destination on the left, a Destination Details and Mapping progress indicator, and a Next button`,\"data-og-width\":`2802`,width:`2802`,\"data-og-height\":`1282`,height:`1282`,\"data-path\":`articles/integrate-customer/Storage/integrate-customer/launchdarkly/Launchdarkly_11.png`,\"data-optimize\":`true`,\"data-opv\":`3`,srcset:`https://mintcdn.com/zeotap/N2x6le2iGwMeelJt/articles/integrate-customer/Storage/integrate-customer/launchdarkly/Launchdarkly_11.png?w=280\u0026fit=max\u0026auto=format\u0026n=N2x6le2iGwMeelJt\u0026q=85\u0026s=f6a1fe4e5d55c4f36cb292ce81ef9825 280w, https://mintcdn.com/zeotap/N2x6le2iGwMeelJt/articles/integrate-customer/Storage/integrate-customer/launchdarkly/Launchdarkly_11.png?w=560\u0026fit=max\u0026auto=format\u0026n=N2x6le2iGwMeelJt\u0026q=85\u0026s=130d363430ded16f0202b904d9a6b836 560w, https://mintcdn.com/zeotap/N2x6le2iGwMeelJt/articles/integrate-customer/Storage/integrate-customer/launchdarkly/Launchdarkly_11.png?w=840\u0026fit=max\u0026auto=format\u0026n=N2x6le2iGwMeelJt\u0026q=85\u0026s=3d0928048f76f4b3d8cdea8daef0b1bd 840w, https://mintcdn.com/zeotap/N2x6le2iGwMeelJt/articles/integrate-customer/Storage/integrate-customer/launchdarkly/Launchdarkly_11.png?w=1100\u0026fit=max\u0026auto=format\u0026n=N2x6le2iGwMeelJt\u0026q=85\u0026s=1a016b5ae43c779855684db1104f1444 1100w, https://mintcdn.com/zeotap/N2x6le2iGwMeelJt/articles/integrate-customer/Storage/integrate-customer/launchdarkly/Launchdarkly_11.png?w=1650\u0026fit=max\u0026auto=format\u0026n=N2x6le2iGwMeelJt\u0026q=85\u0026s=c636422e530cd984886dab8d1c26f655 1650w, https://mintcdn.com/zeotap/N2x6le2iGwMeelJt/articles/integrate-customer/Storage/integrate-customer/launchdarkly/Launchdarkly_11.png?w=2500\u0026fit=max\u0026auto=format\u0026n=N2x6le2iGwMeelJt\u0026q=85\u0026s=886dd59ec2bb028e3810b6c67323af2c 2500w`})})]}),_jsxs(Step,{children:[_jsxs(_components.p,{children:[`On the `,_jsx(_components.strong,{children:`Mapping`}),` screen, choose the action and the field mapping:`]}),_jsxs(_components.p,{children:[`a. Under `,_jsx(_components.strong,{children:`Choose your Action`}),`, select `,_jsx(_components.strong,{children:`Send Identifiers to Launch Darkly`}),`.`]}),_jsxs(_components.p,{children:[`b. Under `,_jsx(_components.strong,{children:`Map the Fields`}),`, map the Catalogue field that carries the ID to the matching LaunchDarkly destination field — in the capture below, the Catalogue field `,_jsx(_components.strong,{children:`User Id`}),` is mapped to the destination field `,_jsx(_components.strong,{children:`User ID`}),` under `,_jsx(_components.strong,{children:`Identifiers`}),`. The `,_jsx(_components.a,{href:`/articles/segment-customer/choose-the-output-identifiers`,children:`output identifiers`}),` the platform accepts are shown by default, and you can edit, add or remove an identifier from the list; for the rules that govern actions and mappings across every destination, see `,_jsx(_components.a,{href:`/articles/integrate-customer/destinations#define-the-mapping`,children:`Define the mapping`}),`.`]}),_jsx(Frame,{caption:`The Mapping step, with Send Identifiers to Launch Darkly chosen and a Catalogue field mapped to a LaunchDarkly destination field`,children:_jsx(OptimizedImage,{src:`https://mintcdn.com/zeotap/N2x6le2iGwMeelJt/articles/integrate-customer/Storage/integrate-customer/launchdarkly/Lauchdarkly_12.png?fit=max\u0026auto=format\u0026n=N2x6le2iGwMeelJt\u0026q=85\u0026s=c67aae6775fb81c8bb8d0320e82d96db`,alt:`Zeotap CDP Mapping screen with Send Identifiers to Launch Darkly selected under Choose your Action, and a Map the Fields table under an Identifiers heading pairing the Catalogue field User Id with the destination field User ID, above a Create Destination button`,\"data-og-width\":`2802`,width:`2802`,\"data-og-height\":`1282`,height:`1282`,\"data-path\":`articles/integrate-customer/Storage/integrate-customer/launchdarkly/Lauchdarkly_12.png`,\"data-optimize\":`true`,\"data-opv\":`3`,srcset:`https://mintcdn.com/zeotap/N2x6le2iGwMeelJt/articles/integrate-customer/Storage/integrate-customer/launchdarkly/Lauchdarkly_12.png?w=280\u0026fit=max\u0026auto=format\u0026n=N2x6le2iGwMeelJt\u0026q=85\u0026s=40de5e88b7320997be95ce520ede586c 280w, https://mintcdn.com/zeotap/N2x6le2iGwMeelJt/articles/integrate-customer/Storage/integrate-customer/launchdarkly/Lauchdarkly_12.png?w=560\u0026fit=max\u0026auto=format\u0026n=N2x6le2iGwMeelJt\u0026q=85\u0026s=7f768b1af23287a3d75caed459b3a284 560w, https://mintcdn.com/zeotap/N2x6le2iGwMeelJt/articles/integrate-customer/Storage/integrate-customer/launchdarkly/Lauchdarkly_12.png?w=840\u0026fit=max\u0026auto=format\u0026n=N2x6le2iGwMeelJt\u0026q=85\u0026s=0759629442e2357a2324437e76dc5f21 840w, https://mintcdn.com/zeotap/N2x6le2iGwMeelJt/articles/integrate-customer/Storage/integrate-customer/launchdarkly/Lauchdarkly_12.png?w=1100\u0026fit=max\u0026auto=format\u0026n=N2x6le2iGwMeelJt\u0026q=85\u0026s=61f067180be8c90c6ee8a0e90241bf8b 1100w, https://mintcdn.com/zeotap/N2x6le2iGwMeelJt/articles/integrate-customer/Storage/integrate-customer/launchdarkly/Lauchdarkly_12.png?w=1650\u0026fit=max\u0026auto=format\u0026n=N2x6le2iGwMeelJt\u0026q=85\u0026s=9dd8ecd5791baf7f715d72e5dbb1134f 1650w, https://mintcdn.com/zeotap/N2x6le2iGwMeelJt/articles/integrate-customer/Storage/integrate-customer/launchdarkly/Lauchdarkly_12.png?w=2500\u0026fit=max\u0026auto=format\u0026n=N2x6le2iGwMeelJt\u0026q=85\u0026s=316fdbdc564c3d3502fcf0a0e2b4fb00 2500w`})})]}),_jsx(Step,{children:_jsxs(_components.p,{children:[`Click `,_jsx(_components.strong,{children:`Create Destination`}),`. The destination is then listed in the `,_jsx(_components.strong,{children:`Audiences`}),` application, ready to be linked to an audience.`]})})]}),`\n`,_jsxs(_components.p,{children:[`For the two entry points into destination configuration and what each part of the configuration does, see `,_jsx(_components.a,{href:`/articles/integrate-customer/destinations#configure-a-destination`,children:`Configure a destination`}),`.`]}),`\n`,_jsx(Heading,{level:`2`,id:`link-an-audience-to-the-destination`,children:`Link an audience to the destination`}),`\n`,_jsxs(_components.p,{children:[`Once the destination is created, link it to the audience you want to activate from the `,_jsx(_components.strong,{children:`Audiences`}),` application — see `,_jsx(_components.a,{href:`/articles/integrate-customer/link-an-audience-to-the-destination#activate-in-audiences`,children:`Activate in Audiences`}),` for the end-to-end workflow, including refresh frequency and the output identifier mapping.`]}),`\n`,_jsx(Note,{children:_jsxs(_components.p,{children:[`The terms `,_jsx(_components.em,{children:`Audiences`}),` and `,_jsx(_components.em,{children:`Segments`}),` are used interchangeably to refer to customer cohorts belonging to a specific category. For example, an audience or a segment can be a specific group of customers who are over 18 years of age and have performed an `,_jsx(_components.code,{children:`addToCart`}),` event within the last 30 days.`]})}),`\n`,_jsx(Note,{children:_jsx(_components.p,{children:`The destination form notes that segments can take up to two business days to become available on the LaunchDarkly side. Allow for that before treating a missing segment as a failure.`})}),`\n`,_jsx(Heading,{level:`2`,id:`target-the-segment-on-a-feature-flag`,children:`Target the segment on a feature flag`}),`\n`,_jsx(_components.p,{children:`Once an audience has been linked to the destination and the segment has arrived, add a targeting rule in LaunchDarkly so a flag serves a variation to the people in it.`}),`\n`,_jsxs(Steps,{children:[_jsx(Step,{children:_jsxs(_components.p,{children:[`Log into LaunchDarkly and navigate to `,_jsx(_components.strong,{children:`Feature flags`}),`.`]})}),_jsxs(Step,{children:[_jsx(_components.p,{children:`Choose the feature flag you want to target from the list.`}),_jsx(Frame,{caption:`The LaunchDarkly Feature flags list`,children:_jsx(OptimizedImage,{src:`https://mintcdn.com/zeotap/sBMx_EDYCwiX_b1v/articles/integrate-customer/Storage/integrate-customer/rtb-house/view_seg_in_LD_1.png?fit=max\u0026auto=format\u0026n=sBMx_EDYCwiX_b1v\u0026q=85\u0026s=a11753649450aa13fb82b1e7613d39ae`,alt:`LaunchDarkly Feature flags list showing one flag row with its key, creation date, serving variation, targeting-modified date and an on-off toggle, with Feature flags highlighted in the left navigation`,\"data-og-width\":`3020`,width:`3020`,\"data-og-height\":`1692`,height:`1692`,\"data-path\":`articles/integrate-customer/Storage/integrate-customer/rtb-house/view_seg_in_LD_1.png`,\"data-optimize\":`true`,\"data-opv\":`3`,srcset:`https://mintcdn.com/zeotap/sBMx_EDYCwiX_b1v/articles/integrate-customer/Storage/integrate-customer/rtb-house/view_seg_in_LD_1.png?w=280\u0026fit=max\u0026auto=format\u0026n=sBMx_EDYCwiX_b1v\u0026q=85\u0026s=2869d5e0852e1fe2bc10ea2ba129dafe 280w, https://mintcdn.com/zeotap/sBMx_EDYCwiX_b1v/articles/integrate-customer/Storage/integrate-customer/rtb-house/view_seg_in_LD_1.png?w=560\u0026fit=max\u0026auto=format\u0026n=sBMx_EDYCwiX_b1v\u0026q=85\u0026s=d8068bf8edb358521ef62d2309e5d555 560w, https://mintcdn.com/zeotap/sBMx_EDYCwiX_b1v/articles/integrate-customer/Storage/integrate-customer/rtb-house/view_seg_in_LD_1.png?w=840\u0026fit=max\u0026auto=format\u0026n=sBMx_EDYCwiX_b1v\u0026q=85\u0026s=29e0b743dc96ea313a42b02073f3a355 840w, https://mintcdn.com/zeotap/sBMx_EDYCwiX_b1v/articles/integrate-customer/Storage/integrate-customer/rtb-house/view_seg_in_LD_1.png?w=1100\u0026fit=max\u0026auto=format\u0026n=sBMx_EDYCwiX_b1v\u0026q=85\u0026s=df73f44a9c95ccf7cec6490c07c09b21 1100w, https://mintcdn.com/zeotap/sBMx_EDYCwiX_b1v/articles/integrate-customer/Storage/integrate-customer/rtb-house/view_seg_in_LD_1.png?w=1650\u0026fit=max\u0026auto=format\u0026n=sBMx_EDYCwiX_b1v\u0026q=85\u0026s=2cedddf7b99ce79b9af2c75ec9c66b69 1650w, https://mintcdn.com/zeotap/sBMx_EDYCwiX_b1v/articles/integrate-customer/Storage/integrate-customer/rtb-house/view_seg_in_LD_1.png?w=2500\u0026fit=max\u0026auto=format\u0026n=sBMx_EDYCwiX_b1v\u0026q=85\u0026s=542c0fadd174b49c3b8e24a4ef724d3f 2500w`})})]}),_jsxs(Step,{children:[_jsxs(_components.p,{children:[`On the flag’s `,_jsx(_components.strong,{children:`Targeting`}),` tab, click the `,_jsx(_components.strong,{children:`Add rule`}),` drop-down and choose `,_jsx(_components.strong,{children:`Target segments`}),`. This creates a new rule section.`]}),_jsx(Frame,{caption:`The Add rule drop-down on a flag's Targeting tab, with Target segments highlighted`,children:_jsx(OptimizedImage,{src:`https://mintcdn.com/zeotap/sBMx_EDYCwiX_b1v/articles/integrate-customer/Storage/integrate-customer/rtb-house/view_seg_in_LD_2.png?fit=max\u0026auto=format\u0026n=sBMx_EDYCwiX_b1v\u0026q=85\u0026s=ecb13a11fe0125febef268bc2a125926`,alt:`LaunchDarkly flag Targeting tab with the Add rule drop-down open, listing Target segments, Target individuals, Target mobile, Build a custom rule and Set prerequisites, with Target segments highlighted above an existing rule and the Default rule section`,\"data-og-width\":`3016`,width:`3016`,\"data-og-height\":`1710`,height:`1710`,\"data-path\":`articles/integrate-customer/Storage/integrate-customer/rtb-house/view_seg_in_LD_2.png`,\"data-optimize\":`true`,\"data-opv\":`3`,srcset:`https://mintcdn.com/zeotap/sBMx_EDYCwiX_b1v/articles/integrate-customer/Storage/integrate-customer/rtb-house/view_seg_in_LD_2.png?w=280\u0026fit=max\u0026auto=format\u0026n=sBMx_EDYCwiX_b1v\u0026q=85\u0026s=b03d4bba6942af368012bbf70134b57f 280w, https://mintcdn.com/zeotap/sBMx_EDYCwiX_b1v/articles/integrate-customer/Storage/integrate-customer/rtb-house/view_seg_in_LD_2.png?w=560\u0026fit=max\u0026auto=format\u0026n=sBMx_EDYCwiX_b1v\u0026q=85\u0026s=c9165612a429da750ba27d134eb18f17 560w, https://mintcdn.com/zeotap/sBMx_EDYCwiX_b1v/articles/integrate-customer/Storage/integrate-customer/rtb-house/view_seg_in_LD_2.png?w=840\u0026fit=max\u0026auto=format\u0026n=sBMx_EDYCwiX_b1v\u0026q=85\u0026s=3f89ec3436a3ea4194da9e1b96cb9083 840w, https://mintcdn.com/zeotap/sBMx_EDYCwiX_b1v/articles/integrate-customer/Storage/integrate-customer/rtb-house/view_seg_in_LD_2.png?w=1100\u0026fit=max\u0026auto=format\u0026n=sBMx_EDYCwiX_b1v\u0026q=85\u0026s=fb864a1a46e195557f6d4adfc632b0ab 1100w, https://mintcdn.com/zeotap/sBMx_EDYCwiX_b1v/articles/integrate-customer/Storage/integrate-customer/rtb-house/view_seg_in_LD_2.png?w=1650\u0026fit=max\u0026auto=format\u0026n=sBMx_EDYCwiX_b1v\u0026q=85\u0026s=71d7e66950a891bd8119cb6453021aea 1650w, https://mintcdn.com/zeotap/sBMx_EDYCwiX_b1v/articles/integrate-customer/Storage/integrate-customer/rtb-house/view_seg_in_LD_2.png?w=2500\u0026fit=max\u0026auto=format\u0026n=sBMx_EDYCwiX_b1v\u0026q=85\u0026s=5d9ea9dbc98375cfb7fc7ce995392a2f 2500w`})})]}),_jsxs(Step,{children:[_jsxs(_components.p,{children:[`In the new rule, open the `,_jsx(_components.strong,{children:`Segments`}),` drop-down to see the audiences pushed from Zeotap CDP.`]}),_jsx(Note,{children:_jsx(_components.p,{children:`A Zeotap CDP audience only appears in this list once the LaunchDarkly destination has been created and linked to at least one audience.`})})]}),_jsxs(Step,{children:[_jsx(_components.p,{children:`Choose the audience you want the flag to apply to, set the variation the rule serves, and save the flag.`}),_jsx(Frame,{caption:`The Segments drop-down on a targeting rule, listing the segments available to the flag`,children:_jsx(OptimizedImage,{src:`https://mintcdn.com/zeotap/sBMx_EDYCwiX_b1v/articles/integrate-customer/Storage/integrate-customer/rtb-house/view_seg_in_LD_3.png?fit=max\u0026auto=format\u0026n=sBMx_EDYCwiX_b1v\u0026q=85\u0026s=bc9f2c9980d87bef0280db26f27b7c5f`,alt:`LaunchDarkly flag targeting rule with a Context is in Segment condition above a second rule whose Segments drop-down is open, showing a Most targeted segments group and a Recently updated segments group listing several named segments with their last-modified dates`,\"data-og-width\":`3020`,width:`3020`,\"data-og-height\":`1718`,height:`1718`,\"data-path\":`articles/integrate-customer/Storage/integrate-customer/rtb-house/view_seg_in_LD_3.png`,\"data-optimize\":`true`,\"data-opv\":`3`,srcset:`https://mintcdn.com/zeotap/sBMx_EDYCwiX_b1v/articles/integrate-customer/Storage/integrate-customer/rtb-house/view_seg_in_LD_3.png?w=280\u0026fit=max\u0026auto=format\u0026n=sBMx_EDYCwiX_b1v\u0026q=85\u0026s=729ee9982aca7d010635cd25dd2d9747 280w, https://mintcdn.com/zeotap/sBMx_EDYCwiX_b1v/articles/integrate-customer/Storage/integrate-customer/rtb-house/view_seg_in_LD_3.png?w=560\u0026fit=max\u0026auto=format\u0026n=sBMx_EDYCwiX_b1v\u0026q=85\u0026s=c281d2324ac59505e54e3ff8285a5e50 560w, https://mintcdn.com/zeotap/sBMx_EDYCwiX_b1v/articles/integrate-customer/Storage/integrate-customer/rtb-house/view_seg_in_LD_3.png?w=840\u0026fit=max\u0026auto=format\u0026n=sBMx_EDYCwiX_b1v\u0026q=85\u0026s=72ae08d18c6ad598424b22e508e4a977 840w, https://mintcdn.com/zeotap/sBMx_EDYCwiX_b1v/articles/integrate-customer/Storage/integrate-customer/rtb-house/view_seg_in_LD_3.png?w=1100\u0026fit=max\u0026auto=format\u0026n=sBMx_EDYCwiX_b1v\u0026q=85\u0026s=6b69b8d962717f28572689c95cf996c2 1100w, https://mintcdn.com/zeotap/sBMx_EDYCwiX_b1v/articles/integrate-customer/Storage/integrate-customer/rtb-house/view_seg_in_LD_3.png?w=1650\u0026fit=max\u0026auto=format\u0026n=sBMx_EDYCwiX_b1v\u0026q=85\u0026s=bff9a97e7215184fe85458071a115aa3 1650w, https://mintcdn.com/zeotap/sBMx_EDYCwiX_b1v/articles/integrate-customer/Storage/integrate-customer/rtb-house/view_seg_in_LD_3.png?w=2500\u0026fit=max\u0026auto=format\u0026n=sBMx_EDYCwiX_b1v\u0026q=85\u0026s=2a4931d43535668a9efdf85e40487d80 2500w`})})]})]}),`\n`,_jsx(Heading,{level:`2`,id:`verify-the-audience-reached-launchdarkly`,children:`Verify the audience reached LaunchDarkly`}),`\n`,_jsx(_components.p,{children:`Check both sides after the first refresh has run.`}),`\n`,_jsxs(_components.ol,{children:[`\n`,_jsxs(_components.li,{children:[_jsx(_components.strong,{children:`In Zeotap CDP`}),` — open the audience–destination pair in the `,_jsx(_components.strong,{children:`Audiences`}),` application and confirm the run has completed with a non-zero qualified count. For what the statuses mean across destinations, see `,_jsx(_components.a,{href:`/articles/integrate-customer/destinations#verify-the-activation-worked`,children:`Verify the activation worked`}),`.`]}),`\n`,_jsxs(_components.li,{children:[_jsx(_components.strong,{children:`In LaunchDarkly`}),` — open a feature flag in the target environment, add or edit a rule that targets segments, and confirm the audience is listed in the `,_jsx(_components.strong,{children:`Segments`}),` drop-down. The list groups the most targeted segments above the recently updated ones, with the date each was last modified, so you can tell a fresh delivery from a stale one.`]}),`\n`]}),`\n`,_jsx(_components.p,{children:`Allow up to two business days between a successful Zeotap CDP run and the segment appearing in LaunchDarkly.`}),`\n`,_jsx(Heading,{level:`2`,id:`troubleshoot-the-launchdarkly-destination`,children:`Troubleshoot the LaunchDarkly destination`}),`\n`,_jsxs(Table,{children:[_jsx(_components.thead,{children:_jsxs(_components.tr,{children:[_jsx(_components.th,{children:`Symptom`}),_jsx(_components.th,{children:`What it means`}),_jsx(_components.th,{children:`What to do`})]})}),_jsxs(_components.tbody,{children:[_jsxs(_components.tr,{children:[_jsxs(_components.td,{children:[`The audience does not appear in the `,_jsx(_components.strong,{children:`Segments`}),` drop-down`]}),_jsx(_components.td,{children:`The destination has not been linked to an audience yet, or the delivery has not surfaced on the LaunchDarkly side`}),_jsxs(_components.td,{children:[`Confirm the destination is linked to at least one audience in the `,_jsx(_components.strong,{children:`Audiences`}),` application and that the run completed, then allow up to two business days before treating it as a failure`]})]}),_jsxs(_components.tr,{children:[_jsx(_components.td,{children:`The segment appears in a different LaunchDarkly environment from the one you are looking at`}),_jsxs(_components.td,{children:[`The `,_jsx(_components.strong,{children:`Client Side ID`}),` on the destination belongs to another environment of the project — each environment has its own`]}),_jsxs(_components.td,{children:[`Re-read the `,_jsx(_components.strong,{children:`Client-side ID`}),` under `,_jsx(_components.strong,{children:`View SDK keys`}),` for the environment you intend to target, and correct it on the destination`]})]}),_jsxs(_components.tr,{children:[_jsx(_components.td,{children:`The destination fails to authenticate`}),_jsxs(_components.td,{children:[`The access token recorded on the destination is no longer valid — it may have been deleted or replaced in `,_jsx(_components.strong,{children:`Settings → Authorization`})]}),_jsxs(_components.td,{children:[`Create a new token with the `,_jsx(_components.strong,{children:`Writer`}),` role, copy it at creation time, and update the `,_jsx(_components.strong,{children:`Access Token`}),` on the destination. LaunchDarkly hides a token’s value after creation, so an old token cannot be read back`]})]}),_jsxs(_components.tr,{children:[_jsx(_components.td,{children:`The run completes but far fewer people are matched than the audience holds`}),_jsx(_components.td,{children:`The Custom ID mapped on the destination is not the ID LaunchDarkly knows those users by`}),_jsx(_components.td,{children:`Review the destination’s mapping and confirm the mapped Catalogue field carries the same ID that is activated within LaunchDarkly`})]}),_jsxs(_components.tr,{children:[_jsx(_components.td,{children:`A change to the audience is not reflected in LaunchDarkly`}),_jsx(_components.td,{children:`Delta upload is not supported on this integration, so changes arrive with the next full refresh rather than immediately`}),_jsxs(_components.td,{children:[`Wait for the next scheduled refresh, or check `,_jsx(_components.a,{href:`/articles/segment-customer/factors-influencing-the-data-upload-time-to-destinations`,children:`what influences upload time to destinations`})]})]})]})]}),`\n`,_jsxs(_components.p,{children:[`For delivery errors that are not specific to LaunchDarkly — no customers qualified, a terminated refresh, a rejected payload — see `,_jsx(_components.a,{href:`/articles/integrate-customer/destinations#why-deliveries-fail`,children:`Why deliveries fail`}),` and `,_jsx(_components.a,{href:`/articles/integrate-customer/destinations#when-to-contact-support`,children:`When to contact support`}),`.`]}),`\n`,_jsx(Heading,{level:`2`,id:`faq`,children:`FAQ`}),`\n`,_jsxs(AccordionGroup,{children:[_jsx(Accordion,{title:`Why are there two LaunchDarkly entries in the destination catalogue?`,id:`why-are-there-two-launchdarkly-entries-in-the-destination-catalogue`,children:_jsxs(_components.p,{children:[`They are two integrations for the same vendor, distinguished by where you activate from. `,_jsx(_components.strong,{children:`LaunchDarkly`}),` — this page — is a batch destination linked to an audience in the `,_jsx(_components.strong,{children:`Audiences`}),` application. `,_jsx(_components.strong,{children:_jsx(_components.a,{href:`/articles/integrate-customer/launchdarkly-real-time-integration`,children:`LaunchDarkly Real Time Integration`})}),` is a real-time destination attached to a `,_jsx(_components.strong,{children:`Send to Destinations`}),` node in a journey. Both send data out of Zeotap CDP to LaunchDarkly.`]})}),_jsx(Accordion,{title:`Which LaunchDarkly environment do my audiences land in?`,id:`which-launchdarkly-environment-do-my-audiences-land-in`,children:_jsxs(_components.p,{children:[`The one whose `,_jsx(_components.strong,{children:`Client-side ID`}),` you entered on the destination. A LaunchDarkly project can hold several environments and each has its own Client-side ID, so the value on the destination decides where the segments appear. To send to more than one environment, create a separate destination for each.`]})}),_jsx(Accordion,{title:`Do I have to create the segment in LaunchDarkly before linking an audience?`,id:`do-i-have-to-create-the-segment-in-launchdarkly-before-linking-an-audience`,children:_jsx(_components.p,{children:`No. Link the audience to the destination and the segment becomes available to target on the LaunchDarkly side; you then add the targeting rule on the flag that should use it.`})}),_jsx(Accordion,{title:`Does this destination support ID extension, delta upload or delete?`,id:`does-this-destination-support-id-extension-delta-upload-or-delete`,children:_jsxs(_components.p,{children:[`No. None of the three is supported on this integration, so each refresh sends the audience as it stands at that moment. See `,_jsx(_components.a,{href:`/articles/segment-customer/delta-upload-and-delete-functions`,children:`Delta upload and delete functions`}),` for the destinations where delta upload and delete are available.`]})}),_jsx(Accordion,{title:`Can one destination serve several audiences?`,id:`can-one-destination-serve-several-audiences`,children:_jsx(_components.p,{children:`Yes. The destination stores the LaunchDarkly credential, the environment and the mapping, so it can be linked to as many audiences as you need. Each audience arrives as its own segment and can be targeted by a different flag.`})})]}),`\n`,_jsx(Heading,{level:`2`,id:`next-steps`,children:`Next steps`}),`\n`,_jsxs(_components.ul,{children:[`\n`,_jsx(_components.li,{children:_jsx(_components.a,{href:`/articles/integrate-customer/launchdarkly-real-time-integration`,children:`Set up the real-time LaunchDarkly destination →`})}),`\n`,_jsx(_components.li,{children:_jsx(_components.a,{href:`/articles/integrate-customer/link-an-audience-to-the-destination#activate-in-audiences`,children:`Link the audience to the destination →`})}),`\n`,_jsx(_components.li,{children:_jsx(_components.a,{href:`/articles/integrate-customer/destinations`,children:`Review how destinations, actions and mappings fit together →`})}),`\n`,_jsx(_components.li,{children:_jsx(_components.a,{href:`/articles/segment-customer/create-an-audience`,children:`Build the audience that feeds this destination →`})}),`\n`,_jsx(_components.li,{children:_jsx(_components.a,{href:`/articles/segment-customer/factors-influencing-the-data-upload-time-to-destinations`,children:`Check what influences upload time to destinations →`})}),`\n`]})]})}function MDXContent(props={}){const{wrapper:MDXLayout}={..._provideComponents(),...props.components};return MDXLayout?_jsx(MDXLayout,{...props,children:_jsx(_createMdxContent,{...props})}):_createMdxContent(props)}return{default:MDXContent};function _missingMdxReference(id,component){throw new Error(`Expected `+(component?`component`:`object`)+\" `\"+id+\"` to be defined: you likely forgot to import, pass, or provide it.\")}","frontmatter":{},"scope":{"config":{},"pageMetadata":{"title":"LaunchDarkly","description":"Send Zeotap CDP audiences out to LaunchDarkly as segments, so a feature flag can serve a variation to the customers who qualified.","sidebarTitle":"LaunchDarkly","last_validated":"2026-09-29T00:00:00.000Z","href":"/articles/integrate-customer/launchdarkly"}}},"mdxSourceWithNoJs":null},"mdxExtracts":{"tableOfContents":[{"title":"What this is","slug":"what-this-is","depth":2,"children":[]},{"title":"Supported identifiers and actions","slug":"supported-identifiers-and-actions","depth":2,"children":[]},{"title":"Prerequisites","slug":"prerequisites","depth":2,"children":[]},{"title":"Get the LaunchDarkly details you need","slug":"get-the-launchdarkly-details-you-need","depth":2,"children":[{"title":"Access token","slug":"access-token","depth":3,"children":[]},{"title":"Client-side ID","slug":"client-side-id","depth":3,"children":[]}]},{"title":"Create the LaunchDarkly destination","slug":"create-the-launchdarkly-destination","depth":2,"children":[]},{"title":"Link an audience to the destination","slug":"link-an-audience-to-the-destination","depth":2,"children":[]},{"title":"Target the segment on a feature flag","slug":"target-the-segment-on-a-feature-flag","depth":2,"children":[]},{"title":"Verify the audience reached LaunchDarkly","slug":"verify-the-audience-reached-launchdarkly","depth":2,"children":[]},{"title":"Troubleshoot the LaunchDarkly destination","slug":"troubleshoot-the-launchdarkly-destination","depth":2,"children":[]},{"title":"FAQ","slug":"faq","depth":2,"children":[]},{"title":"Next steps","slug":"next-steps","depth":2,"children":[]}],"codeExamples":{}},"jsLinks":["/_mintlify/custom/zeotap/8d1f66bf8eed64a4/scripts/convert-to-mdx.js"],"subdomain":"zeotap","siteName":"Zeotap docs","title":"LaunchDarkly - Zeotap docs","navMaps":{"firstHrefInVersion":{},"firstHrefInLanguage":{}},"lastModified":"2026-11-05T09:25:29.295Z","gitLastModified":"2026-11-05T09:25:17.000Z","originalFileLocation":"articles/integrate-customer/launchdarkly.mdx"},"headHtml":"\u003cscript data-mint-head>(function(){var d=document.documentElement,p=null;if(!p){try{p=localStorage.getItem(\"isDarkMode\")}catch(e){}if(p==='true')p='dark';else if(p==='false')p='light';if(p!=='light'\u0026\u0026p!=='dark'\u0026\u0026p!=='system')p=\"light\"}var r=p==='system'?(matchMedia(\"(prefers-color-scheme: dark)\").matches?'dark':'light'):p;d.classList.remove(r==='dark'?'light':'dark');d.classList.add(r);d.setAttribute(\"data-theme-preference\",p)})();\u003c/script>\u003cmeta data-mint-head name=\"description\" content=\"Send Zeotap CDP audiences out to LaunchDarkly as segments, so a feature flag can serve a variation to the customers who qualified.\">\u003cmeta data-mint-head name=\"application-name\" content=\"Zeotap docs\">\u003cmeta data-mint-head name=\"generator\" content=\"Mintlify\">\u003clink data-mint-head rel=\"icon\" type=\"image/png\" sizes=\"192x192\" href=\"/mintlify-assets/_mintlify/favicons/zeotap/dSUuokAmJ7V-SYpL/_generated/favicon/android-chrome-192x192.png\" media=\"(prefers-color-scheme: light)\">\u003clink data-mint-head rel=\"apple-touch-icon\" type=\"image/png\" sizes=\"180x180\" href=\"/mintlify-assets/_mintlify/favicons/zeotap/dSUuokAmJ7V-SYpL/_generated/favicon/apple-touch-icon.png\">\u003clink data-mint-head rel=\"icon\" type=\"image/png\" sizes=\"16x16\" href=\"/mintlify-assets/_mintlify/favicons/zeotap/dSUuokAmJ7V-SYpL/_generated/favicon/favicon-16x16.png\" media=\"(prefers-color-scheme: light)\">\u003clink data-mint-head rel=\"icon\" type=\"image/png\" sizes=\"32x32\" href=\"/mintlify-assets/_mintlify/favicons/zeotap/dSUuokAmJ7V-SYpL/_generated/favicon/favicon-32x32.png\" media=\"(prefers-color-scheme: light)\">\u003clink data-mint-head rel=\"shortcut icon\" type=\"image/x-icon\" href=\"/mintlify-assets/_mintlify/favicons/zeotap/dSUuokAmJ7V-SYpL/_generated/favicon/favicon.ico\" media=\"(prefers-color-scheme: light)\">\u003clink data-mint-head rel=\"icon\" type=\"image/png\" sizes=\"192x192\" href=\"/mintlify-assets/_mintlify/favicons/zeotap/dSUuokAmJ7V-SYpL/_generated/favicon-dark/android-chrome-192x192.png\" media=\"(prefers-color-scheme: dark)\">\u003clink data-mint-head rel=\"icon\" type=\"image/png\" sizes=\"16x16\" href=\"/mintlify-assets/_mintlify/favicons/zeotap/dSUuokAmJ7V-SYpL/_generated/favicon-dark/favicon-16x16.png\" media=\"(prefers-color-scheme: dark)\">\u003clink data-mint-head rel=\"icon\" type=\"image/png\" sizes=\"32x32\" href=\"/mintlify-assets/_mintlify/favicons/zeotap/dSUuokAmJ7V-SYpL/_generated/favicon-dark/favicon-32x32.png\" media=\"(prefers-color-scheme: dark)\">\u003clink data-mint-head rel=\"shortcut icon\" type=\"image/x-icon\" href=\"/mintlify-assets/_mintlify/favicons/zeotap/dSUuokAmJ7V-SYpL/_generated/favicon-dark/favicon.ico\" media=\"(prefers-color-scheme: dark)\">\u003cmeta data-mint-head property=\"og:title\" content=\"LaunchDarkly - Zeotap docs\">\u003cmeta data-mint-head property=\"og:description\" content=\"Send Zeotap CDP audiences out to LaunchDarkly as segments, so a feature flag can serve a variation to the customers who qualified.\">\u003cmeta data-mint-head property=\"og:site_name\" content=\"Zeotap docs\">\u003cmeta data-mint-head property=\"og:url\" content=\"https://docs.zeotap.com/articles/integrate-customer/launchdarkly\">\u003cmeta data-mint-head property=\"og:type\" content=\"website\">\u003cmeta data-mint-head property=\"og:image\" content=\"https://zeotap.mintlify.site/_mintlify/api/og/v2?division=Batch+Integrations\u0026amp;title=LaunchDarkly\u0026amp;description=Send+Zeotap+CDP+audiences+out+to+LaunchDarkly+as+segments%2C+so+a+feature+flag+can+serve+a+variation+to+the+customers+who+qualified.\u0026amp;theme=93bf95acd4691f2b4bc4d35f\u0026amp;signature=f641e2c9b72fe4edcfedf60a6f43dd723330d041d7913e4a21037729873c4a28\">\u003cmeta data-mint-head property=\"og:image:width\" content=\"1200\">\u003cmeta data-mint-head property=\"og:image:height\" content=\"630\">\u003cmeta data-mint-head name=\"twitter:card\" content=\"summary_large_image\">\u003cmeta data-mint-head name=\"twitter:title\" content=\"LaunchDarkly - Zeotap docs\">\u003cmeta data-mint-head name=\"twitter:description\" content=\"Send Zeotap CDP audiences out to LaunchDarkly as segments, so a feature flag can serve a variation to the customers who qualified.\">\u003cmeta data-mint-head name=\"twitter:image\" content=\"https://zeotap.mintlify.site/_mintlify/api/og/v2?division=Batch+Integrations\u0026amp;title=LaunchDarkly\u0026amp;description=Send+Zeotap+CDP+audiences+out+to+LaunchDarkly+as+segments%2C+so+a+feature+flag+can+serve+a+variation+to+the+customers+who+qualified.\u0026amp;theme=93bf95acd4691f2b4bc4d35f\u0026amp;signature=f641e2c9b72fe4edcfedf60a6f43dd723330d041d7913e4a21037729873c4a28\">\u003cmeta data-mint-head name=\"twitter:image:width\" content=\"1200\">\u003cmeta data-mint-head name=\"twitter:image:height\" content=\"630\">\u003cmeta data-mint-head name=\"msapplication-config\" content=\"/mintlify-assets/_mintlify/favicons/zeotap/dSUuokAmJ7V-SYpL/_generated/favicon/browserconfig.xml\">\u003cmeta data-mint-head name=\"apple-mobile-web-app-title\" content=\"Zeotap docs\">\u003cmeta data-mint-head name=\"msapplication-TileColor\" content=\"#174efb\">\u003clink data-mint-head rel=\"canonical\" href=\"https://docs.zeotap.com/articles/integrate-customer/launchdarkly\">\u003clink data-mint-head rel=\"alternate\" type=\"application/xml\" href=\"/sitemap.xml\">\u003clink data-mint-head rel=\"alternate\" type=\"text/markdown\" href=\"/articles/integrate-customer/launchdarkly.md\">\u003cscript data-mint-head type=\"application/ld+json\">{\"@context\":\"https://schema.org\",\"@graph\":[{\"@type\":\"Organization\",\"@id\":\"https://docs.zeotap.com/#organization\",\"name\":\"Zeotap docs\",\"url\":\"https://docs.zeotap.com\",\"logo\":{\"@type\":\"ImageObject\",\"url\":\"https://mintcdn.com/zeotap/pbiFRnrYXBNUsbba/logo/light.svg?fit=max\u0026auto=format\u0026n=pbiFRnrYXBNUsbba\u0026q=85\u0026s=c566b5af653699d3bcf4d8efb4f678d1\"}},{\"@type\":\"WebSite\",\"@id\":\"https://docs.zeotap.com#website\",\"name\":\"Zeotap docs\",\"url\":\"https://docs.zeotap.com\",\"publisher\":{\"@id\":\"https://docs.zeotap.com/#organization\"}},{\"@type\":\"WebPage\",\"@id\":\"https://docs.zeotap.com/articles/integrate-customer/launchdarkly#webpage\",\"url\":\"https://docs.zeotap.com/articles/integrate-customer/launchdarkly\",\"name\":\"LaunchDarkly\",\"description\":\"Send Zeotap CDP audiences out to LaunchDarkly as segments, so a feature flag can serve a variation to the customers who qualified.\",\"dateModified\":\"2026-11-05T09:25:17.000Z\",\"isPartOf\":{\"@id\":\"https://docs.zeotap.com#website\"},\"breadcrumb\":{\"@id\":\"https://docs.zeotap.com/articles/integrate-customer/launchdarkly#breadcrumb\"}},{\"@type\":\"BreadcrumbList\",\"@id\":\"https://docs.zeotap.com/articles/integrate-customer/launchdarkly#breadcrumb\",\"itemListElement\":[{\"@type\":\"ListItem\",\"position\":1,\"name\":\"Integrate\",\"item\":\"https://docs.zeotap.com/articles/integrate-customer/integrate\"},{\"@type\":\"ListItem\",\"position\":2,\"name\":\"Destinations\",\"item\":\"https://docs.zeotap.com/articles/integrate-customer/destinations\"},{\"@type\":\"ListItem\",\"position\":3,\"name\":\"Batch Integrations\",\"item\":\"https://docs.zeotap.com/articles/integrate-customer/destination-batch-integrations\"},{\"@type\":\"ListItem\",\"position\":4,\"name\":\"LaunchDarkly\",\"item\":\"https://docs.zeotap.com/articles/integrate-customer/launchdarkly\"}]},{\"@type\":[\"Article\",\"TechArticle\"],\"@id\":\"https://docs.zeotap.com/articles/integrate-customer/launchdarkly#article\",\"headline\":\"LaunchDarkly\",\"name\":\"LaunchDarkly\",\"description\":\"Send Zeotap CDP audiences out to LaunchDarkly as segments, so a feature flag can serve a variation to the customers who qualified.\",\"url\":\"https://docs.zeotap.com/articles/integrate-customer/launchdarkly\",\"mainEntityOfPage\":{\"@id\":\"https://docs.zeotap.com/articles/integrate-customer/launchdarkly#webpage\"},\"dateModified\":\"2026-11-05T09:25:17.000Z\",\"publisher\":{\"@id\":\"https://docs.zeotap.com/#organization\"},\"isPartOf\":{\"@id\":\"https://docs.zeotap.com#website\"}}]}\u003c/script>\u003cscript data-mint-head type=\"application/ld+json\">{\"@context\":\"https://schema.org\",\"@type\":\"WebSite\",\"name\":\"Zeotap docs\",\"publisher\":{\"@type\":\"Organization\",\"name\":\"Zeotap docs\"},\"provider\":{\"@type\":\"Organization\",\"name\":\"Mintlify\",\"url\":\"https://mintlify.com\"}}\u003c/script>","agentPointerHref":"/articles/integrate-customer/launchdarkly.md","siteName":"Zeotap docs","nav":{"global":{},"tabs":[{"tab":"Home","icon":"house","pages":[{"title":"Home","href":""}]},{"tab":"Products","icon":"grid-2","groups":[{"group":"Integrate","icon":"plug","root":{"title":"Integrate","sidebarTitle":"Overview","href":"/articles/integrate-customer/integrate"},"expanded":false,"pages":[{"group":"Sources","icon":"database","root":{"title":"Sources","sidebarTitle":"Overview","href":"/articles/integrate-customer/sources"},"pages":[{"title":"Components of the Source Listing Page","sidebarTitle":"Source Listing Page","href":"/articles/integrate-customer/components-of-the-source-listing-page"},{"title":"Components of the Preview Data Tab","sidebarTitle":"Preview Data tab","href":"/articles/integrate-customer/knowing-the-fields-on-the-preview-data-tab"},{"title":"Onboard Raw PII data into Zeotap","sidebarTitle":"Onboard Raw PII","href":"/articles/integrate-customer/onboard-raw-pii-data-into-zeotap"},{"group":"Source Integrations (Batch+Real-Time)","root":{"title":"Source Integrations (Batch and Real-Time)","sidebarTitle":"Sources catalogue","href":"/articles/integrate-customer/creating-a-source"},"pages":[{"group":"Website Events (CE)","root":{"title":"Website Events (CE)","sidebarTitle":"Website Events","href":"/articles/integrate-customer/website-events"},"pages":[{"group":"Web JavaScript SDK","root":{"title":"Web JavaScript SDK","sidebarTitle":"Web JavaScript SDK","href":"/articles/integrate-customer/web-javascript"},"pages":[{"title":"Create a Web JavaScript source","sidebarTitle":"Create a Web JS source","href":"/articles/integrate-customer/creating-web-js-source-2676490558"}]},{"group":"Web Pixel/Web IFrame/App Pixel","root":{"title":"Web Pixel/Web IFrame/App Pixel","sidebarTitle":"Overview","href":"/articles/integrate-customer/web-pixel-web-iframe-app-pixel"},"pages":[{"title":"Create a Web Pixel, IFrame or App Pixel source","sidebarTitle":"Create the source","href":"/articles/integrate-customer/2676392376"},{"title":"Implement the Pixel Source","sidebarTitle":"Implement pixels","href":"/articles/integrate-customer/implementing-pixel-source-2665775396"},{"title":"Implement Pixels on a Site, Ad or Campaign","sidebarTitle":"Pixels via a tag manager","href":"/articles/integrate-customer/implementing-pixels-on-a-site-2c-ad-or-campaign-2693727342"}]}]},{"group":"App Events (CE)","root":{"title":"App Events (CE)","sidebarTitle":"App Events","href":"/articles/integrate-customer/app-events"},"pages":[{"group":"Android SDK","root":{"title":"Android SDK source","sidebarTitle":"Android SDK","href":"/articles/integrate-customer/android-sdk"},"pages":[{"title":"Create an Android SDK source","sidebarTitle":"Create the source","href":"/articles/integrate-customer/creating-android-sdk-source"}]},{"group":"iOS SDK","root":{"title":"iOS SDK","sidebarTitle":"iOS SDK","href":"/articles/integrate-customer/ios-sdk"},"pages":[{"title":"Create an iOS SDK source","sidebarTitle":"Create the source","href":"/articles/integrate-customer/create-an-ios-sdk-source"}]},{"title":"SDK Reference","sidebarTitle":"SDK Reference","href":"/articles/integrate-customer/sdk-reference"}]},{"group":"Flat Files (CE+NCE)","root":{"title":"Flat Files (CE+NCE)","sidebarTitle":"Flat Files","href":"/articles/integrate-customer/flat-files"},"pages":[{"group":"Zeotap Google Cloud Storage","root":{"title":"Zeotap Google Cloud Storage","sidebarTitle":"GCS source","href":"/articles/integrate-customer/zeotap-google-cloud-storage"},"pages":[{"title":"Create a Zeotap Google Cloud Storage Source","sidebarTitle":"Create the source","href":"/articles/integrate-customer/create-a-zeotap-google-cloud-storage-source"},{"title":"Implement a Zeotap Google Cloud Storage Source","sidebarTitle":"Implement the source","href":"/articles/integrate-customer/implement-a-zeotap-google-cloud-storage-source"},{"title":"Upload files to your source using the Google Cloud Console","sidebarTitle":"Upload with Cloud Console","href":"/articles/integrate-customer/upload-files-on-gcloud-console"},{"title":"Upload files to your source using gsutil","sidebarTitle":"Upload with gsutil","href":"/articles/integrate-customer/upload-files-using-gsutil"},{"title":"Upload files to your source using Cyberduck","sidebarTitle":"Upload with Cyberduck","href":"/articles/integrate-customer/upload-files-using-cyberduck"}]},{"group":"SFTP (Secure File Transfer Protocol)","root":{"title":"SFTP (Secure File Transfer Protocol)","sidebarTitle":"SFTP Source","href":"/articles/integrate-customer/sftp-secure-file-transfer-protocol"},"pages":[{"group":"Create an SFTP (Pull) Source","root":{"title":"Create an SFTP (Push) Source","sidebarTitle":"Create SFTP (Push) source","href":"/articles/integrate-customer/creating-sftp-push-source"},"pages":[{"title":"Implement the SFTP (Push) Source","sidebarTitle":"Implement SFTP (Push)","href":"/articles/integrate-customer/implementing-sftp-push-source"}]},{"group":"Create an SFTP (Pull) Source","root":{"title":"Create an SFTP (Pull) Source","sidebarTitle":"Create SFTP (Pull) source","href":"/articles/integrate-customer/create-an-sftp-pull-source"},"pages":[{"title":"Implement the SFTP (Pull) Source","sidebarTitle":"Implement SFTP (Pull)","href":"/articles/integrate-customer/implement-the-sftp-pull-source"}]}]},{"group":"Best Practices for Flat File Source","root":{"title":"Best Practices for Flat File Source","sidebarTitle":"Flat file best practices","href":"/articles/integrate-customer/best-practices-for-flat-file-source-2709422090"},"pages":[{"title":"Supported File Formats","href":"/articles/integrate-customer/supported-file-formats"}]}]},{"group":"Server-to-Server (CE+NCE)","root":{"title":"Server-to-Server (CE+NCE)","sidebarTitle":"Overview","href":"/articles/integrate-customer/server-to-server"},"pages":[{"title":"Create and Implement the Server-to-Server Source","sidebarTitle":"Server-to-Server source","href":"/articles/integrate-customer/implementing-server-to-server-source-2665709918"},{"title":"Create an Adjust source","sidebarTitle":"Adjust","href":"/articles/integrate-customer/create-an-adjust-source"}]},{"group":"Tag Managers (CE)","root":{"title":"Tag Managers (CE)","sidebarTitle":"Overview","href":"/articles/integrate-customer/tag-managers"},"pages":[{"group":"Adobe Experience Platform Tag Extension","root":{"title":"Adobe Experience Platform Tag Extension","sidebarTitle":"Overview","href":"/articles/integrate-customer/adobe-experience-platform-tag-extension"},"pages":[{"group":"Create an Adobe Experience Platform Tag Extension Source","root":{"title":"Create an Adobe Experience Platform Tag Extension Source","sidebarTitle":"Create the source","href":"/articles/integrate-customer/create-an-adobe-experience-platform-tag-extension-source"},"pages":[{"title":"Implement an Adobe Experience Platform Tag Extension Source","sidebarTitle":"Implement the source","href":"/articles/integrate-customer/implement-an-adobe-experience-platform-tag-extension-source"}]}]},{"group":"Google Tag Manager","root":{"title":"Google Tag Manager","sidebarTitle":"Google Tag Manager","href":"/articles/integrate-customer/google-tag-manager"},"pages":[{"title":"Create a Google Tag Manager Source","sidebarTitle":"Create the GTM source","href":"/articles/integrate-customer/creating-tag-manager-source-2676490586"},{"title":"Implement the Google Tag Manager source","sidebarTitle":"Implement the GTM source","href":"/articles/integrate-customer/implementing-google-tag-manager-source-2665775403"}]}]},{"group":"CRM Data (CE)","root":{"title":"CRM Data","href":"/articles/integrate-customer/crm-data"},"pages":[{"group":"HubSpot Source","root":{"title":"HubSpot Source","sidebarTitle":"Overview","href":"/articles/integrate-customer/hubspot-source"},"pages":[{"title":"Create a HubSpot source","sidebarTitle":"Create a HubSpot source","href":"/articles/integrate-customer/create-a-hubspot-source"}]},{"group":"Microsoft Dynamics CRM","root":{"title":"Microsoft Dynamics CRM source","sidebarTitle":"Microsoft Dynamics CRM","href":"/articles/integrate-customer/ms-dynamics-source"},"pages":[{"title":"Create a Microsoft Dynamics CRM source","sidebarTitle":"Create a source","href":"/articles/integrate-customer/create-a-ms-dynamics-crm-source"}]},{"group":"Salesforce CRM","root":{"title":"Salesforce CRM source","sidebarTitle":"Salesforce CRM","href":"/articles/integrate-customer/salesforce-crm"},"pages":[{"title":"Create a Salesforce CRM source","sidebarTitle":"Create a Salesforce CRM source","href":"/articles/integrate-customer/creating-salesforce-crm"},{"title":"Best practices for the Salesforce CRM source","sidebarTitle":"Best practices","href":"/articles/integrate-customer/best-practices-for-salesforce-crm-source"}]}]},{"group":"Data Warehouse (CE+NCE)","root":{"title":"Data Warehouse (CE+NCE)","href":"/articles/integrate-customer/data-warehouse"},"pages":[{"group":"Snowflake","root":{"title":"Snowflake","sidebarTitle":"Snowflake (Source)","href":"/articles/integrate-customer/snowflake"},"pages":[{"title":"Create a Snowflake Source and Load Data","sidebarTitle":"Create a Snowflake Source","href":"/articles/integrate-customer/create-a-snowflake-source"},{"title":"Best Practices for Snowflake Source","sidebarTitle":"Snowflake best practices","href":"/articles/integrate-customer/best-practices-for-snowflake-source"},{"title":"Error Handling and More","href":"/articles/integrate-customer/snowflake-source-error-handling-and-more"},{"title":"FAQs for Snowflake","sidebarTitle":"FAQs","href":"/articles/integrate-customer/faqs-for-snowflake"}]},{"group":"BigQuery","root":{"title":"BigQuery source overview","sidebarTitle":"BigQuery","href":"/articles/integrate-customer/bigquery"},"pages":[{"title":"Create and Implement a BigQuery Source","sidebarTitle":"Create a BigQuery source","href":"/articles/integrate-customer/create-a-bigquery-source"},{"title":"Best Practices for BigQuery","sidebarTitle":"Best Practices for BigQuery","href":"/articles/integrate-customer/best-practices-for-bigquery"}]},{"group":"Amazon S3","root":{"title":"Amazon S3 source overview","sidebarTitle":"Amazon S3","href":"/articles/integrate-customer/amazon-s3"},"pages":[{"title":"Create and Implement an Amazon S3 Source","sidebarTitle":"Create and Implement an Amazon S3 Source","href":"/articles/integrate-customer/create-and-implement-an-amazon-s3-source"}]},{"group":"Databricks","root":{"title":"Databricks source overview","sidebarTitle":"Databricks","href":"/articles/integrate-customer/databricks"},"pages":[{"title":"Create and Implement a Databricks Source","sidebarTitle":"Databricks Source","href":"/articles/integrate-customer/create-and-implement-a-databricks-source"},{"title":"Set up a Databricks source","sidebarTitle":"Set up a source","href":"/articles/integrate-customer/set-up-a-databricks-source"}]},{"title":"Microsoft Fabric","sidebarTitle":"Microsoft Fabric","href":"/articles/integrate-customer/microsoft-fabric"}]},{"group":"Customer Engagement Channels (CE)","root":{"title":"Customer Engagement Channels (CE)","href":"/articles/integrate-customer/customer-engagement-channels"},"pages":[{"group":"Batch Source","root":{"title":"Batch Source","href":"/articles/integrate-customer/batch-source"},"pages":[{"title":"Create a Batch Source","href":"/articles/integrate-customer/create-a-batch-source"}]},{"group":"Braze Currents","root":{"title":"Braze Currents source","sidebarTitle":"Braze Currents","href":"/articles/integrate-customer/braze-currents"},"pages":[{"group":"Create a Braze Currents Source","root":{"title":"Create a Braze Currents source","sidebarTitle":"Create a Braze Currents source","href":"/articles/integrate-customer/create-a-braze-currents-source"},"pages":[{"title":"Implement a Braze Currents source","sidebarTitle":"Implement the Braze Currents source","href":"/articles/integrate-customer/implement-a-braze-currents-source"}]},{"title":"Best Practices for Braze Currents","sidebarTitle":"Braze Currents Best Practices","href":"/articles/integrate-customer/best-practices-for-braze-currents"}]},{"group":"Dotdigital","root":{"title":"Dotdigital","sidebarTitle":"Overview","href":"/articles/integrate-customer/dotdigital"},"pages":[{"title":"Create a Dotdigital source","sidebarTitle":"Create a source","href":"/articles/integrate-customer/create-a-dotdigital-source"}]},{"group":"Airship (Batch)","root":{"title":"Airship (Batch) source","sidebarTitle":"Airship (Batch)","href":"/articles/integrate-customer/airship-batch-source"},"pages":[{"title":"Create an Airship (Batch) source","sidebarTitle":"Create the source","href":"/articles/integrate-customer/create-an-airship-batch-source"}]},{"group":"Airship Real-Time Data Streaming","root":{"title":"Airship Real-Time Data Streaming Source","sidebarTitle":"Overview","href":"/articles/integrate-customer/airship-real-time-data-streaming-source"},"pages":[{"title":"Create an Airship Real-Time Data Streaming Source","sidebarTitle":"Create the source","href":"/articles/integrate-customer/create-an-airship-real-time-data-streaming-source"},{"title":"Implement an Airship Real-Time Data Streaming Source","sidebarTitle":"Implement the Airship source","href":"/articles/integrate-customer/implement-an-airship-real-time-data-streaming-source"}]},{"group":"Cleverpush (Batch) Source","root":{"title":"Cleverpush (Batch) Source","sidebarTitle":"Overview","href":"/articles/integrate-customer/cleverpush-batch-source"},"pages":[{"title":"Create a Cleverpush (Batch) source","sidebarTitle":"Create a Cleverpush (Batch) source","href":"/articles/integrate-customer/create-a-cleverpush-batch-source"},{"title":"Appendix for the Cleverpush sources","sidebarTitle":"Appendix","href":"/articles/integrate-customer/cleverpush_appendix"}]},{"group":"Cleverpush Real-Time Source","root":{"title":"Cleverpush Real-Time Source","sidebarTitle":"Overview","href":"/articles/integrate-customer/cleverpush-real-time-source"},"pages":[{"title":"Create a Cleverpush Real-Time source","sidebarTitle":"Create a Cleverpush Real-Time source","href":"/articles/integrate-customer/create-a-cleverpush-real-time-source"},{"title":"Implement a Cleverpush real-time source","sidebarTitle":"Implement the source","href":"/articles/integrate-customer/implement-a-cleverpush-real-time-source"}]},{"group":"Emarsys Source","root":{"title":"Emarsys source","sidebarTitle":"Emarsys source","href":"/articles/integrate-customer/emarsys-source"},"pages":[{"title":"Getting Emarsys credentials","sidebarTitle":"Getting credentials","href":"/articles/integrate-customer/getting-emarsys-credentials"},{"title":"Create an Emarsys source","sidebarTitle":"Create the source","href":"/articles/integrate-customer/creating-an-emarsys-source"}]},{"group":"Insider Webhook","root":{"title":"Insider Webhook Source","sidebarTitle":"Overview","href":"/articles/integrate-customer/insider-webhook"},"pages":[{"title":"Create an Insider source","sidebarTitle":"Create an Insider source","href":"/articles/integrate-customer/create-an-insider-source"},{"title":"Implement an Insider Source","sidebarTitle":"Implement the Insider source","href":"/articles/integrate-customer/implement-an-insider-source"}]},{"group":"Moengage Source","root":{"title":"MoEngage source","sidebarTitle":"MoEngage source","href":"/articles/integrate-customer/moengage-source"},"pages":[{"title":"Create a MoEngage Events stream source","sidebarTitle":"Create the source","href":"/articles/integrate-customer/creating-a-moengage-stream"}]}]},{"group":"Message Queue","root":{"title":"Message Queue","sidebarTitle":"Overview","href":"/articles/integrate-customer/message-queue"},"pages":[{"group":"Pub/Sub Stream","root":{"title":"Pub/Sub Stream","sidebarTitle":"Overview","href":"/articles/integrate-customer/pub-sub-stream"},"pages":[{"title":"Create a Pub/Sub Stream Source","sidebarTitle":"Create Pub/Sub Stream source","href":"/articles/integrate-customer/create-a-pub-sub-streaming-source"}]},{"group":"Pub/Sub Batch","root":{"title":"Pub/Sub Batch","sidebarTitle":"Overview","href":"/articles/integrate-customer/pub-sub-batch"},"pages":[{"title":"Create a Pub/Sub Batch Source","sidebarTitle":"Create the source","href":"/articles/integrate-customer/create-a-pub-sub-batch-source"}]},{"title":"Kafka Message Queue Source","sidebarTitle":"Kafka source","href":"/articles/integrate-customer/kafka_message_queue"}]},{"title":"Blacklisted Fields for Data Ingestion","href":"/articles/integrate-customer/blacklisted-fields-for-data-ingestion"}]},{"title":"Source Alerts","sidebarTitle":"Source Alerts","href":"/articles/integrate-customer/source-alerts"},{"group":"Source Report","root":{"title":"Source Report","sidebarTitle":"Overview","href":"/articles/integrate-customer/source-report"},"pages":[{"title":"Exploring Source Reports","href":"/articles/integrate-customer/exploring-source-reports"},{"title":"Understanding the Ingestion Log Error","sidebarTitle":"Ingestion log errors","href":"/articles/integrate-customer/understanding-the-ingestion-log-error"}]},{"title":"Understanding Cookies","href":"/articles/integrate-customer/understanding-cookies"},{"title":"Region of Storage","href":"/articles/integrate-customer/region-of-storage"},{"title":"PGP Encryption in Sources","sidebarTitle":"PGP Encryption","href":"/articles/integrate-customer/pgp-encryption-in-sources"},{"title":"Source Access Rules","sidebarTitle":"Source Access Rules","href":"/articles/integrate-customer/source-access-rules"},{"title":"Archived Source","href":"/articles/integrate-customer/archived-source"}]},{"group":"Destinations","icon":"paper-plane","root":{"title":"Destinations","sidebarTitle":"Destinations","href":"/articles/integrate-customer/destinations"},"pages":[{"title":"Create a Destination","sidebarTitle":"Create a Destination","href":"/articles/integrate-customer/create-a-destination"},{"title":"Payload Preview for Destination Mappings","href":"/articles/integrate-customer/payload-preview-for-destination-mappings"},{"title":"Activate Your Batch Audiences","sidebarTitle":"Activate Audiences","href":"/articles/integrate-customer/link-an-audience-to-the-destination"},{"title":"Activate your real-time audiences","sidebarTitle":"Activate real-time","href":"/articles/integrate-customer/activate-your-real-time-audiences"},{"title":"PGP encryption for file-based destinations","sidebarTitle":"PGP encryption","href":"/articles/integrate-customer/pgp-encryption-in-destinations"},{"title":"Destination Access Rules","sidebarTitle":"Destination Access Rules","href":"/articles/integrate-customer/destination-access-rules"},{"title":"Troubleshoot Batch Uploads to a Destination","href":"/articles/integrate-customer/troubleshoot-batch-destination-uploads"},{"group":"Batch Integrations","root":{"title":"Batch Destination Integrations","sidebarTitle":"Batch Integrations","href":"/articles/integrate-customer/destination-batch-integrations"},"pages":[{"title":"Acxiom","sidebarTitle":"Acxiom","href":"/articles/integrate-customer/acxiom"},{"title":"Active Agent - Virtual Minds","sidebarTitle":"Active Agent","href":"/articles/integrate-customer/active-agent-virtual-minds"},{"title":"Adform","sidebarTitle":"Adform","href":"/articles/integrate-customer/adform"},{"title":"Adform DMP","sidebarTitle":"Adform DMP","href":"/articles/integrate-customer/adform-dmp"},{"title":"Adobe Analytics (New)","sidebarTitle":"Adobe Analytics (New)","href":"/articles/integrate-customer/adobe-analytics"},{"title":"Adobe Campaign (Audiences)","sidebarTitle":"Adobe Campaign (Audiences)","href":"/articles/integrate-customer/adobe-campaign"},{"group":"Adobe Target","root":{"title":"Adobe Target","sidebarTitle":"Adobe Target","href":"/articles/integrate-customer/adobe-target"},"pages":[{"title":"Adobe Target (Bulk Update)","sidebarTitle":"Adobe Target (Bulk Update)","href":"/articles/integrate-customer/adobe-target-bulk-update"}]},{"title":"Airship Static Lists","sidebarTitle":"Airship Static Lists","href":"/articles/integrate-customer/airship"},{"title":"Amazon DSP","sidebarTitle":"Amazon DSP","href":"/articles/integrate-customer/amazon-dsp"},{"title":"Amazon DSP - DP Audience","sidebarTitle":"Amazon DSP - DP","href":"/articles/integrate-customer/amazon-dsp-dp-audience"},{"title":"Amazon S3","sidebarTitle":"Amazon S3 (Destination)","href":"/articles/integrate-customer/amazon-s3-destination"},{"title":"Amazon Marketing Cloud (AMC)","sidebarTitle":"Amazon Marketing Cloud","href":"/articles/integrate-customer/amazon-marketing-cloud"},{"title":"Appademic S3","sidebarTitle":"Appademic S3","href":"/articles/integrate-customer/appademic-s3"},{"title":"AppNexus","sidebarTitle":"AppNexus","href":"/articles/integrate-customer/appnexus"},{"title":"Azure Blob Storage","sidebarTitle":"Azure Blob Storage","href":"/articles/integrate-customer/azure-blob-storage"},{"title":"Batch","href":"/articles/integrate-customer/batch"},{"title":"Batch CEP","href":"/articles/integrate-customer/batch-audience-management"},{"title":"Bird - Customer Lists","sidebarTitle":"Bird - Customer Lists","href":"/articles/integrate-customer/bird-customer-lists"},{"title":"Bloomreach","sidebarTitle":"Bloomreach","href":"/articles/integrate-customer/bloomreach"},{"title":"Braze","sidebarTitle":"Braze","href":"/articles/integrate-customer/braze-1"},{"title":"Channable GCS Upload","sidebarTitle":"Channable GCS Upload","href":"/articles/integrate-customer/channable-gcs-upload"},{"group":"Cleverpush","root":{"title":"Cleverpush","sidebarTitle":"Cleverpush","href":"/articles/integrate-customer/cleverpush-destination"},"pages":[{"title":"Appendix for Cleverpush","sidebarTitle":"Appendix for Cleverpush","href":"/articles/integrate-customer/appendix-cleverpush-destination"}]},{"title":"Criteo","sidebarTitle":"Criteo","href":"/articles/integrate-customer/criteo"},{"title":"Criteo Retail Media","sidebarTitle":"Criteo Retail Media","href":"/articles/integrate-customer/criteo-retail-media"},{"title":"Decentriq","sidebarTitle":"Decentriq","href":"/articles/integrate-customer/decentriq"},{"title":"Dotdigital (New)","sidebarTitle":"Dotdigital (New)","href":"/articles/integrate-customer/dotdigital-1"},{"title":"Dynamic Yield","sidebarTitle":"Dynamic Yield","href":"/articles/integrate-customer/dynamic-yield"},{"title":"Dynamic Yield: CSV upload","sidebarTitle":"Dynamic Yield: CSV upload","href":"/articles/integrate-customer/dynamic-yield-csv-upload"},{"title":"ELAINE","sidebarTitle":"ELAINE","href":"/articles/integrate-customer/artegic-elaine"},{"title":"Send audiences to Emarsys","sidebarTitle":"Emarsys","href":"/articles/integrate-customer/emarsys"},{"title":"Facebook","sidebarTitle":"Facebook","href":"/articles/integrate-customer/facebook"},{"title":"Facebook 1P (Meta)","sidebarTitle":"Facebook 1P (Meta)","href":"/articles/integrate-customer/facebook-1p"},{"title":"Facebook Enhanced Conversions API (Send Offline data)","sidebarTitle":"Facebook Enhanced CAPI","href":"/articles/integrate-customer/facebook-enhanced-conversions-api-capi"},{"title":"Facebook Product Catalog","sidebarTitle":"Facebook Product Catalog","href":"/articles/integrate-customer/facebook-product-catalog"},{"title":"Google Ad Manager","sidebarTitle":"Google Ad Manager","href":"/articles/integrate-customer/google-ad-manager"},{"title":"Google Analytics 4","sidebarTitle":"Google Analytics 4","href":"/articles/integrate-customer/google-analytics-4"},{"title":"Google Analytics Hub","sidebarTitle":"Google Analytics Hub","href":"/articles/integrate-customer/google-analytics-hub"},{"title":"Google BigQuery destination","sidebarTitle":"Google BigQuery","href":"/articles/integrate-customer/google-bigquery-destination"},{"title":"Google Cloud Storage destination","sidebarTitle":"Google Cloud Storage","href":"/articles/integrate-customer/google-cloud-storage"},{"group":"Google Customer Match (Customer Contact Information)","root":{"title":"Google Customer Match (Customer Contact Information)","sidebarTitle":"Customer Match (contact info)","href":"/articles/integrate-customer/google-customer-match-customer-contact-information"},"pages":[{"title":"Google Customer Match consent update","sidebarTitle":"Google consent update","href":"/articles/integrate-customer/faqs-related-to-google-consent-update"}]},{"title":"Google Customer Match (Mobile Device IDs)","sidebarTitle":"GCM (MAIDs)","href":"/articles/integrate-customer/google-customer-match-mobile-device-ids"},{"title":"Google DDP","sidebarTitle":"Google DDP","href":"/articles/integrate-customer/google-ddp"},{"title":"Google DMP","sidebarTitle":"Google DMP","href":"/articles/integrate-customer/google-dmp"},{"title":"Hello Charles","sidebarTitle":"Hello Charles","href":"/articles/integrate-customer/hello-charles"},{"title":"HubSpot","sidebarTitle":"HubSpot","href":"/articles/integrate-customer/hubspot"},{"title":"InfoSum Audience","sidebarTitle":"InfoSum Audience","href":"/articles/integrate-customer/infosum-audience"},{"title":"Insider","sidebarTitle":"Insider","href":"/articles/integrate-customer/insider"},{"title":"Inxmail Audience","sidebarTitle":"Inxmail Audience","href":"/articles/integrate-customer/inxmail-audience"},{"title":"Iterable: Campaign Trigger","description":"Send a batch audience out of Zeotap CDP to Iterable to fire an API-triggered campaign or update a subscriber list.","sidebarTitle":"Iterable: Campaign Trigger (Audiences)","href":"/articles/integrate-customer/iterable-campaign-trigger-audience"},{"title":"LaunchDarkly","sidebarTitle":"LaunchDarkly","href":"/articles/integrate-customer/launchdarkly"},{"title":"LinkedIn destination","description":"Activate Zeotap audiences as Matched Audiences in your LinkedIn Campaign Manager Ad Account using SHA256 emails or MAIDs.","sidebarTitle":"LinkedIn","href":"/articles/integrate-customer/linkedin"},{"title":"Looker","sidebarTitle":"Looker Studio","href":"/articles/integrate-customer/looker"},{"title":"Meta Custom Audience","sidebarTitle":"Meta Custom Audience","href":"/articles/integrate-customer/meta-custom-audience"},{"title":"Microsoft Ads Customer Match","sidebarTitle":"Microsoft Ads Customer Match","href":"/articles/integrate-customer/microsoft-ads-customer-match"},{"title":"Microsoft Fabric [Audience]","sidebarTitle":"Microsoft Fabric","href":"/articles/integrate-customer/microsoft-fabric-audience"},{"title":"MoEngage Audience","sidebarTitle":"MoEngage Audience","href":"/articles/integrate-customer/moengage-audience"},{"title":"Moloco","sidebarTitle":"Moloco","href":"/articles/integrate-customer/moloco"},{"title":"Neodata","sidebarTitle":"Neodata","href":"/articles/integrate-customer/neodata"},{"title":"Oath (Yahoo)","sidebarTitle":"Oath (Yahoo)","href":"/articles/integrate-customer/yahoo"},{"title":"Ongage","sidebarTitle":"Ongage","href":"/articles/integrate-customer/ongage"},{"title":"Optimizely","sidebarTitle":"Optimizely","href":"/articles/integrate-customer/optimizely-connect-integration"},{"title":"Permutive","sidebarTitle":"Permutive","href":"/articles/integrate-customer/permutive"},{"title":"Personyze","sidebarTitle":"Personyze","href":"/articles/integrate-customer/personyze"},{"title":"Pinterest Customer Lists destination","sidebarTitle":"Pinterest","href":"/articles/integrate-customer/pinterest"},{"title":"PromoteIQ","sidebarTitle":"PromoteIQ","href":"/articles/integrate-customer/promote-iq"},{"title":"PubMatic","sidebarTitle":"PubMatic","href":"/articles/integrate-customer/pubmatic"},{"title":"Quantcast","sidebarTitle":"Quantcast","href":"/articles/integrate-customer/quantcast"},{"title":"Reddit","sidebarTitle":"Reddit","href":"/articles/integrate-customer/reddit"},{"title":"Reddit Offline CAPI","sidebarTitle":"Reddit Offline CAPI","href":"/articles/integrate-customer/reddit-offline-capi"},{"title":"Responsys","sidebarTitle":"Responsys","href":"/articles/integrate-customer/responsys"},{"title":"Rokt","sidebarTitle":"Rokt","href":"/articles/integrate-customer/rokt"},{"title":"RTB House","sidebarTitle":"RTB House","href":"/articles/integrate-customer/rtb-house"},{"title":"Salesforce CRM (Sales and Service Cloud)","sidebarTitle":"Salesforce CRM","href":"/articles/integrate-customer/salesforce-crm-sales-and-service-cloud"},{"title":"Salesforce Marketing Cloud — Data Extension","sidebarTitle":"SFMC Data Extension","href":"/articles/integrate-customer/salesforce-marketing-cloud-data-extension"},{"title":"SFMC Personalization (Audiences)","sidebarTitle":"SFMC Personalization (Audiences)","href":"/articles/integrate-customer/sfmc-personalization-audiences"},{"title":"SFTP Audience Integration","sidebarTitle":"SFTP","href":"/articles/integrate-customer/sftp-audience-integration"},{"group":"Sendinblue (Brevo)","root":{"title":"Sendinblue (Brevo)","sidebarTitle":"Sendinblue (Brevo)","href":"/articles/integrate-customer/brevo-sendinblue"},"pages":[{"title":"Appendix for Sendinblue","sidebarTitle":"Appendix for Sendinblue","href":"/articles/integrate-customer/appendix-for-sendinblue"}]},{"title":"Smadex","sidebarTitle":"Smadex","href":"/articles/integrate-customer/smadex"},{"title":"Snapchat","sidebarTitle":"Snapchat","href":"/articles/integrate-customer/snapchat"},{"title":"Snapchat OAuth 2.0","sidebarTitle":"Snapchat OAuth 2.0","href":"/articles/integrate-customer/snapchat-oauth-2-0"},{"title":"Snowflake","sidebarTitle":"Snowflake (Destination)","href":"/articles/integrate-customer/snowflake-destination"},{"title":"Sportradar","sidebarTitle":"Sportradar","href":"/articles/integrate-customer/sportradar"},{"title":"StackAdapt DSP","sidebarTitle":"StackAdapt DSP","href":"/articles/integrate-customer/stackadapt-dsp"},{"title":"Tableau AWS S3","sidebarTitle":"Tableau AWS S3","href":"/articles/integrate-customer/tableau-aws-s3"},{"group":"Taboola","root":{"title":"Taboola","sidebarTitle":"Taboola","href":"/articles/integrate-customer/taboola"},"pages":[{"title":"Taboola appendix: taxonomy file and Channel ID","sidebarTitle":"Appendix","href":"/articles/integrate-customer/appendix-taboola-destination"}]},{"title":"Taboola Custom Audience","href":"/articles/integrate-customer/taboola-custom-audience"},{"title":"Talon.One Audience","sidebarTitle":"Talon.One Audience","href":"/articles/integrate-customer/talon-one-audience"},{"title":"TikTok","href":"/articles/integrate-customer/tiktok"},{"title":"The Trade Desk (TTD)","sidebarTitle":"TTD","href":"/articles/integrate-customer/ttd"},{"title":"TTD CRM Data","sidebarTitle":"TTD CRM Data","href":"/articles/integrate-customer/ttd-euid"},{"title":"TTD 1P","sidebarTitle":"TTD 1P","href":"/articles/integrate-customer/ttd-1p"},{"title":"TTD Data Monetisation","sidebarTitle":"TTD Data Monetisation","href":"/articles/integrate-customer/ttd-data-monetisation"},{"title":"Twitter","sidebarTitle":"Twitter","href":"/articles/integrate-customer/twitter"},{"title":"Yieldlab SSP","sidebarTitle":"Yieldlab SSP","href":"/articles/integrate-customer/yieldlab-ssp"},{"title":"Zeotap Pvt Channel","sidebarTitle":"Zeotap Pvt Channel","href":"/articles/integrate-customer/zeotap-pvt-channel"},{"title":"Databricks","sidebarTitle":"Databricks","href":"/articles/integrate-customer/databricks_destination"},{"title":"PubMatic Publisher","sidebarTitle":"PubMatic Publisher","href":"/articles/integrate-customer/pubmatic-publisher"}]},{"group":"Real-time Integrations","root":{"title":"Real-Time Integrations","sidebarTitle":"Real-Time Integrations","href":"/articles/integrate-customer/real-time-integrations"},"pages":[{"title":"Apache Kafka","sidebarTitle":"Apache Kafka","href":"/articles/integrate-customer/apache-kafka-destination"},{"title":"Adobe Campaign real-time integration","sidebarTitle":"Adobe Campaign (real-time)","href":"/articles/integrate-customer/adobe-campaign-real-time-integration"},{"title":"Adobe Target (Delivery API)","sidebarTitle":"Adobe Target (Delivery API)","href":"/articles/integrate-customer/adobe-target-delivery-api"},{"title":"Adobe Target (Single Update)","sidebarTitle":"Adobe Target (Single Update)","href":"/articles/integrate-customer/adobe-target-single-update"},{"title":"Airship real-time destination","sidebarTitle":"Airship (real-time)","href":"/articles/integrate-customer/airship-real-time-destination-integration"},{"title":"Amazon Conversions API","sidebarTitle":"Amazon Conversions API","href":"/articles/integrate-customer/amazon-conversions-api"},{"title":"AppsFlyer Real Time Integration","sidebarTitle":"AppsFlyer","href":"/articles/integrate-customer/appsflyer-real-time-integration"},{"title":"Batch Real Time Destination Integration","sidebarTitle":"Batch (Real-Time)","href":"/articles/integrate-customer/batch-real-time-destination-integration"},{"title":"Braze Integration","sidebarTitle":"Braze Integration","href":"/articles/integrate-customer/braze-integration"},{"title":"Braze - Object Sync (Journey Action)","sidebarTitle":"Braze - Object Sync","href":"/articles/integrate-customer/braze-journey-action"},{"title":"Brevo","sidebarTitle":"Brevo","href":"/articles/integrate-customer/brevo"},{"title":"Bird Trigger Events","sidebarTitle":"Bird Trigger Events","href":"/articles/integrate-customer/bird-trigger-events"},{"title":"Channable real-time integration","sidebarTitle":"Channable","href":"/articles/integrate-customer/channable-real-time-integration"},{"title":"Cleverpush Real-Time Integration","sidebarTitle":"Cleverpush Real-Time Integration","href":"/articles/integrate-customer/cleverpush-real-time-integration"},{"title":"Appendix: Cleverpush channel and platform setup","sidebarTitle":"Appendix: channel and platforms","href":"/articles/integrate-customer/appendix-cleverpush-real-time-integration"},{"title":"Criteo Offline Sales Reporting","sidebarTitle":"Criteo Offline Sales Reporting","href":"/articles/integrate-customer/criteo-offline-sales-reporting"},{"title":"Dynamic Yield (RealTime)","sidebarTitle":"Dynamic Yield (RealTime)","href":"/articles/integrate-customer/dynamic-yield-realtime"},{"title":"ELAINE real-time integration","sidebarTitle":"ELAINE real-time integration","href":"/articles/integrate-customer/elaine-real-time-integration"},{"title":"Eloqua","sidebarTitle":"Eloqua","href":"/articles/integrate-customer/eloqua"},{"title":"Emarsys real-time integration","sidebarTitle":"Emarsys real-time","href":"/articles/integrate-customer/emarsys-real-time-integration"},{"title":"Facebook Conversions API","sidebarTitle":"Facebook Conversions API","href":"/articles/integrate-customer/facebook-conversions-api"},{"title":"Send events to Facebook Conversions API using the /events endpoint","sidebarTitle":"Send events via API","href":"/articles/integrate-customer/send-events-using-the-api"},{"title":"Google Enhanced Conversions API (CAPI)","sidebarTitle":"Google Enhanced CAPI","href":"/articles/integrate-customer/google-enhanced-conversions-api-capi"},{"title":"Google Pub/Sub","sidebarTitle":"Google Pub/Sub","href":"/articles/integrate-customer/google-pub-sub"},{"title":"Google Universal Analytics Integration","sidebarTitle":"Google Universal Analytics","href":"/articles/integrate-customer/google-universal-analytics-integration"},{"title":"Inxmail","sidebarTitle":"Inxmail","href":"/articles/integrate-customer/inxmail"},{"title":"Iterable: Campaign Trigger real-time integration","sidebarTitle":"Iterable: Campaign Trigger","href":"/articles/integrate-customer/iterable-campaign-trigger"},{"title":"LaunchDarkly real-time integration","sidebarTitle":"LaunchDarkly (real-time)","href":"/articles/integrate-customer/launchdarkly-real-time-integration"},{"title":"Microsoft CAPI","sidebarTitle":"Microsoft CAPI","href":"/articles/integrate-customer/microsoft-capi"},{"title":"MoEngage","sidebarTitle":"MoEngage","href":"/articles/integrate-customer/moengage"},{"title":"Optimizely (Real Time)","sidebarTitle":"Optimizely (Real Time)","href":"/articles/integrate-customer/optimizely"},{"title":"Optimizely Campaigns (Real Time)","sidebarTitle":"Optimizely Campaigns","href":"/articles/integrate-customer/optimizely-campaigns"},{"title":"Personyze real-time integration","sidebarTitle":"Personyze real-time","href":"/articles/integrate-customer/personyze-real-time-integration"},{"title":"Pinterest CAPI","sidebarTitle":"Pinterest CAPI","href":"/articles/integrate-customer/pinterest-capi"},{"title":"Reddit CAPI destination","sidebarTitle":"Reddit CAPI","href":"/articles/integrate-customer/reddit-capi"},{"title":"Responsys real-time integration","sidebarTitle":"Responsys real-time integration","href":"/articles/integrate-customer/responsys-real-time-integration"},{"title":"RTB House Conversions API (CAPI)","sidebarTitle":"RTB House CAPI","href":"/articles/integrate-customer/rtb-house-capi"},{"title":"Salesforce CRM Real Time Integration","sidebarTitle":"Salesforce CRM : Journeys","href":"/articles/integrate-customer/salesforce-crm-real-time-integration"},{"title":"SendGrid","sidebarTitle":"SendGrid","href":"/articles/integrate-customer/sendgrid"},{"title":"SFMC Journey Builder","sidebarTitle":"SFMC Journey Builder","href":"/articles/integrate-customer/sfmc-journey-builder"},{"title":"Appendix for SFMC Journey Builder","sidebarTitle":"SFMC Journey Builder appendix","href":"/articles/integrate-customer/appendix-for-sfmc-journey-builder"},{"title":"SFMC Personalization (Journeys)","sidebarTitle":"SFMC Personalization (Journeys)","href":"/articles/integrate-customer/sfmc-personalization-journeys"},{"title":"Talon.One Trigger Custom Events","sidebarTitle":"Talon.One Trigger Custom Events","href":"/articles/integrate-customer/talon-one"},{"title":"TikTok Events","sidebarTitle":"TikTok Events","href":"/articles/integrate-customer/tiktok-events"},{"title":"WhatsApp","sidebarTitle":"WhatsApp","href":"/articles/integrate-customer/whatsapp"},{"title":"Zeotap Webhook","sidebarTitle":"Zeotap Webhook","href":"/articles/integrate-customer/zeotap-webhook"}]}]}]},{"group":"Unify","icon":"layer-group","root":{"title":"Unify","href":"/articles/unify-customer/unify"},"expanded":false,"pages":[{"group":"Catalogue","icon":"book-open","root":{"title":"Catalogue","href":"/articles/unify-customer/catalogue"},"expanded":true,"pages":[{"group":"Components of the Catalogue Screen","root":{"title":"Components of the Catalogue Screen","href":"/articles/unify-customer/components-of-the-catalogue-screen"},"pages":[{"title":"Understand the Basic Fields","href":"/articles/unify-customer/understand-the-basic-fields"},{"title":"Understand the Advance Fields","href":"/articles/unify-customer/understand-the-advance-fields"}]},{"title":"When to use a Catalogue Field","href":"/articles/unify-customer/when-to-use-a-catalogue-field"},{"group":"Standard Fields in Catalogue","root":{"title":"Standard Fields in Catalogue","href":"/articles/unify-customer/standard-fields-in-catalogue"},"pages":[{"title":"Zeotap Standard Fields","href":"/articles/unify-customer/zeotap-standard-fields"},{"title":"Reserved Catalogue Fields","href":"/articles/unify-customer/reserved-catalogue-fields"}]},{"title":"Data Types in Catalogue","href":"/articles/unify-customer/data-types-in-catalogue"},{"group":"Add a Catalogue Field","root":{"title":"Add a Catalogue Field","href":"/articles/unify-customer/add-a-catalogue-field"},"pages":[{"group":"Categories for adding Catalogue fields","root":{"title":"Categories for adding Catalogue fields","href":"/articles/unify-customer/categories-in-catalogue"},"pages":[{"title":"Add a Consent Category","href":"/articles/unify-customer/adding-a-consent-category"},{"title":"Add a Campaign Category","href":"/articles/unify-customer/adding-a-campaign-category"},{"title":"Add a Product Category","href":"/articles/unify-customer/adding-a-product-category"},{"title":"Add a Marketing Preference Category","href":"/articles/unify-customer/adding-a-marketing-preference-category"},{"title":"Add an Event Category","href":"/articles/unify-customer/adding-an-event-category"},{"title":"Add an ID Metadata Category","href":"/articles/unify-customer/adding-an-id-metadata-category"},{"title":"Add an ID Consent Category","href":"/articles/unify-customer/adding-an-id-consent-category"},{"title":"Add an ID Category","href":"/articles/unify-customer/adding-an-id-category"},{"title":"Add a User Trait Category","href":"/articles/unify-customer/adding-a-user-trait-category"},{"title":"Add a Non-Customer Entity Category","href":"/articles/unify-customer/adding-a-non-customer-entity-category"}]}]},{"title":"Edit a Catalogue Field","href":"/articles/unify-customer/edit-a-catalogue-field"},{"group":"Map the Catalogue","root":{"title":"Map the Catalogue","href":"/articles/unify-customer/map-the-catalogue"},"pages":[{"group":"Supported Data Entities","root":{"title":"Supported Data Entities","href":"/articles/unify-customer/supported-data-entities"},"pages":[{"group":"Customer Data","root":{"title":"Customer Data","href":"/articles/unify-customer/customer-data"},"pages":[{"title":"Map the Catalogue for Customer Data","href":"/articles/unify-customer/map-the-catalogue-for-customer-data"}]},{"group":"Non Customer Entity Data","root":{"title":"Non-Customer Entity Data","href":"/articles/unify-customer/non-customer-entity-data"},"pages":[{"title":"How to use NCE","href":"/articles/unify-customer/how-to-use-nce"},{"title":"Why do we need NCE?","href":"/articles/unify-customer/why-do-we-need-nce"},{"title":"Understand One-to-Many Relationship in NCE","href":"/articles/unify-customer/understand-one-to-many-relationship-in-nce"},{"title":"Join Key Enricher","href":"/articles/unify-customer/join-key-enricher"},{"title":"Using Composite Key in NCE","href":"/articles/unify-customer/using-composite-key-in-nce"},{"title":"Map the Catalogue for Non-Customer Entity Data","href":"/articles/unify-customer/map-the-catalogue-for-non-customer-entity-data"}]},{"title":"Auto Mapping","href":"/articles/unify-customer/auto-mapping"}]}]},{"title":"Editing a Catalogue Mapping","href":"/articles/unify-customer/editing-a-mapping"},{"title":"Ingestion Filter Criteria","href":"/articles/unify-customer/ingestion-filter"},{"title":"Override the Source Data Type","href":"/articles/unify-customer/override-the-source-data-type"},{"group":"Enrichers","root":{"title":"Enrichers","href":"/articles/unify-customer/enrichers"},"pages":[{"title":"Predefined Data Transformers","href":"/articles/unify-customer/enrichers-for-data-transformation-2816770049"},{"group":"Custom Transformers","root":{"title":"Enrichers for Custom Transformations","href":"/articles/unify-customer/enrichers-for-custom-transformations"},"pages":[{"group":"Use Cases for Custom Transformers","root":{"title":"Use Cases for Custom Transformers","href":"/articles/unify-customer/use-cases-for-custom-transformers"},"pages":[{"title":"Scenario 1: Transformation of Consent Using a Custom Transformer","href":"/articles/unify-customer/scenario-1-transformation-of-consent-using-a-custom-transformer"},{"title":"Scenario 2: Transformation of Currency Data Using a Custom Transformer","href":"/articles/unify-customer/scenario-2-transformation-of-currency-data-using-custom-transformer"},{"title":"Scenario 3: Extraction of Object Data Using a Custom Transformer","href":"/articles/unify-customer/scenario-3-extraction-of-object-data-using-custom-transformer"},{"title":"Scenario 4: Transformation of Array Using a Custom Transformer","href":"/articles/unify-customer/scenario-4-transformation-of-array-using-custom-transformer"},{"title":"Scenario 5: Transformation of Cellphone Number into E164 Format Using a Custom Transformer","href":"/articles/unify-customer/scenario-5-transformation-of-cellphone-number-into-e164-format-using-custom-transformer"}]}]},{"group":"Configure the Enrichers","root":{"title":"Configuring the Enrichers","href":"/articles/unify-customer/configuring-the-enrichers"},"pages":[{"title":"Configure the Country Enricher","href":"/articles/unify-customer/configuring-the-country-enricher"},{"title":"Configure the Timestamp Enricher","href":"/articles/unify-customer/configuring-the-timestamp-enricher"},{"title":"Configure the Value Mapper Enricher","href":"/articles/unify-customer/configuring-the-value-mapper-enricher"},{"title":"Configure the Hardcode Enricher","href":"/articles/unify-customer/configuring-the-hardcode-enricher"},{"title":"Configure the Derived Field Enricher","href":"/articles/unify-customer/configuring-the-derived-field-enricher"},{"title":"Configure the Custom Transformation Enricher","href":"/articles/unify-customer/configuring-the-custom-transformation-enricher"},{"title":"Configure the Join Key Enricher","href":"/articles/unify-customer/configuring-the-join-key-enricher"}]}]},{"title":"Hashing Guidelines","href":"/articles/unify-customer/hashing-guidelines"},{"title":"Data Onboarding Guide for Partners","href":"/articles/unify-customer/data-onboarding-guide-for-partners"},{"title":"Time-to-Live","href":"/articles/unify-customer/time-to-live"},{"title":"Group Name","href":"/articles/unify-customer/group-name"},{"title":"Taxonomy","href":"/articles/unify-customer/taxonomy-and-catalogue"},{"title":"FAQs about Catalogue","href":"/articles/unify-customer/faqs-about-catalogue"},{"title":"FAQs about Mapping and Ingestion","href":"/articles/unify-customer/faqs-about-mapping-and-ingestion"}]},{"group":"Calculated Attributes","icon":"calculator","root":{"title":"Calculated Attributes","href":"/articles/unify-customer/calculated-attributes"},"expanded":true,"pages":[{"title":"How Calculated Attributes Work","href":"/articles/unify-customer/how-calculated-attributes-work"},{"title":"Batch vs. Real-Time Calculated Attributes","href":"/articles/unify-customer/batch-vs-real-time-calculated-attributes"},{"title":"Components of the Calculated Attributes Screen","href":"/articles/unify-customer/components-of-the-calculated-attributes-screen"},{"title":"Create a Batch Calculated Attribute","href":"/articles/unify-customer/add-a-calculated-attribute"},{"title":"Create a Real-Time Calculated Attribute","href":"/articles/unify-customer/create-a-real-time-calculated-attribute"},{"title":"Segment Membership Calculated Attribute","sidebarTitle":"Segment Membership","href":"/articles/unify-customer/system-defined-calculated-attributes"},{"title":"Calculated Attributes: Use Cases","href":"/articles/unify-customer/calculated-attributes-use-cases"},{"title":"Calculated Attributes: Guardrails \u0026 Limits","href":"/articles/unify-customer/calculated-attributes-guardrails-and-limits"},{"title":"FAQs about Calculated Attributes","href":"/articles/unify-customer/faqs-about-calculated-attributes"}]},{"group":"ID Strategy","icon":"fingerprint","root":{"title":"Identity Resolution","href":"/articles/unify-customer/identity-resolution"},"expanded":true,"pages":[{"group":"Types of ID Strategies","root":{"title":"Types of ID Strategies","href":"/articles/unify-customer/id-strategies"},"pages":[{"title":"Default ID Strategy","href":"/articles/unify-customer/default-id-strategy"},{"group":"High-fidelity or Custom ID Strategy","root":{"title":"High-fidelity or Custom ID Strategy","href":"/articles/unify-customer/high-fidelity-or-custom-id-strategy"},"pages":[{"title":"How does Custom Strategy Work","href":"/articles/unify-customer/how-does-the-strategy-work"},{"title":"ID Prioritisation","href":"/articles/unify-customer/id-prioritisation"},{"title":"How to Stitch Unknown to Known Profile using the Custom Strategy","href":"/articles/unify-customer/how-to-stitch-unknown-to-known-profile-using-the-custom-strategy"}]}]},{"title":"ID Strategy Use Cases","href":"/articles/unify-customer/id-strategy-use-cases"},{"title":"Configure the ID Strategy","href":"/articles/unify-customer/configure-the-id-strategy"},{"title":"Edit an ID Strategy","href":"/articles/unify-customer/edit-an-id-strategy"},{"title":"FAQs about Identity Strategy","href":"/articles/unify-customer/faqs-about-identity-resolution"}]}]},{"group":"Segment","icon":"users","root":{"title":"Audiences","href":"/articles/segment-customer/audience"},"expanded":false,"pages":[{"title":"Audience lifecycle","sidebarTitle":"Audience lifecycle","href":"/articles/segment-customer/audience-lifecycle"},{"title":"Batch audience vs real-time audience","sidebarTitle":"Batch vs real-time","href":"/articles/segment-customer/batch-audience-vs-real-time-audience"},{"title":"Real-time audiences vs journeys","sidebarTitle":"Real-time vs journeys","href":"/articles/segment-customer/real-time-audience-vs-journeys"},{"title":"RFM predictive model","sidebarTitle":"RFM model","href":"/articles/segment-customer/predictive-model"},{"group":"Build an Audience","icon":"filter","root":{"title":"Create an audience","sidebarTitle":"Create an audience","href":"/articles/segment-customer/create-an-audience"},"expanded":true,"pages":[{"title":"Apply attributes to your audience","sidebarTitle":"Apply attributes","href":"/articles/segment-customer/apply-attributes-to-your-audience"},{"title":"Operators used in audience segmentation","sidebarTitle":"Audience operators","href":"/articles/segment-customer/work-with-operators"},{"title":"How do conditional blocks work","sidebarTitle":"Conditional blocks","href":"/articles/segment-customer/how-do-conditional-blocks-work"},{"title":"NOT logic vs. Does Not Exist","sidebarTitle":"NOT vs Does Not Exist","href":"/articles/segment-customer/not-logic-vs-does-not-exist"},{"title":"Create an audience with Ada (AI-based audience builder)","sidebarTitle":"Ada audience builder","href":"/articles/segment-customer/create-audience-using-ada-ai-based-audience-builder"},{"title":"Choose the Output Identifiers","href":"/articles/segment-customer/choose-the-output-identifiers"}]},{"group":"Activate \u0026 Send to Destinations","icon":"rocket","root":{"title":"Activate Your Audience","href":"/articles/segment-customer/activate-your-audience"},"expanded":true,"pages":[{"title":"Link an audience to a destination","sidebarTitle":"Link to destination","href":"/articles/segment-customer/link-the-destination"},{"title":"Create a new destination","sidebarTitle":"Create a new destination","href":"/articles/segment-customer/create-a-new-destination"},{"title":"Explore A/B Testing","href":"/articles/segment-customer/ab-testing"},{"title":"Extend your audience","sidebarTitle":"Extend your audience","href":"/articles/segment-customer/extend-your-audience"},{"title":"Audience Boost","sidebarTitle":"Audience Boost","href":"/articles/segment-customer/audience-boost"},{"title":"Troubleshoot Audience Boost","href":"/articles/segment-customer/troubleshoot-audience-boost"},{"title":"Enable Membership (Beta)","sidebarTitle":"Enable Membership","href":"/articles/segment-customer/enable-membership"},{"title":"Audience Scheduling","href":"/articles/segment-customer/audience-scheduling"},{"title":"Using the 'Delete customers in this Audience from the system' checkbox","href":"/articles/segment-customer/using-the-delete-customers-in-this-audience-from-the-system-checkbox"},{"title":"Delta Upload and Delete Functions","href":"/articles/segment-customer/delta-upload-and-delete-functions"},{"title":"Key Factors Influencing the Data Upload to Destinations","href":"/articles/segment-customer/factors-influencing-the-data-upload-time-to-destinations"},{"title":"Object, List of Objects and NCE Support in Destination Upload","href":"/articles/segment-customer/object-list-of-objects-and-nce-support-in-destination-upload"},{"title":"Enrichers in Destination Mapping","href":"/articles/segment-customer/enrichers-in-destination-mapping"}]},{"group":"Manage \u0026 Organize","icon":"folder-tree","root":{"title":"Explore audience listing page options","sidebarTitle":"Audience listing page","href":"/articles/segment-customer/audience-listing-page-options"},"expanded":true,"pages":[{"title":"Work with folders","sidebarTitle":"Folders","href":"/articles/segment-customer/work-with-folders"},{"title":"Audience templates","sidebarTitle":"Audience templates","href":"/articles/segment-customer/audience-templates"},{"title":"Audience status and activation status","sidebarTitle":"Audience statuses","href":"/articles/segment-customer/audience-status-and-activation-status"}]},{"group":"Monitor","icon":"chart-line","pages":[{"title":"Audience Insights","href":"/articles/segment-customer/audience-insights"},{"title":"Audience Alerts","href":"/articles/segment-customer/audience-alerts"},{"title":"Audience Destination Alert Emails","href":"/articles/segment-customer/audience-destination-alert-emails"}]},{"group":"FAQs","icon":"circle-question","pages":[{"title":"FAQs for real-time audience creation","sidebarTitle":"Real-time audience FAQs","href":"/articles/segment-customer/faqs-for-real-time-audience-creation"}]}]},{"group":"Orchestrate","icon":"code-branch","root":{"title":"Orchestrate","sidebarTitle":"Orchestrate","href":"/articles/orchestrate-customer/orchestrate"},"expanded":false,"pages":[{"group":"Build a journey","icon":"diagram-project","root":{"title":"Create a Workflow","href":"/articles/orchestrate-customer/create-a-workflow"},"expanded":true,"pages":[{"title":"Add an Entry Condition","href":"/articles/orchestrate-customer/add-an-entry-condition"},{"title":"Add a Condition","href":"/articles/orchestrate-customer/add-a-condition"},{"title":"Add a Delay","href":"/articles/orchestrate-customer/add-a-delay"},{"title":"Wait for Condition","href":"/articles/orchestrate-customer/wait-for-condition"},{"title":"Apply True/False Split","sidebarTitle":"Apply True/False Split","href":"/articles/orchestrate-customer/apply-true-false-split"},{"title":"Apply a multi-branch split","sidebarTitle":"Apply a multi-branch split","href":"/articles/orchestrate-customer/apply-multi-branch-split"},{"title":"Add or delete a node","sidebarTitle":"Add or delete a node","href":"/articles/orchestrate-customer/add-or-delete-a-node"},{"title":"Name a Node","href":"/articles/orchestrate-customer/name-a-node"},{"title":"Gateway","sidebarTitle":"Gateway","href":"/articles/orchestrate-customer/gateway"},{"title":"Save as draft","sidebarTitle":"Save as draft","href":"/articles/orchestrate-customer/save-as-draft"}]},{"group":"Journey Settings","icon":"sliders","pages":[{"title":"Add Concurrent Entry","href":"/articles/orchestrate-customer/add-concurrent-entry"},{"title":"Add Re-entry Criteria","href":"/articles/orchestrate-customer/add-re-entry-criteria"}]},{"group":"Manage \u0026 Organize","icon":"folder-tree","root":{"title":"Explore Journeys Listing Page Options","href":"/articles/orchestrate-customer/components-of-the-listing-screen"},"expanded":true,"pages":[{"title":"Organise journeys into folders","sidebarTitle":"Journey folders","href":"/articles/orchestrate-customer/journey-folders"},{"title":"Journey Templates","href":"/articles/orchestrate-customer/journey-templates"}]},{"group":"Monitor","icon":"chart-line","pages":[{"title":"Understand Metrics","href":"/articles/orchestrate-customer/understand-metrics"},{"title":"Journey Traces","href":"/articles/orchestrate-customer/journey-traces"}]},{"group":"Troubleshoot \u0026 Errors","icon":"triangle-exclamation","pages":[{"title":"Identify journey errors","sidebarTitle":"Identify journey errors","href":"/articles/orchestrate-customer/identify-journey-errors"},{"title":"Journey error codes","sidebarTitle":"Journey error codes","href":"/articles/orchestrate-customer/journey-error-codes"},{"title":"Troubleshooting journeys","sidebarTitle":"Troubleshooting journeys","href":"/articles/orchestrate-customer/journey-troubleshooting"}]},{"group":"FAQs","icon":"circle-question","pages":[{"title":"Frequently asked questions","sidebarTitle":"Frequently asked questions","href":"/articles/orchestrate-customer/frequently-asked-questions"}]}]},{"group":"Collaborate","icon":"handshake","root":{"title":"Collaborate","sidebarTitle":"Overview","href":"/articles/collaborate-customer/collaborate"},"expanded":false,"pages":[{"title":"Quick Start: Your First Partnership","href":"/articles/collaborate-customer/quick-start"},{"title":"Contributor Guide","href":"/articles/collaborate-customer/contributor-guide"},{"title":"Subscriber Guide","href":"/articles/collaborate-customer/subscriber-guide"},{"title":"Key Concepts","href":"/articles/collaborate-customer/key-concepts"},{"title":"Frequently Asked Questions","href":"/articles/collaborate-customer/frequently-asked-questions"}]},{"group":"Dashboard","icon":"chart-bar","root":{"title":"Overview","href":"/articles/dashboard-customer/overview"},"expanded":false,"pages":[]},{"group":"Protect","icon":"shield-halved","root":{"title":"Protect","href":"/articles/protect-customer/protect"},"expanded":false,"pages":[{"group":"Consent","icon":"handshake","root":{"title":"Consent","href":"/articles/protect-customer/consent"},"expanded":true,"pages":[{"title":"Granular Consent","href":"/articles/protect-customer/processing-and-storing-granular-consent-2830598176"},{"title":"Marketing Preferences","href":"/articles/protect-customer/processing-and-storing-customer-marketing-preferences-2830630950"},{"title":"Consent Orchestration","href":"/articles/protect-customer/consent-orchestration-2830401643"}]},{"group":"Customer 360","icon":"circle-user","root":{"title":"Customer 360","href":"/articles/protect-customer/customer-360"},"expanded":true,"pages":[{"title":"Lookup a User Profile","href":"/articles/protect-customer/working-with-customer-360"},{"title":"Delete a Profile","href":"/articles/protect-customer/delete-a-profile"},{"title":"Frequently Asked Questions","href":"/articles/protect-customer/frequently-asked-questions"}]},{"group":"Data Lifecycle","icon":"arrows-rotate","root":{"title":"Data Lifecycle","href":"/articles/protect-customer/data-lifecycle"},"expanded":true,"pages":[{"title":"Working with different Data Lifecycle Screens","href":"/articles/protect-customer/working-with-different-data-lifecycle-screens"},{"title":"Create a Deletion Rule for Customer Data","href":"/articles/protect-customer/create-a-deletion-rule-for-customer-data"},{"title":"FAQs for Data Lifecycle","href":"/articles/protect-customer/faqs-for-data-lifecycle"},{"title":"Create a Deletion Rule for Non-Customer Entity Data","href":"/articles/protect-customer/create-a-deletion-rule-for-nce-data"}]}]},{"group":"Admin","icon":"gear","root":{"title":"Admin","href":"/articles/admin-customer/admin"},"expanded":false,"pages":[{"title":"My Organisation","href":"/articles/admin-customer/creating-an-organisation"},{"title":"My Roles","href":"/articles/admin-customer/my-roles"},{"title":"Access Rules","sidebarTitle":"Access Rules","href":"/articles/admin-customer/access-rules"},{"group":"My Users","root":{"title":"My Users","href":"/articles/admin-customer/add-an-user"},"expanded":true,"pages":[{"title":"User Roles and Access","href":"/articles/admin-customer/user-roles-and-access"},{"title":"Roles and their descriptions","href":"/articles/admin-customer/role-descriptions"}]},{"group":"Request Access","root":{"title":"Request Access","href":"/articles/admin-customer/request-access"},"expanded":true,"pages":[{"title":"Process to follow for Org/User creation or access","href":"/articles/admin-customer/process-to-follow-for-org-user-creation-or-access-1"}]},{"group":"Audit Logs","root":{"title":"Audit Logs","href":"/articles/admin-customer/audit-logs"},"expanded":true,"pages":[{"title":"Events Tracked in Zeotap CDP","href":"/articles/admin-customer/events-tracked-in-zeotap-cdp"}]},{"title":"Alerts \u0026 Notifications","href":"/articles/admin-customer/alerts-and-notifications"},{"title":"Logging In \u0026 Two-Factor Authentication","href":"/articles/admin-customer/your-first-login-to-the-zeotap-cdp-platform"}]},{"group":"Labs","icon":"flask-vial","root":{"title":"Labs","href":"/articles/labs-customer/labs"},"expanded":false,"pages":[{"group":"AI Playground","icon":"sparkles","root":{"title":"AI Playground","href":"/articles/labs-customer/ai-playground"},"expanded":false,"pages":[{"title":"Audience Recommender","href":"/articles/labs-customer/audience-recommender"}]},{"title":"Zeotap MCP","href":"/articles/labs-customer/zeotap-mcp"},{"title":"Observability Hub","href":"/articles/labs-customer/observability-hub"}]}]},{"tab":"SDKs","icon":"code","pages":[{"title":"SDKs","href":"/articles/sdks/overview"}]},{"tab":"Status","icon":"signal","href":"https://status.zeotap.com/"},{"tab":"Profile API","icon":"square-terminal","pages":[{"title":"Profile API","href":"/profile-api/profileapi"}]},{"tab":"Get Started","icon":"rocket","hidden":true,"pages":[{"title":"Get Started","href":"/articles/get-started-guide/getting-started"}]},{"tab":"What's New?","icon":"calendar-days","pages":[{"title":"What's New?","href":"/articles/product-release-notes/2026/q3-2026"}]},{"tab":"Composable CDP","href":"https://composable-docs.zeotap.com/"},{"tab":"ID+","icon":"fingerprint","hidden":true,"pages":[{"title":"ID+","href":"/articles/id-publication/basic-integration-guide_v2"}]},{"tab":"Support","icon":"headset","hidden":true,"pages":[{"title":"Support","href":"/articles/support/clear-your-cache-and-cookies"}]}]},"basePath":"","title":"LaunchDarkly - Zeotap docs","deploymentId":"dpl_vSEmv961Ncyvz1psVwgUnTXQMSYk","buildId":"dpl_vSEmv961Ncyvz1psVwgUnTXQMSYk","dynamics":["10e4515597","07c022d89b","a74be98ba7"],"chunks":["BannerMarkdown-DnSAhvaM.js","dist-DIfYWxfm.js","lib-DMeTj1gb.js","lib-B8HbPgcC.js","katex-Dbtb6Wk7.js","html-void-elements-mCSPHezU.js","marked.esm-CZWythHk.js","Frame-BRsfsIIG.js","DynamicMarkdown-NFqqduU7.js","zoom-image-lightbox-BguUeq2N.js","lightbox-handle-r17bVUz3.js"]}