

What this is
The Google Analytics 4 destination sends Zeotap audience membership into a GA4 property as a custom event namedzeotap_event. Each event carries two parameters — audience_name (the Zeotap audience the profile belongs to) and zeotap_event_type (add when the profile joins the audience, remove when a later refresh drops it). Inside GA4 you build a Custom Audience on top of those events, and from there you link it into Google Ads or Optimize 360 for activation. The integration supports the GA Client ID identifier, the ID Extension feature, and DELETE actions; it does not support DELTA UPLOAD.
Prerequisites
Before you start, collect the following from your Google Analytics 4 account:
- A GA4 Property with a Web Data Stream. This integration supports the web implementation of GA4 only.
- The Data Stream’s Measurement ID.
- A Measurement Protocol API Secret generated against that Data Stream.
- Two Custom Dimensions on the property, both scoped to
Event, with Event Parameter namesaudience_nameandzeotap_event_type(see Create the two required Custom Dimensions). - The GA Client ID available on the profiles you plan to activate — this is the identifier the destination sends.
Configure the GA4 property and Data Stream
If you already have a GA4 Property with a Web Data Stream, skip to step 3.-
In your Google Analytics 4 account, open Admin and select Create Property. Enter a Property Name, click Next, complete the Business information section as per your business requirement, then click Create. The GA4 property is created.
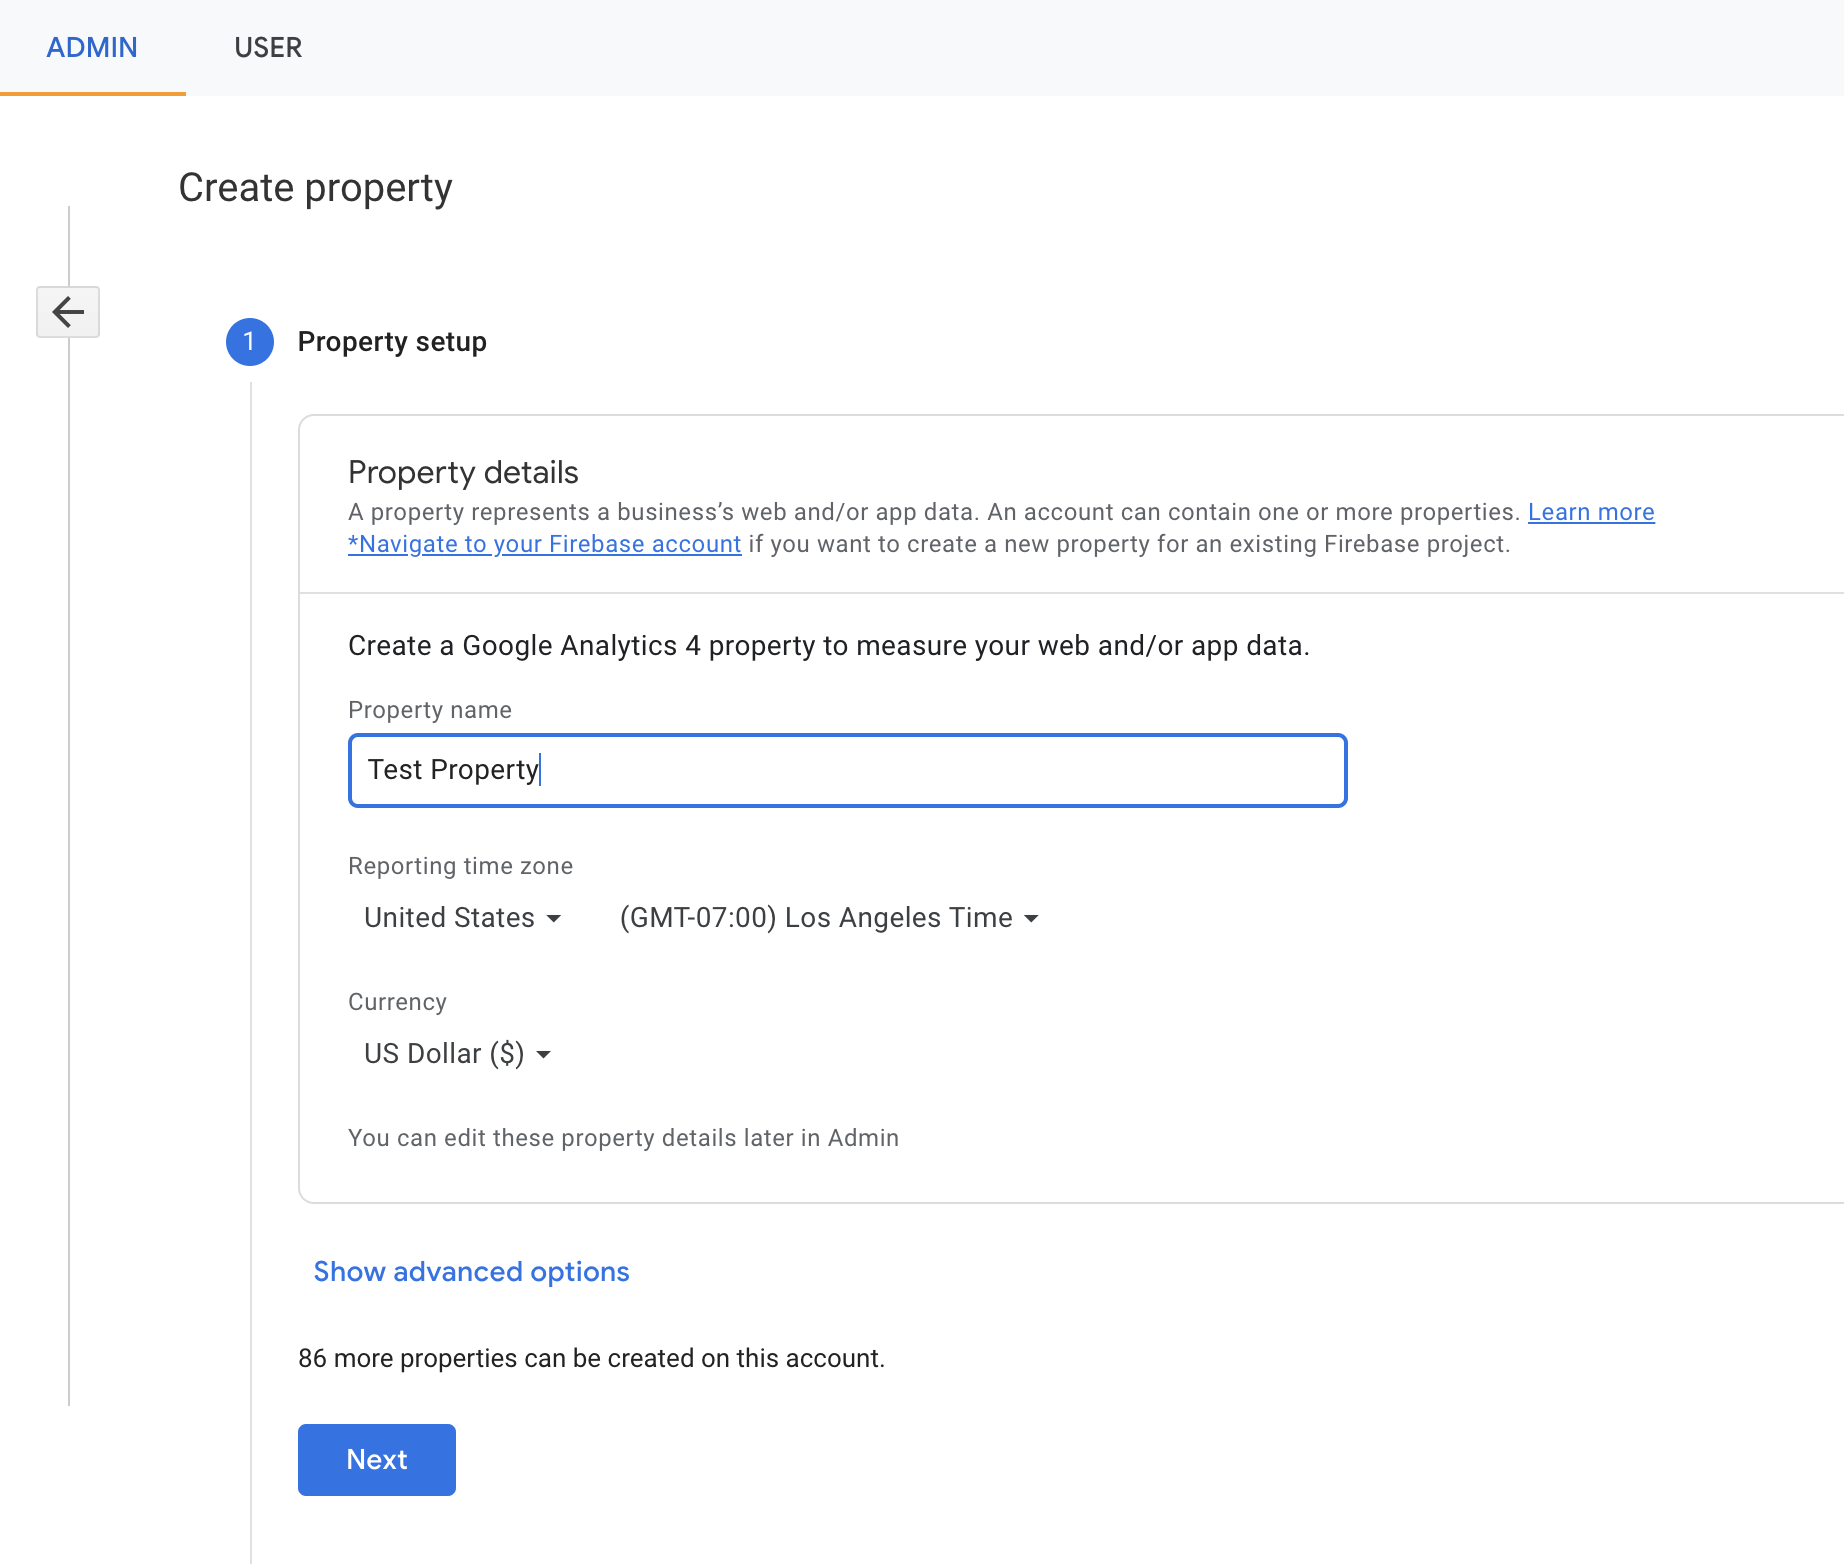
- Inside the new property, open Data Streams, choose Web, enter the Website URL you want to track and a Stream Name, then click Create Stream.
-
Open the Data Stream. A details panel opens on the right. Copy the Measurement ID — you paste it into Zeotap in a later step.
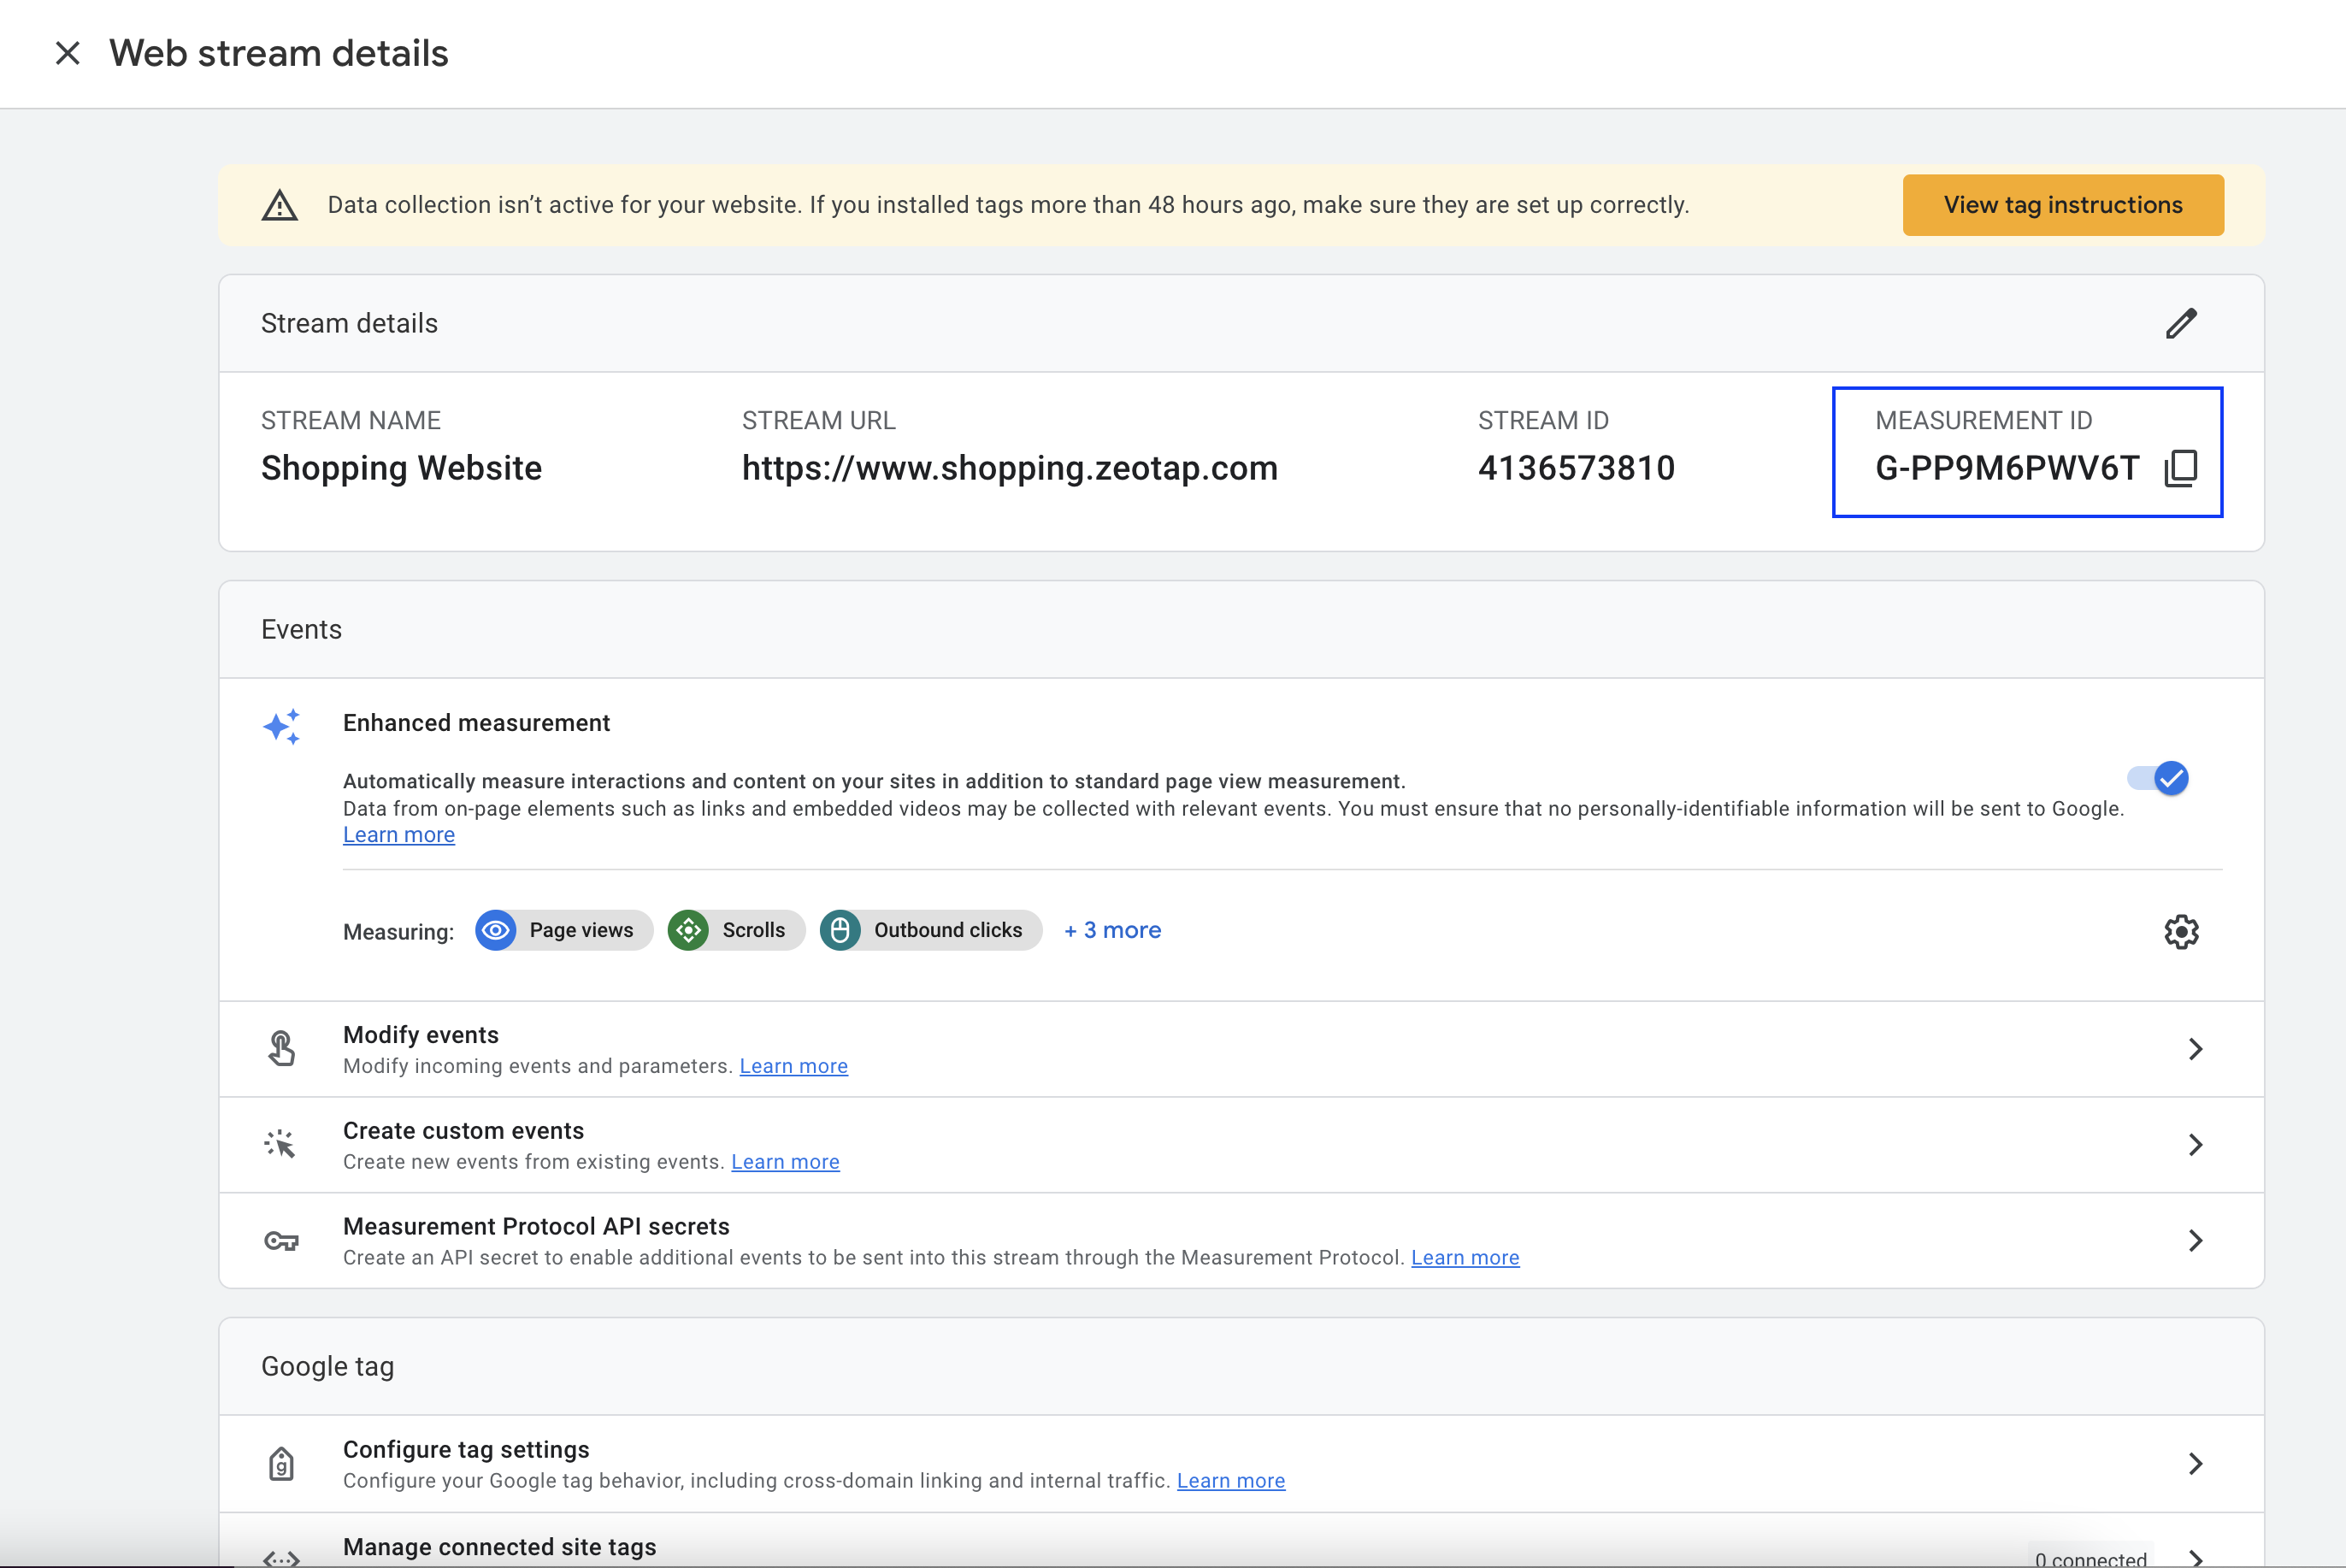
-
In the same panel, scroll down and open Measurement Protocol API secrets. Click Create, then copy the resulting API Secret.
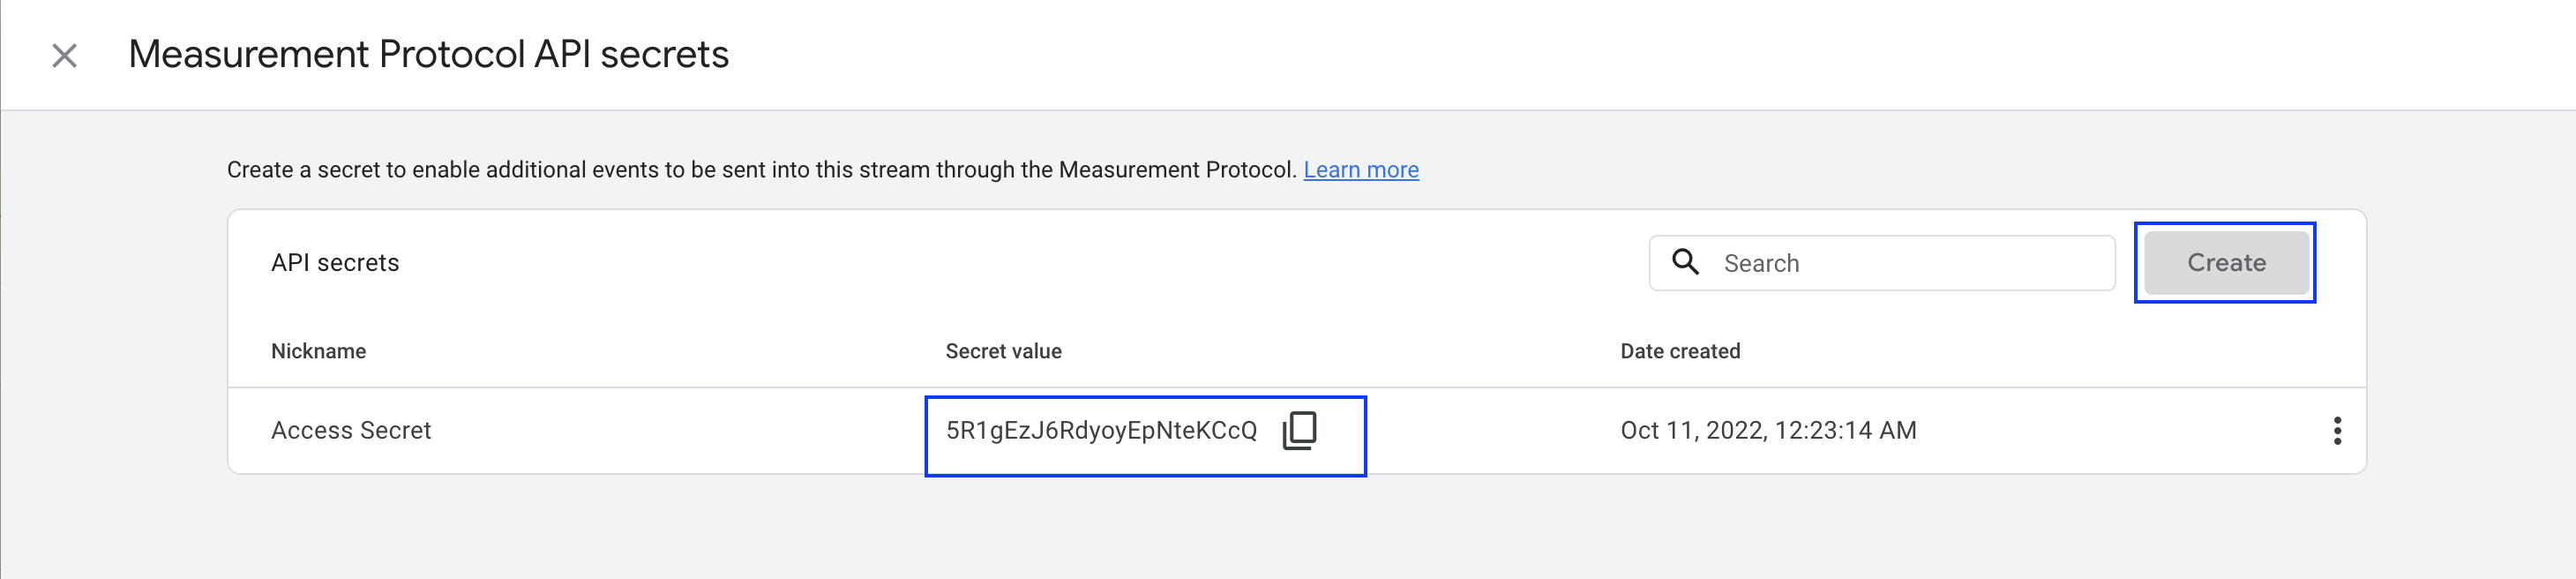
Create the two required Custom Dimensions
Without both Custom Dimensions in place, GA4 cannot resolve the parameters on thezeotap_event and any audience built on those parameters returns zero users.
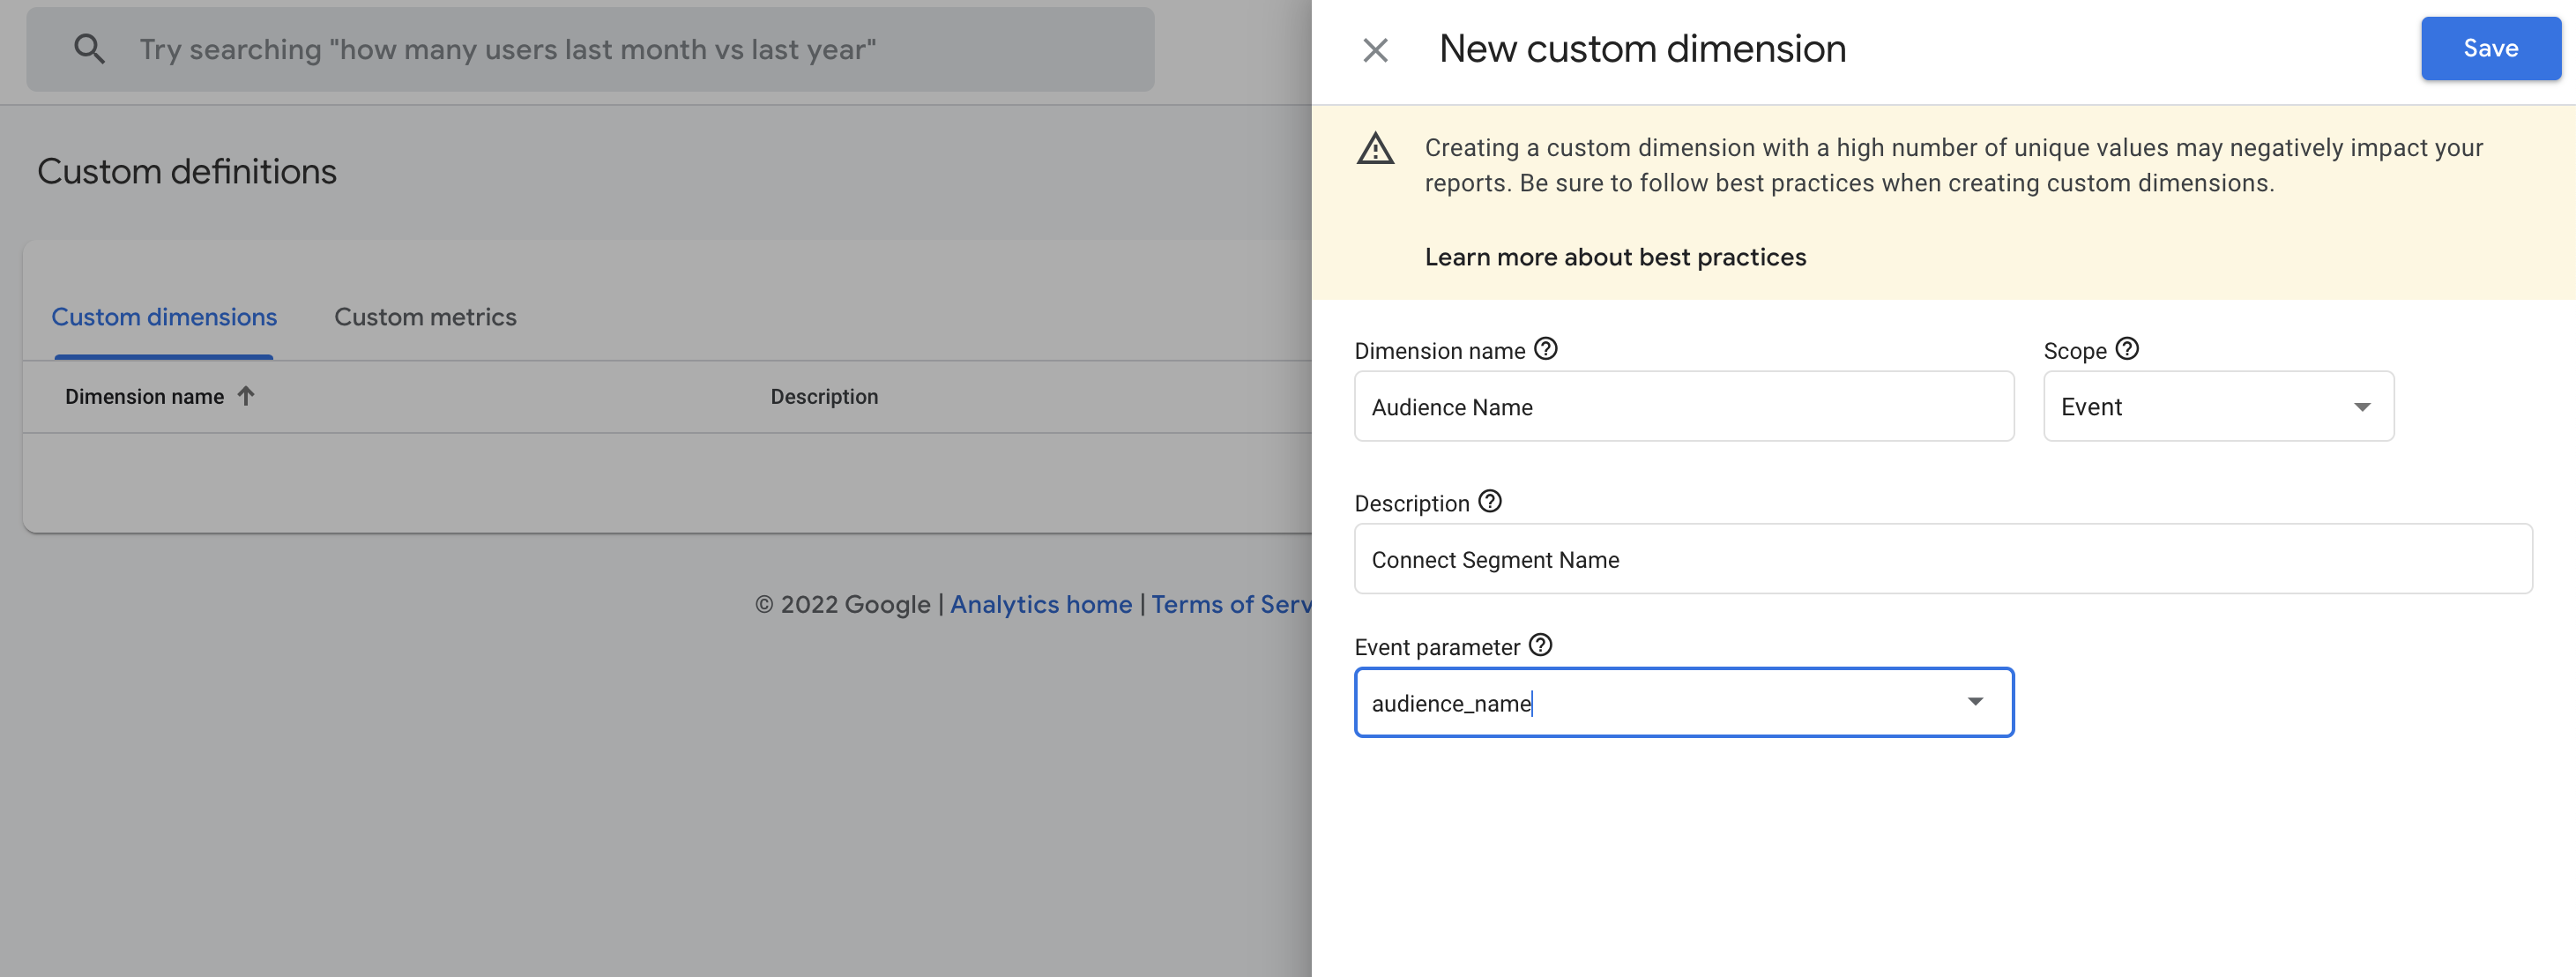
- In GA4, open Configure → Custom Definitions → Create Custom Dimensions.
-
Create the first Custom Dimension:
- Dimension Name:
Audience Name - Scope:
Event - Description: as per your requirement
- Event Parameter:
audience_name
- Dimension Name:
-
Create the second Custom Dimension:
- Dimension Name:
Zeotap Event Type - Scope:
Event - Description: as per your requirement
- Event Parameter:
zeotap_event_type
- Dimension Name:
Create the GA4 destination in Zeotap
- Log into the Zeotap CDP App and open the Destinations application.
-
Click + Create Destination.

-
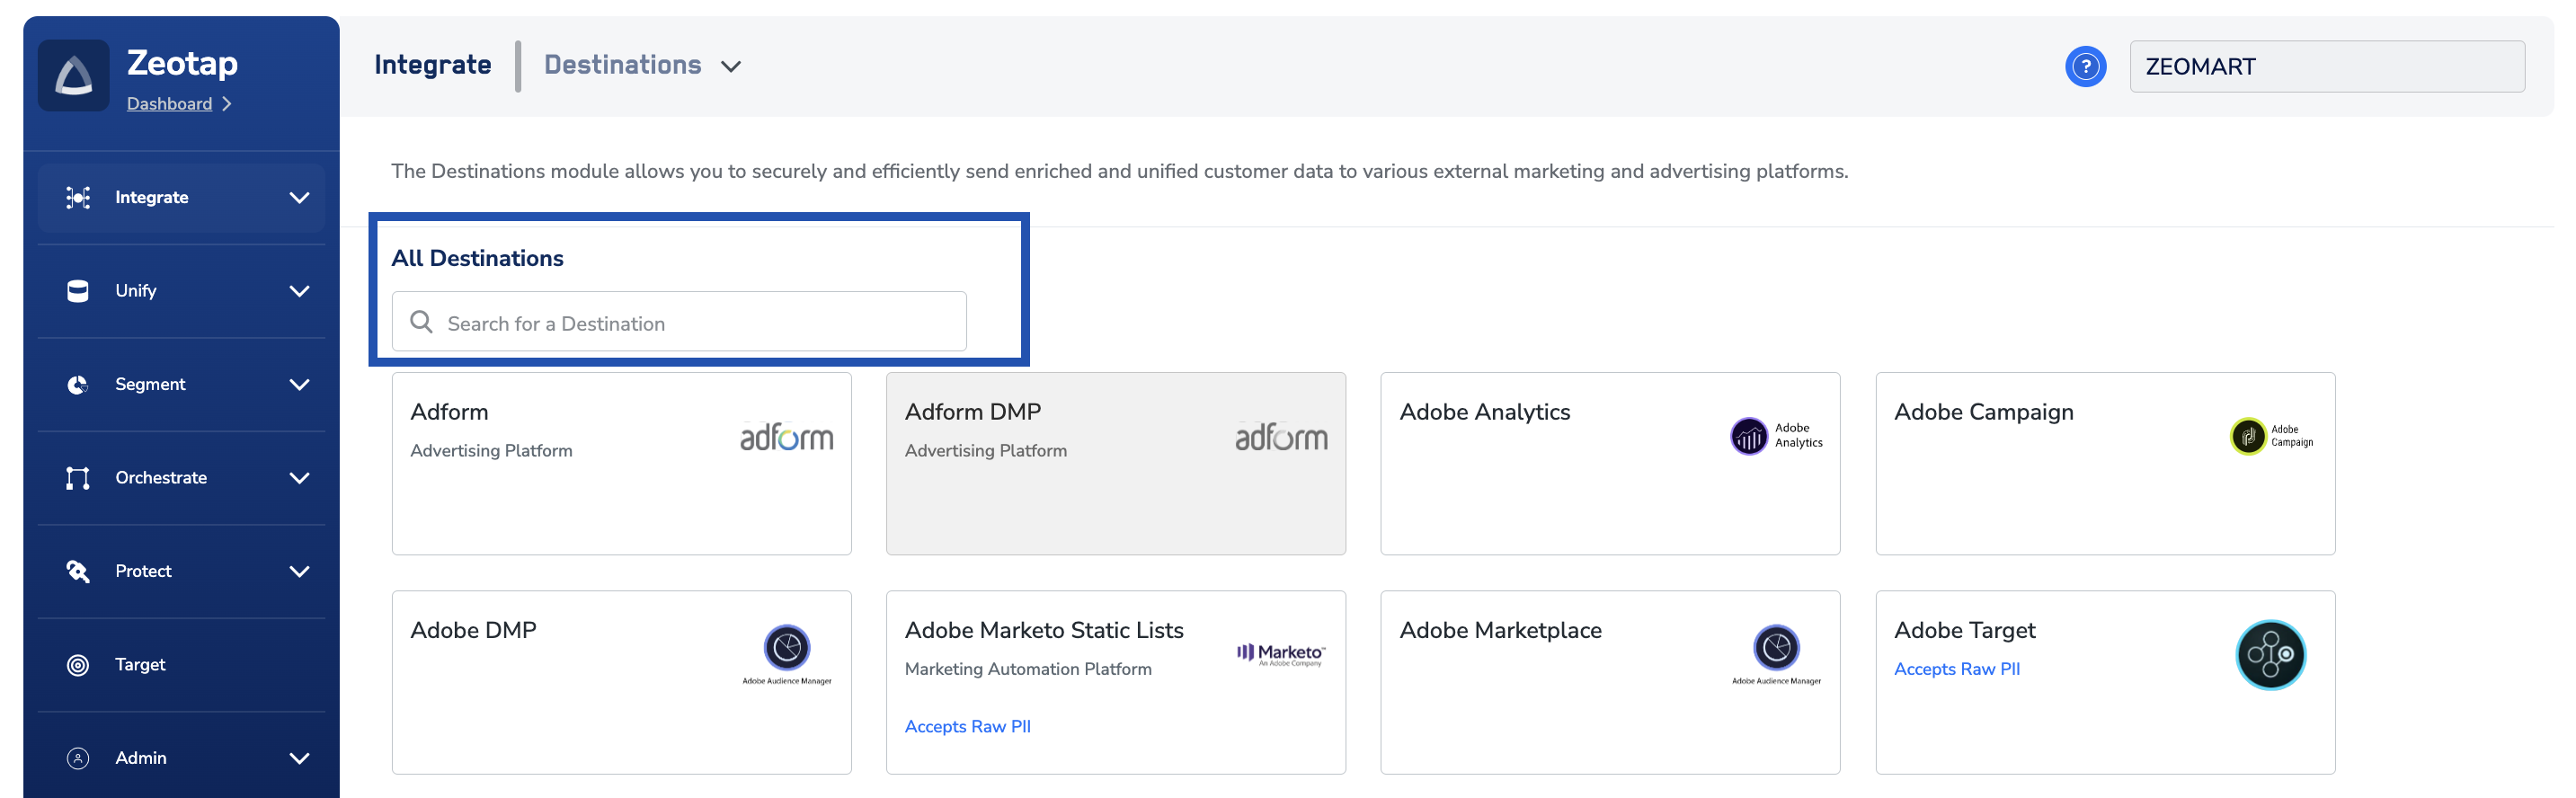
Under All Destinations, search for Google Analytics 4 and open it. The right pane shows the fields the integration needs.
-
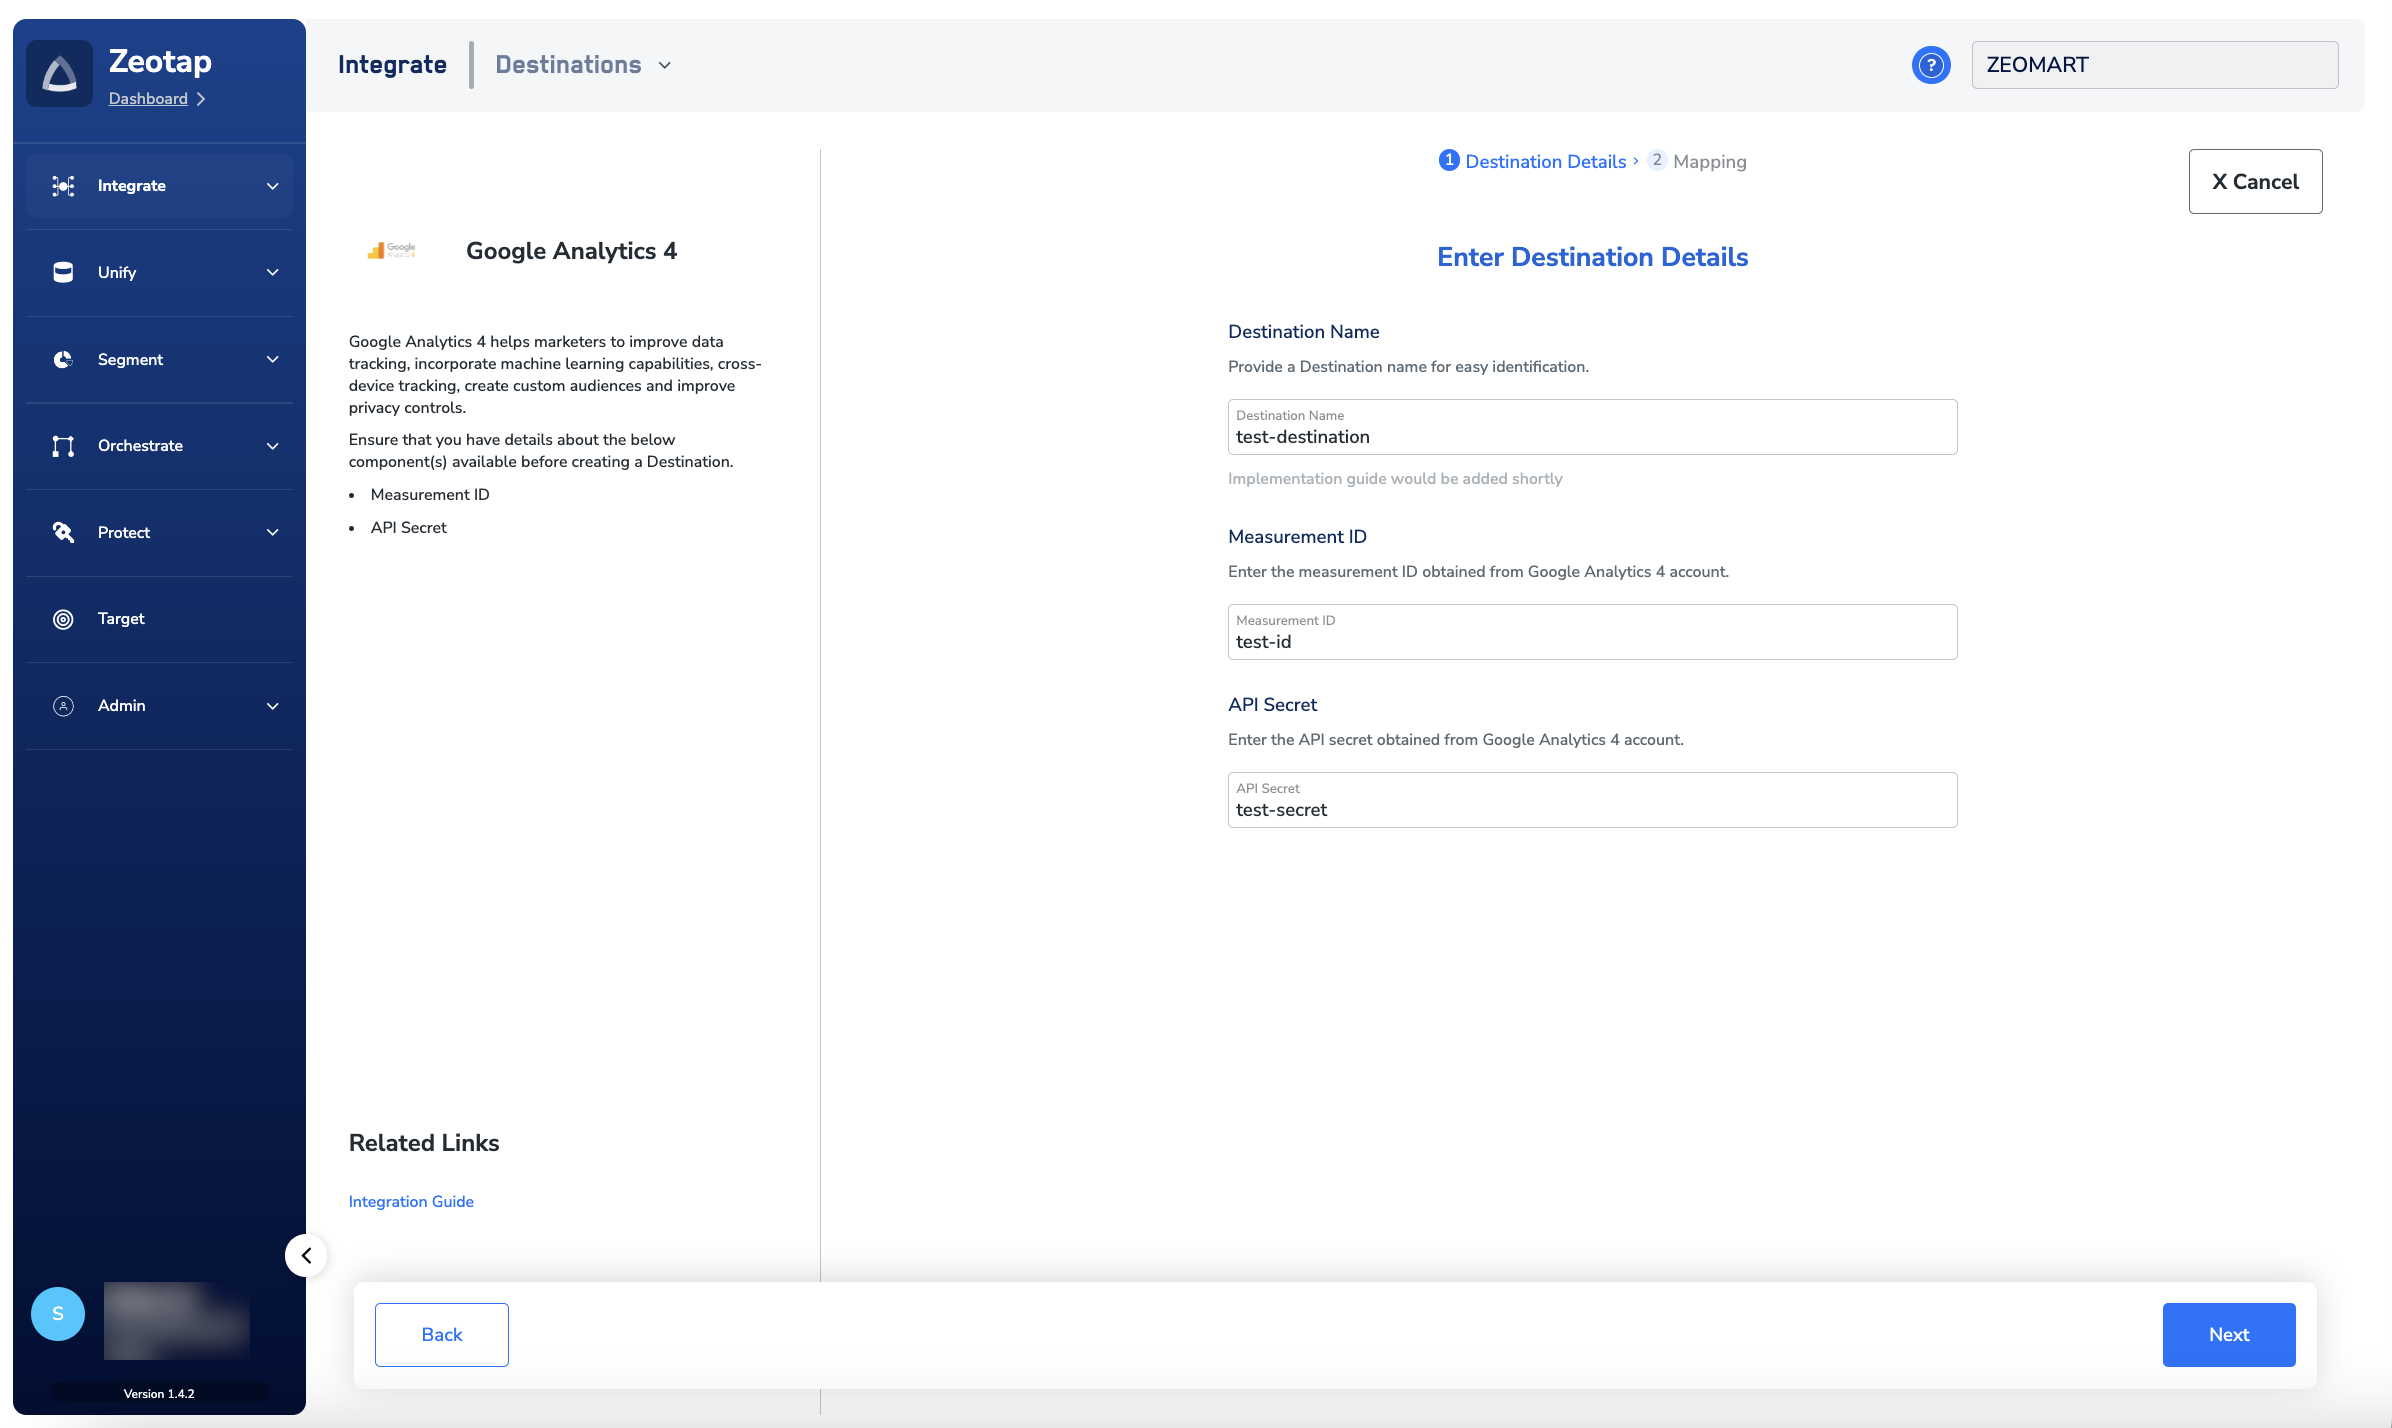
Enter a Destination Name, paste the Measurement ID and API Secret you copied from GA4, review your entries, then click Next.
-
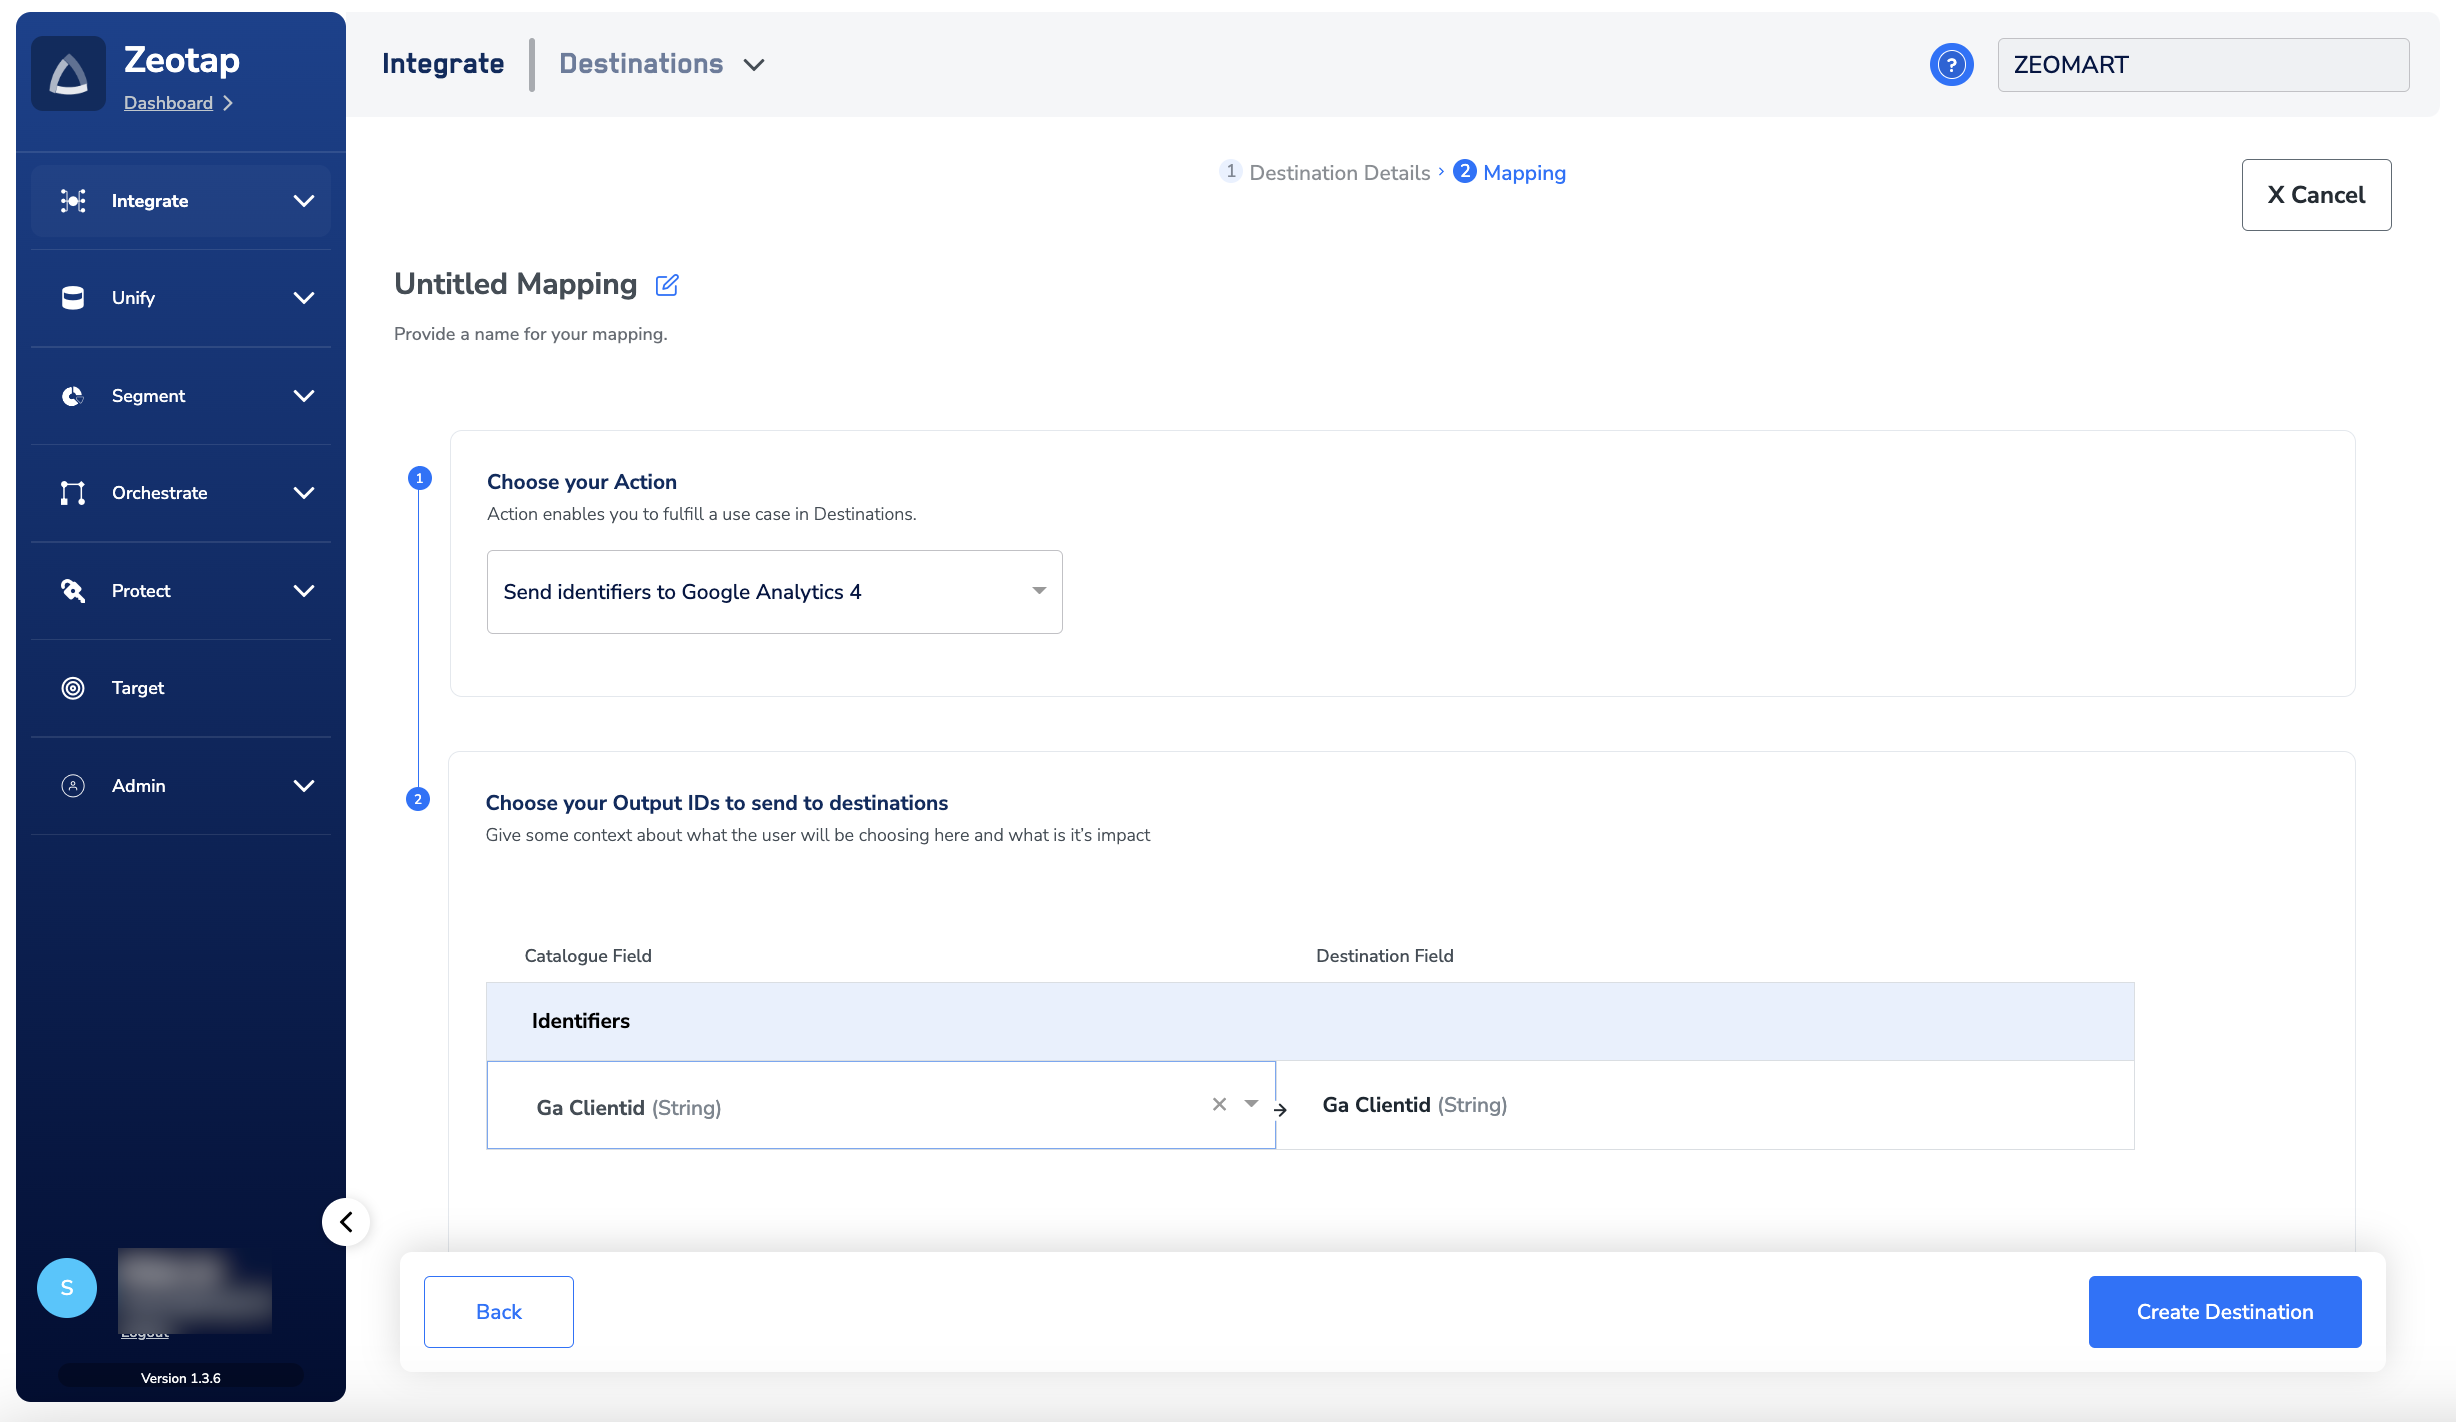
On the mapping screen, under Choose your Action select Send identifiers to Google Analytics 4. Under Map the Fields, map an output identifier to GA Client ID. You can edit, add, or remove identifier rows using the mapping controls — see Destinations — mapping for the full reference.
- Click Create Destination. The destination now appears in the Audiences application, ready to attach to an audience.
Link an audience to the destination
Attach the newly-created destination to a Zeotap audience from the Audiences application. For the full walkthrough, see Link an audience to the destination. It can take up to one business day for the audience to become available in the GA4 seat after linking.The terms Audiences and Segments are used interchangeably to refer to customer cohorts belonging to a specific category — for example, a group of customers who are over 18 years of age and performed an
addToCart event within the last 30 days.What Zeotap sends to GA4
Zeotap emits a single custom event per profile per refresh, using the GA4 Measurement Protocol. The event and its two parameters look like this:- If the profile is part of the audience in the current refresh,
zeotap_event_typeisadd. - If the profile was in the audience in an earlier refresh and has dropped out in the current one,
zeotap_event_typeisremove. This drives the user disqualification flow described below.
Verify the integration
- In GA4, open the property’s Realtime or DebugView report and confirm events named
zeotap_eventappear from your Data Stream. - Open one such event and confirm both parameters
audience_nameandzeotap_event_typeare populated, withaudience_namematching the Zeotap audience name you activated. - In GA4, open Configure → Custom Definitions and confirm both Custom Dimensions are listed with Event Parameter values
audience_nameandzeotap_event_type. - In GA4, open Configure → Audiences, build the audience described in Build a GA4 audience from the zeotap_event below, and confirm the audience size grows as GA4 processes events. GA4 processing latency depends on your account tier — see Google’s data-processing documentation.
Troubleshoot common errors
Almost every failed GA4 setup traces back to one of the conditions in this table. Work through it row-by-row before contacting support.Build a GA4 audience from the zeotap_event
Once events flow into GA4, build a Custom Audience on top ofzeotap_event.
- In GA4, open Configure → Audiences → New Audience → Create a Custom Audience.
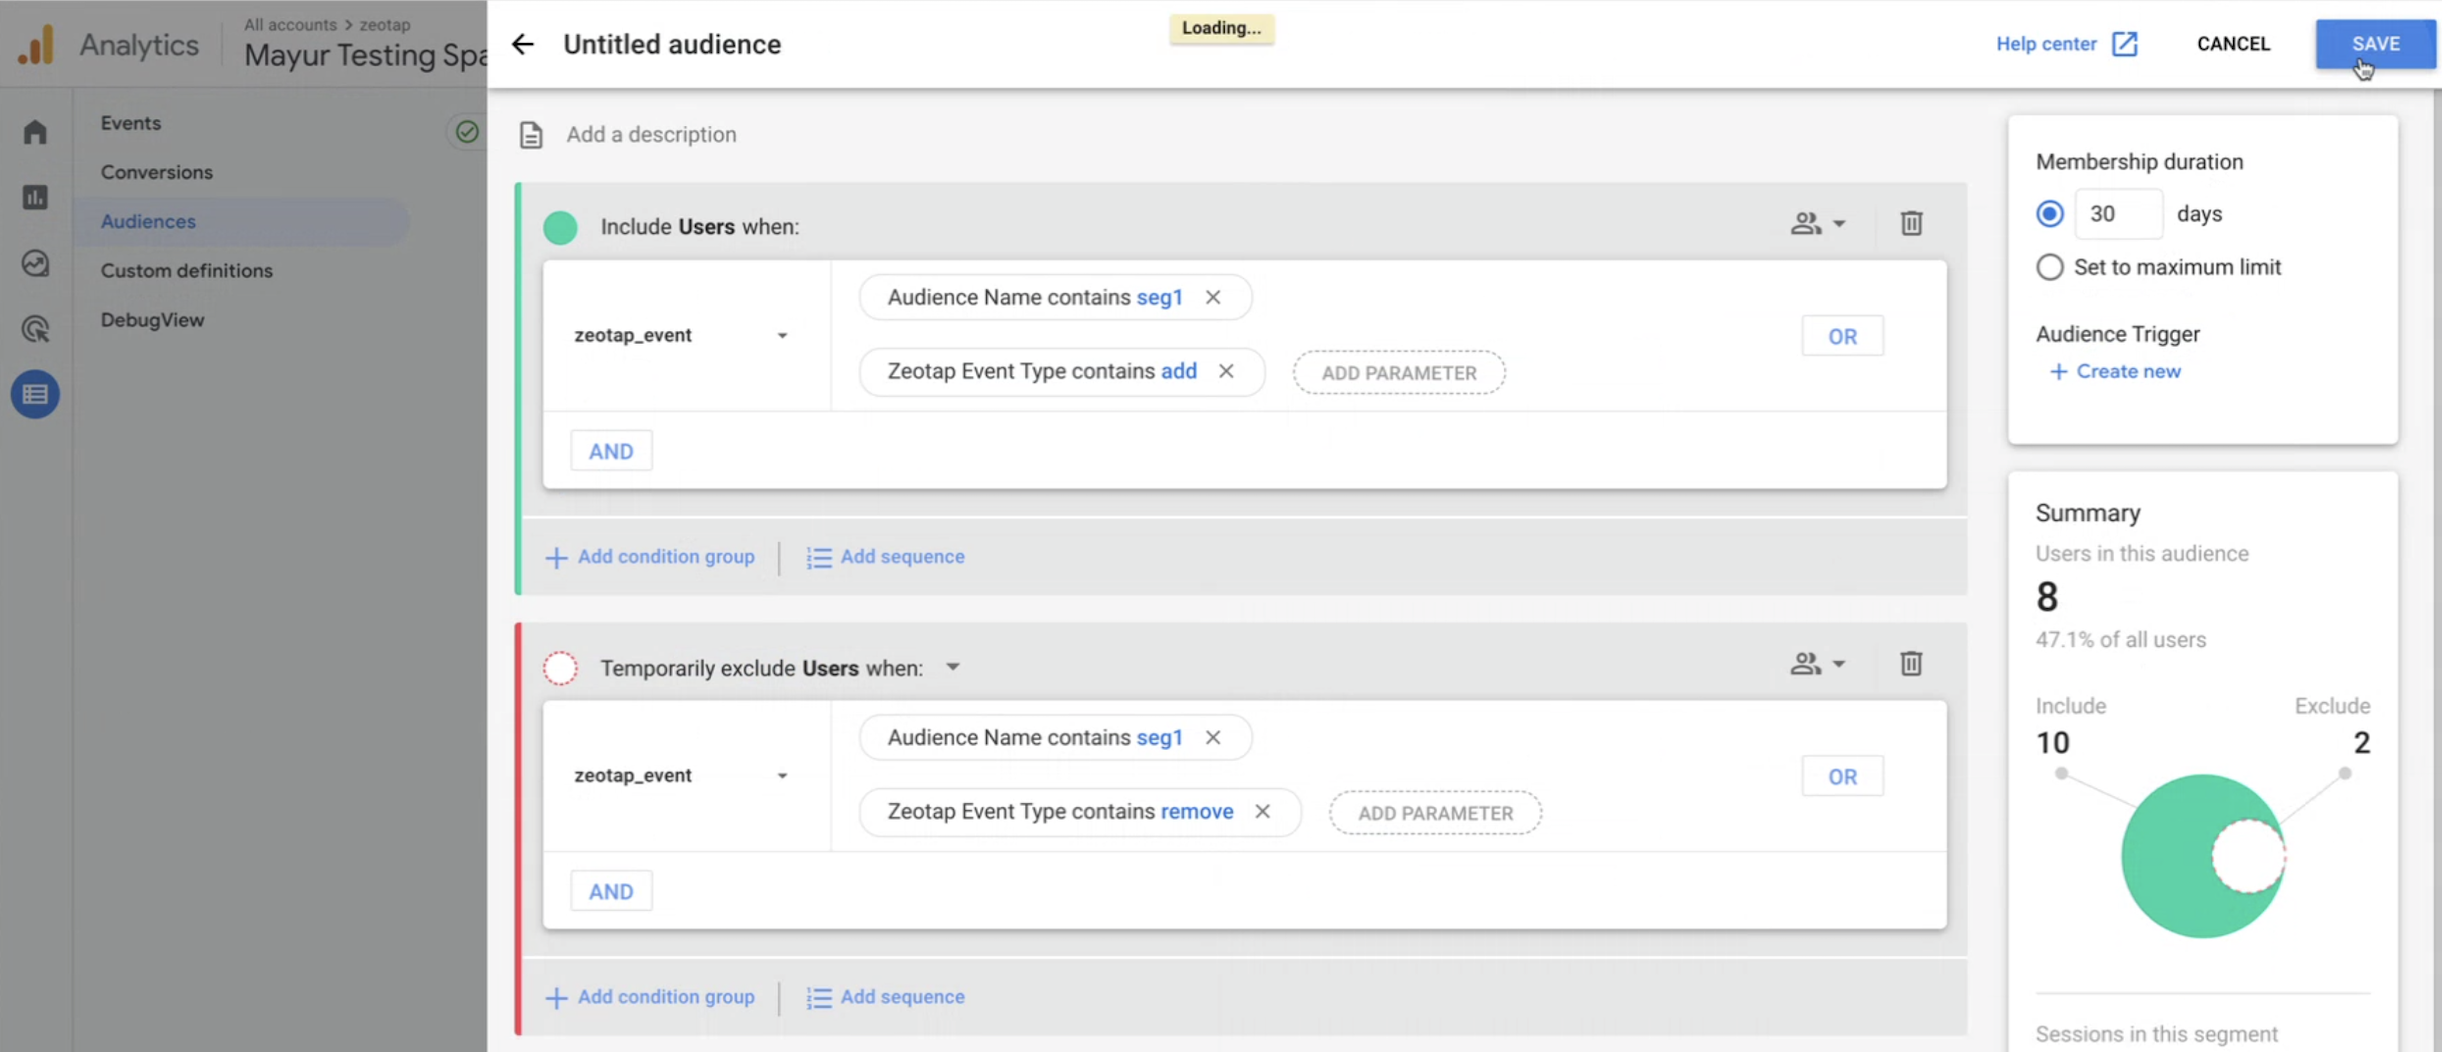
- Under Include users, click Add new condition and configure:
- Choose Events → zeotap_event from the drop-down.
- Click ADD PARAMETER and under Custom, select Audience Name → audience_name and choose the relevant Zeotap audience name from the drop-down.
- Add a second parameter: Zeotap Event Type → zeotap_event_type and choose add.
- Under ADD GROUP TO EXCLUDE, click Add new condition to exclude users removed from the audience in a later refresh:
- Choose Events → zeotap_event.
- Audience Name → audience_name matches the same Zeotap audience name.
- Zeotap Event Type → zeotap_event_type equals remove.
- Click Save.
User disqualification from audiences
The GA4 destination supports user disqualification.- When a profile no longer qualifies for a Zeotap audience — because it fails the audience criteria, consent requirements, or another condition set on the audience — Zeotap issues a deletion request in the next refresh cycle for that audience-destination pair.
- The disqualified profile is excluded from the audience based on the audience’s configured refresh frequency.
- Disqualification is programmatic. You do not configure anything to trigger it — Zeotap emits
zeotap_event_type: removefor the profile, and the GA4 audience built with theremoveexclusion condition drops the profile on the next GA4 audience evaluation.
FAQ
How long does it take for a Zeotap audience to appear in GA4?
How long does it take for a Zeotap audience to appear in GA4?
After you link a Zeotap audience to the GA4 destination, it can take up to one business day for the audience to become available at the GA4 seat. GA4-side processing of Measurement Protocol events adds additional latency on top of that — Google Analytics 360 accounts see lower latency than the free tier. See Google’s GA4 data-processing latency documentation.
Do I need to do anything to remove a user who leaves the audience?
Do I need to do anything to remove a user who leaves the audience?
No. When a profile stops qualifying for the audience, Zeotap emits
zeotap_event_type: remove on the next refresh. Provided your GA4 Custom Audience uses the exclude-group described in Build a GA4 audience from the zeotap_event, the profile is dropped from the audience on the next GA4 evaluation.Which GA4 identifier does this integration send?
Which GA4 identifier does this integration send?
The GA Client ID — the identifier stored in the GA
_ga cookie on the browser. If you use the Zeotap Collect Tag through GTM, see Google Analytics configuration in GTM for how to capture the GA Client ID onto Zeotap profiles.Can I send Zeotap data to a mobile GA4 Data Stream?
Can I send Zeotap data to a mobile GA4 Data Stream?
No. The integration supports the web implementation of GA4 only. The Data Stream you copy the Measurement ID from must be a Web stream.