

What this is
The Trade Desk (TTD) is a demand-side platform (DSP) used to buy programmatic ad inventory. This destination sends the users in a Zeotap audience to TTD so campaigns in TTD can target them. Integrated with Zeotap CDP, it helps you understand your customers better, improve the targeting of your advertising campaigns, and optimise your marketing strategy. Setup has three parts: gathering your TTD account details, creating the destination in Zeotap CDP, and linking an audience so refreshes push identifiers to TTD on your schedule. This page covers the buyer-side activation destination. If you want to publish audience data into TTD’s third-party data marketplace with CPM rates, see TTD Data Monetisation. If you want to send raw or hashed emails and phone numbers through TTD’s CRM Data Platform API (EUID), see TTD CRM Data. If you want to send first-party data with an Advertiser ID + Secret Key, see TTD 1P.Prerequisites
Before you create the destination, gather the following:
- Currency — either USD or EUR. It has to match the currency configured on your TTD account.
- Org Type — decide whether the destination represents a Partner, an Advertiser, or a System org, and collect the IDs that type requires (see Component details below).
- Access to Zeotap CDP with permission to create destinations.
- The audience or segment you want to activate against TTD.
Component details
Ensure that you have details about each of the following components of TTD available before you create the destination. The Partner, Advertiser and Org identifiers are issued on the TTD side; Currency must match your TTD account set-up, and Org Type is chosen when you configure the destination.
If you cannot locate the Partner, Advertiser, or Org IDs, contact your TTD account team.
Supported identifiers
This destination accepts MAIDs/Device IDs and TTD cookies as output identifiers. It also supports EUID, EUID Token, and netID.- EUID is the European Unified ID — a version of The Trade Desk’s UID2 that targets logged-in, consented traffic and complies with GDPR. An EUID identifier stays valid for 90 days. To send raw or hashed email addresses and cell phone numbers to TTD through the CRM Data Platform API, use the dedicated TTD CRM Data destination, which documents that flow end to end.
- EUID Token and netID are also supported as identifiers for this integration.
EUID, EUID Token, and netID support applies across the TTD destinations — this page, TTD 1P, and TTD Data Monetisation.
Create the TTD destination
1
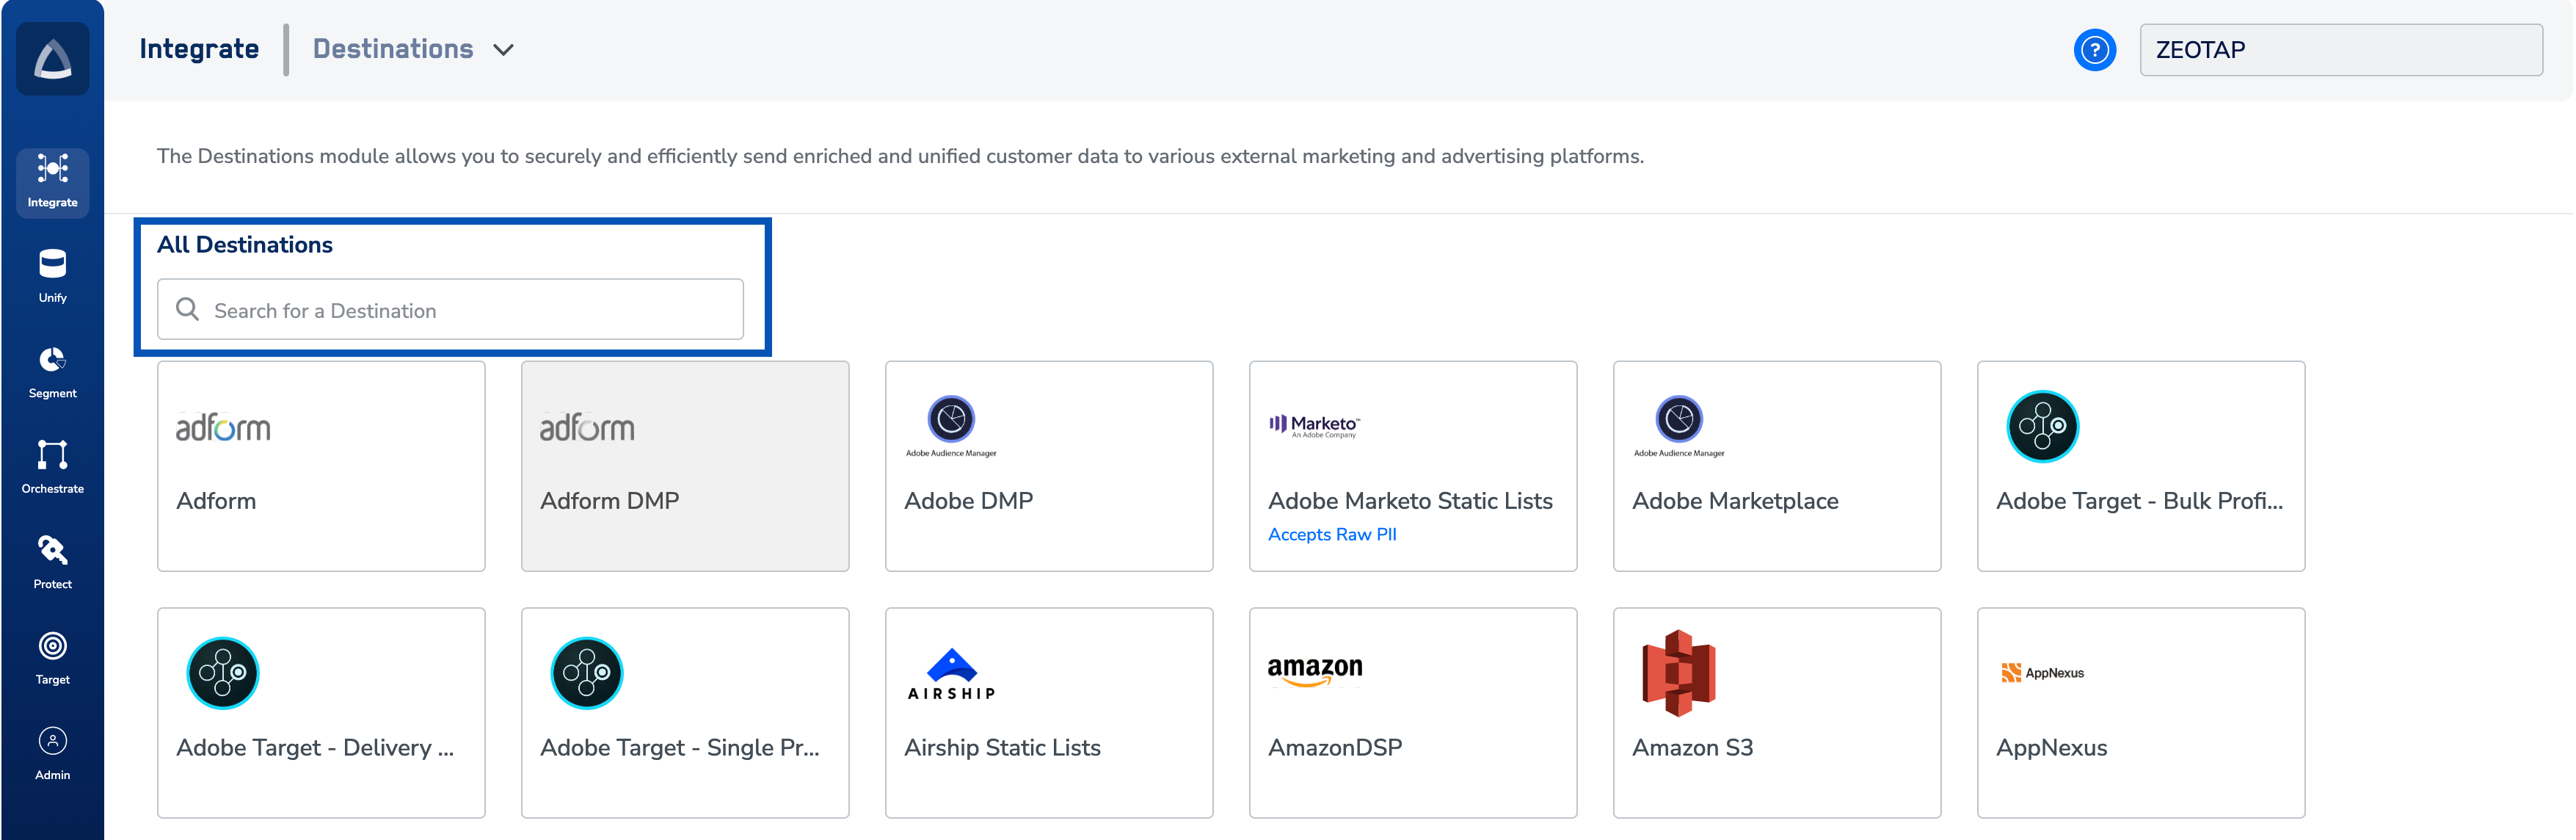
Open the All Destinations and select The Trade Desk
Log in to the Zeotap CDP App, go to the DESTINATIONS application, and click + Create Destination.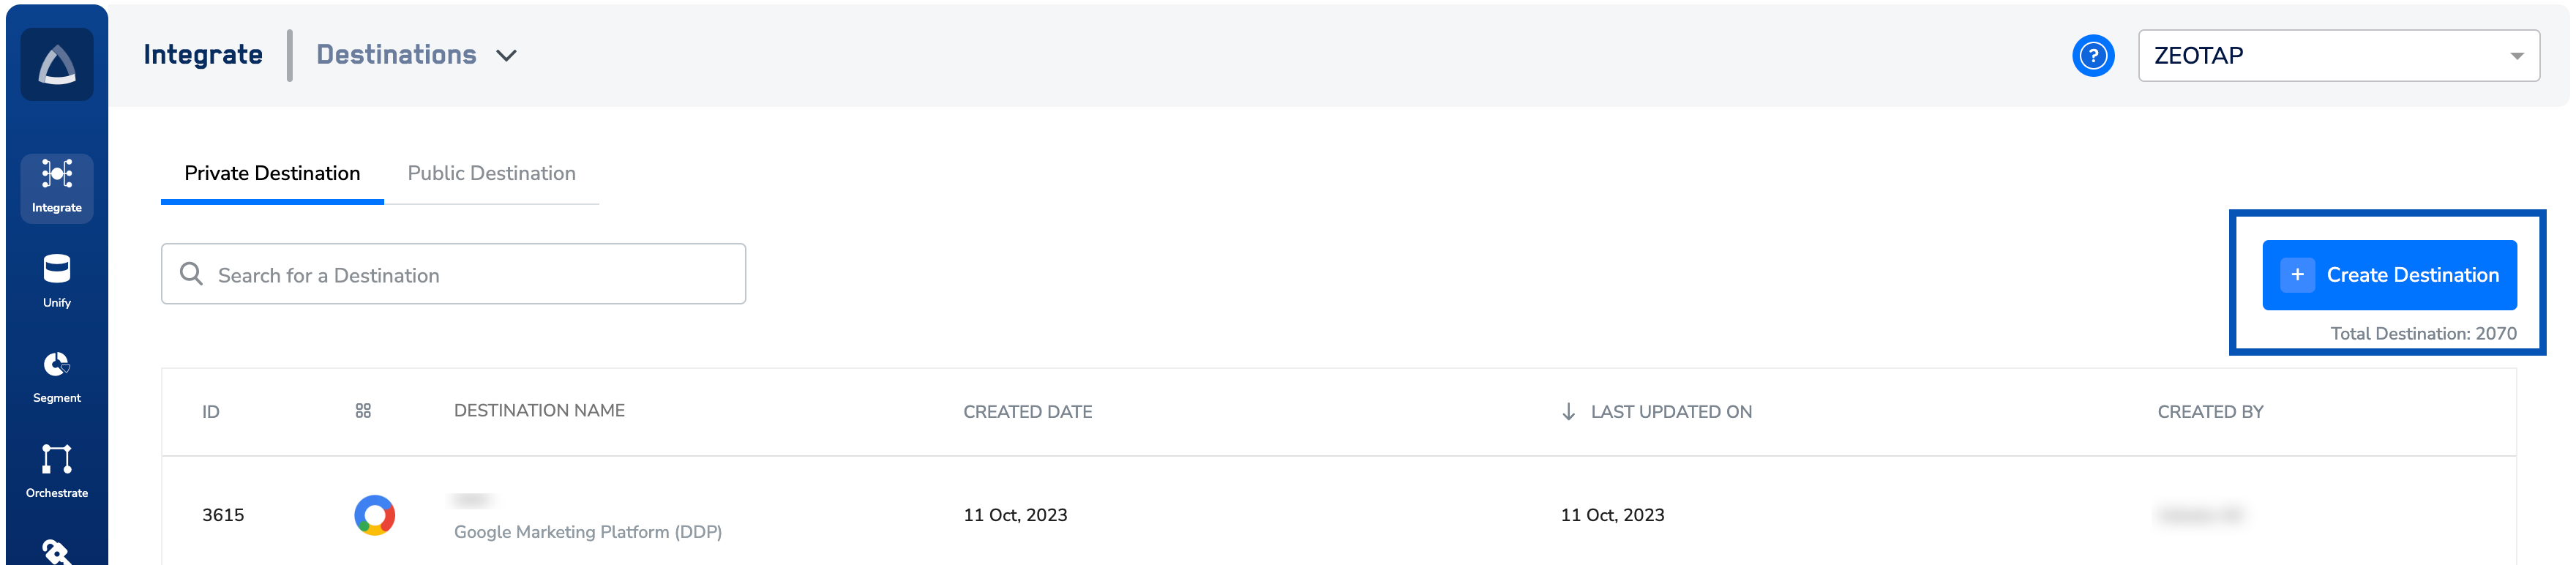
2
Enter the destination name and currency
Give the destination a name that identifies it in your workspace, then set Currency to either USD or EUR — the value has to match what is configured on your TTD account. No other currencies are accepted for this destination.
3
Choose the Org Type and enter the matching IDs
Set Org Type to one of the three supported values and fill in the fields the form reveals for that choice: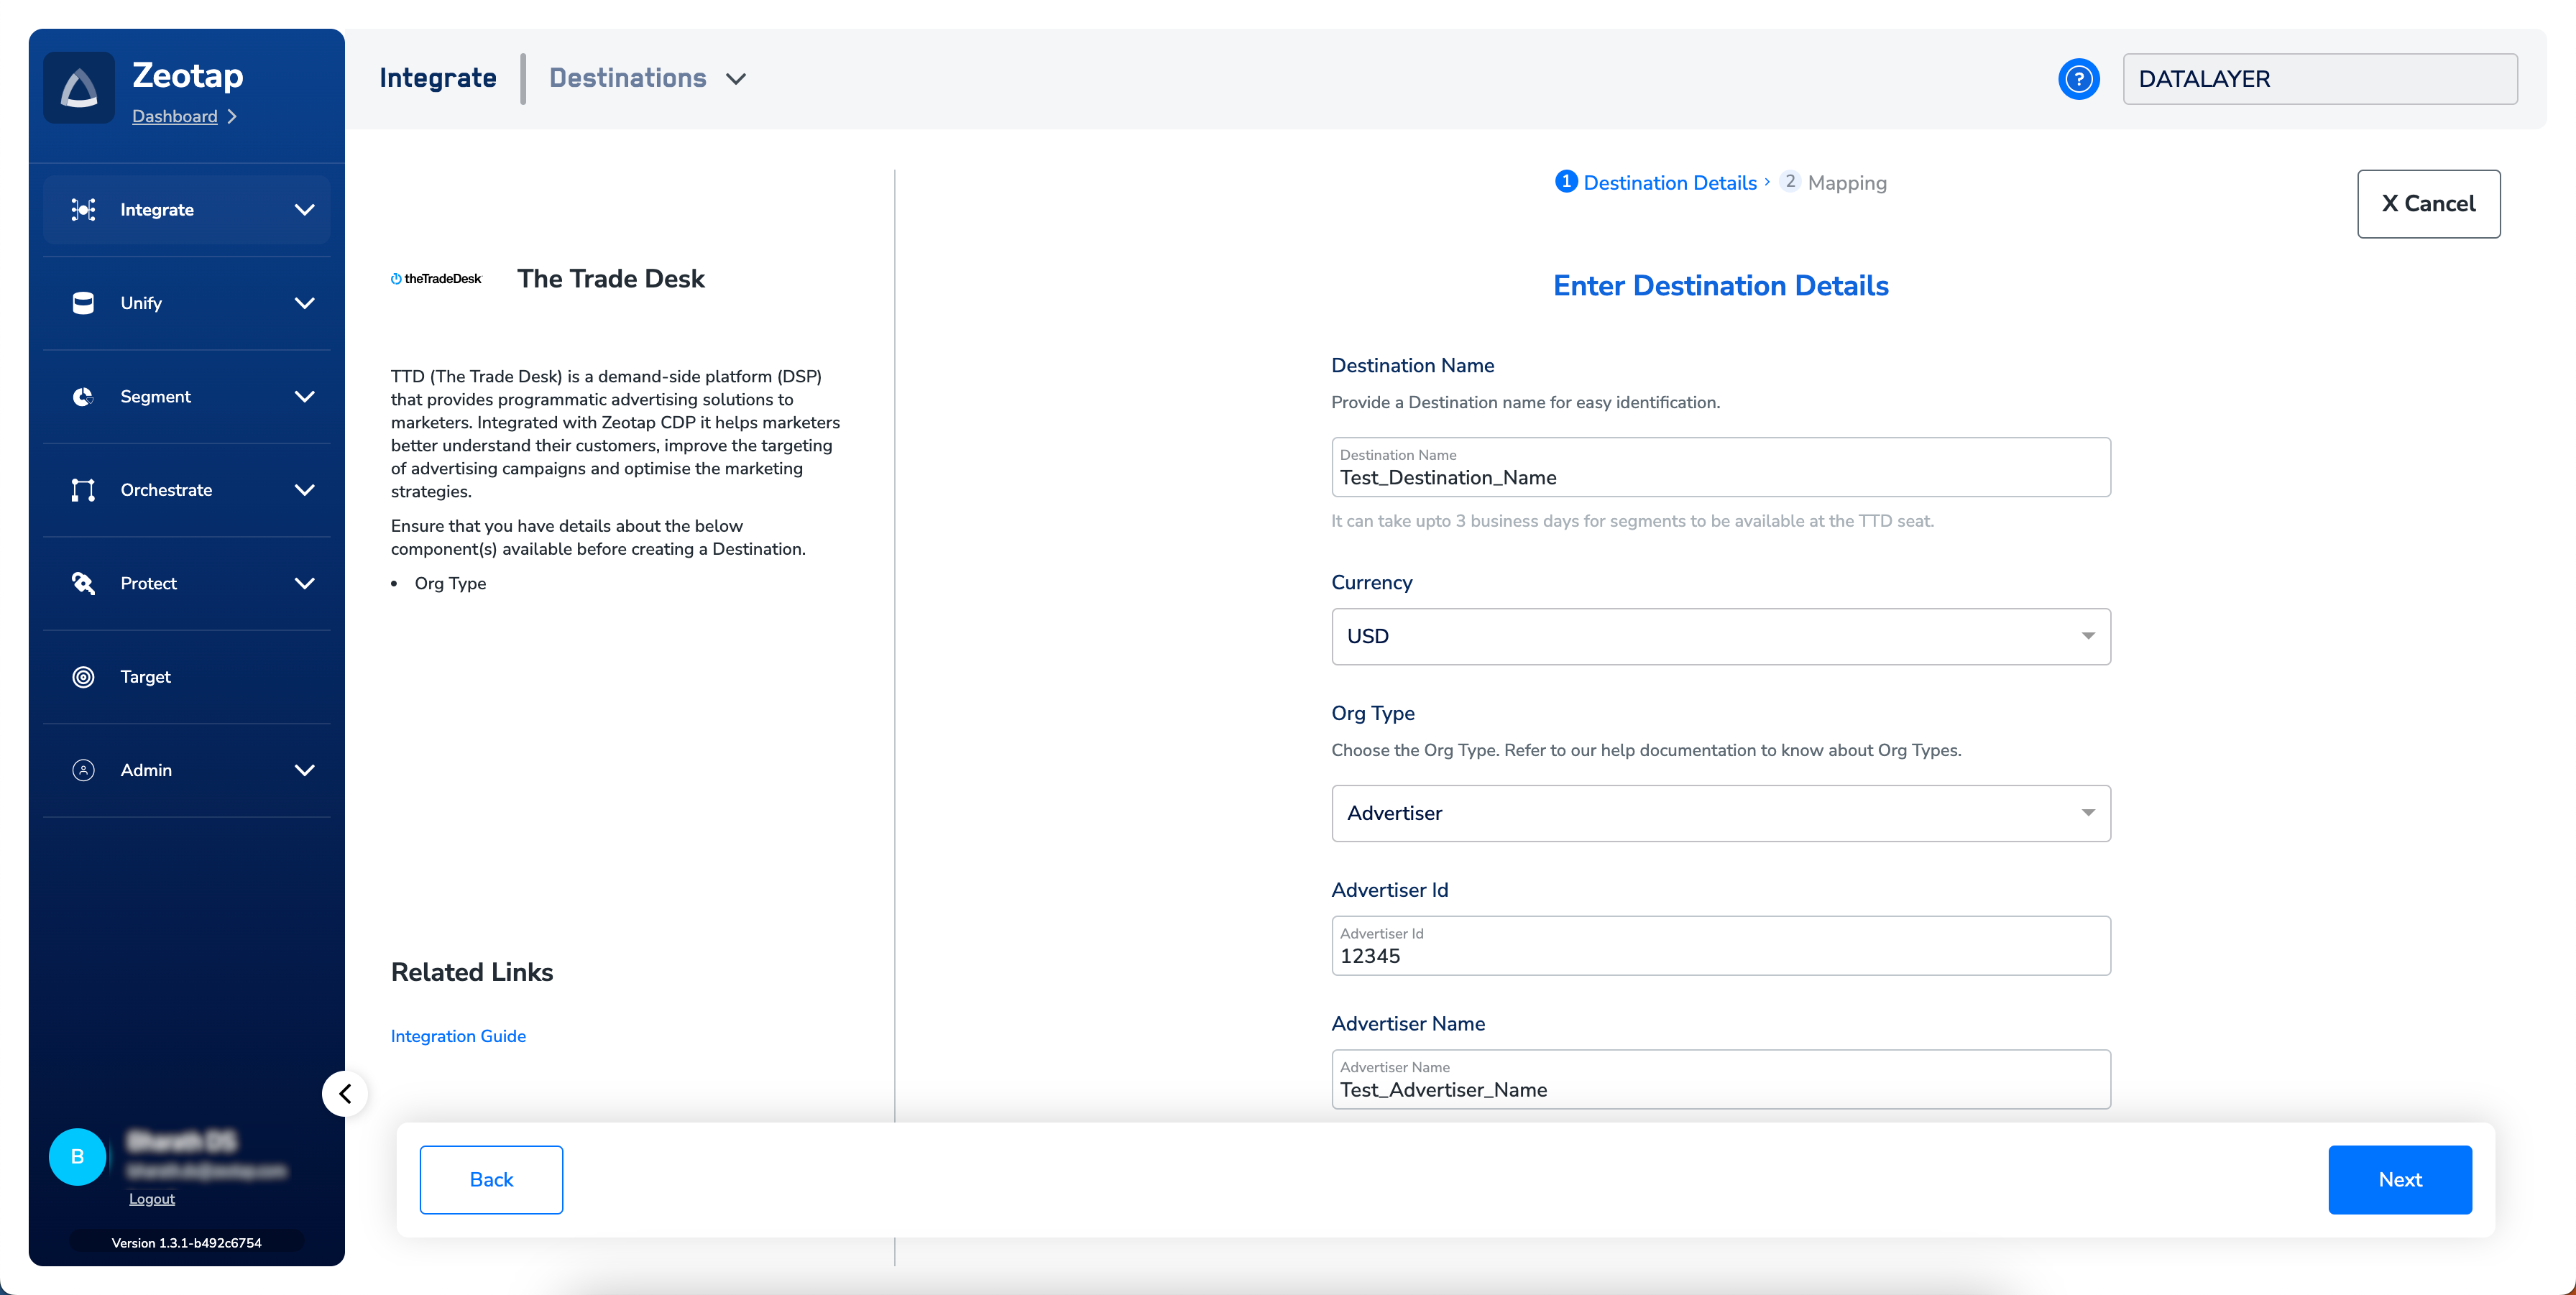
The Partner ID, Partner Name, Advertiser ID, Advertiser Name, and Org ID all come from your TTD console or your TTD account team — see Component details for where each one lives.Review the values you entered, then click Next to proceed.
4
Configure the action and field mapping
On the next screen, pick the action you want to run under Choose your Action, then map your Zeotap identifiers onto the corresponding TTD destination fields under Map the Fields. The Output Identifiers accepted by the platform are shown by default — MAIDs, cookies, email IDs, and more — and you can add, remove, or edit an identifier in that list. See destination actions and field mappings for how to edit the mapping.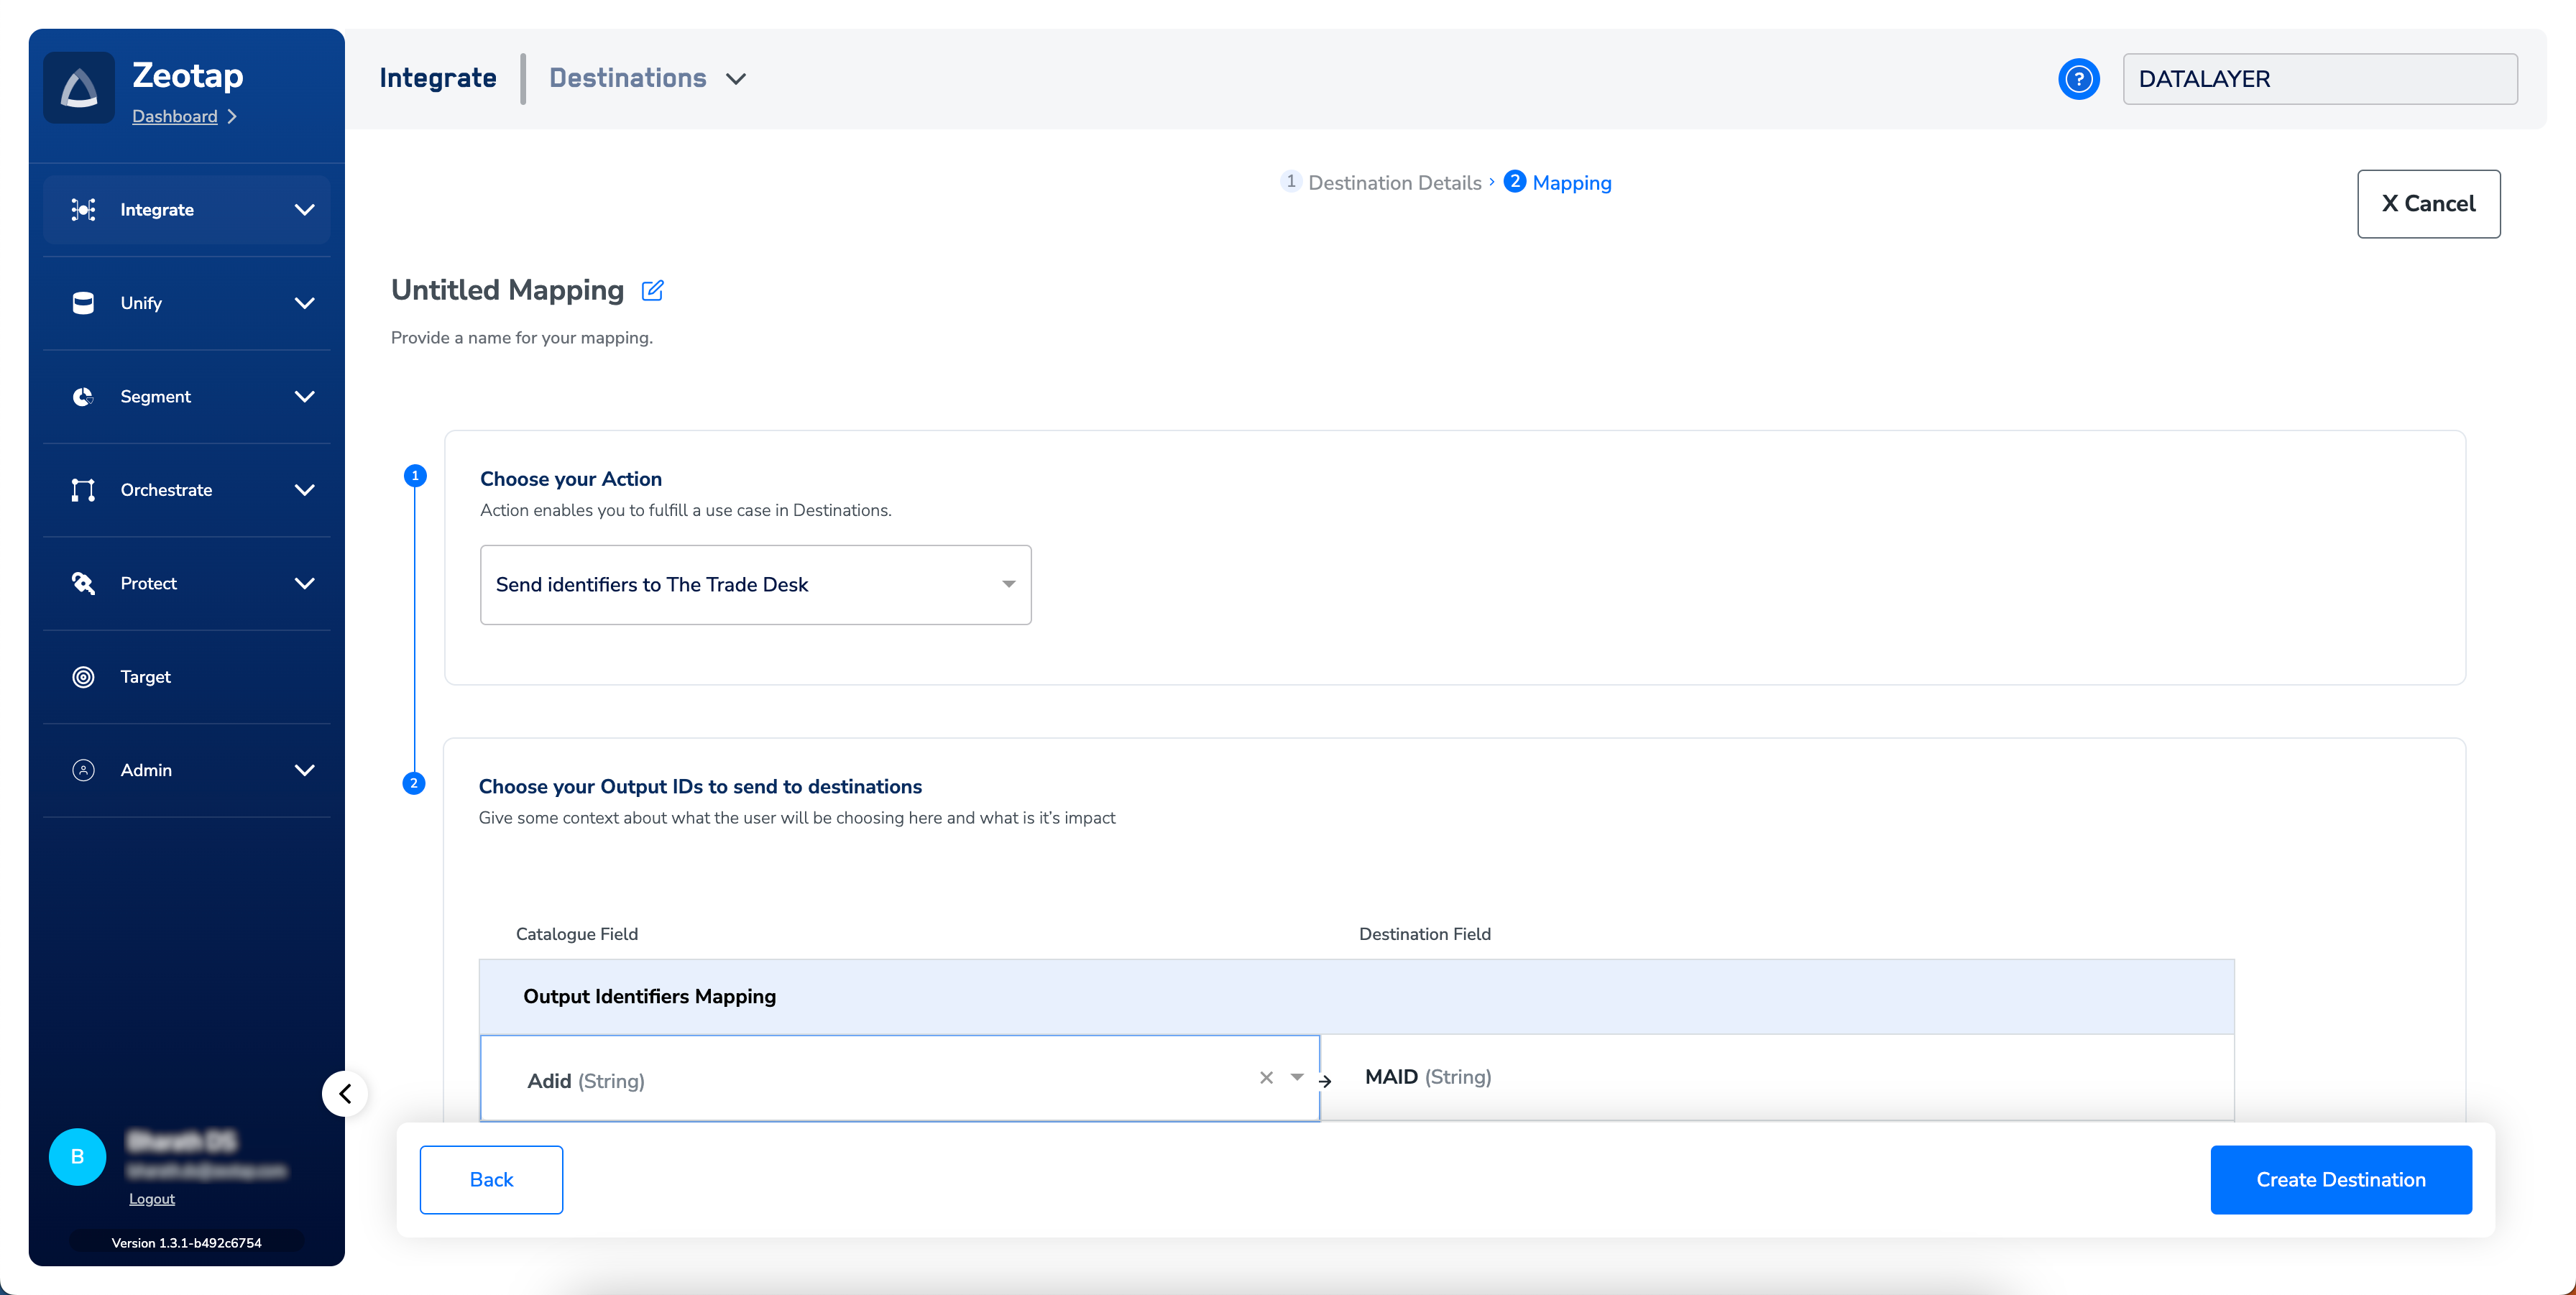
5
Save the destination
Click Create Destination. The destination is then listed in the Audiences application, where you can link it to an audience or segment.
Link an audience to the destination
Follow the standard audience-linking flow — see Link an Audience to the Destination for the full procedure. Two TTD-specific rules apply when you push an audience:- Segment pricing. If segment pricing is enabled on your workspace, search for the audience in Audiences, enter a Price and a Percentage of Media Cost, and then push it to TTD. Once you have pushed a segment with a Price, that Price is fixed and cannot be edited afterwards.
- Zero-price segments. Segments created at a $0 price go through an additional approval process on the TTD side. Coordinate with your Zeotap CSM and share the segment details before pushing them.
Verify the segment reached TTD
Zeotap sends the audience to TTD on the refresh frequency you configured. Two customer-visible checks confirm the integration end-to-end.- Destination status in Zeotap. After a private-segment request is sent, TTD takes 24–48 hours to process it. During that window, the licence/destination shows the Approved status. Once TTD finishes processing, the status changes to Active. If the segment is not visible at the TTD account yet, wait out those two days before investigating further.
- Segment appears at your TTD seat. It takes up to three business days for a Zeotap-pushed segment to be available at your TTD seat after the first push. Once it is available, open the TTD Audience Builder console and look for your Zeotap segment groups — the individual segments live inside those groups. See View your audiences on TTD for the steps.
View your audiences on TTD
1
Log in to the TTD Audience Builder console
Log in to the TTD Audience Builder console with your TTD credentials.
2
Select the Zeotap data provider
Under Data Preferences, search for Zeotap and then select Zeotap New from the drop-down list.
3
Choose the segment type
From the Type drop-down list (marked 1 in the image below), choose one of the following options: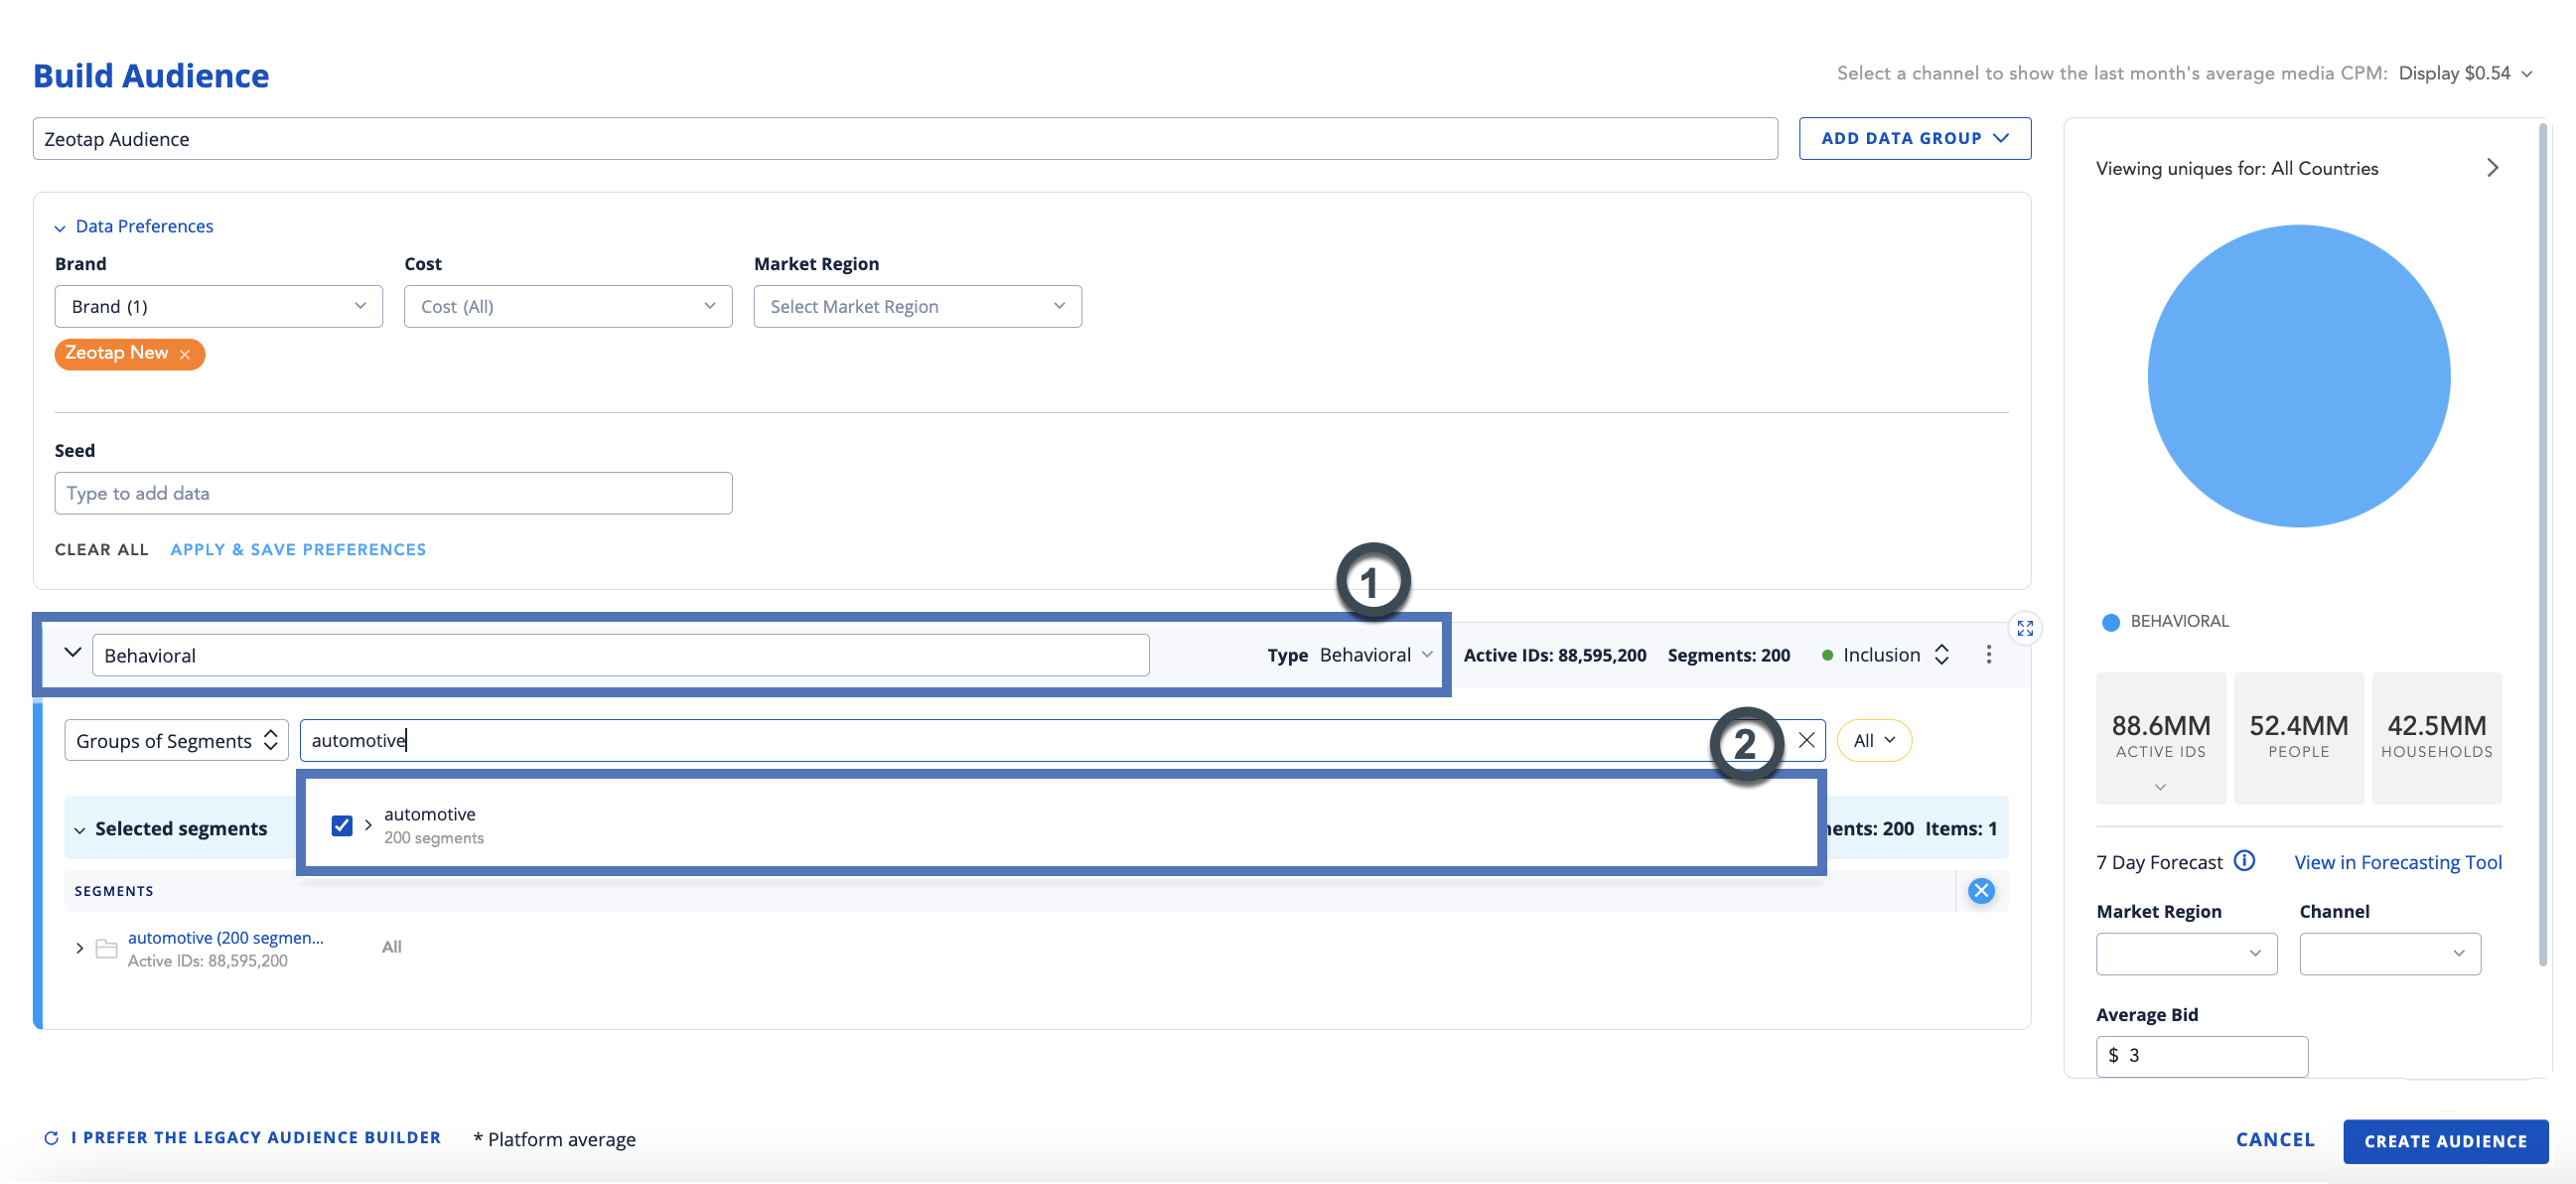
- Look-a-like
- First party data
- Behavioral
- Demographics
- Mixed
4
Open the segment group
In the Group of Segments field (marked 2 in the image below), search for and select the segment group you want. The segments inside the selected segment group are then listed.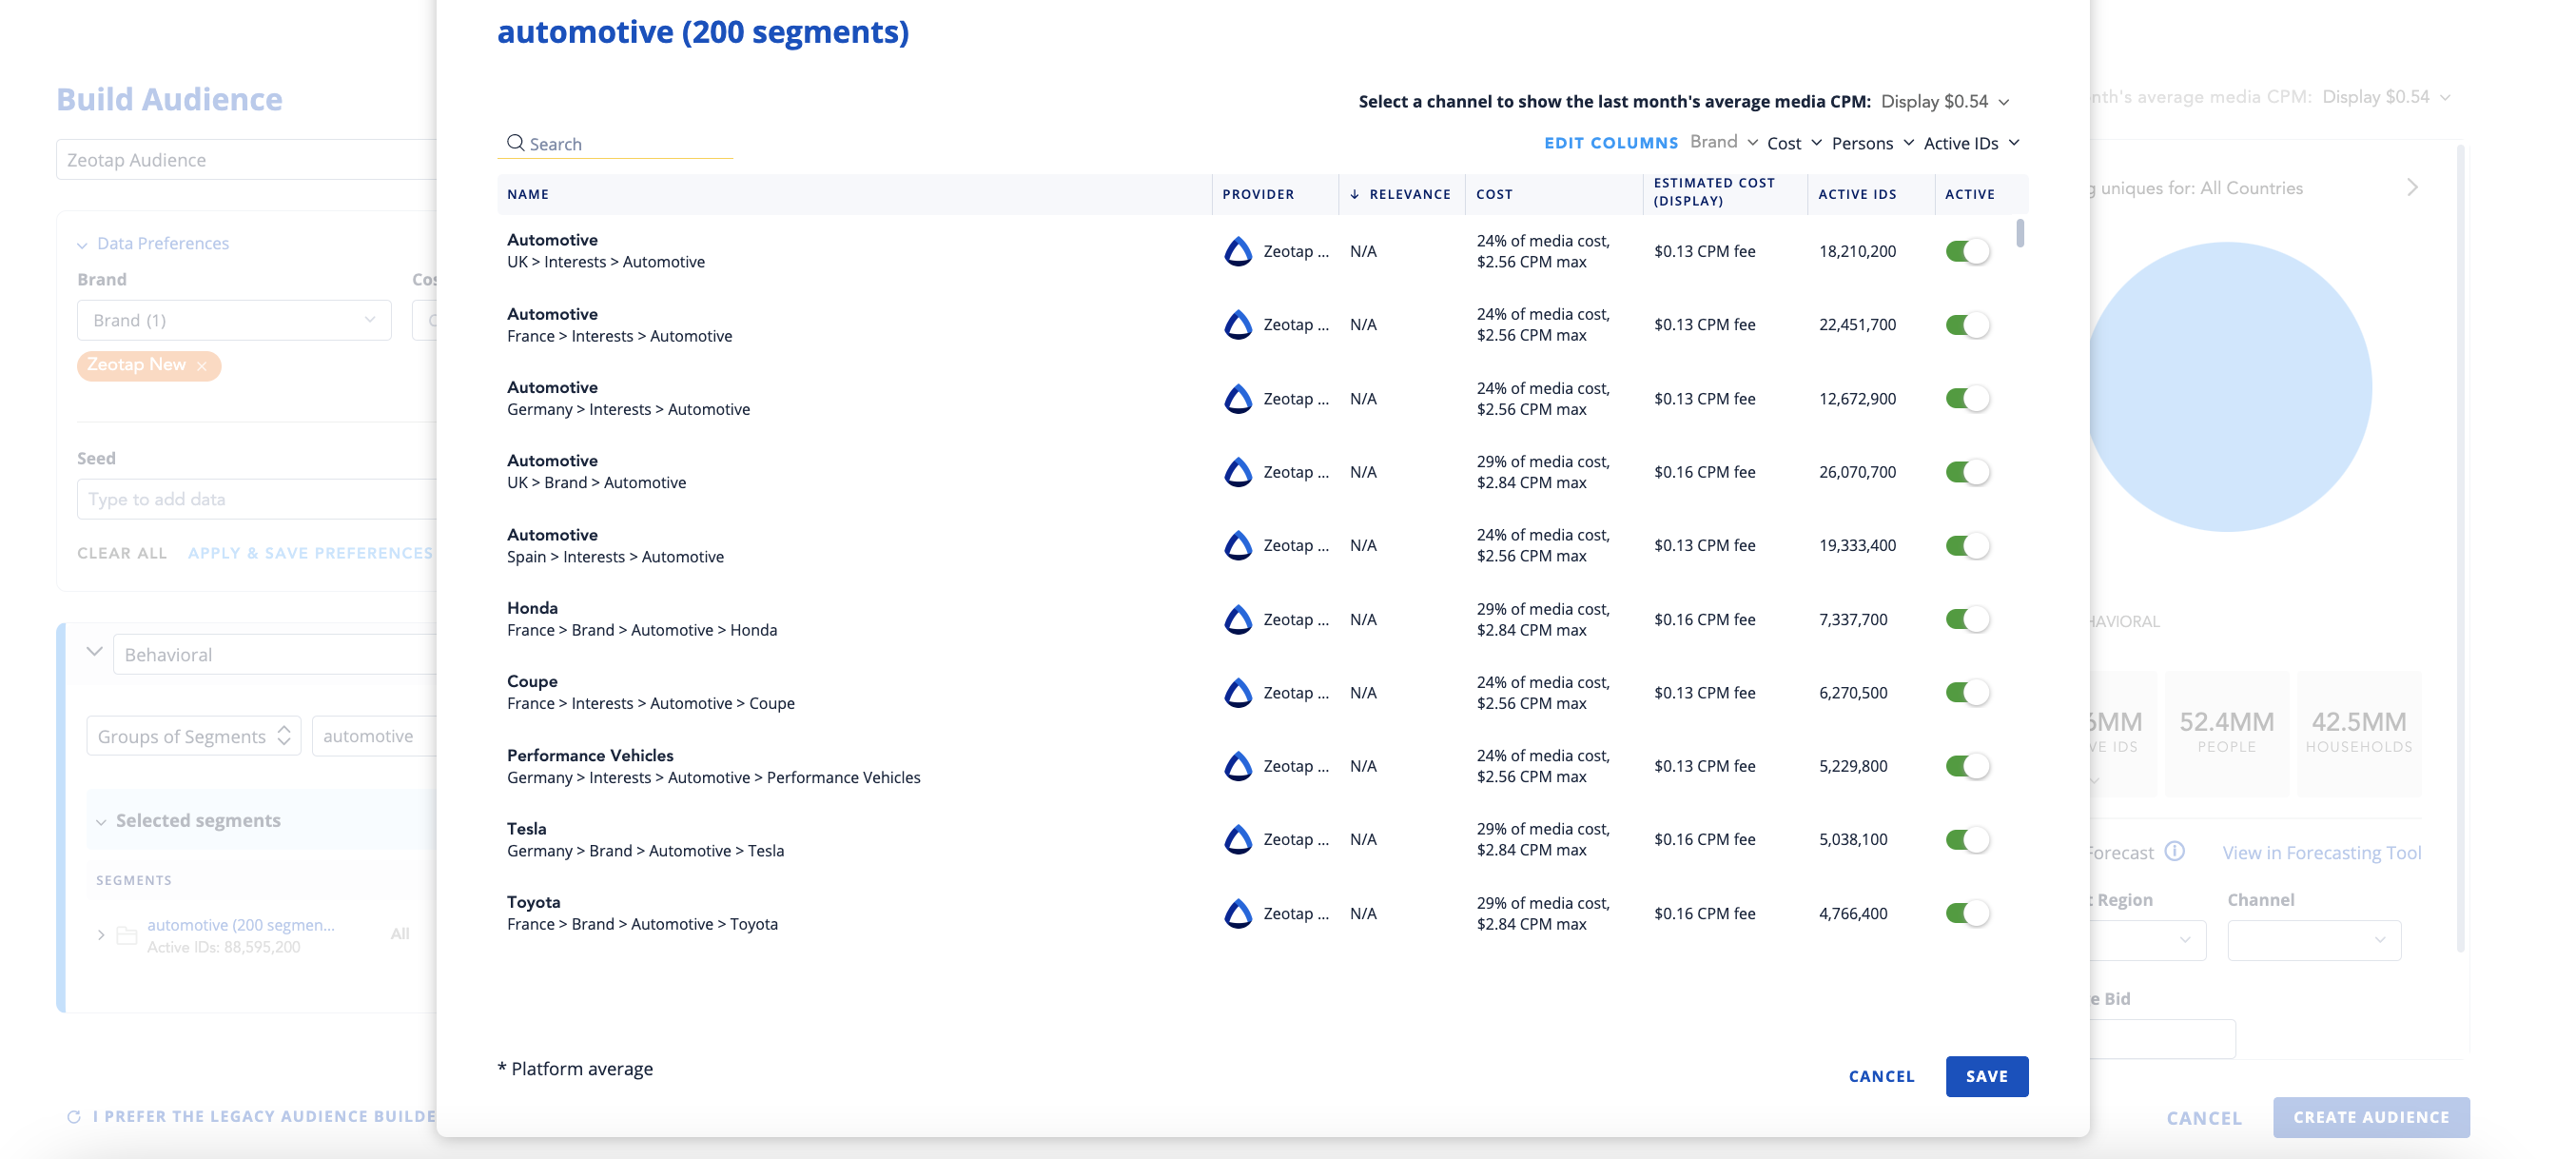
TTD owns this console, so it sets and updates the screen layout and field names. If a screen differs from the images above, use TTD’s own product documentation as the source of truth for their console navigation.
Troubleshooting
User disqualification from audiences
TTD supports user disqualification. When a user no longer qualifies for an audience — for example when the audience criteria no longer match, when consent requirements are not met, or when another audience condition changes — that user is excluded from the TTD segment on the next refresh. Zeotap CDP initiates a user deletion request in the next refresh cycle, and those requests go to every audience linked to this destination. Disqualified users are excluded based on the refresh frequency configured for the audience. This is a programmatic process that works automatically; you do not need to specify anything to trigger the disqualification and exclusion of users from audiences.FAQ
Which identifiers can I send to TTD through this destination?
Which identifiers can I send to TTD through this destination?
MAIDs/Device IDs and TTD cookies, plus EUID, EUID Token, and netID. The Output Identifiers accepted by the platform — MAIDs, cookies, email IDs, and more — are shown by default on the Map the Fields step, and you can add, remove, or edit an identifier in that list.
Which currencies can I use for a TTD destination?
Which currencies can I use for a TTD destination?
Only USD and EUR are accepted. The value has to match the currency configured on your TTD account.
Where do I find my Partner ID and Partner Name?
Where do I find my Partner ID and Partner Name?
Log in to the Trade Desk console in the advertiser view and go to Preferences > Partner Info > Partner ID. The Partner Name is shown alongside the Partner ID on the same screen.
How long does TTD take to process a private-segment request?
How long does TTD take to process a private-segment request?
TTD takes 24–48 hours to process a private-segment request. The Zeotap destination shows Approved during processing and changes to Active once TTD finishes. Separately, it can take up to three business days for a pushed segment to be available at your TTD seat.
Can I change the Price on an audience I already pushed to TTD?
Can I change the Price on an audience I already pushed to TTD?
No. Once a segment has been pushed with a Price, that Price cannot be edited from the Zeotap side. Contact Zeotap support if the Price needs to change.
What is different about $0-price segments?
What is different about $0-price segments?
Segments created at a $0 price go through an additional approval process with TTD. Coordinate with your Zeotap CSM and share the segment details before pushing them.
Do I need to trigger user deletion in TTD manually when someone leaves an audience?
Do I need to trigger user deletion in TTD manually when someone leaves an audience?
No. Zeotap CDP queues a deletion request in the next refresh cycle for every audience linked to this destination. The user is excluded from the TTD segment on that refresh.
Next steps
- Explore TTD 1P → — send first-party data to TTD using an Advertiser ID and Secret Key.
- Explore TTD CRM Data → — send raw or hashed emails and phone numbers through TTD’s CRM Data Platform API (EUID).
- Explore TTD Data Monetisation → — publish audiences to TTD’s third-party data marketplace with CPM rates.
- Explore Link an Audience to the Destination → — the full audience-linking flow used across every destination.