Google Customer Match (Customer Contact Information)
Google Customer Match (Customer Contact Information)
Send hashed email addresses and hashed phone numbers from Zeotap CDP to Google Ads or Display & Video 360 as Customer Match customer lists.
What this is
Google Customer Match (Customer Contact Information) is a batch destination: it sends hashed email addresses and hashed phone numbers out of Zeotap CDP into your Google Ads or Google DV360 (Display & Video 360) account, where they arrive as Customer Match customer lists you can target or suppress in campaigns. You build the audience in Zeotap CDP, link it to this destination, and Zeotap CDP uploads the identifiers on the audience’s refresh schedule.Google Customer Match lets you use first-party data to share the unique insights you have about your customers beyond Google’s understanding. That can deepen existing customer relationships — or build new ones — across Google’s properties in a privacy-safe way. This is becoming increasingly important as Google phases out cookie-based re-marketing due to privacy, browser and regulation changes.Related pages for the same vendor:
To collect website events into Zeotap CDP using a Google tag container, see the Google Tag Manager source.
Important Notice:To ensure compliance with the EU user consent policy and continue accessing Customer Match within the European Economic Area (EEA), Google is enhancing its enforcement measures. Google requires its partners to update to the latest Google Ads API v15 and begin transmitting consent signals for users in the EEA region. The following are the consent signals it covers:
ad_user_data: Indicates consent to send user data for advertising purposes to Google.
ad_personalization: Indicates consent for ad personalisation.
Note that commencing March 6th, 2024, Zeotap CDP will transmit a GRANTED consent status for the above mentioned consent signals. To ensure that only consented users meet the audience criteria, you are advised to perform the following actions:
Provide Zeotap CDP with the appropriate consent parameters covering the two consent signals requested by Google (ad_user_data and ad_personalization)
Establish relevant Consent Orchestration rules to ensure that only users who have consented to perform ad personalisation on Google Products are ingested.
Customer Match is a useful advertising tool for many business goals, from increasing brand awareness to driving conversions. Audiences sent through this destination can be used as follows:
On the Search Network and the Shopping tab, you can optimise your campaigns by adjusting your bid based on what you know about your customers’ activities.
On Gmail, you can reach your customers or similar audiences using personalised ads at the top of their inbox tabs.
On YouTube, you can reach new audiences by targeting audiences similar to your most valuable customers.
On Display, you can reach your customers or similar audiences using personalised ads on the Google Display Network.
Common uses
Re-engage known customers. Upload email addresses from your CRM into Zeotap CDP, build tailored audience segments, and send them to Google Customer Match for targeted campaigns across Search, the Shopping tab, Gmail, YouTube and Display.
Suppress ads. Create suppression segments in Zeotap CDP for existing customers, or for people who do not wish to be targeted, and send them to Google Customer Match so those audiences are excluded from ad campaigns.
Reach similar prospects. Identify high-value customer segments in Zeotap CDP and send them to Google Customer Match to build lookalike audiences, allocating higher budgets to those segments and lower cost limits to low-LTV audiences.
Supported identifiers and actions
This integration supports hashed phone numbers in E164 format and hashed email addresses (mostly Gmail).
Note:Follow these guidelines to ensure proper data handling and audience segmentation when using Customer Match:
Ensure that the emails are hashed to SHA256 and cellphone numbers are converted to E164 format before hashing it to SHA256. For more information about how to convert it to E164, refer to our hashing guidelines.
When you send multiple identifiers, such as email addresses, phone numbers, and MAIDs, to Customer Match, Zeotap CDP creates multiple audience segments within GCM (AdWords), each with a unique segment ID. The data is uploaded to the corresponding segments based on these IDs. The segment IDs are displayed separately on the UI. The segment name in AdWords for the identifiers appears in the following format: {AudienceName}{DestinationName}_SegmentId
Available actions and supported features
The following table lists the action types available for the integration and their supported features:
Send identifiers to Google Customer Match - Customer Contact Information
✅
✅
-
Delta and Delete functionality is released in phases and is activated per destination — see Delta Upload and Delete Functions, which lists this integration under the Delete-enabled integrations and describes how activation is requested.
Prerequisites
Customer Match is not available for all advertisers. To use Customer Match, the account must have the following details:
A good history of policy compliance
A good payment history
At least 90 days history in Google Ads
More than 50,000 USD total lifetime spend. For advertisers whose accounts are managed in currencies other than USD, your spend amount will be converted to USD using the average monthly conversion rate for that currency.
For complete information about the requirements for using Google Customer Match, refer to the Google Help documentation. These guidelines apply to advertisers using Customer Match for campaigns on Search, Shopping, Display, YouTube or Gmail.Ensure that you have the below details available before creating a Google Customer Match destination in Zeotap CDP.
Seat ID
This is the unique ID assigned to your Advertiser account that you can locate next to your account name within the respective Google products. Note that you can add a Seat ID for Google Ads and Google DV360 through this integration. Depending on the product that your Seat ID is associated with, you have to choose the corresponding Product Type.
Product type
Based on the platform you want to use and your role, choose the Google product that matches your requirement. You can either use Google Ads (AdWords) or Google DV360 (Display & Video 360).
If you are using Google Ads, then choose ADWORDS as your Product Type.
This allows you to serve ad campaigns on Search, the Shopping tab, Gmail, YouTube and Display.
If you are using Google DV360, a demand-side platform (DSP) for managing and optimising digital ad campaigns across channels like display, video, and connected TV, then choose from the below options.
INVITE_PARTNER — Select this option if you are a Bid Manager Partner. A Partner manages multiple advertiser accounts under a single account, typically used by agencies or organisations handling campaigns for multiple clients.
INVITE_ADVERTISER — Select this option if you are a Bid Manager Advertiser. An Advertiser represents a single brand or organisation running its own campaigns in DV360.Key differences between a Partner and an Advertiser in DV360
Aspect
Bid Manager Partner
Bid Manager Advertiser
Role
Manages and oversees multiple advertisers.
Represents a single advertiser’s account.
Hierarchy
Higher-level entity in the DV360 structure.
Sub-account within a partner.
Responsibilities
Sets policies, manages billing, and organises advertisers.
Focuses on campaign creation and execution.
Use Case
Agencies or organisations managing several clients or business units.
Individual brands or advertisers.
Whitelist Zeotap on your Google product
To send audiences (segments) from Zeotap CDP to Google Ads or DV360, you must first whitelist Zeotap on the platform you wish to use. Whitelisting is required for successful audience/segment creation; without it, the segments will fail.Follow the instructions below for the platform you use:
To send audience segments from Zeotap CDP to Google Ads, ensure that you whitelist Zeotap CDP by performing the following steps:
1
Log into your Google Ads account.
2
In the left panel, navigate to Tools > Data manager.
3
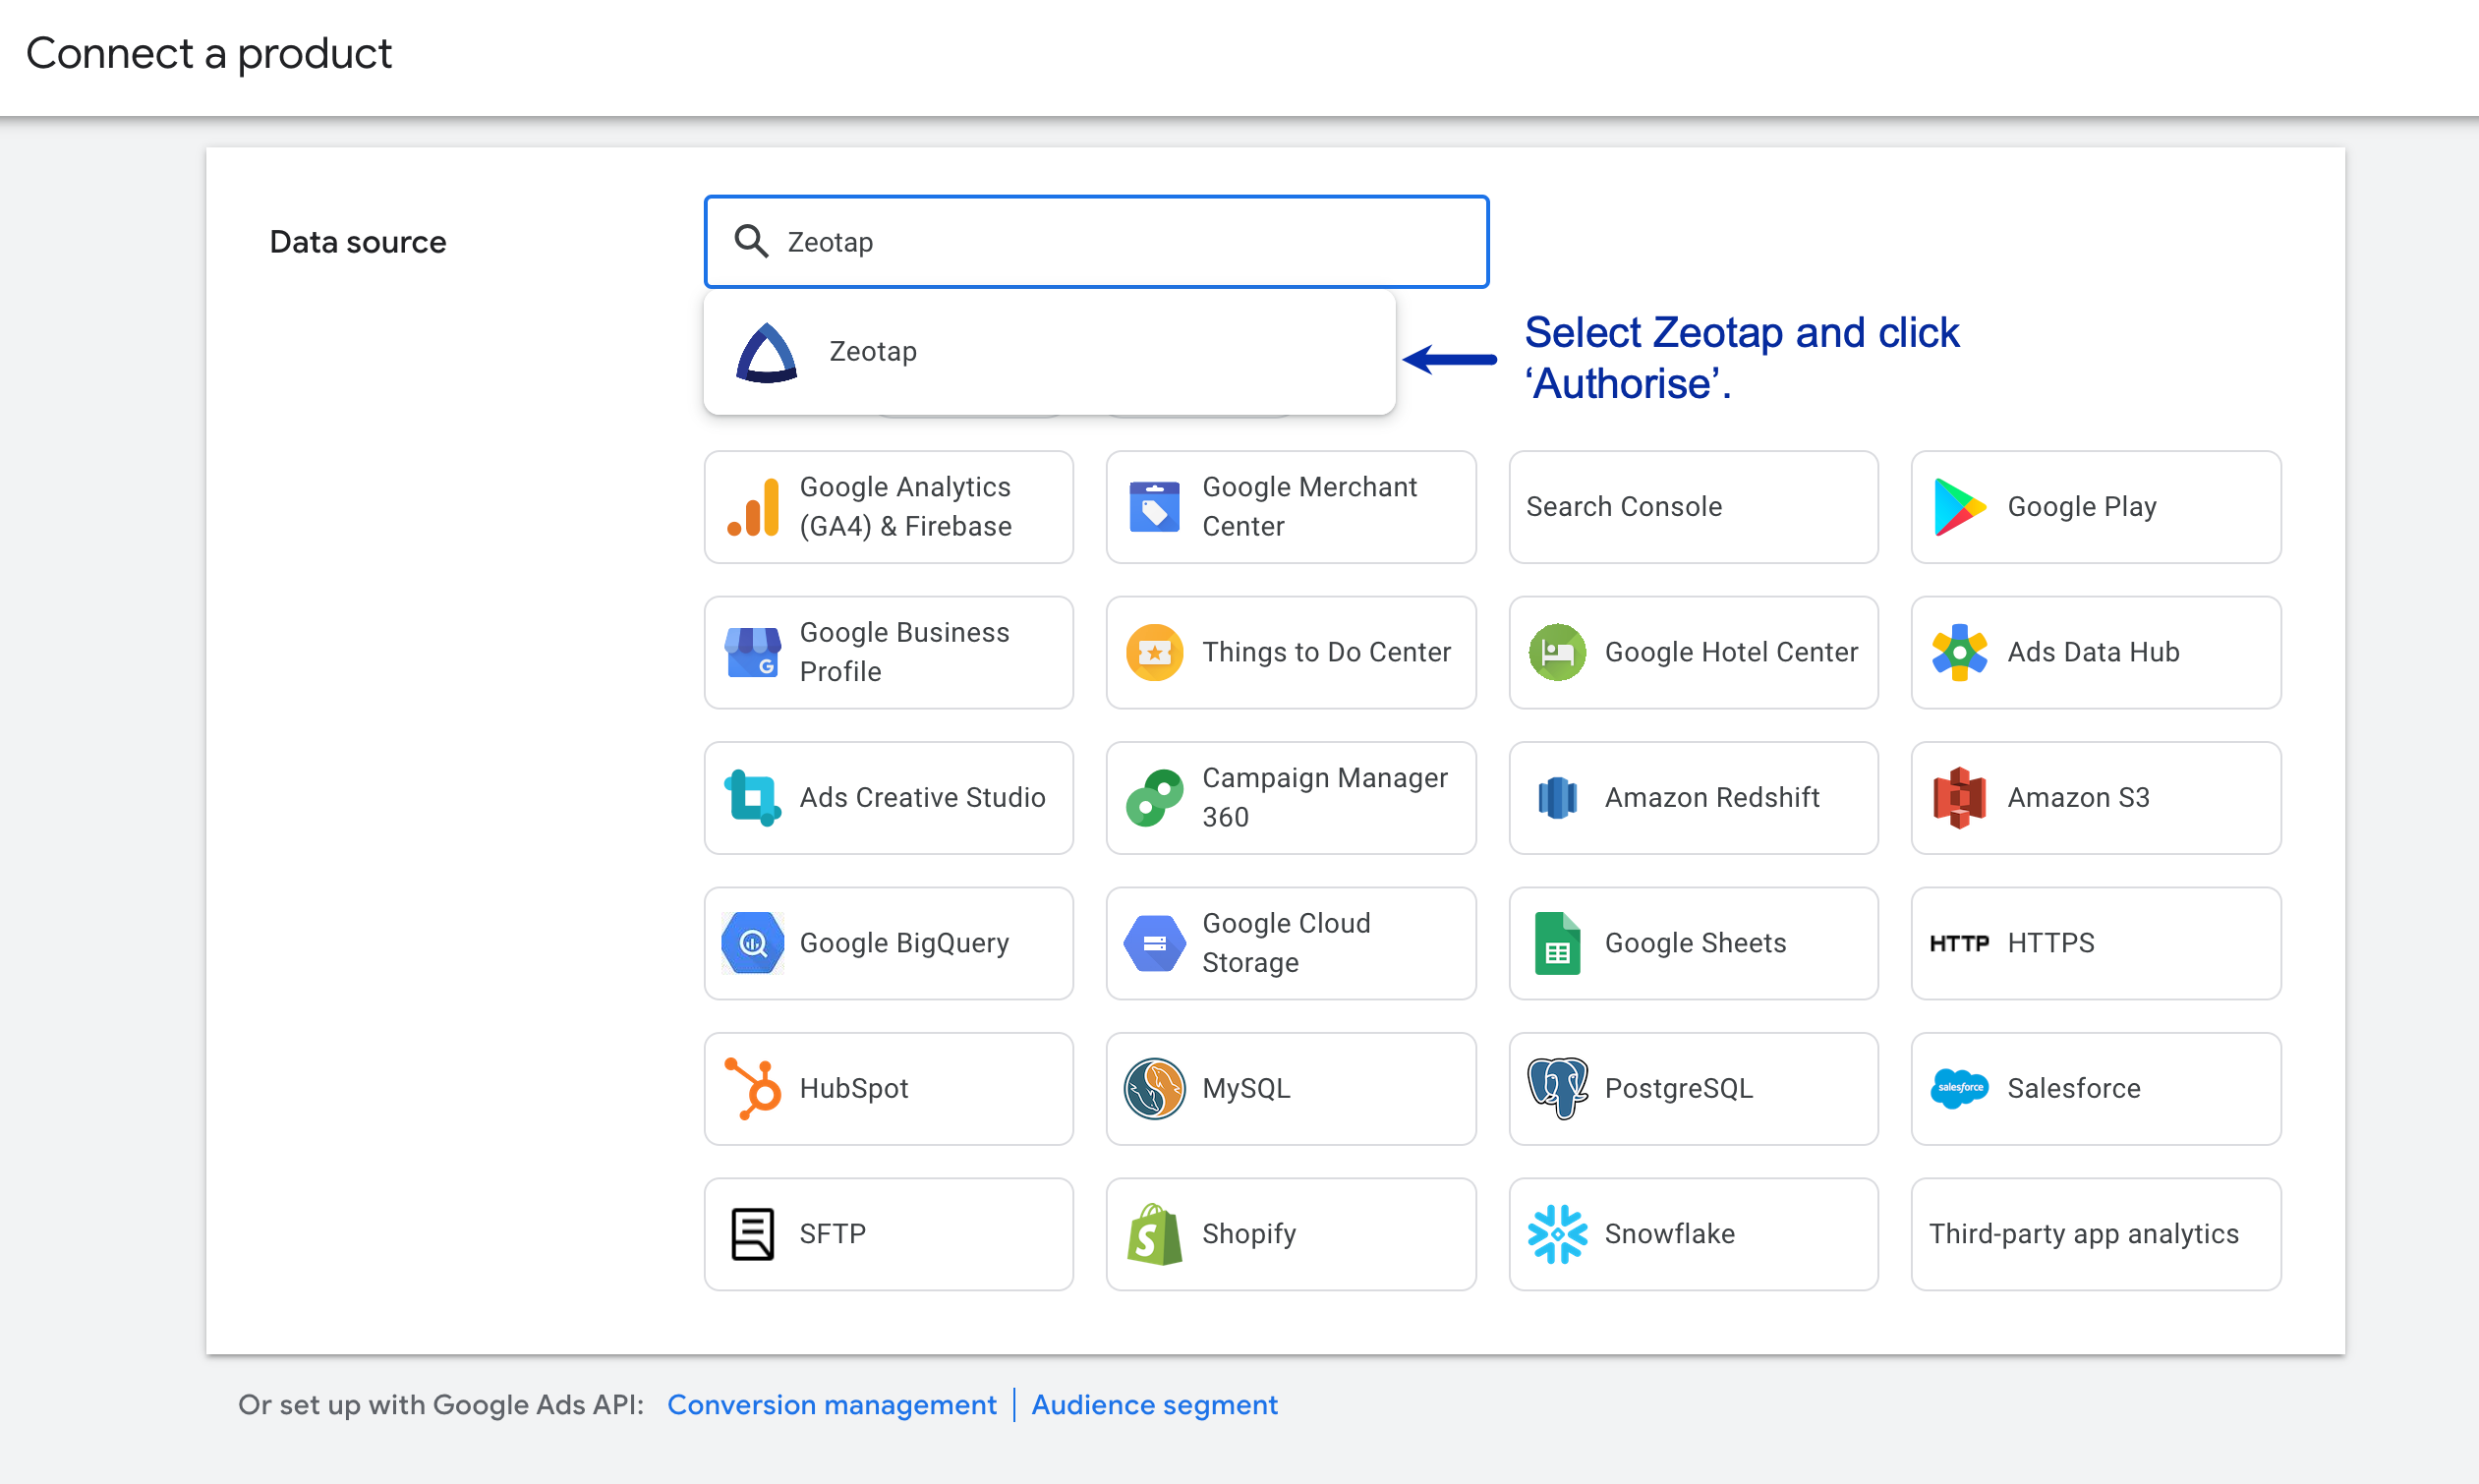
Under Data manager, open the Connected products tab, then click + Connect Product as shown below.
4
In the search box, search for and select Zeotap, then click Authorise.
5
Once the data source is connected, the dialog shows Data source connected with Audiences selected as the use case. The Conversions use case is unavailable for this data source. Click Done.You can then use Zeotap CDP to create and send audiences to Google Ads as Customer Lists.
Whitelist Zeotap on Google DV360
You must complete a one-time mapping of your DV360 Partner or Advertiser ID to Zeotap before Zeotap CDP can send any data into DV360. Also, make sure you know which DV360 entity object (Partner or Advertiser) you are associated with, so that the matching Product Type — INVITE_PARTNER or INVITE_ADVERTISER — is selected when you create the destination.Perform the following steps to link Zeotap to your DV360 account:
1
Log into your DV360 account with the appropriate credentials.
2
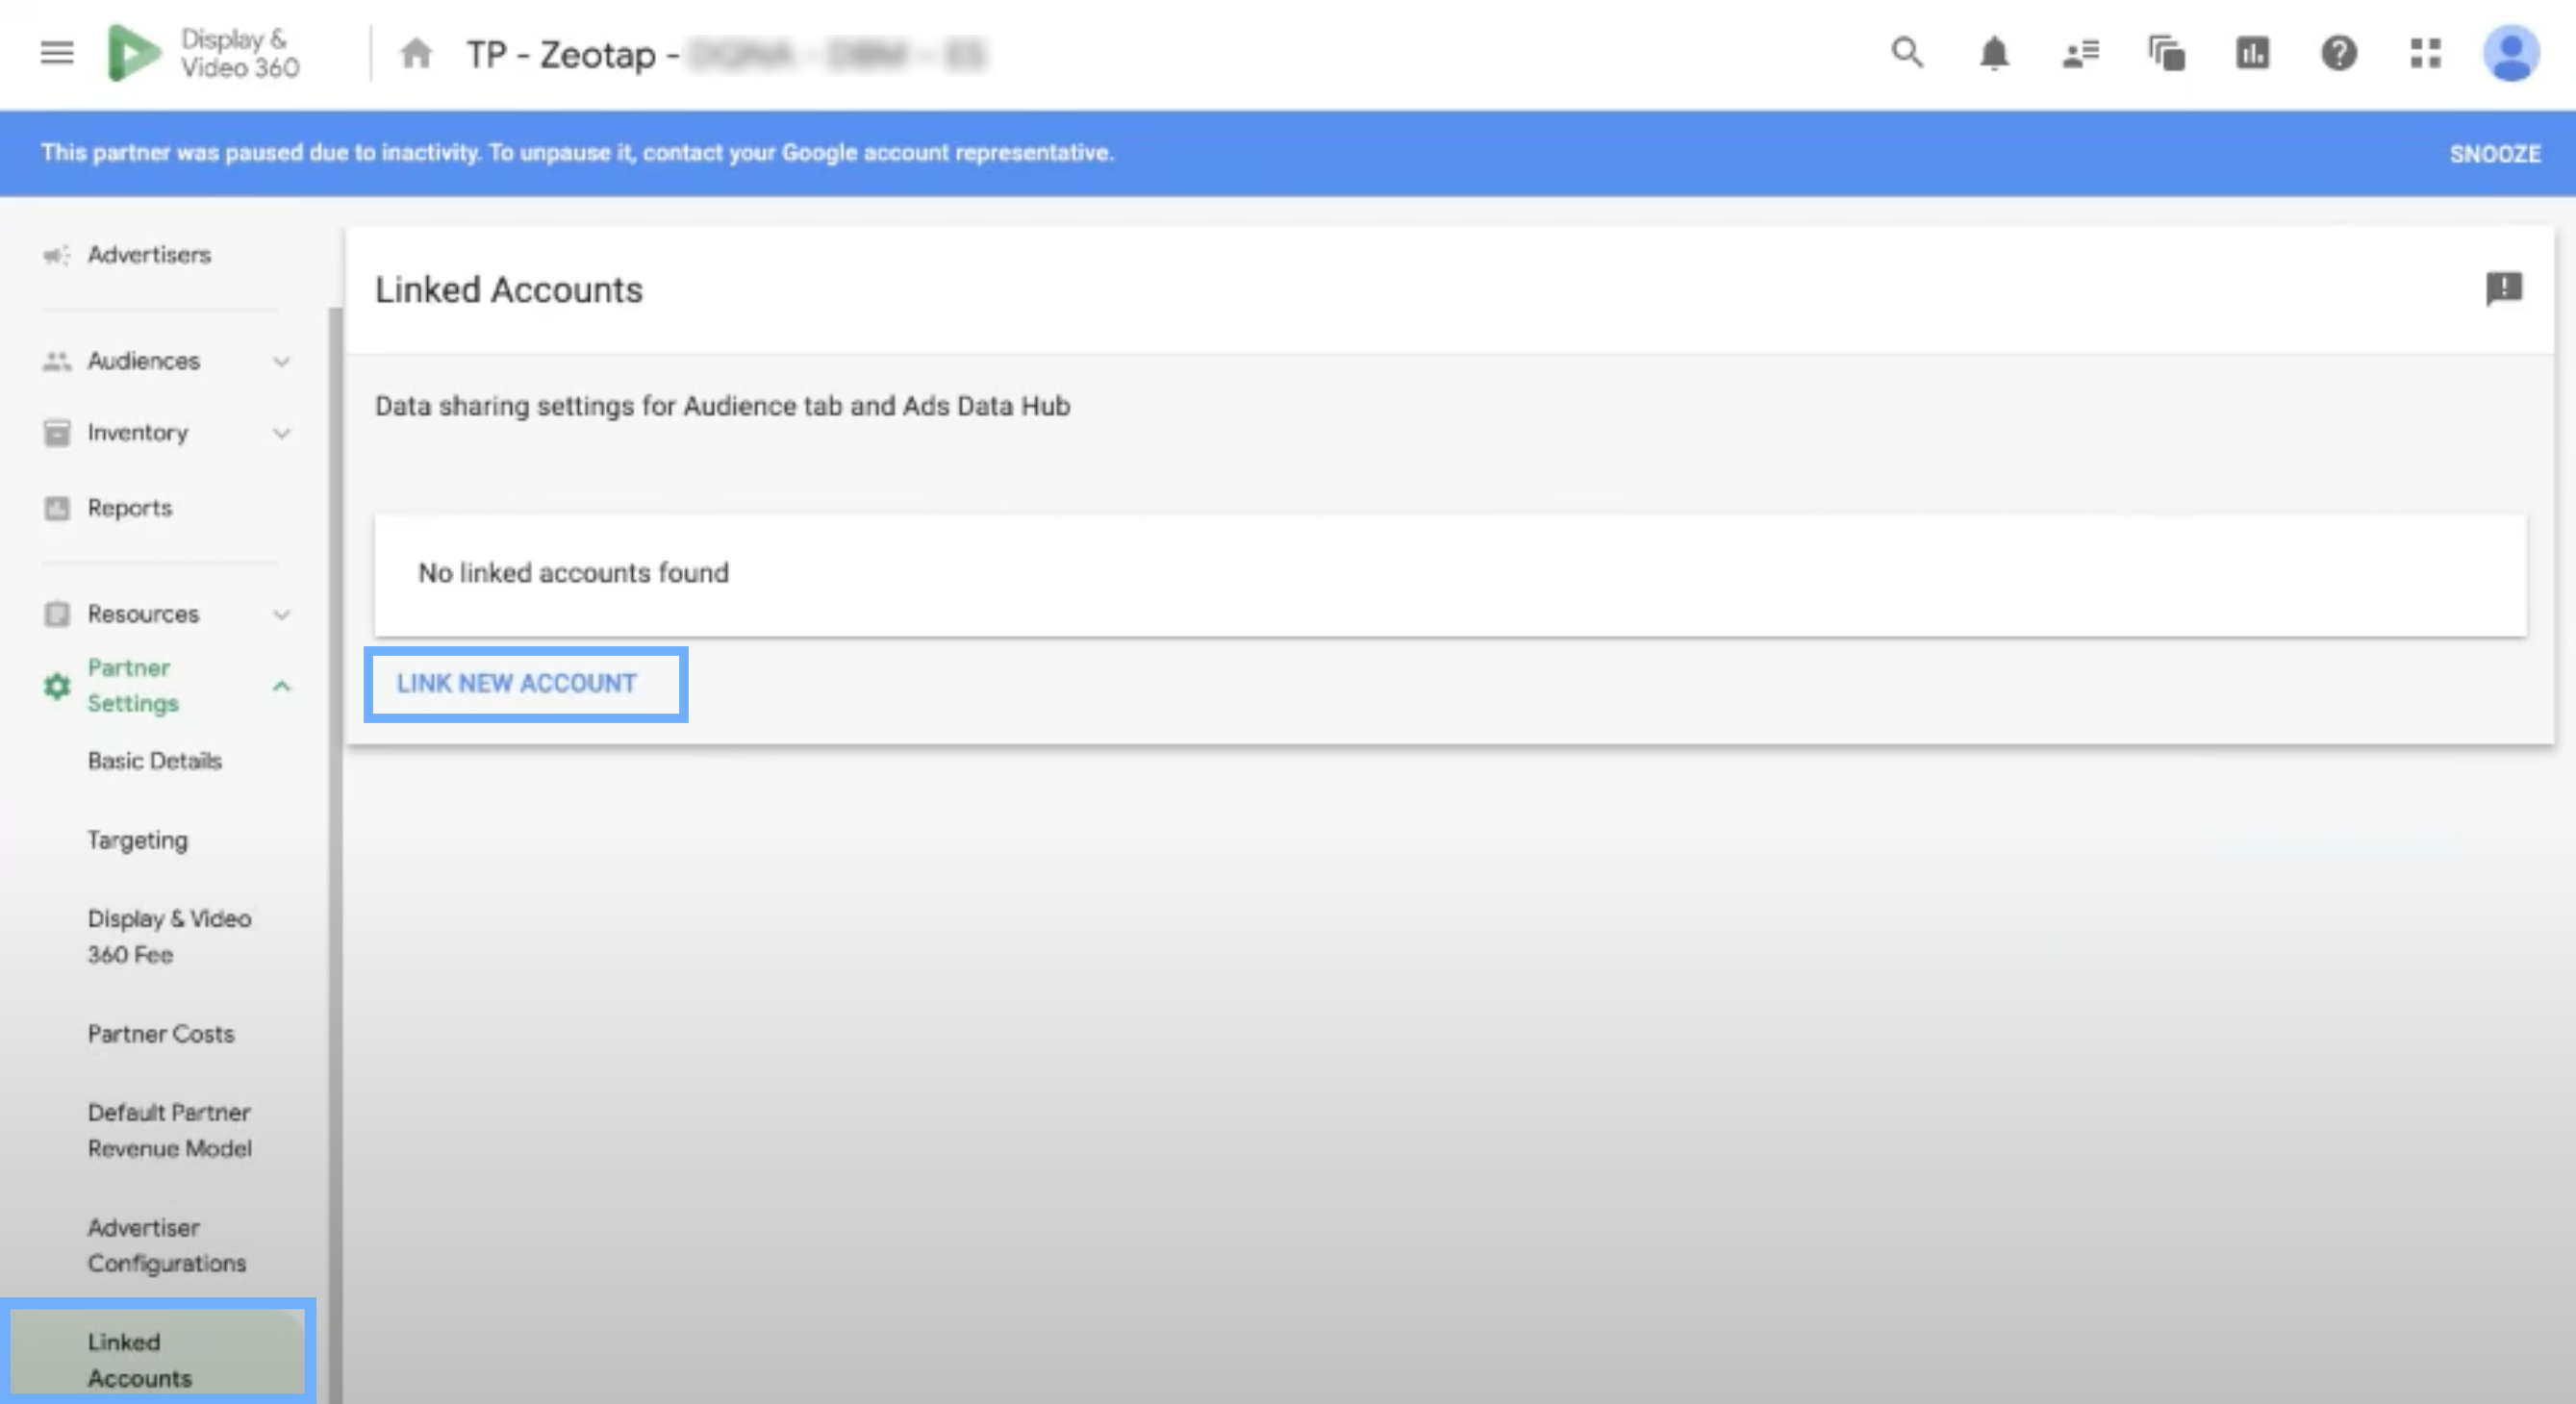
Navigate to Partner Settings and select Linked Accounts.
3
Under Linked Accounts, click LINK NEW ACCOUNT and select External Data partner.
4
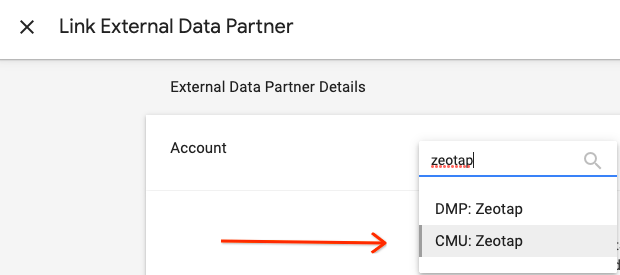
Under Account, search for Zeotap.
5
Select CMU: Zeotap (Customer Match Upload: Zeotap) as shown below and click Link.
Mapping of Zeotap CMU by Google on their interface
6
Once you complete the linking process, the Zeotap account appears under the linked accounts.
Create the Google Customer Match (Customer Contact Information) destination
Once you have completed the prerequisites above, perform the following steps to create the destination in Zeotap CDP:
1
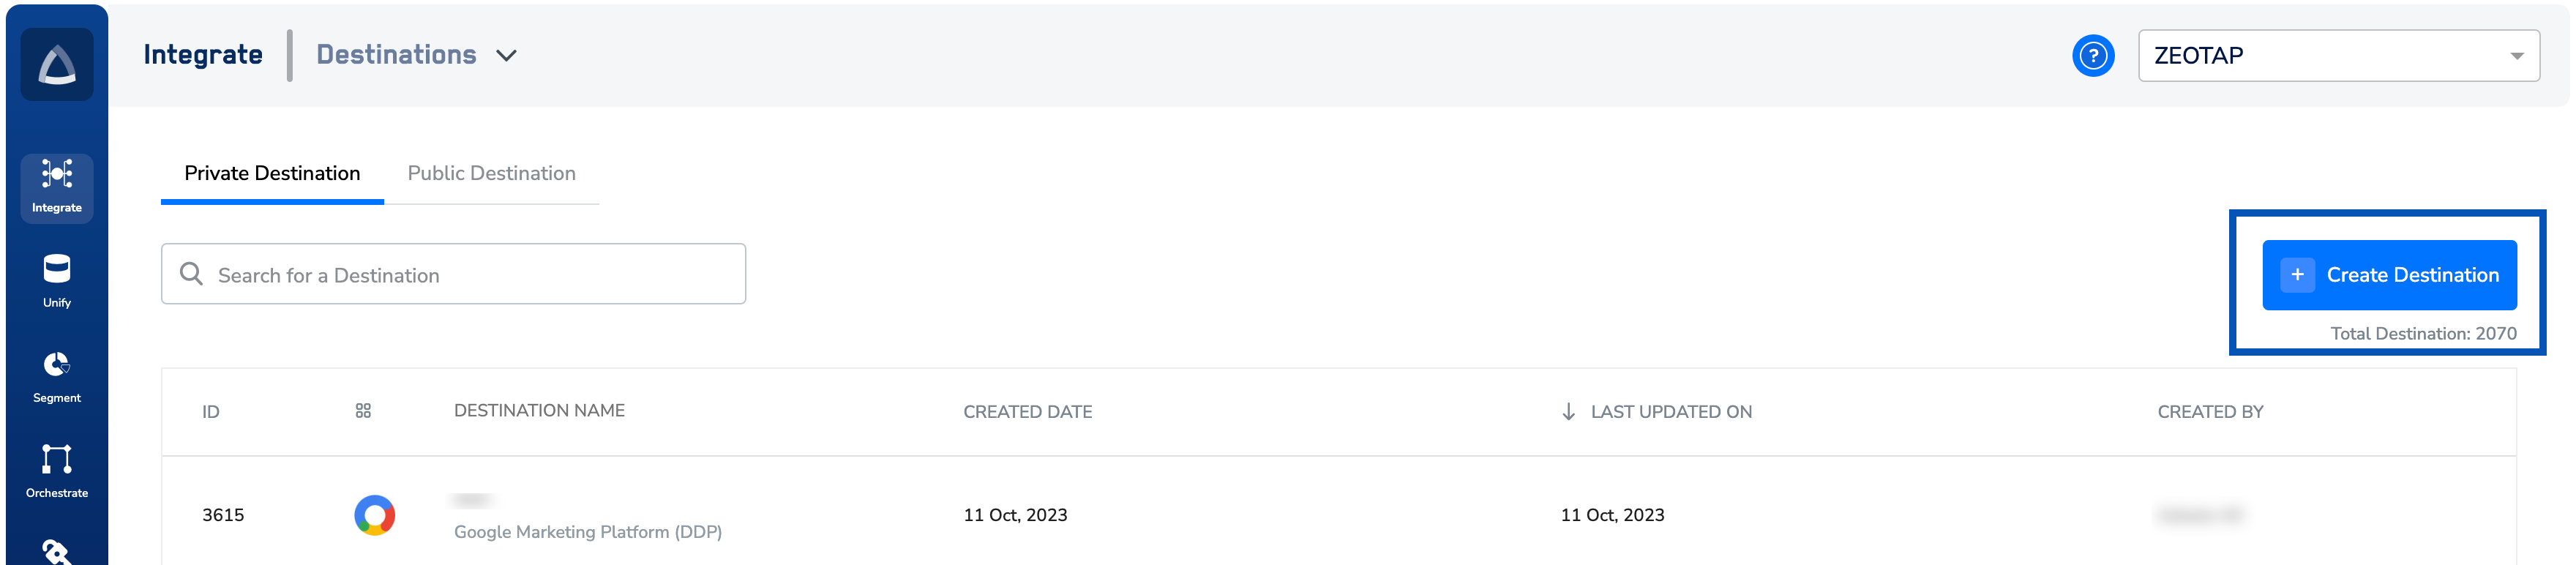
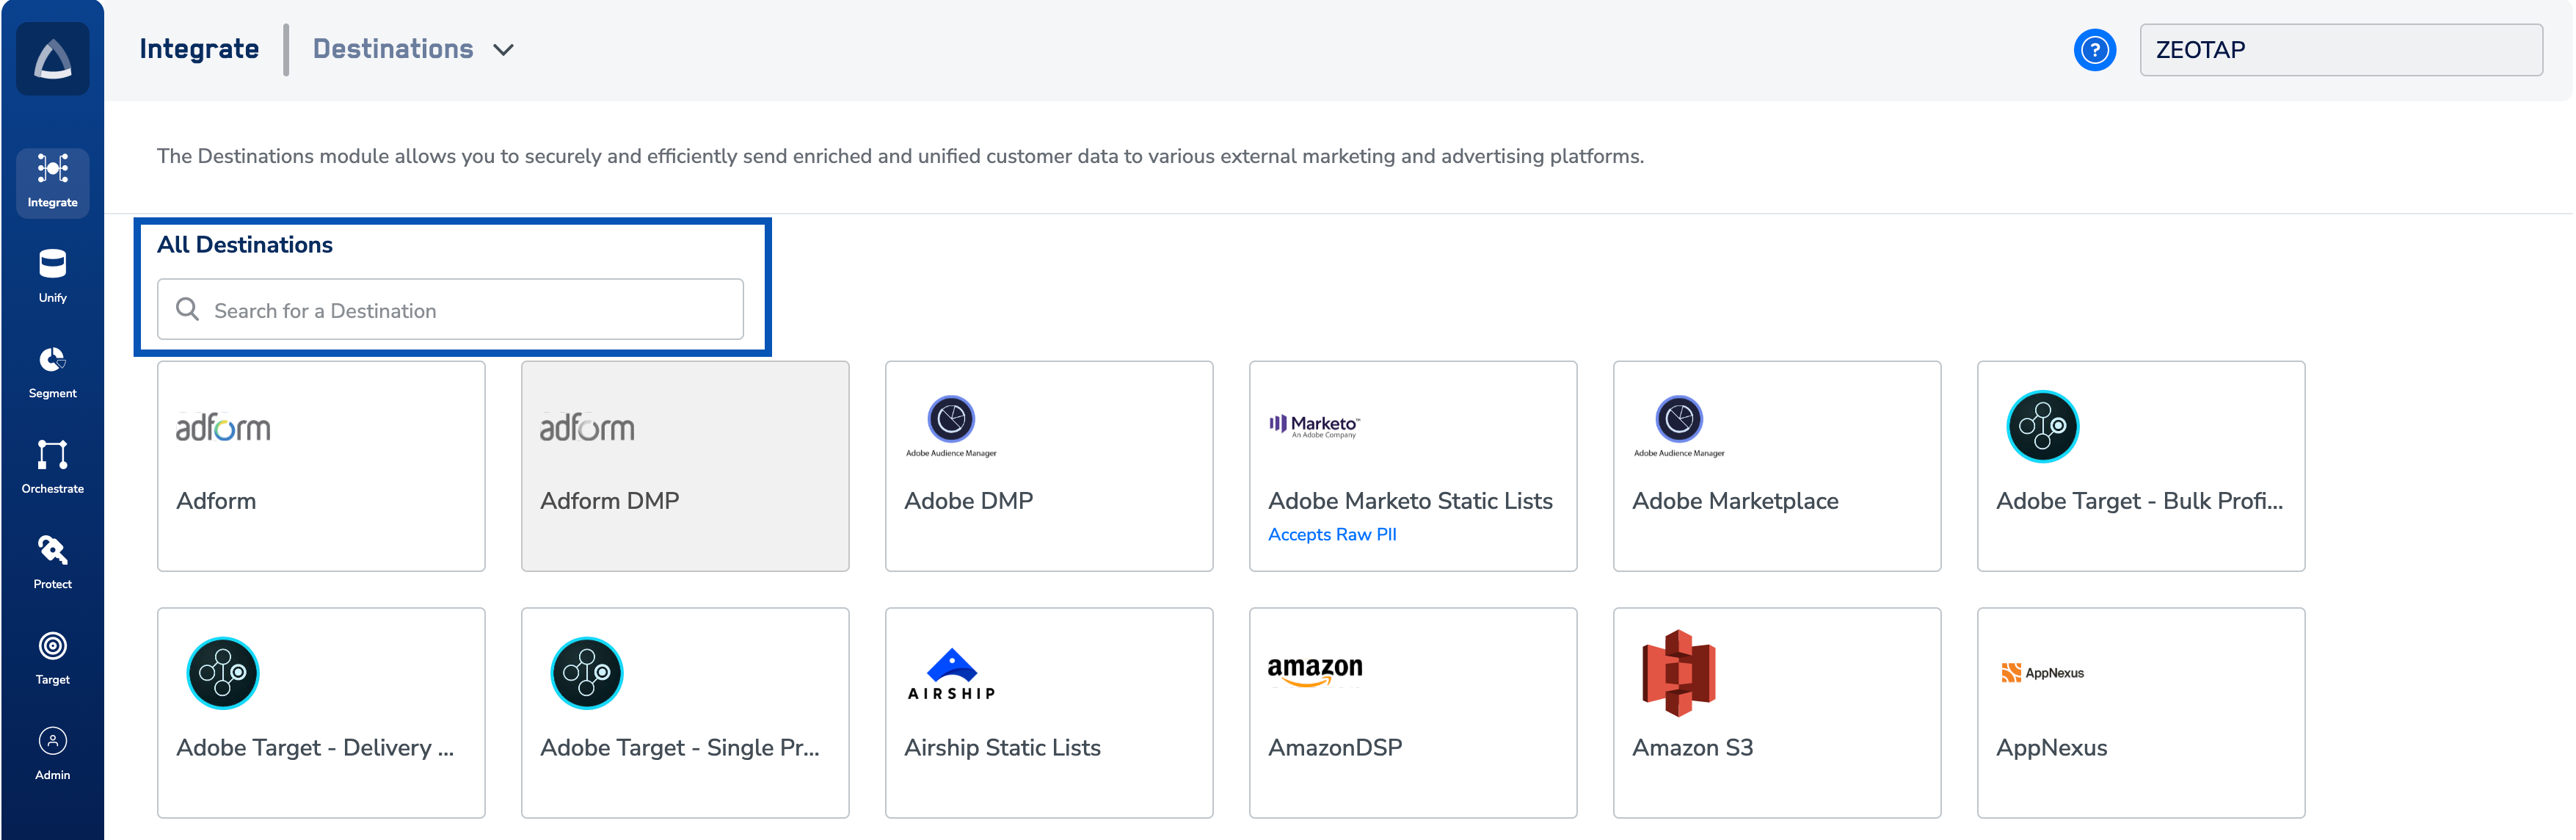
Log into the Zeotap CDP App and go to Integrate > Destinations.
2
Click + Create Destination.
3
Under All Destinations, search for Google Customer Match (Customer Contact Information).
4
Click Google Customer Match (Customer Contact Information).
A screen appears displaying details about the particular destination towards the left. On the right-hand side of the screen you will find the fields required for the integration to be established. Enter the required details as mentioned in the following steps:a. Enter a name for the Destination under Destination Name.b. Enter the Seat ID of the account on which you want the segment. Learn morec. Select the appropriate Product Type that the Seat ID belongs to. Learn mored. Click Next to proceed to mapping.
5
In the new screen that appears, choose the appropriate action and mapping as explained below.a. Under Choose your Action, you can choose either Send Identifiers to Google Customer Match - Customer Contact Information or Send Multiple User Identifiers as the action, based on your use case.i. If you choose Send Identifiers to Google Customer Match - Customer Contact Information, then the output identifiers email addresses and cellphone numbers are populated. Note that in this action, each identifier is sent as an individual user profile.
ii. If you choose Send Multiple User Identifiers as your action, then the output identifiers such as Hashed email address, Hashed cellphone numbers, last name, first name, Country Code and Postal Code are populated. Note that in this action, all the identifiers selected under the mapping screen are sent as a single user profile.
Note:To increase the match rate, we recommend that you use Send Multiple User Identifiers as the action.
6
Click Create Destination. The created Destination gets listed in the Audiences application, where it can be linked to an Audience/segment.
Link an audience to the destination
For information about how to link an Audience or segment to the created Destination in the Audiences application, refer to Activate Your Batch Audiences. It can take up to three business days for the segment to be available at the Google Customer Match (Customer Contact Information) seat. Note that the segments created on GCM appear in the format: {Audience Name}_{Audience Id}.
Note:The terms Audiences and Segments are used interchangeably to refer to customer cohorts belonging to a specific category. For example, an Audience or a segment can be a specific group of customers who are over 18 years of age and have performed an addToCart event within the last 30 days.
User disqualification from audiences
This integration supports user disqualification from audiences. That is, a user can be disqualified from an audience (segment) for various reasons, such as not meeting audience criteria, consent requirements or other conditions set for a particular audience.
When a user disqualifies from an audience, Zeotap CDP initiates a user deletion request in the next refresh cycle. These requests are sent to the audiences linked to the specific destination.
The disqualified users are excluded from the audiences based on the configured refresh frequency for a particular audience.
User disqualification is a programmatic process that works automatically. You do not need to specify anything to trigger the disqualification and exclusion of users from audiences.
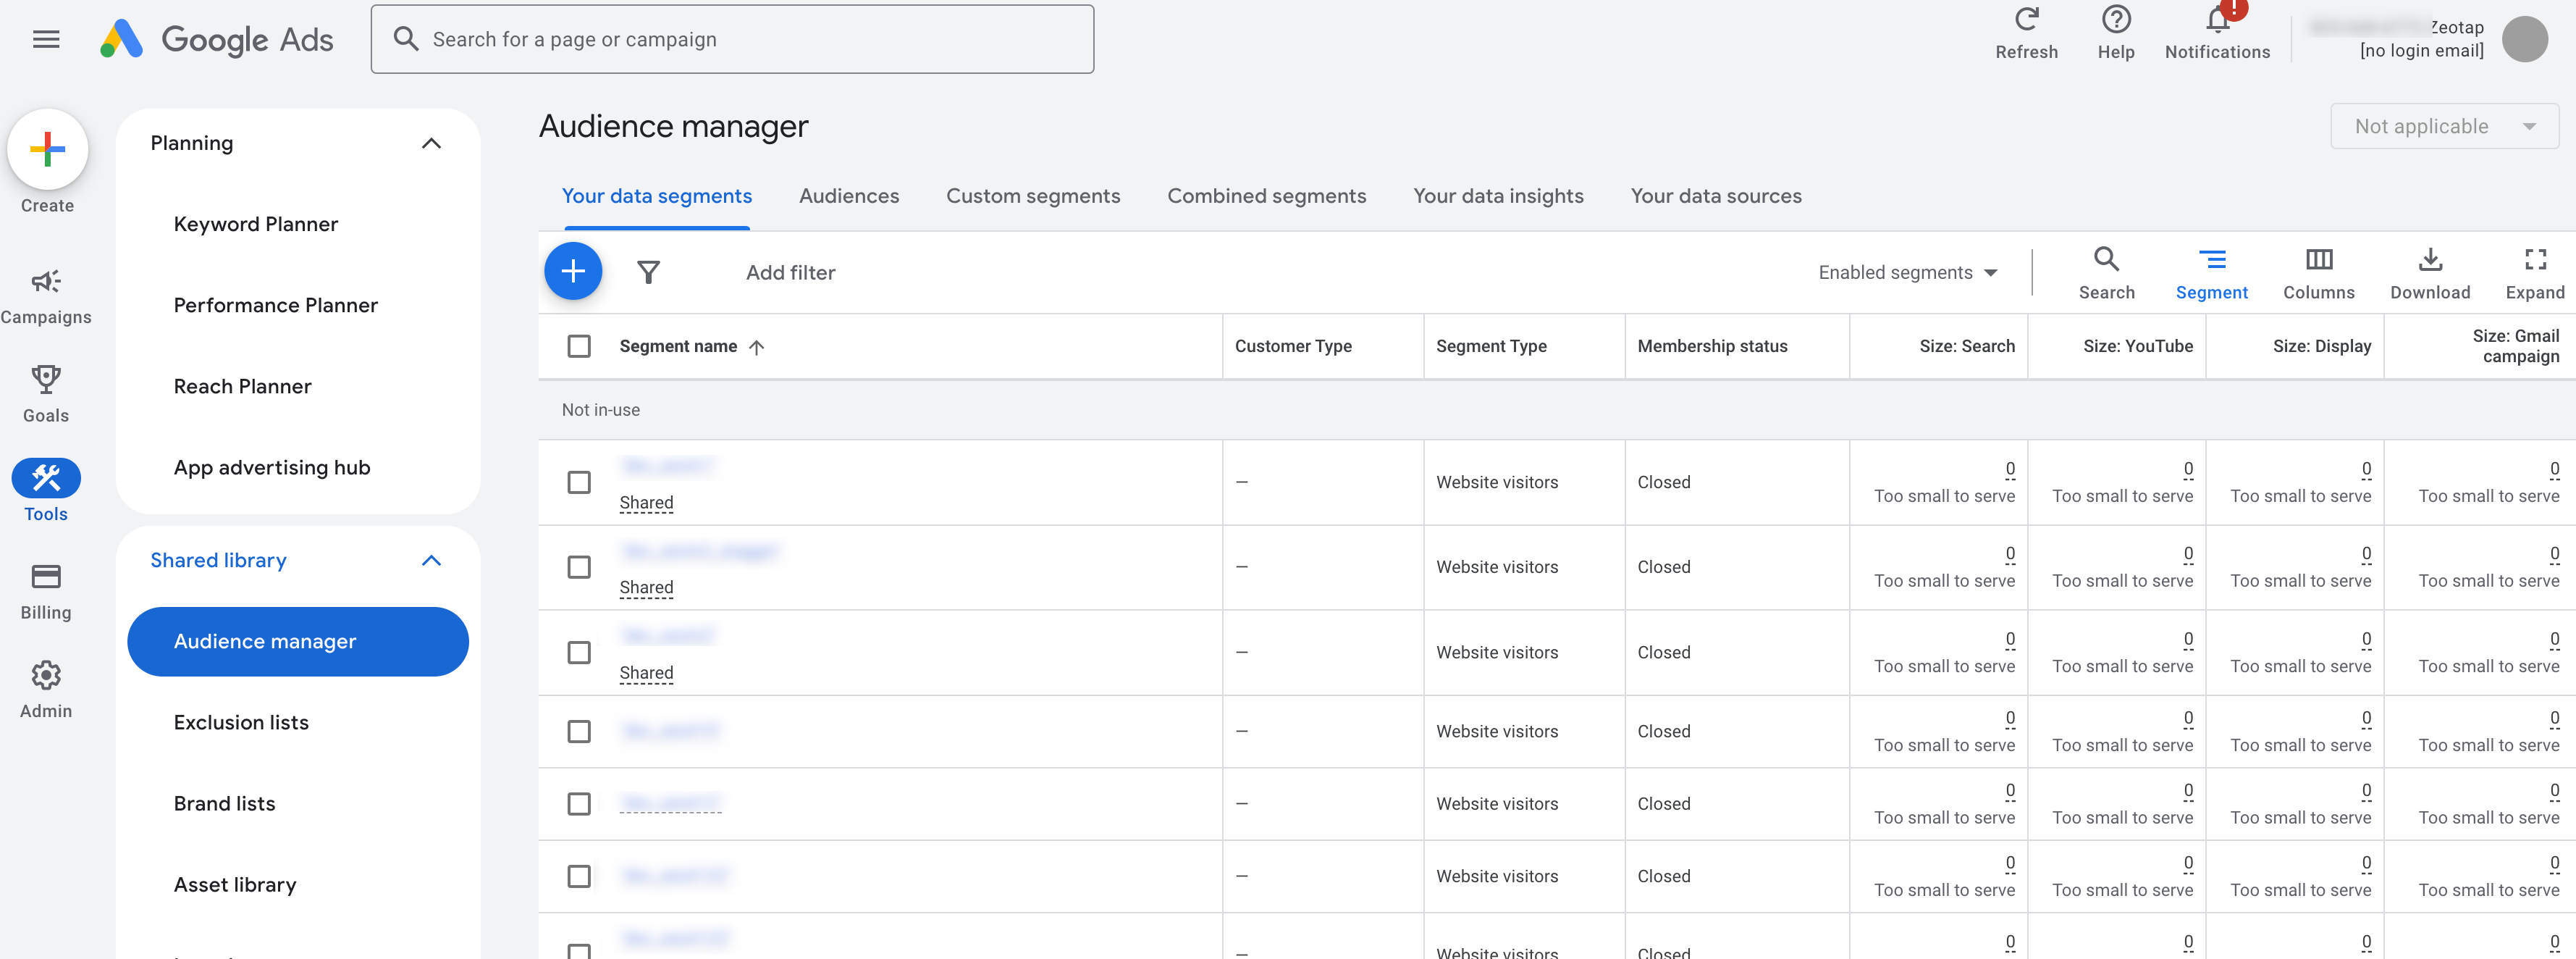
Perform the following steps to view the segments pushed to Google Ads:
1
Log into your Google Ads account.
2
In the left panel, navigate to Tools.
3
Under Shared library, select Audience manager.
4
Under Your data segments, you can view the list of all the segments pushed. You can find the ‘Customer list’ for any segment pushed through Google Ads along with the customer contact information tied to the particular segment under the Customer Type column. For example, Customer list (Mobile Device IDs) or Customer list (Customer contact information).
Troubleshoot Google Customer Match deliveries
Symptom
What to check
Segment or audience creation fails on the Google side
You cannot find the segment under its audience name
Segments are renamed on upload. Segments created on GCM appear as {Audience Name}_{Audience Id}; where multiple identifiers are sent, the note under Supported identifiers and actions documents the format {AudienceName}{DestinationName}_SegmentId.
More segments appear in GCM than you expected
When you send multiple identifiers, Zeotap CDP creates multiple audience segments within GCM, each with its own segment ID, and uploads the data to the corresponding segment. The segment IDs are displayed separately on the UI.
The match rate is lower than expected
Check that emails are hashed to SHA256 and that cellphone numbers are converted to E164 before hashing — see the hashing guidelines. Using Send Multiple User Identifiers as the action is recommended to increase the match rate.
Users disappear from a segment without a change on your side
This is user disqualification working as designed: disqualified users are removed on the audience’s configured refresh frequency. See User disqualification from audiences.
EEA users are not being matched
Check that you are providing consent parameters covering ad_user_data and ad_personalization, and that your Consent Orchestration rules admit only users who consented to ad personalisation on Google products. See FAQs related to Google Consent Update.
The delivery itself failed in Zeotap CDP
Open the audience–destination pair and read the recorded error. The common destination delivery errors and what they mean are listed in Why deliveries fail, along with when to contact support.
{"docsConfig":{"theme":"mint","$schema":"https://mintlify.com/docs.json","name":"Zeotap docs","colors":{"primary":"#174efb","light":"#174efb","dark":"#174efb"},"logo":{"light":"https://mintcdn.com/zeotap/pbiFRnrYXBNUsbba/logo/light.svg?fit=max\u0026auto=format\u0026n=pbiFRnrYXBNUsbba\u0026q=85\u0026s=c566b5af653699d3bcf4d8efb4f678d1","dark":"https://mintcdn.com/zeotap/pbiFRnrYXBNUsbba/logo/dark.svg?fit=max\u0026auto=format\u0026n=pbiFRnrYXBNUsbba\u0026q=85\u0026s=ae6e1d27d3d2e409f9e86c089b64e224","href":"https://zeotap.com/"},"favicon":"https://mintcdn.com/zeotap/Tg-jPUQrcrgXsHVA/favicon.svg?fit=max\u0026auto=format\u0026n=Tg-jPUQrcrgXsHVA\u0026q=85\u0026s=f5b2731a91bf6cad0fe370680ebae4fe","appearance":{"default":"light"},"background":{"decoration":"gradient","color":{"light":"#eaf0fe"}},"navbar":{"links":[{"href":"https://login.zeotap.com/","label":"Login"}],"primary":{"type":"button","label":"Book a Demo","href":"https://zeotap.com/demo/"}},"footer":{"socials":{"linkedin":"https://www.linkedin.com/company/zeotap"}},"seo":{"indexing":"all"},"integrations":{"ga4":{"measurementId":"G-XXXXXXXXXX"}},"banner":{"content":"New: [Support \u0026 Diagnostics](/articles/support-diagnostics-customer/support-diagnostics) troubleshooting guides are now live.","dismissible":true},"contextual":{"options":["copy","view","chatgpt","claude","perplexity","mcp","cursor","vscode"],"display":"header"},"metadata":{"timestamp":true},"styling":{"latex":true},"navigation":{"global":{},"pages":[]}},"deployment":{"deploymentMetadataValue":{"subdomain":"zeotap","hasAudioNarration":false,"actualSubdomain":"zeotap","customDomains":["docs.zeotap.com"],"gitSource":{"type":"github","owner":"zeotap","repo":"zeotap-docs","deployBranch":"main","contentDirectory":"","isPrivate":true,"mountPath":"","label":""},"feedback":{"thumbs":true},"entitlements":{"AI_CHAT":{"status":"ENABLED"},"WEB_MCP":{"status":"ENABLED"},"NARRATION":{"status":"ENABLED"}},"buildId":"6afc6bd4e9e77883dbfacc5f","clientVersion":"0.0.4177","searchFilterCounts":[{"language":"default","tag":"Products","count":354},{"language":"default","tag":"Integrate","count":215},{"language":"default","tag":"SDKs","count":157},{"language":"default","tag":"Destinations","count":150},{"language":"default","tag":"Batch Integrations","count":97},{"language":"default","tag":"Sources","count":65},{"language":"default","tag":"Unify","count":65},{"language":"default","tag":"Source Integrations (Batch+Real-Time)","count":54},{"language":"default","tag":"Release Notes","count":54},{"language":"default","tag":"Catalogue","count":48}]},"assistantConfig":{"enableAskAiButton":false,"enableStarterQuestions":false,"enableAskAiSearchBar":true},"basePath":"","hasChatPermissions":true,"hasWebMcpPermissions":true,"toggles":[{"name":"kill-isr","enabled":true,"variant":{"name":"disabled","enabled":false,"feature_enabled":true},"impressionData":false},{"name":"custom-rbac-roles","enabled":true,"variant":{"name":"disabled","enabled":false,"feature_enabled":true},"impressionData":false},{"name":"agent-mintlify-slack","enabled":true,"variant":{"name":"disabled","enabled":false,"feature_enabled":true},"impressionData":false},{"name":"agent-integrations-settings","enabled":true,"variant":{"name":"disabled","enabled":false,"feature_enabled":true},"impressionData":false},{"name":"rbac-expansion","enabled":true,"variant":{"name":"disabled","enabled":false,"feature_enabled":true},"impressionData":false},{"name":"automations-pr-grouping","enabled":true,"variant":{"name":"disabled","enabled":false,"feature_enabled":true},"impressionData":false},{"name":"custom-prefix","enabled":true,"variant":{"name":"disabled","enabled":false,"feature_enabled":true},"impressionData":false},{"name":"analytics-v7","enabled":true,"variant":{"name":"disabled","enabled":false,"feature_enabled":true},"impressionData":false},{"name":"user-flows-analytics","enabled":true,"variant":{"name":"disabled","enabled":false,"feature_enabled":true},"impressionData":false},{"name":"no-publish-flow","enabled":true,"variant":{"name":"disabled","enabled":false,"feature_enabled":true},"impressionData":false},{"name":"workos-onboarding","enabled":true,"variant":{"name":"disabled","enabled":false,"feature_enabled":true},"impressionData":false},{"name":"snapshot-serving-live","enabled":true,"variant":{"name":"disabled","enabled":false,"feature_enabled":true},"impressionData":false},{"name":"stripTemperatureMiddleware","enabled":true,"variant":{"name":"disabled","enabled":false,"feature_enabled":true},"impressionData":false},{"name":"support-platform-pylon-zendesk","enabled":true,"variant":{"name":"disabled","enabled":false,"feature_enabled":true},"impressionData":false},{"name":"snapshot-serving","enabled":true,"variant":{"name":"disabled","enabled":false,"feature_enabled":true},"impressionData":false},{"name":"instant-rollback","enabled":true,"variant":{"name":"disabled","enabled":false,"feature_enabled":true},"impressionData":false},{"name":"granular-notifications-server","enabled":true,"variant":{"name":"disabled","enabled":false,"feature_enabled":true},"impressionData":false},{"name":"granular-notifications","enabled":true,"variant":{"name":"disabled","enabled":false,"feature_enabled":true},"impressionData":false},{"name":"automations-fable","enabled":true,"variant":{"name":"disabled","enabled":false,"feature_enabled":true},"impressionData":false},{"name":"fixed-ai-action-pricing","enabled":true,"variant":{"name":"disabled","enabled":false,"feature_enabled":true},"impressionData":false},{"name":"automation-resolve-merge-conflict","enabled":true,"variant":{"name":"disabled","enabled":false,"feature_enabled":true},"impressionData":false},{"name":"scoped-publishing","enabled":true,"variant":{"name":"disabled","enabled":false,"feature_enabled":true},"impressionData":false},{"name":"mintql","enabled":true,"variant":{"name":"disabled","enabled":false,"feature_enabled":true},"impressionData":false},{"name":"page-level-analytics","enabled":true,"variant":{"name":"disabled","enabled":false,"feature_enabled":true},"impressionData":false},{"name":"editor-version-history-v2","enabled":true,"variant":{"name":"disabled","enabled":false,"feature_enabled":true},"impressionData":false},{"name":"billing-page-v2","enabled":true,"variant":{"name":"disabled","enabled":false,"feature_enabled":true},"impressionData":false},{"name":"full-page-search","enabled":true,"variant":{"name":"disabled","enabled":false,"feature_enabled":true},"impressionData":false},{"name":"workspace-projects","enabled":true,"variant":{"name":"disabled","enabled":false,"feature_enabled":true},"impressionData":false},{"name":"assistant-v5","enabled":true,"variant":{"name":"disabled","enabled":false,"feature_enabled":true},"impressionData":false},{"name":"fork-pr-previews","enabled":true,"variant":{"name":"disabled","enabled":false,"feature_enabled":true},"impressionData":false},{"name":"revalidation-jwt","enabled":true,"variant":{"name":"disabled","enabled":false,"feature_enabled":true},"impressionData":false},{"name":"workos-sso-scim","enabled":true,"variant":{"name":"disabled","enabled":false,"feature_enabled":true},"impressionData":false},{"name":"hobby-abuse-scan","enabled":true,"variant":{"name":"disabled","enabled":false,"feature_enabled":true},"impressionData":false},{"name":"dashboard-inbox","enabled":true,"variant":{"name":"disabled","enabled":false,"feature_enabled":true},"impressionData":false},{"name":"workos-signup","enabled":true,"variant":{"name":"disabled","enabled":false,"feature_enabled":true},"impressionData":false},{"name":"turbopuffer-dual-write","enabled":true,"variant":{"name":"disabled","enabled":false,"feature_enabled":true},"impressionData":false},{"name":"workos-enabled","enabled":true,"variant":{"name":"disabled","enabled":false,"feature_enabled":true},"impressionData":false},{"name":"approve-review-flow","enabled":true,"variant":{"name":"disabled","enabled":false,"feature_enabled":true},"impressionData":false},{"name":"editor-metadata","enabled":true,"variant":{"name":"disabled","enabled":false,"feature_enabled":true},"impressionData":false},{"name":"sso-setup-deadline-banner","enabled":true,"variant":{"name":"disabled","enabled":false,"feature_enabled":true},"impressionData":false},{"name":"turbopuffer-serve","enabled":true,"variant":{"name":"disabled","enabled":false,"feature_enabled":true},"impressionData":false},{"name":"live-agents","enabled":true,"variant":{"name":"disabled","enabled":false,"feature_enabled":true},"impressionData":false},{"name":"starter-pricing","enabled":true,"variant":{"name":"treatment","enabled":true,"payload":{"type":"string","value":"treatment"},"feature_enabled":true},"impressionData":false},{"name":"llms-txt-v2","enabled":true,"variant":{"name":"disabled","enabled":false,"feature_enabled":true},"impressionData":false}],"googleFontsInlined":false},"customCss":[],"page":{"pagePath":"articles/integrate-customer/google-customer-match-customer-contact-information","slug":"/articles/integrate-customer/google-customer-match-customer-contact-information","pageMetadata":{"title":"Google Customer Match (Customer Contact Information)","description":"Send hashed email addresses and hashed phone numbers from Zeotap CDP to Google Ads or Display \u0026 Video 360 as Customer Match customer lists.","sidebarTitle":"Customer Match (contact info)","last_validated":"2026-10-01T00:00:00.000Z","href":"/articles/integrate-customer/google-customer-match-customer-contact-information"},"description":{"compiledSource":"\"use strict\";\nconst {jsx: _jsx} = arguments[0];\nconst {useMDXComponents: _provideComponents} = arguments[0];\nfunction _createMdxContent(props) {\n const _components = {\n p: \"p\",\n ..._provideComponents(),\n ...props.components\n };\n return _jsx(_components.p, {\n children: \"Send hashed email addresses and hashed phone numbers from Zeotap CDP to Google Ads or Display \u0026 Video 360 as Customer Match customer lists.\"\n });\n}\nfunction MDXContent(props = {}) {\n const {wrapper: MDXLayout} = {\n ..._provideComponents(),\n ...props.components\n };\n return MDXLayout ? _jsx(MDXLayout, {\n ...props,\n children: _jsx(_createMdxContent, {\n ...props\n })\n }) : _createMdxContent(props);\n}\nreturn {\n default: MDXContent\n};\n","frontmatter":{},"scope":{}},"pageType":"default","mdx":{"mdxSource":{"compiledSource":"\"use strict\";const{Fragment:_Fragment,jsx:_jsx,jsxs:_jsxs}=arguments[0];const{useMDXComponents:_provideComponents}=arguments[0];function _createMdxContent(props){const _components={a:`a`,code:`code`,em:`em`,li:`li`,p:`p`,strong:`strong`,tbody:`tbody`,td:`td`,th:`th`,thead:`thead`,tr:`tr`,ul:`ul`,..._provideComponents(),...props.components},{Frame,Heading,Note,OptimizedImage,Step,Steps,Table}=_components;if(!Frame)_missingMdxReference(`Frame`,true);if(!Heading)_missingMdxReference(`Heading`,true);if(!Note)_missingMdxReference(`Note`,true);if(!OptimizedImage)_missingMdxReference(`OptimizedImage`,true);if(!Step)_missingMdxReference(`Step`,true);if(!Steps)_missingMdxReference(`Steps`,true);if(!Table)_missingMdxReference(`Table`,true);return _jsxs(_Fragment,{children:[_jsx(Heading,{level:`2`,id:`what-this-is`,children:`What this is`}),`\n`,_jsxs(_components.p,{children:[`Google Customer Match (Customer Contact Information) is a `,_jsx(_components.strong,{children:`batch destination`}),`: it sends hashed email addresses and hashed phone numbers `,_jsx(_components.strong,{children:`out of Zeotap CDP into your Google Ads or Google DV360 (Display \u0026 Video 360) account`}),`, where they arrive as Customer Match customer lists you can target or suppress in campaigns. You build the audience in Zeotap CDP, link it to this destination, and Zeotap CDP uploads the identifiers on the audience’s refresh schedule.`]}),`\n`,_jsxs(_components.p,{children:[`Google Customer Match lets you use first-party data to share the unique insights you have about your customers beyond Google’s understanding. That can deepen existing customer relationships — or build new ones — across Google’s properties in a `,_jsx(_components.a,{href:`https://blog.google/products/ads-commerce/a-more-privacy-first-web`,children:`privacy-safe way`}),`. This is becoming increasingly important as Google phases out cookie-based re-marketing due to privacy, browser and regulation changes.`]}),`\n`,_jsx(_components.p,{children:`Related pages for the same vendor:`}),`\n`,_jsxs(_components.ul,{children:[`\n`,_jsxs(_components.li,{children:[`To send `,_jsx(_components.strong,{children:`mobile advertising IDs`}),` instead of contact information, use `,_jsx(_components.a,{href:`/articles/integrate-customer/google-customer-match-mobile-device-ids`,children:`Google Customer Match (Mobile Device IDs)`}),`.`]}),`\n`,_jsxs(_components.li,{children:[`To collect website events `,_jsx(_components.strong,{children:`into`}),` Zeotap CDP using a Google tag container, see the `,_jsx(_components.a,{href:`/articles/integrate-customer/google-tag-manager`,children:`Google Tag Manager source`}),`.`]}),`\n`]}),`\n`,_jsxs(Note,{children:[_jsx(_components.p,{children:_jsx(_components.strong,{children:`Important Notice:`})}),_jsxs(_components.p,{children:[`To ensure compliance with the `,_jsx(_components.a,{href:`https://www.google.com/about/company/user-consent-policy/`,children:`EU user consent policy`}),` and continue accessing Customer Match within the European Economic Area (EEA), Google is enhancing its enforcement measures. Google requires its partners to update to the latest `,_jsx(_components.code,{children:`Google Ads API v15`}),` and begin transmitting consent signals for users in the EEA region. The following are the consent signals it covers:`]}),_jsxs(_components.ul,{children:[`\n`,_jsxs(_components.li,{children:[_jsx(_components.code,{children:`ad_user_data`}),`: Indicates consent to send user data for advertising purposes to Google.`]}),`\n`,_jsxs(_components.li,{children:[_jsx(_components.code,{children:`ad_personalization`}),`: Indicates consent for ad personalisation.`]}),`\n`]}),_jsx(_components.p,{children:`Note that commencing March 6th, 2024, Zeotap CDP will transmit a GRANTED consent status for the above mentioned consent signals. To ensure that only consented users meet the audience criteria, you are advised to perform the following actions:`}),_jsxs(_components.ul,{children:[`\n`,_jsxs(_components.li,{children:[`Provide Zeotap CDP with the appropriate consent parameters covering the two consent signals requested by Google (`,_jsx(_components.code,{children:`ad_user_data`}),` and `,_jsx(_components.code,{children:`ad_personalization`}),`)`]}),`\n`,_jsx(_components.li,{children:`Establish relevant Consent Orchestration rules to ensure that only users who have consented to perform ad personalisation on Google Products are ingested.`}),`\n`]}),_jsxs(_components.p,{children:[_jsx(_components.strong,{children:`Note:`}),` For the frequently asked questions about the consent update, refer to `,_jsx(_components.a,{href:`/articles/integrate-customer/faqs-related-to-google-consent-update`,children:`FAQs related to Google Consent Update`}),`.`]})]}),`\n`,_jsx(Heading,{level:`3`,id:`where-the-audience-can-be-used`,children:`Where the audience can be used`}),`\n`,_jsx(_components.p,{children:`Customer Match is a useful advertising tool for many business goals, from increasing brand awareness to driving conversions. Audiences sent through this destination can be used as follows:`}),`\n`,_jsxs(_components.ul,{children:[`\n`,_jsxs(_components.li,{children:[`On the `,_jsx(_components.strong,{children:`Search Network and the Shopping tab`}),`, you can optimise your campaigns by adjusting your bid based on what you know about your customers’ activities.`]}),`\n`,_jsxs(_components.li,{children:[`On `,_jsx(_components.strong,{children:`Gmail`}),`, you can reach your customers or similar audiences using personalised ads at the top of their inbox tabs.`]}),`\n`,_jsxs(_components.li,{children:[`On `,_jsx(_components.strong,{children:`YouTube`}),`, you can reach new audiences by targeting audiences similar to your most valuable customers.`]}),`\n`,_jsxs(_components.li,{children:[`On `,_jsx(_components.strong,{children:`Display`}),`, you can reach your customers or similar audiences using personalised ads on the Google Display Network.`]}),`\n`]}),`\n`,_jsx(Heading,{level:`3`,id:`common-uses`,children:`Common uses`}),`\n`,_jsxs(_components.ul,{children:[`\n`,_jsxs(_components.li,{children:[_jsx(_components.strong,{children:`Re-engage known customers.`}),` Upload email addresses from your CRM into Zeotap CDP, build tailored audience segments, and send them to Google Customer Match for targeted campaigns across Search, the Shopping tab, Gmail, YouTube and Display.`]}),`\n`,_jsxs(_components.li,{children:[_jsx(_components.strong,{children:`Suppress ads.`}),` Create suppression segments in Zeotap CDP for existing customers, or for people who do not wish to be targeted, and send them to Google Customer Match so those audiences are excluded from ad campaigns.`]}),`\n`,_jsxs(_components.li,{children:[_jsx(_components.strong,{children:`Reach similar prospects.`}),` Identify high-value customer segments in Zeotap CDP and send them to Google Customer Match to build lookalike audiences, allocating higher budgets to those segments and lower cost limits to low-LTV audiences.`]}),`\n`]}),`\n`,_jsx(Heading,{level:`2`,id:`supported-identifiers-and-actions`,children:`Supported identifiers and actions`}),`\n`,_jsx(_components.p,{children:`This integration supports hashed phone numbers in E164 format and hashed email addresses (mostly Gmail).`}),`\n`,_jsxs(Note,{children:[_jsx(_components.p,{children:_jsx(_components.strong,{children:`Note:`})}),_jsx(_components.p,{children:_jsx(_components.em,{children:`Follow these guidelines to ensure proper data handling and audience segmentation when using Customer Match:`})}),_jsxs(_components.ul,{children:[`\n`,_jsxs(_components.li,{children:[`Ensure that the emails are hashed to `,_jsx(_components.code,{children:`SHA256`}),` and cellphone numbers are converted to `,_jsx(_components.code,{children:`E164`}),` format before hashing it to `,_jsx(_components.code,{children:`SHA256`}),`. For more information about how to convert it to `,_jsx(_components.code,{children:`E164`}),`, refer to our `,_jsx(_components.a,{href:`/articles/unify-customer/hashing-guidelines`,children:`hashing guidelines`}),`.`]}),`\n`,_jsxs(_components.li,{children:[`When you send multiple identifiers, such as email addresses, phone numbers, and MAIDs, to Customer Match, Zeotap CDP creates multiple audience segments within GCM (AdWords), each with a unique segment ID. The data is uploaded to the corresponding segments based on these IDs. The segment IDs are displayed separately on the UI. The segment name in AdWords for the identifiers appears in the following format: `,_jsx(_components.code,{children:`{AudienceName}{DestinationName}_SegmentId`})]}),`\n`]})]}),`\n`,_jsx(Heading,{level:`3`,id:`available-actions-and-supported-features`,children:`Available actions and supported features`}),`\n`,_jsx(_components.p,{children:`The following table lists the action types available for the integration and their supported features:`}),`\n`,_jsxs(Table,{children:[_jsx(_components.thead,{children:_jsxs(_components.tr,{children:[_jsx(_components.th,{style:{textAlign:`left`},children:`Action Name`}),_jsx(_components.th,{style:{textAlign:`left`},children:_jsx(_components.a,{href:`/articles/segment-customer/audience-boost`,children:`AUDIENCE BOOST`})}),_jsx(_components.th,{style:{textAlign:`left`},children:_jsx(_components.a,{href:`/articles/segment-customer/delta-upload-and-delete-functions`,children:`DELETE`})}),_jsx(_components.th,{style:{textAlign:`left`},children:_jsx(_components.a,{href:`/articles/segment-customer/delta-upload-and-delete-functions`,children:`DELTA UPLOAD`})})]})}),_jsxs(_components.tbody,{children:[_jsxs(_components.tr,{children:[_jsx(_components.td,{style:{textAlign:`left`},children:`Send Multiple User Identifiers`}),_jsx(_components.td,{style:{textAlign:`left`},children:`✅`}),_jsx(_components.td,{style:{textAlign:`left`},children:`✅`}),_jsx(_components.td,{\"data-numeric\":`true`,style:{textAlign:`left`},children:`-`})]}),_jsxs(_components.tr,{children:[_jsx(_components.td,{style:{textAlign:`left`},children:`Send identifiers to Google Customer Match - Customer Contact Information`}),_jsx(_components.td,{style:{textAlign:`left`},children:`✅`}),_jsx(_components.td,{style:{textAlign:`left`},children:`✅`}),_jsx(_components.td,{\"data-numeric\":`true`,style:{textAlign:`left`},children:`-`})]})]})]}),`\n`,_jsxs(_components.p,{children:[`Delta and Delete functionality is released in phases and is activated per destination — see `,_jsx(_components.a,{href:`/articles/segment-customer/delta-upload-and-delete-functions`,children:`Delta Upload and Delete Functions`}),`, which lists this integration under the Delete-enabled integrations and describes how activation is requested.`]}),`\n`,_jsx(Heading,{level:`2`,id:`prerequisites`,children:`Prerequisites`}),`\n`,_jsx(_components.p,{children:`Customer Match is not available for all advertisers. To use Customer Match, the account must have the following details:`}),`\n`,_jsxs(_components.ul,{children:[`\n`,_jsx(_components.li,{children:`A good history of policy compliance`}),`\n`,_jsx(_components.li,{children:`A good payment history`}),`\n`,_jsx(_components.li,{children:`At least 90 days history in Google Ads`}),`\n`,_jsx(_components.li,{children:`More than 50,000 USD total lifetime spend. For advertisers whose accounts are managed in currencies other than USD, your spend amount will be converted to USD using the average monthly conversion rate for that currency.`}),`\n`]}),`\n`,_jsxs(_components.p,{children:[`For complete information about the requirements for using Google Customer Match, refer to the `,_jsx(_components.a,{href:`https://support.google.com/google-ads/answer/6299717`,children:`Google Help documentation`}),`. These guidelines apply to advertisers using Customer Match for campaigns on Search, Shopping, Display, YouTube or Gmail.`]}),`\n`,_jsx(_components.p,{children:`Ensure that you have the below details available before creating a Google Customer Match destination in Zeotap CDP.`}),`\n`,_jsx(Heading,{level:`3`,id:`seat-id`,children:`Seat ID`}),`\n`,_jsx(_components.p,{children:`This is the unique ID assigned to your Advertiser account that you can locate next to your account name within the respective Google products. Note that you can add a Seat ID for Google Ads and Google DV360 through this integration. Depending on the product that your Seat ID is associated with, you have to choose the corresponding Product Type.`}),`\n`,_jsx(Frame,{children:_jsx(OptimizedImage,{src:`https://mintcdn.com/zeotap/eToLLIFlmf1QY4Al/articles/integrate-customer/Storage/integrate-customer/google-customer-match/google-customer-match-2024-12-10-1.png?fit=max\u0026auto=format\u0026n=eToLLIFlmf1QY4Al\u0026q=85\u0026s=7bebd7b52745c1ad574d096b9436af31`,alt:`The Google Ads top navigation bar. The account identifier that sits beside the account name in the header is outlined with a box and marked with an arrow, showing where in the interface to look for it.`,\"data-og-width\":`3580`,width:`3580`,\"data-og-height\":`834`,height:`834`,\"data-path\":`articles/integrate-customer/Storage/integrate-customer/google-customer-match/google-customer-match-2024-12-10-1.png`,\"data-optimize\":`true`,\"data-opv\":`3`,srcset:`https://mintcdn.com/zeotap/eToLLIFlmf1QY4Al/articles/integrate-customer/Storage/integrate-customer/google-customer-match/google-customer-match-2024-12-10-1.png?w=280\u0026fit=max\u0026auto=format\u0026n=eToLLIFlmf1QY4Al\u0026q=85\u0026s=7ffe20a8f8d9a122dea080a6336f1c77 280w, https://mintcdn.com/zeotap/eToLLIFlmf1QY4Al/articles/integrate-customer/Storage/integrate-customer/google-customer-match/google-customer-match-2024-12-10-1.png?w=560\u0026fit=max\u0026auto=format\u0026n=eToLLIFlmf1QY4Al\u0026q=85\u0026s=bd90dc7c1fe25c59908857516135531d 560w, https://mintcdn.com/zeotap/eToLLIFlmf1QY4Al/articles/integrate-customer/Storage/integrate-customer/google-customer-match/google-customer-match-2024-12-10-1.png?w=840\u0026fit=max\u0026auto=format\u0026n=eToLLIFlmf1QY4Al\u0026q=85\u0026s=711487dd497a20bcc49a921eb91ee2c9 840w, https://mintcdn.com/zeotap/eToLLIFlmf1QY4Al/articles/integrate-customer/Storage/integrate-customer/google-customer-match/google-customer-match-2024-12-10-1.png?w=1100\u0026fit=max\u0026auto=format\u0026n=eToLLIFlmf1QY4Al\u0026q=85\u0026s=943a6dc08986c63a0cfb3d3968623aaa 1100w, https://mintcdn.com/zeotap/eToLLIFlmf1QY4Al/articles/integrate-customer/Storage/integrate-customer/google-customer-match/google-customer-match-2024-12-10-1.png?w=1650\u0026fit=max\u0026auto=format\u0026n=eToLLIFlmf1QY4Al\u0026q=85\u0026s=6326eaaa42a9919cf9c85d70573af447 1650w, https://mintcdn.com/zeotap/eToLLIFlmf1QY4Al/articles/integrate-customer/Storage/integrate-customer/google-customer-match/google-customer-match-2024-12-10-1.png?w=2500\u0026fit=max\u0026auto=format\u0026n=eToLLIFlmf1QY4Al\u0026q=85\u0026s=8c78d72cf93b9577ef3270dffb5b1ee8 2500w`})}),`\n`,_jsx(Heading,{level:`3`,id:`product-type`,children:`Product type`}),`\n`,_jsxs(_components.p,{children:[`Based on the platform you want to use and your role, choose the Google product that matches your requirement. You can either use `,_jsx(_components.strong,{children:`Google Ads (AdWords)`}),` or `,_jsx(_components.strong,{children:`Google DV360 (Display \u0026 Video 360).`})]}),`\n`,_jsxs(_components.ul,{children:[`\n`,_jsxs(_components.li,{children:[`\n`,_jsxs(_components.p,{children:[`If you are using `,_jsx(_components.strong,{children:`Google Ads`}),`, then choose `,_jsx(_components.strong,{children:`ADWORDS`}),` as your Product Type.\nThis allows you to serve ad campaigns on Search, the Shopping tab, Gmail, YouTube and Display.`]}),`\n`]}),`\n`,_jsxs(_components.li,{children:[`\n`,_jsxs(_components.p,{children:[`If you are using `,_jsx(_components.strong,{children:`Google DV360`}),`, a demand-side platform (DSP) for managing and optimising digital ad campaigns across channels like display, video, and connected TV, then choose from the below options.`]}),`\n`,_jsxs(_components.ul,{children:[`\n`,_jsxs(_components.li,{children:[`\n`,_jsxs(_components.p,{children:[_jsx(_components.strong,{children:`INVITE_PARTNER —`}),` Select this option if you are a `,_jsx(_components.strong,{children:`Bid Manager Partner`}),`. A Partner manages multiple advertiser accounts under a single account, typically used by agencies or organisations handling campaigns for multiple clients.`]}),`\n`]}),`\n`,_jsxs(_components.li,{children:[`\n`,_jsxs(_components.p,{children:[_jsx(_components.strong,{children:`INVITE_ADVERTISER —`}),` Select this option if you are a `,_jsx(_components.strong,{children:`Bid Manager Advertiser`}),`. An Advertiser represents a single brand or organisation running its own campaigns in DV360.`]}),`\n`,_jsx(_components.p,{children:_jsx(_components.strong,{children:`Key differences between a Partner and an Advertiser in DV360`})}),`\n`,_jsxs(Table,{children:[_jsx(_components.thead,{children:_jsxs(_components.tr,{children:[_jsx(_components.th,{style:{textAlign:`left`},children:_jsx(_components.strong,{children:`Aspect`})}),_jsx(_components.th,{style:{textAlign:`left`},children:_jsx(_components.strong,{children:`Bid Manager Partner`})}),_jsx(_components.th,{style:{textAlign:`left`},children:_jsx(_components.strong,{children:`Bid Manager Advertiser`})})]})}),_jsxs(_components.tbody,{children:[_jsxs(_components.tr,{children:[_jsx(_components.td,{style:{textAlign:`left`},children:_jsx(_components.strong,{children:`Role`})}),_jsx(_components.td,{style:{textAlign:`left`},children:`Manages and oversees multiple advertisers.`}),_jsx(_components.td,{style:{textAlign:`left`},children:`Represents a single advertiser’s account.`})]}),_jsxs(_components.tr,{children:[_jsx(_components.td,{style:{textAlign:`left`},children:_jsx(_components.strong,{children:`Hierarchy`})}),_jsx(_components.td,{style:{textAlign:`left`},children:`Higher-level entity in the DV360 structure.`}),_jsx(_components.td,{style:{textAlign:`left`},children:`Sub-account within a partner.`})]}),_jsxs(_components.tr,{children:[_jsx(_components.td,{style:{textAlign:`left`},children:_jsx(_components.strong,{children:`Responsibilities`})}),_jsx(_components.td,{style:{textAlign:`left`},children:`Sets policies, manages billing, and organises advertisers.`}),_jsx(_components.td,{style:{textAlign:`left`},children:`Focuses on campaign creation and execution.`})]}),_jsxs(_components.tr,{children:[_jsx(_components.td,{style:{textAlign:`left`},children:_jsx(_components.strong,{children:`Use Case`})}),_jsx(_components.td,{style:{textAlign:`left`},children:`Agencies or organisations managing several clients or business units.`}),_jsx(_components.td,{style:{textAlign:`left`},children:`Individual brands or advertisers.`})]})]})]}),`\n`]}),`\n`]}),`\n`]}),`\n`]}),`\n`,_jsx(Heading,{level:`2`,id:`whitelist-zeotap-on-your-google-product`,children:`Whitelist Zeotap on your Google product`}),`\n`,_jsx(_components.p,{children:`To send audiences (segments) from Zeotap CDP to Google Ads or DV360, you must first whitelist Zeotap on the platform you wish to use. Whitelisting is required for successful audience/segment creation; without it, the segments will fail.`}),`\n`,_jsx(_components.p,{children:`Follow the instructions below for the platform you use:`}),`\n`,_jsxs(_components.ul,{children:[`\n`,_jsx(_components.li,{children:_jsx(_components.a,{href:`#whitelist-zeotap-on-google-ads`,children:`Whitelist Zeotap on Google Ads`})}),`\n`,_jsx(_components.li,{children:_jsx(_components.a,{href:`#whitelist-zeotap-on-google-dv360`,children:`Whitelist Zeotap on Google DV360`})}),`\n`]}),`\n`,_jsx(Heading,{level:`3`,id:`whitelist-zeotap-on-google-ads`,children:`Whitelist Zeotap on Google Ads`}),`\n`,_jsx(_components.p,{children:`To send audience segments from Zeotap CDP to Google Ads, ensure that you whitelist Zeotap CDP by performing the following steps:`}),`\n`,_jsxs(Steps,{children:[_jsx(Step,{children:_jsxs(_components.p,{children:[`Log into your `,_jsx(_components.strong,{children:`Google Ads`}),` account.`]})}),_jsx(Step,{children:_jsxs(_components.p,{children:[`In the left panel, navigate to `,_jsx(_components.strong,{children:`Tools`}),` > `,_jsx(_components.strong,{children:`Data manager`}),`.`]})}),_jsxs(Step,{children:[_jsxs(_components.p,{children:[`Under `,_jsx(_components.strong,{children:`Data manager`}),`, open the `,_jsx(_components.strong,{children:`Connected products`}),` tab, then click `,_jsx(_components.strong,{children:`+ Connect Product`}),` as shown below.`]}),_jsx(Frame,{children:_jsx(OptimizedImage,{src:`https://mintcdn.com/zeotap/Hq-UxQPMElXbNbMd/articles/integrate-customer/Storage/integrate-customer/google-customer-match-customer-contact-information/google-customer-match-customer-contact-information-2025-01-17-3.png?fit=max\u0026auto=format\u0026n=Hq-UxQPMElXbNbMd\u0026q=85\u0026s=362a43dee27052c91eec817bc81aba0c`,alt:`The Google Ads Data manager page on the Connected products tab, with annotations marking Data manager in the Tools menu and the + Connect Product button. The Connected products list shows YouTube and Zeotap entries.`,\"data-og-width\":`2796`,width:`2796`,\"data-og-height\":`1192`,height:`1192`,\"data-path\":`articles/integrate-customer/Storage/integrate-customer/google-customer-match-customer-contact-information/google-customer-match-customer-contact-information-2025-01-17-3.png`,\"data-optimize\":`true`,\"data-opv\":`3`,srcset:`https://mintcdn.com/zeotap/Hq-UxQPMElXbNbMd/articles/integrate-customer/Storage/integrate-customer/google-customer-match-customer-contact-information/google-customer-match-customer-contact-information-2025-01-17-3.png?w=280\u0026fit=max\u0026auto=format\u0026n=Hq-UxQPMElXbNbMd\u0026q=85\u0026s=4fcaaaec8f792630998c64583be0f57f 280w, https://mintcdn.com/zeotap/Hq-UxQPMElXbNbMd/articles/integrate-customer/Storage/integrate-customer/google-customer-match-customer-contact-information/google-customer-match-customer-contact-information-2025-01-17-3.png?w=560\u0026fit=max\u0026auto=format\u0026n=Hq-UxQPMElXbNbMd\u0026q=85\u0026s=737b400bf0507b1ed697536e3b348aa4 560w, https://mintcdn.com/zeotap/Hq-UxQPMElXbNbMd/articles/integrate-customer/Storage/integrate-customer/google-customer-match-customer-contact-information/google-customer-match-customer-contact-information-2025-01-17-3.png?w=840\u0026fit=max\u0026auto=format\u0026n=Hq-UxQPMElXbNbMd\u0026q=85\u0026s=a802e29331bd895e69bfbbf56d87219f 840w, https://mintcdn.com/zeotap/Hq-UxQPMElXbNbMd/articles/integrate-customer/Storage/integrate-customer/google-customer-match-customer-contact-information/google-customer-match-customer-contact-information-2025-01-17-3.png?w=1100\u0026fit=max\u0026auto=format\u0026n=Hq-UxQPMElXbNbMd\u0026q=85\u0026s=a6d307da9fd497925ea1c8b18e8d52e4 1100w, https://mintcdn.com/zeotap/Hq-UxQPMElXbNbMd/articles/integrate-customer/Storage/integrate-customer/google-customer-match-customer-contact-information/google-customer-match-customer-contact-information-2025-01-17-3.png?w=1650\u0026fit=max\u0026auto=format\u0026n=Hq-UxQPMElXbNbMd\u0026q=85\u0026s=72edf3ec3da265b45db743e2932882fe 1650w, https://mintcdn.com/zeotap/Hq-UxQPMElXbNbMd/articles/integrate-customer/Storage/integrate-customer/google-customer-match-customer-contact-information/google-customer-match-customer-contact-information-2025-01-17-3.png?w=2500\u0026fit=max\u0026auto=format\u0026n=Hq-UxQPMElXbNbMd\u0026q=85\u0026s=161350e2da503f2cc9990a8952011786 2500w`})})]}),_jsxs(Step,{children:[_jsxs(_components.p,{children:[`In the search box, search for and select Zeotap, then click `,_jsx(_components.strong,{children:`Authorise`}),`.`]}),_jsx(Frame,{children:_jsx(OptimizedImage,{src:`https://mintcdn.com/zeotap/Hq-UxQPMElXbNbMd/articles/integrate-customer/Storage/integrate-customer/google-customer-match-customer-contact-information/google-customer-match-customer-contact-information-2025-01-17-1.png?fit=max\u0026auto=format\u0026n=Hq-UxQPMElXbNbMd\u0026q=85\u0026s=0534bc496e3fa7f07630f280832de4c0`,alt:`The Connect a product dialog in Google Ads. The Data source search box contains the text Zeotap and a matching Zeotap result appears in the dropdown, with an annotation reading 'Select Zeotap and click Authorise'. A grid of other available data sources sits below.`,\"data-og-width\":`2522`,width:`2522`,\"data-og-height\":`1510`,height:`1510`,\"data-path\":`articles/integrate-customer/Storage/integrate-customer/google-customer-match-customer-contact-information/google-customer-match-customer-contact-information-2025-01-17-1.png`,\"data-optimize\":`true`,\"data-opv\":`3`,srcset:`https://mintcdn.com/zeotap/Hq-UxQPMElXbNbMd/articles/integrate-customer/Storage/integrate-customer/google-customer-match-customer-contact-information/google-customer-match-customer-contact-information-2025-01-17-1.png?w=280\u0026fit=max\u0026auto=format\u0026n=Hq-UxQPMElXbNbMd\u0026q=85\u0026s=e3f3c53d658a7d490ac73a01724fd9e9 280w, https://mintcdn.com/zeotap/Hq-UxQPMElXbNbMd/articles/integrate-customer/Storage/integrate-customer/google-customer-match-customer-contact-information/google-customer-match-customer-contact-information-2025-01-17-1.png?w=560\u0026fit=max\u0026auto=format\u0026n=Hq-UxQPMElXbNbMd\u0026q=85\u0026s=2118e891523ec5b38dfa52682944317c 560w, https://mintcdn.com/zeotap/Hq-UxQPMElXbNbMd/articles/integrate-customer/Storage/integrate-customer/google-customer-match-customer-contact-information/google-customer-match-customer-contact-information-2025-01-17-1.png?w=840\u0026fit=max\u0026auto=format\u0026n=Hq-UxQPMElXbNbMd\u0026q=85\u0026s=a9105d454cfeb58abb99c5ee5e9172a7 840w, https://mintcdn.com/zeotap/Hq-UxQPMElXbNbMd/articles/integrate-customer/Storage/integrate-customer/google-customer-match-customer-contact-information/google-customer-match-customer-contact-information-2025-01-17-1.png?w=1100\u0026fit=max\u0026auto=format\u0026n=Hq-UxQPMElXbNbMd\u0026q=85\u0026s=90a9b7548693bb8e6d233962a18cfbd7 1100w, https://mintcdn.com/zeotap/Hq-UxQPMElXbNbMd/articles/integrate-customer/Storage/integrate-customer/google-customer-match-customer-contact-information/google-customer-match-customer-contact-information-2025-01-17-1.png?w=1650\u0026fit=max\u0026auto=format\u0026n=Hq-UxQPMElXbNbMd\u0026q=85\u0026s=6ec2bf0225e1d7ff90a1718dca6bf4ba 1650w, https://mintcdn.com/zeotap/Hq-UxQPMElXbNbMd/articles/integrate-customer/Storage/integrate-customer/google-customer-match-customer-contact-information/google-customer-match-customer-contact-information-2025-01-17-1.png?w=2500\u0026fit=max\u0026auto=format\u0026n=Hq-UxQPMElXbNbMd\u0026q=85\u0026s=c65d793a8954c1b2cf12341c6b4c54c1 2500w`})})]}),_jsxs(Step,{children:[_jsxs(_components.p,{children:[`Once the data source is connected, the dialog shows `,_jsx(_components.strong,{children:`Data source connected`}),` with `,_jsx(_components.strong,{children:`Audiences`}),` selected as the use case. The `,_jsx(_components.strong,{children:`Conversions`}),` use case is unavailable for this data source. Click `,_jsx(_components.strong,{children:`Done`}),`.`]}),_jsx(_components.p,{children:`You can then use Zeotap CDP to create and send audiences to Google Ads as Customer Lists.`}),_jsx(Frame,{children:_jsx(OptimizedImage,{src:`https://mintcdn.com/zeotap/Hq-UxQPMElXbNbMd/articles/integrate-customer/Storage/integrate-customer/google-customer-match-customer-contact-information/google-customer-match-customer-contact-information-2025-01-17-2.png?fit=max\u0026auto=format\u0026n=Hq-UxQPMElXbNbMd\u0026q=85\u0026s=7c470a8c88d4fd38647e06fbdbc51bc8`,alt:`The Connect a product dialog in Google Ads showing Zeotap as the data source with a green 'Data source connected' confirmation, the Audiences use case selected, an Audience Segments section explaining that segments created in Zeotap appear in Audience manager as customer lists, and a Done button.`,\"data-og-width\":`2518`,width:`2518`,\"data-og-height\":`1782`,height:`1782`,\"data-path\":`articles/integrate-customer/Storage/integrate-customer/google-customer-match-customer-contact-information/google-customer-match-customer-contact-information-2025-01-17-2.png`,\"data-optimize\":`true`,\"data-opv\":`3`,srcset:`https://mintcdn.com/zeotap/Hq-UxQPMElXbNbMd/articles/integrate-customer/Storage/integrate-customer/google-customer-match-customer-contact-information/google-customer-match-customer-contact-information-2025-01-17-2.png?w=280\u0026fit=max\u0026auto=format\u0026n=Hq-UxQPMElXbNbMd\u0026q=85\u0026s=9ec32f55e7c5c8a9e8333025a1189fe8 280w, https://mintcdn.com/zeotap/Hq-UxQPMElXbNbMd/articles/integrate-customer/Storage/integrate-customer/google-customer-match-customer-contact-information/google-customer-match-customer-contact-information-2025-01-17-2.png?w=560\u0026fit=max\u0026auto=format\u0026n=Hq-UxQPMElXbNbMd\u0026q=85\u0026s=6f89deaf2d346980829ec95eae2bc88c 560w, https://mintcdn.com/zeotap/Hq-UxQPMElXbNbMd/articles/integrate-customer/Storage/integrate-customer/google-customer-match-customer-contact-information/google-customer-match-customer-contact-information-2025-01-17-2.png?w=840\u0026fit=max\u0026auto=format\u0026n=Hq-UxQPMElXbNbMd\u0026q=85\u0026s=5d984052dda83e27f8b33ec3824a33cd 840w, https://mintcdn.com/zeotap/Hq-UxQPMElXbNbMd/articles/integrate-customer/Storage/integrate-customer/google-customer-match-customer-contact-information/google-customer-match-customer-contact-information-2025-01-17-2.png?w=1100\u0026fit=max\u0026auto=format\u0026n=Hq-UxQPMElXbNbMd\u0026q=85\u0026s=81b285c99f731fc008c314f25510503f 1100w, https://mintcdn.com/zeotap/Hq-UxQPMElXbNbMd/articles/integrate-customer/Storage/integrate-customer/google-customer-match-customer-contact-information/google-customer-match-customer-contact-information-2025-01-17-2.png?w=1650\u0026fit=max\u0026auto=format\u0026n=Hq-UxQPMElXbNbMd\u0026q=85\u0026s=921ca4a3f8efe5cabf5c160496654666 1650w, https://mintcdn.com/zeotap/Hq-UxQPMElXbNbMd/articles/integrate-customer/Storage/integrate-customer/google-customer-match-customer-contact-information/google-customer-match-customer-contact-information-2025-01-17-2.png?w=2500\u0026fit=max\u0026auto=format\u0026n=Hq-UxQPMElXbNbMd\u0026q=85\u0026s=aa26204f039fad4f0b374a63c557ab3f 2500w`})})]})]}),`\n`,_jsx(Heading,{level:`3`,id:`whitelist-zeotap-on-google-dv360`,children:`Whitelist Zeotap on Google DV360`}),`\n`,_jsx(_components.p,{children:`You must complete a one-time mapping of your DV360 Partner or Advertiser ID to Zeotap before Zeotap CDP can send any data into DV360. Also, make sure you know which DV360 entity object (Partner or Advertiser) you are associated with, so that the matching Product Type — INVITE_PARTNER or INVITE_ADVERTISER — is selected when you create the destination.`}),`\n`,_jsx(_components.p,{children:`Perform the following steps to link Zeotap to your DV360 account:`}),`\n`,_jsxs(Steps,{children:[_jsx(Step,{children:_jsx(_components.p,{children:`Log into your DV360 account with the appropriate credentials.`})}),_jsx(Step,{children:_jsxs(_components.p,{children:[`Navigate to `,_jsx(_components.strong,{children:`Partner Settings`}),` and select `,_jsx(_components.strong,{children:`Linked Accounts`}),`.`]})}),_jsxs(Step,{children:[_jsxs(_components.p,{children:[`Under `,_jsx(_components.strong,{children:`Linked Accounts`}),`, click `,_jsx(_components.strong,{children:`LINK NEW ACCOUNT`}),` and select External Data partner.`]}),_jsx(Frame,{children:_jsx(OptimizedImage,{src:`https://mintcdn.com/zeotap/Hq-UxQPMElXbNbMd/articles/integrate-customer/Storage/integrate-customer/google-customer-match-customer-contact-information/gcm_cci_6.png?fit=max\u0026auto=format\u0026n=Hq-UxQPMElXbNbMd\u0026q=85\u0026s=6665a1cef1e3cdbcf4ba2314d8afc060`,alt:`The Display \u0026 Video 360 Linked Accounts page under Partner Settings, with Linked Accounts highlighted in the left menu and the LINK NEW ACCOUNT control outlined. The panel reads 'Data sharing settings for Audience tab and Ads Data Hub' and 'No linked accounts found'.`,\"data-og-width\":`2678`,width:`2678`,\"data-og-height\":`1460`,height:`1460`,\"data-path\":`articles/integrate-customer/Storage/integrate-customer/google-customer-match-customer-contact-information/gcm_cci_6.png`,\"data-optimize\":`true`,\"data-opv\":`3`,srcset:`https://mintcdn.com/zeotap/Hq-UxQPMElXbNbMd/articles/integrate-customer/Storage/integrate-customer/google-customer-match-customer-contact-information/gcm_cci_6.png?w=280\u0026fit=max\u0026auto=format\u0026n=Hq-UxQPMElXbNbMd\u0026q=85\u0026s=7ad36769122591ffc95cb72b7b697b89 280w, https://mintcdn.com/zeotap/Hq-UxQPMElXbNbMd/articles/integrate-customer/Storage/integrate-customer/google-customer-match-customer-contact-information/gcm_cci_6.png?w=560\u0026fit=max\u0026auto=format\u0026n=Hq-UxQPMElXbNbMd\u0026q=85\u0026s=b54e9ed39fa053ca140d44f3428f2b0b 560w, https://mintcdn.com/zeotap/Hq-UxQPMElXbNbMd/articles/integrate-customer/Storage/integrate-customer/google-customer-match-customer-contact-information/gcm_cci_6.png?w=840\u0026fit=max\u0026auto=format\u0026n=Hq-UxQPMElXbNbMd\u0026q=85\u0026s=569472b8afb46d874956ab5d45f03f81 840w, https://mintcdn.com/zeotap/Hq-UxQPMElXbNbMd/articles/integrate-customer/Storage/integrate-customer/google-customer-match-customer-contact-information/gcm_cci_6.png?w=1100\u0026fit=max\u0026auto=format\u0026n=Hq-UxQPMElXbNbMd\u0026q=85\u0026s=10a24bae9735d03ffbd090e969e73652 1100w, https://mintcdn.com/zeotap/Hq-UxQPMElXbNbMd/articles/integrate-customer/Storage/integrate-customer/google-customer-match-customer-contact-information/gcm_cci_6.png?w=1650\u0026fit=max\u0026auto=format\u0026n=Hq-UxQPMElXbNbMd\u0026q=85\u0026s=dc325682116d8ad8a18e6e077e7ec0c7 1650w, https://mintcdn.com/zeotap/Hq-UxQPMElXbNbMd/articles/integrate-customer/Storage/integrate-customer/google-customer-match-customer-contact-information/gcm_cci_6.png?w=2500\u0026fit=max\u0026auto=format\u0026n=Hq-UxQPMElXbNbMd\u0026q=85\u0026s=907c317e0890c5455ae4fc538314991d 2500w`})})]}),_jsx(Step,{children:_jsxs(_components.p,{children:[`Under `,_jsx(_components.strong,{children:`Account`}),`, search for Zeotap.`]})}),_jsxs(Step,{children:[_jsxs(_components.p,{children:[`Select `,_jsx(_components.strong,{children:`CMU: Zeotap`}),` (Customer Match Upload: Zeotap) as shown below and click `,_jsx(_components.strong,{children:`Link`}),`.`]}),_jsx(Frame,{caption:`Mapping of Zeotap CMU by Google on their interface`,children:_jsx(OptimizedImage,{src:`https://mintcdn.com/zeotap/Hq-UxQPMElXbNbMd/articles/integrate-customer/Storage/integrate-customer/google-customer-match-customer-contact-information/gcm_cci_7.png?fit=max\u0026auto=format\u0026n=Hq-UxQPMElXbNbMd\u0026q=85\u0026s=8cdac6ba87c92d76127188acfd15d76f`,alt:`The Link External Data Partner dialog in Display \u0026 Video 360. The Account search box contains 'zeotap' and the results list shows two entries, DMP: Zeotap and CMU: Zeotap, with an arrow pointing at CMU: Zeotap.`,\"data-og-width\":`620`,width:`620`,\"data-og-height\":`275`,height:`275`,\"data-path\":`articles/integrate-customer/Storage/integrate-customer/google-customer-match-customer-contact-information/gcm_cci_7.png`,\"data-optimize\":`true`,\"data-opv\":`3`,srcset:`https://mintcdn.com/zeotap/Hq-UxQPMElXbNbMd/articles/integrate-customer/Storage/integrate-customer/google-customer-match-customer-contact-information/gcm_cci_7.png?w=280\u0026fit=max\u0026auto=format\u0026n=Hq-UxQPMElXbNbMd\u0026q=85\u0026s=cc6020ffd32b80e1841b0a2b252c6e7e 280w, https://mintcdn.com/zeotap/Hq-UxQPMElXbNbMd/articles/integrate-customer/Storage/integrate-customer/google-customer-match-customer-contact-information/gcm_cci_7.png?w=560\u0026fit=max\u0026auto=format\u0026n=Hq-UxQPMElXbNbMd\u0026q=85\u0026s=8d4fa7b4f46de1b607cbe8ad3fe48784 560w, https://mintcdn.com/zeotap/Hq-UxQPMElXbNbMd/articles/integrate-customer/Storage/integrate-customer/google-customer-match-customer-contact-information/gcm_cci_7.png?w=840\u0026fit=max\u0026auto=format\u0026n=Hq-UxQPMElXbNbMd\u0026q=85\u0026s=d8c7592e1ea122288aa0b8dcebb3efa8 840w, https://mintcdn.com/zeotap/Hq-UxQPMElXbNbMd/articles/integrate-customer/Storage/integrate-customer/google-customer-match-customer-contact-information/gcm_cci_7.png?w=1100\u0026fit=max\u0026auto=format\u0026n=Hq-UxQPMElXbNbMd\u0026q=85\u0026s=3e661b93517f66b3865359bf536cf8be 1100w, https://mintcdn.com/zeotap/Hq-UxQPMElXbNbMd/articles/integrate-customer/Storage/integrate-customer/google-customer-match-customer-contact-information/gcm_cci_7.png?w=1650\u0026fit=max\u0026auto=format\u0026n=Hq-UxQPMElXbNbMd\u0026q=85\u0026s=981b2e42a9f5551694068a71706584f1 1650w, https://mintcdn.com/zeotap/Hq-UxQPMElXbNbMd/articles/integrate-customer/Storage/integrate-customer/google-customer-match-customer-contact-information/gcm_cci_7.png?w=2500\u0026fit=max\u0026auto=format\u0026n=Hq-UxQPMElXbNbMd\u0026q=85\u0026s=5db5bc4c7fd59ce6a883a280f711a3f5 2500w`})})]}),_jsx(Step,{children:_jsx(_components.p,{children:`Once you complete the linking process, the Zeotap account appears under the linked accounts.`})})]}),`\n`,_jsx(Heading,{level:`2`,id:`create-the-google-customer-match-customer-contact-information-destination`,children:`Create the Google Customer Match (Customer Contact Information) destination`}),`\n`,_jsx(_components.p,{children:`Once you have completed the prerequisites above, perform the following steps to create the destination in Zeotap CDP:`}),`\n`,_jsxs(Steps,{children:[_jsx(Step,{children:_jsxs(_components.p,{children:[`Log into the Zeotap CDP App and go to `,_jsx(_components.strong,{children:`Integrate`}),` > `,_jsx(_components.strong,{children:`Destinations`}),`.`]})}),_jsxs(Step,{children:[_jsxs(_components.p,{children:[`Click `,_jsx(_components.strong,{children:`+ Create Destination.`})]}),_jsx(Frame,{children:_jsx(OptimizedImage,{src:`https://mintcdn.com/zeotap/oGjzXQ32KVGTt8MH/articles/integrate-customer/Storage/integrate-customer/adform/Destinations_all_1.png?fit=max\u0026auto=format\u0026n=oGjzXQ32KVGTt8MH\u0026q=85\u0026s=92dfe8ecb29e59c9d7d57cb954e54618`,alt:`The Zeotap CDP Destinations list under Integrate, on the Private Destination tab, with the + Create Destination button outlined. The table columns are ID, Destination Name, Created Date, Last Updated On and Created By.`,\"data-og-width\":`3520`,width:`3520`,\"data-og-height\":`772`,height:`772`,\"data-path\":`articles/integrate-customer/Storage/integrate-customer/adform/Destinations_all_1.png`,\"data-optimize\":`true`,\"data-opv\":`3`,srcset:`https://mintcdn.com/zeotap/oGjzXQ32KVGTt8MH/articles/integrate-customer/Storage/integrate-customer/adform/Destinations_all_1.png?w=280\u0026fit=max\u0026auto=format\u0026n=oGjzXQ32KVGTt8MH\u0026q=85\u0026s=b8de37431122d58889fdb28524148d6d 280w, https://mintcdn.com/zeotap/oGjzXQ32KVGTt8MH/articles/integrate-customer/Storage/integrate-customer/adform/Destinations_all_1.png?w=560\u0026fit=max\u0026auto=format\u0026n=oGjzXQ32KVGTt8MH\u0026q=85\u0026s=2f63002e2c8574f7d7b2e05cc580e686 560w, https://mintcdn.com/zeotap/oGjzXQ32KVGTt8MH/articles/integrate-customer/Storage/integrate-customer/adform/Destinations_all_1.png?w=840\u0026fit=max\u0026auto=format\u0026n=oGjzXQ32KVGTt8MH\u0026q=85\u0026s=605427f3bea6cfcd1e531838779e1d27 840w, https://mintcdn.com/zeotap/oGjzXQ32KVGTt8MH/articles/integrate-customer/Storage/integrate-customer/adform/Destinations_all_1.png?w=1100\u0026fit=max\u0026auto=format\u0026n=oGjzXQ32KVGTt8MH\u0026q=85\u0026s=7e2671655441a365b2a11d645623a517 1100w, https://mintcdn.com/zeotap/oGjzXQ32KVGTt8MH/articles/integrate-customer/Storage/integrate-customer/adform/Destinations_all_1.png?w=1650\u0026fit=max\u0026auto=format\u0026n=oGjzXQ32KVGTt8MH\u0026q=85\u0026s=a44b695e06e67ef538278887ca213659 1650w, https://mintcdn.com/zeotap/oGjzXQ32KVGTt8MH/articles/integrate-customer/Storage/integrate-customer/adform/Destinations_all_1.png?w=2500\u0026fit=max\u0026auto=format\u0026n=oGjzXQ32KVGTt8MH\u0026q=85\u0026s=575a5e0ccebf063078914bff3013ed57 2500w`})})]}),_jsxs(Step,{children:[_jsxs(_components.p,{children:[`Under `,_jsx(_components.strong,{children:`All Destinations`}),`, search for `,_jsx(_components.strong,{children:`Google Customer Match (Customer Contact Information)`}),`.`]}),_jsx(Frame,{children:_jsx(OptimizedImage,{src:`https://mintcdn.com/zeotap/oGjzXQ32KVGTt8MH/articles/integrate-customer/Storage/integrate-customer/adform/Destinations_all_2.png?fit=max\u0026auto=format\u0026n=oGjzXQ32KVGTt8MH\u0026q=85\u0026s=6f5f0f5367788fb4e9e946f4b3cb5874`,alt:`The All Destinations catalogue in Zeotap CDP with the 'Search for a Destination' box outlined, above a grid of destination tiles such as Adform, Adobe DMP, Airship Static Lists and AmazonDSP.`,\"data-og-width\":`3510`,width:`3510`,\"data-og-height\":`1144`,height:`1144`,\"data-path\":`articles/integrate-customer/Storage/integrate-customer/adform/Destinations_all_2.png`,\"data-optimize\":`true`,\"data-opv\":`3`,srcset:`https://mintcdn.com/zeotap/oGjzXQ32KVGTt8MH/articles/integrate-customer/Storage/integrate-customer/adform/Destinations_all_2.png?w=280\u0026fit=max\u0026auto=format\u0026n=oGjzXQ32KVGTt8MH\u0026q=85\u0026s=86570590494edfc91d3a99ae66ccebd3 280w, https://mintcdn.com/zeotap/oGjzXQ32KVGTt8MH/articles/integrate-customer/Storage/integrate-customer/adform/Destinations_all_2.png?w=560\u0026fit=max\u0026auto=format\u0026n=oGjzXQ32KVGTt8MH\u0026q=85\u0026s=ac7e3ef19360de05e93973cceed105ba 560w, https://mintcdn.com/zeotap/oGjzXQ32KVGTt8MH/articles/integrate-customer/Storage/integrate-customer/adform/Destinations_all_2.png?w=840\u0026fit=max\u0026auto=format\u0026n=oGjzXQ32KVGTt8MH\u0026q=85\u0026s=f2a083ebac8e64ec427fcbc6bf087df6 840w, https://mintcdn.com/zeotap/oGjzXQ32KVGTt8MH/articles/integrate-customer/Storage/integrate-customer/adform/Destinations_all_2.png?w=1100\u0026fit=max\u0026auto=format\u0026n=oGjzXQ32KVGTt8MH\u0026q=85\u0026s=6b4bb532d3d92dca1e0648f66b59aace 1100w, https://mintcdn.com/zeotap/oGjzXQ32KVGTt8MH/articles/integrate-customer/Storage/integrate-customer/adform/Destinations_all_2.png?w=1650\u0026fit=max\u0026auto=format\u0026n=oGjzXQ32KVGTt8MH\u0026q=85\u0026s=cdfea6d5a2da7ade7d8b1855dd2e529b 1650w, https://mintcdn.com/zeotap/oGjzXQ32KVGTt8MH/articles/integrate-customer/Storage/integrate-customer/adform/Destinations_all_2.png?w=2500\u0026fit=max\u0026auto=format\u0026n=oGjzXQ32KVGTt8MH\u0026q=85\u0026s=6006452caffad316c12d65bbbcbc6da2 2500w`})})]}),_jsxs(Step,{children:[_jsxs(_components.p,{children:[`Click `,_jsx(_components.strong,{children:`Google Customer Match (Customer Contact Information)`}),`.\nA screen appears displaying details about the particular destination towards the left. On the right-hand side of the screen you will find the fields required for the integration to be established. Enter the required details as mentioned in the following steps:`]}),_jsxs(_components.p,{children:[`a. Enter a name for the Destination under `,_jsx(_components.strong,{children:`Destination Name`}),`.`]}),_jsxs(_components.p,{children:[`b. Enter the `,_jsx(_components.strong,{children:`Seat ID`}),` of the account on which you want the segment. `,_jsx(_components.a,{href:`#seat-id`,children:`Learn more`})]}),_jsxs(_components.p,{children:[`c. Select the appropriate `,_jsx(_components.strong,{children:`Product Type`}),` that the Seat ID belongs to. `,_jsx(_components.a,{href:`#product-type`,children:`Learn more`})]}),_jsxs(_components.p,{children:[`d. Click `,_jsx(_components.strong,{children:`Next`}),` to proceed to mapping.`]}),_jsx(Frame,{children:_jsx(OptimizedImage,{src:`https://mintcdn.com/zeotap/eToLLIFlmf1QY4Al/articles/integrate-customer/Storage/integrate-customer/google-customer-match-customer-contact-information/google-customer-match-customer-contact-information-2023-11-08-1.png?fit=max\u0026auto=format\u0026n=eToLLIFlmf1QY4Al\u0026q=85\u0026s=b46a877b92a73b697dc6f5f487099320`,alt:`The 'Enter Destination Details' step of the Google Customer Match - Customer Contact Information destination in Zeotap CDP, showing the Destination Name, Seat ID and Product Type fields with ADWORDS chosen as the Product Type, a note that segments can take up to three business days to appear at the seat, and Back and Next buttons.`,\"data-og-width\":`3584`,width:`3584`,\"data-og-height\":`1802`,height:`1802`,\"data-path\":`articles/integrate-customer/Storage/integrate-customer/google-customer-match-customer-contact-information/google-customer-match-customer-contact-information-2023-11-08-1.png`,\"data-optimize\":`true`,\"data-opv\":`3`,srcset:`https://mintcdn.com/zeotap/eToLLIFlmf1QY4Al/articles/integrate-customer/Storage/integrate-customer/google-customer-match-customer-contact-information/google-customer-match-customer-contact-information-2023-11-08-1.png?w=280\u0026fit=max\u0026auto=format\u0026n=eToLLIFlmf1QY4Al\u0026q=85\u0026s=02350641972b44e4eed15102f2c85c17 280w, https://mintcdn.com/zeotap/eToLLIFlmf1QY4Al/articles/integrate-customer/Storage/integrate-customer/google-customer-match-customer-contact-information/google-customer-match-customer-contact-information-2023-11-08-1.png?w=560\u0026fit=max\u0026auto=format\u0026n=eToLLIFlmf1QY4Al\u0026q=85\u0026s=071f5871f44d78b21a96c5e99fc698f4 560w, https://mintcdn.com/zeotap/eToLLIFlmf1QY4Al/articles/integrate-customer/Storage/integrate-customer/google-customer-match-customer-contact-information/google-customer-match-customer-contact-information-2023-11-08-1.png?w=840\u0026fit=max\u0026auto=format\u0026n=eToLLIFlmf1QY4Al\u0026q=85\u0026s=3d108255fb7127f138eabd8b0c73251c 840w, https://mintcdn.com/zeotap/eToLLIFlmf1QY4Al/articles/integrate-customer/Storage/integrate-customer/google-customer-match-customer-contact-information/google-customer-match-customer-contact-information-2023-11-08-1.png?w=1100\u0026fit=max\u0026auto=format\u0026n=eToLLIFlmf1QY4Al\u0026q=85\u0026s=f383f6890eb8ab3959828ca4da369c4f 1100w, https://mintcdn.com/zeotap/eToLLIFlmf1QY4Al/articles/integrate-customer/Storage/integrate-customer/google-customer-match-customer-contact-information/google-customer-match-customer-contact-information-2023-11-08-1.png?w=1650\u0026fit=max\u0026auto=format\u0026n=eToLLIFlmf1QY4Al\u0026q=85\u0026s=abe6fc772d6396c4758aefbd891a3764 1650w, https://mintcdn.com/zeotap/eToLLIFlmf1QY4Al/articles/integrate-customer/Storage/integrate-customer/google-customer-match-customer-contact-information/google-customer-match-customer-contact-information-2023-11-08-1.png?w=2500\u0026fit=max\u0026auto=format\u0026n=eToLLIFlmf1QY4Al\u0026q=85\u0026s=11645c517035cf5ea3ebe459ff6f06ef 2500w`})})]}),_jsxs(Step,{children:[_jsx(_components.p,{children:`In the new screen that appears, choose the appropriate action and mapping as explained below.`}),_jsxs(_components.p,{children:[`a. Under `,_jsx(_components.strong,{children:`Choose your Action`}),`, you can choose either `,_jsx(_components.strong,{children:`Send Identifiers to Google Customer Match - Customer Contact Information`}),` or `,_jsx(_components.strong,{children:`Send Multiple User Identifiers`}),` as the action, based on your use case.`]}),_jsxs(_components.p,{children:[`i. If you choose `,_jsx(_components.strong,{children:`Send Identifiers to Google Customer Match - Customer Contact Information`}),`, then the output identifiers `,_jsx(_components.code,{children:`email addresses`}),` and `,_jsx(_components.code,{children:`cellphone numbers`}),` are populated. Note that in this action, each identifier is sent as an individual user profile.`]}),_jsx(Frame,{children:_jsx(OptimizedImage,{src:`https://mintcdn.com/zeotap/eToLLIFlmf1QY4Al/articles/integrate-customer/Storage/integrate-customer/google-customer-match-customer-contact-information/google-customer-match-customer-contact-information-2023-11-08-2.png?fit=max\u0026auto=format\u0026n=eToLLIFlmf1QY4Al\u0026q=85\u0026s=a334375a4cab319d4ab693a4fed8b799`,alt:`The Mapping step in Zeotap CDP with 'Send identifiers to Google Customer Match - Custom...' chosen under Choose your Action, and an Output Identifiers Mapping table pairing the Cellphone Number E164 catalogue field with the Mobile E164 destination field and the Email SHA256 catalogue field with the Email destination field.`,\"data-og-width\":`3584`,width:`3584`,\"data-og-height\":`1802`,height:`1802`,\"data-path\":`articles/integrate-customer/Storage/integrate-customer/google-customer-match-customer-contact-information/google-customer-match-customer-contact-information-2023-11-08-2.png`,\"data-optimize\":`true`,\"data-opv\":`3`,srcset:`https://mintcdn.com/zeotap/eToLLIFlmf1QY4Al/articles/integrate-customer/Storage/integrate-customer/google-customer-match-customer-contact-information/google-customer-match-customer-contact-information-2023-11-08-2.png?w=280\u0026fit=max\u0026auto=format\u0026n=eToLLIFlmf1QY4Al\u0026q=85\u0026s=08e585349adcad78e993d4ff27405cb3 280w, https://mintcdn.com/zeotap/eToLLIFlmf1QY4Al/articles/integrate-customer/Storage/integrate-customer/google-customer-match-customer-contact-information/google-customer-match-customer-contact-information-2023-11-08-2.png?w=560\u0026fit=max\u0026auto=format\u0026n=eToLLIFlmf1QY4Al\u0026q=85\u0026s=a31e801382d3e1568cfb6dfdc0aea6cb 560w, https://mintcdn.com/zeotap/eToLLIFlmf1QY4Al/articles/integrate-customer/Storage/integrate-customer/google-customer-match-customer-contact-information/google-customer-match-customer-contact-information-2023-11-08-2.png?w=840\u0026fit=max\u0026auto=format\u0026n=eToLLIFlmf1QY4Al\u0026q=85\u0026s=ecb439932e954c004c041f9f5c8d1d77 840w, https://mintcdn.com/zeotap/eToLLIFlmf1QY4Al/articles/integrate-customer/Storage/integrate-customer/google-customer-match-customer-contact-information/google-customer-match-customer-contact-information-2023-11-08-2.png?w=1100\u0026fit=max\u0026auto=format\u0026n=eToLLIFlmf1QY4Al\u0026q=85\u0026s=0e2dd7e668ffdaa2cb274350885a8c50 1100w, https://mintcdn.com/zeotap/eToLLIFlmf1QY4Al/articles/integrate-customer/Storage/integrate-customer/google-customer-match-customer-contact-information/google-customer-match-customer-contact-information-2023-11-08-2.png?w=1650\u0026fit=max\u0026auto=format\u0026n=eToLLIFlmf1QY4Al\u0026q=85\u0026s=a8a1ba291e387711f857d2bc99ac929f 1650w, https://mintcdn.com/zeotap/eToLLIFlmf1QY4Al/articles/integrate-customer/Storage/integrate-customer/google-customer-match-customer-contact-information/google-customer-match-customer-contact-information-2023-11-08-2.png?w=2500\u0026fit=max\u0026auto=format\u0026n=eToLLIFlmf1QY4Al\u0026q=85\u0026s=fcd6786742b0880764537a9b1d4b36ad 2500w`})}),_jsxs(_components.p,{children:[`ii. If you choose `,_jsx(_components.strong,{children:`Send Multiple User Identifiers`}),` as your action, then the output identifiers such as `,_jsx(_components.code,{children:`Hashed email address`}),`, `,_jsx(_components.code,{children:`Hashed cellphone numbers`}),`, `,_jsx(_components.code,{children:`last name`}),`, `,_jsx(_components.code,{children:`first name`}),`, `,_jsx(_components.code,{children:`Country Code`}),` and `,_jsx(_components.code,{children:`Postal Code`}),` are populated. Note that in this action, all the identifiers selected under the mapping screen are sent as a single user profile.`]}),_jsxs(Note,{children:[_jsx(_components.p,{children:_jsx(_components.strong,{children:`Note:`})}),_jsx(_components.p,{children:_jsxs(_components.em,{children:[`To increase the match rate, we recommend that you use `,_jsx(_components.strong,{children:`Send Multiple User Identifiers`}),` as the action.`]})})]}),_jsx(Frame,{children:_jsx(OptimizedImage,{src:`https://mintcdn.com/zeotap/eToLLIFlmf1QY4Al/articles/integrate-customer/Storage/integrate-customer/google-customer-match-customer-contact-information/google-customer-match-customer-contact-information-2024-05-21.png?fit=max\u0026auto=format\u0026n=eToLLIFlmf1QY4Al\u0026q=85\u0026s=e1f5bb93c411e903465c686abe97a3f8`,alt:`The Mapping step in Zeotap CDP with Send Multiple User Identifiers chosen under Choose your Action, and a 'Map the Fields' table under Identifiers pairing catalogue fields with the Email, Mobile E164 and Country Code destination fields.`,\"data-og-width\":`3500`,width:`3500`,\"data-og-height\":`1734`,height:`1734`,\"data-path\":`articles/integrate-customer/Storage/integrate-customer/google-customer-match-customer-contact-information/google-customer-match-customer-contact-information-2024-05-21.png`,\"data-optimize\":`true`,\"data-opv\":`3`,srcset:`https://mintcdn.com/zeotap/eToLLIFlmf1QY4Al/articles/integrate-customer/Storage/integrate-customer/google-customer-match-customer-contact-information/google-customer-match-customer-contact-information-2024-05-21.png?w=280\u0026fit=max\u0026auto=format\u0026n=eToLLIFlmf1QY4Al\u0026q=85\u0026s=a94f7ca54adee1ceaeb82439efa80c0d 280w, https://mintcdn.com/zeotap/eToLLIFlmf1QY4Al/articles/integrate-customer/Storage/integrate-customer/google-customer-match-customer-contact-information/google-customer-match-customer-contact-information-2024-05-21.png?w=560\u0026fit=max\u0026auto=format\u0026n=eToLLIFlmf1QY4Al\u0026q=85\u0026s=4b4fc427d676563a3755b789196159c4 560w, https://mintcdn.com/zeotap/eToLLIFlmf1QY4Al/articles/integrate-customer/Storage/integrate-customer/google-customer-match-customer-contact-information/google-customer-match-customer-contact-information-2024-05-21.png?w=840\u0026fit=max\u0026auto=format\u0026n=eToLLIFlmf1QY4Al\u0026q=85\u0026s=afd04c0ea2e60947e55dd8e89c9c884f 840w, https://mintcdn.com/zeotap/eToLLIFlmf1QY4Al/articles/integrate-customer/Storage/integrate-customer/google-customer-match-customer-contact-information/google-customer-match-customer-contact-information-2024-05-21.png?w=1100\u0026fit=max\u0026auto=format\u0026n=eToLLIFlmf1QY4Al\u0026q=85\u0026s=d2181a4c1cef60615e88b109d207bcb2 1100w, https://mintcdn.com/zeotap/eToLLIFlmf1QY4Al/articles/integrate-customer/Storage/integrate-customer/google-customer-match-customer-contact-information/google-customer-match-customer-contact-information-2024-05-21.png?w=1650\u0026fit=max\u0026auto=format\u0026n=eToLLIFlmf1QY4Al\u0026q=85\u0026s=b4e3873dbaa0e324e6d7092ea093fe46 1650w, https://mintcdn.com/zeotap/eToLLIFlmf1QY4Al/articles/integrate-customer/Storage/integrate-customer/google-customer-match-customer-contact-information/google-customer-match-customer-contact-information-2024-05-21.png?w=2500\u0026fit=max\u0026auto=format\u0026n=eToLLIFlmf1QY4Al\u0026q=85\u0026s=5f326ef72d8c5051e5875b3c3c42687a 2500w`})})]}),_jsx(Step,{children:_jsxs(_components.p,{children:[`Click `,_jsx(_components.strong,{children:`Create Destination`}),`. The created Destination gets listed in the `,_jsx(_components.strong,{children:`Audiences`}),` application, where it can be linked to an Audience/segment.`]})})]}),`\n`,_jsx(Heading,{level:`2`,id:`link-an-audience-to-the-destination`,children:`Link an audience to the destination`}),`\n`,_jsxs(_components.p,{children:[`For information about how to link an Audience or segment to the created Destination in the `,_jsx(_components.strong,{children:`Audiences`}),` application, refer to `,_jsx(_components.a,{href:`/articles/integrate-customer/link-an-audience-to-the-destination`,children:`Activate Your Batch Audiences`}),`. It can take up to three business days for the segment to be available at the Google Customer Match (Customer Contact Information) seat. Note that the segments created on GCM appear in the format: `,_jsx(_components.code,{children:`{Audience Name}_{Audience Id}`}),`.`]}),`\n`,_jsxs(Note,{children:[_jsx(_components.p,{children:_jsx(_components.strong,{children:`Note:`})}),_jsxs(_components.p,{children:[`The terms Audiences and Segments are used interchangeably to refer to customer cohorts belonging to a specific category. For example, an Audience or a segment can be a specific group of customers who are over 18 years of age and have performed an `,_jsx(_components.code,{children:`addToCart`}),` event within the last 30 days.`]})]}),`\n`,_jsx(Heading,{level:`3`,id:`user-disqualification-from-audiences`,children:`User disqualification from audiences`}),`\n`,_jsx(_components.p,{children:`This integration supports user disqualification from audiences. That is, a user can be disqualified from an audience (segment) for various reasons, such as not meeting audience criteria, consent requirements or other conditions set for a particular audience.`}),`\n`,_jsxs(_components.ul,{children:[`\n`,_jsx(_components.li,{children:`When a user disqualifies from an audience, Zeotap CDP initiates a user deletion request in the next refresh cycle. These requests are sent to the audiences linked to the specific destination.`}),`\n`,_jsx(_components.li,{children:`The disqualified users are excluded from the audiences based on the configured refresh frequency for a particular audience.`}),`\n`,_jsx(_components.li,{children:`User disqualification is a programmatic process that works automatically. You do not need to specify anything to trigger the disqualification and exclusion of users from audiences.`}),`\n`]}),`\n`,_jsxs(Note,{children:[_jsx(_components.p,{children:_jsx(_components.strong,{children:`Note:`})}),_jsx(_components.p,{children:_jsxs(_components.em,{children:[`For more information about this functionality, refer to `,_jsx(_components.a,{href:`/articles/segment-customer/delta-upload-and-delete-functions`,children:`Delta Upload and Delete Functions`}),`.`]})})]}),`\n`,_jsx(Heading,{level:`2`,id:`verify-the-segments-reached-google-ads`,children:`Verify the segments reached Google Ads`}),`\n`,_jsx(_components.p,{children:`Perform the following steps to view the segments pushed to Google Ads:`}),`\n`,_jsxs(Steps,{children:[_jsx(Step,{children:_jsx(_components.p,{children:`Log into your Google Ads account.`})}),_jsx(Step,{children:_jsxs(_components.p,{children:[`In the left panel, navigate to `,_jsx(_components.strong,{children:`Tools.`})]})}),_jsx(Step,{children:_jsxs(_components.p,{children:[`Under `,_jsx(_components.strong,{children:`Shared library`}),`, select `,_jsx(_components.strong,{children:`Audience manager`}),`.`]})}),_jsxs(Step,{children:[_jsxs(_components.p,{children:[`Under `,_jsx(_components.strong,{children:`Your data segments`}),`, you can view the list of all the segments pushed. You can find the ‘Customer list’ for any segment pushed through Google Ads along with the customer contact information tied to the particular segment under the `,_jsx(_components.strong,{children:`Customer Type`}),` column. For example, Customer list (Mobile Device IDs) or Customer list (Customer contact information).`]}),_jsx(Frame,{children:_jsx(OptimizedImage,{src:`https://mintcdn.com/zeotap/Hq-UxQPMElXbNbMd/articles/integrate-customer/Storage/integrate-customer/google-customer-match-customer-contact-information/google-customer-match-customer-contact-information-2024-12-17.png?fit=max\u0026auto=format\u0026n=Hq-UxQPMElXbNbMd\u0026q=85\u0026s=9f68d97986dbfd032ea5a26014142203`,alt:`The Google Ads Audience manager on the 'Your data segments' tab, reached from Shared library in the Tools menu. The table lists segments with Segment name, Customer Type, Segment Type, Membership status and per-network size columns.`,\"data-og-width\":`3558`,width:`3558`,\"data-og-height\":`1324`,height:`1324`,\"data-path\":`articles/integrate-customer/Storage/integrate-customer/google-customer-match-customer-contact-information/google-customer-match-customer-contact-information-2024-12-17.png`,\"data-optimize\":`true`,\"data-opv\":`3`,srcset:`https://mintcdn.com/zeotap/Hq-UxQPMElXbNbMd/articles/integrate-customer/Storage/integrate-customer/google-customer-match-customer-contact-information/google-customer-match-customer-contact-information-2024-12-17.png?w=280\u0026fit=max\u0026auto=format\u0026n=Hq-UxQPMElXbNbMd\u0026q=85\u0026s=62512835de0728fe092896e87e9939ea 280w, https://mintcdn.com/zeotap/Hq-UxQPMElXbNbMd/articles/integrate-customer/Storage/integrate-customer/google-customer-match-customer-contact-information/google-customer-match-customer-contact-information-2024-12-17.png?w=560\u0026fit=max\u0026auto=format\u0026n=Hq-UxQPMElXbNbMd\u0026q=85\u0026s=cd972b0f822df72cafe0fd4632973034 560w, https://mintcdn.com/zeotap/Hq-UxQPMElXbNbMd/articles/integrate-customer/Storage/integrate-customer/google-customer-match-customer-contact-information/google-customer-match-customer-contact-information-2024-12-17.png?w=840\u0026fit=max\u0026auto=format\u0026n=Hq-UxQPMElXbNbMd\u0026q=85\u0026s=730eea87d92195965c51528156413d15 840w, https://mintcdn.com/zeotap/Hq-UxQPMElXbNbMd/articles/integrate-customer/Storage/integrate-customer/google-customer-match-customer-contact-information/google-customer-match-customer-contact-information-2024-12-17.png?w=1100\u0026fit=max\u0026auto=format\u0026n=Hq-UxQPMElXbNbMd\u0026q=85\u0026s=b5050f79584f51560433813f3413bdc9 1100w, https://mintcdn.com/zeotap/Hq-UxQPMElXbNbMd/articles/integrate-customer/Storage/integrate-customer/google-customer-match-customer-contact-information/google-customer-match-customer-contact-information-2024-12-17.png?w=1650\u0026fit=max\u0026auto=format\u0026n=Hq-UxQPMElXbNbMd\u0026q=85\u0026s=b6d195930e0e7f25cc1661e2115752fb 1650w, https://mintcdn.com/zeotap/Hq-UxQPMElXbNbMd/articles/integrate-customer/Storage/integrate-customer/google-customer-match-customer-contact-information/google-customer-match-customer-contact-information-2024-12-17.png?w=2500\u0026fit=max\u0026auto=format\u0026n=Hq-UxQPMElXbNbMd\u0026q=85\u0026s=217c65a1ee0c47306953ed1059b20cfc 2500w`})})]})]}),`\n`,_jsx(Heading,{level:`2`,id:`troubleshoot-google-customer-match-deliveries`,children:`Troubleshoot Google Customer Match deliveries`}),`\n`,_jsxs(Table,{children:[_jsx(_components.thead,{children:_jsxs(_components.tr,{children:[_jsx(_components.th,{style:{textAlign:`left`},children:`Symptom`}),_jsx(_components.th,{style:{textAlign:`left`},children:`What to check`})]})}),_jsxs(_components.tbody,{children:[_jsxs(_components.tr,{children:[_jsx(_components.td,{style:{textAlign:`left`},children:`Segment or audience creation fails on the Google side`}),_jsxs(_components.td,{style:{textAlign:`left`},children:[`Confirm that Zeotap is whitelisted on the platform you are sending to. See `,_jsx(_components.a,{href:`#whitelist-zeotap-on-your-google-product`,children:`Whitelist Zeotap on your Google product`}),`.`]})]}),_jsxs(_components.tr,{children:[_jsx(_components.td,{style:{textAlign:`left`},children:`The segment has not appeared at the seat yet`}),_jsxs(_components.td,{style:{textAlign:`left`},children:[`Allow up to three business days after linking the audience — see `,_jsx(_components.a,{href:`#link-an-audience-to-the-destination`,children:`Link an audience to the destination`}),`.`]})]}),_jsxs(_components.tr,{children:[_jsx(_components.td,{style:{textAlign:`left`},children:`You cannot find the segment under its audience name`}),_jsxs(_components.td,{style:{textAlign:`left`},children:[`Segments are renamed on upload. Segments created on GCM appear as `,_jsx(_components.code,{children:`{Audience Name}_{Audience Id}`}),`; where multiple identifiers are sent, the note under `,_jsx(_components.a,{href:`#supported-identifiers-and-actions`,children:`Supported identifiers and actions`}),` documents the format `,_jsx(_components.code,{children:`{AudienceName}{DestinationName}_SegmentId`}),`.`]})]}),_jsxs(_components.tr,{children:[_jsx(_components.td,{style:{textAlign:`left`},children:`More segments appear in GCM than you expected`}),_jsx(_components.td,{style:{textAlign:`left`},children:`When you send multiple identifiers, Zeotap CDP creates multiple audience segments within GCM, each with its own segment ID, and uploads the data to the corresponding segment. The segment IDs are displayed separately on the UI.`})]}),_jsxs(_components.tr,{children:[_jsx(_components.td,{style:{textAlign:`left`},children:`The match rate is lower than expected`}),_jsxs(_components.td,{style:{textAlign:`left`},children:[`Check that emails are hashed to `,_jsx(_components.code,{children:`SHA256`}),` and that cellphone numbers are converted to `,_jsx(_components.code,{children:`E164`}),` before hashing — see the `,_jsx(_components.a,{href:`/articles/unify-customer/hashing-guidelines`,children:`hashing guidelines`}),`. Using `,_jsx(_components.strong,{children:`Send Multiple User Identifiers`}),` as the action is recommended to increase the match rate.`]})]}),_jsxs(_components.tr,{children:[_jsx(_components.td,{style:{textAlign:`left`},children:`Users disappear from a segment without a change on your side`}),_jsxs(_components.td,{style:{textAlign:`left`},children:[`This is user disqualification working as designed: disqualified users are removed on the audience’s configured refresh frequency. See `,_jsx(_components.a,{href:`#user-disqualification-from-audiences`,children:`User disqualification from audiences`}),`.`]})]}),_jsxs(_components.tr,{children:[_jsx(_components.td,{style:{textAlign:`left`},children:`EEA users are not being matched`}),_jsxs(_components.td,{style:{textAlign:`left`},children:[`Check that you are providing consent parameters covering `,_jsx(_components.code,{children:`ad_user_data`}),` and `,_jsx(_components.code,{children:`ad_personalization`}),`, and that your Consent Orchestration rules admit only users who consented to ad personalisation on Google products. See `,_jsx(_components.a,{href:`/articles/integrate-customer/faqs-related-to-google-consent-update`,children:`FAQs related to Google Consent Update`}),`.`]})]}),_jsxs(_components.tr,{children:[_jsx(_components.td,{style:{textAlign:`left`},children:`The delivery itself failed in Zeotap CDP`}),_jsxs(_components.td,{style:{textAlign:`left`},children:[`Open the audience–destination pair and read the recorded error. The common destination delivery errors and what they mean are listed in `,_jsx(_components.a,{href:`/articles/integrate-customer/destinations#why-deliveries-fail`,children:`Why deliveries fail`}),`, along with `,_jsx(_components.a,{href:`/articles/integrate-customer/destinations#when-to-contact-support`,children:`when to contact support`}),`.`]})]})]})]}),`\n`,_jsx(Heading,{level:`2`,id:`next-steps`,children:`Next steps`}),`\n`,_jsxs(_components.ul,{children:[`\n`,_jsx(_components.li,{children:_jsx(_components.a,{href:`/articles/integrate-customer/google-customer-match-mobile-device-ids`,children:`Send mobile advertising IDs to Google Customer Match →`})}),`\n`,_jsx(_components.li,{children:_jsx(_components.a,{href:`/articles/integrate-customer/faqs-related-to-google-consent-update`,children:`Read the FAQs on the Google consent update →`})}),`\n`,_jsx(_components.li,{children:_jsx(_components.a,{href:`/articles/unify-customer/hashing-guidelines`,children:`Review the hashing guidelines for emails and phone numbers →`})}),`\n`,_jsx(_components.li,{children:_jsx(_components.a,{href:`/articles/segment-customer/delta-upload-and-delete-functions`,children:`Understand delta uploads and deletes →`})}),`\n`,_jsx(_components.li,{children:_jsx(_components.a,{href:`/articles/segment-customer/audience-boost`,children:`Boost match rates with Audience Boost →`})}),`\n`,_jsx(_components.li,{children:_jsx(_components.a,{href:`/articles/integrate-customer/destinations`,children:`Learn how destinations work in general →`})}),`\n`]})]})}function MDXContent(props={}){const{wrapper:MDXLayout}={..._provideComponents(),...props.components};return MDXLayout?_jsx(MDXLayout,{...props,children:_jsx(_createMdxContent,{...props})}):_createMdxContent(props)}return{default:MDXContent};function _missingMdxReference(id,component){throw new Error(`Expected `+(component?`component`:`object`)+\" `\"+id+\"` to be defined: you likely forgot to import, pass, or provide it.\")}","frontmatter":{},"scope":{"config":{},"pageMetadata":{"title":"Google Customer Match (Customer Contact Information)","description":"Send hashed email addresses and hashed phone numbers from Zeotap CDP to Google Ads or Display \u0026 Video 360 as Customer Match customer lists.","sidebarTitle":"Customer Match (contact info)","last_validated":"2026-10-01T00:00:00.000Z","href":"/articles/integrate-customer/google-customer-match-customer-contact-information"}}},"mdxSourceWithNoJs":null},"mdxExtracts":{"tableOfContents":[{"title":"What this is","slug":"what-this-is","depth":2,"children":[{"title":"Where the audience can be used","slug":"where-the-audience-can-be-used","depth":3,"children":[]},{"title":"Common uses","slug":"common-uses","depth":3,"children":[]}]},{"title":"Supported identifiers and actions","slug":"supported-identifiers-and-actions","depth":2,"children":[{"title":"Available actions and supported features","slug":"available-actions-and-supported-features","depth":3,"children":[]}]},{"title":"Prerequisites","slug":"prerequisites","depth":2,"children":[{"title":"Seat ID","slug":"seat-id","depth":3,"children":[]},{"title":"Product type","slug":"product-type","depth":3,"children":[]}]},{"title":"Whitelist Zeotap on your Google product","slug":"whitelist-zeotap-on-your-google-product","depth":2,"children":[{"title":"Whitelist Zeotap on Google Ads","slug":"whitelist-zeotap-on-google-ads","depth":3,"children":[]},{"title":"Whitelist Zeotap on Google DV360","slug":"whitelist-zeotap-on-google-dv360","depth":3,"children":[]}]},{"title":"Create the Google Customer Match (Customer Contact Information) destination","slug":"create-the-google-customer-match-customer-contact-information-destination","depth":2,"children":[]},{"title":"Link an audience to the destination","slug":"link-an-audience-to-the-destination","depth":2,"children":[{"title":"User disqualification from audiences","slug":"user-disqualification-from-audiences","depth":3,"children":[]}]},{"title":"Verify the segments reached Google Ads","slug":"verify-the-segments-reached-google-ads","depth":2,"children":[]},{"title":"Troubleshoot Google Customer Match deliveries","slug":"troubleshoot-google-customer-match-deliveries","depth":2,"children":[]},{"title":"Next steps","slug":"next-steps","depth":2,"children":[]}],"codeExamples":{}},"jsLinks":["/_mintlify/custom/zeotap/8d1f66bf8eed64a4/scripts/convert-to-mdx.js"],"subdomain":"zeotap","siteName":"Zeotap docs","title":"Google Customer Match (Customer Contact Information) - Zeotap docs","navMaps":{"firstHrefInVersion":{},"firstHrefInLanguage":{}},"lastModified":"2026-11-17T14:58:11.459Z","gitLastModified":"2026-11-17T14:57:26.000Z","originalFileLocation":"articles/integrate-customer/google-customer-match-customer-contact-information.mdx"},"headHtml":"\u003cscript data-mint-head>(function(){var d=document.documentElement,p=null;if(!p){try{p=localStorage.getItem(\"isDarkMode\")}catch(e){}if(p==='true')p='dark';else if(p==='false')p='light';if(p!=='light'\u0026\u0026p!=='dark'\u0026\u0026p!=='system')p=\"light\"}var r=p==='system'?(matchMedia(\"(prefers-color-scheme: dark)\").matches?'dark':'light'):p;d.classList.remove(r==='dark'?'light':'dark');d.classList.add(r);d.setAttribute(\"data-theme-preference\",p)})();\u003c/script>\u003cmeta data-mint-head name=\"description\" content=\"Send hashed email addresses and hashed phone numbers from Zeotap CDP to Google Ads or Display \u0026amp; Video 360 as Customer Match customer lists.\">\u003cmeta data-mint-head name=\"application-name\" content=\"Zeotap docs\">\u003cmeta data-mint-head name=\"generator\" content=\"Mintlify\">\u003clink data-mint-head rel=\"icon\" type=\"image/png\" sizes=\"192x192\" href=\"/mintlify-assets/_mintlify/favicons/zeotap/dSUuokAmJ7V-SYpL/_generated/favicon/android-chrome-192x192.png\" media=\"(prefers-color-scheme: light)\">\u003clink data-mint-head rel=\"apple-touch-icon\" type=\"image/png\" sizes=\"180x180\" href=\"/mintlify-assets/_mintlify/favicons/zeotap/dSUuokAmJ7V-SYpL/_generated/favicon/apple-touch-icon.png\">\u003clink data-mint-head rel=\"icon\" type=\"image/png\" sizes=\"16x16\" href=\"/mintlify-assets/_mintlify/favicons/zeotap/dSUuokAmJ7V-SYpL/_generated/favicon/favicon-16x16.png\" media=\"(prefers-color-scheme: light)\">\u003clink data-mint-head rel=\"icon\" type=\"image/png\" sizes=\"32x32\" href=\"/mintlify-assets/_mintlify/favicons/zeotap/dSUuokAmJ7V-SYpL/_generated/favicon/favicon-32x32.png\" media=\"(prefers-color-scheme: light)\">\u003clink data-mint-head rel=\"shortcut icon\" type=\"image/x-icon\" href=\"/mintlify-assets/_mintlify/favicons/zeotap/dSUuokAmJ7V-SYpL/_generated/favicon/favicon.ico\" media=\"(prefers-color-scheme: light)\">\u003clink data-mint-head rel=\"icon\" type=\"image/png\" sizes=\"192x192\" href=\"/mintlify-assets/_mintlify/favicons/zeotap/dSUuokAmJ7V-SYpL/_generated/favicon-dark/android-chrome-192x192.png\" media=\"(prefers-color-scheme: dark)\">\u003clink data-mint-head rel=\"icon\" type=\"image/png\" sizes=\"16x16\" href=\"/mintlify-assets/_mintlify/favicons/zeotap/dSUuokAmJ7V-SYpL/_generated/favicon-dark/favicon-16x16.png\" media=\"(prefers-color-scheme: dark)\">\u003clink data-mint-head rel=\"icon\" type=\"image/png\" sizes=\"32x32\" href=\"/mintlify-assets/_mintlify/favicons/zeotap/dSUuokAmJ7V-SYpL/_generated/favicon-dark/favicon-32x32.png\" media=\"(prefers-color-scheme: dark)\">\u003clink data-mint-head rel=\"shortcut icon\" type=\"image/x-icon\" href=\"/mintlify-assets/_mintlify/favicons/zeotap/dSUuokAmJ7V-SYpL/_generated/favicon-dark/favicon.ico\" media=\"(prefers-color-scheme: dark)\">\u003cmeta data-mint-head property=\"og:title\" content=\"Google Customer Match (Customer Contact Information) - Zeotap docs\">\u003cmeta data-mint-head property=\"og:description\" content=\"Send hashed email addresses and hashed phone numbers from Zeotap CDP to Google Ads or Display \u0026amp; Video 360 as Customer Match customer lists.\">\u003cmeta data-mint-head property=\"og:site_name\" content=\"Zeotap docs\">\u003cmeta data-mint-head property=\"og:url\" content=\"https://docs.zeotap.com/articles/integrate-customer/google-customer-match-customer-contact-information\">\u003cmeta data-mint-head property=\"og:type\" content=\"website\">\u003cmeta data-mint-head property=\"og:image\" content=\"https://zeotap.mintlify.site/_mintlify/api/og/v2?division=Documentation\u0026amp;title=Google+Customer+Match+%28Customer+Contact+Information%29\u0026amp;description=Send+hashed+email+addresses+and+hashed+phone+numbers+from+Zeotap+CDP+to+Google+Ads+or+Display+%26+Video+360+as+Customer+Match+customer+lists.\u0026amp;theme=93bf95acd4691f2b4bc4d35f\u0026amp;signature=7ddfd7543ede52a31e075dcff4f3fc2eb26dd1836db94251de8c863a0912b6e7\">\u003cmeta data-mint-head property=\"og:image:width\" content=\"1200\">\u003cmeta data-mint-head property=\"og:image:height\" content=\"630\">\u003cmeta data-mint-head name=\"twitter:card\" content=\"summary_large_image\">\u003cmeta data-mint-head name=\"twitter:title\" content=\"Google Customer Match (Customer Contact Information) - Zeotap docs\">\u003cmeta data-mint-head name=\"twitter:description\" content=\"Send hashed email addresses and hashed phone numbers from Zeotap CDP to Google Ads or Display \u0026amp; Video 360 as Customer Match customer lists.\">\u003cmeta data-mint-head name=\"twitter:image\" content=\"https://zeotap.mintlify.site/_mintlify/api/og/v2?division=Documentation\u0026amp;title=Google+Customer+Match+%28Customer+Contact+Information%29\u0026amp;description=Send+hashed+email+addresses+and+hashed+phone+numbers+from+Zeotap+CDP+to+Google+Ads+or+Display+%26+Video+360+as+Customer+Match+customer+lists.\u0026amp;theme=93bf95acd4691f2b4bc4d35f\u0026amp;signature=7ddfd7543ede52a31e075dcff4f3fc2eb26dd1836db94251de8c863a0912b6e7\">\u003cmeta data-mint-head name=\"twitter:image:width\" content=\"1200\">\u003cmeta data-mint-head name=\"twitter:image:height\" content=\"630\">\u003cmeta data-mint-head name=\"msapplication-config\" content=\"/mintlify-assets/_mintlify/favicons/zeotap/dSUuokAmJ7V-SYpL/_generated/favicon/browserconfig.xml\">\u003cmeta data-mint-head name=\"apple-mobile-web-app-title\" content=\"Zeotap docs\">\u003cmeta data-mint-head name=\"msapplication-TileColor\" content=\"#174efb\">\u003clink data-mint-head rel=\"canonical\" href=\"https://docs.zeotap.com/articles/integrate-customer/google-customer-match-customer-contact-information\">\u003clink data-mint-head rel=\"alternate\" type=\"application/xml\" href=\"/sitemap.xml\">\u003clink data-mint-head rel=\"alternate\" type=\"text/markdown\" href=\"/articles/integrate-customer/google-customer-match-customer-contact-information.md\">\u003cscript data-mint-head type=\"application/ld+json\">{\"@context\":\"https://schema.org\",\"@graph\":[{\"@type\":\"Organization\",\"@id\":\"https://docs.zeotap.com/#organization\",\"name\":\"Zeotap docs\",\"url\":\"https://docs.zeotap.com\",\"logo\":{\"@type\":\"ImageObject\",\"url\":\"https://mintcdn.com/zeotap/pbiFRnrYXBNUsbba/logo/light.svg?fit=max\u0026auto=format\u0026n=pbiFRnrYXBNUsbba\u0026q=85\u0026s=c566b5af653699d3bcf4d8efb4f678d1\"}},{\"@type\":\"WebSite\",\"@id\":\"https://docs.zeotap.com#website\",\"name\":\"Zeotap docs\",\"url\":\"https://docs.zeotap.com\",\"publisher\":{\"@id\":\"https://docs.zeotap.com/#organization\"}},{\"@type\":\"WebPage\",\"@id\":\"https://docs.zeotap.com/articles/integrate-customer/google-customer-match-customer-contact-information#webpage\",\"url\":\"https://docs.zeotap.com/articles/integrate-customer/google-customer-match-customer-contact-information\",\"name\":\"Google Customer Match (Customer Contact Information)\",\"description\":\"Send hashed email addresses and hashed phone numbers from Zeotap CDP to Google Ads or Display \u0026 Video 360 as Customer Match customer lists.\",\"dateModified\":\"2026-11-17T14:57:26.000Z\",\"isPartOf\":{\"@id\":\"https://docs.zeotap.com#website\"},\"breadcrumb\":{\"@id\":\"https://docs.zeotap.com/articles/integrate-customer/google-customer-match-customer-contact-information#breadcrumb\"}},{\"@type\":\"BreadcrumbList\",\"@id\":\"https://docs.zeotap.com/articles/integrate-customer/google-customer-match-customer-contact-information#breadcrumb\",\"itemListElement\":[{\"@type\":\"ListItem\",\"position\":1,\"name\":\"Integrate\",\"item\":\"https://docs.zeotap.com/articles/integrate-customer/integrate\"},{\"@type\":\"ListItem\",\"position\":2,\"name\":\"Destinations\",\"item\":\"https://docs.zeotap.com/articles/integrate-customer/destinations\"},{\"@type\":\"ListItem\",\"position\":3,\"name\":\"Batch Integrations\",\"item\":\"https://docs.zeotap.com/articles/integrate-customer/destination-batch-integrations\"},{\"@type\":\"ListItem\",\"position\":4,\"name\":\"Google Customer Match (Customer Contact Information)\",\"item\":\"https://docs.zeotap.com/articles/integrate-customer/google-customer-match-customer-contact-information\"}]},{\"@type\":[\"Article\",\"TechArticle\"],\"@id\":\"https://docs.zeotap.com/articles/integrate-customer/google-customer-match-customer-contact-information#article\",\"headline\":\"Google Customer Match (Customer Contact Information)\",\"name\":\"Google Customer Match (Customer Contact Information)\",\"description\":\"Send hashed email addresses and hashed phone numbers from Zeotap CDP to Google Ads or Display \u0026 Video 360 as Customer Match customer lists.\",\"url\":\"https://docs.zeotap.com/articles/integrate-customer/google-customer-match-customer-contact-information\",\"mainEntityOfPage\":{\"@id\":\"https://docs.zeotap.com/articles/integrate-customer/google-customer-match-customer-contact-information#webpage\"},\"dateModified\":\"2026-11-17T14:57:26.000Z\",\"publisher\":{\"@id\":\"https://docs.zeotap.com/#organization\"},\"isPartOf\":{\"@id\":\"https://docs.zeotap.com#website\"}}]}\u003c/script>\u003cscript data-mint-head type=\"application/ld+json\">{\"@context\":\"https://schema.org\",\"@type\":\"WebSite\",\"name\":\"Zeotap docs\",\"publisher\":{\"@type\":\"Organization\",\"name\":\"Zeotap docs\"},\"provider\":{\"@type\":\"Organization\",\"name\":\"Mintlify\",\"url\":\"https://mintlify.com\"}}\u003c/script>","agentPointerHref":"/articles/integrate-customer/google-customer-match-customer-contact-information.md","siteName":"Zeotap docs","nav":{"global":{},"tabs":[{"tab":"Home","icon":"house","pages":[{"title":"Home","href":""}]},{"tab":"Products","icon":"grid-2","groups":[{"group":"Integrate","icon":"plug","root":{"title":"Integrate","sidebarTitle":"Overview","href":"/articles/integrate-customer/integrate"},"expanded":false,"pages":[{"group":"Sources","icon":"database","root":{"title":"Sources","sidebarTitle":"Overview","href":"/articles/integrate-customer/sources"},"pages":[{"title":"Components of the Source Listing Page","sidebarTitle":"Source Listing Page","href":"/articles/integrate-customer/components-of-the-source-listing-page"},{"title":"Components of the Preview Data Tab","sidebarTitle":"Preview Data tab","href":"/articles/integrate-customer/knowing-the-fields-on-the-preview-data-tab"},{"title":"Onboard Raw PII data into Zeotap","href":"/articles/integrate-customer/onboard-raw-pii-data-into-zeotap"},{"group":"Source Integrations (Batch+Real-Time)","root":{"title":"Source Integrations (Batch+Real-Time)","href":"/articles/integrate-customer/creating-a-source"},"pages":[{"group":"Website Events (CE)","root":{"title":"Website Events (CE)","sidebarTitle":"Website Events","href":"/articles/integrate-customer/website-events"},"pages":[{"group":"Web JavaScript SDK","root":{"title":"Web JavaScript SDK","href":"/articles/integrate-customer/web-javascript"},"pages":[{"title":"Create a Web JavaScript source","sidebarTitle":"Create a Web JS source","href":"/articles/integrate-customer/creating-web-js-source-2676490558"}]},{"group":"Web Pixel/Web IFrame/App Pixel","root":{"title":"Web Pixel/Web IFrame/App Pixel","sidebarTitle":"Overview","href":"/articles/integrate-customer/web-pixel-web-iframe-app-pixel"},"pages":[{"title":"Create a Web Pixel, IFrame or App Pixel source","sidebarTitle":"Create the source","href":"/articles/integrate-customer/2676392376"},{"title":"Implement the Pixel Source","sidebarTitle":"Implement pixels","href":"/articles/integrate-customer/implementing-pixel-source-2665775396"},{"title":"Implement Pixels on a Site, Ad or Campaign","sidebarTitle":"Pixels via a tag manager","href":"/articles/integrate-customer/implementing-pixels-on-a-site-2c-ad-or-campaign-2693727342"}]}]},{"group":"App Events (CE)","root":{"title":"App Events (CE)","sidebarTitle":"App Events","href":"/articles/integrate-customer/app-events"},"pages":[{"group":"Android SDK","root":{"title":"Android SDK","href":"/articles/integrate-customer/android-sdk"},"pages":[{"title":"Create an Android SDK Source","href":"/articles/integrate-customer/creating-android-sdk-source"}]},{"group":"iOS SDK","root":{"title":"iOS SDK","sidebarTitle":"iOS SDK","href":"/articles/integrate-customer/ios-sdk"},"pages":[{"title":"Create an iOS SDK source","sidebarTitle":"Create the source","href":"/articles/integrate-customer/create-an-ios-sdk-source"}]},{"title":"SDK Reference","sidebarTitle":"SDK Reference","href":"/articles/integrate-customer/sdk-reference"}]},{"group":"Flat Files (CE+NCE)","root":{"title":"Flat Files (CE+NCE)","sidebarTitle":"Flat Files","href":"/articles/integrate-customer/flat-files"},"pages":[{"group":"Zeotap Google Cloud Storage","root":{"title":"Zeotap Google Cloud Storage","sidebarTitle":"GCS source","href":"/articles/integrate-customer/zeotap-google-cloud-storage"},"pages":[{"title":"Create a Zeotap Google Cloud Storage Source","href":"/articles/integrate-customer/create-a-zeotap-google-cloud-storage-source"},{"title":"Implement a Zeotap Google Cloud Storage Source","sidebarTitle":"Implement the source","href":"/articles/integrate-customer/implement-a-zeotap-google-cloud-storage-source"},{"title":"Upload files to your source using the Google Cloud Console","sidebarTitle":"Upload with Cloud Console","href":"/articles/integrate-customer/upload-files-on-gcloud-console"},{"title":"Upload files to your source using gsutil","sidebarTitle":"Upload with gsutil","href":"/articles/integrate-customer/upload-files-using-gsutil"},{"title":"Upload files to your source using Cyberduck","sidebarTitle":"Upload with Cyberduck","href":"/articles/integrate-customer/upload-files-using-cyberduck"}]},{"group":"SFTP (Secure File Transfer Protocol)","root":{"title":"SFTP (Secure File Transfer Protocol)","sidebarTitle":"SFTP Source","href":"/articles/integrate-customer/sftp-secure-file-transfer-protocol"},"pages":[{"group":"Create an SFTP (Pull) Source","root":{"title":"Create an SFTP (Push) Source","href":"/articles/integrate-customer/creating-sftp-push-source"},"pages":[{"title":"Implement the SFTP (Push) Source","sidebarTitle":"Implement SFTP (Push)","href":"/articles/integrate-customer/implementing-sftp-push-source"}]},{"group":"Create an SFTP (Pull) Source","root":{"title":"Create an SFTP (Pull) Source","href":"/articles/integrate-customer/create-an-sftp-pull-source"},"pages":[{"title":"Implement the SFTP Pull Source","href":"/articles/integrate-customer/implement-the-sftp-pull-source"}]}]},{"group":"Best Practices for Flat File Source","root":{"title":"Best Practices for Flat File Source","sidebarTitle":"Flat file best practices","href":"/articles/integrate-customer/best-practices-for-flat-file-source-2709422090"},"pages":[{"title":"Supported File Formats","href":"/articles/integrate-customer/supported-file-formats"}]}]},{"group":"Server-to-Server (CE+NCE)","root":{"title":"Server-to-Server (CE+NCE)","sidebarTitle":"Overview","href":"/articles/integrate-customer/server-to-server"},"pages":[{"title":"Create and Implement the Server-to-Server Source","sidebarTitle":"Server-to-Server source","href":"/articles/integrate-customer/implementing-server-to-server-source-2665709918"},{"title":"Create an Adjust source","sidebarTitle":"Adjust","href":"/articles/integrate-customer/create-an-adjust-source"}]},{"group":"Tag Managers (CE)","root":{"title":"Tag Managers (CE)","href":"/articles/integrate-customer/tag-managers"},"pages":[{"group":"Adobe Experience Platform Tag Extension","root":{"title":"Adobe Experience Platform Tag Extension","sidebarTitle":"Overview","href":"/articles/integrate-customer/adobe-experience-platform-tag-extension"},"pages":[{"group":"Create an Adobe Experience Platform Tag Extension Source","root":{"title":"Create an Adobe Experience Platform Tag Extension Source","sidebarTitle":"Create the source","href":"/articles/integrate-customer/create-an-adobe-experience-platform-tag-extension-source"},"pages":[{"title":"Implement an Adobe Experience Platform Tag Extension Source","sidebarTitle":"Implement the source","href":"/articles/integrate-customer/implement-an-adobe-experience-platform-tag-extension-source"}]}]},{"group":"Google Tag Manager","root":{"title":"Google Tag Manager","href":"/articles/integrate-customer/google-tag-manager"},"pages":[{"title":"Create a Google Tag Manager Source","sidebarTitle":"Create the GTM source","href":"/articles/integrate-customer/creating-tag-manager-source-2676490586"},{"title":"Implement the Google Tag Manager source","sidebarTitle":"Implement the GTM source","href":"/articles/integrate-customer/implementing-google-tag-manager-source-2665775403"}]}]},{"group":"CRM Data (CE)","root":{"title":"CRM Data","href":"/articles/integrate-customer/crm-data"},"pages":[{"group":"HubSpot Source","root":{"title":"HubSpot Source","sidebarTitle":"Overview","href":"/articles/integrate-customer/hubspot-source"},"pages":[{"title":"Create a HubSpot Source","href":"/articles/integrate-customer/create-a-hubspot-source"}]},{"group":"Microsoft Dynamics CRM","root":{"title":"Microsoft Dynamics CRM source","sidebarTitle":"Microsoft Dynamics CRM","href":"/articles/integrate-customer/ms-dynamics-source"},"pages":[{"title":"Create a Microsoft Dynamics CRM source","sidebarTitle":"Create a source","href":"/articles/integrate-customer/create-a-ms-dynamics-crm-source"}]},{"group":"Salesforce CRM","root":{"title":"Salesforce CRM source","sidebarTitle":"Salesforce CRM","href":"/articles/integrate-customer/salesforce-crm"},"pages":[{"title":"Create a Salesforce CRM source","sidebarTitle":"Create a Salesforce CRM source","href":"/articles/integrate-customer/creating-salesforce-crm"},{"title":"Best Practices for Salesforce CRM Source","href":"/articles/integrate-customer/best-practices-for-salesforce-crm-source"}]}]},{"group":"Data Warehouse (CE+NCE)","root":{"title":"Data Warehouse (CE+NCE)","href":"/articles/integrate-customer/data-warehouse"},"pages":[{"group":"Snowflake","root":{"title":"Snowflake","sidebarTitle":"Snowflake (Source)","href":"/articles/integrate-customer/snowflake"},"pages":[{"title":"Create a Snowflake Source and Load Data","href":"/articles/integrate-customer/create-a-snowflake-source"},{"title":"Best Practices for Snowflake Source","sidebarTitle":"Snowflake best practices","href":"/articles/integrate-customer/best-practices-for-snowflake-source"},{"title":"Error Handling and More","href":"/articles/integrate-customer/snowflake-source-error-handling-and-more"},{"title":"FAQs for Snowflake","href":"/articles/integrate-customer/faqs-for-snowflake"}]},{"group":"BigQuery","root":{"title":"BigQuery source overview","sidebarTitle":"BigQuery","href":"/articles/integrate-customer/bigquery"},"pages":[{"title":"Create and Implement a BigQuery Source","sidebarTitle":"Create a BigQuery source","href":"/articles/integrate-customer/create-a-bigquery-source"},{"title":"Best Practices for BigQuery","sidebarTitle":"Best Practices for BigQuery","href":"/articles/integrate-customer/best-practices-for-bigquery"}]},{"group":"Amazon S3","root":{"title":"Amazon S3 source overview","sidebarTitle":"Amazon S3","href":"/articles/integrate-customer/amazon-s3"},"pages":[{"title":"Create and Implement an Amazon S3 Source","sidebarTitle":"Create and Implement an Amazon S3 Source","href":"/articles/integrate-customer/create-and-implement-an-amazon-s3-source"}]},{"group":"Databricks","root":{"title":"Databricks source overview","sidebarTitle":"Databricks","href":"/articles/integrate-customer/databricks"},"pages":[{"title":"Create and Implement a Databricks Source","sidebarTitle":"Databricks Source","href":"/articles/integrate-customer/create-and-implement-a-databricks-source"},{"title":"Set Up a Databricks Source","href":"/articles/integrate-customer/set-up-a-databricks-source"}]},{"title":"Microsoft Fabric","sidebarTitle":"Microsoft Fabric","href":"/articles/integrate-customer/microsoft-fabric"}]},{"group":"Customer Engagement Channels (CE)","root":{"title":"Customer Engagement Channels (CE)","href":"/articles/integrate-customer/customer-engagement-channels"},"pages":[{"group":"Batch Source","root":{"title":"Batch Source","href":"/articles/integrate-customer/batch-source"},"pages":[{"title":"Create a Batch Source","href":"/articles/integrate-customer/create-a-batch-source"}]},{"group":"Braze Currents","root":{"title":"Braze Currents source","sidebarTitle":"Braze Currents","href":"/articles/integrate-customer/braze-currents"},"pages":[{"group":"Create a Braze Currents Source","root":{"title":"Create a Braze Currents Source","href":"/articles/integrate-customer/create-a-braze-currents-source"},"pages":[{"title":"Implement a Braze Currents Source","href":"/articles/integrate-customer/implement-a-braze-currents-source"}]},{"title":"Best Practices for Braze Currents","sidebarTitle":"Braze Currents Best Practices","href":"/articles/integrate-customer/best-practices-for-braze-currents"}]},{"group":"Dotdigital","root":{"title":"Dotdigital","sidebarTitle":"Overview","href":"/articles/integrate-customer/dotdigital"},"pages":[{"title":"Create a Dotdigital source","sidebarTitle":"Create a source","href":"/articles/integrate-customer/create-a-dotdigital-source"}]},{"group":"Airship (Batch)","root":{"title":"Airship (Batch) source","sidebarTitle":"Airship (Batch)","href":"/articles/integrate-customer/airship-batch-source"},"pages":[{"title":"Create an Airship (Batch) Source","href":"/articles/integrate-customer/create-an-airship-batch-source"}]},{"group":"Airship Real-Time Data Streaming","root":{"title":"Airship Real-Time Data Streaming Source","href":"/articles/integrate-customer/airship-real-time-data-streaming-source"},"pages":[{"title":"Create an Airship Real-Time Data Streaming Source","sidebarTitle":"Create the source","href":"/articles/integrate-customer/create-an-airship-real-time-data-streaming-source"},{"title":"Implement an Airship Real-Time Data Streaming Source","sidebarTitle":"Implement the Airship source","href":"/articles/integrate-customer/implement-an-airship-real-time-data-streaming-source"}]},{"group":"Cleverpush (Batch) Source","root":{"title":"Cleverpush (Batch) Source","sidebarTitle":"Overview","href":"/articles/integrate-customer/cleverpush-batch-source"},"pages":[{"title":"Create a Cleverpush (Batch) source","sidebarTitle":"Create a Cleverpush (Batch) source","href":"/articles/integrate-customer/create-a-cleverpush-batch-source"},{"title":"Appendix for the Cleverpush sources","sidebarTitle":"Appendix","href":"/articles/integrate-customer/cleverpush_appendix"}]},{"group":"Cleverpush Real-Time Source","root":{"title":"Cleverpush Real-Time Source","sidebarTitle":"Overview","href":"/articles/integrate-customer/cleverpush-real-time-source"},"pages":[{"title":"Create a Cleverpush Real-Time source","sidebarTitle":"Create a Cleverpush Real-Time source","href":"/articles/integrate-customer/create-a-cleverpush-real-time-source"},{"title":"Implement a Cleverpush real-time source","sidebarTitle":"Implement the source","href":"/articles/integrate-customer/implement-a-cleverpush-real-time-source"}]},{"group":"Emarsys Source","root":{"title":"Emarsys source","sidebarTitle":"Emarsys source","href":"/articles/integrate-customer/emarsys-source"},"pages":[{"title":"Getting Emarsys credentials","sidebarTitle":"Getting credentials","href":"/articles/integrate-customer/getting-emarsys-credentials"},{"title":"Creating an Emarsys Source","href":"/articles/integrate-customer/creating-an-emarsys-source"}]},{"group":"Insider Webhook","root":{"title":"Insider Webhook Source","sidebarTitle":"Overview","href":"/articles/integrate-customer/insider-webhook"},"pages":[{"title":"Create an Insider source","sidebarTitle":"Create an Insider source","href":"/articles/integrate-customer/create-an-insider-source"},{"title":"Implement an Insider Source","sidebarTitle":"Implement the Insider source","href":"/articles/integrate-customer/implement-an-insider-source"}]},{"group":"Moengage Source","root":{"title":"MoEngage source","sidebarTitle":"MoEngage source","href":"/articles/integrate-customer/moengage-source"},"pages":[{"title":"Create a MoEngage Events stream source","sidebarTitle":"Create the source","href":"/articles/integrate-customer/creating-a-moengage-stream"}]}]},{"group":"Message Queue","root":{"title":"Message Queue","sidebarTitle":"Overview","href":"/articles/integrate-customer/message-queue"},"pages":[{"group":"Pub/Sub Stream","root":{"title":"Pub/Sub Stream","sidebarTitle":"Overview","href":"/articles/integrate-customer/pub-sub-stream"},"pages":[{"title":"Create a Pub/Sub Stream Source","sidebarTitle":"Create Pub/Sub Stream source","href":"/articles/integrate-customer/create-a-pub-sub-streaming-source"}]},{"group":"Pub/Sub Batch","root":{"title":"Pub/Sub Batch","sidebarTitle":"Overview","href":"/articles/integrate-customer/pub-sub-batch"},"pages":[{"title":"Create a Pub/Sub Batch Source","sidebarTitle":"Create the source","href":"/articles/integrate-customer/create-a-pub-sub-batch-source"}]},{"title":"Kafka Message Queue Source","sidebarTitle":"Kafka source","href":"/articles/integrate-customer/kafka_message_queue"}]},{"title":"Blacklisted Fields for Data Ingestion","href":"/articles/integrate-customer/blacklisted-fields-for-data-ingestion"}]},{"title":"Source Alerts","sidebarTitle":"Source Alerts","href":"/articles/integrate-customer/source-alerts"},{"group":"Source Report","root":{"title":"Source Report","sidebarTitle":"Overview","href":"/articles/integrate-customer/source-report"},"pages":[{"title":"Exploring Source Reports","href":"/articles/integrate-customer/exploring-source-reports"},{"title":"Understanding the Ingestion Log Error","sidebarTitle":"Ingestion log errors","href":"/articles/integrate-customer/understanding-the-ingestion-log-error"}]},{"title":"Understanding Cookies","href":"/articles/integrate-customer/understanding-cookies"},{"title":"Region of Storage","href":"/articles/integrate-customer/region-of-storage"},{"title":"PGP Encryption in Sources","sidebarTitle":"PGP Encryption","href":"/articles/integrate-customer/pgp-encryption-in-sources"},{"title":"Source Access Rules","sidebarTitle":"Source Access Rules","href":"/articles/integrate-customer/source-access-rules"},{"title":"Archived Source","href":"/articles/integrate-customer/archived-source"}]},{"group":"Destinations","icon":"paper-plane","root":{"title":"Destinations","sidebarTitle":"Destinations","href":"/articles/integrate-customer/destinations"},"pages":[{"title":"Create a Destination","sidebarTitle":"Create a Destination","href":"/articles/integrate-customer/create-a-destination"},{"title":"Payload Preview for Destination Mappings","href":"/articles/integrate-customer/payload-preview-for-destination-mappings"},{"title":"Activate Your Batch Audiences","href":"/articles/integrate-customer/link-an-audience-to-the-destination"},{"title":"Activate your real-time audiences","sidebarTitle":"Activate real-time","href":"/articles/integrate-customer/activate-your-real-time-audiences"},{"title":"PGP encryption for file-based destinations","sidebarTitle":"PGP encryption","href":"/articles/integrate-customer/pgp-encryption-in-destinations"},{"title":"Destination Access Rules","href":"/articles/integrate-customer/destination-access-rules"},{"title":"Troubleshoot Batch Uploads to a Destination","href":"/articles/integrate-customer/troubleshoot-batch-destination-uploads"},{"group":"Batch Integrations","root":{"title":"Batch Destination Integrations","sidebarTitle":"Batch Integrations","href":"/articles/integrate-customer/destination-batch-integrations"},"pages":[{"title":"Acxiom","sidebarTitle":"Acxiom","href":"/articles/integrate-customer/acxiom"},{"title":"Active Agent - Virtual Minds","sidebarTitle":"Active Agent","href":"/articles/integrate-customer/active-agent-virtual-minds"},{"title":"Adform","sidebarTitle":"Adform","href":"/articles/integrate-customer/adform"},{"title":"Adform DMP","sidebarTitle":"Adform DMP","href":"/articles/integrate-customer/adform-dmp"},{"title":"Adobe Analytics (New)","sidebarTitle":"Adobe Analytics (New)","href":"/articles/integrate-customer/adobe-analytics"},{"title":"Adobe Campaign (Audiences)","sidebarTitle":"Adobe Campaign (Audiences)","href":"/articles/integrate-customer/adobe-campaign"},{"group":"Adobe Target","root":{"title":"Adobe Target","sidebarTitle":"Adobe Target","href":"/articles/integrate-customer/adobe-target"},"pages":[{"title":"Adobe Target (Bulk Update)","href":"/articles/integrate-customer/adobe-target-bulk-update"}]},{"title":"Airship Static Lists","sidebarTitle":"Airship Static Lists","href":"/articles/integrate-customer/airship"},{"title":"Amazon DSP","sidebarTitle":"Amazon DSP","href":"/articles/integrate-customer/amazon-dsp"},{"title":"Amazon DSP - DP Audience","sidebarTitle":"Amazon DSP - DP","href":"/articles/integrate-customer/amazon-dsp-dp-audience"},{"title":"Amazon S3","sidebarTitle":"Amazon S3 (Destination)","href":"/articles/integrate-customer/amazon-s3-destination"},{"title":"Amazon Marketing Cloud (AMC)","sidebarTitle":"Amazon Marketing Cloud","href":"/articles/integrate-customer/amazon-marketing-cloud"},{"title":"Appademic S3","sidebarTitle":"Appademic S3","href":"/articles/integrate-customer/appademic-s3"},{"title":"AppNexus","sidebarTitle":"AppNexus","href":"/articles/integrate-customer/appnexus"},{"title":"Azure Blob Storage","sidebarTitle":"Azure Blob Storage","href":"/articles/integrate-customer/azure-blob-storage"},{"title":"Batch","href":"/articles/integrate-customer/batch"},{"title":"Batch CEP","href":"/articles/integrate-customer/batch-audience-management"},{"title":"Bird - Customer Lists","sidebarTitle":"Bird - Customer Lists","href":"/articles/integrate-customer/bird-customer-lists"},{"title":"Bloomreach","sidebarTitle":"Bloomreach","href":"/articles/integrate-customer/bloomreach"},{"title":"Braze","href":"/articles/integrate-customer/braze-1"},{"title":"Channable GCS Upload","sidebarTitle":"Channable GCS Upload","href":"/articles/integrate-customer/channable-gcs-upload"},{"group":"Cleverpush","root":{"title":"Cleverpush","sidebarTitle":"Cleverpush","href":"/articles/integrate-customer/cleverpush-destination"},"pages":[{"title":"Appendix for Cleverpush","sidebarTitle":"Appendix for Cleverpush","href":"/articles/integrate-customer/appendix-cleverpush-destination"}]},{"title":"Criteo","sidebarTitle":"Criteo","href":"/articles/integrate-customer/criteo"},{"title":"Criteo Retail Media","sidebarTitle":"Criteo Retail Media","href":"/articles/integrate-customer/criteo-retail-media"},{"title":"Decentriq","sidebarTitle":"Decentriq","href":"/articles/integrate-customer/decentriq"},{"title":"Dotdigital (New)","sidebarTitle":"Dotdigital (New)","href":"/articles/integrate-customer/dotdigital-1"},{"title":"Dynamic Yield","sidebarTitle":"Dynamic Yield","href":"/articles/integrate-customer/dynamic-yield"},{"title":"Dynamic Yield: CSV upload","sidebarTitle":"Dynamic Yield: CSV upload","href":"/articles/integrate-customer/dynamic-yield-csv-upload"},{"title":"ELAINE","sidebarTitle":"ELAINE","href":"/articles/integrate-customer/artegic-elaine"},{"title":"Send audiences to Emarsys","sidebarTitle":"Emarsys","href":"/articles/integrate-customer/emarsys"},{"title":"Facebook","href":"/articles/integrate-customer/facebook"},{"title":"Facebook 1P (Meta)","sidebarTitle":"Facebook 1P (Meta)","href":"/articles/integrate-customer/facebook-1p"},{"title":"Facebook Enhanced Conversions API (Send Offline data)","href":"/articles/integrate-customer/facebook-enhanced-conversions-api-capi"},{"title":"Facebook Product Catalog","sidebarTitle":"Facebook Product Catalog","href":"/articles/integrate-customer/facebook-product-catalog"},{"title":"Google Ad Manager","sidebarTitle":"Google Ad Manager","href":"/articles/integrate-customer/google-ad-manager"},{"title":"Google Analytics 4","sidebarTitle":"Google Analytics 4","href":"/articles/integrate-customer/google-analytics-4"},{"title":"Google Analytics Hub","sidebarTitle":"Google Analytics Hub","href":"/articles/integrate-customer/google-analytics-hub"},{"title":"Google BigQuery destination","sidebarTitle":"Google BigQuery","href":"/articles/integrate-customer/google-bigquery-destination"},{"title":"Google Cloud Storage destination","description":"Configure a Google Cloud Storage destination so Zeotap CDP delivers audiences to your bucket as CSV files.","sidebarTitle":"Google Cloud Storage","href":"/articles/integrate-customer/google-cloud-storage"},{"group":"Google Customer Match (Customer Contact Information)","root":{"title":"Google Customer Match (Customer Contact Information)","sidebarTitle":"Customer Match (contact info)","href":"/articles/integrate-customer/google-customer-match-customer-contact-information"},"pages":[{"title":"FAQs related to Google Consent Update","description":"The following are some of the frequently asked questions regarding the consent update for Google Customer Match:","href":"/articles/integrate-customer/faqs-related-to-google-consent-update"}]},{"title":"Google Customer Match (Mobile Device IDs)","sidebarTitle":"GCM (MAIDs)","href":"/articles/integrate-customer/google-customer-match-mobile-device-ids"},{"title":"Google DDP","sidebarTitle":"Google DDP","href":"/articles/integrate-customer/google-ddp"},{"title":"Google DMP","sidebarTitle":"Google DMP","href":"/articles/integrate-customer/google-dmp"},{"title":"Hello Charles","sidebarTitle":"Hello Charles","href":"/articles/integrate-customer/hello-charles"},{"title":"HubSpot","sidebarTitle":"HubSpot","href":"/articles/integrate-customer/hubspot"},{"title":"InfoSum Audience","sidebarTitle":"InfoSum Audience","href":"/articles/integrate-customer/infosum-audience"},{"title":"Insider","sidebarTitle":"Insider","href":"/articles/integrate-customer/insider"},{"title":"Inxmail Audience","sidebarTitle":"Inxmail Audience","href":"/articles/integrate-customer/inxmail-audience"},{"title":"Iterable: Campaign Trigger","sidebarTitle":"Iterable: Campaign Trigger (Audiences)","href":"/articles/integrate-customer/iterable-campaign-trigger-audience"},{"title":"LaunchDarkly","sidebarTitle":"LaunchDarkly","href":"/articles/integrate-customer/launchdarkly"},{"title":"LinkedIn destination","sidebarTitle":"LinkedIn","href":"/articles/integrate-customer/linkedin"},{"title":"Looker","sidebarTitle":"Looker Studio","href":"/articles/integrate-customer/looker"},{"title":"Meta Custom Audience","sidebarTitle":"Meta Custom Audience","href":"/articles/integrate-customer/meta-custom-audience"},{"title":"Microsoft Ads Customer Match","sidebarTitle":"Microsoft Ads Customer Match","href":"/articles/integrate-customer/microsoft-ads-customer-match"},{"title":"Microsoft Fabric [Audience]","sidebarTitle":"Microsoft Fabric","href":"/articles/integrate-customer/microsoft-fabric-audience"},{"title":"MoEngage Audience","sidebarTitle":"MoEngage Audience","href":"/articles/integrate-customer/moengage-audience"},{"title":"Moloco","sidebarTitle":"Moloco","href":"/articles/integrate-customer/moloco"},{"title":"Neodata","sidebarTitle":"Neodata","href":"/articles/integrate-customer/neodata"},{"title":"Oath (Yahoo)","sidebarTitle":"Oath (Yahoo)","href":"/articles/integrate-customer/yahoo"},{"title":"Ongage","sidebarTitle":"Ongage","href":"/articles/integrate-customer/ongage"},{"title":"Optimizely","sidebarTitle":"Optimizely","href":"/articles/integrate-customer/optimizely-connect-integration"},{"title":"Permutive","sidebarTitle":"Permutive","href":"/articles/integrate-customer/permutive"},{"title":"Personyze","sidebarTitle":"Personyze","href":"/articles/integrate-customer/personyze"},{"title":"Pinterest Customer Lists destination","sidebarTitle":"Pinterest","href":"/articles/integrate-customer/pinterest"},{"title":"PromoteIQ","sidebarTitle":"PromoteIQ","href":"/articles/integrate-customer/promote-iq"},{"title":"PubMatic","sidebarTitle":"PubMatic","href":"/articles/integrate-customer/pubmatic"},{"title":"Quantcast","sidebarTitle":"Quantcast","href":"/articles/integrate-customer/quantcast"},{"title":"Reddit","sidebarTitle":"Reddit","href":"/articles/integrate-customer/reddit"},{"title":"Reddit Offline CAPI","sidebarTitle":"Reddit Offline CAPI","href":"/articles/integrate-customer/reddit-offline-capi"},{"title":"Responsys","sidebarTitle":"Responsys","href":"/articles/integrate-customer/responsys"},{"title":"Rokt","sidebarTitle":"Rokt","href":"/articles/integrate-customer/rokt"},{"title":"RTB House","sidebarTitle":"RTB House","href":"/articles/integrate-customer/rtb-house"},{"title":"Salesforce CRM (Sales and Service Cloud)","sidebarTitle":"Salesforce CRM","href":"/articles/integrate-customer/salesforce-crm-sales-and-service-cloud"},{"title":"Salesforce Marketing Cloud — Data Extension","sidebarTitle":"SFMC Data Extension","href":"/articles/integrate-customer/salesforce-marketing-cloud-data-extension"},{"title":"SFMC Personalization (Audiences)","sidebarTitle":"SFMC Personalization (Audiences)","href":"/articles/integrate-customer/sfmc-personalization-audiences"},{"title":"SFTP Audience Integration","sidebarTitle":"SFTP","href":"/articles/integrate-customer/sftp-audience-integration"},{"group":"Sendinblue (Brevo)","root":{"title":"Sendinblue (Brevo)","sidebarTitle":"Sendinblue (Brevo)","href":"/articles/integrate-customer/brevo-sendinblue"},"pages":[{"title":"Appendix for Sendinblue","sidebarTitle":"Appendix for Sendinblue","href":"/articles/integrate-customer/appendix-for-sendinblue"}]},{"title":"Smadex","href":"/articles/integrate-customer/smadex"},{"title":"Snapchat","sidebarTitle":"Snapchat","href":"/articles/integrate-customer/snapchat"},{"title":"Snapchat OAuth 2.0","sidebarTitle":"Snapchat OAuth 2.0","href":"/articles/integrate-customer/snapchat-oauth-2-0"},{"title":"Snowflake","sidebarTitle":"Snowflake (Destination)","href":"/articles/integrate-customer/snowflake-destination"},{"title":"Sportradar","sidebarTitle":"Sportradar","href":"/articles/integrate-customer/sportradar"},{"title":"StackAdapt DSP","sidebarTitle":"StackAdapt DSP","href":"/articles/integrate-customer/stackadapt-dsp"},{"title":"Tableau AWS S3","sidebarTitle":"Tableau AWS S3","href":"/articles/integrate-customer/tableau-aws-s3"},{"group":"Taboola","root":{"title":"Taboola","sidebarTitle":"Taboola","href":"/articles/integrate-customer/taboola"},"pages":[{"title":"Taboola appendix: taxonomy file and Channel ID","sidebarTitle":"Appendix","href":"/articles/integrate-customer/appendix-taboola-destination"}]},{"title":"Taboola Custom Audience","href":"/articles/integrate-customer/taboola-custom-audience"},{"title":"Talon.One Audience","sidebarTitle":"Talon.One Audience","href":"/articles/integrate-customer/talon-one-audience"},{"title":"TikTok","href":"/articles/integrate-customer/tiktok"},{"title":"The Trade Desk (TTD)","sidebarTitle":"TTD","href":"/articles/integrate-customer/ttd"},{"title":"TTD CRM Data","sidebarTitle":"TTD CRM Data","href":"/articles/integrate-customer/ttd-euid"},{"title":"TTD 1P","sidebarTitle":"TTD 1P","href":"/articles/integrate-customer/ttd-1p"},{"title":"TTD Data Monetisation","sidebarTitle":"TTD Data Monetisation","href":"/articles/integrate-customer/ttd-data-monetisation"},{"title":"Twitter","sidebarTitle":"Twitter","href":"/articles/integrate-customer/twitter"},{"title":"Yieldlab SSP","sidebarTitle":"Yieldlab SSP","href":"/articles/integrate-customer/yieldlab-ssp"},{"title":"Zeotap Pvt Channel","sidebarTitle":"Zeotap Pvt Channel","href":"/articles/integrate-customer/zeotap-pvt-channel"},{"title":"Databricks","sidebarTitle":"Databricks","href":"/articles/integrate-customer/databricks_destination"},{"title":"PubMatic Publisher","sidebarTitle":"PubMatic Publisher","href":"/articles/integrate-customer/pubmatic-publisher"}]},{"group":"Real-time Integrations","root":{"title":"Real-Time Integrations","sidebarTitle":"Real-Time Integrations","href":"/articles/integrate-customer/real-time-integrations"},"pages":[{"title":"Apache Kafka","sidebarTitle":"Apache Kafka","href":"/articles/integrate-customer/apache-kafka-destination"},{"title":"Adobe Campaign real-time integration","sidebarTitle":"Adobe Campaign (real-time)","href":"/articles/integrate-customer/adobe-campaign-real-time-integration"},{"title":"Adobe Target (Delivery API)","sidebarTitle":"Adobe Target (Delivery API)","href":"/articles/integrate-customer/adobe-target-delivery-api"},{"title":"Adobe Target (Single Update)","sidebarTitle":"Adobe Target (Single Update)","href":"/articles/integrate-customer/adobe-target-single-update"},{"title":"Airship real-time destination","sidebarTitle":"Airship (real-time)","href":"/articles/integrate-customer/airship-real-time-destination-integration"},{"title":"Amazon Conversions API","href":"/articles/integrate-customer/amazon-conversions-api"},{"title":"AppsFlyer Real Time Integration","sidebarTitle":"AppsFlyer","href":"/articles/integrate-customer/appsflyer-real-time-integration"},{"title":"Batch Real Time Destination Integration","sidebarTitle":"Batch (Real-Time)","href":"/articles/integrate-customer/batch-real-time-destination-integration"},{"title":"Braze Integration","sidebarTitle":"Braze Integration","href":"/articles/integrate-customer/braze-integration"},{"title":"Braze - Object Sync (Journey Action)","sidebarTitle":"Braze - Object Sync","href":"/articles/integrate-customer/braze-journey-action"},{"title":"Brevo","sidebarTitle":"Brevo","href":"/articles/integrate-customer/brevo"},{"title":"Bird Trigger Events","sidebarTitle":"Bird Trigger Events","href":"/articles/integrate-customer/bird-trigger-events"},{"title":"Channable real-time integration","sidebarTitle":"Channable","href":"/articles/integrate-customer/channable-real-time-integration"},{"title":"Cleverpush Real-Time Integration","sidebarTitle":"Cleverpush Real-Time Integration","href":"/articles/integrate-customer/cleverpush-real-time-integration"},{"title":"Appendix: Cleverpush channel and platform setup","sidebarTitle":"Appendix: channel and platforms","href":"/articles/integrate-customer/appendix-cleverpush-real-time-integration"},{"title":"Criteo Offline Sales Reporting","sidebarTitle":"Criteo Offline Sales Reporting","href":"/articles/integrate-customer/criteo-offline-sales-reporting"},{"title":"Dynamic Yield (RealTime)","sidebarTitle":"Dynamic Yield (RealTime)","href":"/articles/integrate-customer/dynamic-yield-realtime"},{"title":"ELAINE real-time integration","sidebarTitle":"ELAINE real-time integration","href":"/articles/integrate-customer/elaine-real-time-integration"},{"title":"Eloqua","sidebarTitle":"Eloqua","href":"/articles/integrate-customer/eloqua"},{"title":"Emarsys real-time integration","sidebarTitle":"Emarsys real-time","href":"/articles/integrate-customer/emarsys-real-time-integration"},{"title":"Facebook Conversions API","sidebarTitle":"Facebook Conversions API","href":"/articles/integrate-customer/facebook-conversions-api"},{"title":"Send events to Facebook Conversions API using the /events endpoint","sidebarTitle":"Send events via API","href":"/articles/integrate-customer/send-events-using-the-api"},{"title":"Google Enhanced Conversions API (CAPI)","sidebarTitle":"Google Enhanced CAPI","href":"/articles/integrate-customer/google-enhanced-conversions-api-capi"},{"title":"Google Pub/Sub","sidebarTitle":"Google Pub/Sub","href":"/articles/integrate-customer/google-pub-sub"},{"title":"Google Universal Analytics Integration","sidebarTitle":"Google Universal Analytics","href":"/articles/integrate-customer/google-universal-analytics-integration"},{"title":"Inxmail","sidebarTitle":"Inxmail","href":"/articles/integrate-customer/inxmail"},{"title":"Iterable: Campaign Trigger real-time integration","sidebarTitle":"Iterable: Campaign Trigger","href":"/articles/integrate-customer/iterable-campaign-trigger"},{"title":"LaunchDarkly real-time integration","sidebarTitle":"LaunchDarkly (real-time)","href":"/articles/integrate-customer/launchdarkly-real-time-integration"},{"title":"Microsoft CAPI","href":"/articles/integrate-customer/microsoft-capi"},{"title":"MoEngage","sidebarTitle":"MoEngage","href":"/articles/integrate-customer/moengage"},{"title":"Optimizely (Real Time)","sidebarTitle":"Optimizely (Real Time)","href":"/articles/integrate-customer/optimizely"},{"title":"Optimizely Campaigns (Real Time)","sidebarTitle":"Optimizely Campaigns","href":"/articles/integrate-customer/optimizely-campaigns"},{"title":"Personyze real-time integration","sidebarTitle":"Personyze real-time","href":"/articles/integrate-customer/personyze-real-time-integration"},{"title":"Pinterest CAPI","sidebarTitle":"Pinterest CAPI","href":"/articles/integrate-customer/pinterest-capi"},{"title":"Reddit CAPI destination","sidebarTitle":"Reddit CAPI","href":"/articles/integrate-customer/reddit-capi"},{"title":"Responsys real-time integration","sidebarTitle":"Responsys real-time integration","href":"/articles/integrate-customer/responsys-real-time-integration"},{"title":"RTB House Conversions API (CAPI)","sidebarTitle":"RTB House CAPI","href":"/articles/integrate-customer/rtb-house-capi"},{"title":"Salesforce CRM Real Time Integration","sidebarTitle":"Salesforce CRM : Journeys","href":"/articles/integrate-customer/salesforce-crm-real-time-integration"},{"title":"SendGrid","sidebarTitle":"SendGrid","href":"/articles/integrate-customer/sendgrid"},{"title":"SFMC Journey Builder","sidebarTitle":"SFMC Journey Builder","href":"/articles/integrate-customer/sfmc-journey-builder"},{"title":"Appendix for SFMC Journey Builder","sidebarTitle":"SFMC Journey Builder appendix","href":"/articles/integrate-customer/appendix-for-sfmc-journey-builder"},{"title":"SFMC Personalization (Journeys)","sidebarTitle":"SFMC Personalization (Journeys)","href":"/articles/integrate-customer/sfmc-personalization-journeys"},{"title":"Talon.One Trigger Custom Events","sidebarTitle":"Talon.One Trigger Custom Events","href":"/articles/integrate-customer/talon-one"},{"title":"TikTok Events","href":"/articles/integrate-customer/tiktok-events"},{"title":"WhatsApp","sidebarTitle":"WhatsApp","href":"/articles/integrate-customer/whatsapp"},{"title":"Zeotap Webhook","sidebarTitle":"Zeotap Webhook","href":"/articles/integrate-customer/zeotap-webhook"}]}]}]},{"group":"Unify","icon":"layer-group","root":{"title":"Unify","href":"/articles/unify-customer/unify"},"expanded":false,"pages":[{"group":"Catalogue","icon":"book-open","root":{"title":"Catalogue","href":"/articles/unify-customer/catalogue"},"expanded":true,"pages":[{"group":"Components of the Catalogue Screen","root":{"title":"Components of the Catalogue Screen","href":"/articles/unify-customer/components-of-the-catalogue-screen"},"pages":[{"title":"Understand the Basic Fields","href":"/articles/unify-customer/understand-the-basic-fields"},{"title":"Understand the Advance Fields","href":"/articles/unify-customer/understand-the-advance-fields"}]},{"title":"When to use a Catalogue Field","href":"/articles/unify-customer/when-to-use-a-catalogue-field"},{"group":"Standard Fields in Catalogue","root":{"title":"Standard Fields in Catalogue","href":"/articles/unify-customer/standard-fields-in-catalogue"},"pages":[{"title":"Zeotap Standard Fields","href":"/articles/unify-customer/zeotap-standard-fields"},{"title":"Reserved Catalogue Fields","href":"/articles/unify-customer/reserved-catalogue-fields"}]},{"title":"Data Types in Catalogue","href":"/articles/unify-customer/data-types-in-catalogue"},{"group":"Add a Catalogue Field","root":{"title":"Add a Catalogue Field","href":"/articles/unify-customer/add-a-catalogue-field"},"pages":[{"group":"Categories for adding Catalogue fields","root":{"title":"Categories for adding Catalogue fields","href":"/articles/unify-customer/categories-in-catalogue"},"pages":[{"title":"Add a Consent Category","href":"/articles/unify-customer/adding-a-consent-category"},{"title":"Add a Campaign Category","href":"/articles/unify-customer/adding-a-campaign-category"},{"title":"Add a Product Category","href":"/articles/unify-customer/adding-a-product-category"},{"title":"Add a Marketing Preference Category","href":"/articles/unify-customer/adding-a-marketing-preference-category"},{"title":"Add an Event Category","href":"/articles/unify-customer/adding-an-event-category"},{"title":"Add an ID Metadata Category","href":"/articles/unify-customer/adding-an-id-metadata-category"},{"title":"Add an ID Consent Category","href":"/articles/unify-customer/adding-an-id-consent-category"},{"title":"Add an ID Category","href":"/articles/unify-customer/adding-an-id-category"},{"title":"Add a User Trait Category","href":"/articles/unify-customer/adding-a-user-trait-category"},{"title":"Add a Non-Customer Entity Category","href":"/articles/unify-customer/adding-a-non-customer-entity-category"}]}]},{"title":"Edit a Catalogue Field","href":"/articles/unify-customer/edit-a-catalogue-field"},{"group":"Map the Catalogue","root":{"title":"Map the Catalogue","href":"/articles/unify-customer/map-the-catalogue"},"pages":[{"group":"Supported Data Entities","root":{"title":"Supported Data Entities","href":"/articles/unify-customer/supported-data-entities"},"pages":[{"group":"Customer Data","root":{"title":"Customer Data","href":"/articles/unify-customer/customer-data"},"pages":[{"title":"Map the Catalogue for Customer Data","href":"/articles/unify-customer/map-the-catalogue-for-customer-data"}]},{"group":"Non Customer Entity Data","root":{"title":"Non-Customer Entity Data","href":"/articles/unify-customer/non-customer-entity-data"},"pages":[{"title":"How to use NCE","href":"/articles/unify-customer/how-to-use-nce"},{"title":"Why do we need NCE?","href":"/articles/unify-customer/why-do-we-need-nce"},{"title":"Understand One-to-Many Relationship in NCE","href":"/articles/unify-customer/understand-one-to-many-relationship-in-nce"},{"title":"Join Key Enricher","href":"/articles/unify-customer/join-key-enricher"},{"title":"Using Composite Key in NCE","href":"/articles/unify-customer/using-composite-key-in-nce"},{"title":"Map the Catalogue for Non-Customer Entity Data","href":"/articles/unify-customer/map-the-catalogue-for-non-customer-entity-data"}]},{"title":"Auto Mapping","href":"/articles/unify-customer/auto-mapping"}]}]},{"title":"Editing a Catalogue Mapping","href":"/articles/unify-customer/editing-a-mapping"},{"title":"Ingestion Filter Criteria","href":"/articles/unify-customer/ingestion-filter"},{"title":"Override the Source Data Type","href":"/articles/unify-customer/override-the-source-data-type"},{"group":"Enrichers","root":{"title":"Enrichers","href":"/articles/unify-customer/enrichers"},"pages":[{"title":"Predefined Data Transformers","href":"/articles/unify-customer/enrichers-for-data-transformation-2816770049"},{"group":"Custom Transformers","root":{"title":"Enrichers for Custom Transformations","href":"/articles/unify-customer/enrichers-for-custom-transformations"},"pages":[{"group":"Use Cases for Custom Transformers","root":{"title":"Use Cases for Custom Transformers","href":"/articles/unify-customer/use-cases-for-custom-transformers"},"pages":[{"title":"Scenario 1: Transformation of Consent Using a Custom Transformer","href":"/articles/unify-customer/scenario-1-transformation-of-consent-using-a-custom-transformer"},{"title":"Scenario 2: Transformation of Currency Data Using a Custom Transformer","href":"/articles/unify-customer/scenario-2-transformation-of-currency-data-using-custom-transformer"},{"title":"Scenario 3: Extraction of Object Data Using a Custom Transformer","href":"/articles/unify-customer/scenario-3-extraction-of-object-data-using-custom-transformer"},{"title":"Scenario 4: Transformation of Array Using a Custom Transformer","href":"/articles/unify-customer/scenario-4-transformation-of-array-using-custom-transformer"},{"title":"Scenario 5: Transformation of Cellphone Number into E164 Format Using a Custom Transformer","href":"/articles/unify-customer/scenario-5-transformation-of-cellphone-number-into-e164-format-using-custom-transformer"}]}]},{"group":"Configure the Enrichers","root":{"title":"Configuring the Enrichers","href":"/articles/unify-customer/configuring-the-enrichers"},"pages":[{"title":"Configure the Country Enricher","href":"/articles/unify-customer/configuring-the-country-enricher"},{"title":"Configure the Timestamp Enricher","href":"/articles/unify-customer/configuring-the-timestamp-enricher"},{"title":"Configure the Value Mapper Enricher","href":"/articles/unify-customer/configuring-the-value-mapper-enricher"},{"title":"Configure the Hardcode Enricher","href":"/articles/unify-customer/configuring-the-hardcode-enricher"},{"title":"Configure the Derived Field Enricher","href":"/articles/unify-customer/configuring-the-derived-field-enricher"},{"title":"Configure the Custom Transformation Enricher","href":"/articles/unify-customer/configuring-the-custom-transformation-enricher"},{"title":"Configure the Join Key Enricher","href":"/articles/unify-customer/configuring-the-join-key-enricher"}]}]},{"title":"Hashing Guidelines","href":"/articles/unify-customer/hashing-guidelines"},{"title":"Data Onboarding Guide for Partners","href":"/articles/unify-customer/data-onboarding-guide-for-partners"},{"title":"Time-to-Live","href":"/articles/unify-customer/time-to-live"},{"title":"Group Name","href":"/articles/unify-customer/group-name"},{"title":"Taxonomy","href":"/articles/unify-customer/taxonomy-and-catalogue"},{"title":"FAQs about Catalogue","href":"/articles/unify-customer/faqs-about-catalogue"},{"title":"FAQs about Mapping and Ingestion","href":"/articles/unify-customer/faqs-about-mapping-and-ingestion"}]},{"group":"Calculated Attributes","icon":"calculator","root":{"title":"Calculated Attributes","href":"/articles/unify-customer/calculated-attributes"},"expanded":true,"pages":[{"title":"How Calculated Attributes Work","href":"/articles/unify-customer/how-calculated-attributes-work"},{"title":"Batch vs. Real-Time Calculated Attributes","href":"/articles/unify-customer/batch-vs-real-time-calculated-attributes"},{"title":"Components of the Calculated Attributes Screen","href":"/articles/unify-customer/components-of-the-calculated-attributes-screen"},{"title":"Create a Batch Calculated Attribute","href":"/articles/unify-customer/add-a-calculated-attribute"},{"title":"Create a Real-Time Calculated Attribute","href":"/articles/unify-customer/create-a-real-time-calculated-attribute"},{"title":"Segment Membership Calculated Attribute","sidebarTitle":"Segment Membership","href":"/articles/unify-customer/system-defined-calculated-attributes"},{"title":"Calculated Attributes: Use Cases","href":"/articles/unify-customer/calculated-attributes-use-cases"},{"title":"Calculated Attributes: Guardrails \u0026 Limits","href":"/articles/unify-customer/calculated-attributes-guardrails-and-limits"},{"title":"FAQs about Calculated Attributes","href":"/articles/unify-customer/faqs-about-calculated-attributes"}]},{"group":"ID Strategy","icon":"fingerprint","root":{"title":"Identity Resolution","href":"/articles/unify-customer/identity-resolution"},"expanded":true,"pages":[{"group":"Types of ID Strategies","root":{"title":"Types of ID Strategies","href":"/articles/unify-customer/id-strategies"},"pages":[{"title":"Default ID Strategy","href":"/articles/unify-customer/default-id-strategy"},{"group":"High-fidelity or Custom ID Strategy","root":{"title":"High-fidelity or Custom ID Strategy","href":"/articles/unify-customer/high-fidelity-or-custom-id-strategy"},"pages":[{"title":"How does Custom Strategy Work","href":"/articles/unify-customer/how-does-the-strategy-work"},{"title":"ID Prioritisation","href":"/articles/unify-customer/id-prioritisation"},{"title":"How to Stitch Unknown to Known Profile using the Custom Strategy","href":"/articles/unify-customer/how-to-stitch-unknown-to-known-profile-using-the-custom-strategy"}]}]},{"title":"ID Strategy Use Cases","href":"/articles/unify-customer/id-strategy-use-cases"},{"title":"Configure the ID Strategy","href":"/articles/unify-customer/configure-the-id-strategy"},{"title":"Edit an ID Strategy","href":"/articles/unify-customer/edit-an-id-strategy"},{"title":"FAQs about Identity Strategy","href":"/articles/unify-customer/faqs-about-identity-resolution"}]}]},{"group":"Segment","icon":"users","root":{"title":"Audiences","href":"/articles/segment-customer/audience"},"expanded":false,"pages":[{"group":"Build Your Audience","icon":"filter","root":{"title":"Build Your Audience","href":"/articles/segment-customer/build-your-audience"},"pages":[{"group":"Create an Audience","root":{"title":"Create an audience","sidebarTitle":"Create an audience","href":"/articles/segment-customer/create-an-audience"},"pages":[{"title":"Create an audience with Ada (AI-based audience builder)","sidebarTitle":"Ada audience builder","href":"/articles/segment-customer/create-audience-using-ada-ai-based-audience-builder"},{"title":"Using the 'Delete customers in this Audience from the system' checkbox","href":"/articles/segment-customer/using-the-delete-customers-in-this-audience-from-the-system-checkbox"},{"title":"Batch audience vs real-time audience","sidebarTitle":"Batch vs real-time","href":"/articles/segment-customer/batch-audience-vs-real-time-audience"},{"title":"Real-time audiences vs journeys","sidebarTitle":"Real-time vs journeys","href":"/articles/segment-customer/real-time-audience-vs-journeys"},{"title":"FAQs for real-time audience creation","sidebarTitle":"Real-time audience FAQs","href":"/articles/segment-customer/faqs-for-real-time-audience-creation"}]},{"title":"Apply attributes to your audience","sidebarTitle":"Apply attributes","href":"/articles/segment-customer/apply-attributes-to-your-audience"},{"title":"How do conditional blocks work","sidebarTitle":"Conditional blocks","href":"/articles/segment-customer/how-do-conditional-blocks-work"},{"title":"Operators used in audience segmentation","sidebarTitle":"Audience operators","href":"/articles/segment-customer/work-with-operators"},{"title":"NOT logic vs. Does Not Exist","sidebarTitle":"NOT vs Does Not Exist","href":"/articles/segment-customer/not-logic-vs-does-not-exist"}]},{"group":"Activate Your Audience","icon":"rocket","root":{"title":"Activate Your Audience","href":"/articles/segment-customer/activate-your-audience"},"pages":[{"group":"Link to Destination","root":{"title":"Link an audience to a destination","sidebarTitle":"Link to destination","href":"/articles/segment-customer/link-the-destination"},"pages":[{"title":"Create a new destination","sidebarTitle":"Create a new destination","href":"/articles/segment-customer/create-a-new-destination"},{"title":"Audience Scheduling","href":"/articles/segment-customer/audience-scheduling"},{"title":"Delta Upload and Delete Functions","href":"/articles/segment-customer/delta-upload-and-delete-functions"},{"title":"Key Factors Influencing the Data Upload to Destinations","href":"/articles/segment-customer/factors-influencing-the-data-upload-time-to-destinations"},{"title":"Object, List of Objects and NCE Support in Destination Upload","href":"/articles/segment-customer/object-list-of-objects-and-nce-support-in-destination-upload"},{"title":"Enrichers in Destination Mapping","href":"/articles/segment-customer/enrichers-in-destination-mapping"}]},{"title":"Explore A/B Testing","href":"/articles/segment-customer/ab-testing"},{"title":"Choose the Output Identifiers","href":"/articles/segment-customer/choose-the-output-identifiers"},{"title":"Extend your audience","sidebarTitle":"Extend your audience","href":"/articles/segment-customer/extend-your-audience"},{"title":"Audience Boost","sidebarTitle":"Audience Boost","href":"/articles/segment-customer/audience-boost"},{"title":"Enable Membership (Beta)","sidebarTitle":"Enable Membership","href":"/articles/segment-customer/enable-membership"}]},{"group":"Explore Audience Listing Page Options","root":{"title":"Explore audience listing page options","sidebarTitle":"Audience listing page","href":"/articles/segment-customer/audience-listing-page-options"},"pages":[{"title":"Work with folders","sidebarTitle":"Folders","href":"/articles/segment-customer/work-with-folders"}]},{"title":"Audience lifecycle","sidebarTitle":"Audience lifecycle","href":"/articles/segment-customer/audience-lifecycle"},{"title":"Audience Insights","href":"/articles/segment-customer/audience-insights"},{"title":"Audience status and activation status","sidebarTitle":"Audience statuses","href":"/articles/segment-customer/audience-status-and-activation-status"},{"title":"Audience templates","sidebarTitle":"Audience templates","href":"/articles/segment-customer/audience-templates"},{"title":"Audience Alerts","href":"/articles/segment-customer/audience-alerts"},{"title":"RFM predictive model","sidebarTitle":"RFM model","href":"/articles/segment-customer/predictive-model"}]},{"group":"Orchestrate","icon":"code-branch","root":{"title":"Orchestrate","sidebarTitle":"Orchestrate","href":"/articles/orchestrate-customer/orchestrate"},"expanded":false,"pages":[{"group":"Explore Journeys Listing Page Options","root":{"title":"Explore Journeys Listing Page Options","href":"/articles/orchestrate-customer/components-of-the-listing-screen"},"expanded":true,"pages":[{"title":"Organise journeys into folders","sidebarTitle":"Journey folders","href":"/articles/orchestrate-customer/journey-folders"}]},{"group":"Create a Workflow","root":{"title":"Create a Workflow","href":"/articles/orchestrate-customer/create-a-workflow"},"expanded":true,"pages":[{"title":"Add an Entry Condition","href":"/articles/orchestrate-customer/add-an-entry-condition"},{"title":"Add a Delay","href":"/articles/orchestrate-customer/add-a-delay"},{"title":"Add a Condition","href":"/articles/orchestrate-customer/add-a-condition"},{"title":"Wait for Condition","href":"/articles/orchestrate-customer/wait-for-condition"},{"title":"Apply a multi-branch split","sidebarTitle":"Apply a multi-branch split","href":"/articles/orchestrate-customer/apply-multi-branch-split"},{"title":"Apply True/False Split","sidebarTitle":"Apply True/False Split","href":"/articles/orchestrate-customer/apply-true-false-split"},{"title":"Save as draft","sidebarTitle":"Save as draft","href":"/articles/orchestrate-customer/save-as-draft"},{"title":"Add or delete a node","sidebarTitle":"Add or delete a node","href":"/articles/orchestrate-customer/add-or-delete-a-node"},{"title":"Name a Node","href":"/articles/orchestrate-customer/name-a-node"},{"title":"Add Re-entry Criteria","href":"/articles/orchestrate-customer/add-re-entry-criteria"},{"title":"Add Concurrent Entry","href":"/articles/orchestrate-customer/add-concurrent-entry"},{"title":"Understand Metrics","href":"/articles/orchestrate-customer/understand-metrics"}]},{"group":"Resolve Journey Errors","root":{"title":"Resolve Journey Errors","href":"/articles/orchestrate-customer/journey-execution-error-resolution"},"expanded":true,"pages":[{"title":"Identify journey errors","sidebarTitle":"Identify journey errors","href":"/articles/orchestrate-customer/identify-journey-errors"},{"title":"Journey error codes","sidebarTitle":"Journey error codes","href":"/articles/orchestrate-customer/journey-error-codes"},{"title":"Troubleshooting journeys","sidebarTitle":"Troubleshooting journeys","href":"/articles/orchestrate-customer/journey-troubleshooting"}]},{"title":"Journey Traces","href":"/articles/orchestrate-customer/journey-traces"},{"title":"Journey Templates","href":"/articles/orchestrate-customer/journey-templates"},{"title":"Gateway","sidebarTitle":"Gateway","href":"/articles/orchestrate-customer/gateway"},{"title":"Frequently asked questions","sidebarTitle":"Frequently asked questions","href":"/articles/orchestrate-customer/frequently-asked-questions"}]},{"group":"Collaborate","icon":"handshake","root":{"title":"Collaborate","sidebarTitle":"Overview","href":"/articles/collaborate-customer/collaborate"},"expanded":false,"pages":[{"title":"Quick Start: Your First Partnership","href":"/articles/collaborate-customer/quick-start"},{"title":"Contributor Guide","href":"/articles/collaborate-customer/contributor-guide"},{"title":"Subscriber Guide","href":"/articles/collaborate-customer/subscriber-guide"},{"title":"Key Concepts","href":"/articles/collaborate-customer/key-concepts"},{"title":"Frequently Asked Questions","href":"/articles/collaborate-customer/frequently-asked-questions"}]},{"group":"Dashboard","icon":"chart-bar","root":{"title":"Overview","href":"/articles/dashboard-customer/overview"},"expanded":false,"pages":[]},{"group":"Protect","icon":"shield-halved","root":{"title":"Protect","href":"/articles/protect-customer/protect"},"expanded":false,"pages":[{"group":"Consent","icon":"handshake","root":{"title":"Consent","href":"/articles/protect-customer/consent"},"expanded":true,"pages":[{"title":"Granular Consent","href":"/articles/protect-customer/processing-and-storing-granular-consent-2830598176"},{"title":"Marketing Preferences","href":"/articles/protect-customer/processing-and-storing-customer-marketing-preferences-2830630950"},{"title":"Consent Orchestration","href":"/articles/protect-customer/consent-orchestration-2830401643"}]},{"group":"Customer 360","icon":"circle-user","root":{"title":"Customer 360","href":"/articles/protect-customer/customer-360"},"expanded":true,"pages":[{"title":"Lookup a User Profile","href":"/articles/protect-customer/working-with-customer-360"},{"title":"Delete a Profile","href":"/articles/protect-customer/delete-a-profile"},{"title":"Frequently Asked Questions","href":"/articles/protect-customer/frequently-asked-questions"}]},{"group":"Data Lifecycle","icon":"arrows-rotate","root":{"title":"Data Lifecycle","href":"/articles/protect-customer/data-lifecycle"},"expanded":true,"pages":[{"title":"Working with different Data Lifecycle Screens","href":"/articles/protect-customer/working-with-different-data-lifecycle-screens"},{"title":"Create a Deletion Rule for Customer Data","href":"/articles/protect-customer/create-a-deletion-rule-for-customer-data"},{"title":"FAQs for Data Lifecycle","href":"/articles/protect-customer/faqs-for-data-lifecycle"},{"title":"Create a Deletion Rule for Non-Customer Entity Data","href":"/articles/protect-customer/create-a-deletion-rule-for-nce-data"}]}]},{"group":"Admin","icon":"gear","root":{"title":"Admin","href":"/articles/admin-customer/admin"},"expanded":false,"pages":[{"title":"My Organisation","href":"/articles/admin-customer/creating-an-organisation"},{"title":"My Roles","href":"/articles/admin-customer/my-roles"},{"title":"Access Rules","sidebarTitle":"Access Rules","href":"/articles/admin-customer/access-rules"},{"group":"My Users","root":{"title":"My Users","href":"/articles/admin-customer/add-an-user"},"expanded":true,"pages":[{"title":"User Roles and Access","href":"/articles/admin-customer/user-roles-and-access"},{"title":"Roles and their descriptions","href":"/articles/admin-customer/role-descriptions"}]},{"group":"Request Access","root":{"title":"Request Access","href":"/articles/admin-customer/request-access"},"expanded":true,"pages":[{"title":"Process to follow for Org/User creation or access","href":"/articles/admin-customer/process-to-follow-for-org-user-creation-or-access-1"}]},{"group":"Audit Logs","root":{"title":"Audit Logs","href":"/articles/admin-customer/audit-logs"},"expanded":true,"pages":[{"title":"Events Tracked in Zeotap CDP","href":"/articles/admin-customer/events-tracked-in-zeotap-cdp"}]},{"title":"Alerts \u0026 Notifications","href":"/articles/admin-customer/alerts-and-notifications"},{"title":"Logging In \u0026 Two-Factor Authentication","href":"/articles/admin-customer/your-first-login-to-the-zeotap-cdp-platform"}]},{"group":"Labs","icon":"flask-vial","root":{"title":"Labs","href":"/articles/labs-customer/labs"},"expanded":false,"pages":[{"group":"AI Playground","icon":"sparkles","root":{"title":"AI Playground","href":"/articles/labs-customer/ai-playground"},"expanded":false,"pages":[{"title":"Audience Recommender","href":"/articles/labs-customer/audience-recommender"}]},{"title":"Zeotap MCP","href":"/articles/labs-customer/zeotap-mcp"},{"title":"Observability Hub","href":"/articles/labs-customer/observability-hub"}]}]},{"tab":"SDKs","icon":"code","pages":[{"title":"SDKs","href":"/articles/sdks/overview"}]},{"tab":"Status","icon":"signal","href":"https://status.zeotap.com/"},{"tab":"Profile API","icon":"square-terminal","pages":[{"title":"Profile API","href":"/profile-api/profileapi"}]},{"tab":"Get Started","icon":"rocket","hidden":true,"pages":[{"title":"Get Started","href":"/articles/get-started-guide/getting-started"}]},{"tab":"What's New?","icon":"calendar-days","pages":[{"title":"What's New?","href":"/articles/product-release-notes/2026/q3-2026"}]},{"tab":"Composable CDP","href":"https://composable-docs.zeotap.com/"},{"tab":"ID+","icon":"fingerprint","hidden":true,"pages":[{"title":"ID+","href":"/articles/id-publication/basic-integration-guide_v2"}]},{"tab":"Support","icon":"headset","hidden":true,"pages":[{"title":"Support","href":"/articles/support/clear-your-cache-and-cookies"}]}]},"basePath":"","title":"Google Customer Match (Customer Contact Information) - Zeotap docs","deploymentId":"dpl_HhUetB7eHHDAmK9T1Teip38TgFx9","buildId":"dpl_HhUetB7eHHDAmK9T1Teip38TgFx9","dynamics":["10e4515597","07c022d89b","a74be98ba7"],"chunks":["BannerMarkdown-BjdIPj1P.js","dist-C5gjFYHe.js","lib-DuNMoZ05.js","lib-B8HbPgcC.js","katex-YMM-FMeD.js","html-void-elements-mCSPHezU.js","marked.esm-CZWythHk.js","Frame-DevImLcx.js","DynamicMarkdown-BGHukeRM.js","zoom-image-lightbox-DQG3o8Eu.js","lightbox-handle-r17bVUz3.js"]}