

What this is
A Cleverpush (Batch) source brings subscriber data from a Cleverpush channel into Zeotap CDP. Cleverpush is a web-based platform that enables website owners and developers to send to users who have subscribed to receive them. This page is the click-path: you collect two values from your Cleverpush account, then create the source in the Zeotap CDP App. For what the integration is and where it sits in the catalogue, see the Cleverpush (Batch) Source overview. Two neighbouring Cleverpush integrations are easy to pick by mistake:- To stream events as they happen rather than fetching subscriber data in batches, use the Cleverpush Real-Time Source. On the data-source list, the Cleverpush Real Time tile sits directly above the Cleverpush tile used here.
- To send data the other way — out of Zeotap CDP to Cleverpush, so you can target an audience with push notifications — use the Cleverpush destination.
Supported identifiers
The source fetches information related to the subscribers of a channel, such as the subscription ID, channel ID,created_at, country, custom attributes and segments.
The Subscription ID is the identifier the Cleverpush destination needs in order to send audiences back to Cleverpush. Connecting a Cleverpush source is one of the two documented ways to obtain it; the other is ingesting it from a flat file.
Prerequisites
Have the following ready before you start:- Access to the Sources application under Integrate in the Zeotap CDP App.
- A Private API Key from your Cleverpush account — a unique identifier associated with the account, used to authenticate and authorise access to certain features or APIs of Cleverpush.
- A Channel ID — the unique identifier assigned to the push notification channel you create within Cleverpush.
Obtain the Private API Key from Cleverpush
1
Open the API settings
Log into the Cleverpush console and navigate to Settings.
2
Copy the Private API key
In the left panel, click API and copy the Private API key displayed on the screen.
3
Optionally, add an additional API key
If you wish to add an additional API key, click Add additional API key and select the channel where you intend to use this key. Additional keys can be restricted to the channels you select, so make sure the key you use covers the channel you are ingesting from.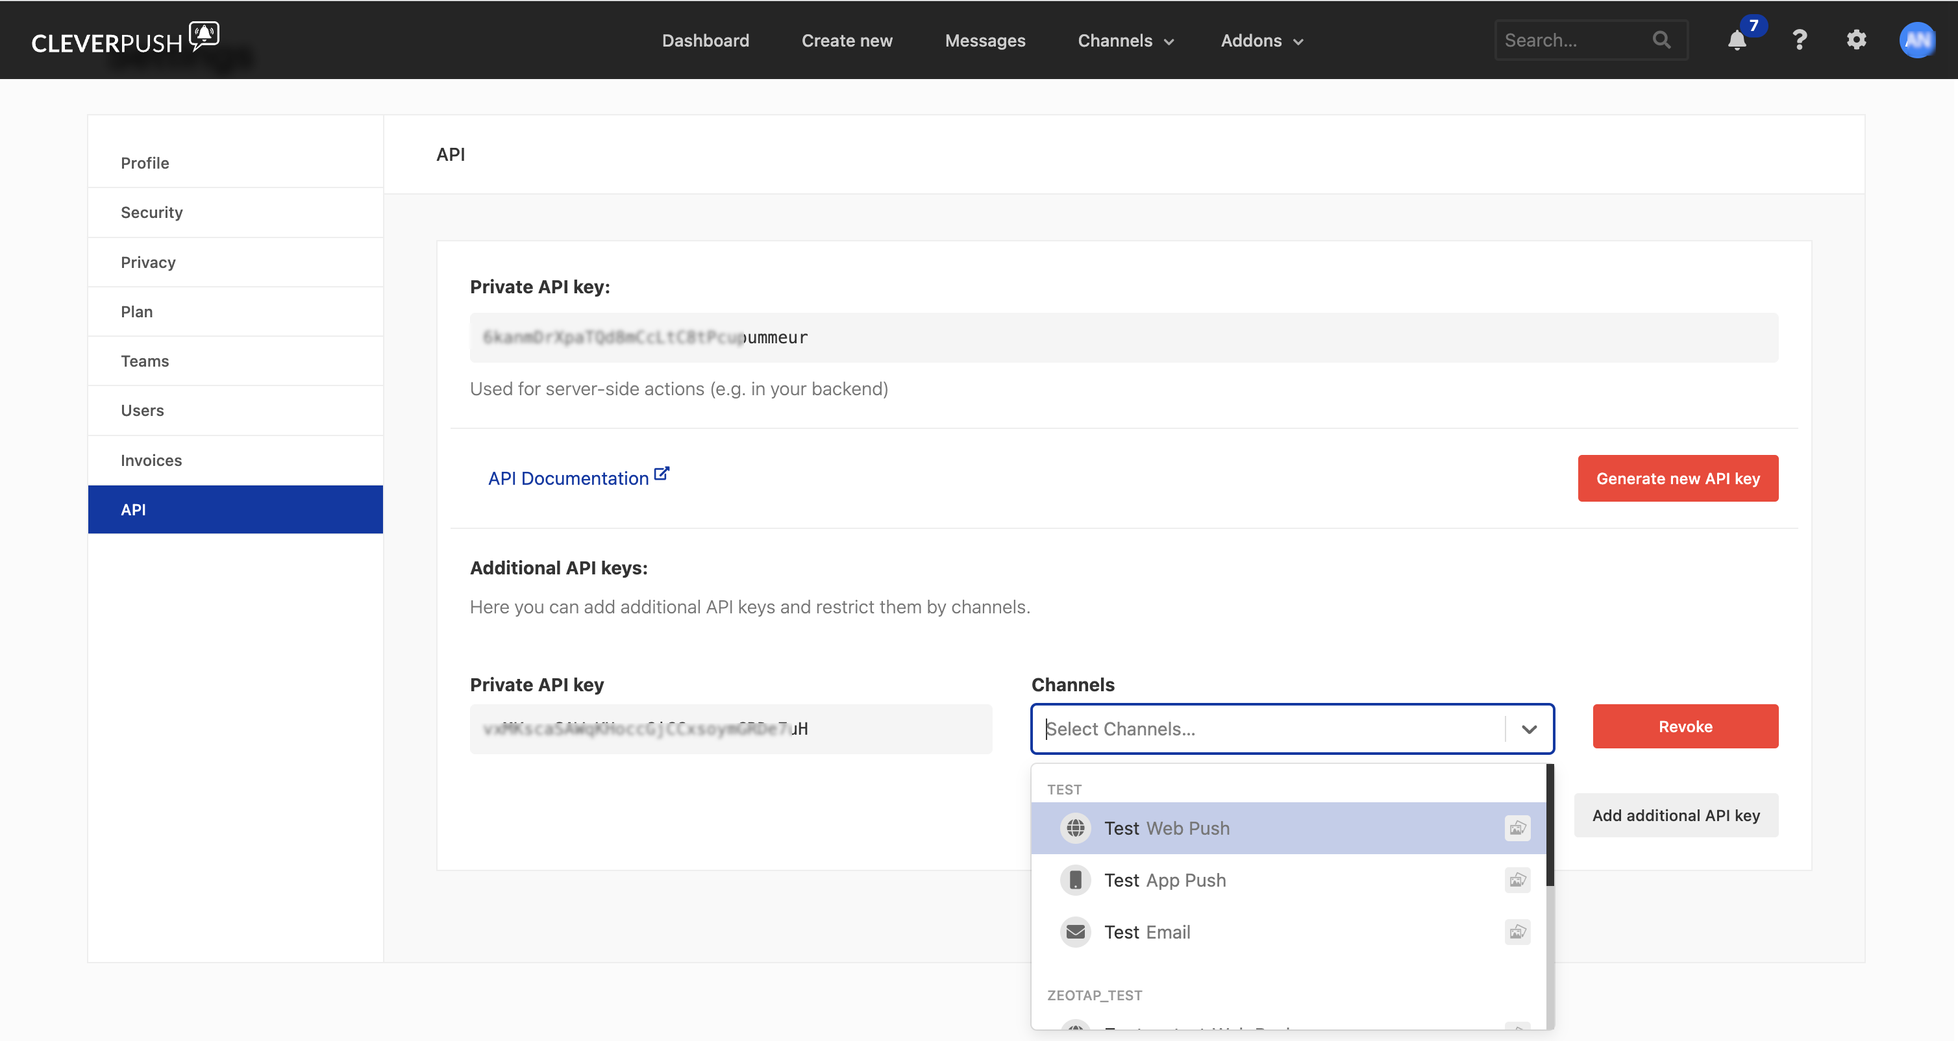
Obtain the Channel ID from Cleverpush
A channel’s Channel ID is shown in the settings of a platform on that channel, so create the channel and set up at least one platform before you look for it, so work through these steps in order.1
Open the channel
Log into the Cleverpush console and navigate to Channels on the top navigation bar. Click the channel that you wish to use for sending push notifications. If the channel does not exist yet, create one by clicking Add Channel in the drop-down menu — see Create a new channel in Cleverpush.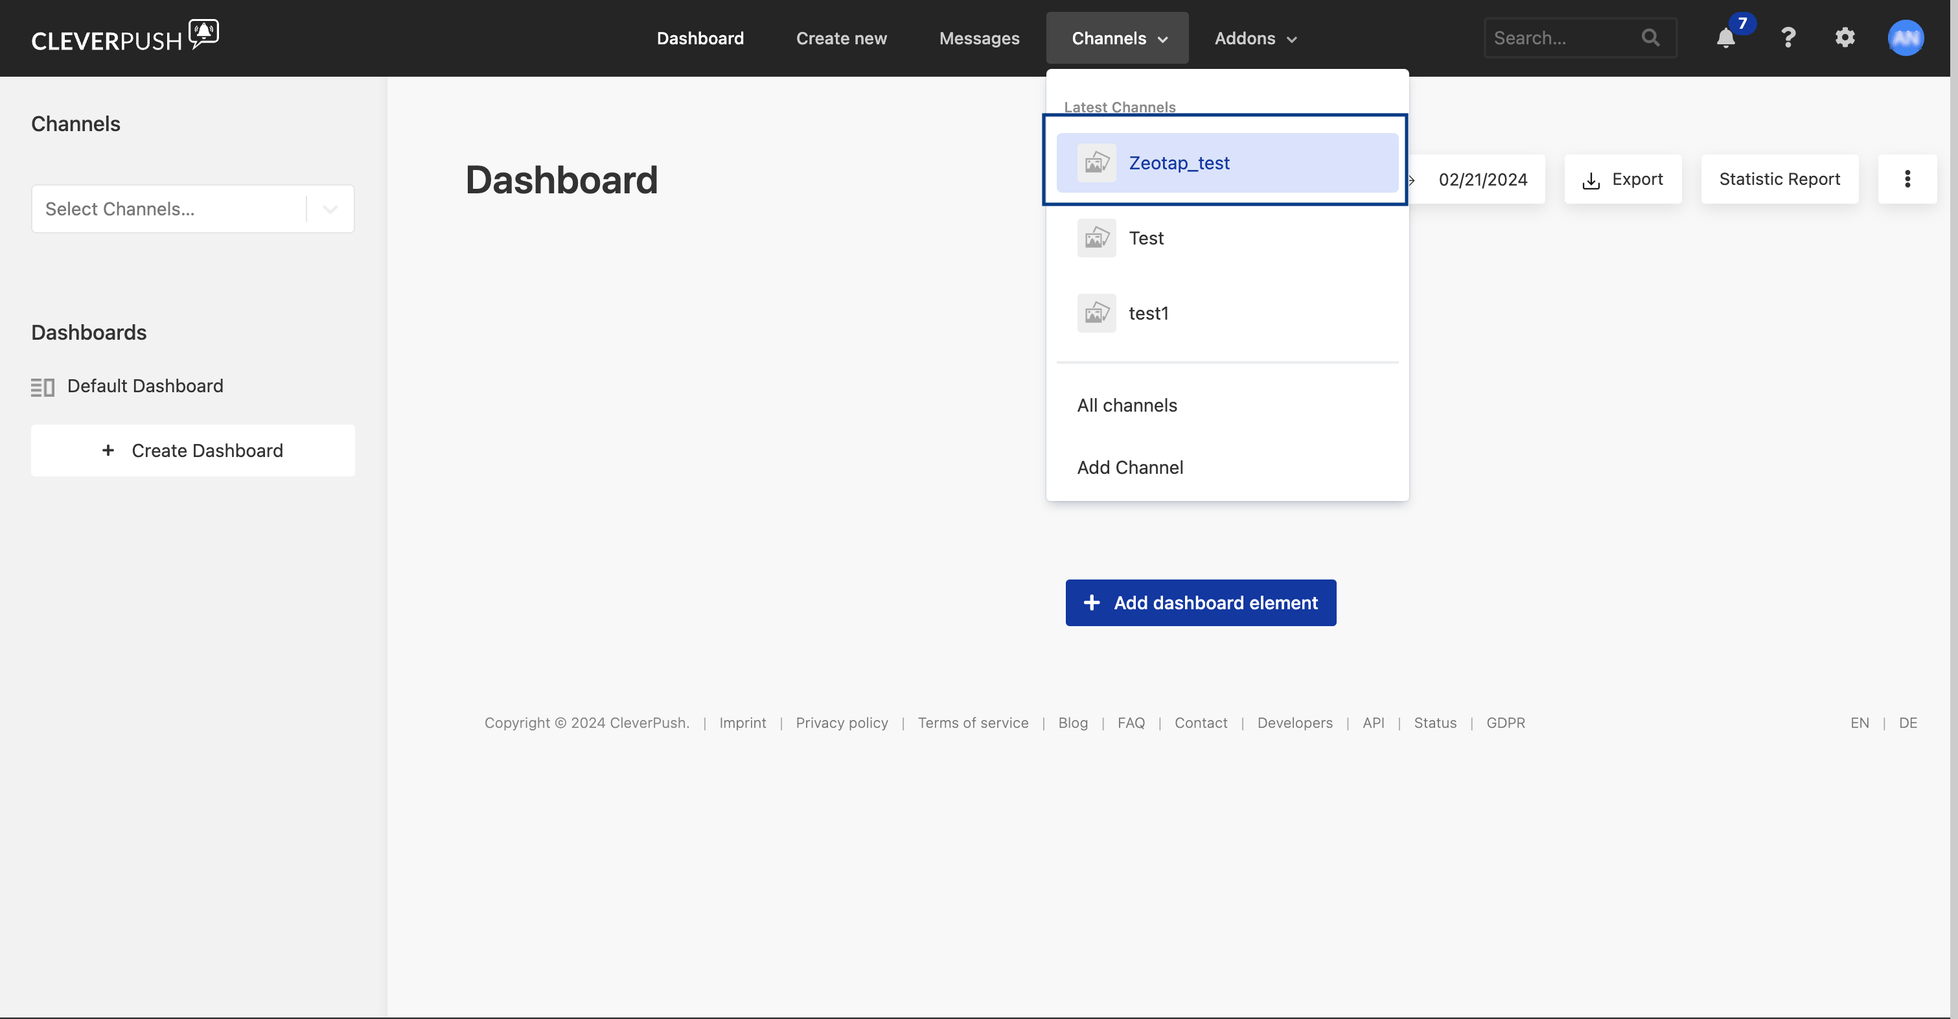
2
Set up a platform on the channel
Once the channel is created, set up the platforms on which you want to send notifications. Zeotap CDP supports the following platforms: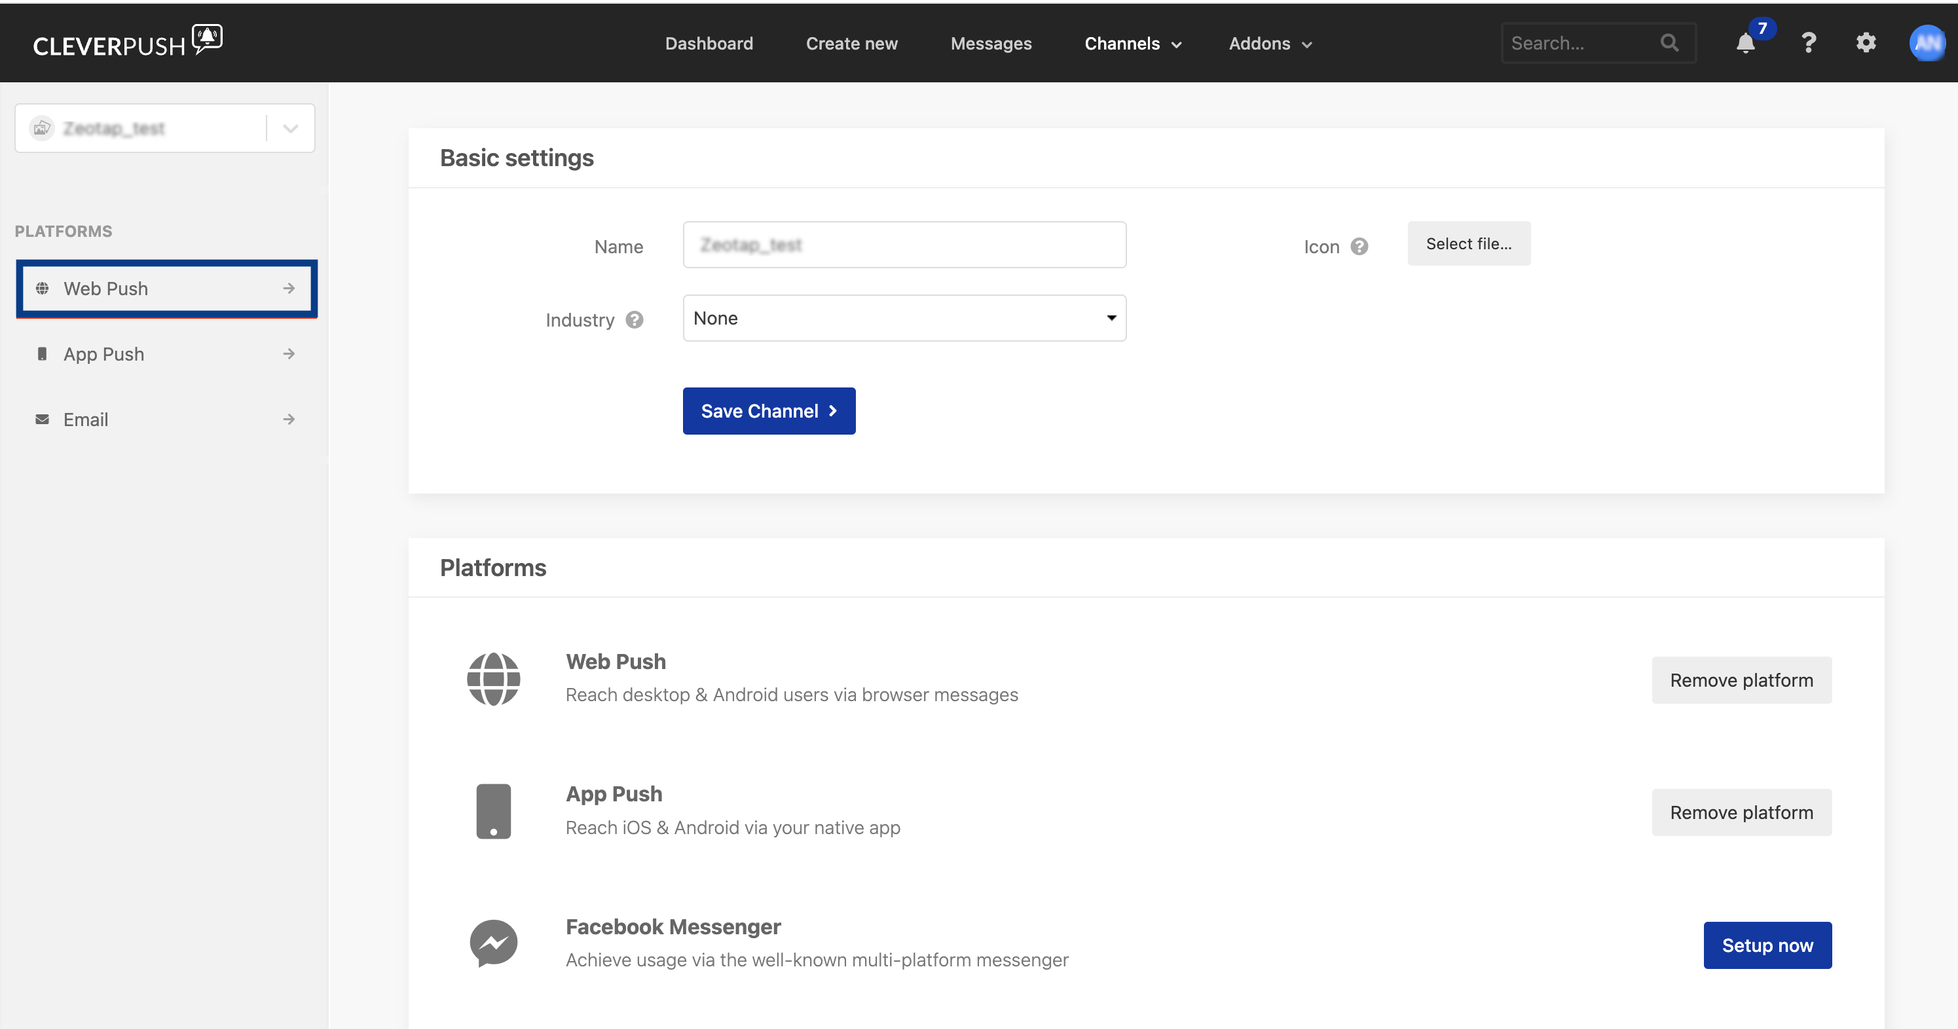
- Web Push
- App Push
- Email Push
3
Read the Channel ID
Click the platform you set up and navigate to General → Advanced settings. The Channel ID is the first field on that page.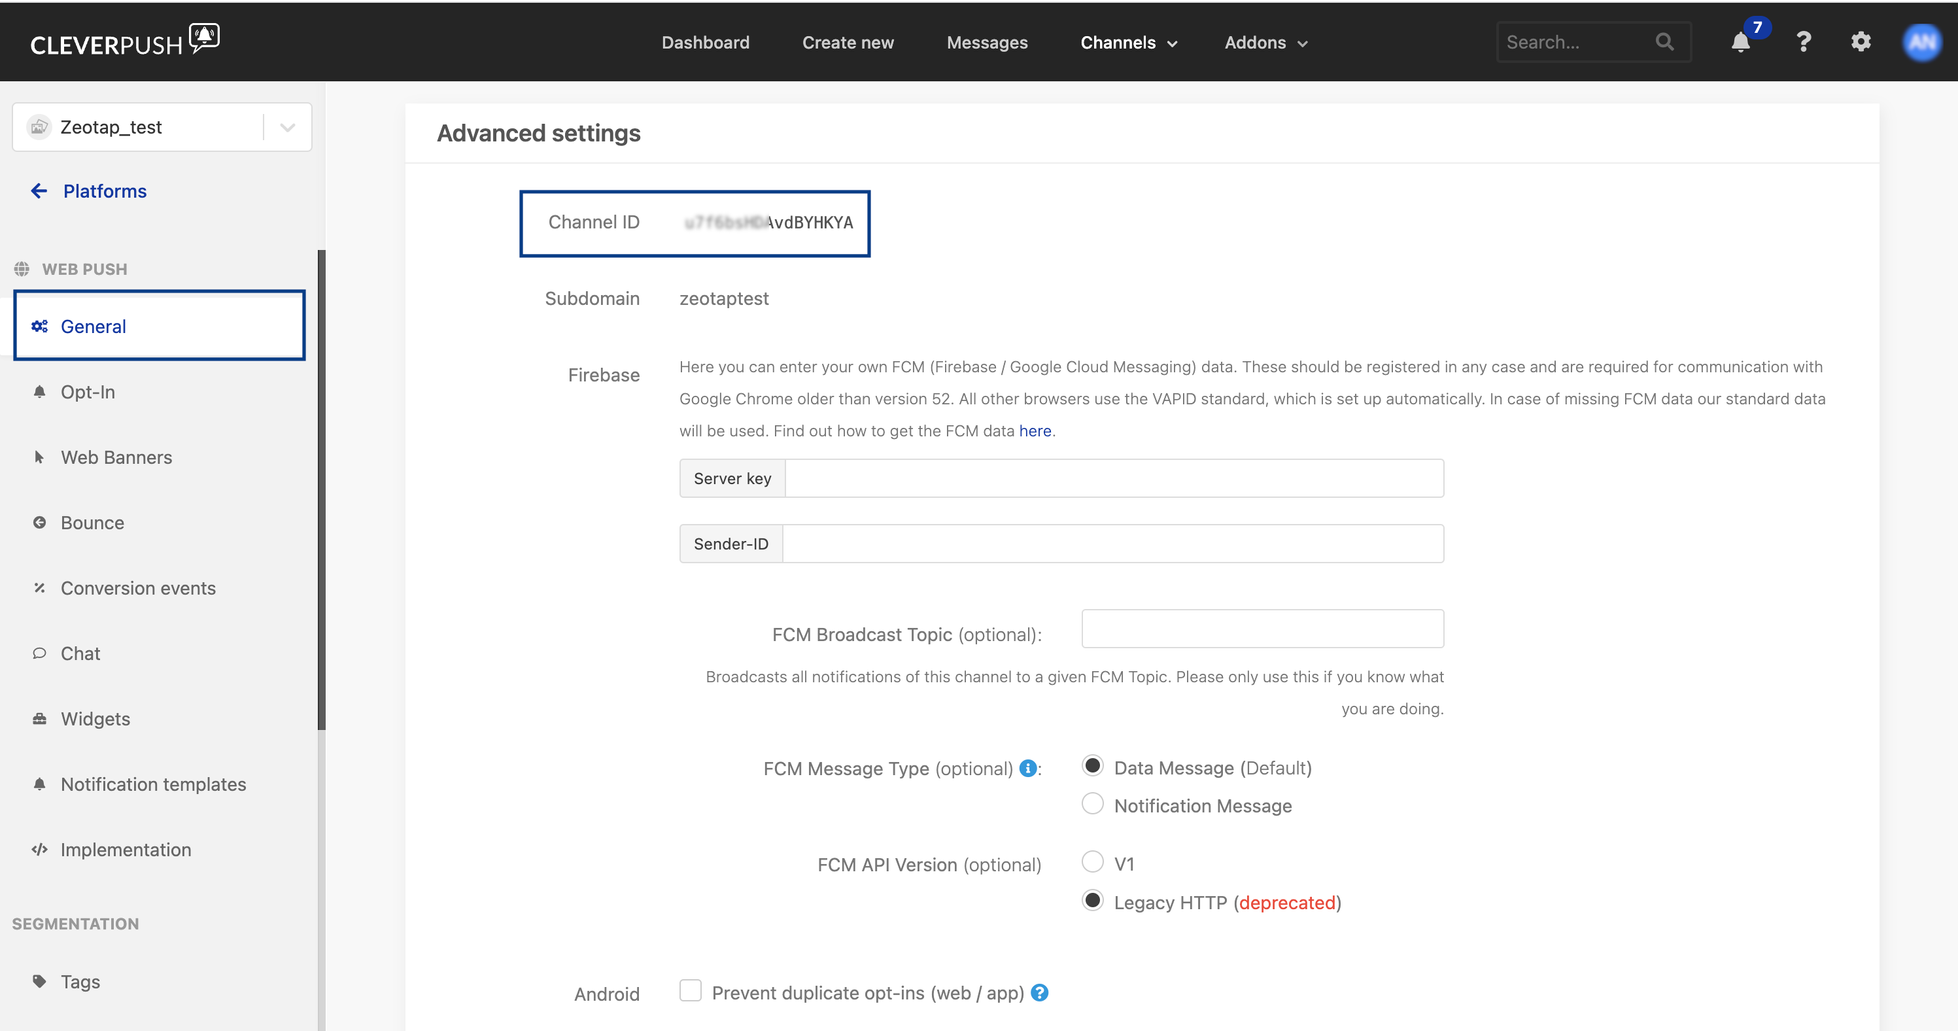
Create the Cleverpush (Batch) source
1
Open the Sources application
In the Zeotap CDP App, go to Integrate → Sources.
2
Start a new source
Click CREATE SOURCE.
3
Choose the category
On the Data Source step, choose Customer Engagement Channels — Ingest Data from engagement channels.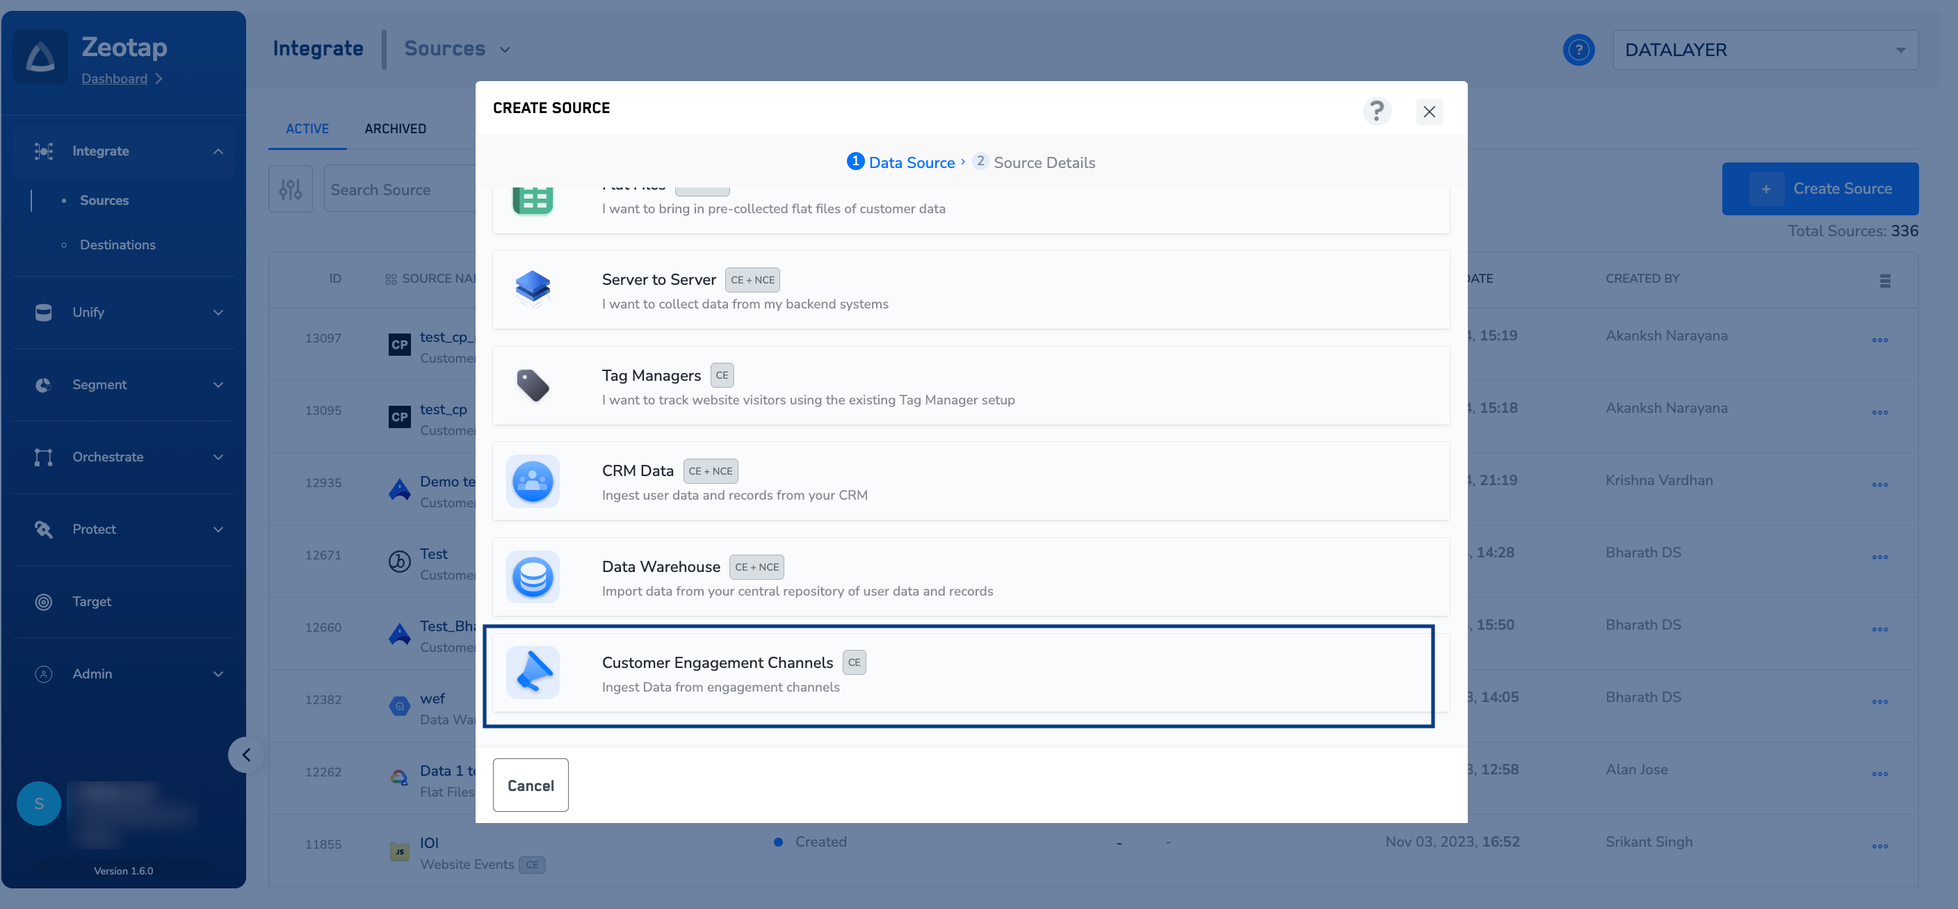
4
Select the Cleverpush data source
Select the Cleverpush tile — Integrate with Cleverpush. Take care not to pick Cleverpush Real Time directly above it, which creates the real-time webhook source instead and does not ask for a Private API Key or a Channel ID.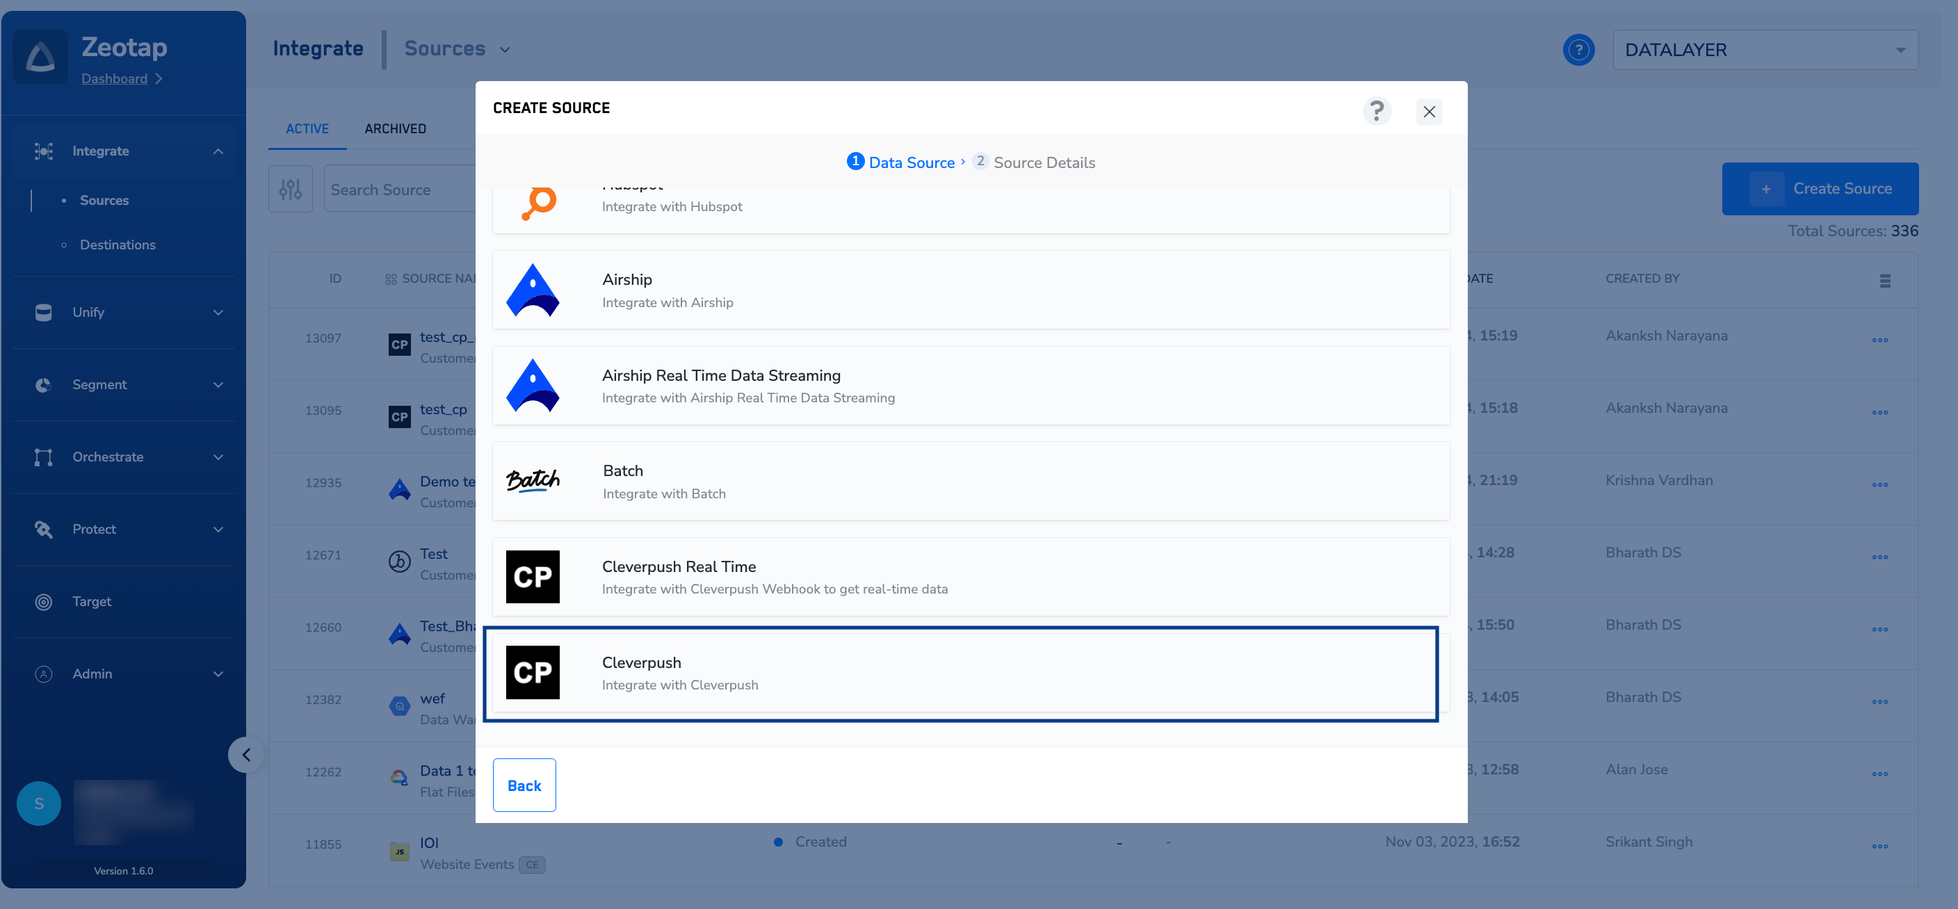
5
Enter the source details
On the Source Details step: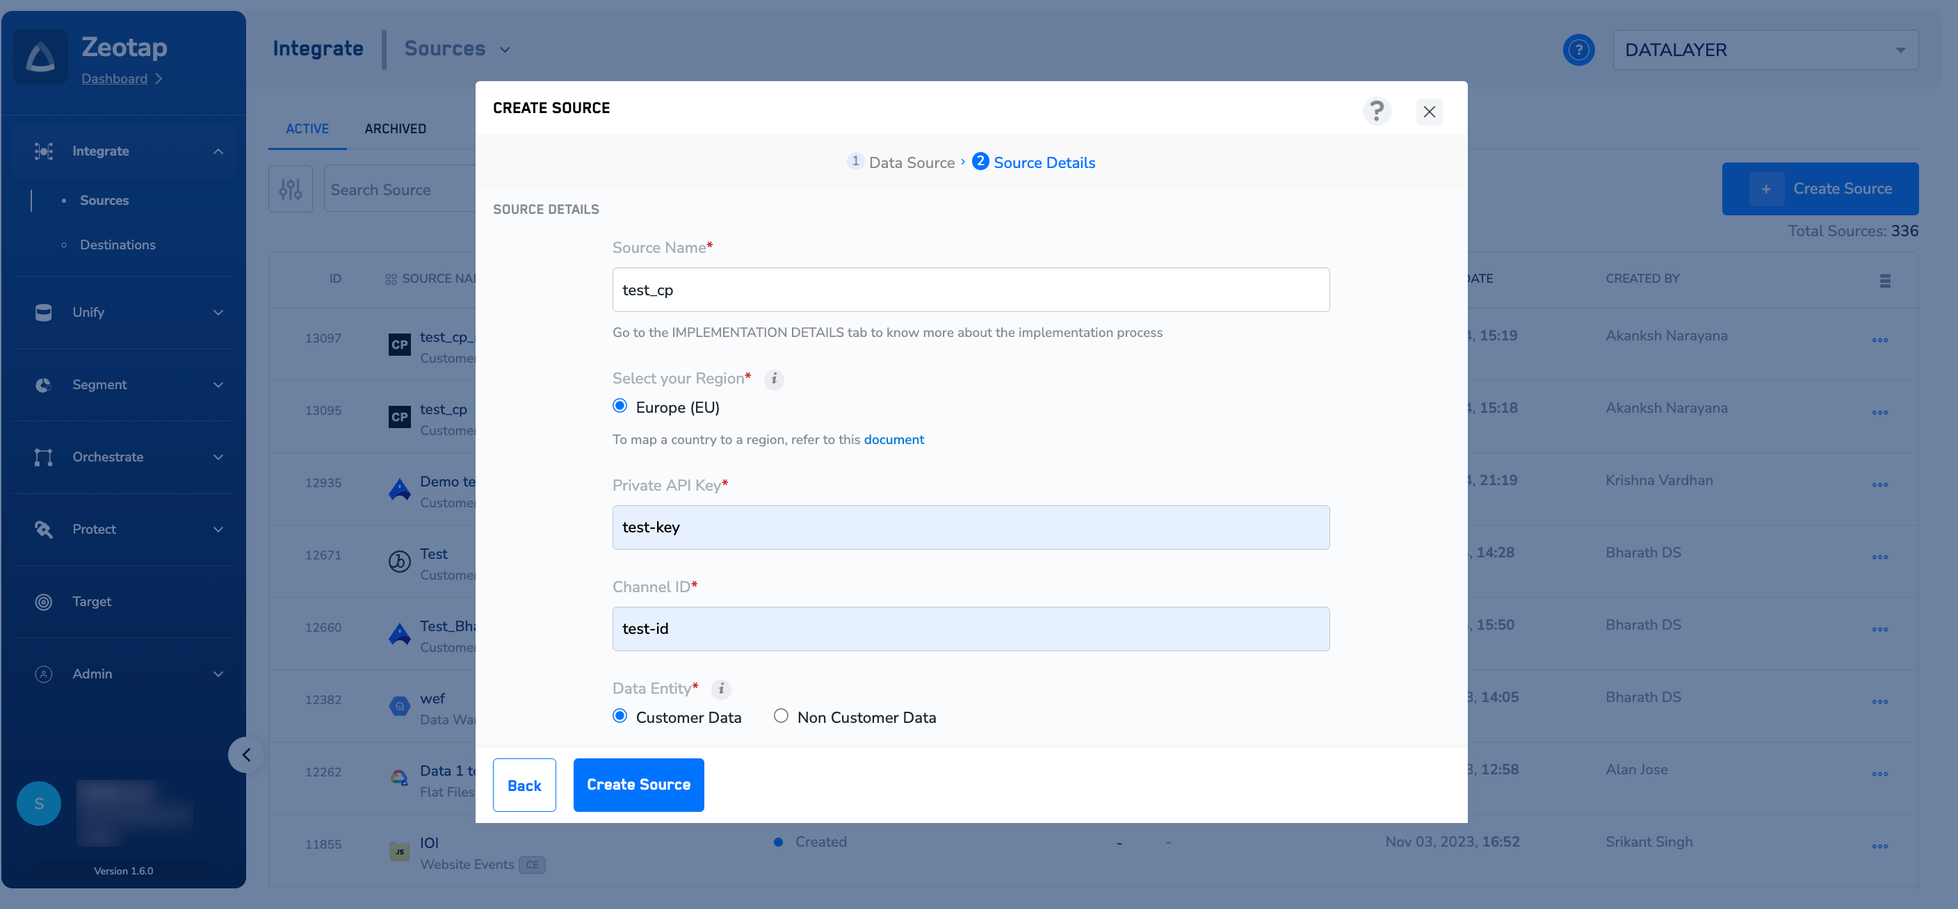
- In Source Name, enter a short, descriptive name. Make the vendor and the direction obvious, so the source is easy to pick out on the listing later.
- Under Select your Region, choose the region this source uploads to.
- Enter the Private API Key you obtained from the Cleverpush account.
- Enter the Channel ID you obtained from the Cleverpush account.
- Under Data Entity, choose Customer Data or Non Customer Data, depending on the type of data you want to ingest. See Supported data entities.
6
Create the source
Click CREATE SOURCE.
Verify the source was created
The new source appears on the SOURCES listing page. Open it and check the IMPLEMENTATION DETAILS tab, which records the Created By, Created Date, Region and Data Entity values, along with the Private API Key (masked) and the Channel ID you entered. Confirm the region and data entity match what you selected.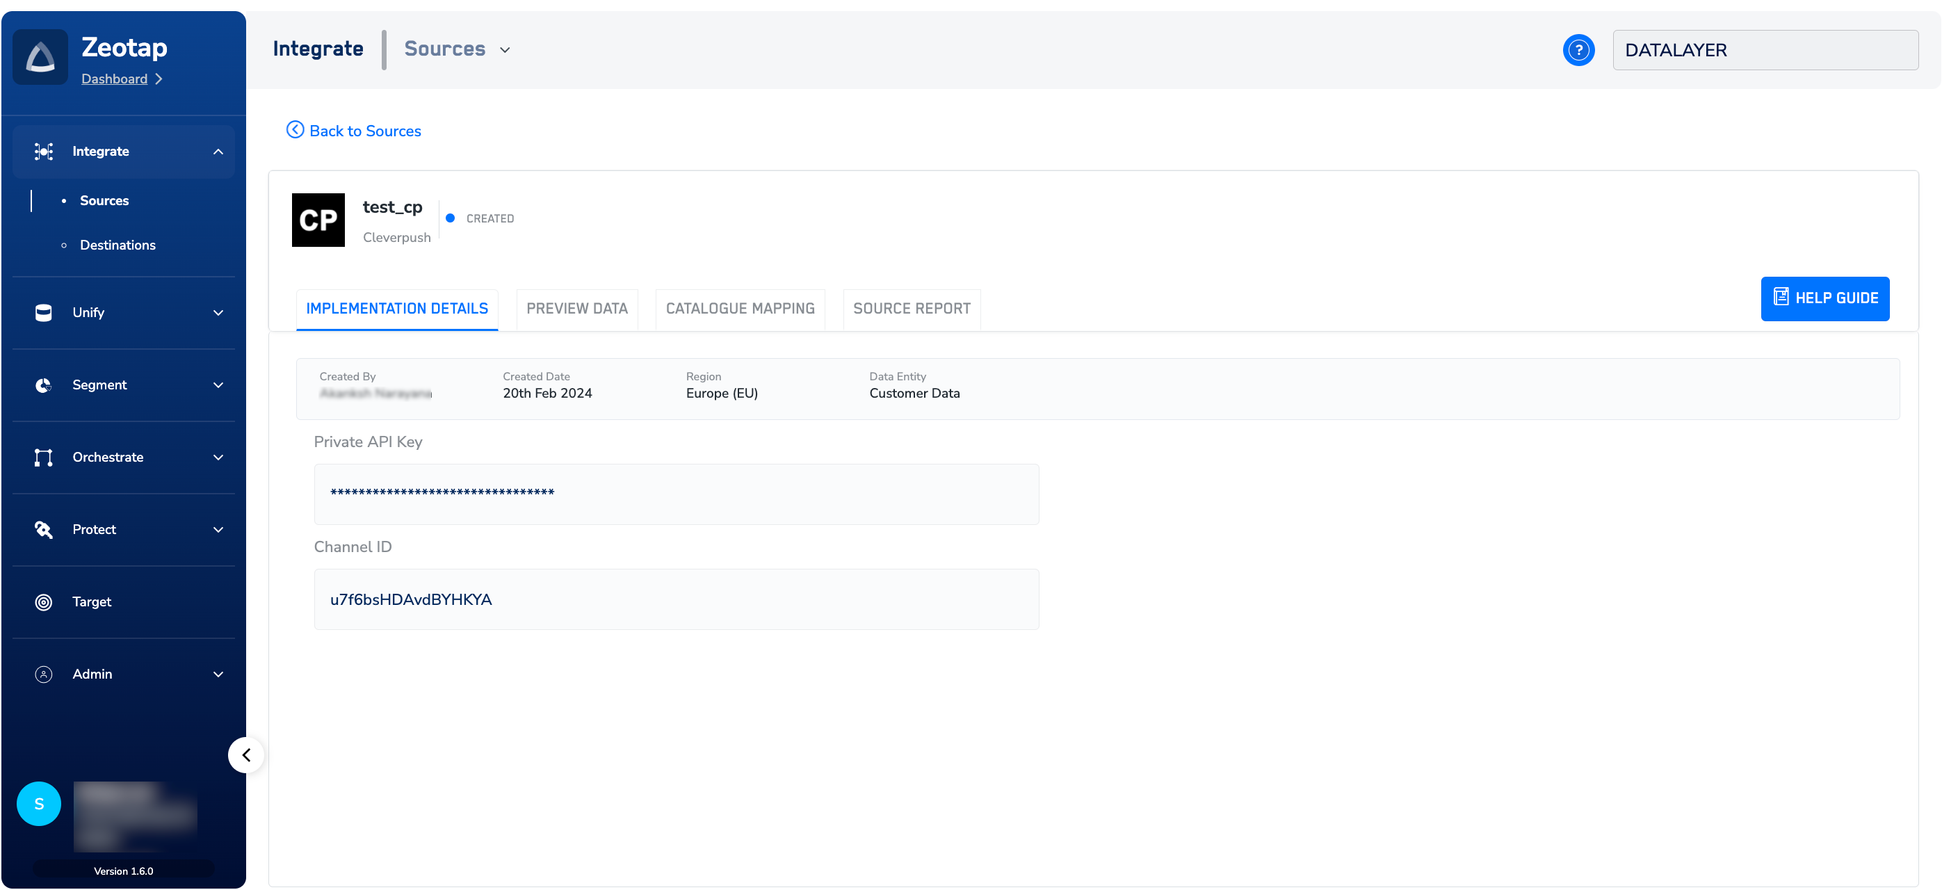
- Created — the source exists in Sources but has not received any data yet.
- Integrated — data has started flowing in. At this point you can preview the incoming records on the PREVIEW DATA tab.
Troubleshoot the source
- The channel has no Channel ID. A channel only exposes a Channel ID through one of its platforms. Set up Web Push, App Push or Email Push on the channel first, then open that platform and go to General → Advanced settings.
- You used an additional API key. Additional API keys in Cleverpush are restricted to the channels selected when they were created. If you entered one of those instead of the account’s Private API key, check that it covers the channel whose Channel ID you entered.
- The status stays Created. No data has reached the source yet. Re-check on the IMPLEMENTATION DETAILS tab that the Channel ID recorded there is the channel you meant to ingest from, and that the Private API Key you entered belongs to the same Cleverpush account.
Next steps
Cleverpush (Batch) Source
What the integration brings in and where it sits in the source catalogue.
Cleverpush appendix
Create a channel in Cleverpush and set up Web Push, App Push or Email Push on it.
Components of the Preview Data tab
Check the records arriving from Cleverpush once the source is integrated.
Cleverpush destination
Send an audience the other way, out of Zeotap CDP to Cleverpush.