> ## Documentation Index
> Fetch the complete documentation index at: https://docs.zeotap.com/llms.txt
> Use this file to discover all available pages before exploring further.
# Unify
> Unify is a powerful tool that helps you to build a complete profile of your customers. Here, the events, profile attributes or consent information received along with the identifiers, are merged into a single profile to have a 360-degree centralised view of a customer.
As a marketer, you can convert your offline customer data into digital format and connect the online activities across various devices to a single identifier. This unified view of the customer spans all platforms and devices, providing valuable insights.
## Get Started with Unify
To get started with the Unify module, follow the step-by-step process outlined:
**Note:**
Ensure to obtain initial customer information as detailed in the [Prerequisites](/articles/get-started-guide/getting-started) section of \`the [Get Started Guide](/articles/get-started-guide/getting-started) before getting started with Unify.
### Step-by-Step Process
To get started with Zeotap CDP, begin by [creating a new source](/articles/integrate-customer/creating-a-source) in the [Sources](/articles/integrate-customer/sources) module. You must also select a source category and source type that align with your specific needs and create the source accordingly. For more information about how to create sources for different categories, refer [here](/articles/integrate-customer/creating-a-source).
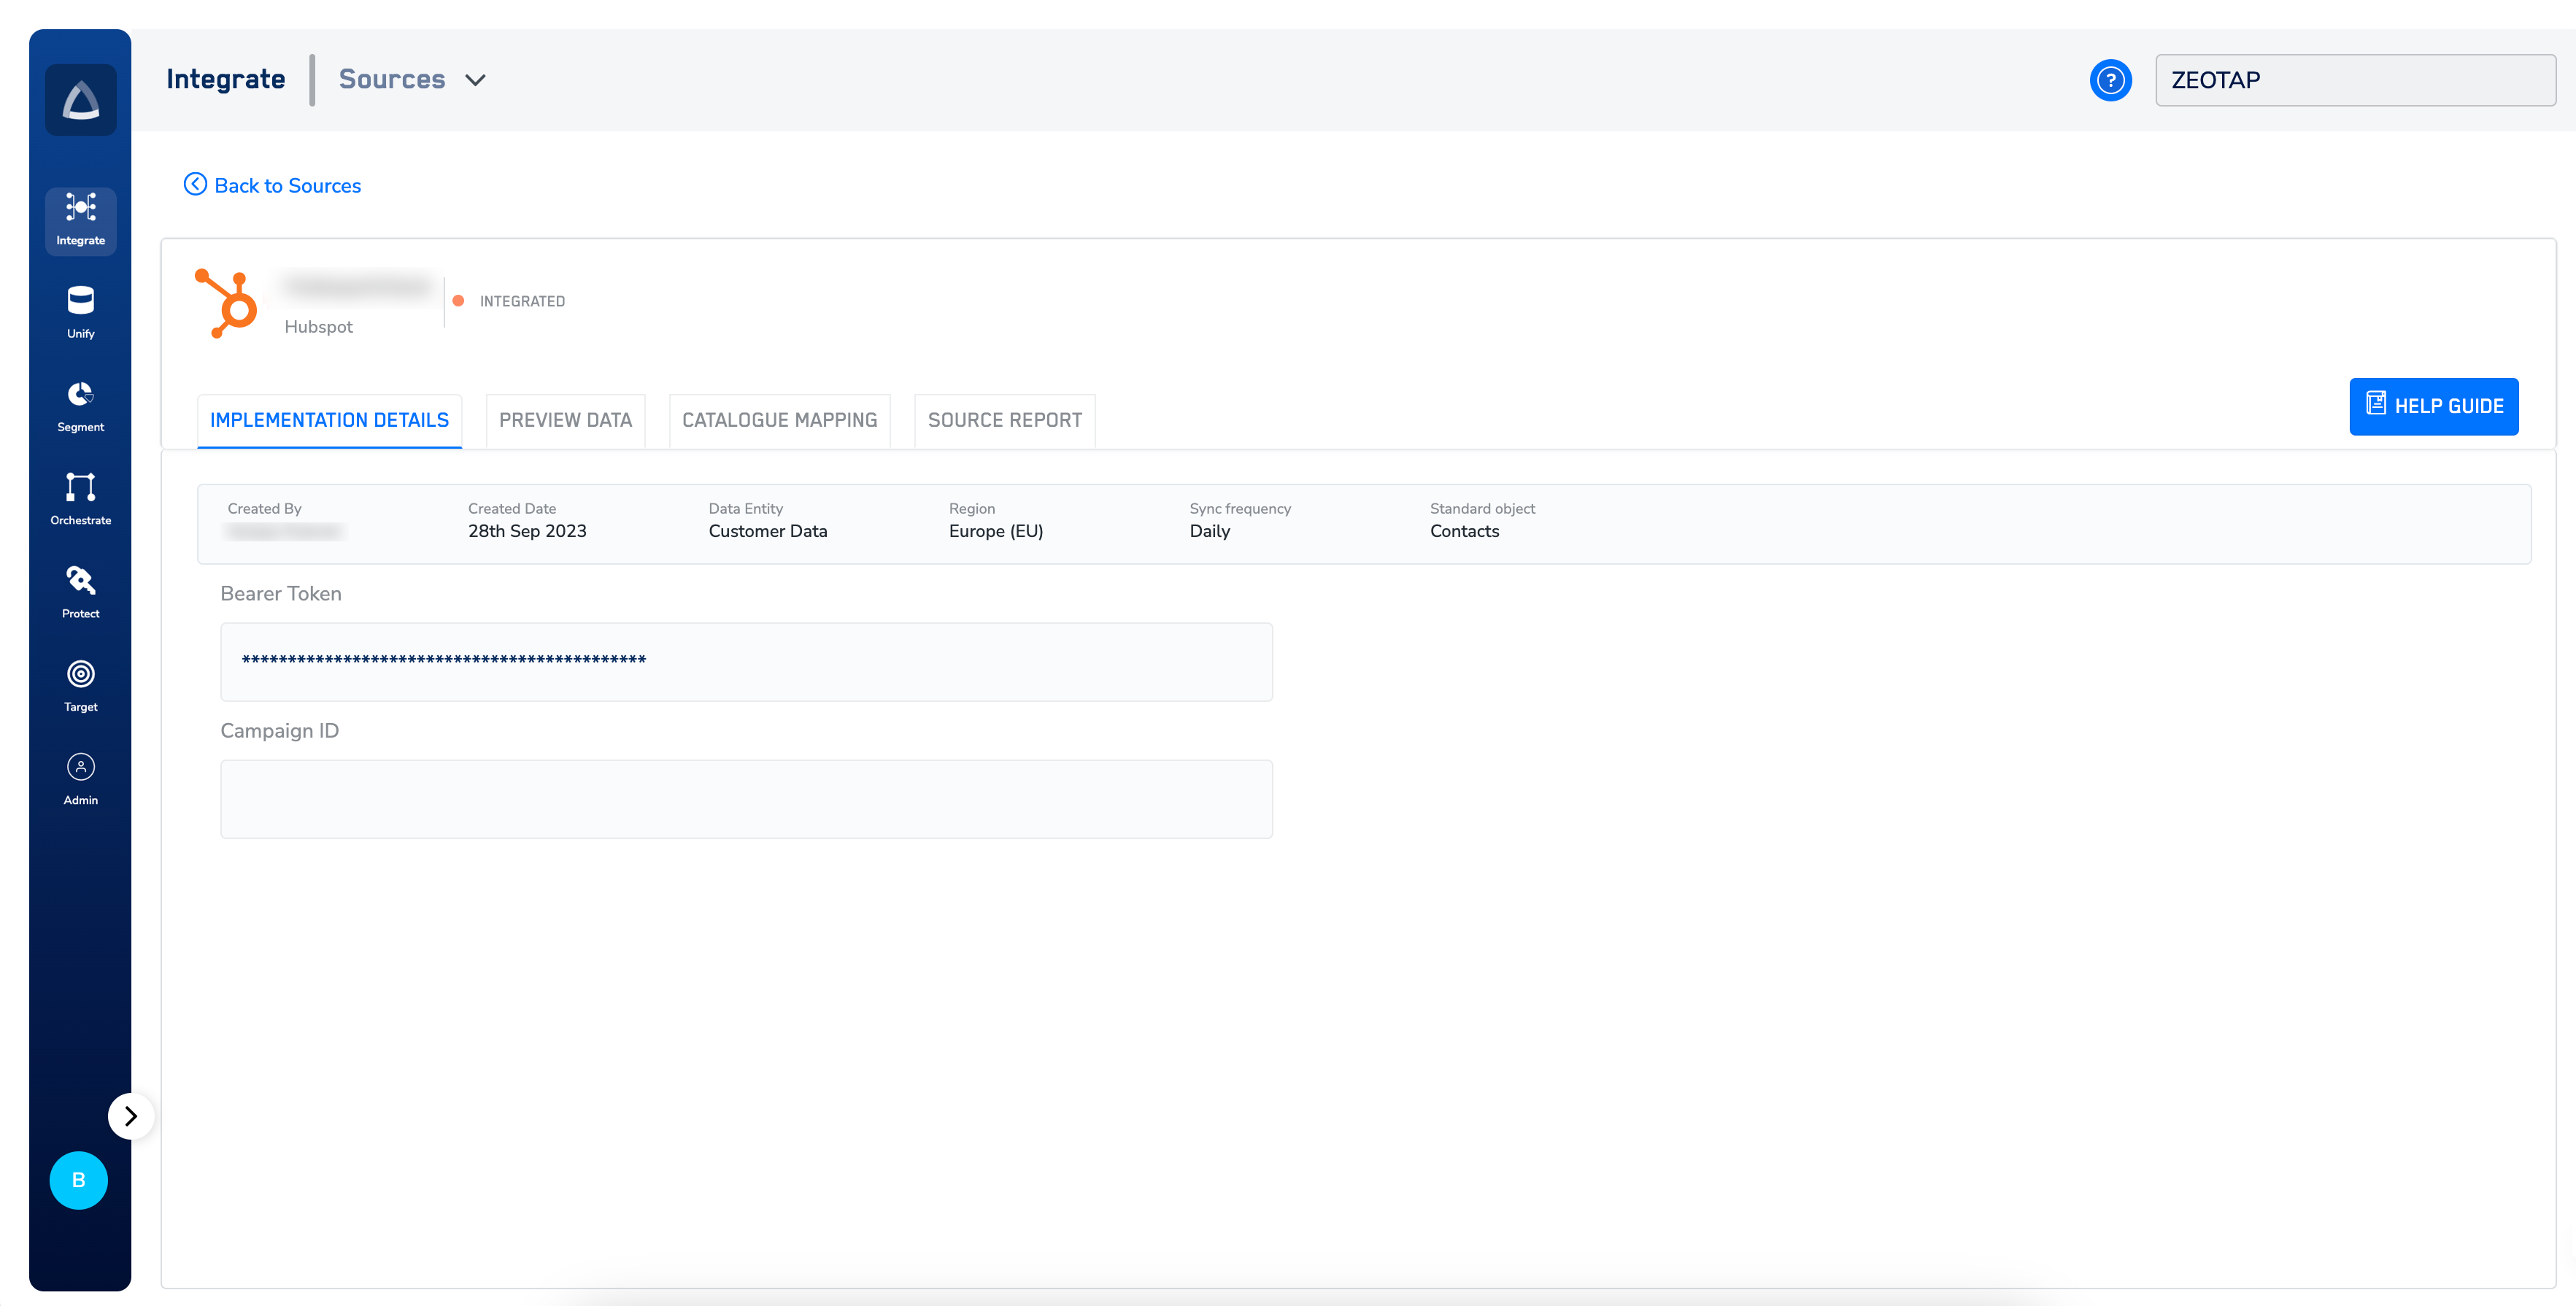
Once the source is created, proceed with its implementation. Refer to the step-by-step instructions provided in the Implementation guide tailored to the chosen Source Type. You can download this document from the **IMPLEMENTATION DETAILS** tab of the source that you created.
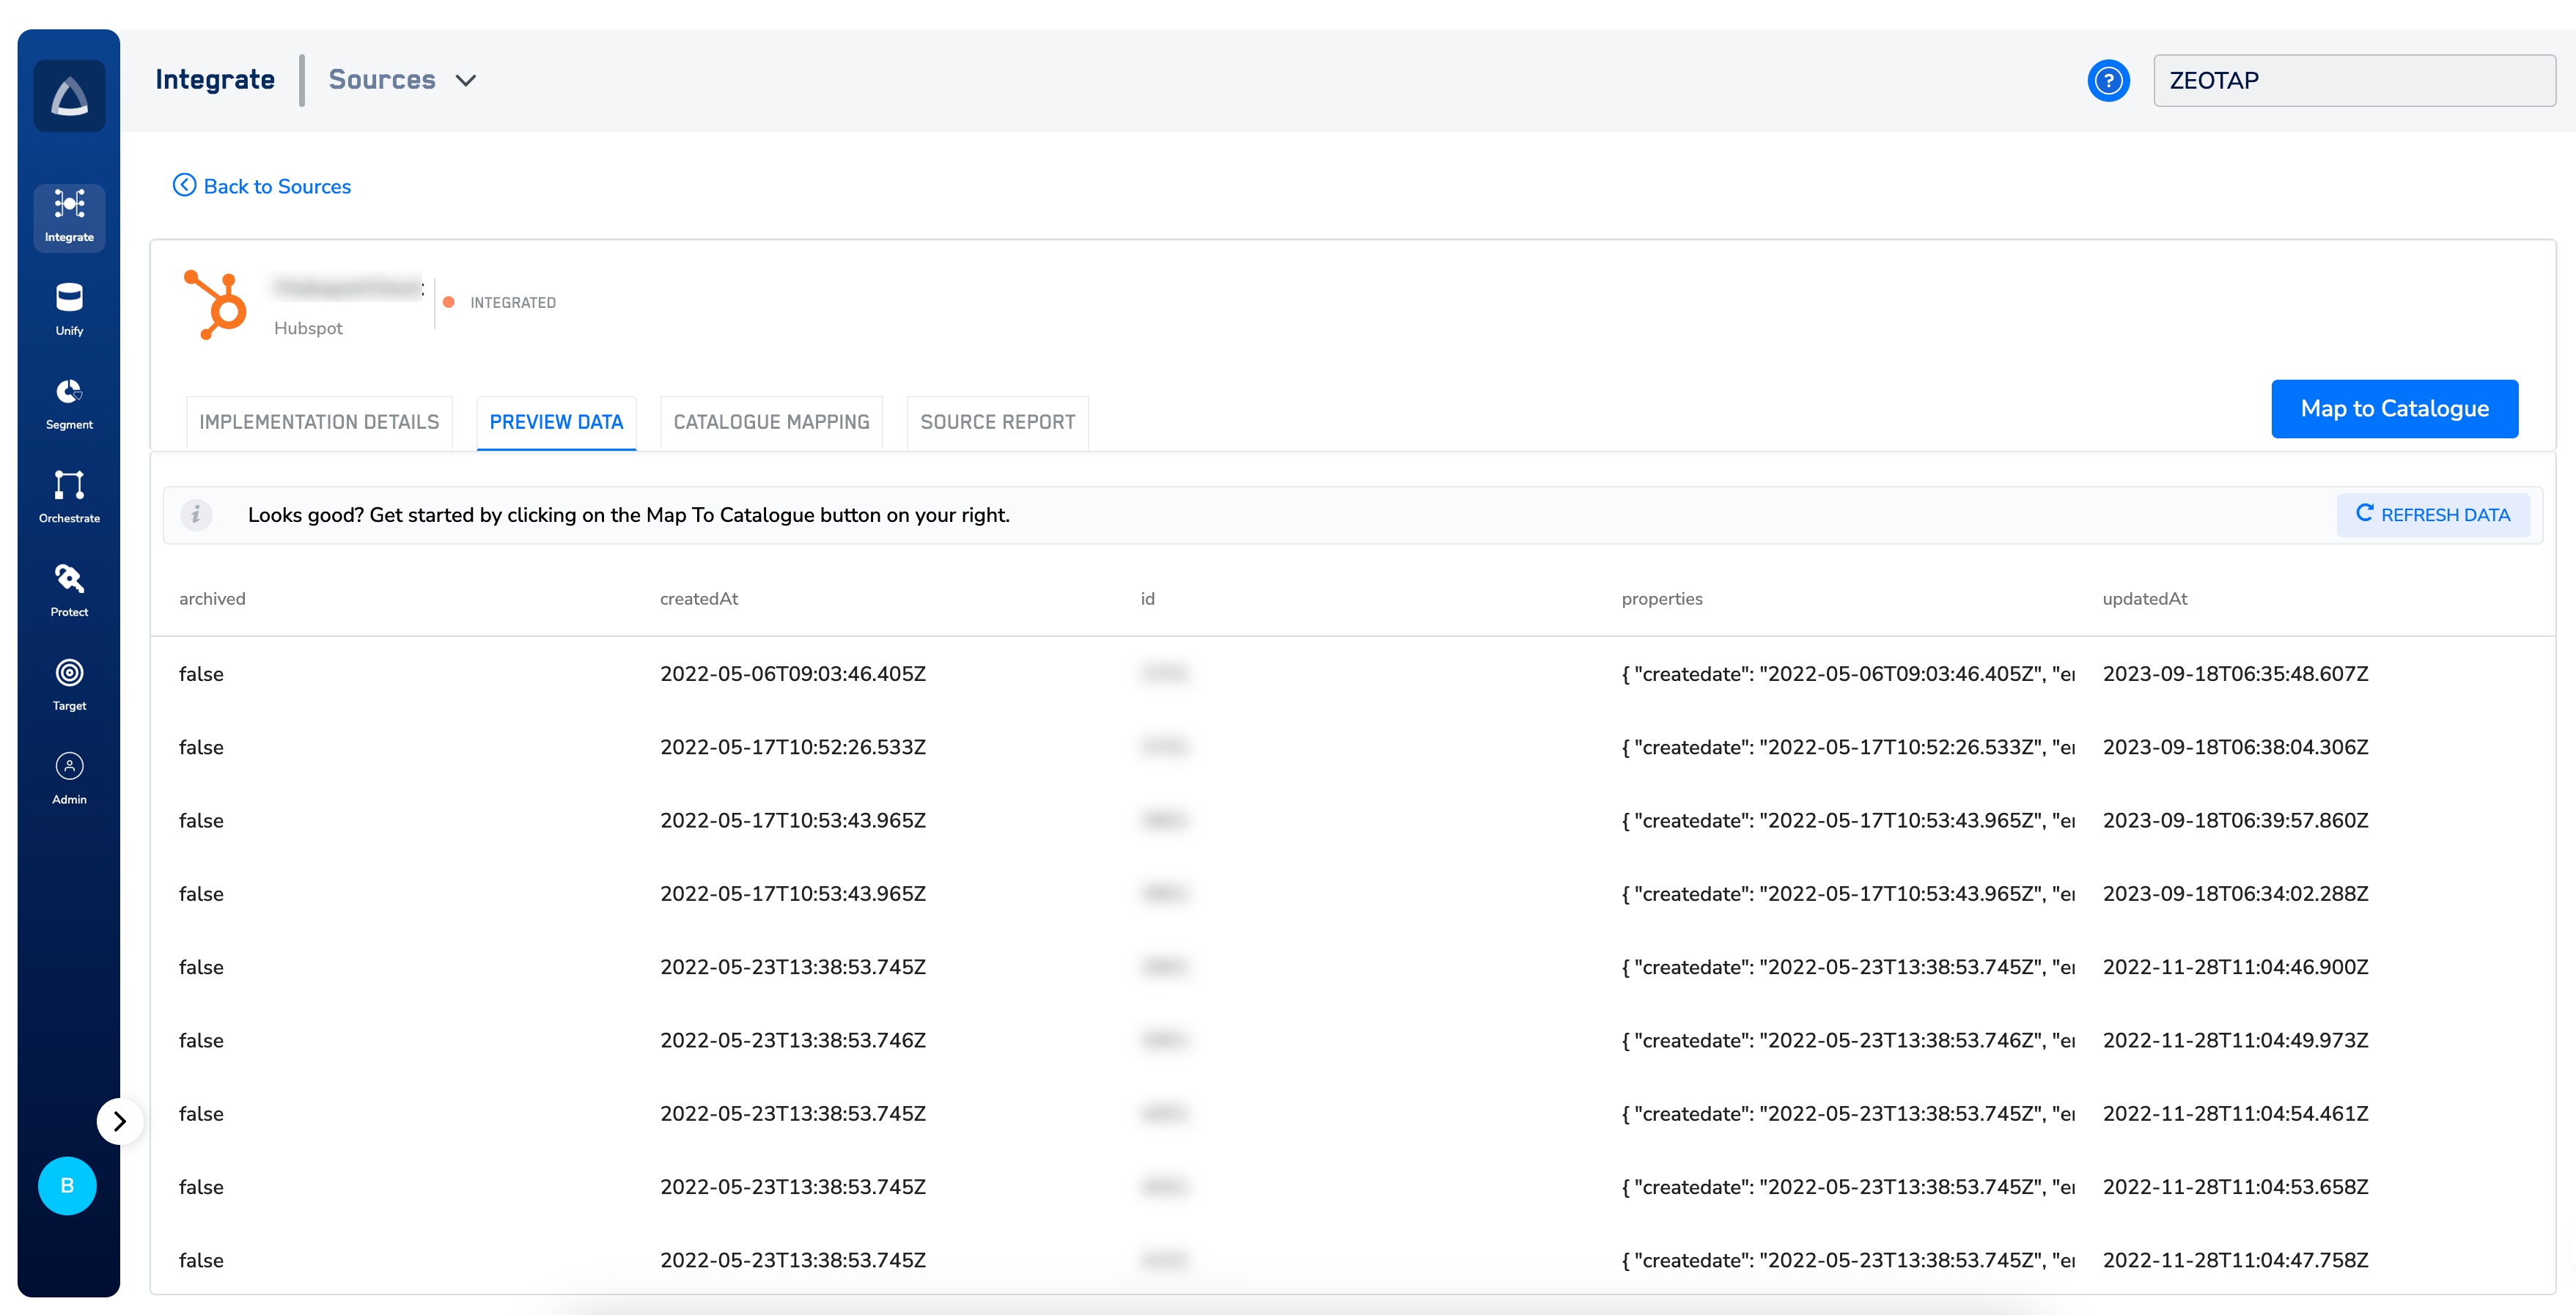
 After implementation, you can examine the data that has been received into the system under the **PREVIEW DATA** tab. Note that once the data starts flowing into the system, the status of the source changes to *Integrated*.
 **Note:**
If no data is ingested, then a message stating “*We haven’t received any data yet. please check again later and ensure that thesource is implemented correctly. In case of any issues, contact [support@zeotap.com](mailto:support@zeotap.com)” message appears on the screen.*
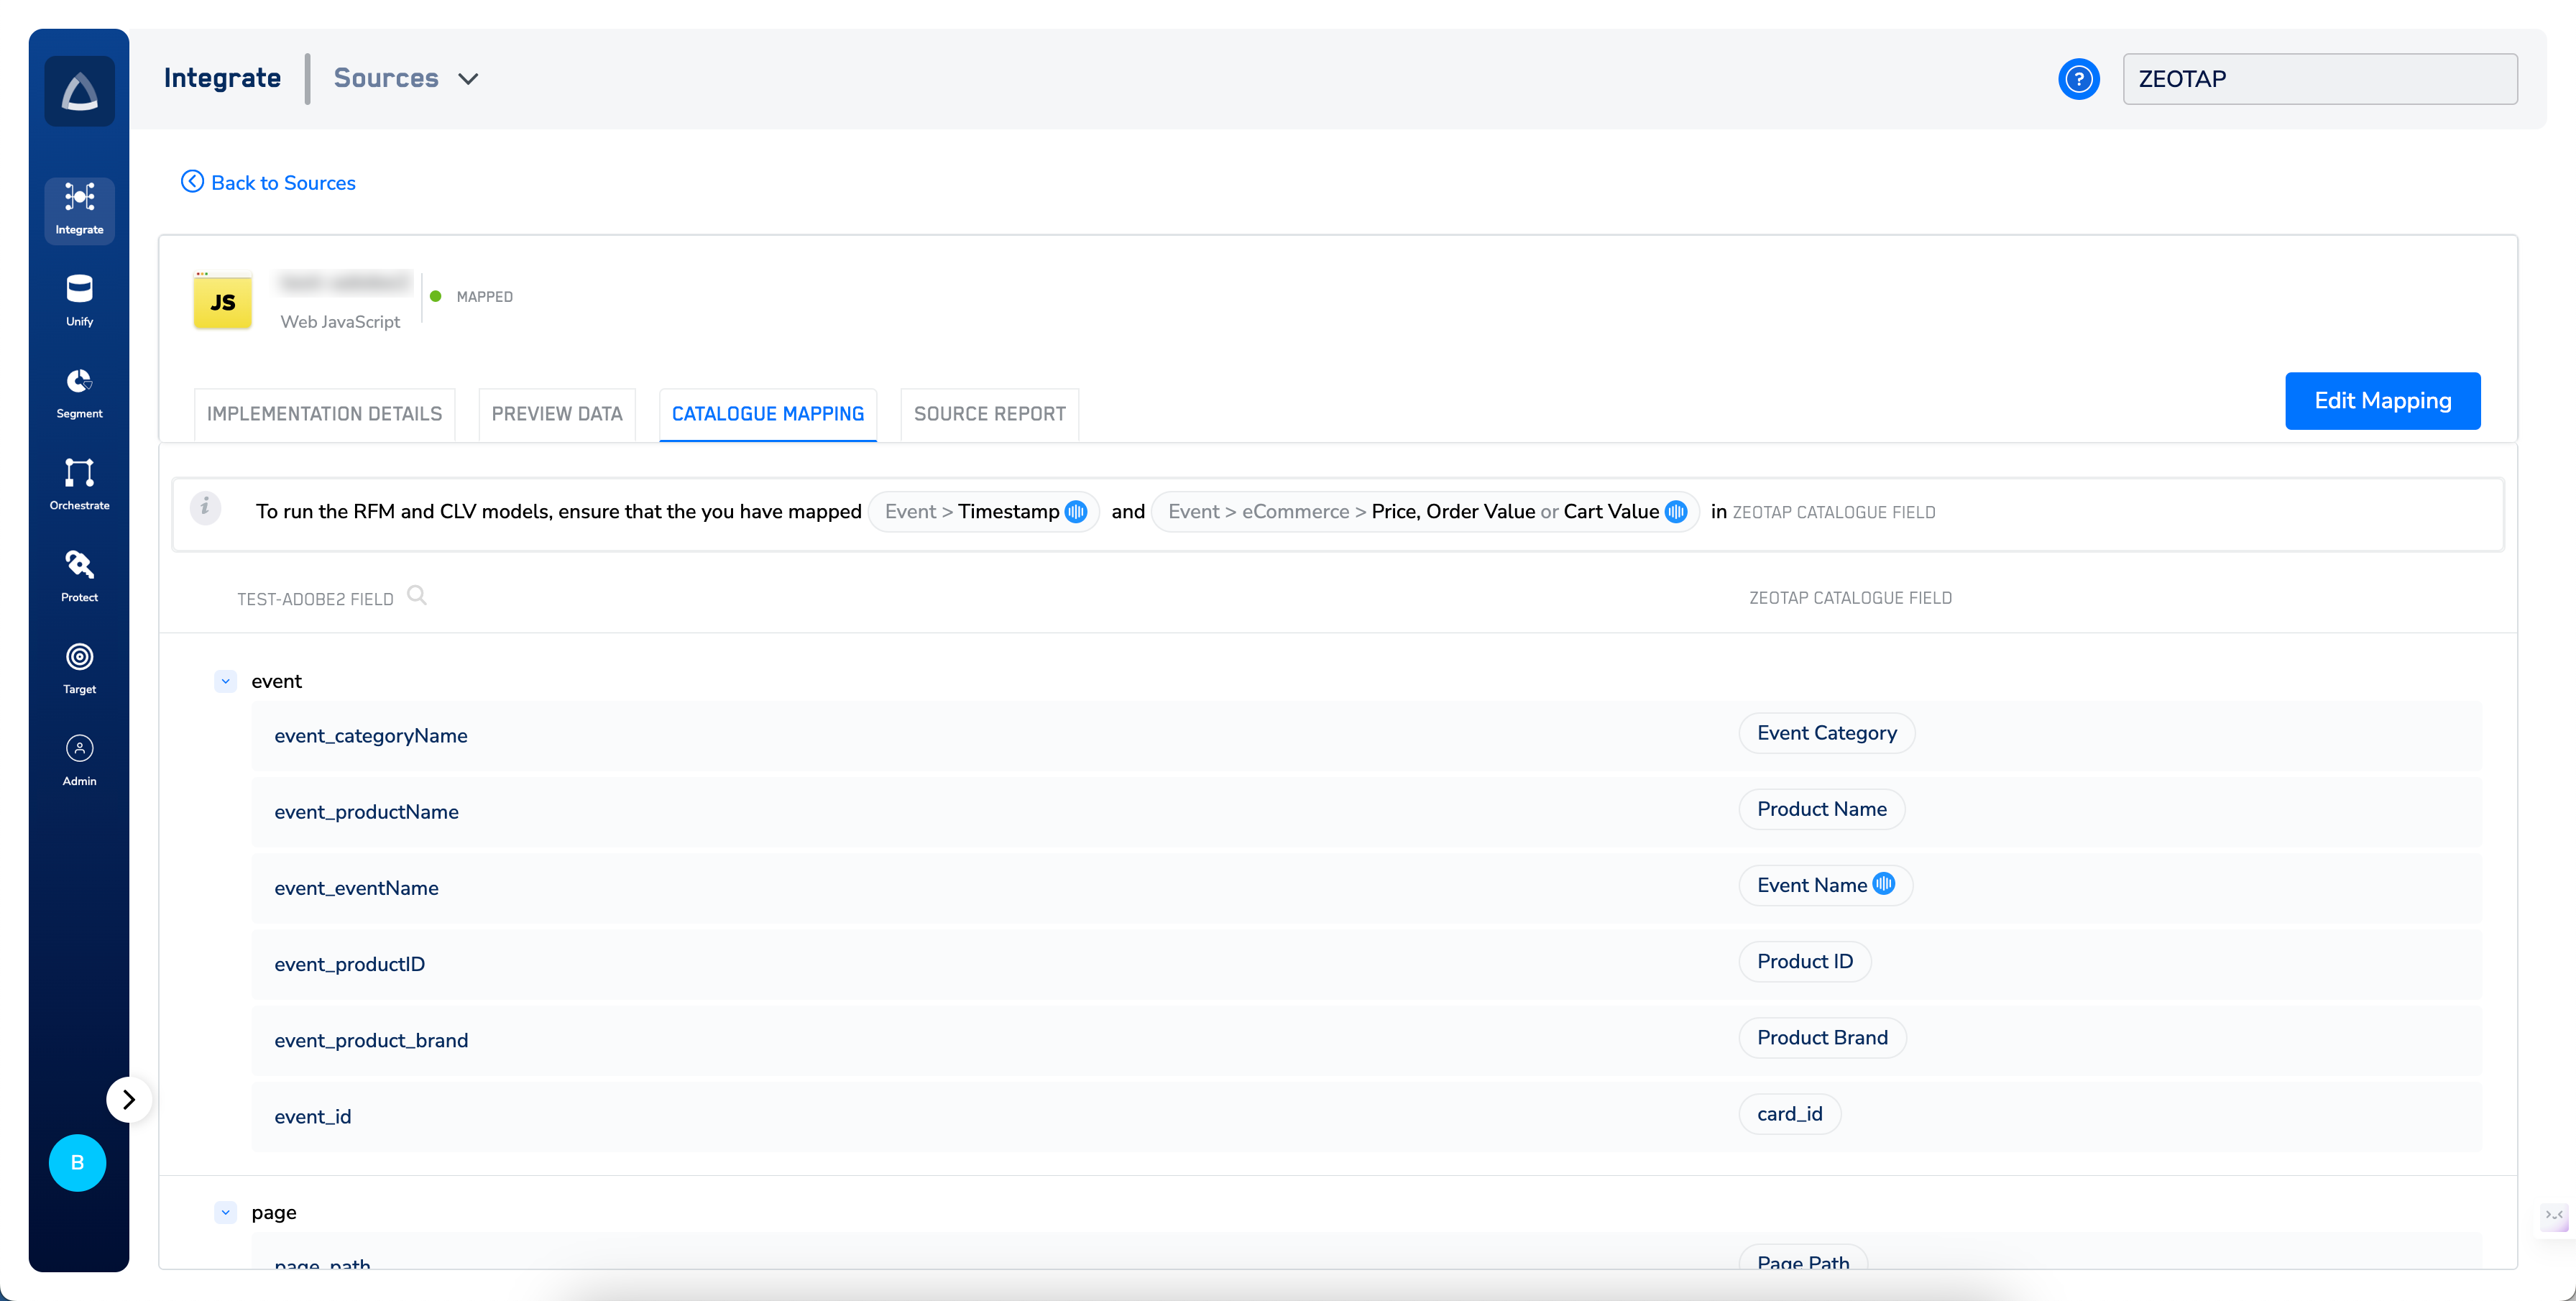
This is the stage in which you can standardise the incoming data to a single organisational-level catalogue by mapping and applying the required data transformations. Ensure that your ingested data such as identifiers, traits, consent, events and more are appropriately mapped against the fields available in the Zeotap catalogue. This ensures the structuring the data flow efficiently. You can map the ingested fields to the Catalogue fields by clicking **MAP TO CATALOGUE** under **CATALOGUE MAPPING**. For more information about the types of data that you can map and for detailed steps of mapping, refer [here](/articles/unify-customer/map-the-catalogue).
**Note:**
If no data is ingested, then a message stating “*We haven’t received any data yet. please check again later and ensure that thesource is implemented correctly. In case of any issues, contact [support@zeotap.com](mailto:support@zeotap.com)” message appears on the screen.*
This is the stage in which you can standardise the incoming data to a single organisational-level catalogue by mapping and applying the required data transformations. Ensure that your ingested data such as identifiers, traits, consent, events and more are appropriately mapped against the fields available in the Zeotap catalogue. This ensures the structuring the data flow efficiently. You can map the ingested fields to the Catalogue fields by clicking **MAP TO CATALOGUE** under **CATALOGUE MAPPING**. For more information about the types of data that you can map and for detailed steps of mapping, refer [here](/articles/unify-customer/map-the-catalogue).
 **Note:**
You can only map a source that has moved to the *Integrated* state. Once the mapping is successfully done,then the Source transitions to *Mapped* state. Post this state, the file/data dropped against this sources will be resolved and ingested into your Zeotap system.
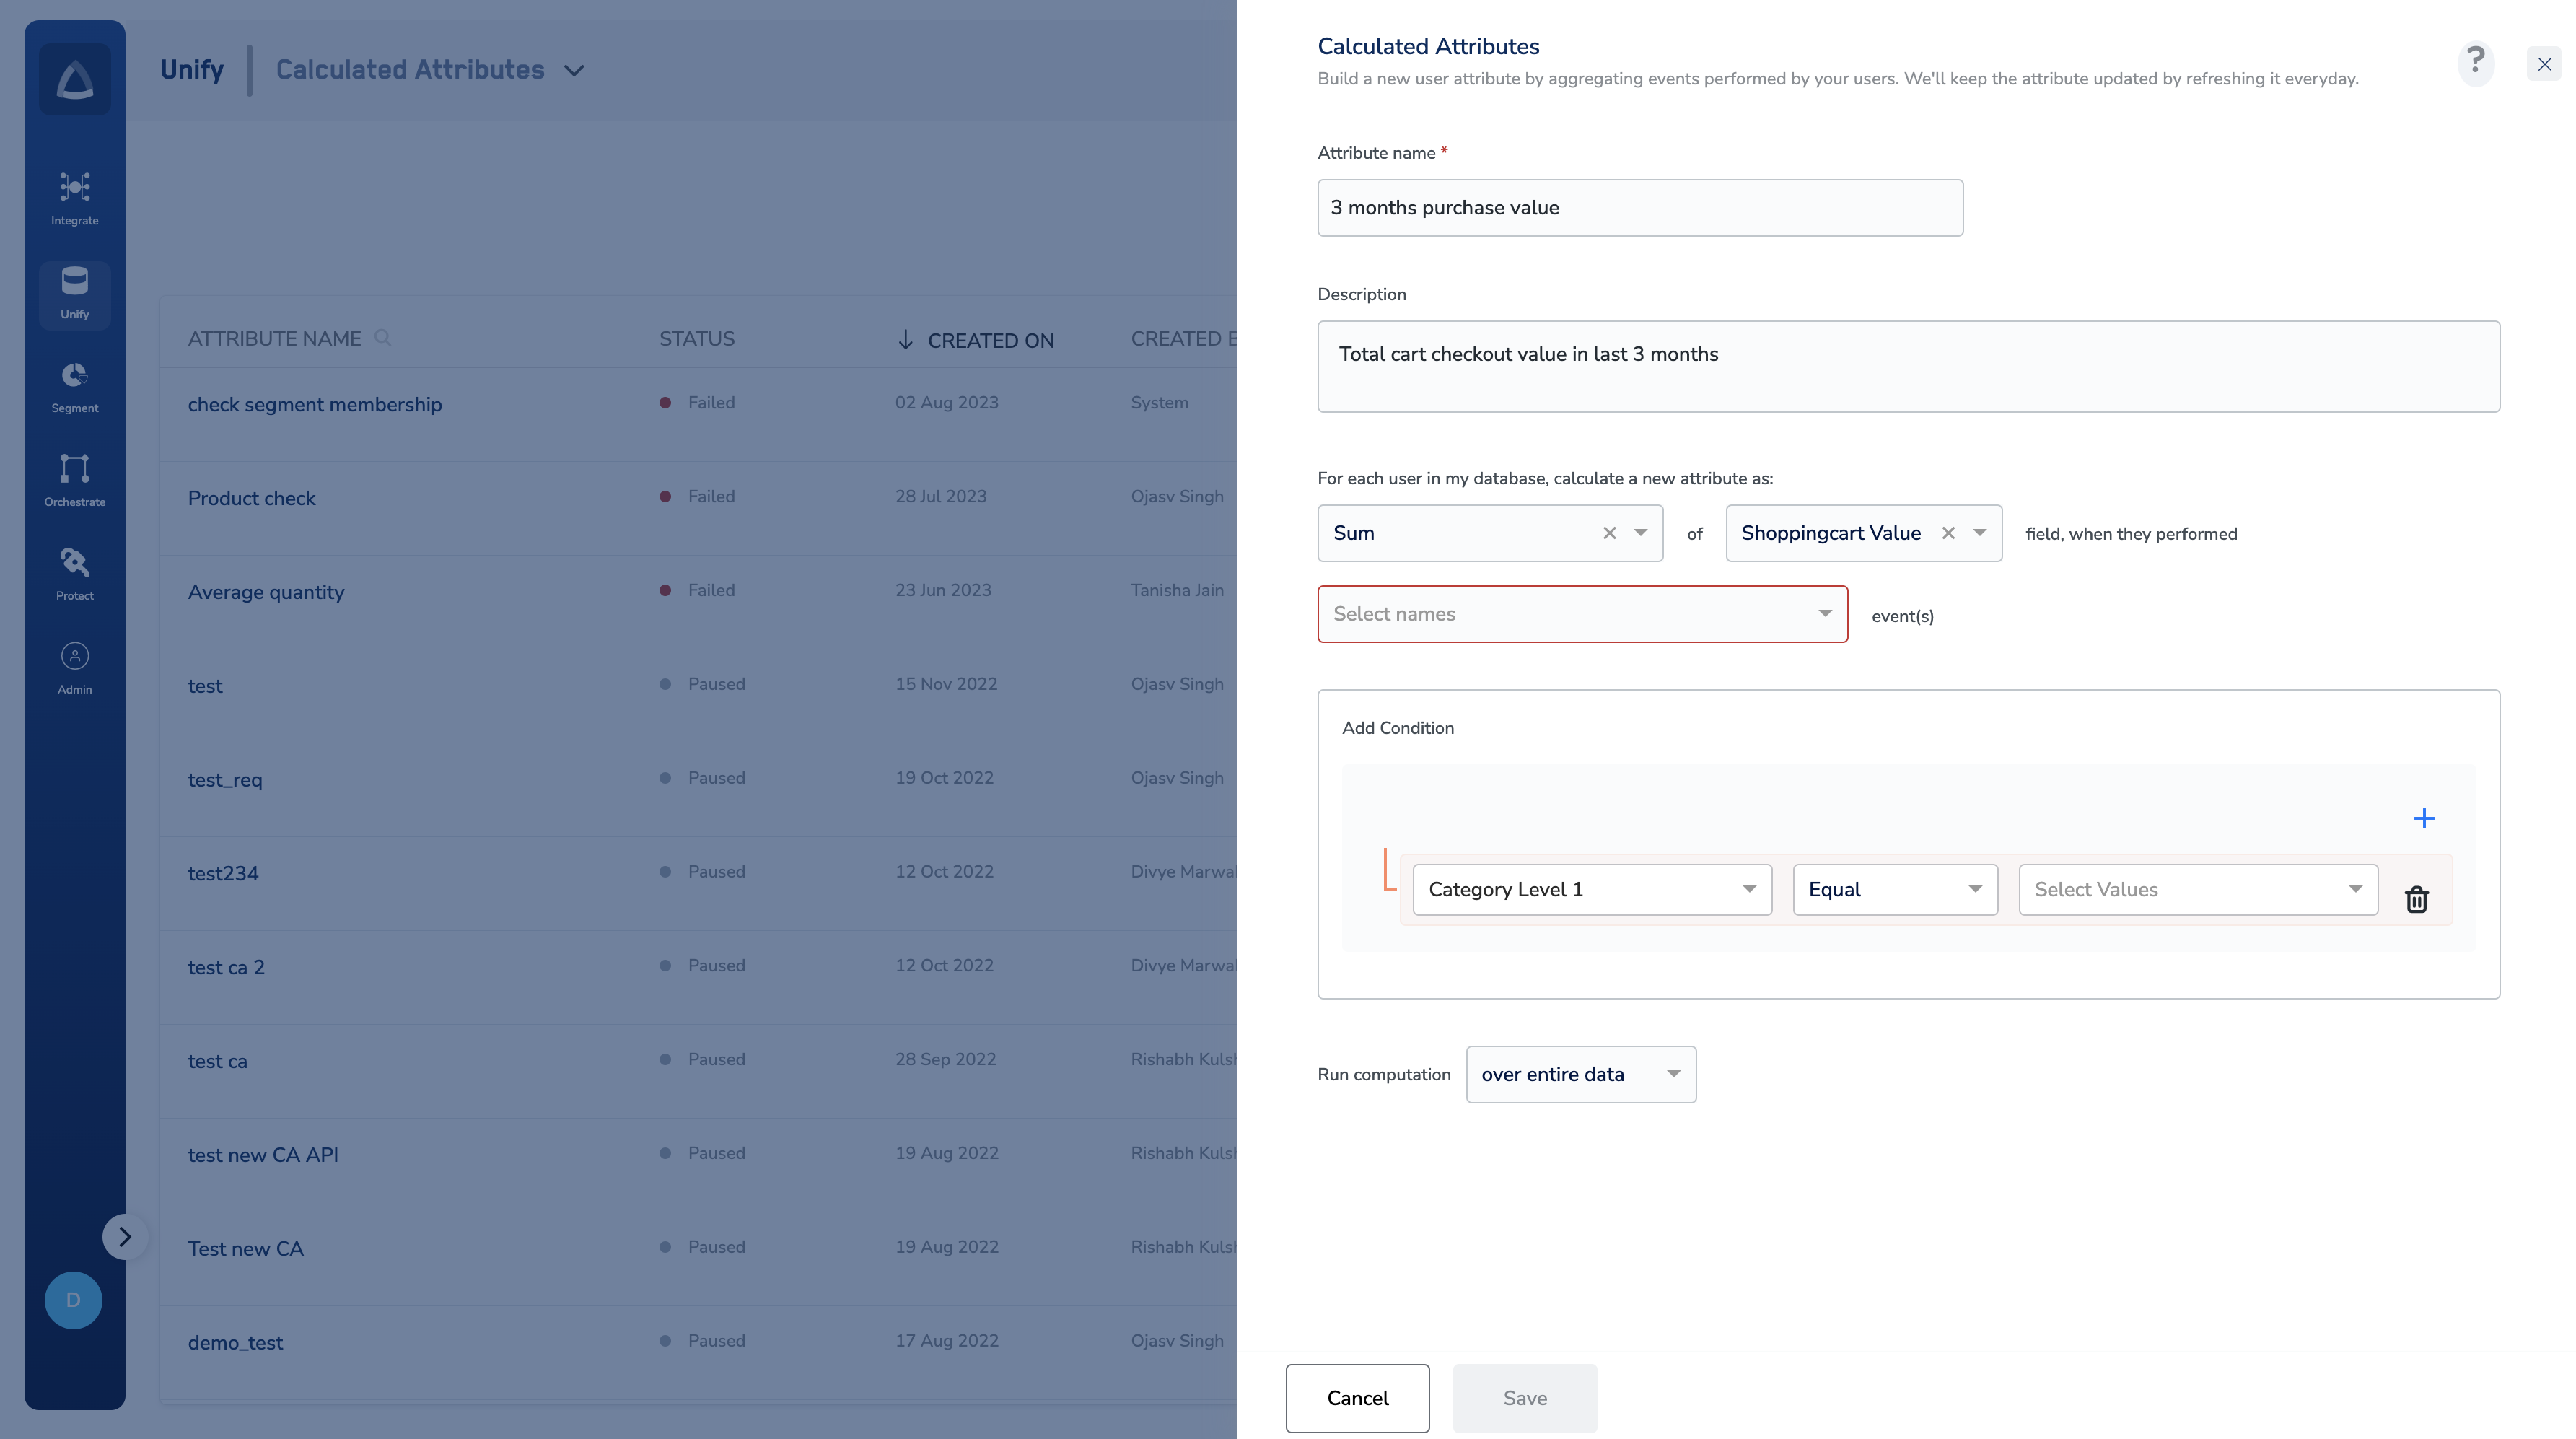
This step allows you to derive user-level insights by aggregating your users' isolated actions. You can then use this data to create more powerful customer cohorts. As a marketer, you can use calculated attributes to create new attributes for a user by aggregating their event data over a specific time period. For example, `90_day_revenue` of a user, `1_week_page_views` to check the engagement of a user, `units_purchased` by a user for a specific category like T-shirts. These calculated attributes are used as segmenting criteria and can then be forwarded to different integrations. For example, in a workflow, you can define `High Spenders` as users with `90_day_revenue` > €500 or `Low Engagement Users` by putting `1_week_page_views` \< 5 criteria. For more information about Calculated Attributes, refer [here](/articles/unify-customer/calculated-attributes).
**Note:**
You can only map a source that has moved to the *Integrated* state. Once the mapping is successfully done,then the Source transitions to *Mapped* state. Post this state, the file/data dropped against this sources will be resolved and ingested into your Zeotap system.
This step allows you to derive user-level insights by aggregating your users' isolated actions. You can then use this data to create more powerful customer cohorts. As a marketer, you can use calculated attributes to create new attributes for a user by aggregating their event data over a specific time period. For example, `90_day_revenue` of a user, `1_week_page_views` to check the engagement of a user, `units_purchased` by a user for a specific category like T-shirts. These calculated attributes are used as segmenting criteria and can then be forwarded to different integrations. For example, in a workflow, you can define `High Spenders` as users with `90_day_revenue` > €500 or `Low Engagement Users` by putting `1_week_page_views` \< 5 criteria. For more information about Calculated Attributes, refer [here](/articles/unify-customer/calculated-attributes).
 ## Related Topics
* For information about how to **configure the ID Strategy**, refer [here](/articles/unify-customer/configure-the-id-strategy).
* For information about the data entities supported by the system, refer [here](/articles/unify-customer/supported-data-entities).
* For information about how to **map the Catalogue**, refer [here](/articles/unify-customer/map-the-catalogue).
* For information about how to **add a Catalogue field**, refer [here](/articles/unify-customer/add-a-catalogue-field).
* For information about the **enrichers supported** and how to configure them, refer [here](/articles/unify-customer/configuring-the-enrichers).
* For information about how to **work with the Calculated Attributes**, refer [here](/articles/unify-customer/working-with-calculated-attributes).
### Non-Customer Entity Data (NCE) Related Topics
* For information on **creating the Non-Customer Entity (NCE) sources** from the Zeotap CDP App, refer [here](/articles/integrate-customer/creating-a-source). Note that you can create an NCE source for the source types: *Flat Files*, *Server to Server*, *CRM Data*, and *Data Warehouse*.
* For information about the **Non-Customer Entity Data (NCE) data**, refer [here](/articles/unify-customer/non-customer-entity-data).
* For information about how to **map the Catalogue for Non-Customer Entity (NCE) data**, refer [here](/articles/unify-customer/map-the-catalogue-for-non-customer-entity-data).
* For information about how to **add a Non-Customer Entity (NCE) attribute**, refer [here](/articles/unify-customer/adding-a-non-customer-entity-category).
* For information about **Join Key Enricher** and how to configure it, refer [here](/articles/unify-customer/configuring-the-join-key-enricher).
## Related Topics
* For information about how to **configure the ID Strategy**, refer [here](/articles/unify-customer/configure-the-id-strategy).
* For information about the data entities supported by the system, refer [here](/articles/unify-customer/supported-data-entities).
* For information about how to **map the Catalogue**, refer [here](/articles/unify-customer/map-the-catalogue).
* For information about how to **add a Catalogue field**, refer [here](/articles/unify-customer/add-a-catalogue-field).
* For information about the **enrichers supported** and how to configure them, refer [here](/articles/unify-customer/configuring-the-enrichers).
* For information about how to **work with the Calculated Attributes**, refer [here](/articles/unify-customer/working-with-calculated-attributes).
### Non-Customer Entity Data (NCE) Related Topics
* For information on **creating the Non-Customer Entity (NCE) sources** from the Zeotap CDP App, refer [here](/articles/integrate-customer/creating-a-source). Note that you can create an NCE source for the source types: *Flat Files*, *Server to Server*, *CRM Data*, and *Data Warehouse*.
* For information about the **Non-Customer Entity Data (NCE) data**, refer [here](/articles/unify-customer/non-customer-entity-data).
* For information about how to **map the Catalogue for Non-Customer Entity (NCE) data**, refer [here](/articles/unify-customer/map-the-catalogue-for-non-customer-entity-data).
* For information about how to **add a Non-Customer Entity (NCE) attribute**, refer [here](/articles/unify-customer/adding-a-non-customer-entity-category).
* For information about **Join Key Enricher** and how to configure it, refer [here](/articles/unify-customer/configuring-the-join-key-enricher).