> ## Documentation Index
> Fetch the complete documentation index at: https://docs.zeotap.com/llms.txt
> Use this file to discover all available pages before exploring further.
# Quick Start Guide
**Important:** Please ensure your CMP configuration includes new **Vendor ID 1469** for 1st Party data tracking. Additionally, include **Vendor ID 301** if cookie sync is enabled. [Learn more](/articles/sdks/web-js/configurations/consent-options#shouldcheckzeotapvendorconsent)
## Setup in Zeotap CDP
Create an iOS source in your Zeotap CDP account. [How to create an iOS source?](https://docs.zeotap.com/articles/#!integrate-customer/create-an-ios-sdk-source)
Obtain the write key from the created source. [How to obtain a write key?](/articles/sdks/ios/configurations/write-key)
## Installation
### CocoaPods (Recommended)
Add the following line to your `Podfile`:
```ruby theme={null}
pod 'ZeotapCollect', '~> 1.3.10'
```
Then run:
```bash theme={null}
pod install
```
### Swift Package Manager
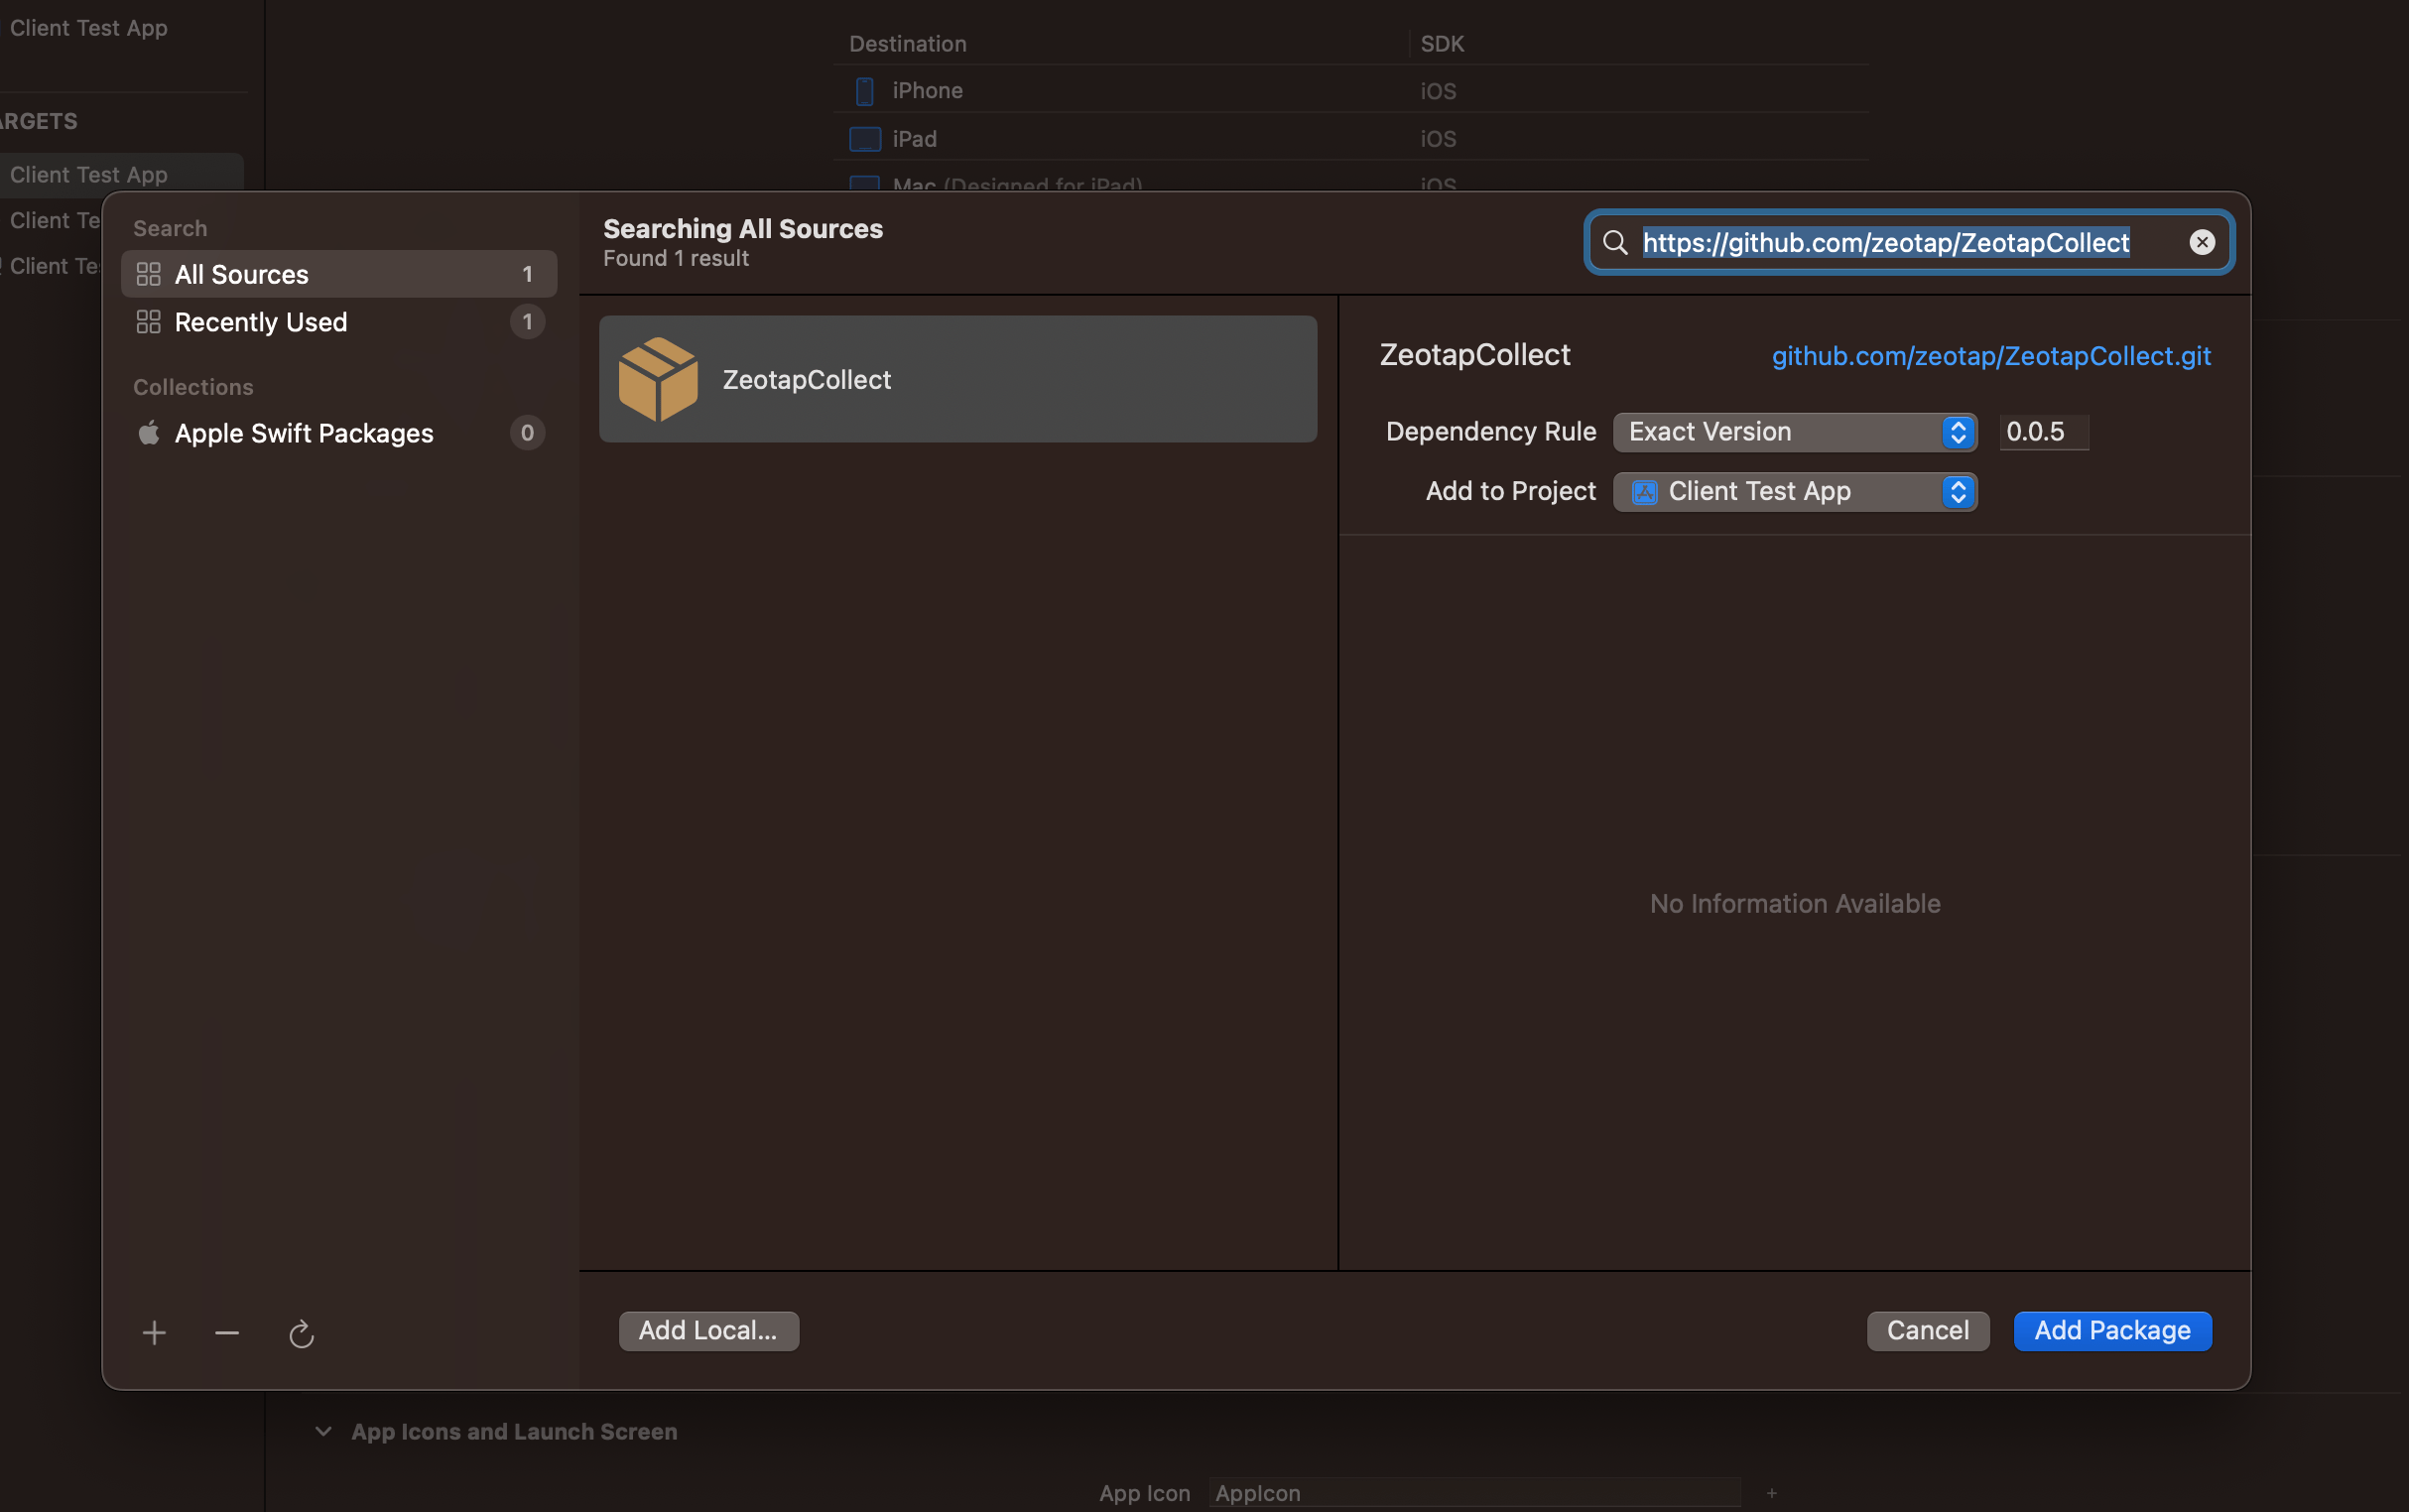
1. Open your project in Xcode
2. Go to **File** → **Add Package Dependencies**
3. Enter the repository URL: `https://github.com/zeotap/ZeotapCollect`
4. Click **Add Package**
5. Select the target where you want to add the SDK
 ### Manual Installation
1. Download the latest release from [here](https://content.zeotap.com/ios-sdk/ios-collect-sdk.zip) and Unzip it.
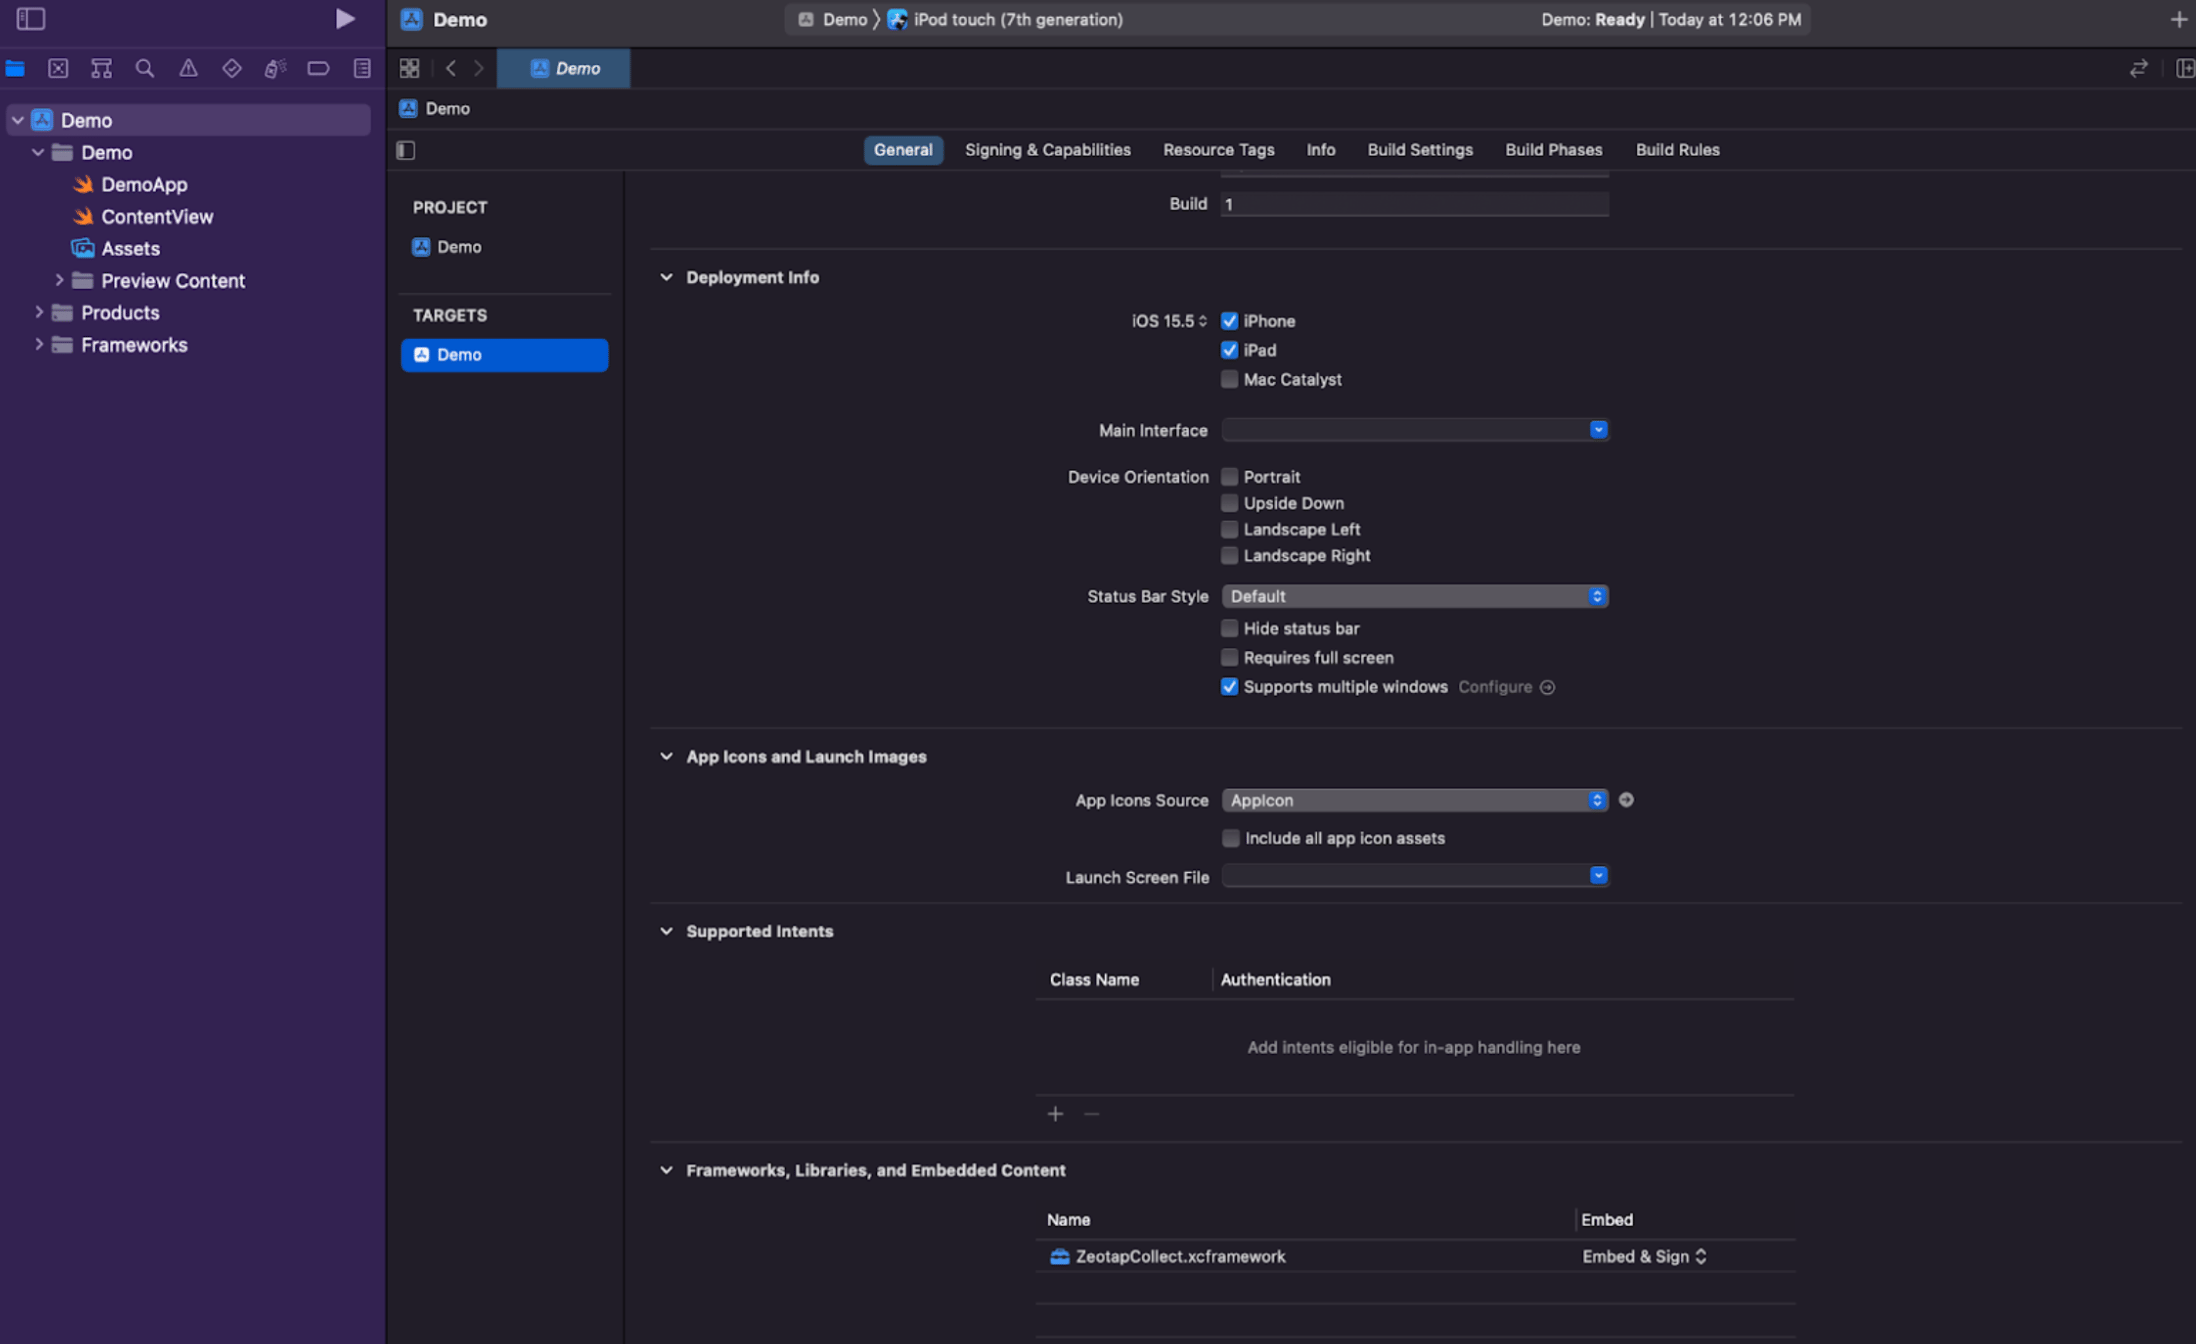
2. Launch the project settings by **PROJECT** → **TARGET** → **General** → scroll and find **Frameworks, Libraries and Embedded Content**
3. Add the `ZeotapCollect.xcframework` into your Xcode project
### Manual Installation
1. Download the latest release from [here](https://content.zeotap.com/ios-sdk/ios-collect-sdk.zip) and Unzip it.
2. Launch the project settings by **PROJECT** → **TARGET** → **General** → scroll and find **Frameworks, Libraries and Embedded Content**
3. Add the `ZeotapCollect.xcframework` into your Xcode project
 ## Initialization
Import the SDK in your AppDelegate or main app file:
```swift theme={null}
import ZeotapCollect
```
Initialize the SDK in your `application(_:didFinishLaunchingWithOptions:)` method:
```swift theme={null}
func application(_ application: UIApplication, didFinishLaunchingWithOptions launchOptions: [UIApplication.LaunchOptionsKey: Any]?) -> Bool {
// Initialize Zeotap Collect SDK
var collectOptions = CollectOption().writeKey(value: "YOUR_WRITE_KEY")
.logging(value: false)
.optout(value: false)
.build()
Collect.initialize(option: collectOptions)
return true
}
```
You need to input your [`write key`](/articles/sdks/ios/configurations/write-key) in place of `YOUR_WRITE_KEY` so that the data gets ingested to an ***iOS source*** created in your Zeotap CDP account.
## Setting up User Identities [(Learn more)](/articles/sdks/ios/api-reference/set-user-identities)
Once the Zeotap SDK is integrated, you can start setting up user identities. User identities are how you associate data to specific users.
The Zeotap iOS SDK provides the `setUserIdentities` function to identify your users:
```swift theme={null}
Collect.getInstance()?.setUserIdentities([
"email": "user@example.com",
"cellno": "+1 5551234567"
])
```
## Setting User Properties [(Learn more)](/articles/sdks/ios/api-reference/set-user-properties)
User properties allow you to store information about your users that doesn't change frequently, such as subscription status, user preferences, or demographic information.
To set user properties, use the `setUserProperties` method:
```swift theme={null}
Collect.getInstance()?.setUserProperties([
"subscription": "premium",
"age": 25,
"city": "New York"
])
```
## Tracking User Events [(Learn more)](/articles/sdks/ios/api-reference/track)
Event tracking allows you to track specific actions that users take in your app, such as making a purchase, completing a level, or sharing content.
To track user events, you can use the `setEventProperties` method:
```swift theme={null}
Collect.getInstance()?.setEventProperties("Product Purchased", [
"productId": "12345",
"productName": "iPhone 15",
"category": "Electronics",
"price": 999.99,
"currency": "USD"
])
```
## Example Integration
Here's a complete example of how to integrate the Zeotap iOS SDK:
```swift theme={null}
import UIKit
import ZeotapCollect
@main
class AppDelegate: UIResponder, UIApplicationDelegate {
func application(_ application: UIApplication, didFinishLaunchingWithOptions launchOptions: [UIApplication.LaunchOptionsKey: Any]?) -> Bool {
// Initialize Zeotap Collect SDK
var collectOptions = CollectOption().writeKey(value: "YOUR_WRITE_KEY")
.logging(value: false)
.optout(value: false)
.build()
Collect.initialize(option: collectOptions)
// Set user identities after login
Collect.getInstance().setUserIdentities([
"email": "user@example.com",
"userId": "12345"
])
// Set user properties
Collect.getInstance()?.setUserProperties([
"subscription": "premium",
"appVersion": Bundle.main.infoDictionary?["CFBundleShortVersionString"] as? String ?? "unknown"
])
return true
}
}
class ViewController: UIViewController {
@IBAction func purchaseButtonTapped(_ sender: UIButton) {
// Track purchase event
Collect.getInstance()?.setEventProperties( "Product Purchased", properties: [
"productId": "12345",
"price": 29.99,
"currency": "USD"
])
}
}
```
## Initialization
Import the SDK in your AppDelegate or main app file:
```swift theme={null}
import ZeotapCollect
```
Initialize the SDK in your `application(_:didFinishLaunchingWithOptions:)` method:
```swift theme={null}
func application(_ application: UIApplication, didFinishLaunchingWithOptions launchOptions: [UIApplication.LaunchOptionsKey: Any]?) -> Bool {
// Initialize Zeotap Collect SDK
var collectOptions = CollectOption().writeKey(value: "YOUR_WRITE_KEY")
.logging(value: false)
.optout(value: false)
.build()
Collect.initialize(option: collectOptions)
return true
}
```
You need to input your [`write key`](/articles/sdks/ios/configurations/write-key) in place of `YOUR_WRITE_KEY` so that the data gets ingested to an ***iOS source*** created in your Zeotap CDP account.
## Setting up User Identities [(Learn more)](/articles/sdks/ios/api-reference/set-user-identities)
Once the Zeotap SDK is integrated, you can start setting up user identities. User identities are how you associate data to specific users.
The Zeotap iOS SDK provides the `setUserIdentities` function to identify your users:
```swift theme={null}
Collect.getInstance()?.setUserIdentities([
"email": "user@example.com",
"cellno": "+1 5551234567"
])
```
## Setting User Properties [(Learn more)](/articles/sdks/ios/api-reference/set-user-properties)
User properties allow you to store information about your users that doesn't change frequently, such as subscription status, user preferences, or demographic information.
To set user properties, use the `setUserProperties` method:
```swift theme={null}
Collect.getInstance()?.setUserProperties([
"subscription": "premium",
"age": 25,
"city": "New York"
])
```
## Tracking User Events [(Learn more)](/articles/sdks/ios/api-reference/track)
Event tracking allows you to track specific actions that users take in your app, such as making a purchase, completing a level, or sharing content.
To track user events, you can use the `setEventProperties` method:
```swift theme={null}
Collect.getInstance()?.setEventProperties("Product Purchased", [
"productId": "12345",
"productName": "iPhone 15",
"category": "Electronics",
"price": 999.99,
"currency": "USD"
])
```
## Example Integration
Here's a complete example of how to integrate the Zeotap iOS SDK:
```swift theme={null}
import UIKit
import ZeotapCollect
@main
class AppDelegate: UIResponder, UIApplicationDelegate {
func application(_ application: UIApplication, didFinishLaunchingWithOptions launchOptions: [UIApplication.LaunchOptionsKey: Any]?) -> Bool {
// Initialize Zeotap Collect SDK
var collectOptions = CollectOption().writeKey(value: "YOUR_WRITE_KEY")
.logging(value: false)
.optout(value: false)
.build()
Collect.initialize(option: collectOptions)
// Set user identities after login
Collect.getInstance().setUserIdentities([
"email": "user@example.com",
"userId": "12345"
])
// Set user properties
Collect.getInstance()?.setUserProperties([
"subscription": "premium",
"appVersion": Bundle.main.infoDictionary?["CFBundleShortVersionString"] as? String ?? "unknown"
])
return true
}
}
class ViewController: UIViewController {
@IBAction func purchaseButtonTapped(_ sender: UIButton) {
// Track purchase event
Collect.getInstance()?.setEventProperties( "Product Purchased", properties: [
"productId": "12345",
"price": 29.99,
"currency": "USD"
])
}
}
```