> ## Documentation Index
> Fetch the complete documentation index at: https://docs.zeotap.com/llms.txt
> Use this file to discover all available pages before exploring further.
# Journey Templates
> Standardise workflow conditions once and reuse them across multiple journeys to enforce consistency and reduce manual effort.
## Overview
Journey Templates let you define a set of conditions or configurations once and apply them across multiple journey workflows. Instead of manually recreating the same logic every time a new journey is built, you define it in a template — and it automatically becomes available to any workflow in your account.
**Key benefits:**
* **Consistency** — Every workflow using the template follows the same baseline logic.
* **Reduced effort** — No need to rebuild conditions from scratch for each new journey.
* **Error prevention** — Standardised configurations eliminate human error in repeated setups.
***
## Accessing Journey Templates
Journey Templates are located in the **Templates** module, found under the **Protect** section in the left navigation.
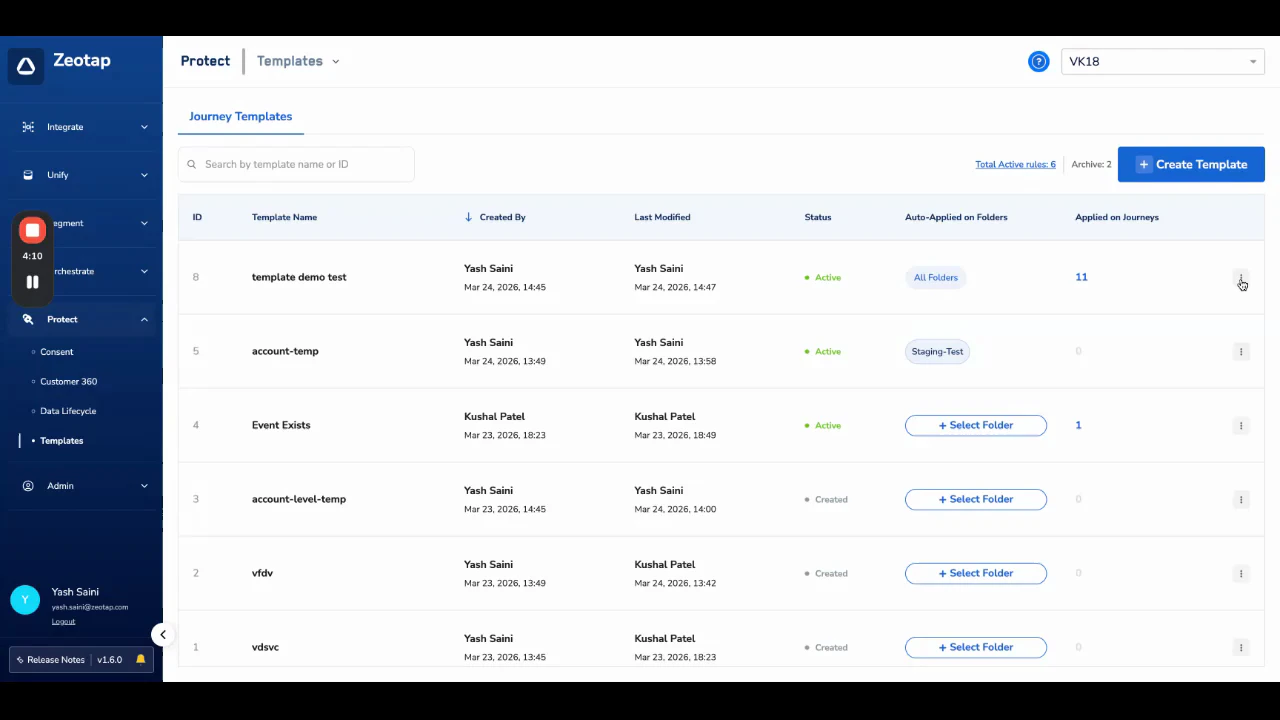
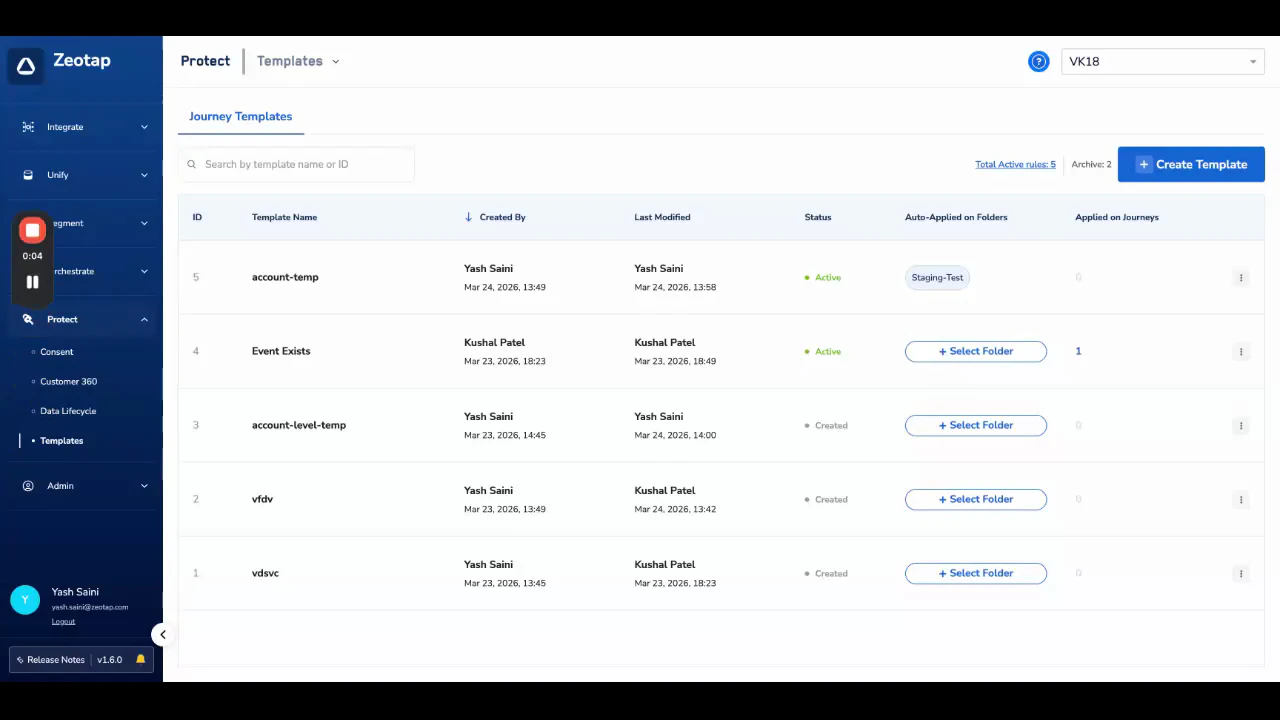 The Templates listing shows all existing templates with the following columns:
| Column | Description |
| --------------------------- | ------------------------------------------------------------------------------------------------- |
| **ID** | The unique identifier of the template. |
| **Template Name** | The name given to the template when it was created. |
| **Created By** | The user who created the template. |
| **Last Modified** | The date and user of the last edit. |
| **Status** | Either `Active` (in use by at least one workflow) or `Created` (not yet applied to any workflow). |
| **Auto-Applied on Folders** | Which folders the template is automatically applied to, if configured. |
| **Applied on Journeys** | The number of published or paused workflows currently using this template. |
***
## Creating a Template
From the left sidebar, go to **Protect → Templates** and click **+ Create Template**.
Enter a clear template name and an optional description explaining what the template enforces (e.g., "GDPR consent check — required on all EU journeys").
The Templates listing shows all existing templates with the following columns:
| Column | Description |
| --------------------------- | ------------------------------------------------------------------------------------------------- |
| **ID** | The unique identifier of the template. |
| **Template Name** | The name given to the template when it was created. |
| **Created By** | The user who created the template. |
| **Last Modified** | The date and user of the last edit. |
| **Status** | Either `Active` (in use by at least one workflow) or `Created` (not yet applied to any workflow). |
| **Auto-Applied on Folders** | Which folders the template is automatically applied to, if configured. |
| **Applied on Journeys** | The number of published or paused workflows currently using this template. |
***
## Creating a Template
From the left sidebar, go to **Protect → Templates** and click **+ Create Template**.
Enter a clear template name and an optional description explaining what the template enforces (e.g., "GDPR consent check — required on all EU journeys").
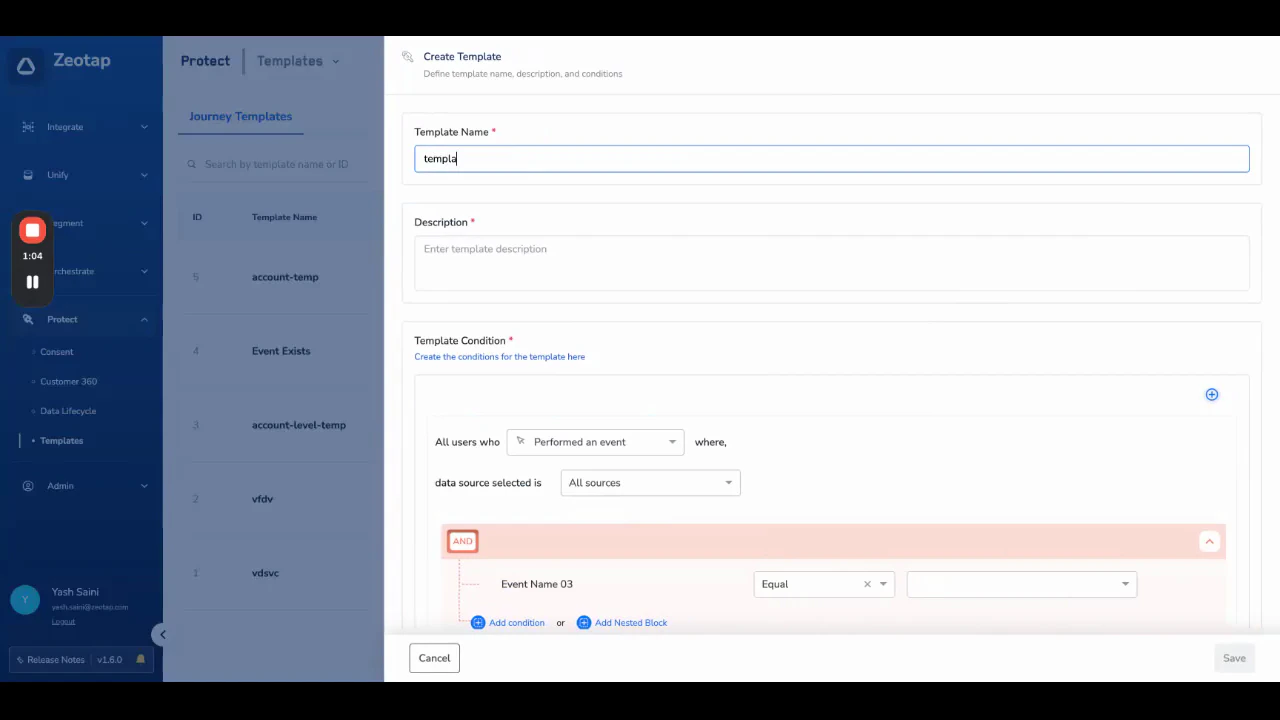 Use the condition builder to define the logic that should be standardised. This is the same interface as creating an entry condition in a workflow — for example, `event_name equals purchase` or conditions based on specific identifiers.
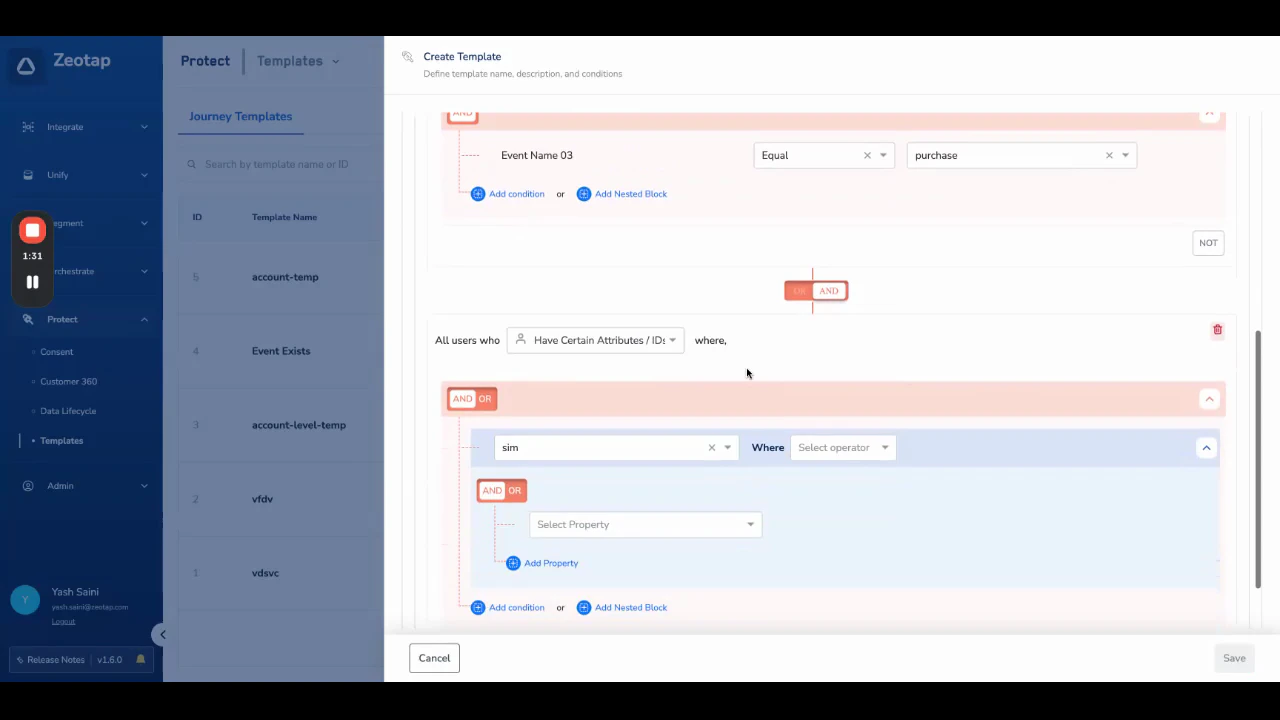 The template condition builder is identical to the workflow condition builder. Any logic you can define in a workflow entry condition can be saved as a template.
Click **Save**. The template is created and moves to **Created** status, meaning it exists but is not yet applied to any workflow.
The template condition builder is identical to the workflow condition builder. Any logic you can define in a workflow entry condition can be saved as a template.
Click **Save**. The template is created and moves to **Created** status, meaning it exists but is not yet applied to any workflow.
 ***
## Template States
| Status | Meaning |
| ------------ | --------------------------------------------------------------------------------- |
| **Created** | The template has been saved but is not currently applied to any journey workflow. |
| **Active** | The template is live and applied to at least one published or paused workflow. |
| **Archived** | A template can only be archived when it is not used in any of the journeys. |
***
## Auto-Applying Templates
Templates can be configured to apply automatically to all workflows within a specific folder or across the entire account. This ensures every journey created in that scope automatically inherits the template conditions.
Auto-Apply is an admin-only feature. Only users with the **CDP Admin** or **CDP Manager** role can configure, edit, or remove auto-apply settings. Changes take effect immediately and affect all running workflows.
Only one template can be enabled for auto-apply per folder.
### Setting Up Auto-Apply
From the template listing, click **+ Select Folder** in the Auto-Applied on Folders column.
***
## Template States
| Status | Meaning |
| ------------ | --------------------------------------------------------------------------------- |
| **Created** | The template has been saved but is not currently applied to any journey workflow. |
| **Active** | The template is live and applied to at least one published or paused workflow. |
| **Archived** | A template can only be archived when it is not used in any of the journeys. |
***
## Auto-Applying Templates
Templates can be configured to apply automatically to all workflows within a specific folder or across the entire account. This ensures every journey created in that scope automatically inherits the template conditions.
Auto-Apply is an admin-only feature. Only users with the **CDP Admin** or **CDP Manager** role can configure, edit, or remove auto-apply settings. Changes take effect immediately and affect all running workflows.
Only one template can be enabled for auto-apply per folder.
### Setting Up Auto-Apply
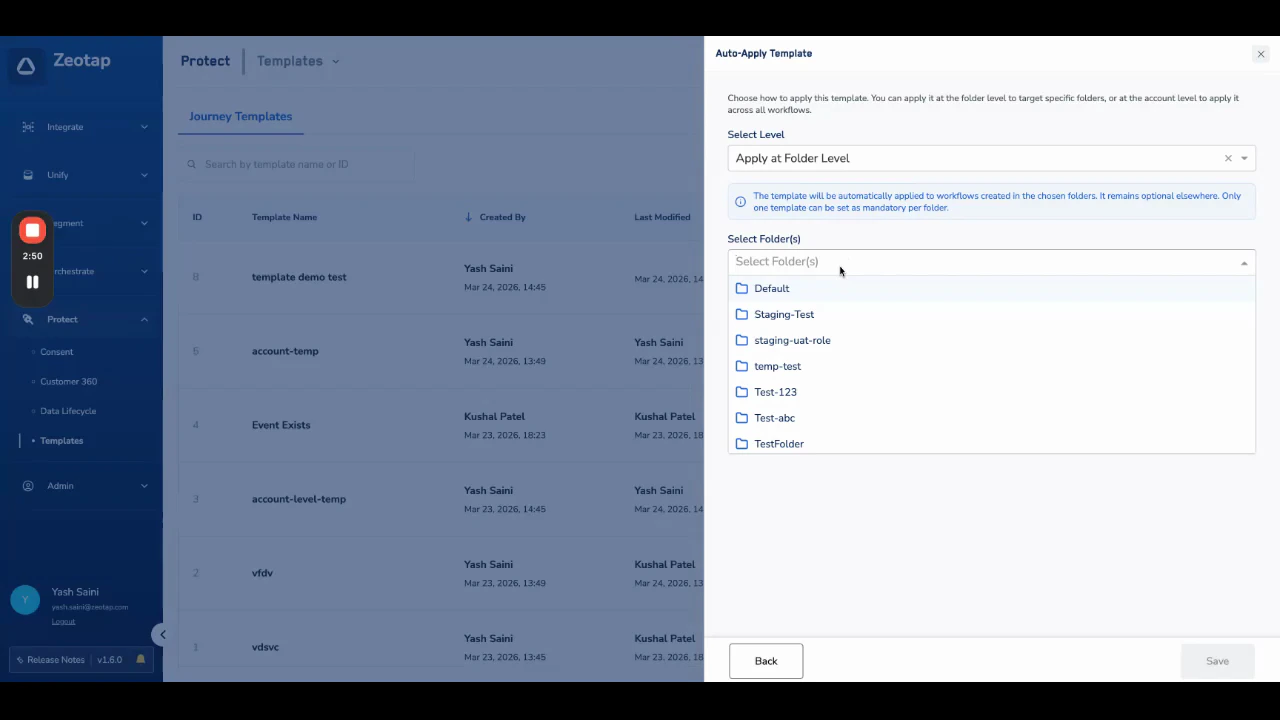
From the template listing, click **+ Select Folder** in the Auto-Applied on Folders column.
 You will see two options:
* **Auto-apply to workflows in a selected folder** — applies to all existing and future journeys within that folder.
* **Auto-apply to all workflows in the account** — applies to every workflow regardless of which folder it lives in.
Choose a specific folder or select account-level, then save. The template will immediately attach to the top layer of all matching workflows as an entry condition.
You will see two options:
* **Auto-apply to workflows in a selected folder** — applies to all existing and future journeys within that folder.
* **Auto-apply to all workflows in the account** — applies to every workflow regardless of which folder it lives in.
Choose a specific folder or select account-level, then save. The template will immediately attach to the top layer of all matching workflows as an entry condition.
 ### How Auto-Apply Works
* **Folder-level:** The template attaches to all existing and future journeys in the selected folder. **Child folders inherit** the same configuration — if a child folder is created under a parent with an auto-applied template, all workflows in the child folder also receive the template.
* **Account-level:** The template applies to all workflows in the account, regardless of folder. When account-level is selected, all folders appear as selected in the folder list.
* **Position:** Auto-applied templates always appear at the **top of the workflow** as the first entry condition. Users cannot move or remove them.
After saving an auto-apply configuration, verify the selected folders are showing correctly in the template listing. The **Applied on Journeys** column will reflect the count of published and paused workflows now using the template.
### Editing or Removing Auto-Apply
Admins can edit the auto-apply configuration at any time from the template's **Edit Auto Apply** option. Changes (including removing a folder or switching from account-level to folder-level) take effect immediately across all affected workflows.
***
## Applying a Template Manually
Any user can manually add a template to a workflow while building it in the Journey canvas.
Navigate to **Orchestrate → Journeys** and open or create the workflow you want to add a template to.
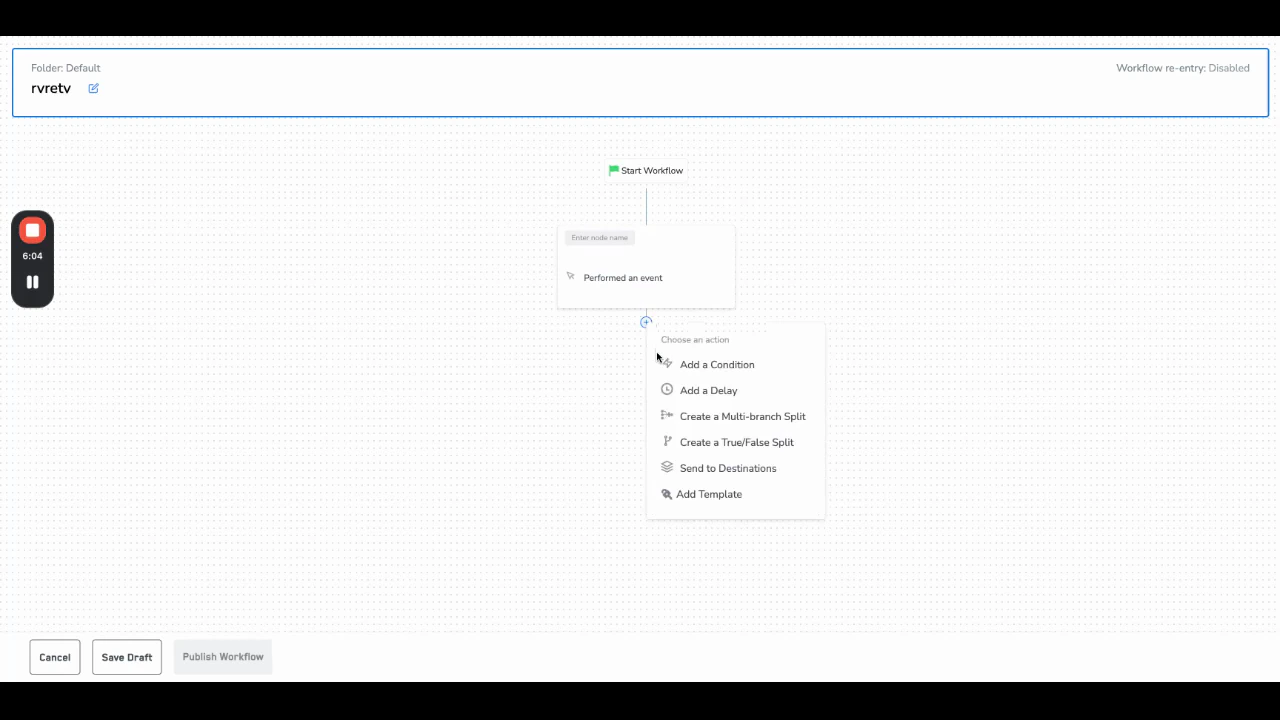
Inside the workflow canvas, click **Add Template**. A panel opens showing all available templates.
### How Auto-Apply Works
* **Folder-level:** The template attaches to all existing and future journeys in the selected folder. **Child folders inherit** the same configuration — if a child folder is created under a parent with an auto-applied template, all workflows in the child folder also receive the template.
* **Account-level:** The template applies to all workflows in the account, regardless of folder. When account-level is selected, all folders appear as selected in the folder list.
* **Position:** Auto-applied templates always appear at the **top of the workflow** as the first entry condition. Users cannot move or remove them.
After saving an auto-apply configuration, verify the selected folders are showing correctly in the template listing. The **Applied on Journeys** column will reflect the count of published and paused workflows now using the template.
### Editing or Removing Auto-Apply
Admins can edit the auto-apply configuration at any time from the template's **Edit Auto Apply** option. Changes (including removing a folder or switching from account-level to folder-level) take effect immediately across all affected workflows.
***
## Applying a Template Manually
Any user can manually add a template to a workflow while building it in the Journey canvas.
Navigate to **Orchestrate → Journeys** and open or create the workflow you want to add a template to.
Inside the workflow canvas, click **Add Template**. A panel opens showing all available templates.
 Click on a template to preview its full configuration (read-only — you cannot edit the template from here), then click **Apply**. The template conditions are added to the workflow automatically.
Templates applied manually can be removed by the user at any time. However, templates applied at the **folder level** or **account level** via auto-apply **cannot** be removed by regular users — only admins can change auto-apply configurations.
***
## Template Permissions & Roles
| Action | Who Can Do It |
| -------------------------------------- | --------------------------------------------------------------- |
| View templates | Any user with **View Audience** or **View Journeys** permission |
| Create or edit templates | Any user with **View Audience** or **View Journeys** permission |
| Apply templates manually to a workflow | Any user |
| Configure, edit, or remove auto-apply | **CDP Admin**, **CDP Manager** only |
Permission settings for View Template and Edit Template can be configured per user in the admin UI under **Protect → Admin**.
Click on a template to preview its full configuration (read-only — you cannot edit the template from here), then click **Apply**. The template conditions are added to the workflow automatically.
Templates applied manually can be removed by the user at any time. However, templates applied at the **folder level** or **account level** via auto-apply **cannot** be removed by regular users — only admins can change auto-apply configurations.
***
## Template Permissions & Roles
| Action | Who Can Do It |
| -------------------------------------- | --------------------------------------------------------------- |
| View templates | Any user with **View Audience** or **View Journeys** permission |
| Create or edit templates | Any user with **View Audience** or **View Journeys** permission |
| Apply templates manually to a workflow | Any user |
| Configure, edit, or remove auto-apply | **CDP Admin**, **CDP Manager** only |
Permission settings for View Template and Edit Template can be configured per user in the admin UI under **Protect → Admin**.