> ## Documentation Index
> Fetch the complete documentation index at: https://docs.zeotap.com/llms.txt
> Use this file to discover all available pages before exploring further.
# Tableau AWS S3
## Overview
Amazon S3 (Simple Storage Service) is a widely used object storage service provided by Amazon Web Services (AWS). Integrated with Zeotap CDP, it enables you to send the audiences (segments) from Zeotap CDP to Amazon S3, which can then be used as a source for Tableau.
**Note:**
This shows the steps to connect an S3 bucket to Zeotap. This same process can be used for the Tableau AWS S3 destination. After configured and audience data is sent to the bucket, We can connect the bucket to Tableau to pull in the data.
You can use other services as well to push the data. Make sure those connectors are available as a data source for your tableau. Use the normal destinations for the same.
## Prerequisites
Before you create an Amazon S3 Destination in Zeotap CDP, ensure to have an account with Amazon S3.
## Amazon S3 Overview
Amazon S3 (Simple Storage Service) is a widely used object storage service provided by Amazon Web Services (AWS). Integrated with Zeotap CDP, it enables you to send the audiences (segments) from Zeotap CDP to Amazon S3, which can then be used for delivering more personalised targeting across various touch points.
## Supported Identifiers
This integration supports MAIDs, Hashed email addresses, Hashed mobile numbers and CRM IDs. Note that you can send any number of identifiers and attributes to Amazon S3 using this integration.
### Bucket
This is the name of your S3 bucket. You can obtain this information on your Amazon S3 account by navigating to Buckets. In the example shown below, **test-adobe-s3-bucket** is the bucket name.
.png?fit=max&auto=format&n=nvqTscX2rya8znmd&q=85&s=285e645295f67b8e7ed9880ed63f79fe) ### S3 Bucket Region
This is the geographical location where the Amazon S3 storage is available. You can obtain this information by navigating to the **Properties** tab under the Amazon S3 bucket as shown in the image below.
### S3 Bucket Region
This is the geographical location where the Amazon S3 storage is available. You can obtain this information by navigating to the **Properties** tab under the Amazon S3 bucket as shown in the image below.
.png?fit=max&auto=format&n=nvqTscX2rya8znmd&q=85&s=d4920504cf29017e61b52e67b48d80d6) ### Folder
In Amazon S3, a folder serves as a logical container for organising stored objects within a bucket. In reality, there are no actual folders in Amazon S3. Instead, the folder concept is emulated by employing object key names containing slashes ("/") to replicate a hierarchical arrangement. You can obtain this information from your Amazon S3 account by navigating to the **Objects** tab under the Amazon S3 bucket as shown in the image below.
### Folder
In Amazon S3, a folder serves as a logical container for organising stored objects within a bucket. In reality, there are no actual folders in Amazon S3. Instead, the folder concept is emulated by employing object key names containing slashes ("/") to replicate a hierarchical arrangement. You can obtain this information from your Amazon S3 account by navigating to the **Objects** tab under the Amazon S3 bucket as shown in the image below.
.png?fit=max&auto=format&n=ROPrHg77hrORMuiL&q=85&s=6b21f4fa5854f281b445578813dcc048) Ensure that you follow the folder structure shown below.
`folder_name/sub_folder_name/`
### Access Token and Secret Access Token
These are the security tokens that provide secure access to your Amazon S3 resources. You can obtain the Access Token and Secret Access Token by navigating to the **AWS IAM Credentials** tab under **Security credentials** in your Amazon S3 account.
## Create a Destination for Amazon S3
Perform the following steps to create a Destination for Amazon S3:
Log into the Zeotap CDP App and go to the **DESTINATIONS** application.
Click **+ Create Destination**.
Ensure that you follow the folder structure shown below.
`folder_name/sub_folder_name/`
### Access Token and Secret Access Token
These are the security tokens that provide secure access to your Amazon S3 resources. You can obtain the Access Token and Secret Access Token by navigating to the **AWS IAM Credentials** tab under **Security credentials** in your Amazon S3 account.
## Create a Destination for Amazon S3
Perform the following steps to create a Destination for Amazon S3:
Log into the Zeotap CDP App and go to the **DESTINATIONS** application.
Click **+ Create Destination**.
.png?fit=max&auto=format&n=99ae7Xt83Dkoy1LQ&q=85&s=8af304a0fb2280e517f24a4a2ad84e21) Under the **All Destinations** section, search for **Amazon S3**.
Under the **All Destinations** section, search for **Amazon S3**.
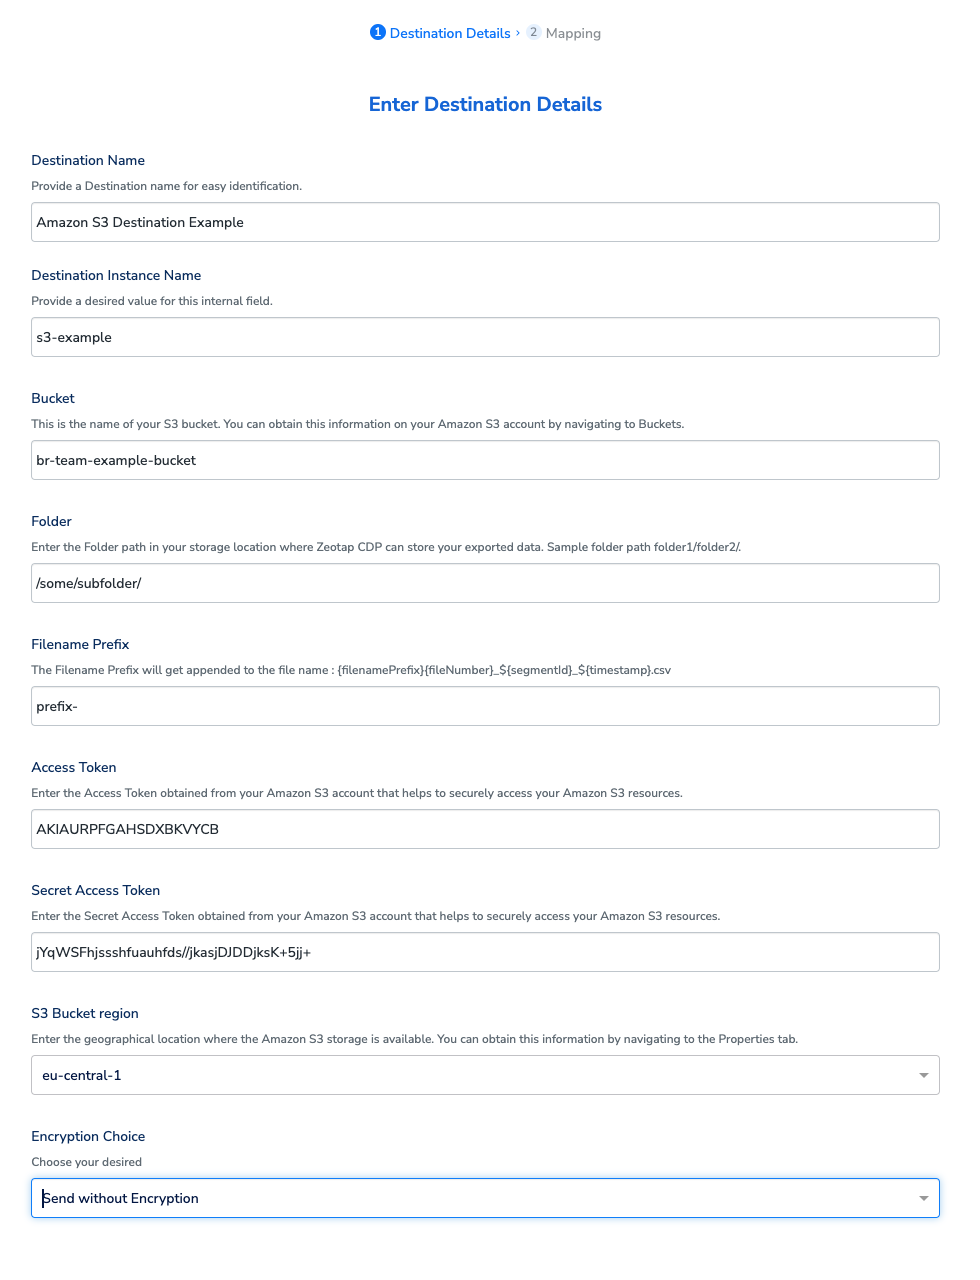
.png?fit=max&auto=format&n=99ae7Xt83Dkoy1LQ&q=85&s=f6ada97715a2a4a0469fef53698ac3b9) Click **Amazon S3**. A screen appears displaying details about the particular destination towards the left. On the right-hand side of the screen find a list of fields that are required for the integration to be established. Provide the required details as mentioned in the following steps:
a. Enter a name for the Destination.
b. Enter the **Destination Instance Name**.
c. In the **Bucke** **t** field, provide the name of the Amazon S3 Bucket.
d. In the **S3 Bucket Regio** **n** field, provide the geographical region where your Amazon S3 bucket is available.
e. In the **Folde** **r** field, provide the folder path in your storage location where Zeotap CDP can store your exported data.
f. Under **Filename Prefix,** enter a text value without special characters, such as underscores (\_), spaces, or symbols (`#, @, $, %, &, *`). Note that the file name follows the format: `${filenamePrefix}part-${sequence}_${destinationAudienceId}_${timestamp}.csv`, where the timestamp is in yyyy-MM-dd format and destinationAudienceId is the ID associated with your audience (segment) in Zeotap CDP, which is generated by the Zeotap CDP after the audience (segment) is linked to a Destination.
Click **Amazon S3**. A screen appears displaying details about the particular destination towards the left. On the right-hand side of the screen find a list of fields that are required for the integration to be established. Provide the required details as mentioned in the following steps:
a. Enter a name for the Destination.
b. Enter the **Destination Instance Name**.
c. In the **Bucke** **t** field, provide the name of the Amazon S3 Bucket.
d. In the **S3 Bucket Regio** **n** field, provide the geographical region where your Amazon S3 bucket is available.
e. In the **Folde** **r** field, provide the folder path in your storage location where Zeotap CDP can store your exported data.
f. Under **Filename Prefix,** enter a text value without special characters, such as underscores (\_), spaces, or symbols (`#, @, $, %, &, *`). Note that the file name follows the format: `${filenamePrefix}part-${sequence}_${destinationAudienceId}_${timestamp}.csv`, where the timestamp is in yyyy-MM-dd format and destinationAudienceId is the ID associated with your audience (segment) in Zeotap CDP, which is generated by the Zeotap CDP after the audience (segment) is linked to a Destination.
 | **Variable** | **Description** |
| :------------------------- | :------------------------------------------------------------------------------------------------------------------------ |
| `filenamePrefix` | The prefix for the file name, typically indicating the context or purpose of the file (e.g., the segment or export type). |
| `part-${sequence}` | A sequential number or identifier indicating the part or chunk number if the data is split across multiple files. |
| `${destinationAudienceId}` | The unique ID assigned by Zeotap CDP to the audience (segment) after it is linked to a Destination. |
| `${timestamp}` | The date when the file is generated, formatted as `yyyy-MM-dd` (e.g., 2024-08-06). |
| `.csv` | The file extension, indicating that the file is in CSV (Comma-Separated Values) format. |
**Example File Name:**
`exportpart-01_894548842_2024-08-06.csv`
g. Enter **Access Token** and **Secret Access Token** that you obtained from your Amazon S3 account.
h. Review all the values entered above and then click **Next** to proceed.
| **Variable** | **Description** |
| :------------------------- | :------------------------------------------------------------------------------------------------------------------------ |
| `filenamePrefix` | The prefix for the file name, typically indicating the context or purpose of the file (e.g., the segment or export type). |
| `part-${sequence}` | A sequential number or identifier indicating the part or chunk number if the data is split across multiple files. |
| `${destinationAudienceId}` | The unique ID assigned by Zeotap CDP to the audience (segment) after it is linked to a Destination. |
| `${timestamp}` | The date when the file is generated, formatted as `yyyy-MM-dd` (e.g., 2024-08-06). |
| `.csv` | The file extension, indicating that the file is in CSV (Comma-Separated Values) format. |
**Example File Name:**
`exportpart-01_894548842_2024-08-06.csv`
g. Enter **Access Token** and **Secret Access Token** that you obtained from your Amazon S3 account.
h. Review all the values entered above and then click **Next** to proceed.
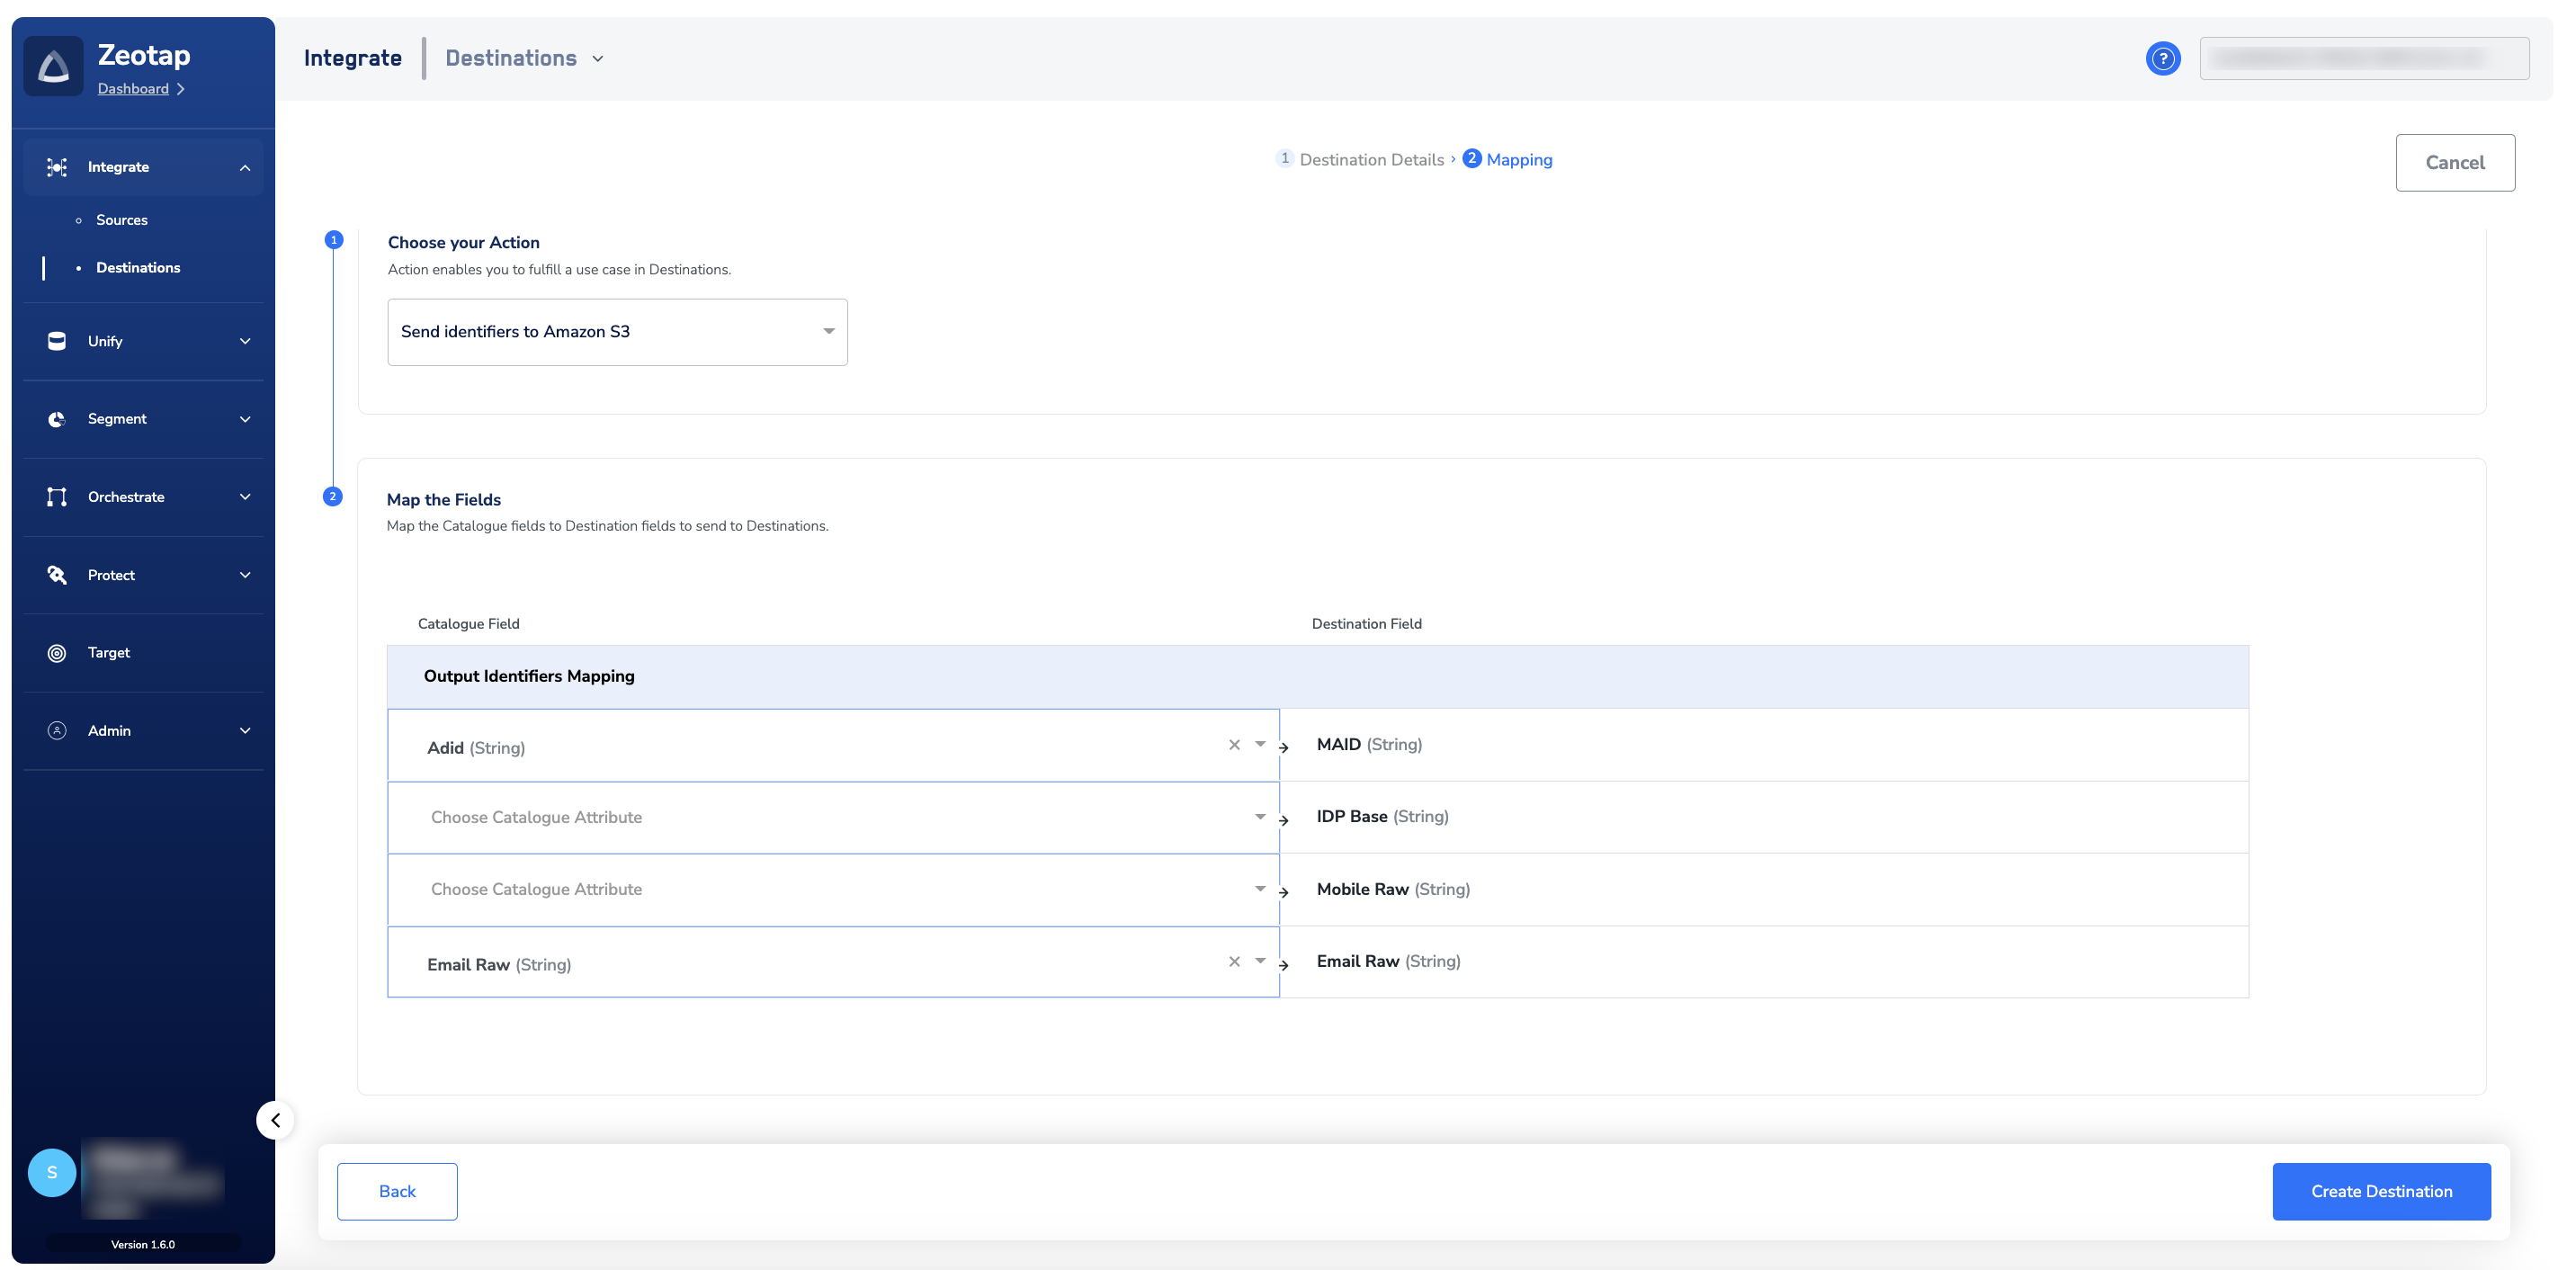
 In the new screen that appears, choose the appropriate [action](/articles/integrate-customer/destinations#actions) and mapping as explained below. Under **Choose your Action**, you can either choose **Send Identifiers to Amazon S3** or **Send attributes and identifiers to Amazon S3** as the action for activating your audience (segment) in Audiences.
a. If you choose **Send identifiers to Amazon S3** as your action, then you can send MAIDs, IDP Base, raw mobile numbers, raw email addresses to Amazon S3.
In the new screen that appears, choose the appropriate [action](/articles/integrate-customer/destinations#actions) and mapping as explained below. Under **Choose your Action**, you can either choose **Send Identifiers to Amazon S3** or **Send attributes and identifiers to Amazon S3** as the action for activating your audience (segment) in Audiences.
a. If you choose **Send identifiers to Amazon S3** as your action, then you can send MAIDs, IDP Base, raw mobile numbers, raw email addresses to Amazon S3.
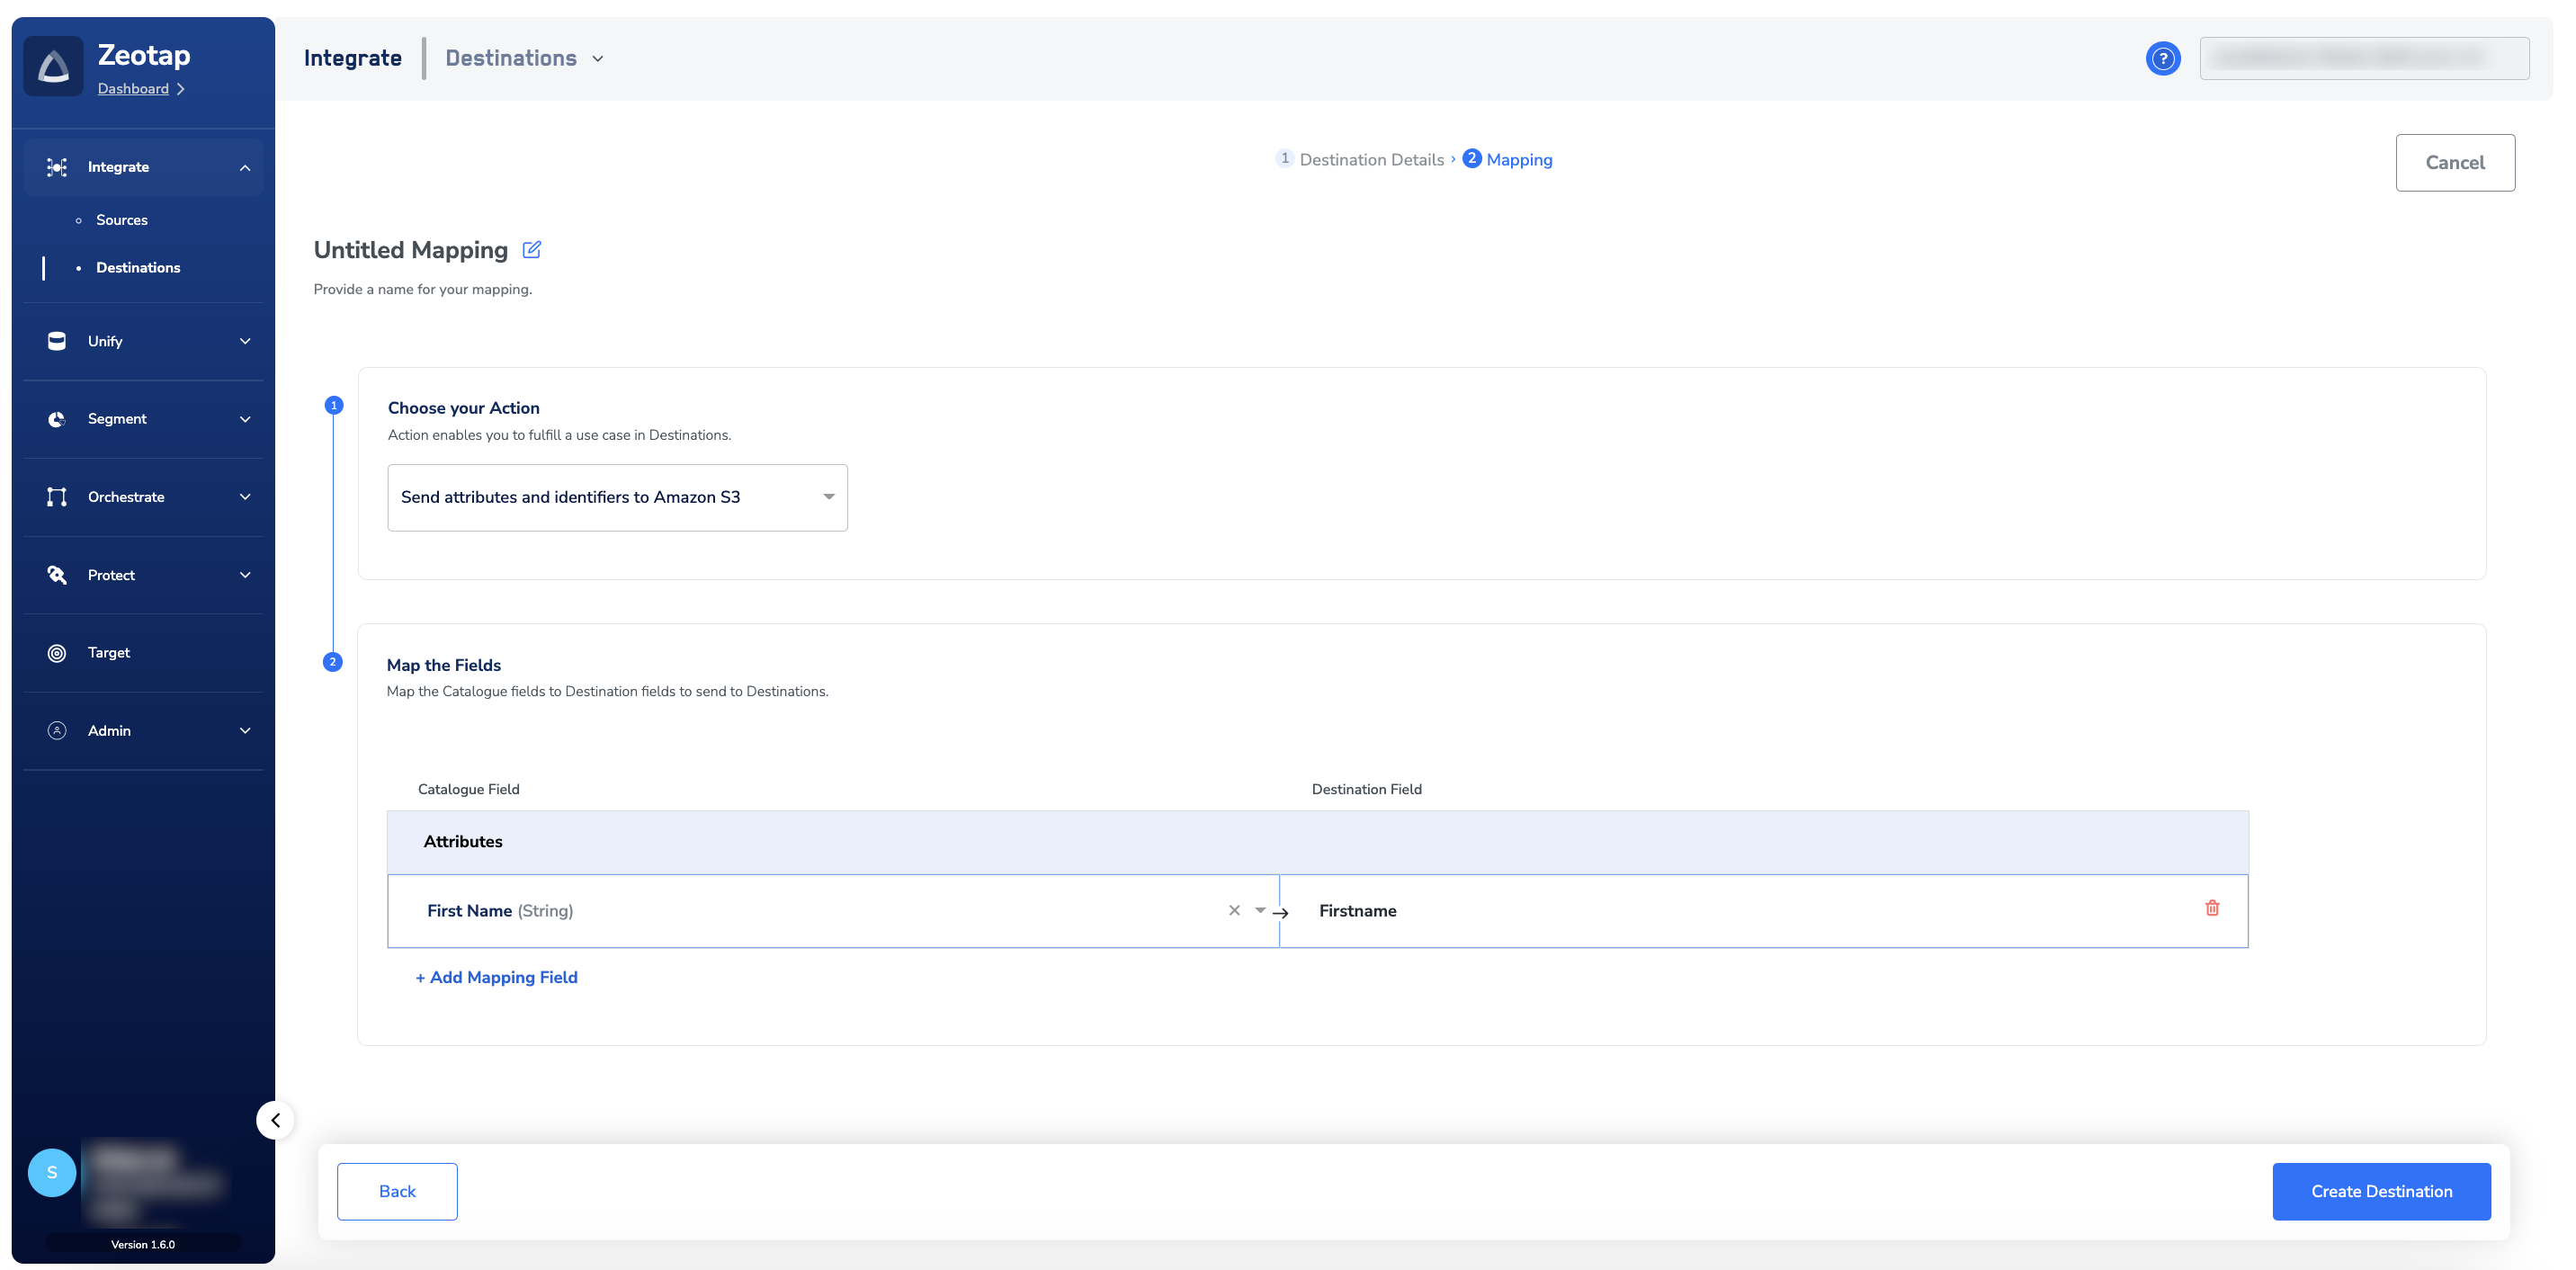
 b. If you choose **Send attributes and identifiers to Amazon S3** as your action, then you can send any attributes and identifiers to Amazon S3. Use the **+ Add Mapping Field** option to add the attributes and identifiers.
 Click **Create Destination**. The created Destination gets listed in the **Audiences** application, which can be linked to an audience.
## Link an Audience to the Amazon S3 Destination
For information about how to link an Audience or segment to the created Destination in **Audiences** application, refer [here](/articles/integrate-customer/link-an-audience-to-the-destination "https://docs.zeotap.com/articles/integrate-customer/link-an-audience-to-the-destination").
## Steps to Connect S3 to tableau
## Overview: Tableau Amazon S3 Connector
The Tableau Amazon S3 connector lets you connect Tableau directly to data files stored in Amazon S3 buckets. Supported file formats include CSV, Excel, and Parquet, including both compressed and uncompressed files. This connection enables Tableau analysts to prep, discover, and visualize insights from cloud data, leveraging Tableau's Hyper engine for high performance.
## How the Connector Works
## Prerequisites
* Tableau Desktop or Server (2023.2 or later recommended)
* AWS IAM credentials with read access to the S3 bucket
* The Amazon S3 connector installed via Tableau Exchange if not present
**Install the Connector**
If necessary, download the connector (.taco file) and place it in Tableau's "Connectors" folder for your operating system. Restart Tableau.
**Create a Connection**
* Launch Tableau and go to **Connect** > **To a Server** > **Amazon S3**.
* Enter AWS region, S3 bucket name, your IAM Access Key ID and Secret Access Key.
* Click **Sign In**.
**Browse and Select Files**
* Upon successful authentication, you'll see the contents of your bucket.
* Navigate folders and select the relevant file(s). You can drag multiple files into Tableau's canvas to create unions or joins if desired.
**Configure Data Source**
* Optionally rename your data source for clarity.
* Drag files into the canvas as needed.
* Use Tableau's data prep tools (join, union, filter) to organize your data quickly.
* Click into *Sheet 1* or further tabs to begin your analysis.
Click **Create Destination**. The created Destination gets listed in the **Audiences** application, which can be linked to an audience.
## Link an Audience to the Amazon S3 Destination
For information about how to link an Audience or segment to the created Destination in **Audiences** application, refer [here](/articles/integrate-customer/link-an-audience-to-the-destination "https://docs.zeotap.com/articles/integrate-customer/link-an-audience-to-the-destination").
## Steps to Connect S3 to tableau
## Overview: Tableau Amazon S3 Connector
The Tableau Amazon S3 connector lets you connect Tableau directly to data files stored in Amazon S3 buckets. Supported file formats include CSV, Excel, and Parquet, including both compressed and uncompressed files. This connection enables Tableau analysts to prep, discover, and visualize insights from cloud data, leveraging Tableau's Hyper engine for high performance.
## How the Connector Works
## Prerequisites
* Tableau Desktop or Server (2023.2 or later recommended)
* AWS IAM credentials with read access to the S3 bucket
* The Amazon S3 connector installed via Tableau Exchange if not present
**Install the Connector**
If necessary, download the connector (.taco file) and place it in Tableau's "Connectors" folder for your operating system. Restart Tableau.
**Create a Connection**
* Launch Tableau and go to **Connect** > **To a Server** > **Amazon S3**.
* Enter AWS region, S3 bucket name, your IAM Access Key ID and Secret Access Key.
* Click **Sign In**.
**Browse and Select Files**
* Upon successful authentication, you'll see the contents of your bucket.
* Navigate folders and select the relevant file(s). You can drag multiple files into Tableau's canvas to create unions or joins if desired.
**Configure Data Source**
* Optionally rename your data source for clarity.
* Drag files into the canvas as needed.
* Use Tableau's data prep tools (join, union, filter) to organize your data quickly.
* Click into *Sheet 1* or further tabs to begin your analysis.