> ## Documentation Index
> Fetch the complete documentation index at: https://docs.zeotap.com/llms.txt
> Use this file to discover all available pages before exploring further.
# Salesforce Marketing Cloud - Data Extension
## Overview
Salesforce Marketing Cloud - Data Extension is a platform support many facets of marketing including multi-channel campaign execution, dynamic customer journeys, pre- and post-campaign analytics including audience building and segmentation and much more. Integrated with Zeotap, it allows marketers to store, manage and segment their data for use in targeted marketing campaigns.
## Supported Identifiers/Attributes
Salesforce Marketing Cloud - Data Extension supports all identifiers that you would like to create using the [Data Extension table](#create-a-data-extension-table). You can send any number of identifiers and attributes to the Data Extension table from Zeotap CDP. Ensure that the corresponding columns are created for the identifiers and attributes in data extension before sending the data from Zeotap.
## Prerequisites
You must have an Admin account to be able to access all the features of Salesforce Marketing Cloud - Data Extension. To proceed with the integration, log into the Salesforce console and create a package.
### Create a Package
For this integration, a new role has to be created. Perform the following steps to create the new package:
Navigate to **Settings** > **Setup** > **Apps** > **Installed** **Packages**. The existing list of packages is displayed.
Click **New**.
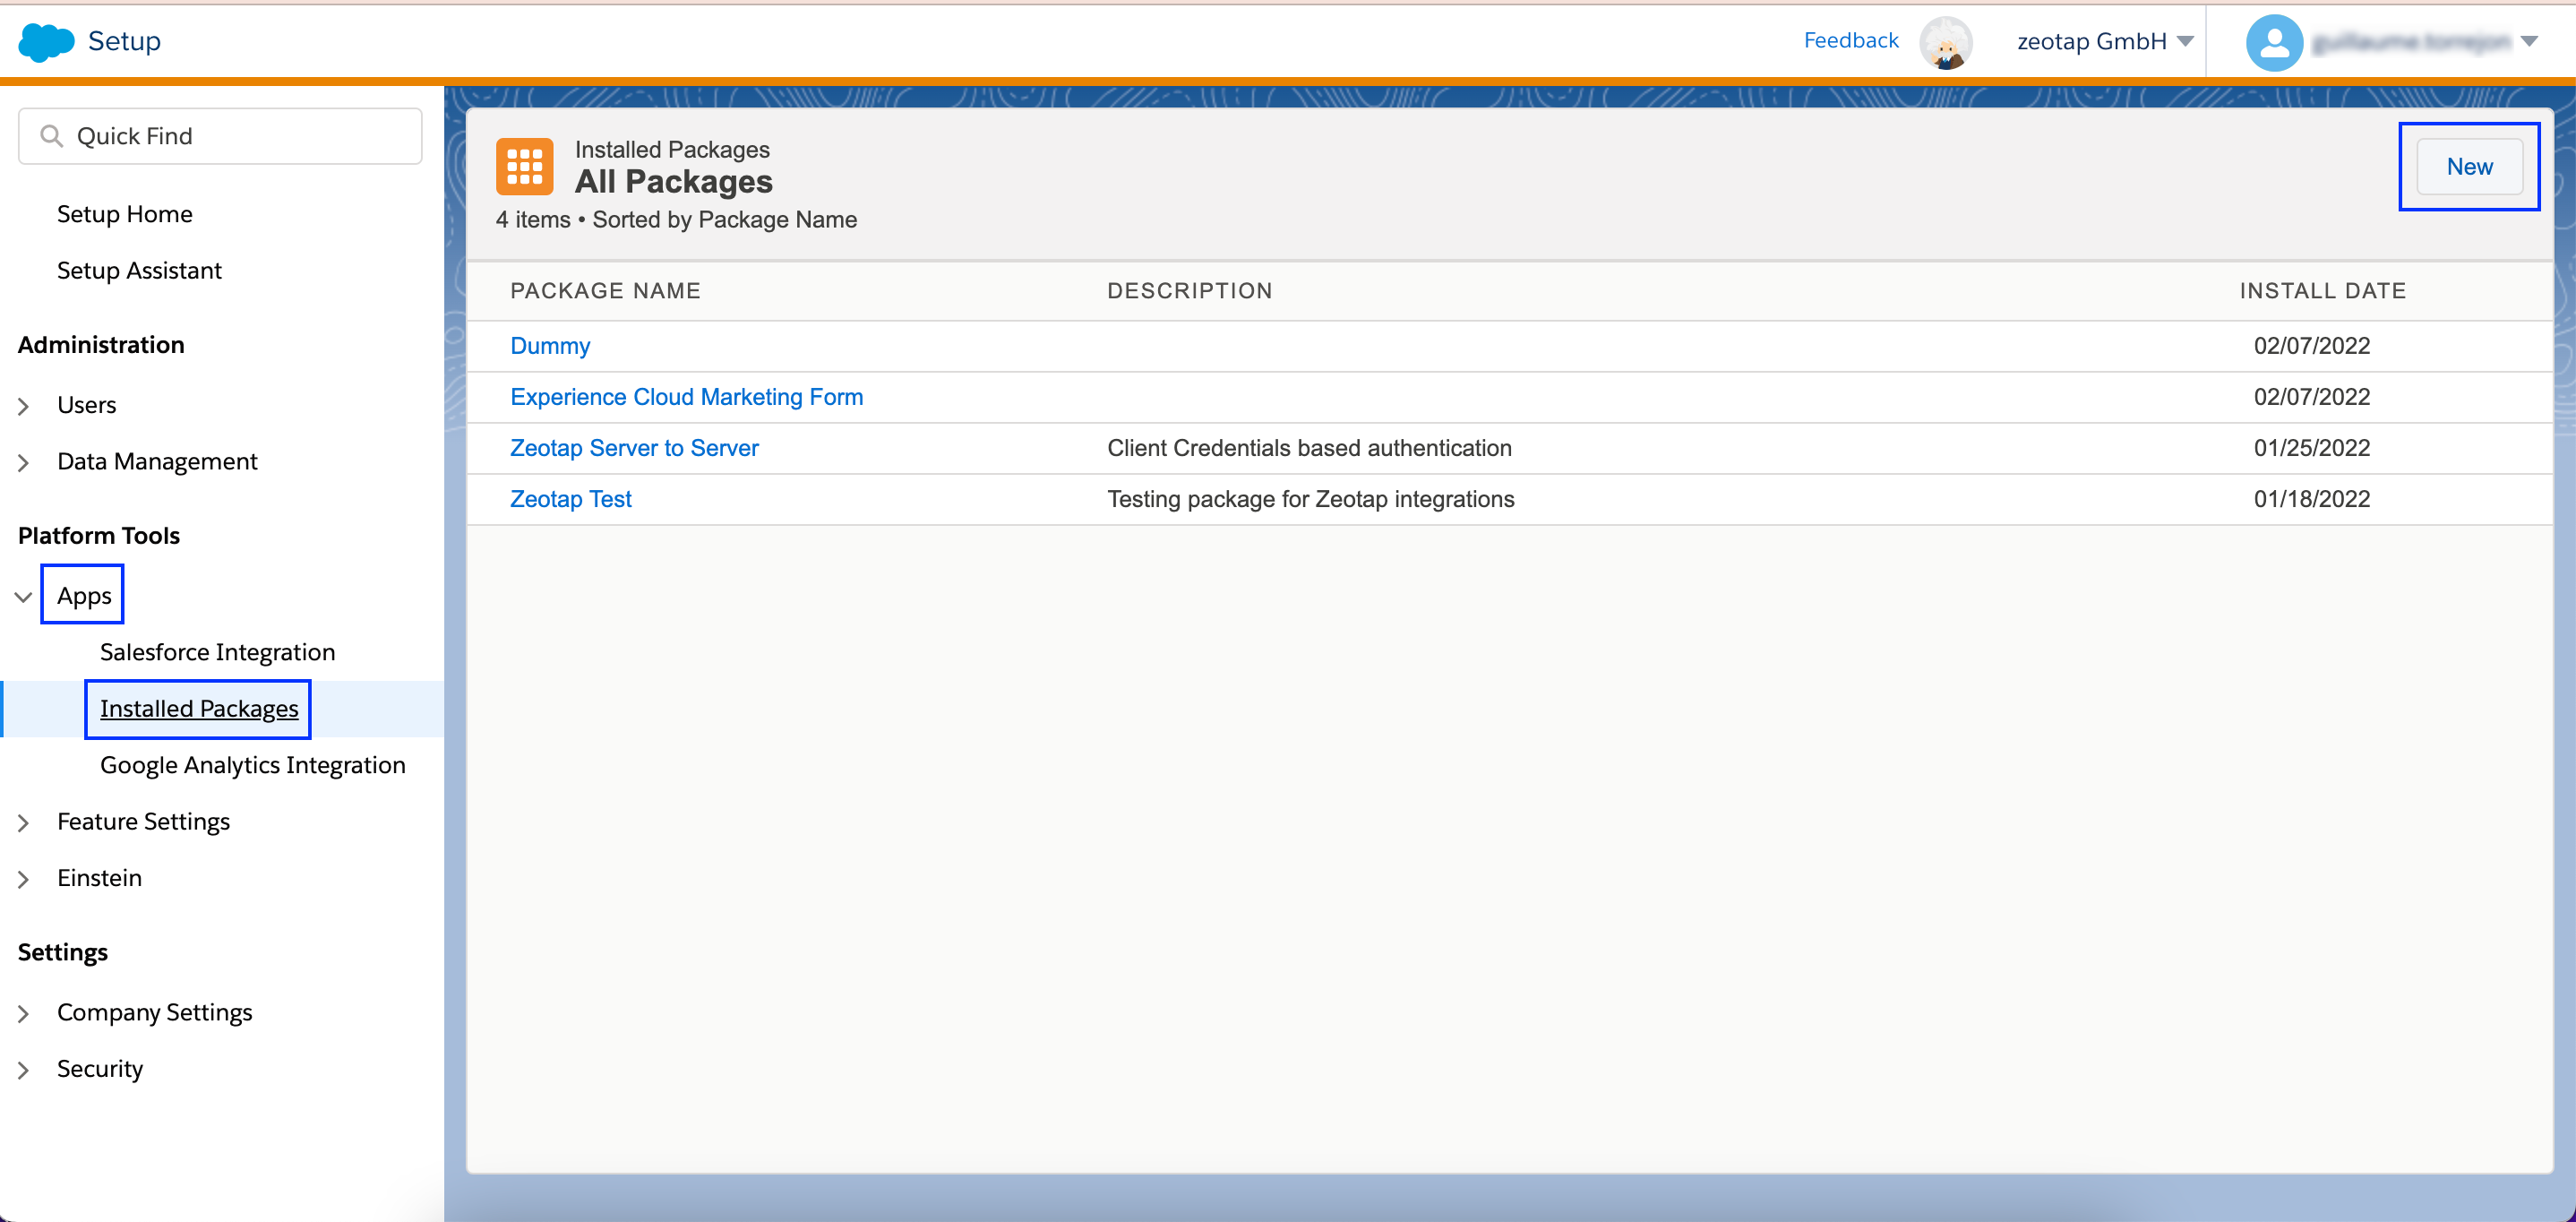 Enter a name for the package and save the changes. We recommend to include the word **Zeotap** in the package name for easy identification.
Click the package you created, and navigate to **Add Component**.
Enter a name for the package and save the changes. We recommend to include the word **Zeotap** in the package name for easy identification.
Click the package you created, and navigate to **Add Component**.
 Choose **API Integration** as the Component Type.
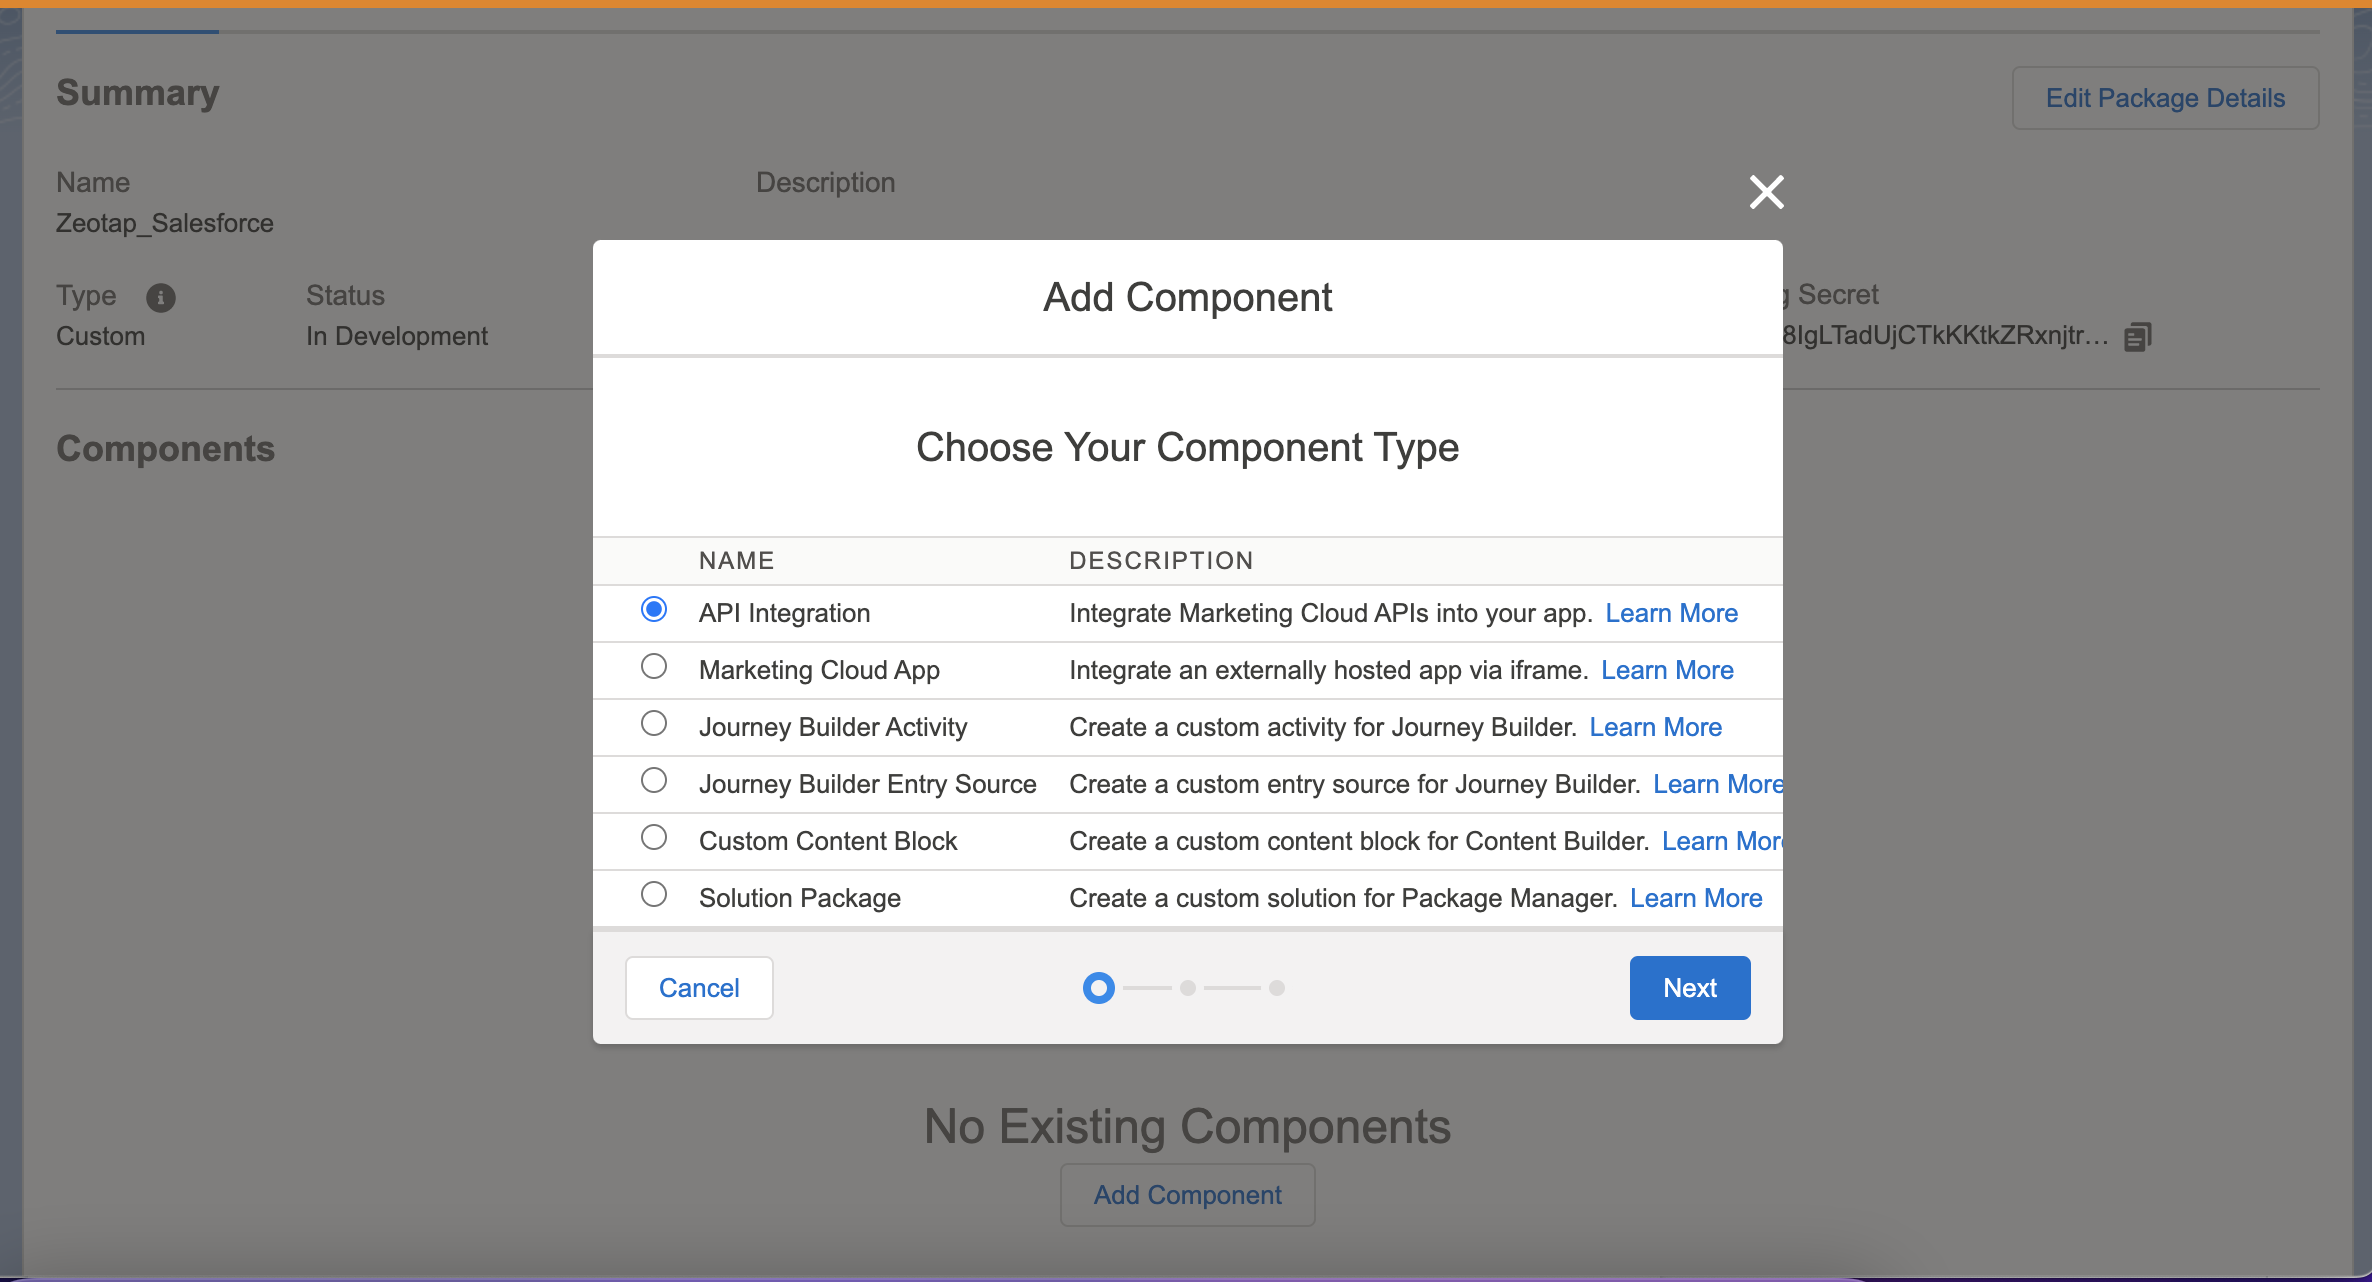 Click **Next**.
Choose **Server-to-Server** as the Integration Type.
Click **Next**.
Choose **Server-to-Server** as the Integration Type.
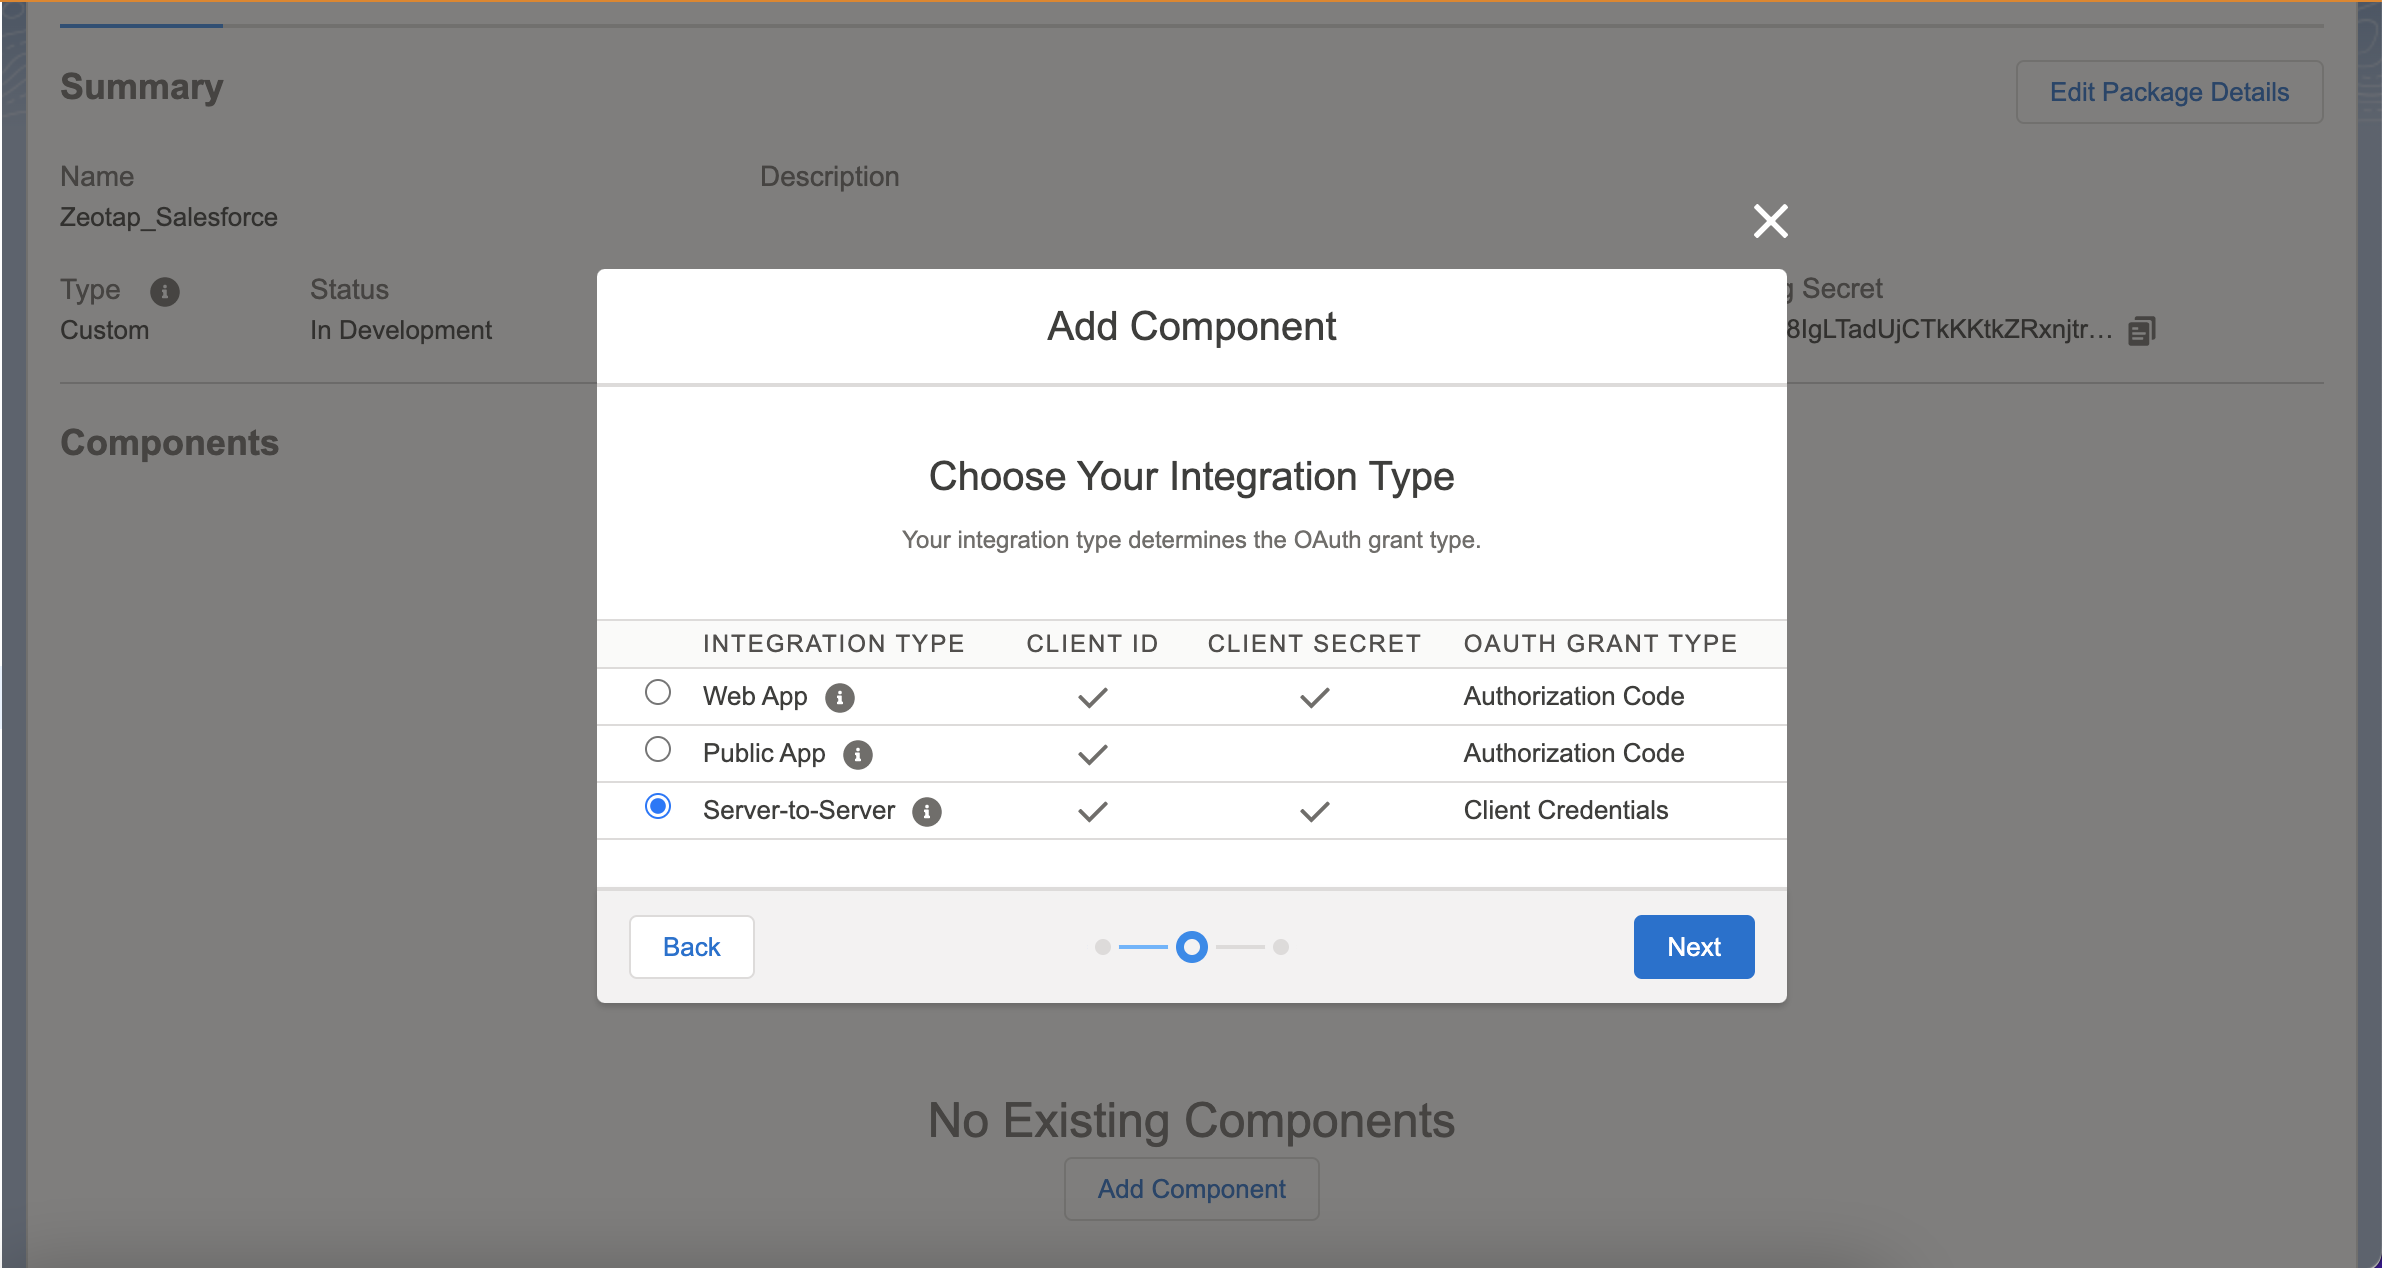 Click **Next**.
Under **DATA**, enable the **Read** and **Write** permissions for Data Extensions. Note that failing to add these permissions, may lead SFMC to send an Insufficient Privileges error.
Click **Next**.
Under **DATA**, enable the **Read** and **Write** permissions for Data Extensions. Note that failing to add these permissions, may lead SFMC to send an Insufficient Privileges error.
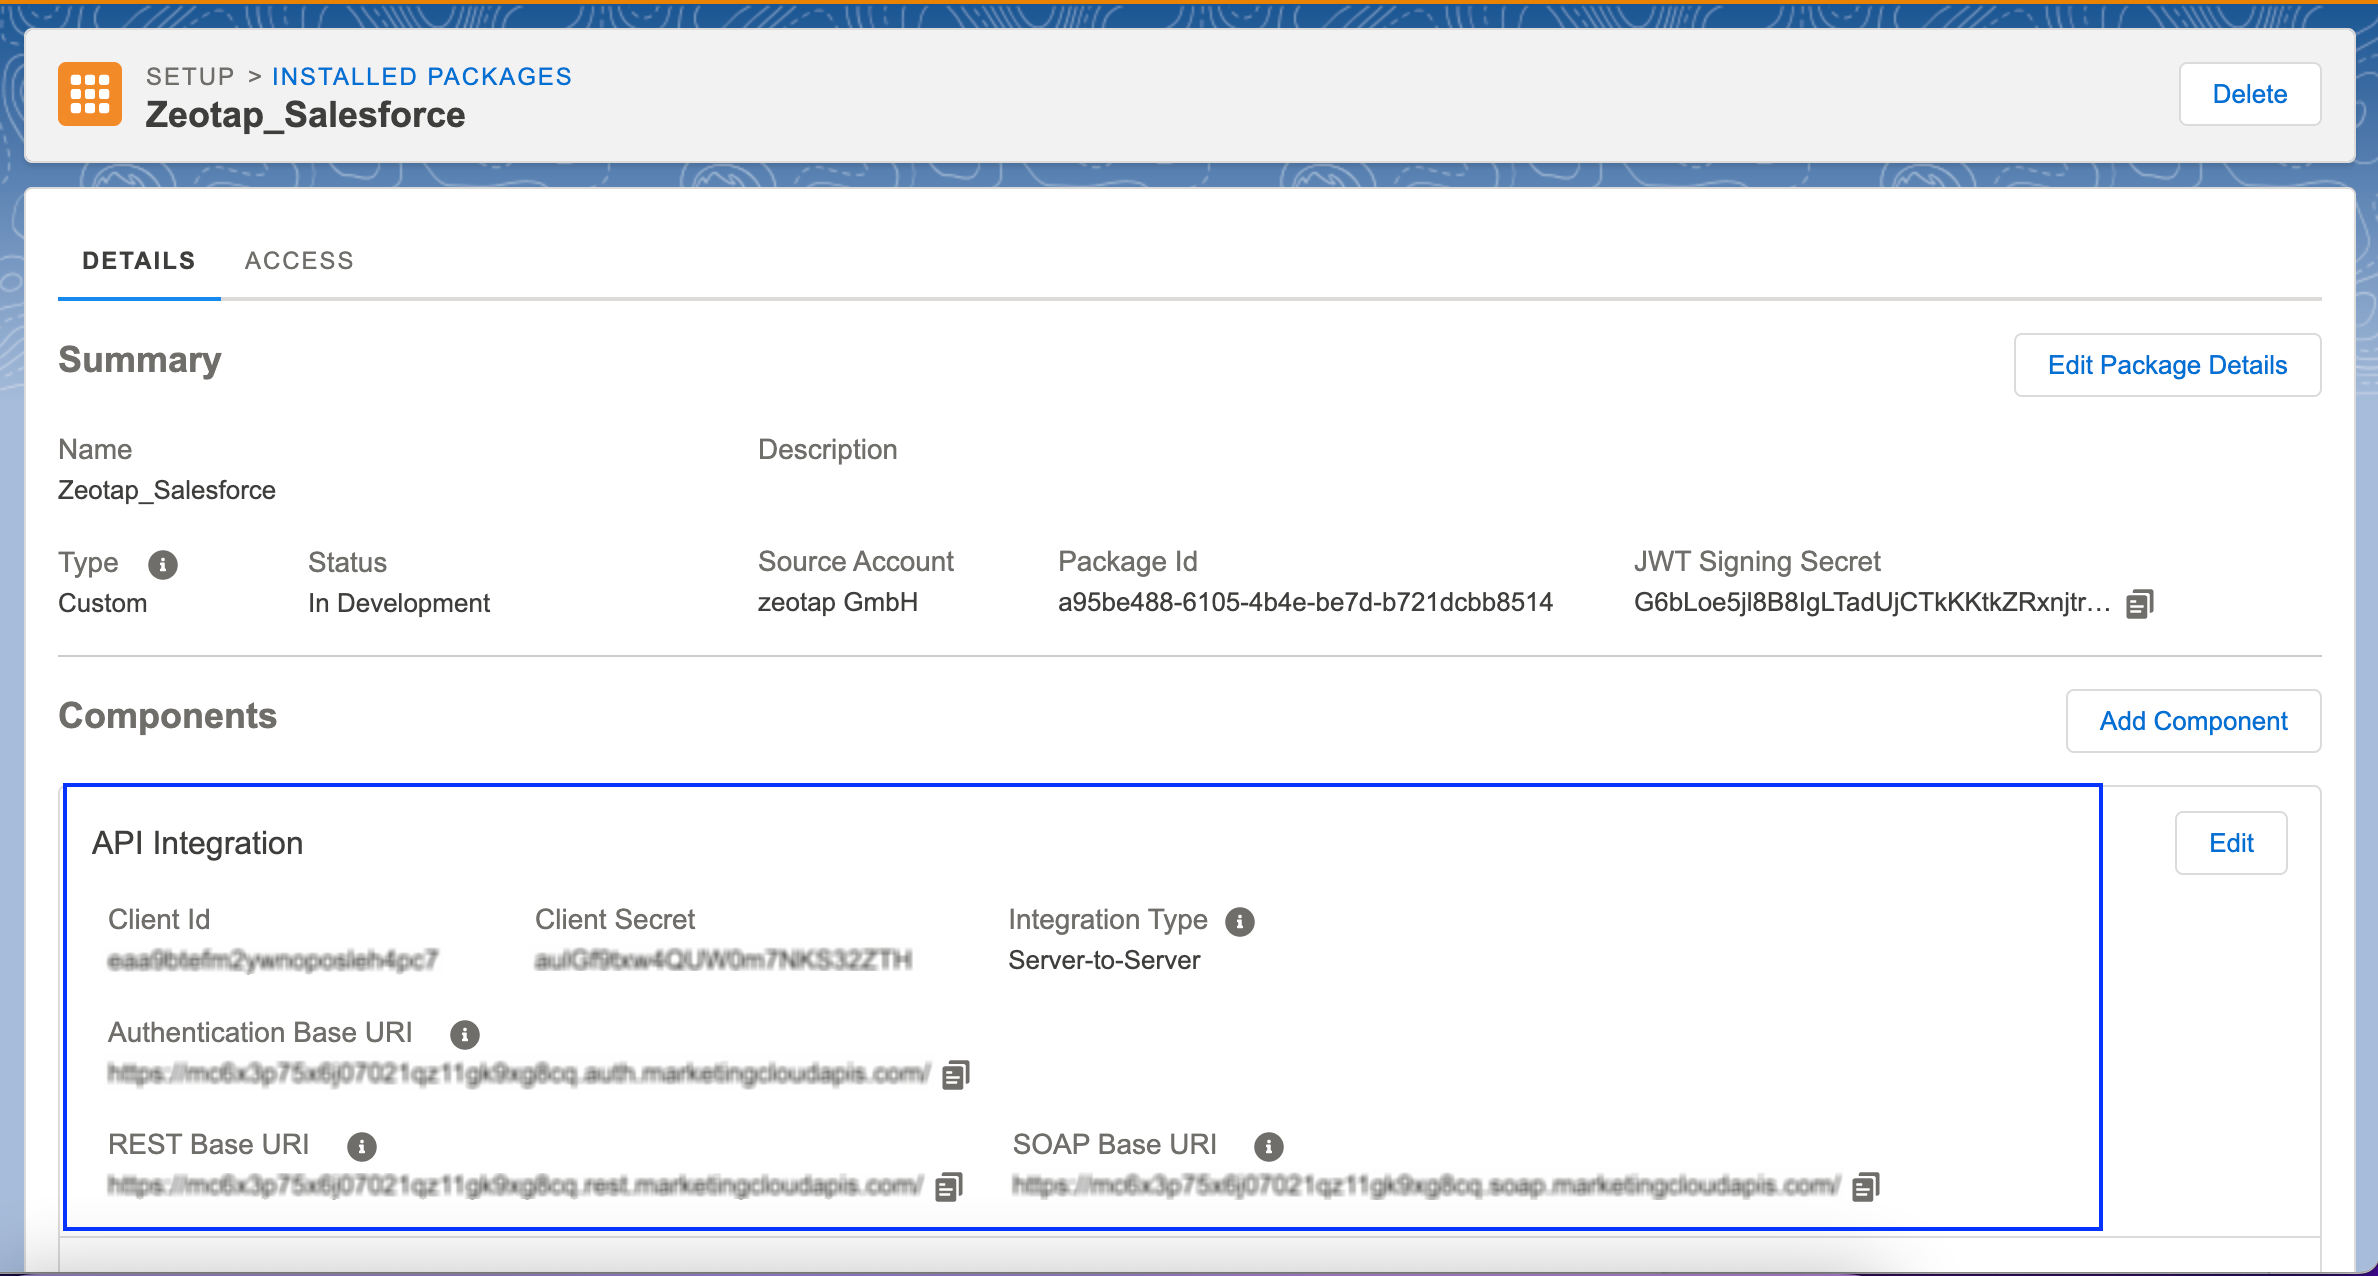
 Click **Save**. The API Integration details are visible under the package summary.
 ### Create a Data Extension Table
To send data to the Data Extension table of Salesforce Marketing Cloud, start by creating a data extension table. To do so, perform the following steps:
Navigate to **Audience Builder > Contact Builder > Data Extensions** in the Salesforce Marketing Cloud console.
Click **Create**.
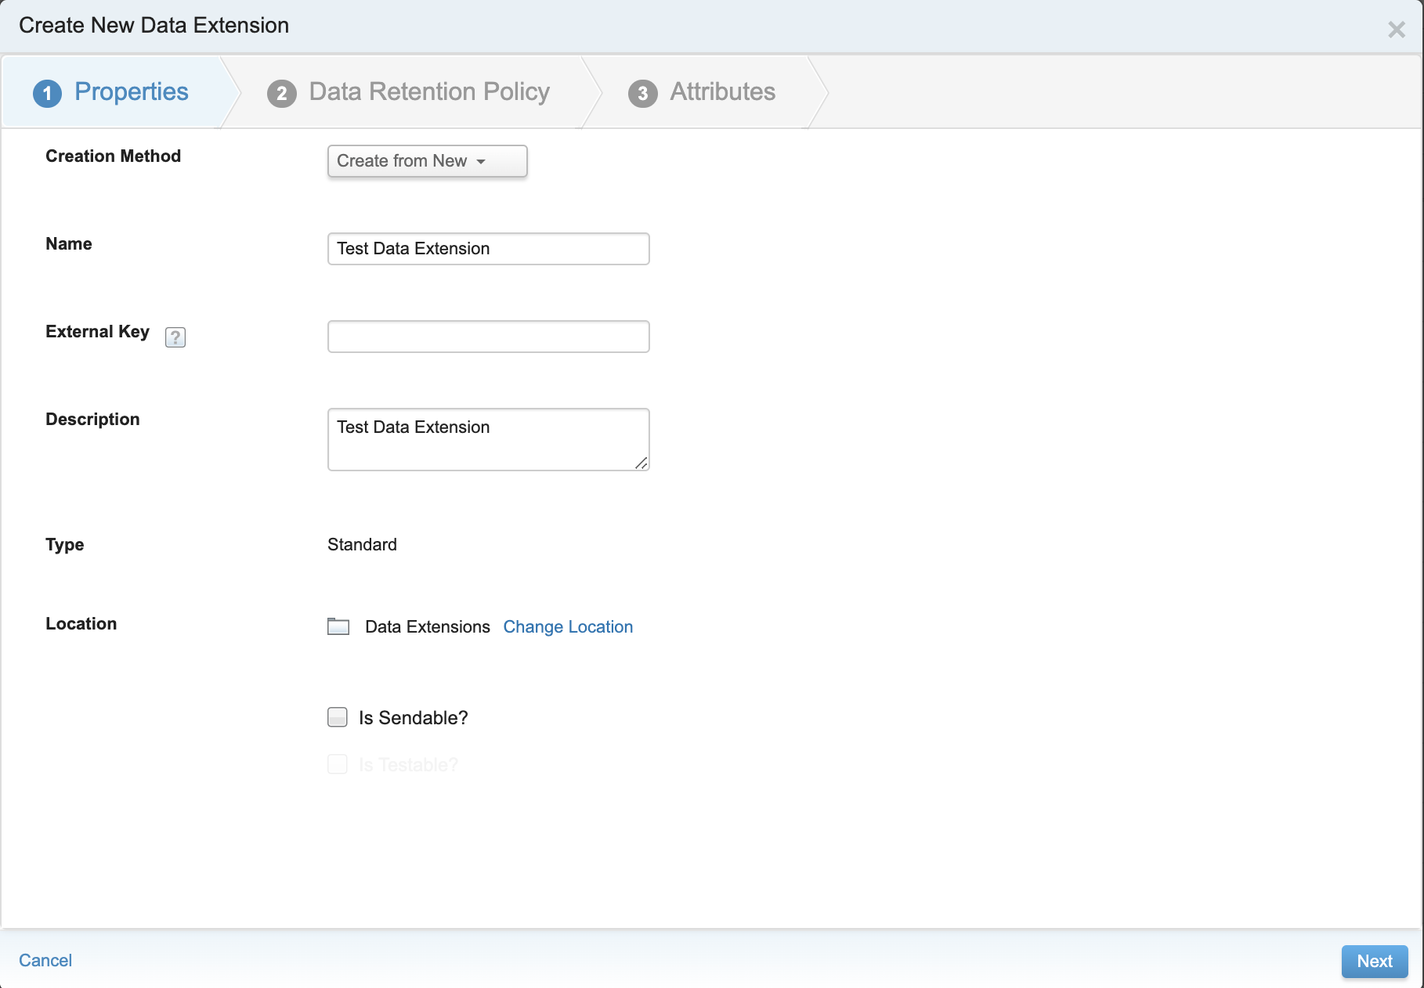
Under **Properties** section, enter the following details:
a. Use the drop-down menu to choose **Create from New** for **Creation Method**.
### Create a Data Extension Table
To send data to the Data Extension table of Salesforce Marketing Cloud, start by creating a data extension table. To do so, perform the following steps:
Navigate to **Audience Builder > Contact Builder > Data Extensions** in the Salesforce Marketing Cloud console.
Click **Create**.
Under **Properties** section, enter the following details:
a. Use the drop-down menu to choose **Create from New** for **Creation Method**.
b. Provide a suitable **Name** for the table and relevant **Description** in the respective fields.
c. For **External Key**, use the system-generated key if the external key is not provided.
d. Currently, only **Standard** is supported as the **Type** (Data Extension).
e. Select the **Is Sendable?** checkbox to enable sending messages to this data extension.
 Under **Data Retention Policy**, enter the required **Data Extension** details.
Under **Attributes**, configure as below to use the **AUDIENCES** module for activating your audience.
a. Zeotap supports data syncing to any number of columns, ensure that you have added at least one column to the table.
Under **Data Retention Policy**, enter the required **Data Extension** details.
Under **Attributes**, configure as below to use the **AUDIENCES** module for activating your audience.
a. Zeotap supports data syncing to any number of columns, ensure that you have added at least one column to the table.
b. Configure the attribute added inside the first column as the **Primary Key** using the check box. Ensure that at least one attribute created in the data extension is chosen as a primary key.
c. Enter the **Length** details based on the size of attributes that the customer sends. Note that to send hashed emails from Zeotap, set the length of the column to 200.
d. Review all the fields and click **Complete**.
**Note:**
*Ensure that the **Name** of all the attributes provided while creating the data extension table should be exactly same as the Destination field name under **Map the fields** when creating the Destination. For example, if you create email as a column in the data extension, then make sure you add the Destination field as email for which you would like to send the email data from Zeotap CDP.*
Before you leave this screen, copy the **External Key for the Data Extension**. Next, you have to set up the Destination in Zeotap.
## Components of Salesforce Marketing Cloud - Data Extension
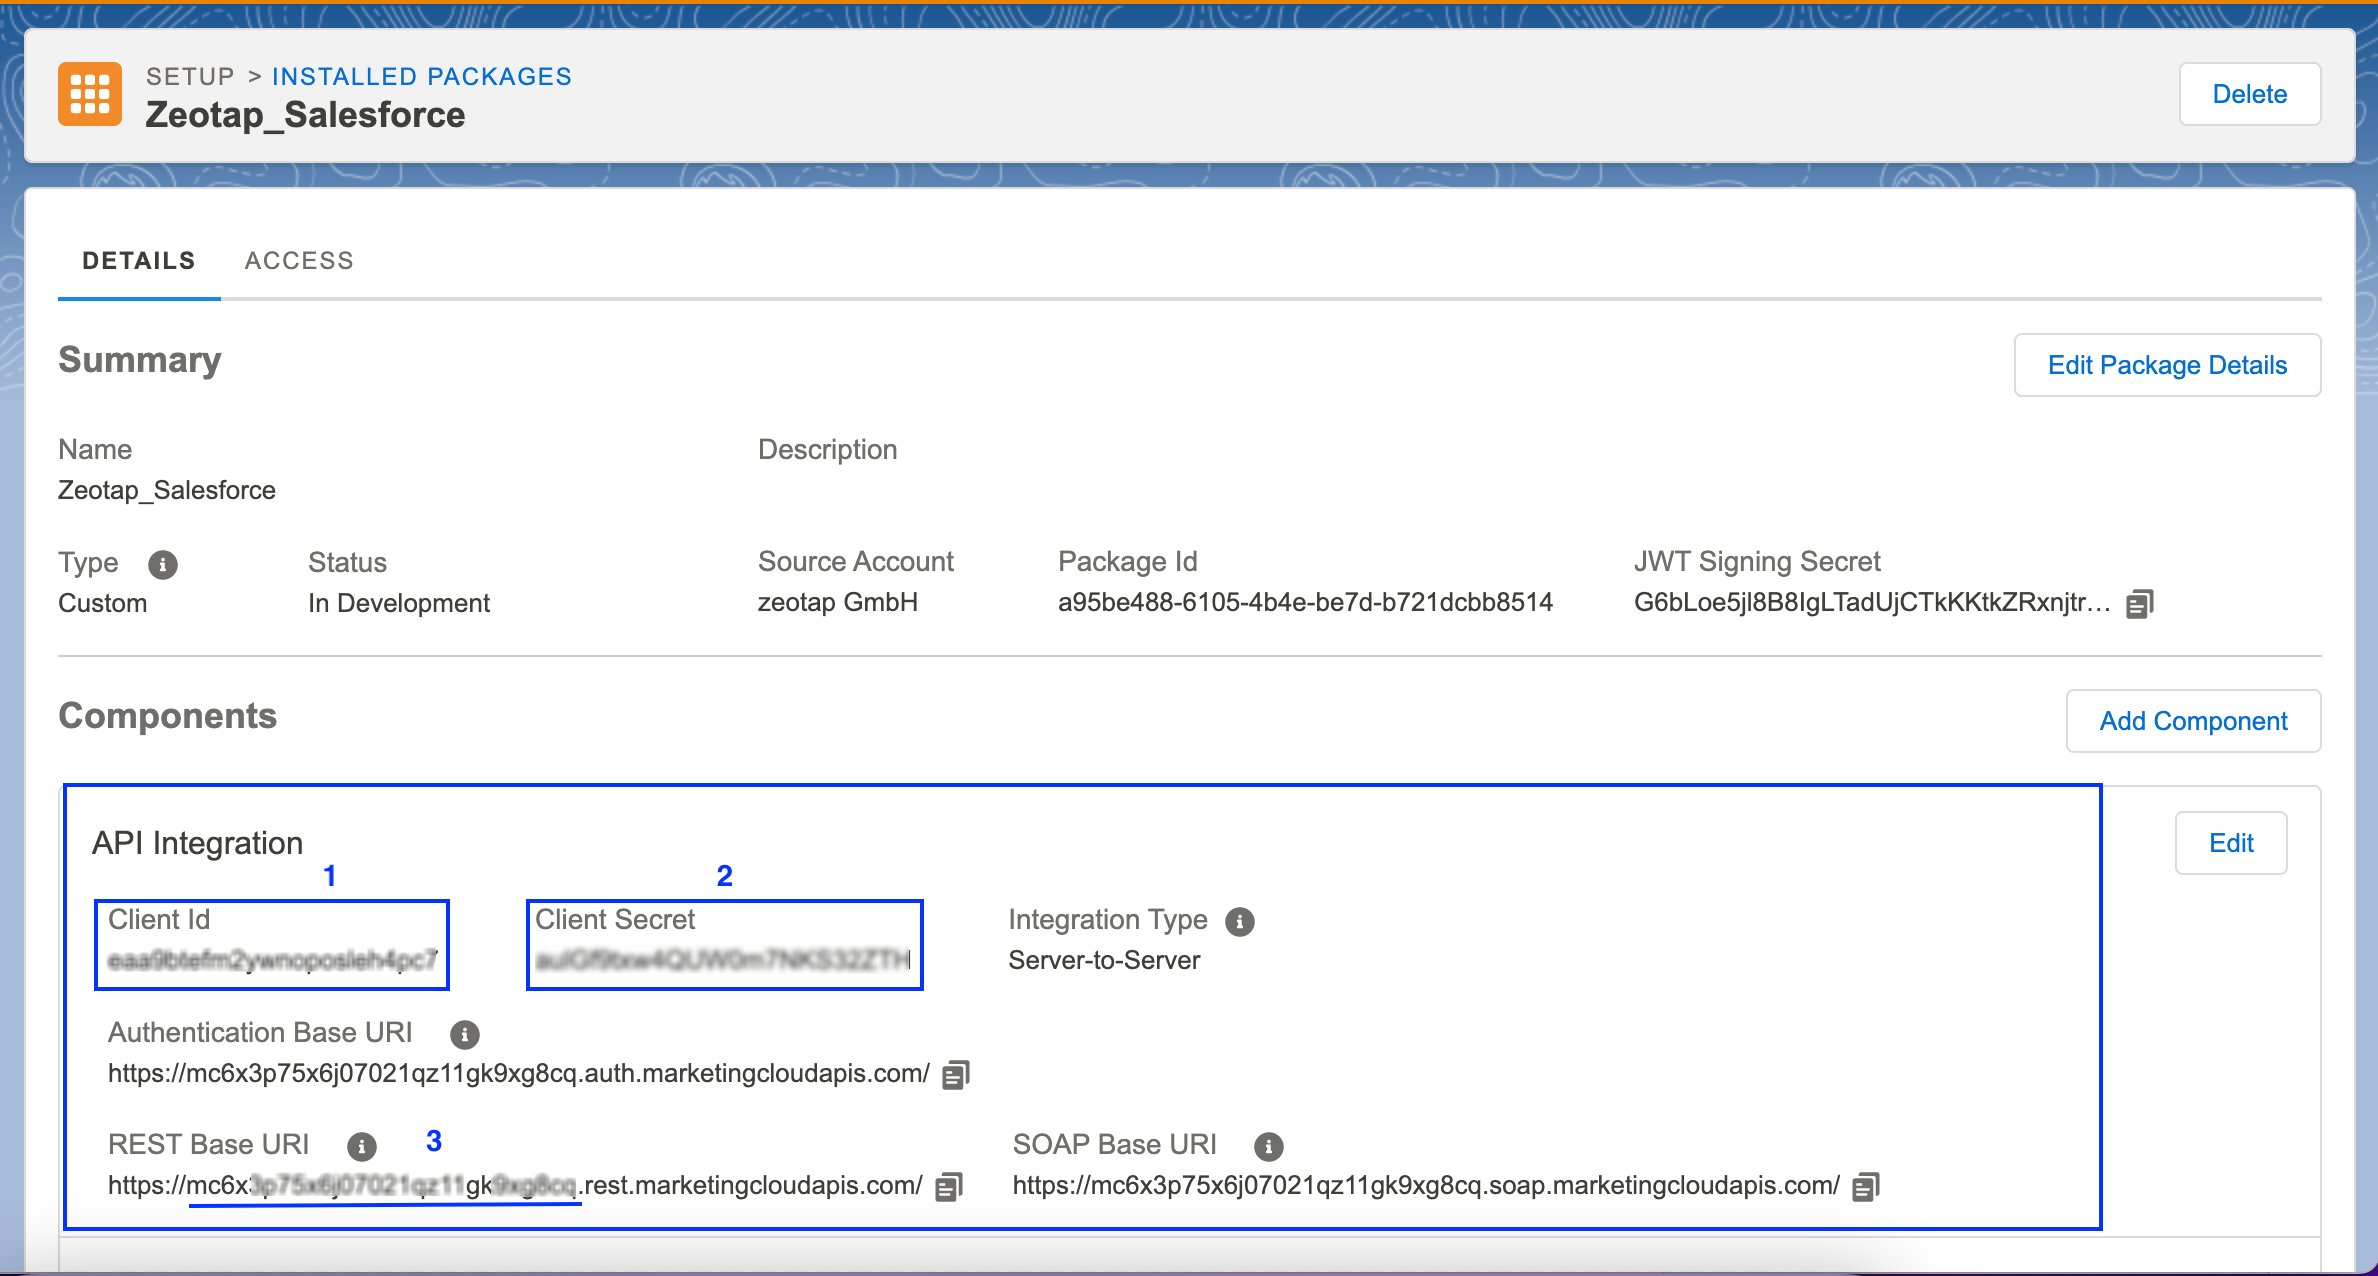 Under **Summary** of the installed package, you can find the following components that are essential for creating a Destination:
* **Client Id** - Marked as **1** in the above image
* **Client Secret** - Marked as **2** in the above image
* **Sub Domain** - Your subdomain is a 28-character string that starts with the letters "mc" in any of your base URIs. For example, in the base URI the subdomain is . You can find it marked as **3** in the above image.
* **Data Extension External Key**- This is the key that is generated when you create a Data Extension, as shown in the image below.
Under **Summary** of the installed package, you can find the following components that are essential for creating a Destination:
* **Client Id** - Marked as **1** in the above image
* **Client Secret** - Marked as **2** in the above image
* **Sub Domain** - Your subdomain is a 28-character string that starts with the letters "mc" in any of your base URIs. For example, in the base URI the subdomain is . You can find it marked as **3** in the above image.
* **Data Extension External Key**- This is the key that is generated when you create a Data Extension, as shown in the image below.
 ## Create a Destination for Salesforce Marketing Cloud- Data Extension
Perform the following steps to create a Destination for Salesforce Marketing Cloud- Data Extension:
Log into the Zeotap CDP App and go to the **DESTINATIONS** application.
Click **+ Create Destination.**
## Create a Destination for Salesforce Marketing Cloud- Data Extension
Perform the following steps to create a Destination for Salesforce Marketing Cloud- Data Extension:
Log into the Zeotap CDP App and go to the **DESTINATIONS** application.
Click **+ Create Destination.**
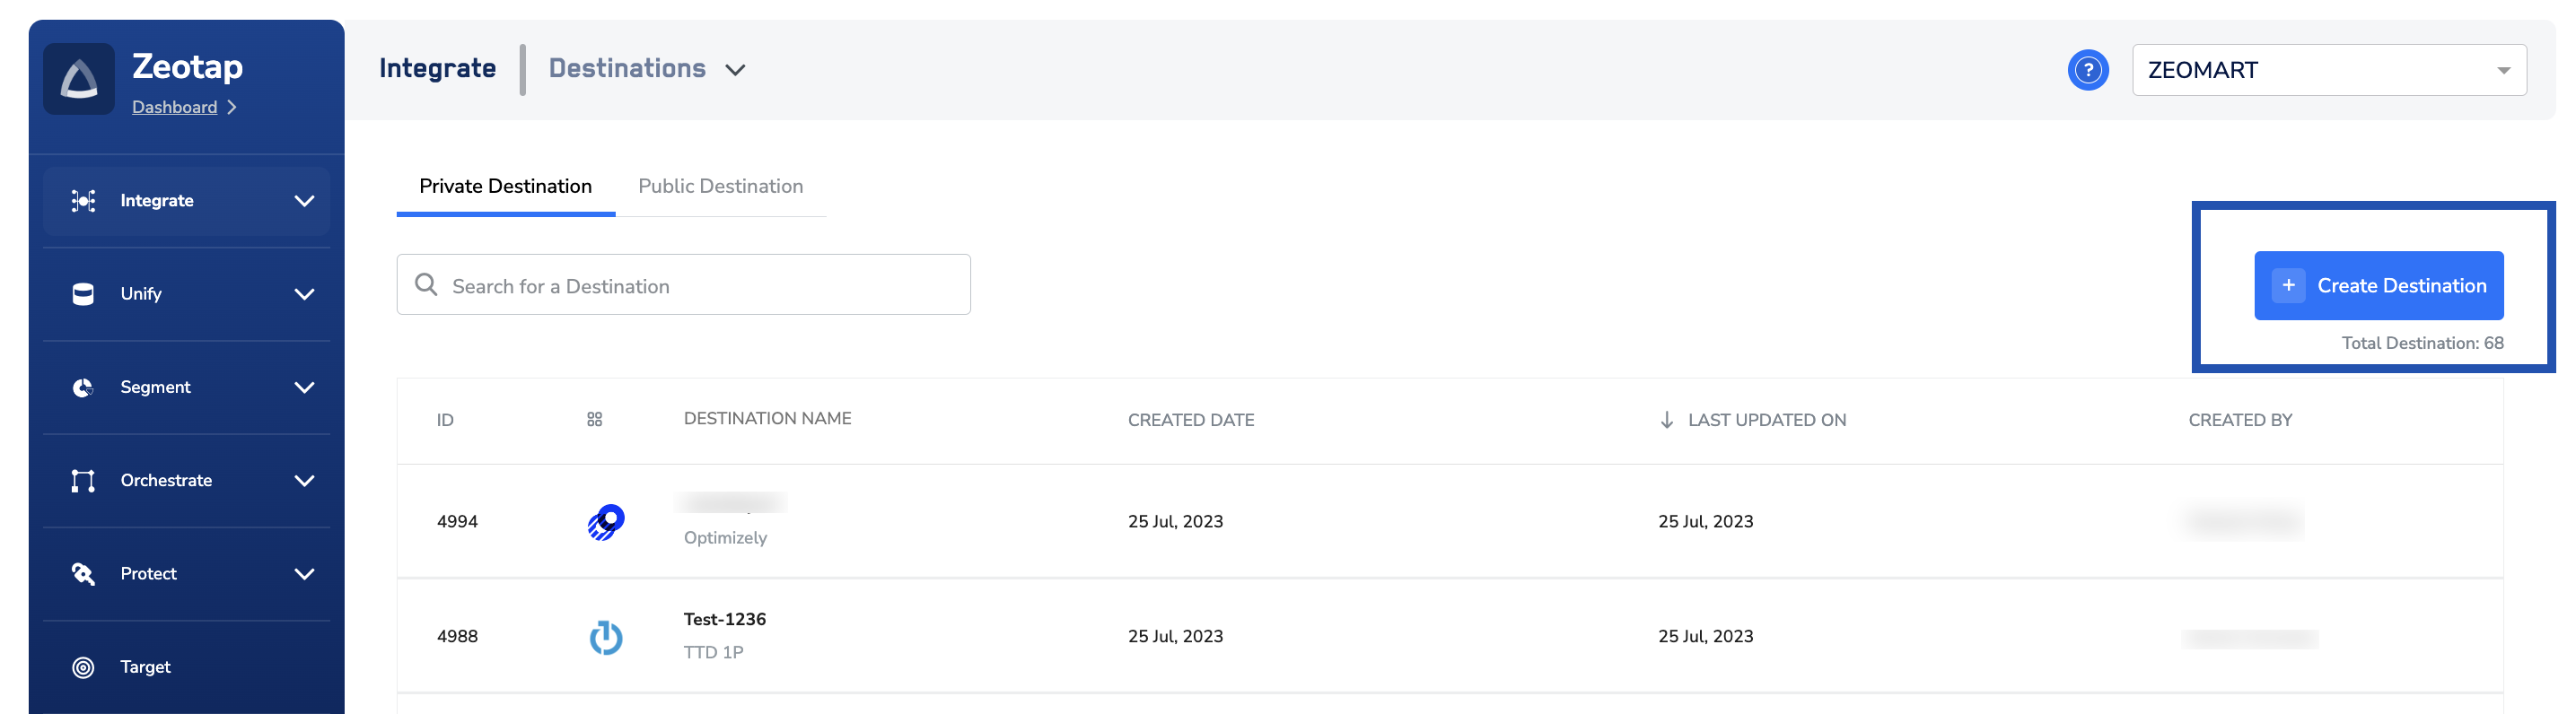 Under **All Destinations**, search for **Salesforce Marketing Cloud- Data Extension**.
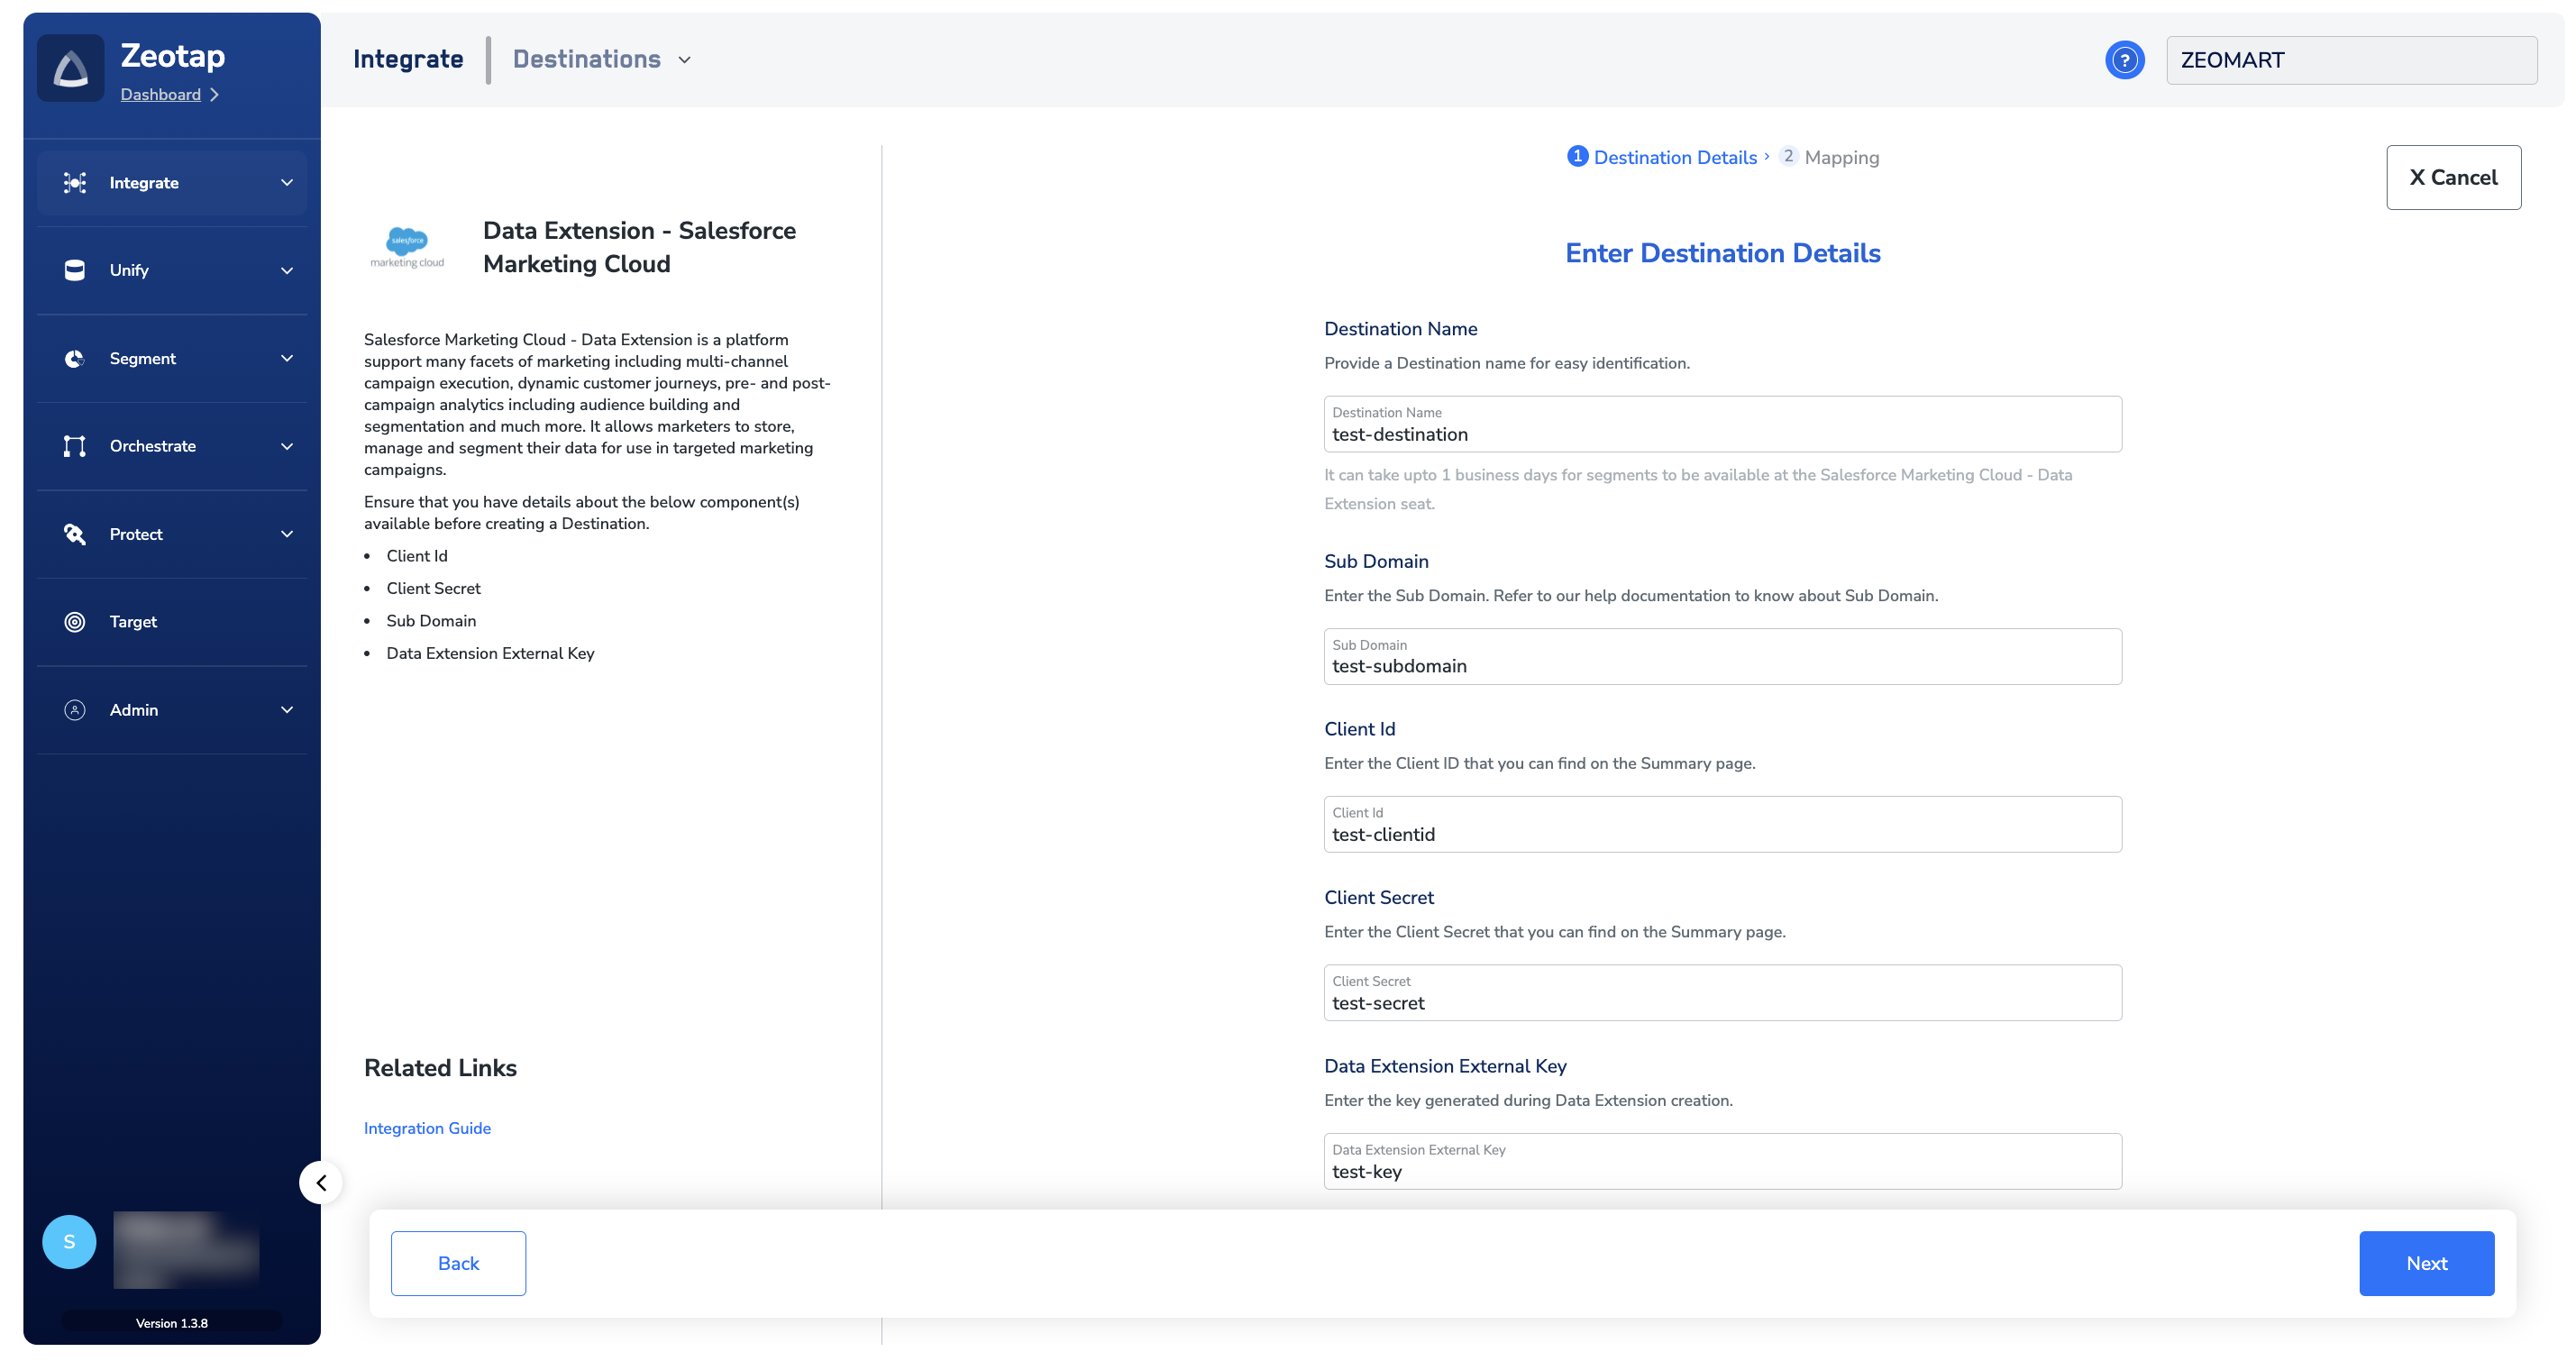
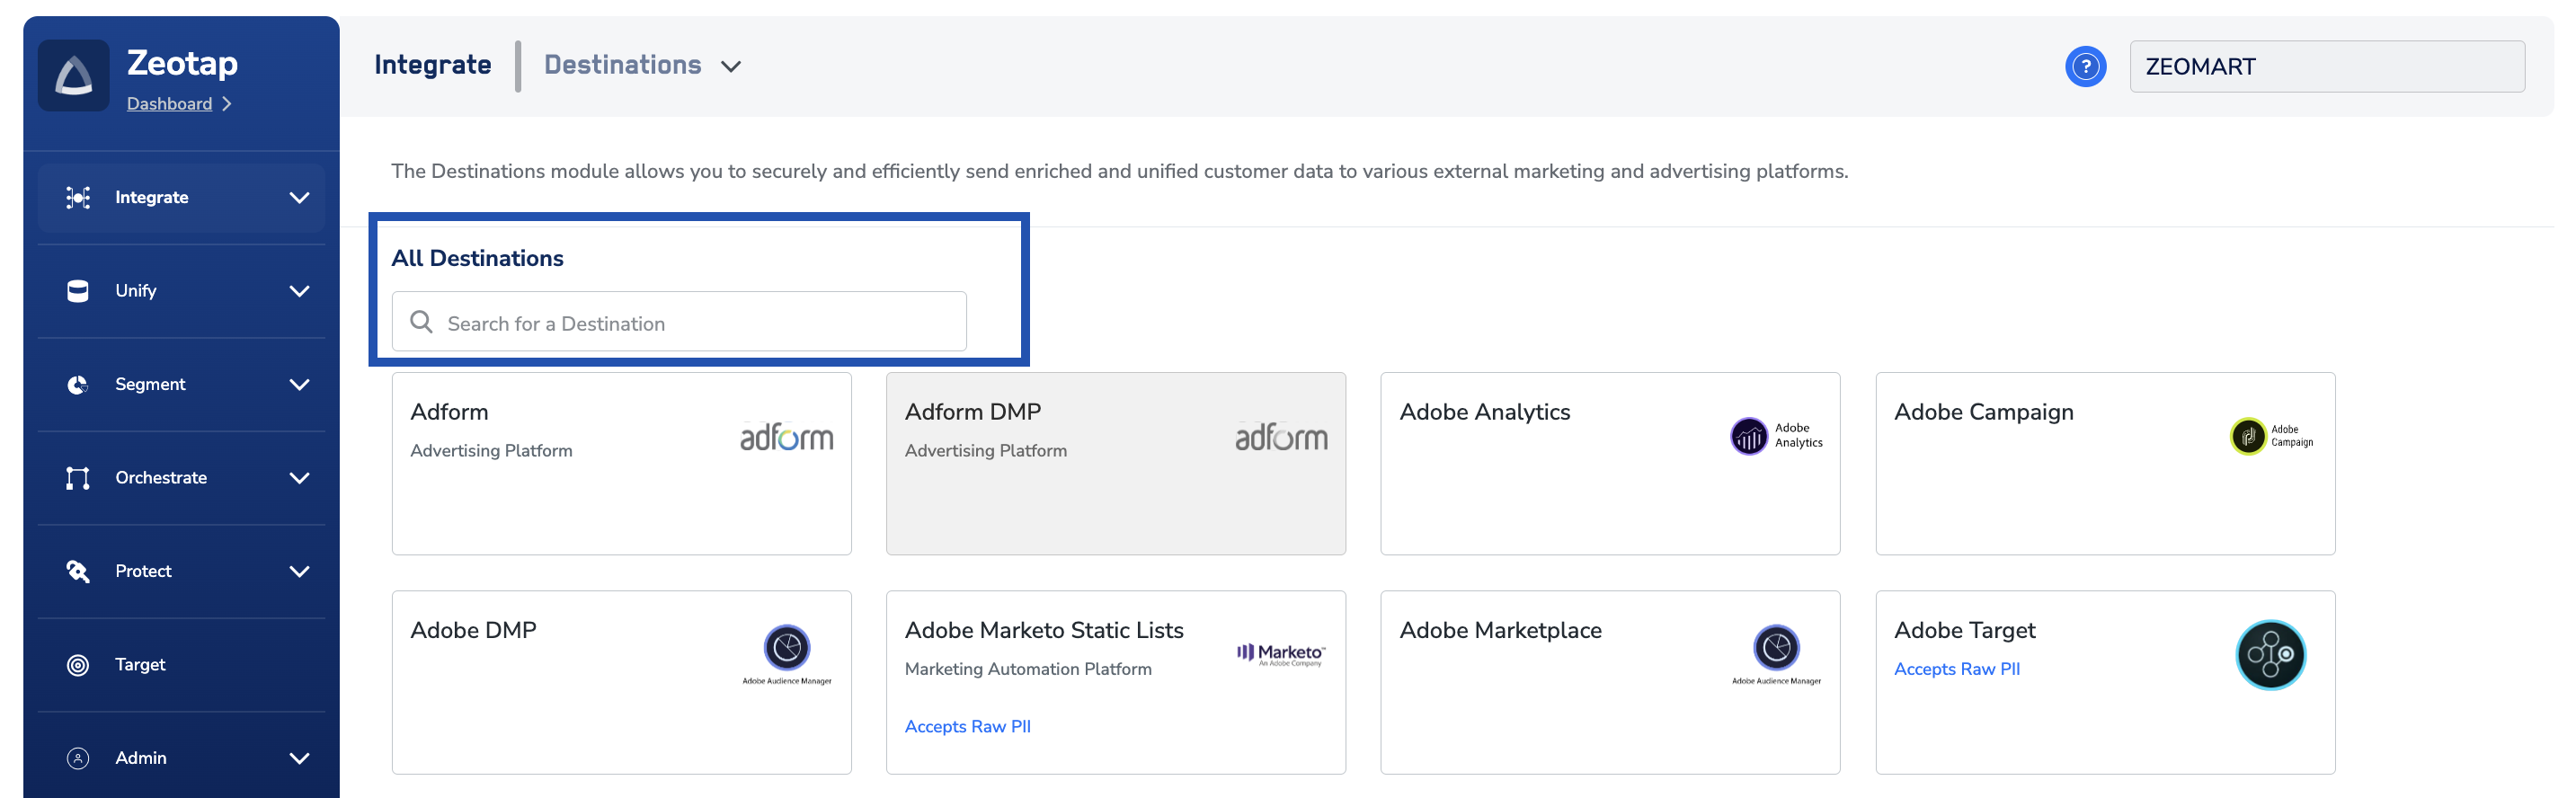 Click **Data Extension - Salesforce Marketing Cloud.** A screen appears displaying details about the particular destination towards the left. On the right-hand side of the screen find a list of fields that are required for the integration to be established. Enter the required details as mentioned in the following steps:
a. Enter a name for the Destination.
Click **Data Extension - Salesforce Marketing Cloud.** A screen appears displaying details about the particular destination towards the left. On the right-hand side of the screen find a list of fields that are required for the integration to be established. Enter the required details as mentioned in the following steps:
a. Enter a name for the Destination.
b. Enter the **Sub Domain**.
c. Enter the **Client Id.**
d. Enter the **Client Secret**.
e. Enter the **Data Extension External Key**. This is the key generated, when you create a Data Extension.
f. Review all the values entered above and then click **Next** to proceed.
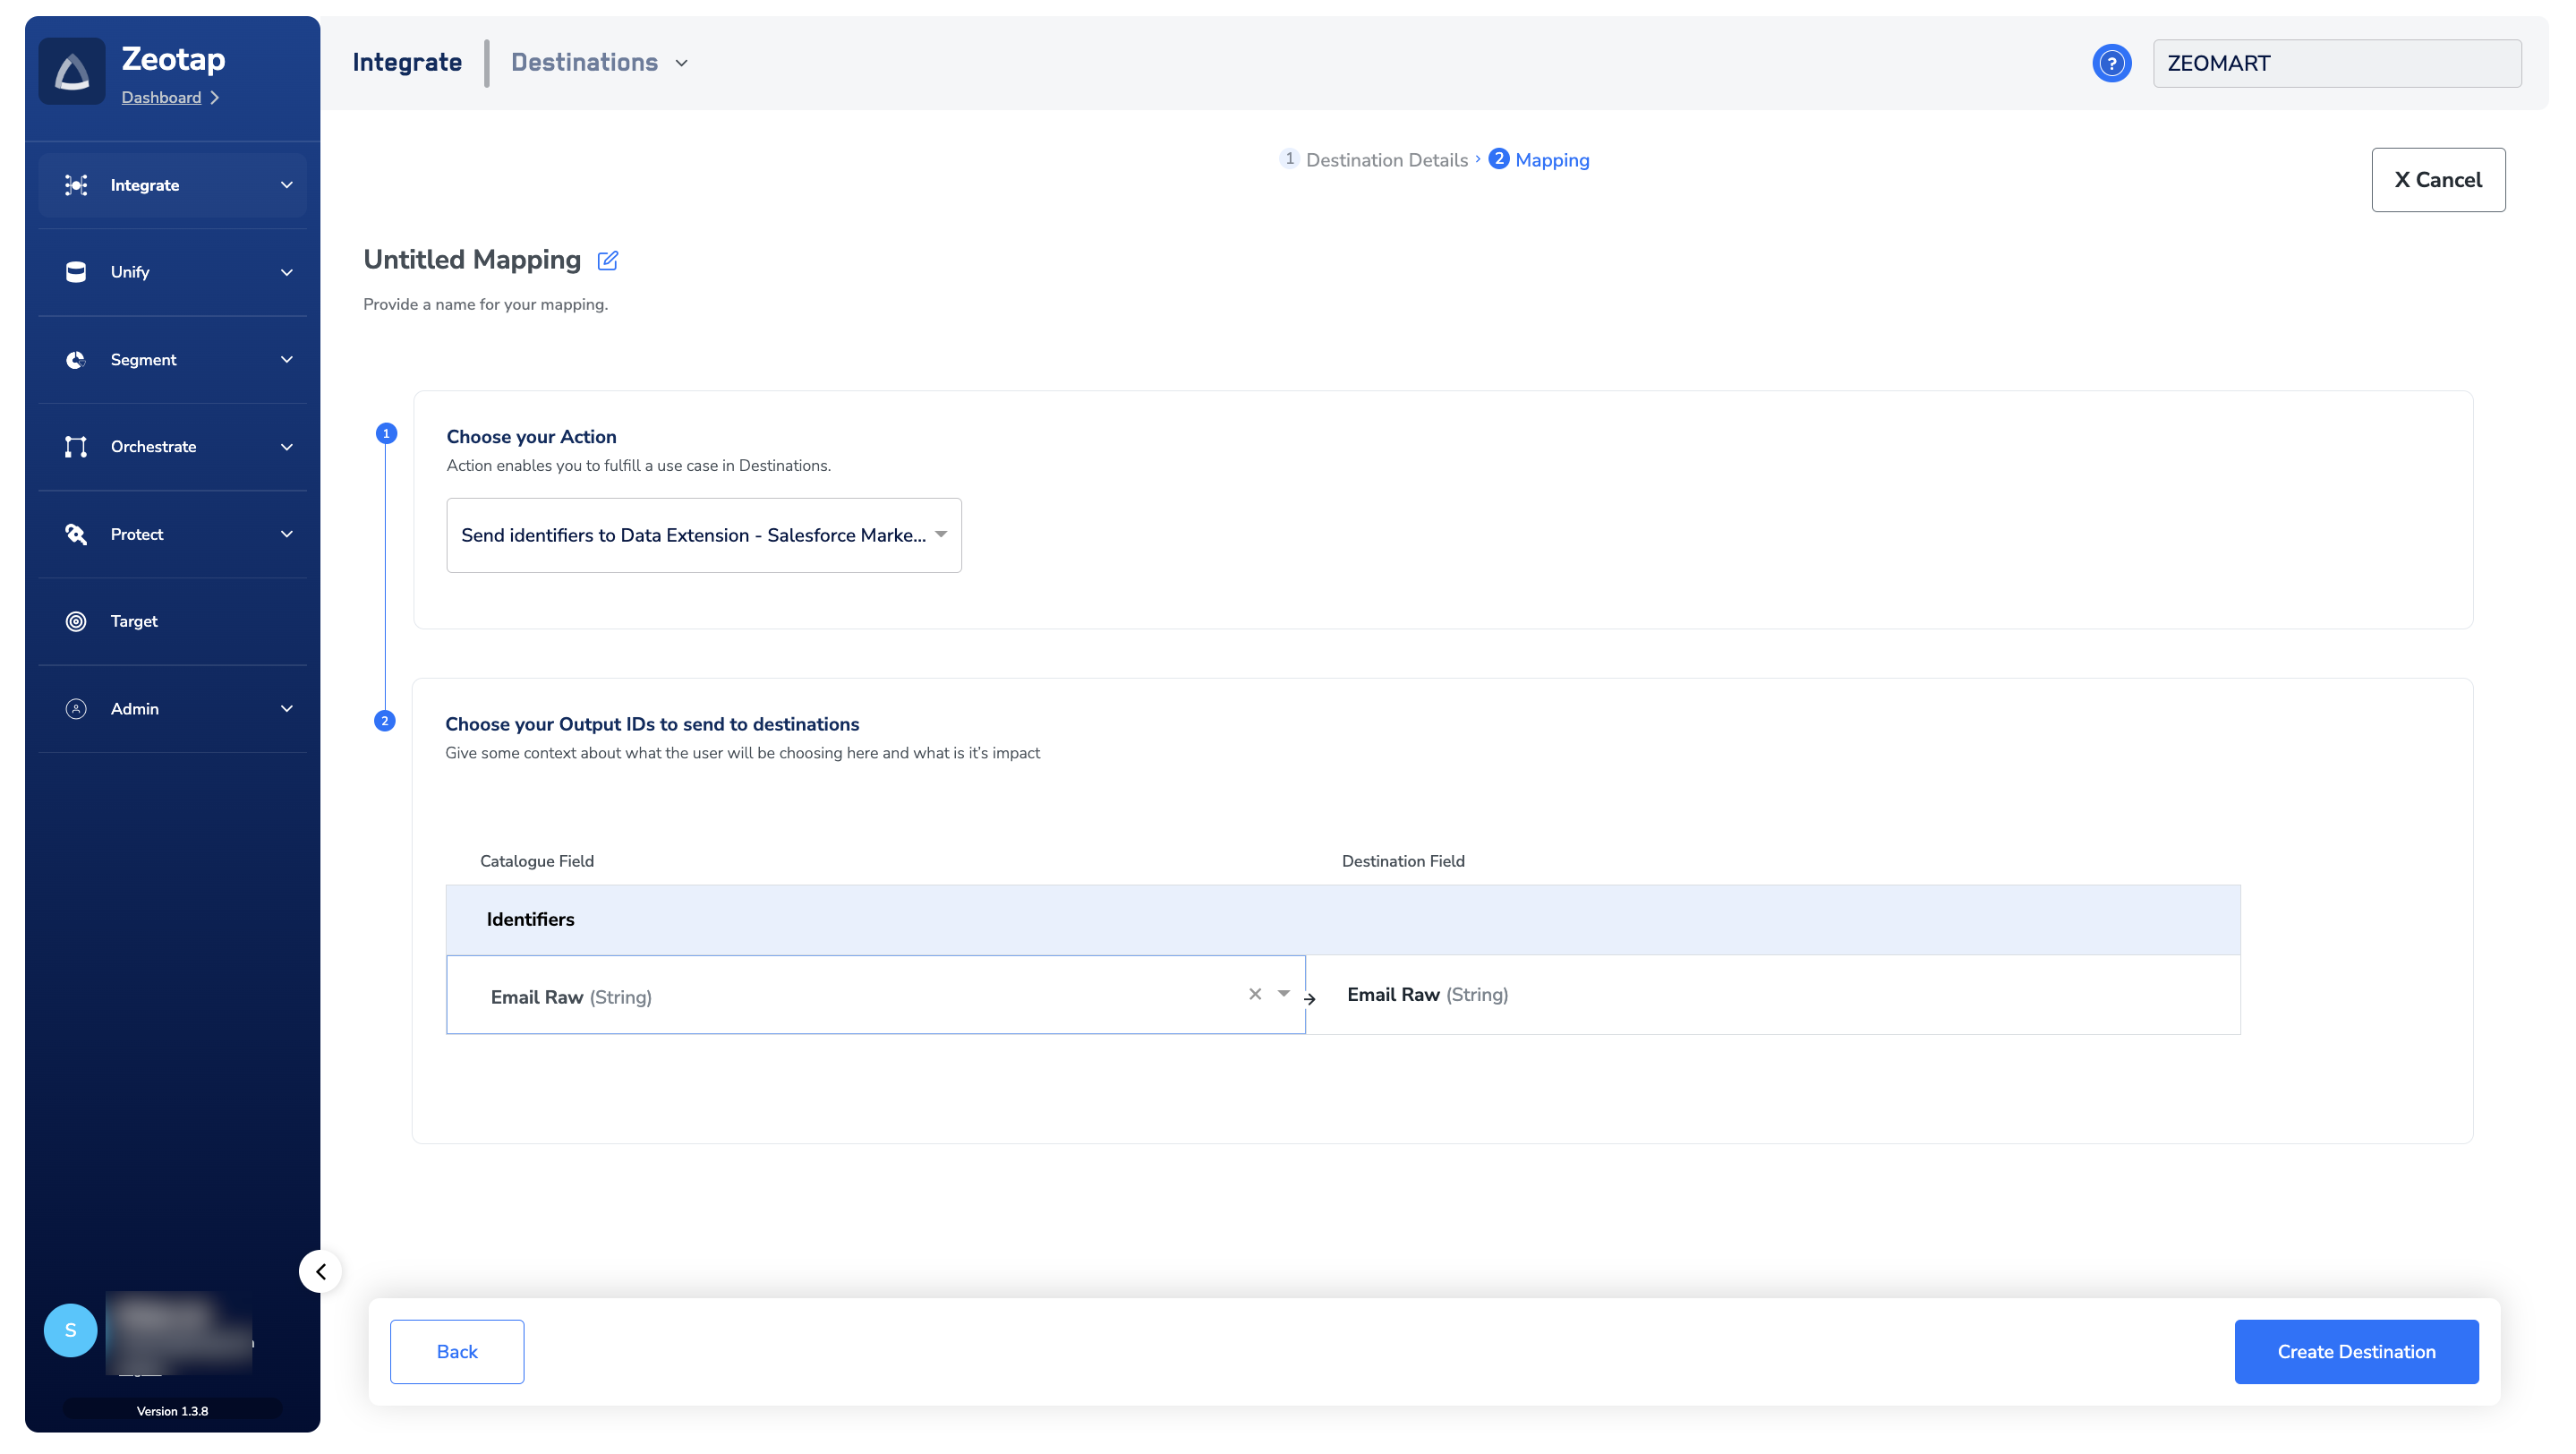
 Under **Choose your Action**, you can either choose **Send Raw emails to Data extension** or **Send email and attributes to Data extension** as the action.
a. Choose **Send Raw emails to Data extension** to send **Raw emails** to Salesforce Marketing Cloud - Data Extension.
Under **Choose your Action**, you can either choose **Send Raw emails to Data extension** or **Send email and attributes to Data extension** as the action.
a. Choose **Send Raw emails to Data extension** to send **Raw emails** to Salesforce Marketing Cloud - Data Extension.
b. Choose **Send email and attributes to Data extension** as your action to send the attributes that you have created in the [Data Extension table](#create-a-data-extension-table) under **Map the Fields**. However, you can edit, add or remove an identifier from the list. To do so, refer [here](/articles/integrate-customer/destinations#mappings).
**Note:**
Ensure that the **Name** of the all the attributes provided while creating the data extension table should be exactly same as the **Destination field** name under **Map the fields** when creating the Destination.
Click **Create Destination**. The created Destination gets listed in the **Audiences** application, which can be linked to an Audience/segment.
 ## Link an Audience to the Salesforce Marketing Cloud- Data Extension Destination
For information about how to link an Audience or segment to the created Destination in the **Audiences** application, refer [here](/articles/integrate-customer/link-an-audience-to-the-destination). Note that it can take one business day for the segment to be available at the Salesforce marketing Cloud - Data Extension seat.
**Note:**
The terms Audiences and Segments are used interchangeably to refer to customer cohorts belonging to a specific category. For example, an Audience or a segment can be a specific group of customers who are over 18 years of age and have performed an `addToCart` event within the last 30 days.
## View Segments on Marketing Cloud - Data Extension
The segments pushed by the Zeotap CDP Appear on the Salesforce Marketing Cloud console under **Audience Builder > Contact Builder > Data Extensions.** You can click the Data Extension created and see the data under the **Records** tab as shown below.
## Link an Audience to the Salesforce Marketing Cloud- Data Extension Destination
For information about how to link an Audience or segment to the created Destination in the **Audiences** application, refer [here](/articles/integrate-customer/link-an-audience-to-the-destination). Note that it can take one business day for the segment to be available at the Salesforce marketing Cloud - Data Extension seat.
**Note:**
The terms Audiences and Segments are used interchangeably to refer to customer cohorts belonging to a specific category. For example, an Audience or a segment can be a specific group of customers who are over 18 years of age and have performed an `addToCart` event within the last 30 days.
## View Segments on Marketing Cloud - Data Extension
The segments pushed by the Zeotap CDP Appear on the Salesforce Marketing Cloud console under **Audience Builder > Contact Builder > Data Extensions.** You can click the Data Extension created and see the data under the **Records** tab as shown below.
 ## Create a Filtered Data Extension
The segments pushed by the Zeotap CDP appear on the Salesforce Marketing Cloud console, you can create a filtered data extension based on the segment column names of the data extension that you created to send data from Zeotap. For more information on how to create a filtered data extension, refer to the [Salesforce documentation](https://help.salesforce.com/s/articleView?id=sf.mc_es_create_filtered_de.htm\&type=5).
## Create a Filtered Data Extension
The segments pushed by the Zeotap CDP appear on the Salesforce Marketing Cloud console, you can create a filtered data extension based on the segment column names of the data extension that you created to send data from Zeotap. For more information on how to create a filtered data extension, refer to the [Salesforce documentation](https://help.salesforce.com/s/articleView?id=sf.mc_es_create_filtered_de.htm\&type=5).