> ## Documentation Index
> Fetch the complete documentation index at: https://docs.zeotap.com/llms.txt
> Use this file to discover all available pages before exploring further.
# Microsoft CAPI
## Overview
Microsoft Advertising's Conversions API (CAPI) is a server-to-server method of sharing conversions and events through Universal Event Tracking (UET), without relying on browser-side tags. The Microsoft CAPI integration with Zeotap creates a direct, server-to-server connection that forwards your conversion and event data to Microsoft Advertising, helping you improve measurement, attribution, and campaign optimisation using your first-party data.
## Supported Identifiers
This integration sends the following fields under **User Data**: hashed **Email**, hashed **Phone Number**, **External Id**, **Anonymous Id**, **Microsoft Last Click ID**, **Client IP Address**, and **Client User Agent**. You can also send additional attributes using **Custom Data** fields, and an **Event Time** is required for every event.
**Note:**
Ensure that the **Email** and **Phone Number** values you map are SHA-256 hashed before they are sent to Microsoft.
## Available Actions
* Send Events to Microsoft
## Prerequisites
Before you create a Microsoft CAPI Destination in Zeotap CDP, ensure that you have the following:
* A Microsoft Advertising account.
* A **UET tag** created in Microsoft Advertising.
* A **Conversions API token** generated for that UET tag. In Microsoft Advertising, open the UET tag's **Set up tagging** step and select **Use Conversions API** to generate the token. Allow up to 15 minutes for a newly generated token to activate.
* Conversion goals configured in Microsoft Advertising for the events you want to track.
For details on the UET Conversion API — including how to configure and send **custom attributes** — refer to Microsoft's [Conversions API (CAPI) guide](https://learn.microsoft.com/en-us/advertising/guides/uet-conversion-api-integration?view=bingads-13).
## Components of Microsoft CAPI
Ensure that you have the details about the below components before creating a Destination.
### UET Tag ID
This is the unique identifier for your Microsoft UET tag. You can find or provision a UET tag in your Microsoft Advertising account.
### Conversions API Token
This is the authorization token used to send events to the Conversions API. Generate it in Microsoft Advertising from your UET tag's **Set up tagging** step by selecting **Use Conversions API**, then copy the token. Allow up to 15 minutes for a newly generated token to activate.
## Creating a Destination
Perform the following steps to create a Destination for Microsoft CAPI:
Log into the **Zeotap CDP** App and go to the **DESTINATIONS** application.
Click **+ Create Destination**.
Under the **All Destinations** section, search for Microsoft CAPI and click **Microsoft CAPI**.
A screen appears displaying details about the Destination towards the left. On the right-hand side, provide the required details:
a. In the **Destination Name** field, enter a name for the Destination.
b. In the **API Token** field, enter the Conversions API token generated in Microsoft Advertising.
c. In the **Tag ID** field, enter the unique identifier for your Microsoft UET tag.
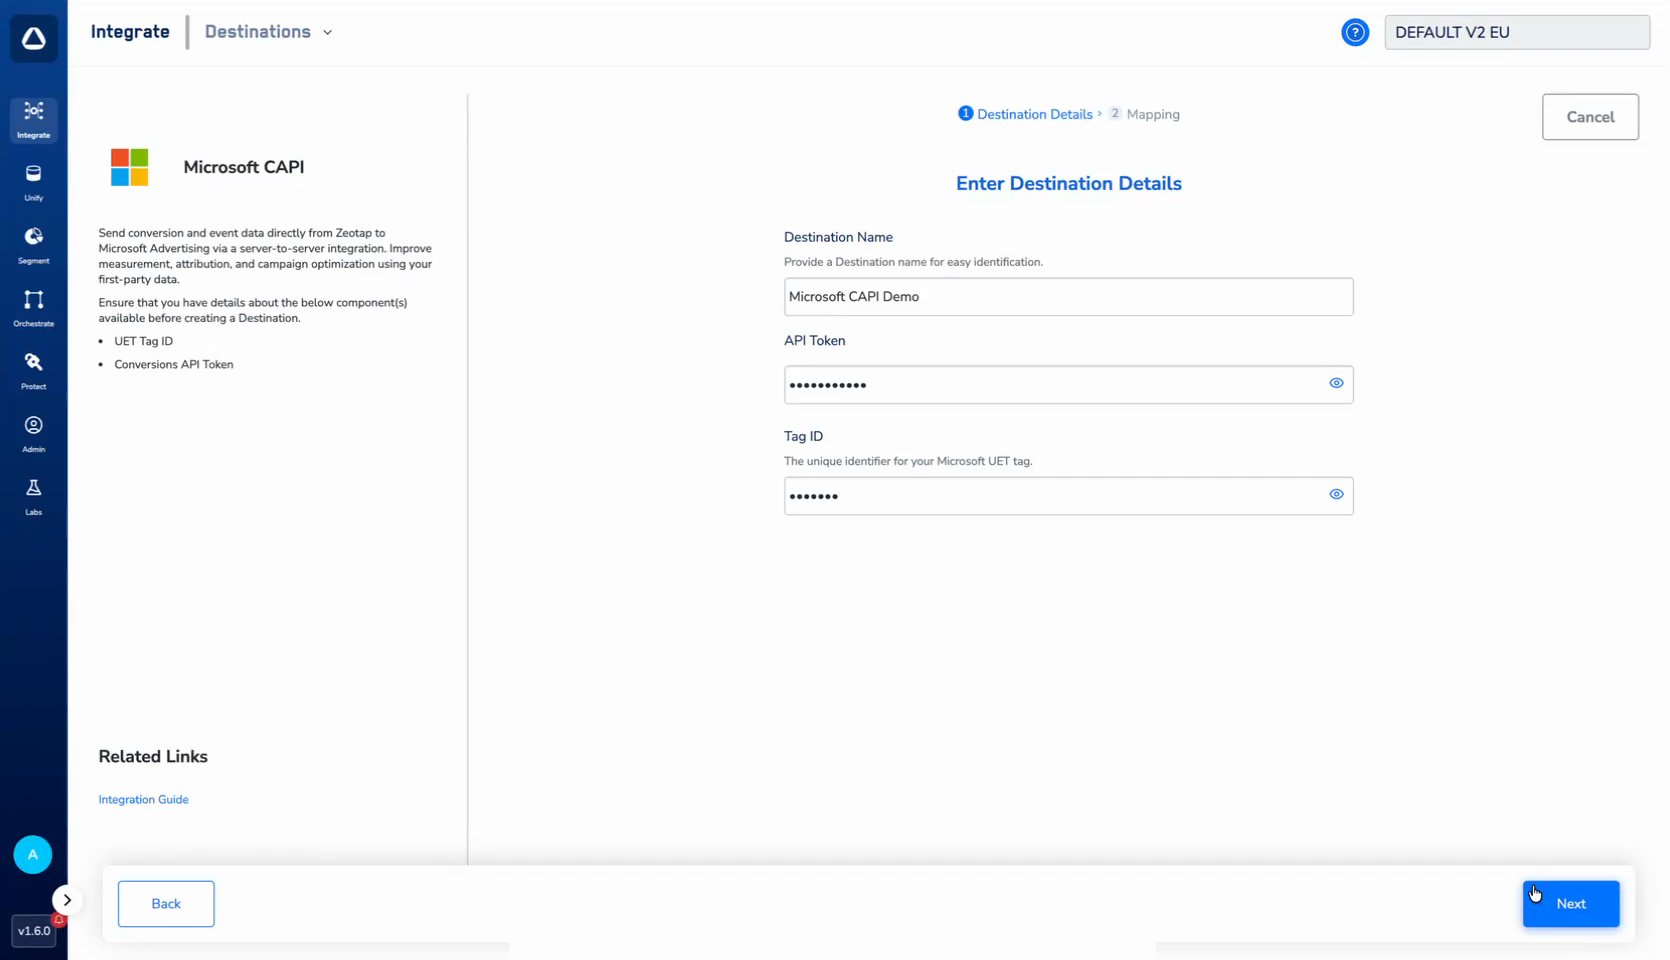 Click **Next** to proceed to the **Mapping** screen.
On the **Mapping** screen, provide a name for your mapping and configure the action and field mapping:
a. Under **Choose your Action**, select **Send Events to Microsoft**. This action sends your conversion events to Microsoft Advertising through Journeys.
Click **Next** to proceed to the **Mapping** screen.
On the **Mapping** screen, provide a name for your mapping and configure the action and field mapping:
a. Under **Choose your Action**, select **Send Events to Microsoft**. This action sends your conversion events to Microsoft Advertising through Journeys.
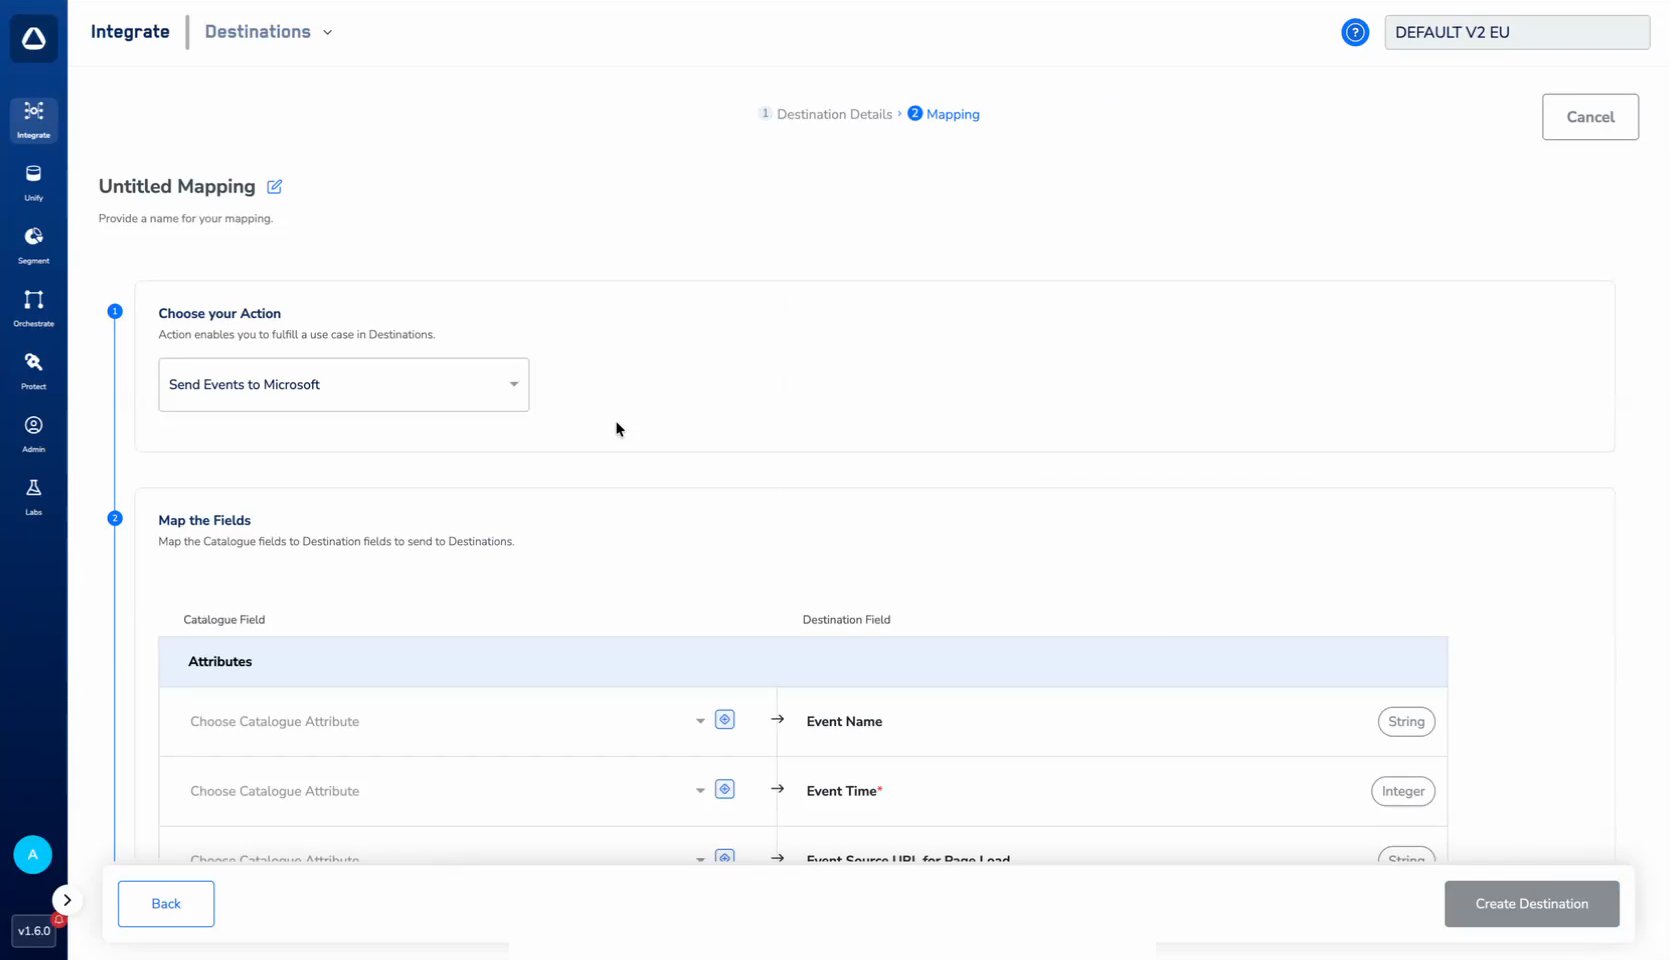 b. Under **Map the Fields**, map the catalogue fields to the destination fields:
i. **Attributes** — map the required **Event Time** (the value must be in **EPOCH seconds** format) and **Event Source URL for Page Load**. Also map **Event Name**, but only when the **Event Type** under **Additional Settings** (sub-step c) is set to **Custom**.
ii. **User Data** — map the identity fields you want to send: External Id, Anonymous Id, Email SHA256 Hashed, Phone Number SHA256 Hashed, Client IP Address, Microsoft Last Click ID, and Client User Agent.
iii. **Custom Data** — use **+ Add Mapping Field** to send any additional attributes.
b. Under **Map the Fields**, map the catalogue fields to the destination fields:
i. **Attributes** — map the required **Event Time** (the value must be in **EPOCH seconds** format) and **Event Source URL for Page Load**. Also map **Event Name**, but only when the **Event Type** under **Additional Settings** (sub-step c) is set to **Custom**.
ii. **User Data** — map the identity fields you want to send: External Id, Anonymous Id, Email SHA256 Hashed, Phone Number SHA256 Hashed, Client IP Address, Microsoft Last Click ID, and Client User Agent.
iii. **Custom Data** — use **+ Add Mapping Field** to send any additional attributes.
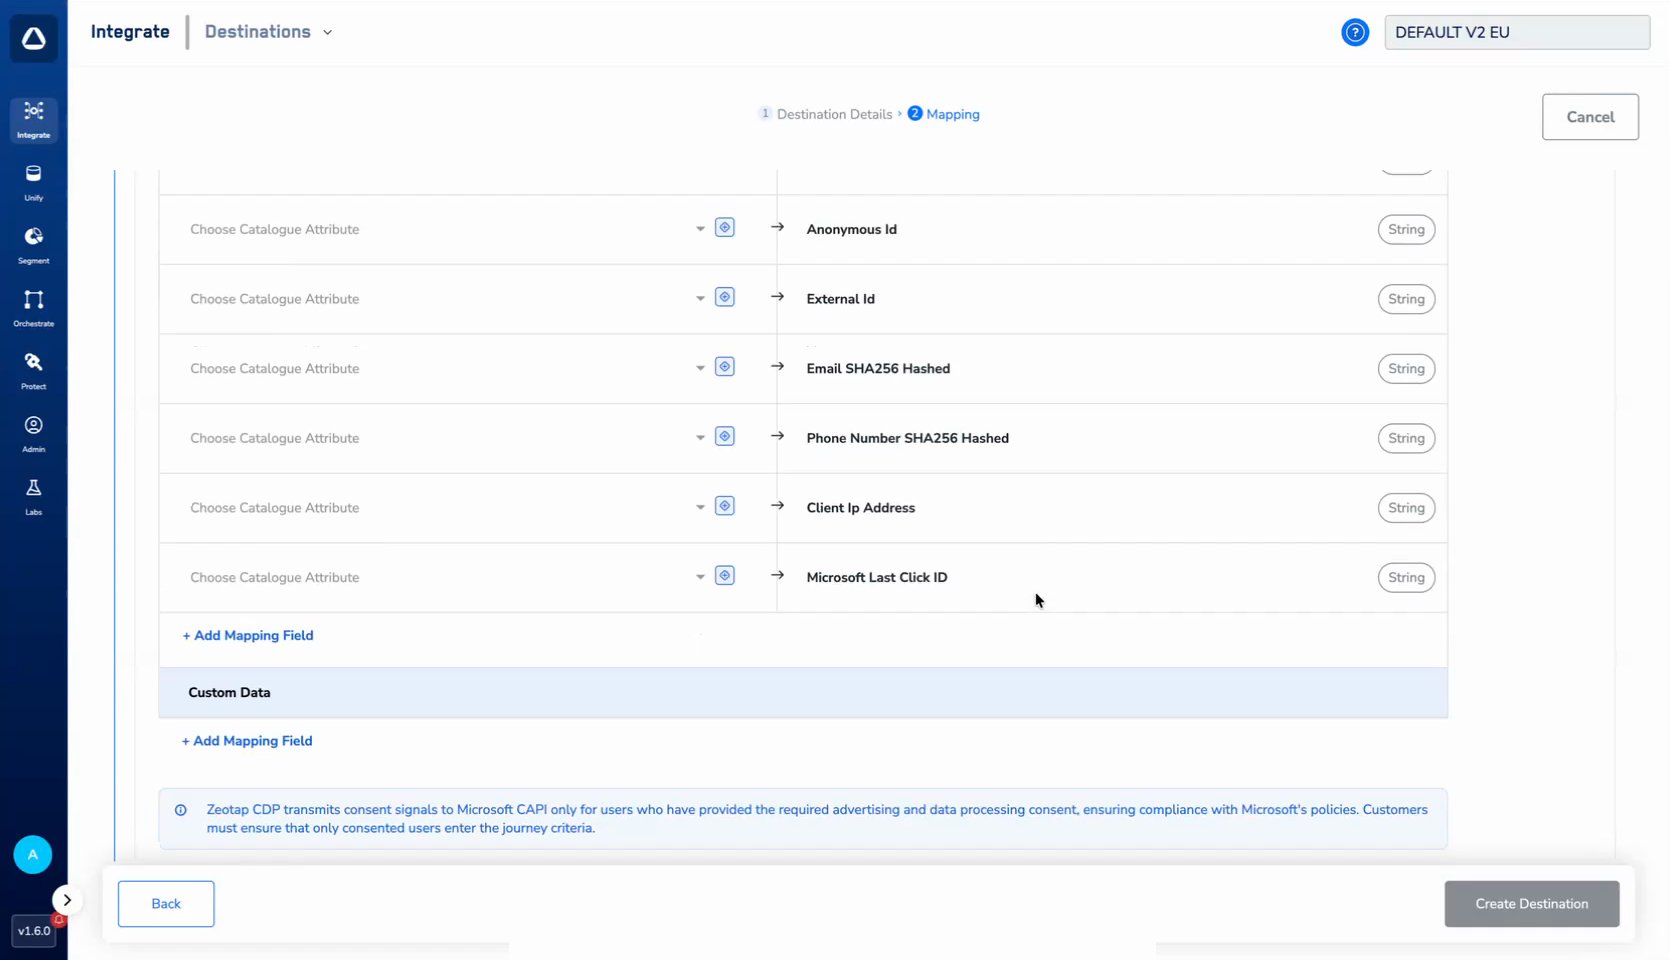 Zeotap CDP transmits consent signals to Microsoft CAPI only for users who have provided the required advertising and data processing consent, ensuring compliance with Microsoft's policies. Ensure that only consented users enter your journey criteria.
**Note:**
For the full list of custom parameters you can send and how to format them, refer to Microsoft's [Conversions API (CAPI) guide](https://learn.microsoft.com/en-us/advertising/guides/uet-conversion-api-integration?view=bingads-13).
c. Under **Additional Settings**, set the **Event Type** — select **Page Load** or **Custom** depending on the event you are sending.
Zeotap CDP transmits consent signals to Microsoft CAPI only for users who have provided the required advertising and data processing consent, ensuring compliance with Microsoft's policies. Ensure that only consented users enter your journey criteria.
**Note:**
For the full list of custom parameters you can send and how to format them, refer to Microsoft's [Conversions API (CAPI) guide](https://learn.microsoft.com/en-us/advertising/guides/uet-conversion-api-integration?view=bingads-13).
c. Under **Additional Settings**, set the **Event Type** — select **Page Load** or **Custom** depending on the event you are sending.
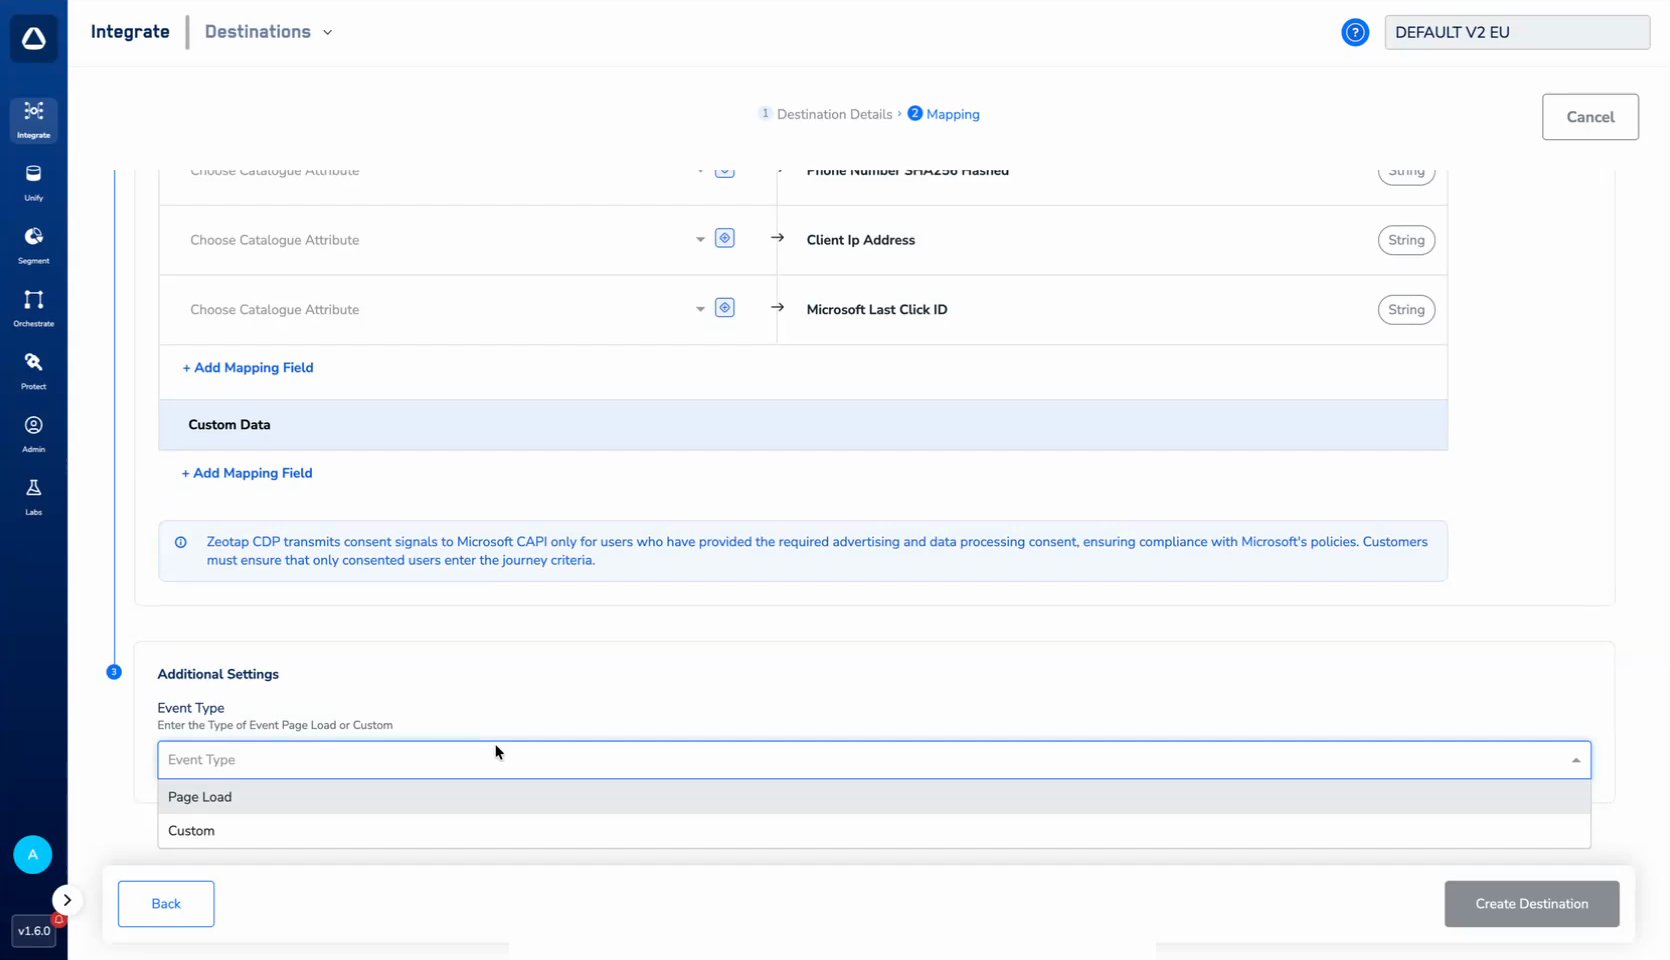 Click **Create Destination**. The created Destination is listed in the **Audiences** application and can be activated through Journeys.
## Activate the Destination on Journeys
The **Send Events to Microsoft** action runs in Journeys. After creating the Destination, attach it using the **Send to Destinations** node within your workflow. For details on activating real-time destinations, refer [here](/articles/integrate-customer/activate-your-real-time-audiences).
## Viewing Conversion Events in Microsoft Advertising
Once the destination is activated and events begin flowing, you can verify them in Microsoft Advertising:
In Microsoft Advertising, open the UET tag linked to this destination.
Open the **Insights** view for the tag. Events sent through the Conversions API appear in the events table, showing details such as the **Event Type** (Page Load or Custom), the number of events received, and the **Consent Signal**.
Click **Create Destination**. The created Destination is listed in the **Audiences** application and can be activated through Journeys.
## Activate the Destination on Journeys
The **Send Events to Microsoft** action runs in Journeys. After creating the Destination, attach it using the **Send to Destinations** node within your workflow. For details on activating real-time destinations, refer [here](/articles/integrate-customer/activate-your-real-time-audiences).
## Viewing Conversion Events in Microsoft Advertising
Once the destination is activated and events begin flowing, you can verify them in Microsoft Advertising:
In Microsoft Advertising, open the UET tag linked to this destination.
Open the **Insights** view for the tag. Events sent through the Conversions API appear in the events table, showing details such as the **Event Type** (Page Load or Custom), the number of events received, and the **Consent Signal**.
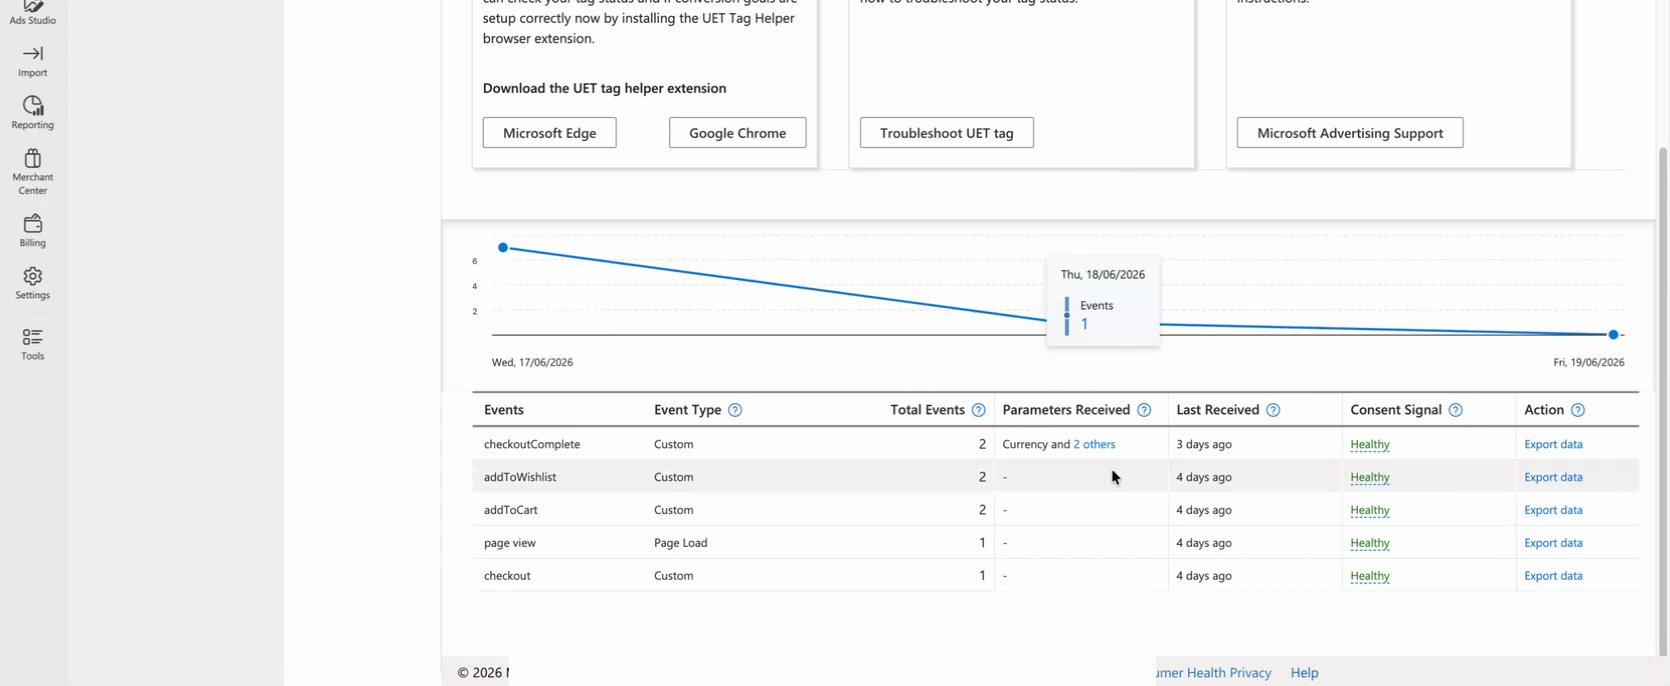 It may take up to 24 hours to verify your UET tag status. Until events are received, the view shows no activity; allow time for the first events to be processed before treating an empty view as an error.
**Note:**
The terms *Audiences* and *Segments* are used interchangeably to refer to customer cohorts belonging to a specific category. For example, an Audience or a segment could be a specific group of customers who are over 18 years of age and who have performed an `addToCart` event within the last 30 days.
## Related Topics
* [Link an Audience to the Destination](/articles/integrate-customer/link-an-audience-to-the-destination)
* [Create a Destination](/articles/integrate-customer/create-a-destination)
* [Activate Your Real-time Audiences](/articles/integrate-customer/activate-your-real-time-audiences)
* [Destination Access Rules](/articles/integrate-customer/destination-access-rules)
It may take up to 24 hours to verify your UET tag status. Until events are received, the view shows no activity; allow time for the first events to be processed before treating an empty view as an error.
**Note:**
The terms *Audiences* and *Segments* are used interchangeably to refer to customer cohorts belonging to a specific category. For example, an Audience or a segment could be a specific group of customers who are over 18 years of age and who have performed an `addToCart` event within the last 30 days.
## Related Topics
* [Link an Audience to the Destination](/articles/integrate-customer/link-an-audience-to-the-destination)
* [Create a Destination](/articles/integrate-customer/create-a-destination)
* [Activate Your Real-time Audiences](/articles/integrate-customer/activate-your-real-time-audiences)
* [Destination Access Rules](/articles/integrate-customer/destination-access-rules)