> ## Documentation Index
> Fetch the complete documentation index at: https://docs.zeotap.com/llms.txt
> Use this file to discover all available pages before exploring further.
# Inxmail Audience
## Overview
This integration allows you to send audience segments from Zeotap CDP directly into Inxmail for targeted email campaigns — without any manual data transfers. Once you set up the Inxmail destination and attach it to an audience, Zeotap automatically creates a mailing list in Inxmail and imports your audience members as recipients. All you need to do is configure the connection, set up your mapping, and attach it to your audience — Zeotap handles the rest.
## How It Works
When you attach the Inxmail destination to an audience in Zeotap CDP, the following happens automatically behind the scenes:
1. You set up Inxmail as a **destination** in Zeotap CDP by entering your API credentials (Client ID, Client Secret, and Customer Name).
2. You pick one of two actions on the mapping screen — **Create a list and upload recipients** (Zeotap creates a new list for you) or **Upload Recipients to a list** (you enter an existing Inxmail List ID on the mapping screen).
3. You configure **recipient attribute mapping** — telling the system which fields (like email, first name, last name) should be sent to Inxmail.
4. You **attach the destination to an audience** in Zeotap. If you chose the create-a-list action, you also fill in the **mailing list parameters** (list name, sender address, etc.) at this point.
5. Depending on the action you chose, Zeotap either **creates a new mailing list** and imports recipients into it, or **imports recipients into the list you selected** — no manual CSV upload or list creation required on your end.
## Available Actions
The Inxmail Audience destination supports two actions. Pick the one that matches your situation on the mapping screen.
| Action | When to use | Inputs |
| --------------------------------------- | ------------------------------------------------------------------------------------------------------- | ----------------------------------------------------------------------------------------- |
| **Create a list and upload recipients** | You don't have a list yet. Zeotap creates a new mailing list in Inxmail and imports recipients into it. | Mailing list parameters (list name, sender address, etc.) + recipient attribute mapping. |
| **Upload Recipients to a list** | The list already exists in Inxmail. Zeotap imports recipients into the list you specify. | Existing Inxmail **List ID** entered on the mapping screen + recipient attribute mapping. |
## Before You Begin
Make sure you have everything ready before starting the setup.
### In Inxmail
* An active Inxmail account with API access enabled
* Access to the **OAuth-Clients** section in your Inxmail account (this is where you generate credentials):
* Your **Client ID** (also called Key ID — used as the username for authentication)
* Your **Client Secret** (used as the password for authentication — shown only once at creation, so store it securely)
* Your **Customer Name** (your Inxmail account identifier, visible in your account settings)
* A valid **sender email address** to use for the mailing list
### In Zeotap CDP
* Access to the **Integrate** module with permission to create new destinations
* An audience segment ready to be sent to Inxmail
* A clear understanding of which recipient attributes you want to map (e.g., email, first name, last name)
## Step-by-Step Configuration Guide
### Prerequisites
Before you can connect Zeotap to Inxmail, you need three pieces of information: your **Client ID**, **Client Secret**, and **Customer Name**.
Log in to your **Inxmail** account.
In the administration area, locate and open the **OAuth-Clients** section.
Click **Create** to generate a new OAuth client for the Zeotap integration.
Give the client a recognizable name (e.g., "Zeotap CDP Integration") so your team knows what it is used for.
After creation, Inxmail will display your **Client ID** and **Client Secret**.
The **Client Secret is shown only once**. Copy it immediately and store it in a secure location (such as a password manager). If you lose it, you will need to create a new OAuth client.
Also note your **Customer Name**. This is typically visible in your Inxmail account settings or in the URL of your Inxmail workspace.
You should now have:
* **Client ID**
* **Client Secret**
* **Customer Name**
### Create a Destination
Head over to Zeotap CDP to create the destination and enter your credentials.
Log in to **Zeotap CDP**.
Navigate to the **Integrate** module from the main navigation menu.
Select **Destinations** from the menu bar.
Click **+ Create Destination**.
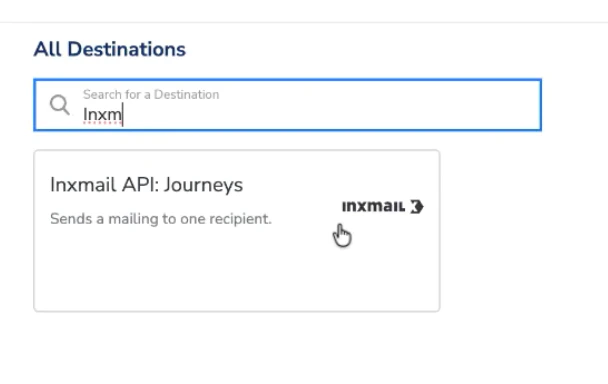
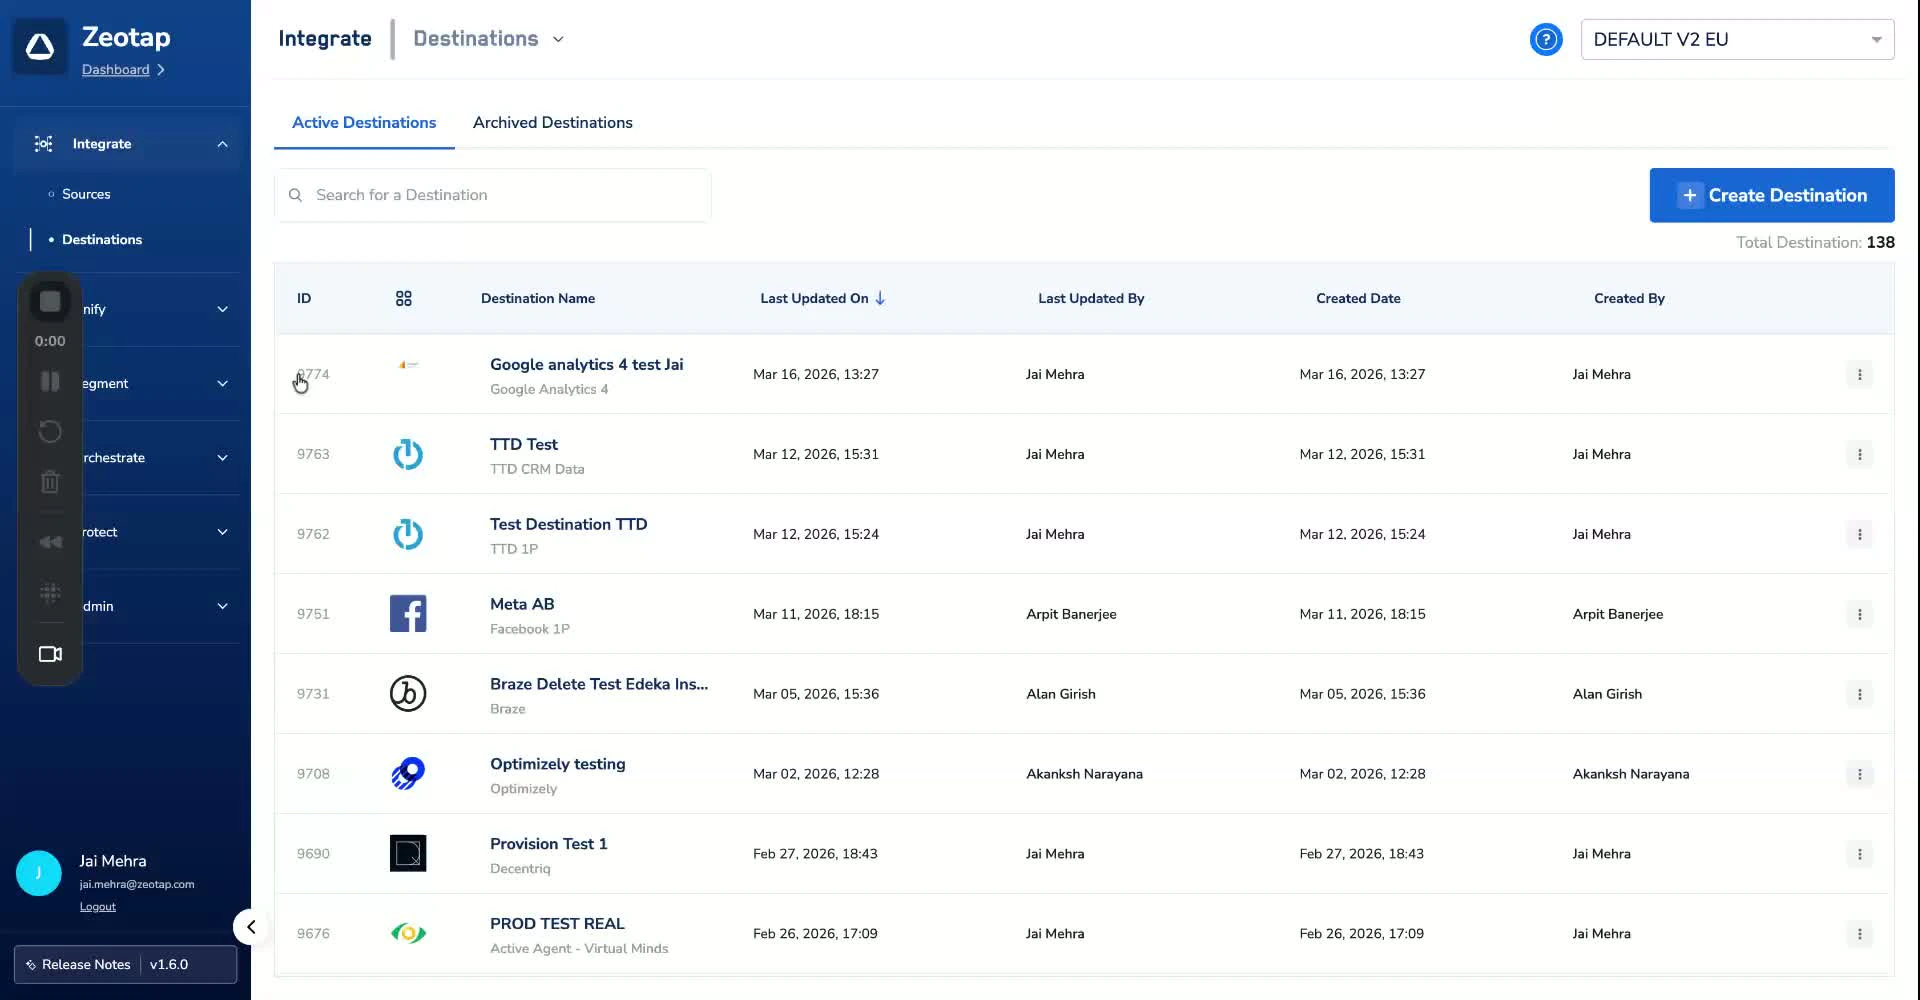 In the destination catalogue, search for **Inxmail** and select the **Inxmail Destinations** card.
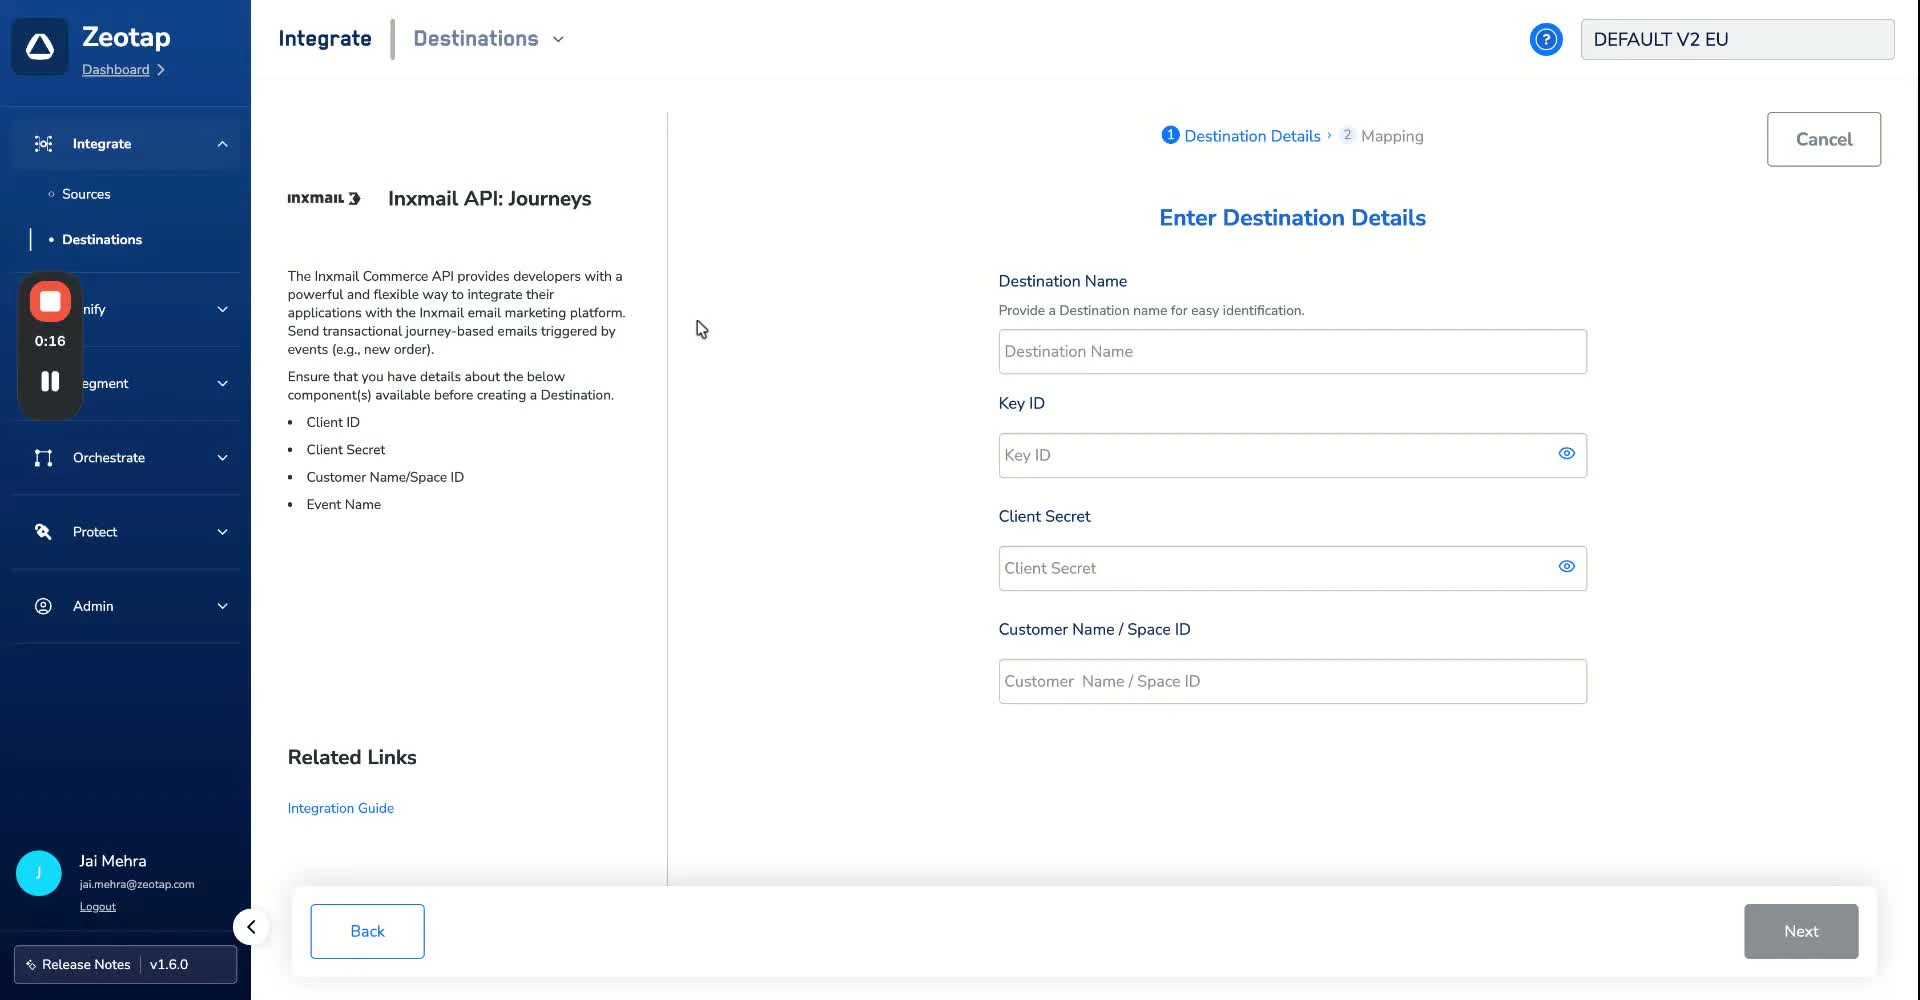
 Fill in the required credential fields:
* **Client ID** — Paste the Client ID you copied from Inxmail.
* **Client Secret** — Paste the Client Secret.
* **Customer Name** — Enter your Inxmail customer name.
Fill in the required credential fields:
* **Client ID** — Paste the Client ID you copied from Inxmail.
* **Client Secret** — Paste the Client Secret.
* **Customer Name** — Enter your Inxmail customer name.
 Click **Next** to proceed to mapping.
### Choose Your Action
On the mapping screen, pick one of two actions and configure the corresponding inputs.
#### Action 1 — Create a list and upload recipients
Use this when no list exists yet. Zeotap creates a new mailing list in Inxmail and imports your audience as recipients into it.
Select **Create a list and upload recipients** as the action and set up the recipient attribute mapping.
Map the **Email ID** field — this is required. Every recipient must have a valid email address.
Map any additional attributes you want to include, such as:
* **First Name**
* **Last Name**
* **Custom attributes** (these must already exist as recipient attributes in your Inxmail account)
Click **Next** to proceed to mapping.
### Choose Your Action
On the mapping screen, pick one of two actions and configure the corresponding inputs.
#### Action 1 — Create a list and upload recipients
Use this when no list exists yet. Zeotap creates a new mailing list in Inxmail and imports your audience as recipients into it.
Select **Create a list and upload recipients** as the action and set up the recipient attribute mapping.
Map the **Email ID** field — this is required. Every recipient must have a valid email address.
Map any additional attributes you want to include, such as:
* **First Name**
* **Last Name**
* **Custom attributes** (these must already exist as recipient attributes in your Inxmail account)
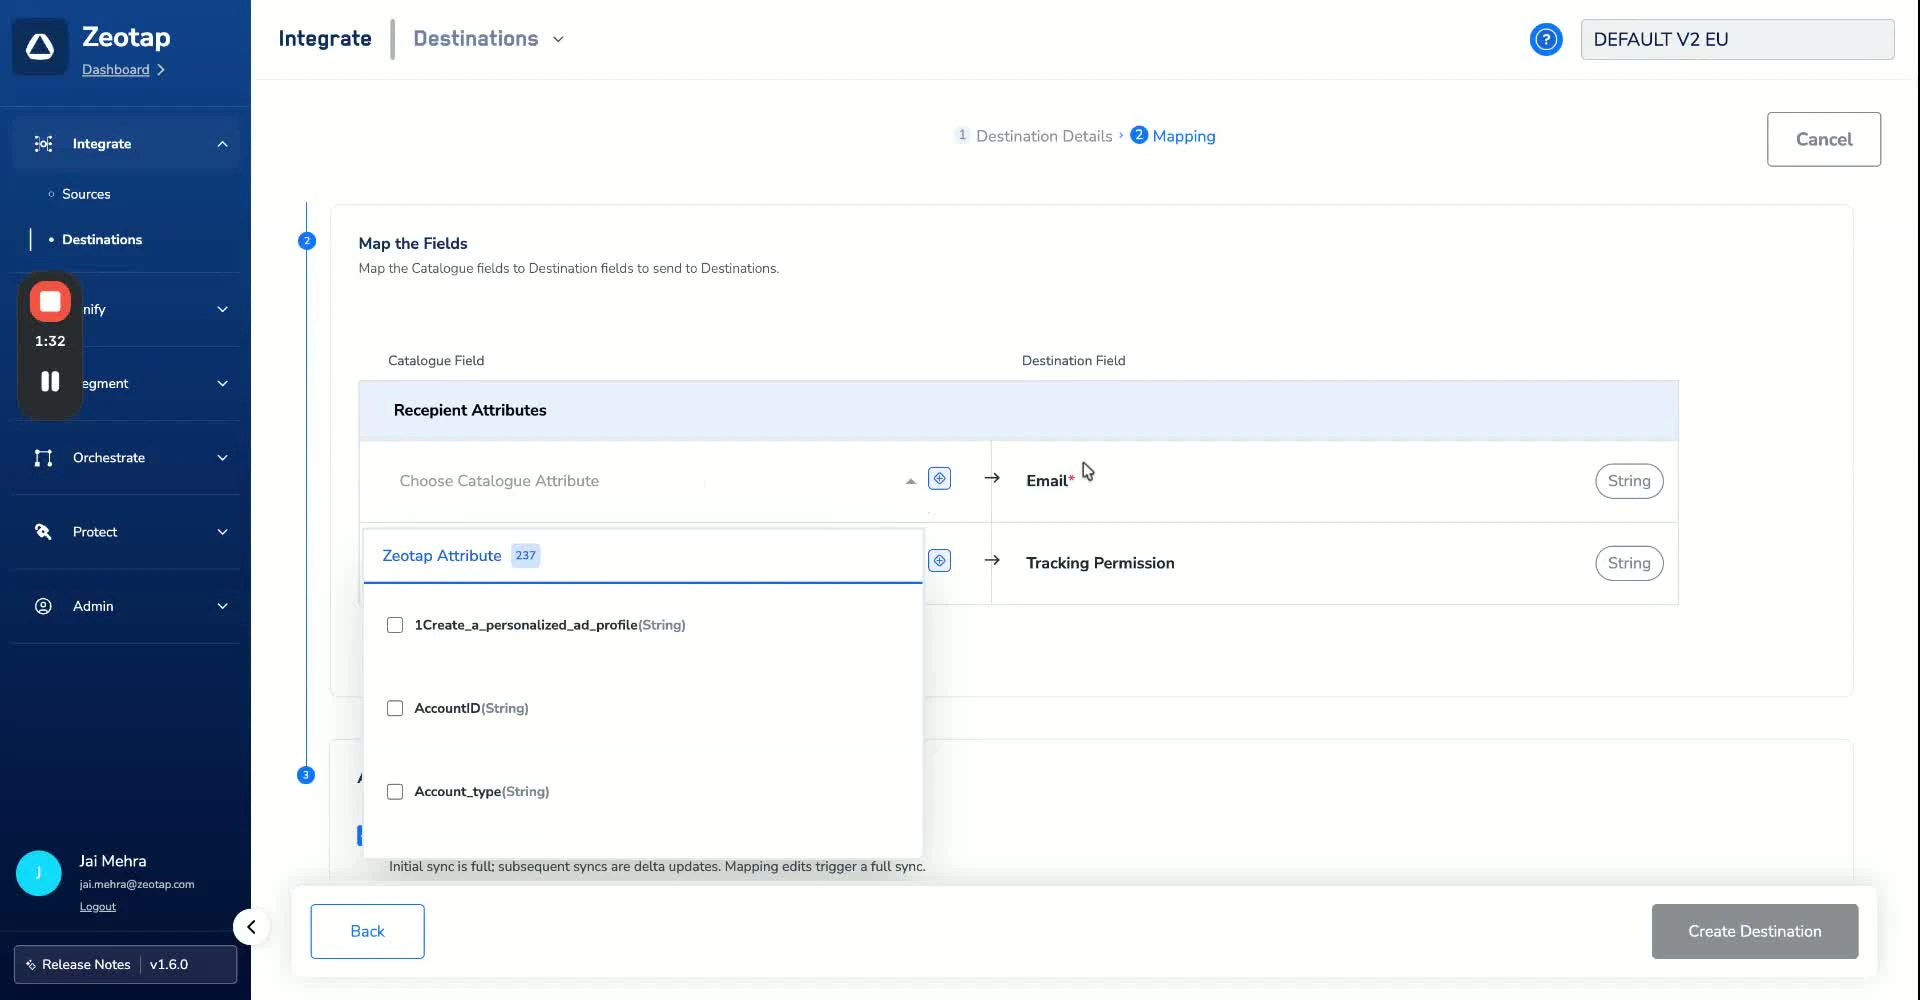 Any custom attributes you map must be pre-defined in Inxmail. If an attribute does not exist in Inxmail, that data will not be imported.
Then define the mailing list details and attach the destination to your audience. When you attach the destination, Zeotap automatically creates the mailing list in Inxmail and imports recipients on your behalf.
Navigate to the **Audience** section in Zeotap CDP.
Select the audience you want to send to Inxmail.
**Attach the Inxmail destination** to this audience.
Any custom attributes you map must be pre-defined in Inxmail. If an attribute does not exist in Inxmail, that data will not be imported.
Then define the mailing list details and attach the destination to your audience. When you attach the destination, Zeotap automatically creates the mailing list in Inxmail and imports recipients on your behalf.
Navigate to the **Audience** section in Zeotap CDP.
Select the audience you want to send to Inxmail.
**Attach the Inxmail destination** to this audience.
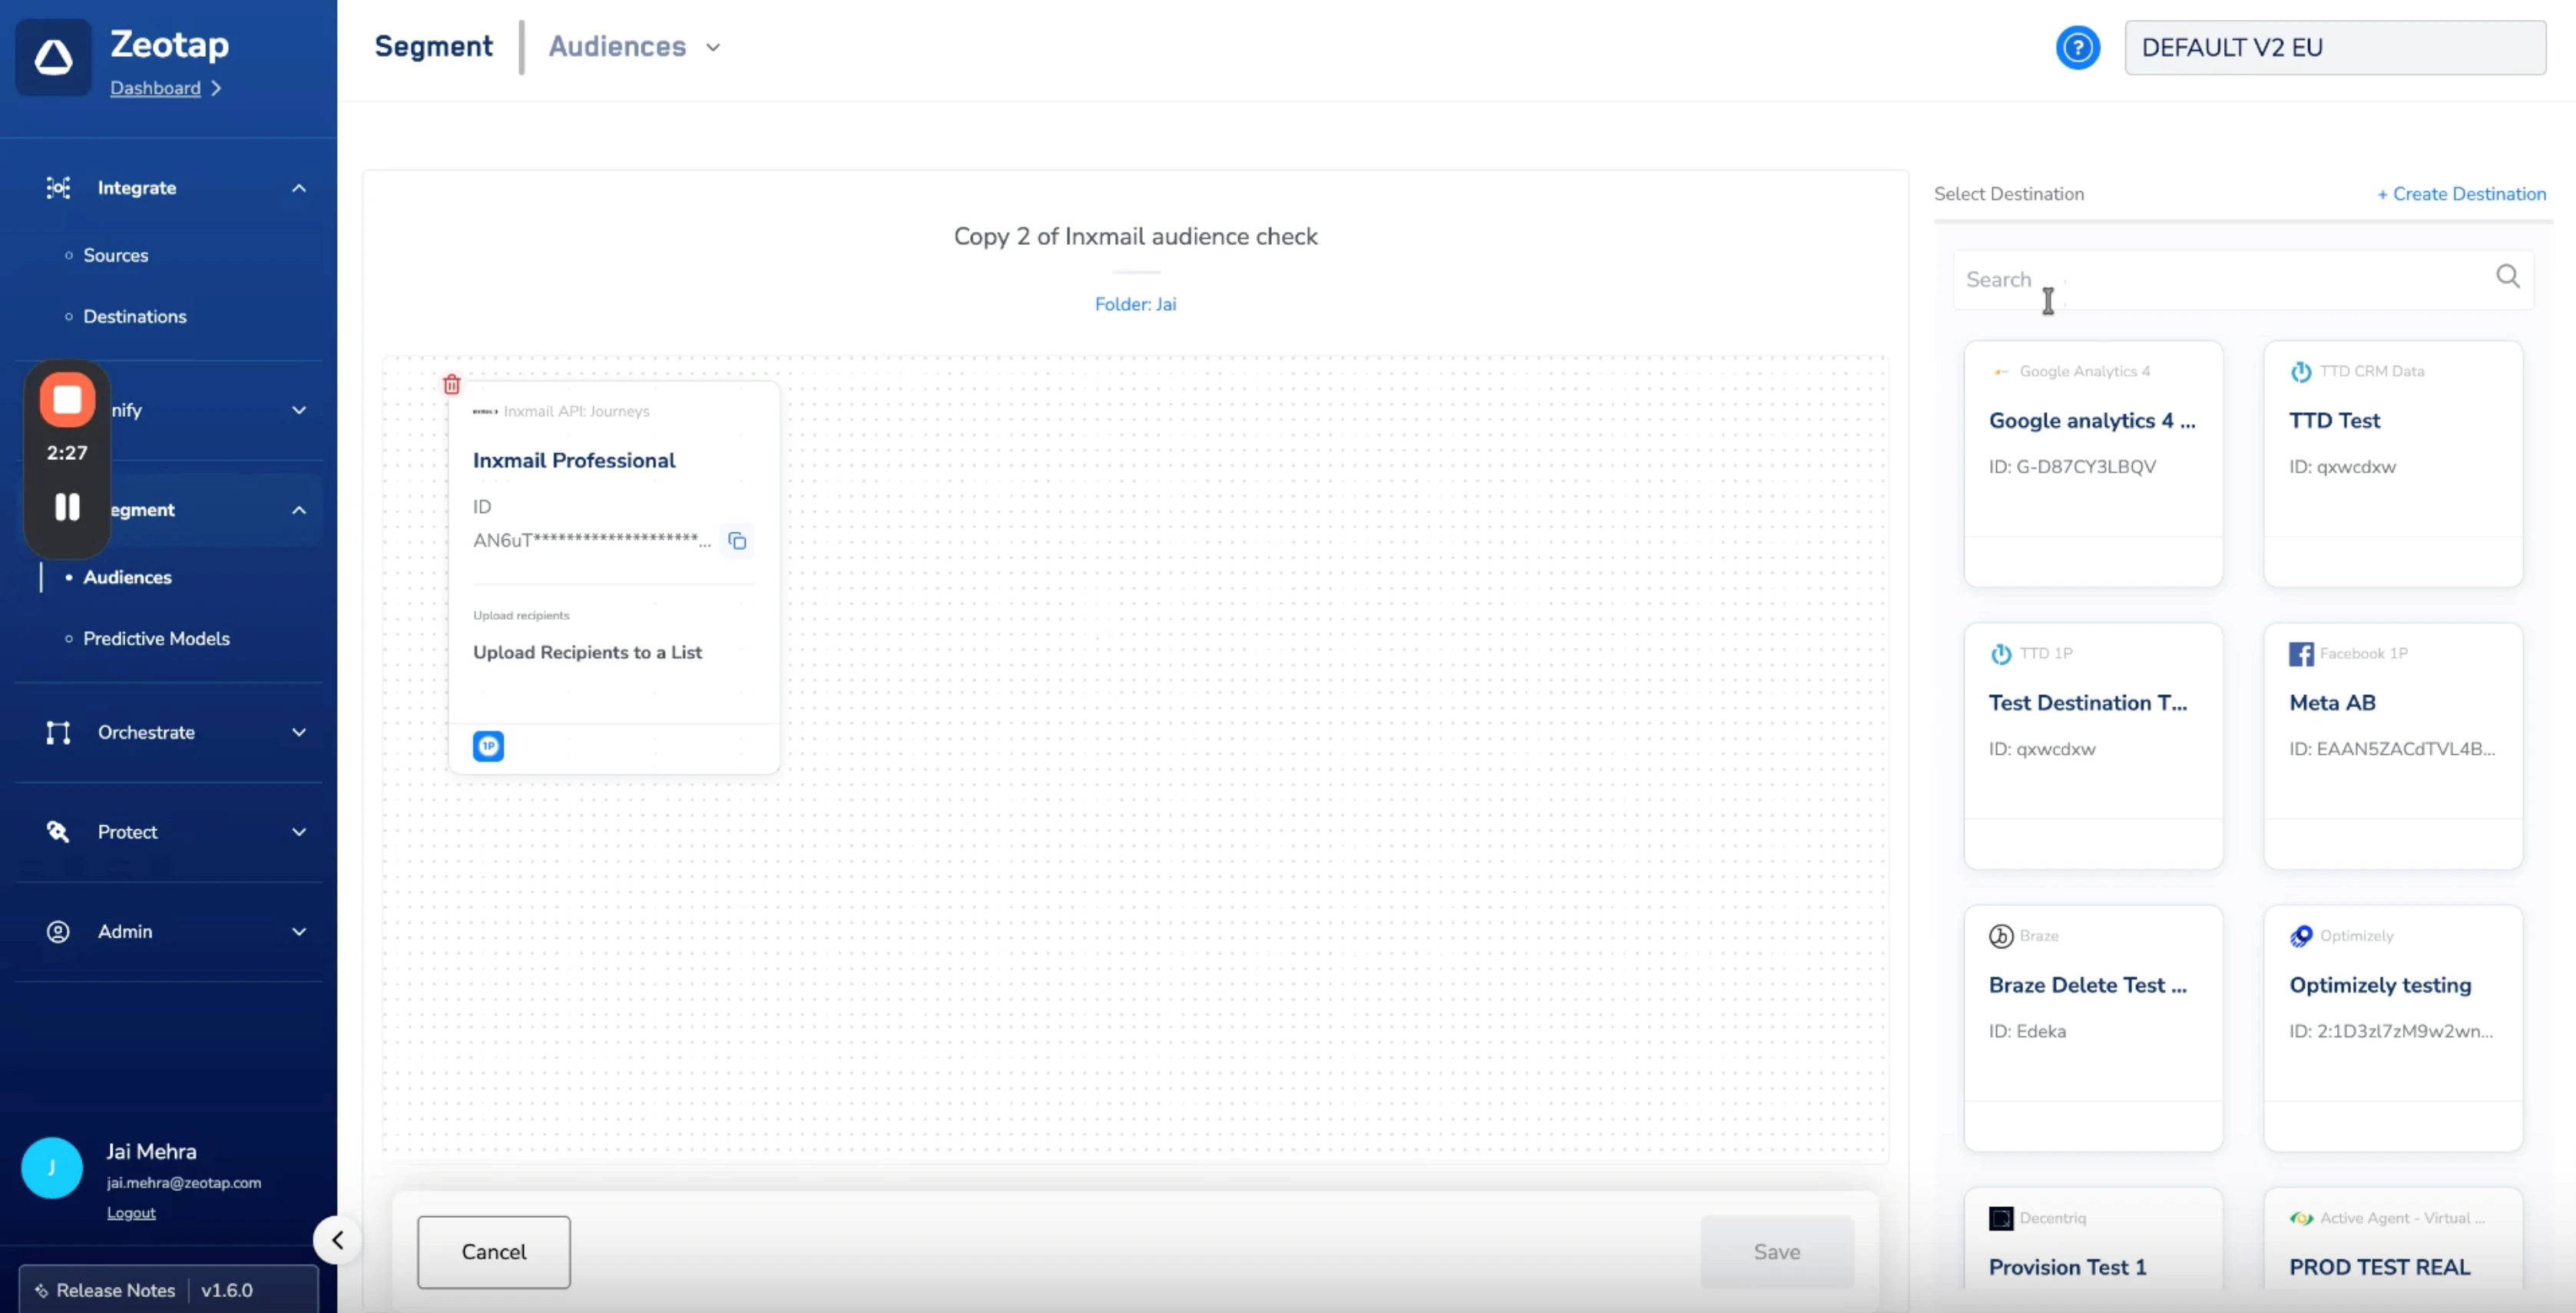 Fill in the mailing list parameters:
| Field | Required? | Description |
| -------------------- | --------- | ---------------------------------------------------------------------------------------------------------------------------------------------------------- |
| **Sender Address** | Yes | The email address that will appear as the "From" address on emails sent from this list (e.g., `marketing@yourcompany.com`). Must be a valid email address. |
| **Sender Name** | No | The display name shown alongside the sender address (e.g., "Your Company Marketing Team"). |
| **Reply-To Address** | No | The email address recipients will reply to, if different from the sender address. |
| **Reply-To Name** | No | The display name associated with the reply-to address. |
Fill in the mailing list parameters:
| Field | Required? | Description |
| -------------------- | --------- | ---------------------------------------------------------------------------------------------------------------------------------------------------------- |
| **Sender Address** | Yes | The email address that will appear as the "From" address on emails sent from this list (e.g., `marketing@yourcompany.com`). Must be a valid email address. |
| **Sender Name** | No | The display name shown alongside the sender address (e.g., "Your Company Marketing Team"). |
| **Reply-To Address** | No | The email address recipients will reply to, if different from the sender address. |
| **Reply-To Name** | No | The display name associated with the reply-to address. |
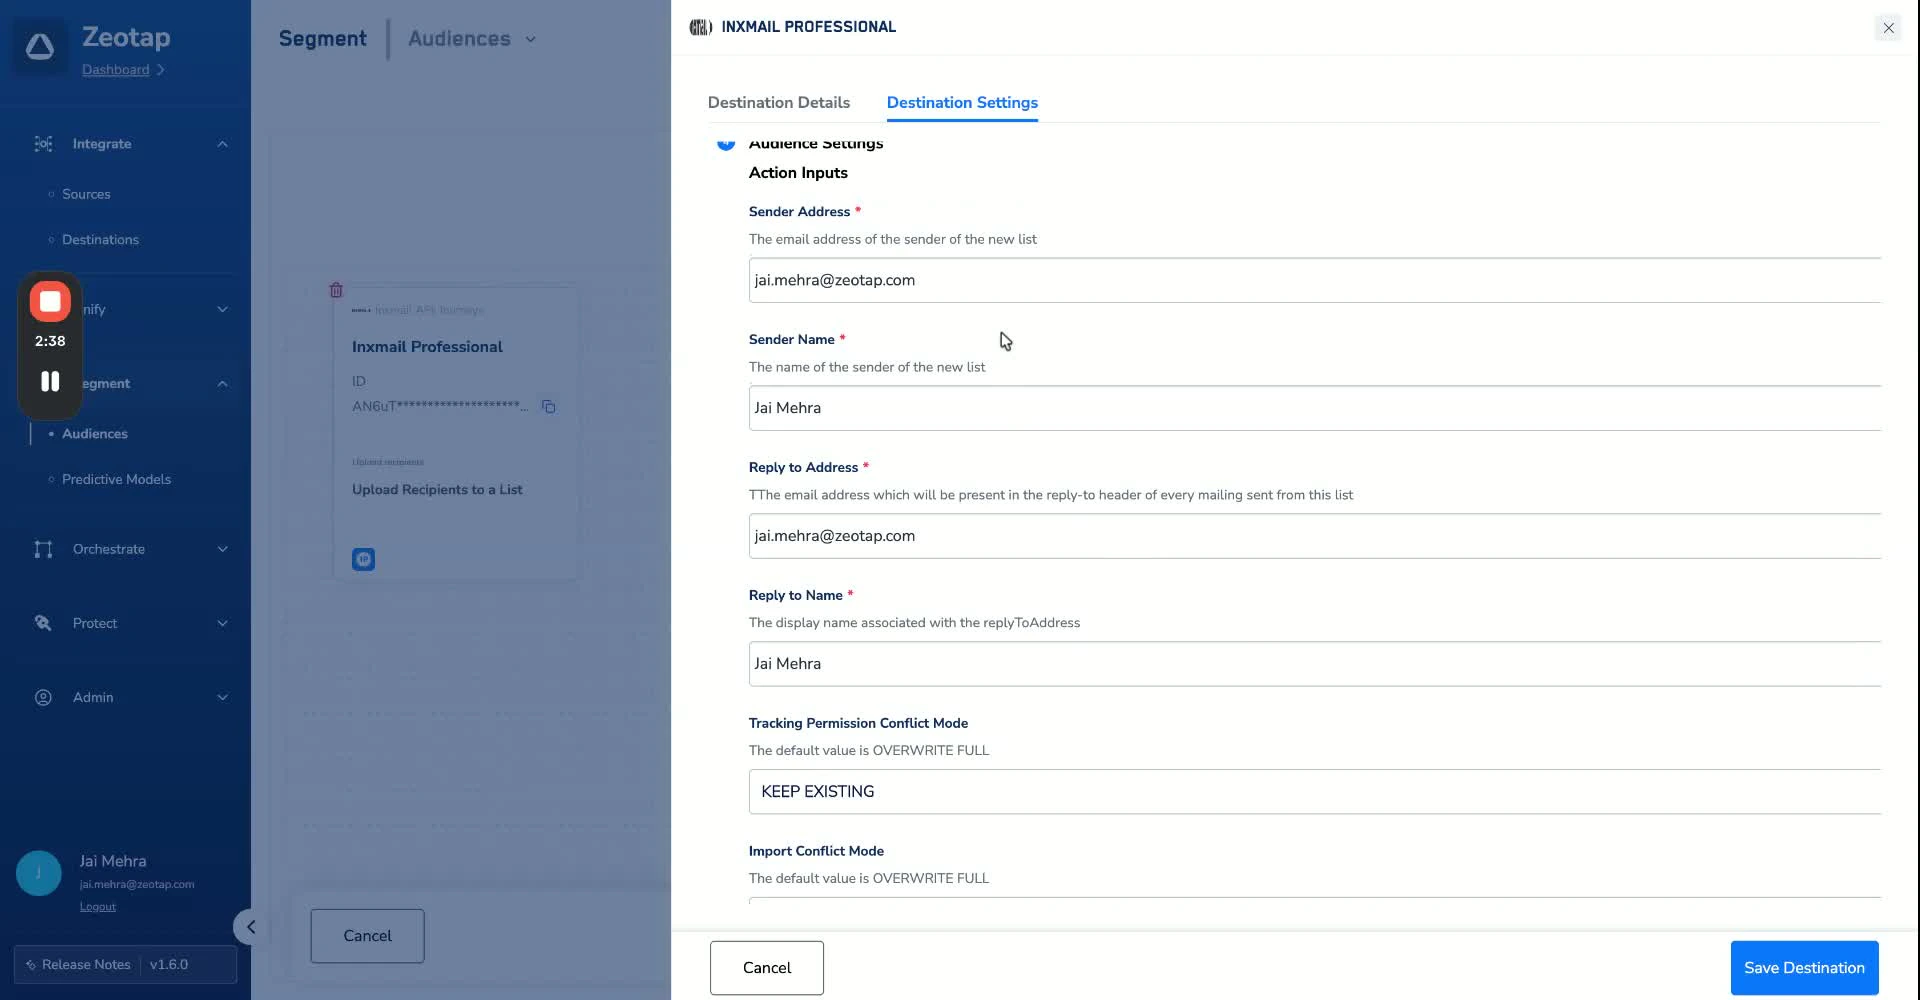 Click **Save** to finalize.
**What happens next:** Once attached, Zeotap automatically creates the mailing list in Inxmail using the parameters you configured, and imports your audience members as recipients into that list. You do not need to manually create the list or upload any files — it is all handled for you.
#### Action 2 — Upload Recipients to a list
Use this when the target list already exists in Inxmail. You provide the Inxmail **List ID** on the mapping screen, then map recipient attributes the same way as Action 1.
On the mapping screen, select **Upload Recipients to a list** as the action.
In the **List ID** field on the mapping screen, enter the ID of the existing Inxmail list you want to load contacts into. You can find this ID inside your Inxmail workspace under the list's settings or the list URL.
The List ID must already exist in your Inxmail account. If the ID is missing, mistyped, or does not match a real list, the connection will fail. Verify the ID in Inxmail before saving the mapping.
Map recipient attributes — same fields as Action 1:
* **Email ID** (required)
* **First Name**, **Last Name**, **Tracking Permission**, and any pre-defined custom attributes (optional)
Any custom attributes you map must be pre-defined in Inxmail. If an attribute does not exist in Inxmail, that data will not be imported.
Save the mapping, then attach the destination to your audience. Zeotap imports the audience members into the list you selected — no list-creation parameters are needed.
## Field Mapping
Below is a reference for how recipient data from Zeotap maps to Inxmail fields.
### Recipient Attribute Mapping
Applies to both actions.
| Zeotap Field | Maps to (Inxmail) | Required / Optional | Notes |
| ------------------- | ----------------------- | ------------------- | -------------------------------------------------------------------------------------------------------------------------- |
| Email ID | `email` (Email Address) | **Required** | Must be a valid email address. This is the unique identifier for each recipient in Inxmail. |
| Tracking Permission | `trackingPermission` | Optional | Controls email tracking consent. Use `GRANTED` to enable tracking; any other value (or empty) is treated as no permission. |
| Custom Attributes | Custom Attribute Names | Optional | Any additional data fields. Must be pre-defined as recipient attributes in your Inxmail account before mapping. |
### Upload Recipients to a list — Inputs
Applies only to the **Upload Recipients to a list** action.
| Parameter | Required / Optional | Notes |
| -------------------- | --------------------------------------- | ----------------------------------------------------------------------------------------------------------------------------------------------- |
| List ID | **Required** | The ID of an existing Inxmail list, entered on the mapping screen. The connection will fail if the ID is missing or does not match a real list. |
| Recipient attributes | See *Recipient Attribute Mapping* above | Email ID is required; other attributes optional. |
### Mailing List Parameters
Applies only to the **Create a list and upload recipients** action.
| Parameter | Maps to (Inxmail) | Required / Optional | Notes |
| ---------------- | ----------------- | ------------------- | -------------------------------------- |
| Sender Address | `senderAddress` | **Required** | Valid email address for the sender. |
| Sender Name | `senderName` | Optional | Display name for the sender. |
| Reply-To Address | `replyToAddress` | Optional | Valid email address for replies. |
| Reply-To Name | `replyToName` | Optional | Display name for the reply-to address. |
## Important Notes & Limitations
**Custom attributes must be pre-defined in Inxmail.** If you map attributes in Zeotap that do not exist as recipient attributes in Inxmail, that data will not be imported. Set up custom attributes in Inxmail before configuring the mapping.
**Mailing list creation and recipient import are automatic.** Once you attach the destination to an audience, Zeotap handles list creation and data import behind the scenes. You do not need to perform these steps manually.
**Opt-in compliance.** Ensure all recipients in your audience have opted in to receive communications in accordance with local regulations (GDPR, CAN-SPAM, etc.) before attaching the destination.
**Sender address must be valid.** The sender email address you configure must be a valid, deliverable email address. Inxmail will reject the mailing list creation if the sender address is invalid.
## Support
If you run into any issues during setup or have questions about the Zeotap-to-Inxmail integration, please reach out to your Zeotap account manager or contact the Zeotap support team.
Click **Save** to finalize.
**What happens next:** Once attached, Zeotap automatically creates the mailing list in Inxmail using the parameters you configured, and imports your audience members as recipients into that list. You do not need to manually create the list or upload any files — it is all handled for you.
#### Action 2 — Upload Recipients to a list
Use this when the target list already exists in Inxmail. You provide the Inxmail **List ID** on the mapping screen, then map recipient attributes the same way as Action 1.
On the mapping screen, select **Upload Recipients to a list** as the action.
In the **List ID** field on the mapping screen, enter the ID of the existing Inxmail list you want to load contacts into. You can find this ID inside your Inxmail workspace under the list's settings or the list URL.
The List ID must already exist in your Inxmail account. If the ID is missing, mistyped, or does not match a real list, the connection will fail. Verify the ID in Inxmail before saving the mapping.
Map recipient attributes — same fields as Action 1:
* **Email ID** (required)
* **First Name**, **Last Name**, **Tracking Permission**, and any pre-defined custom attributes (optional)
Any custom attributes you map must be pre-defined in Inxmail. If an attribute does not exist in Inxmail, that data will not be imported.
Save the mapping, then attach the destination to your audience. Zeotap imports the audience members into the list you selected — no list-creation parameters are needed.
## Field Mapping
Below is a reference for how recipient data from Zeotap maps to Inxmail fields.
### Recipient Attribute Mapping
Applies to both actions.
| Zeotap Field | Maps to (Inxmail) | Required / Optional | Notes |
| ------------------- | ----------------------- | ------------------- | -------------------------------------------------------------------------------------------------------------------------- |
| Email ID | `email` (Email Address) | **Required** | Must be a valid email address. This is the unique identifier for each recipient in Inxmail. |
| Tracking Permission | `trackingPermission` | Optional | Controls email tracking consent. Use `GRANTED` to enable tracking; any other value (or empty) is treated as no permission. |
| Custom Attributes | Custom Attribute Names | Optional | Any additional data fields. Must be pre-defined as recipient attributes in your Inxmail account before mapping. |
### Upload Recipients to a list — Inputs
Applies only to the **Upload Recipients to a list** action.
| Parameter | Required / Optional | Notes |
| -------------------- | --------------------------------------- | ----------------------------------------------------------------------------------------------------------------------------------------------- |
| List ID | **Required** | The ID of an existing Inxmail list, entered on the mapping screen. The connection will fail if the ID is missing or does not match a real list. |
| Recipient attributes | See *Recipient Attribute Mapping* above | Email ID is required; other attributes optional. |
### Mailing List Parameters
Applies only to the **Create a list and upload recipients** action.
| Parameter | Maps to (Inxmail) | Required / Optional | Notes |
| ---------------- | ----------------- | ------------------- | -------------------------------------- |
| Sender Address | `senderAddress` | **Required** | Valid email address for the sender. |
| Sender Name | `senderName` | Optional | Display name for the sender. |
| Reply-To Address | `replyToAddress` | Optional | Valid email address for replies. |
| Reply-To Name | `replyToName` | Optional | Display name for the reply-to address. |
## Important Notes & Limitations
**Custom attributes must be pre-defined in Inxmail.** If you map attributes in Zeotap that do not exist as recipient attributes in Inxmail, that data will not be imported. Set up custom attributes in Inxmail before configuring the mapping.
**Mailing list creation and recipient import are automatic.** Once you attach the destination to an audience, Zeotap handles list creation and data import behind the scenes. You do not need to perform these steps manually.
**Opt-in compliance.** Ensure all recipients in your audience have opted in to receive communications in accordance with local regulations (GDPR, CAN-SPAM, etc.) before attaching the destination.
**Sender address must be valid.** The sender email address you configure must be a valid, deliverable email address. Inxmail will reject the mailing list creation if the sender address is invalid.
## Support
If you run into any issues during setup or have questions about the Zeotap-to-Inxmail integration, please reach out to your Zeotap account manager or contact the Zeotap support team.