> ## Documentation Index
> Fetch the complete documentation index at: https://docs.zeotap.com/llms.txt
> Use this file to discover all available pages before exploring further.
# Insider
## Overview
Insider is a customer experience (CX) platform that enables businesses to deliver personalised and data-driven interactions across multiple channels. The platform helps companies analyse customer behaviour, segment audiences, and automate marketing efforts to enhance engagement and conversions.
By integrating Zeotap CDP with Insider, you can:
* Share audience data from Zeotap CDP to Insider for activation and targeting.
* Forward events from Zeotap CDP to Insider.
* Trigger automation using custom events sent from Zeotap CDP Journeys to Insider.
* Send event properties and user attributes from workflows created in Zeotap CDP to Insider.
## Supported Identifiers
You can use this integration to send any identifiers such as Email, Phone number (E.164 format), UUID, Custom identifiers and other attributes of your choice.
## Prerequisites
Ensure to obtain the following prerequisites from your InOne (Insider) account before creating an Insider destination in Zeotap CDP:
* API key
* Partner name
## Authentication
Insider uses Basic Authentication, which requires a *username* and an *API key*. After setting up your InOne (Insider) account, generate a Unified Customer Database (UCD) API key to push data using the Insider Upsert API.
### Generate an API Key
Perform the following steps to generate an API Key:
Log in to InOne.
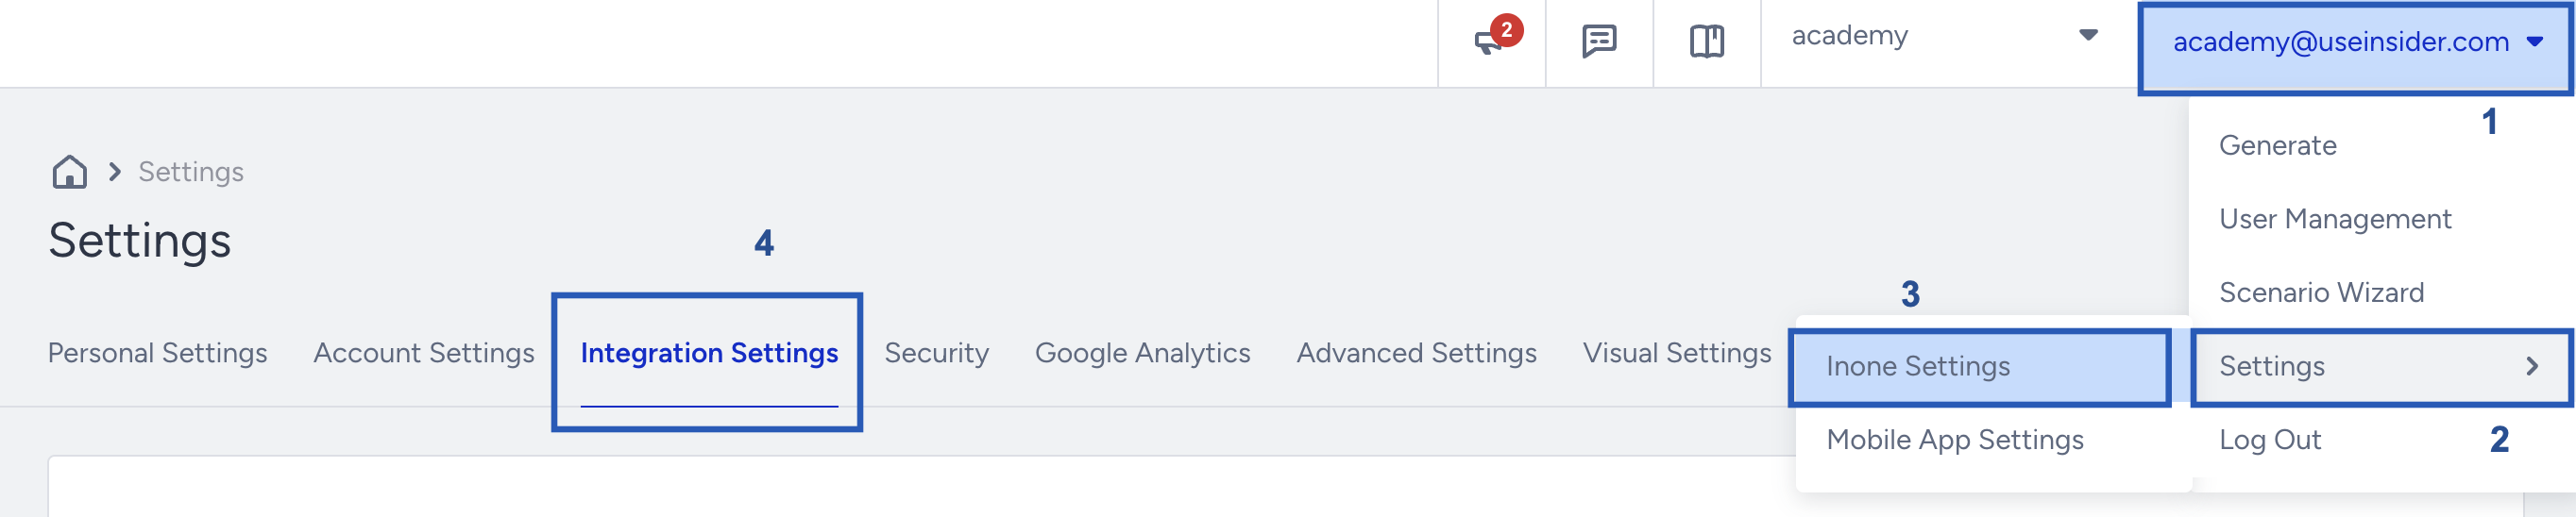
Navigate to **Username** > **Settings** > **InOne Settings** > **Integration Settings** as shown below.
 Scroll to the **API Keys** section and click **Generate API Key.**
If you have existing API keys, they appear in this section.
Scroll to the **API Keys** section and click **Generate API Key.**
If you have existing API keys, they appear in this section.
 Select the API type to generate the key and click **Next** to create the key.
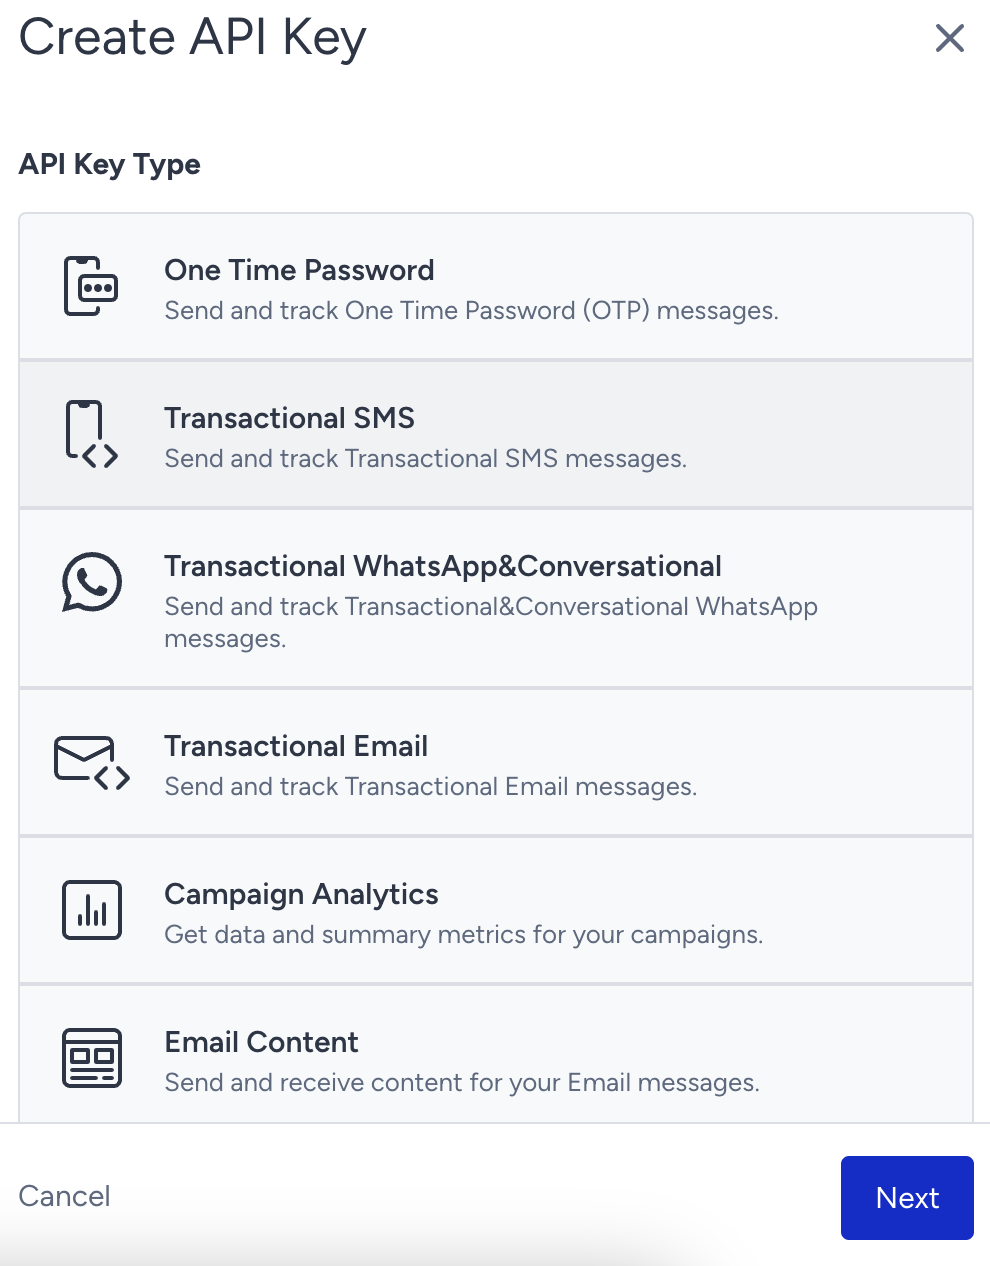 Click **Copy** to save the key before closing the prompt. **You cannot access the key after closing the window, so copy and store it securely.**
 ### Delete an API Key
To delete an existing API key, click **Delete** next to the key.
## Create a Destination for Insider
Follow these steps to create a destination for Insider:
Log into the Zeotap CDP App and go to the **DESTINATIONS** application.
Click **+ Create Destination**.
Under **All Destinations**, search for **Insider**.
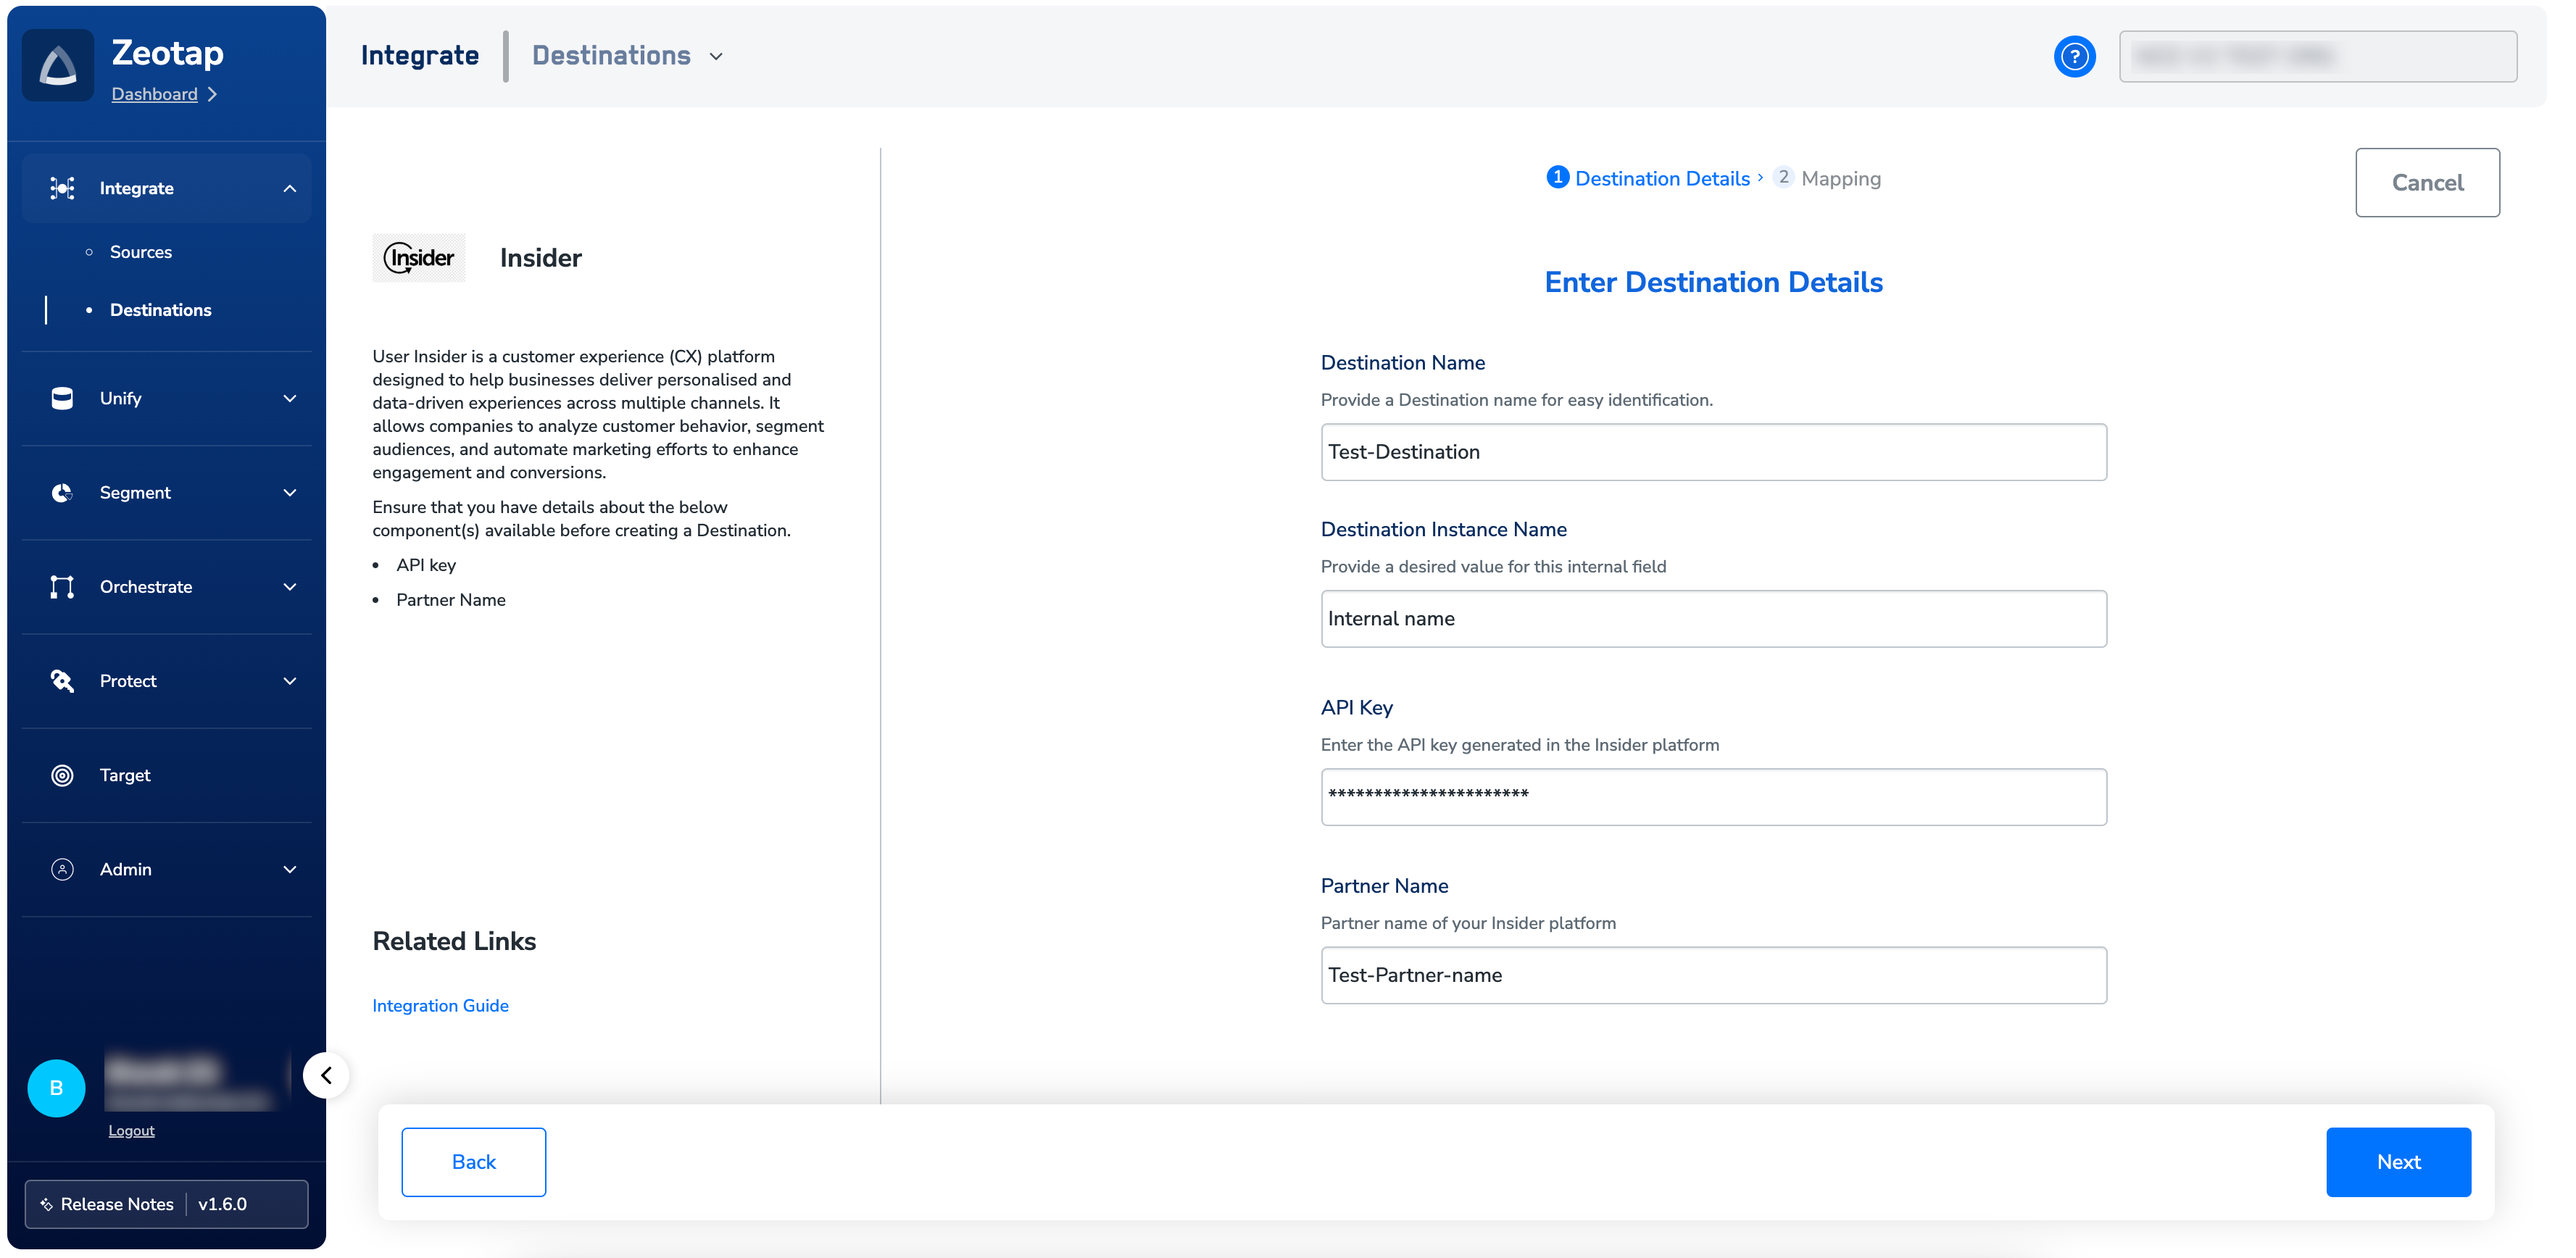
Click **Insider**. A screen appears displaying details about the destination on the left and required integration fields on the right. Enter the following details:
* **Destination name**: Enter a name for the destination.
* **Destination Instance Nam**e: Provide a desired value for this internal field.
* **API Key**: Enter the API key generated in Insider.
* **Partner Name**: Enter your Insider partner name obtained from your Insider account.
### Delete an API Key
To delete an existing API key, click **Delete** next to the key.
## Create a Destination for Insider
Follow these steps to create a destination for Insider:
Log into the Zeotap CDP App and go to the **DESTINATIONS** application.
Click **+ Create Destination**.
Under **All Destinations**, search for **Insider**.
Click **Insider**. A screen appears displaying details about the destination on the left and required integration fields on the right. Enter the following details:
* **Destination name**: Enter a name for the destination.
* **Destination Instance Nam**e: Provide a desired value for this internal field.
* **API Key**: Enter the API key generated in Insider.
* **Partner Name**: Enter your Insider partner name obtained from your Insider account.
 Click **Next** to proceed to mapping.
## Actions and Mapping
On the **Actions and Mapping** screen, choose the action depending on whether you want to use **Audiences (batched data activation)** or **Journeys (real-time activation)**, depending on your use case.
### Audiences (Batched Data)
Supported Action: **Send Attributes and Identifiers**
#### Mapping
Under **Map the Fields**, map Catalogue fields and Destination fields for audience attributes and identifiers.
Required fields:
* **User Identifiers**: Email, Phone number, UUID
* **User Attributes**: Name, Age, Gender, Language, City, Country, Custom attributes
### Journeys (Real-Time Activation)
Supported Actions:
* Add to Cart Event
* Cart Page View Event
* Custom Event
* Item Removed from Cart Event
* Purchase Event
* Send Homepage View Event
* Send Listing View Event
* Send Product Detail Page View Event
#### Mapping
Under **Map the Fields**, for each Journey action, the system populates a list of identifiers and attributes. Ensure to map Catalogue fields and Destination fields appropriately.
Required fields:
* You must mandatorily map the **Event Name** and **Timestamp** fields for all events.
* Map additional event parameters based on the event type you wish to target.
Click **Next** to proceed to mapping.
## Actions and Mapping
On the **Actions and Mapping** screen, choose the action depending on whether you want to use **Audiences (batched data activation)** or **Journeys (real-time activation)**, depending on your use case.
### Audiences (Batched Data)
Supported Action: **Send Attributes and Identifiers**
#### Mapping
Under **Map the Fields**, map Catalogue fields and Destination fields for audience attributes and identifiers.
Required fields:
* **User Identifiers**: Email, Phone number, UUID
* **User Attributes**: Name, Age, Gender, Language, City, Country, Custom attributes
### Journeys (Real-Time Activation)
Supported Actions:
* Add to Cart Event
* Cart Page View Event
* Custom Event
* Item Removed from Cart Event
* Purchase Event
* Send Homepage View Event
* Send Listing View Event
* Send Product Detail Page View Event
#### Mapping
Under **Map the Fields**, for each Journey action, the system populates a list of identifiers and attributes. Ensure to map Catalogue fields and Destination fields appropriately.
Required fields:
* You must mandatorily map the **Event Name** and **Timestamp** fields for all events.
* Map additional event parameters based on the event type you wish to target.
