> ## Documentation Index
> Fetch the complete documentation index at: https://docs.zeotap.com/llms.txt
> Use this file to discover all available pages before exploring further.
# Create and Implement the Server to Server Source
## Getting Started
You can import your data residing in your server to the Zeotap CDP by following the step-by-step instructions provided:
1. [To begin with, create a Server-to-Server source within Zeotap CDP](/articles/integrate-customer/implementing-server-to-server-source-2665709918#step-1-create-a-server-to-server-source-within-zeotap-cdp)
2. [Next, set up the Server-to-Server source to transfer either real-time or batch data as per your requirement](/articles/integrate-customer/implementing-server-to-server-source-2665709918#step-2-set-up-the-server-to-server-source-to-transfer-data-using-http-api)
## Step 1 - Create a Server-to-Server Source Within Zeotap CDP
Perform the following steps to create a Server-to-Server Source in Zeotap CDP App:
Navigate to the **Sources** application in the Zeotap CDP App.
Click **CREATE SOURCE**.
Choose **Server to Server** as the Category.
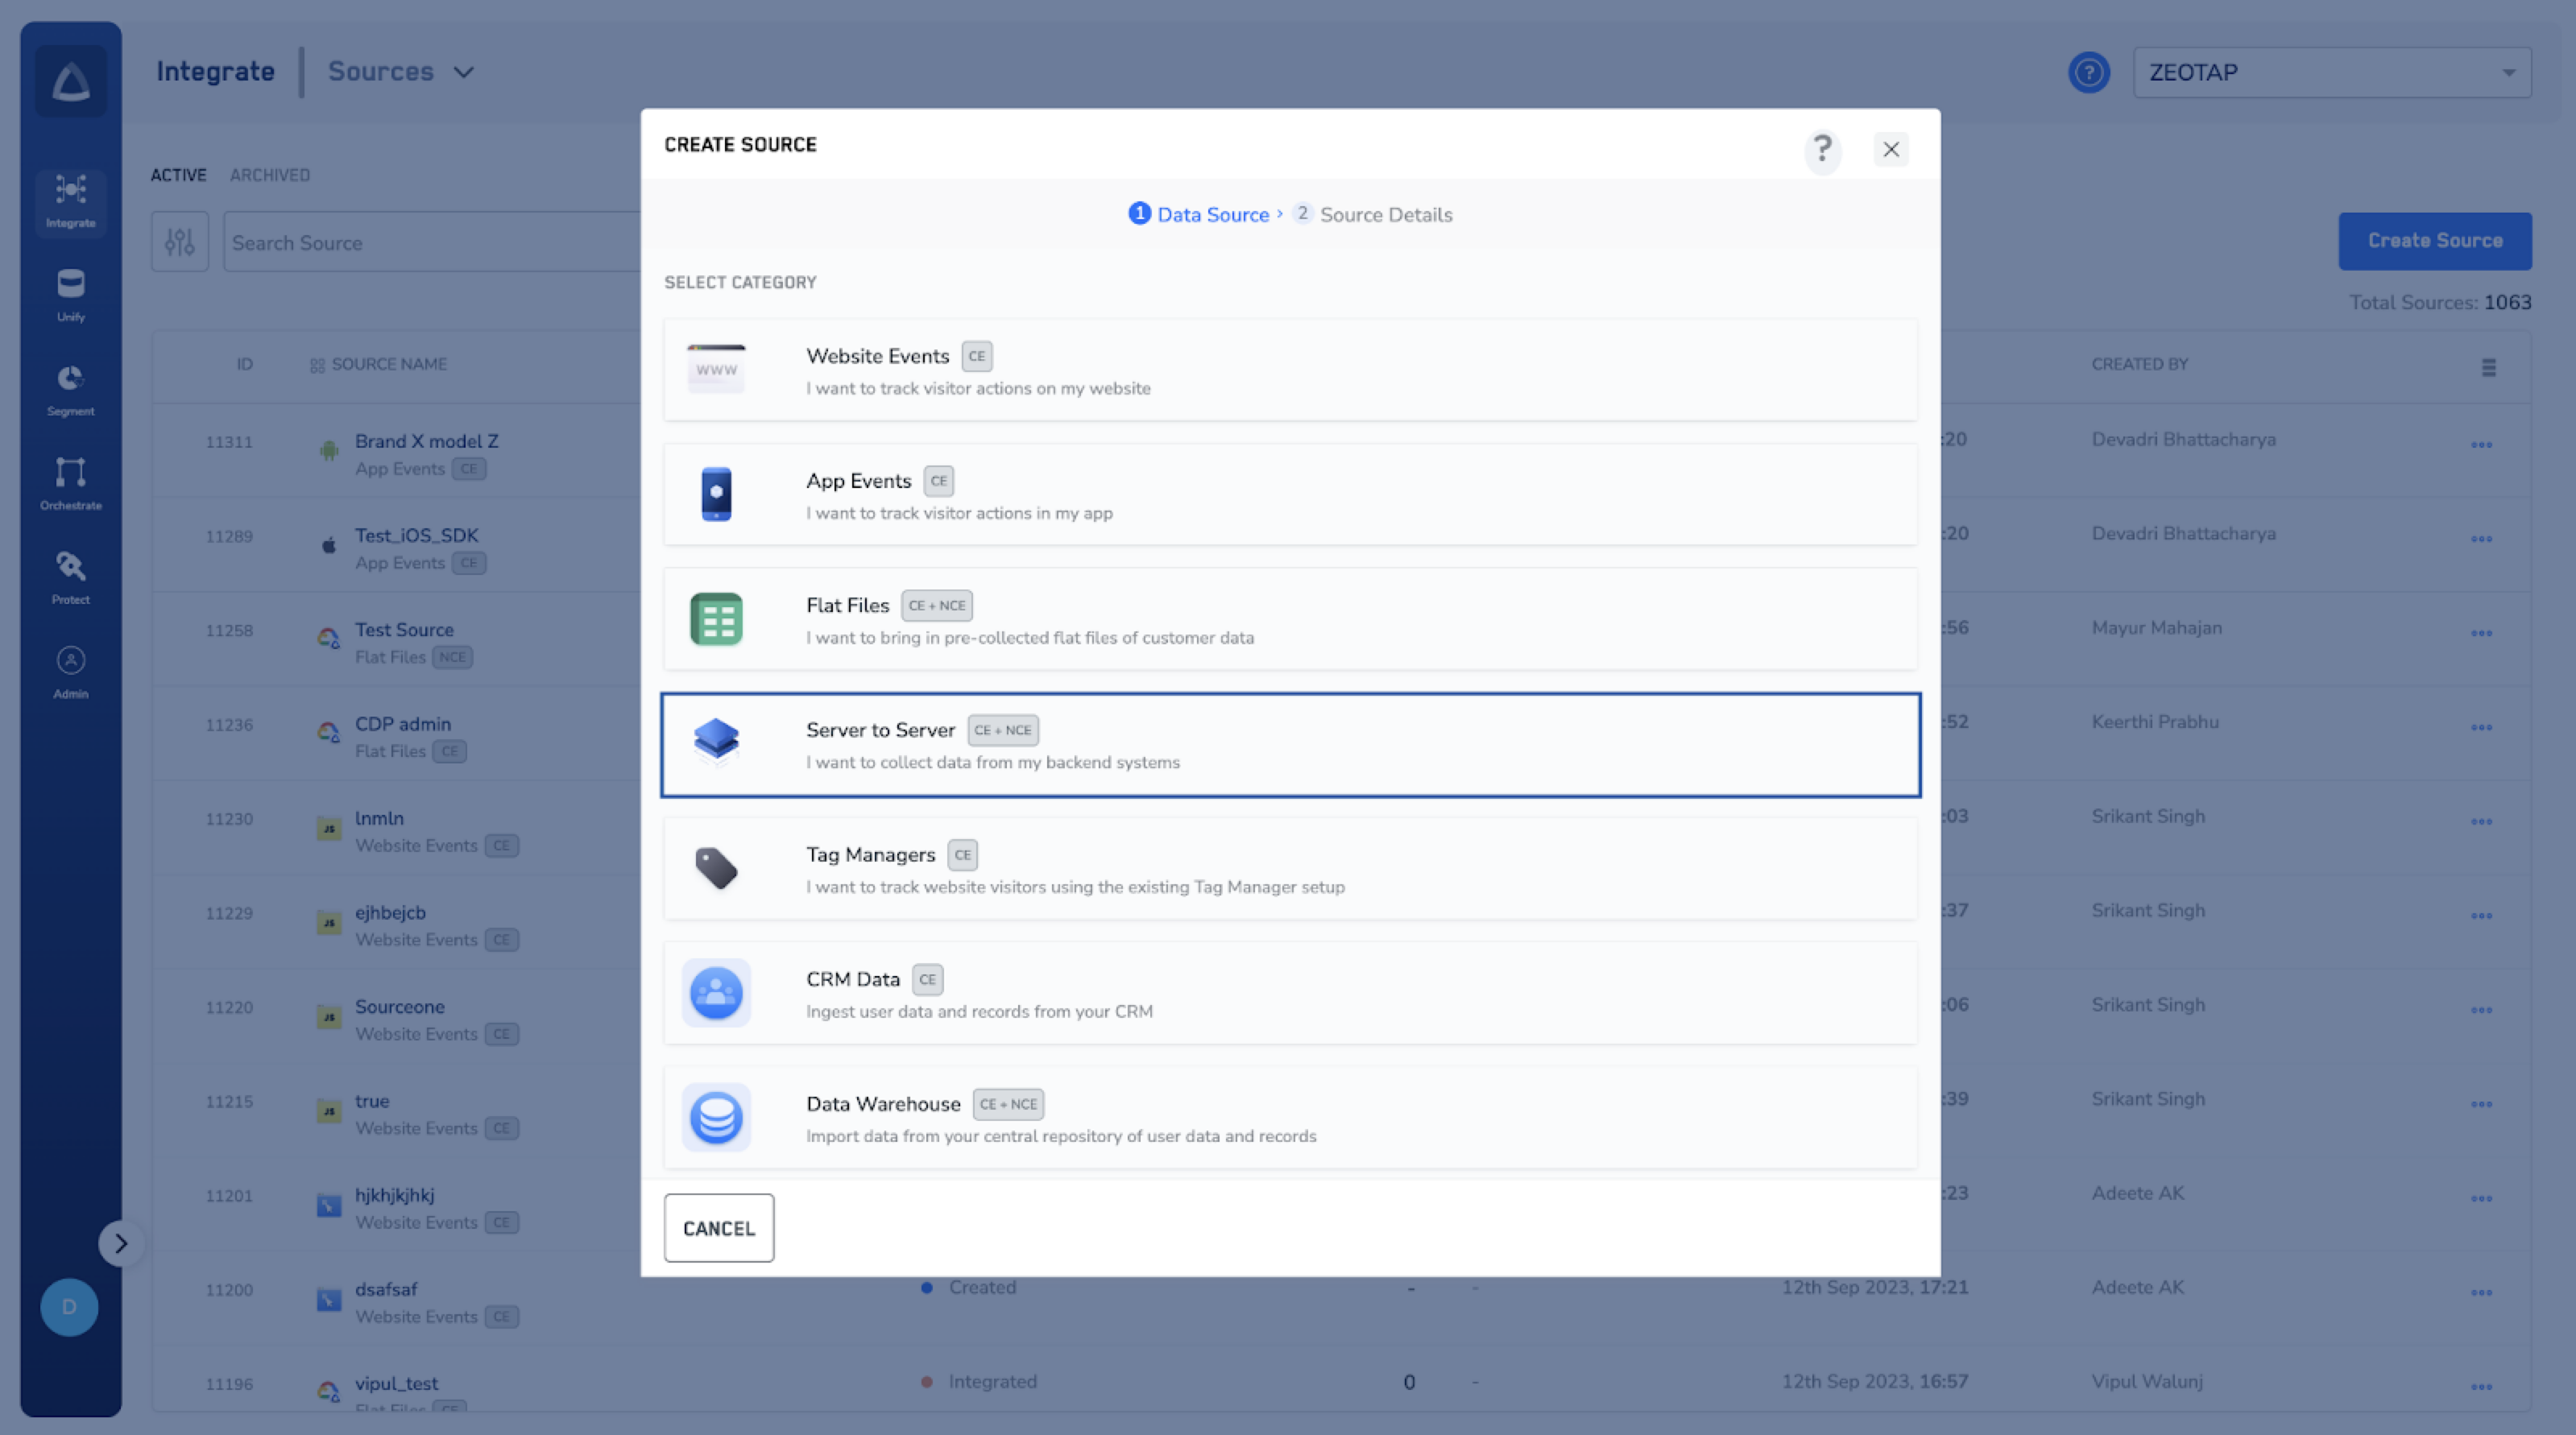 Click **HTTP API** as the Data Source.
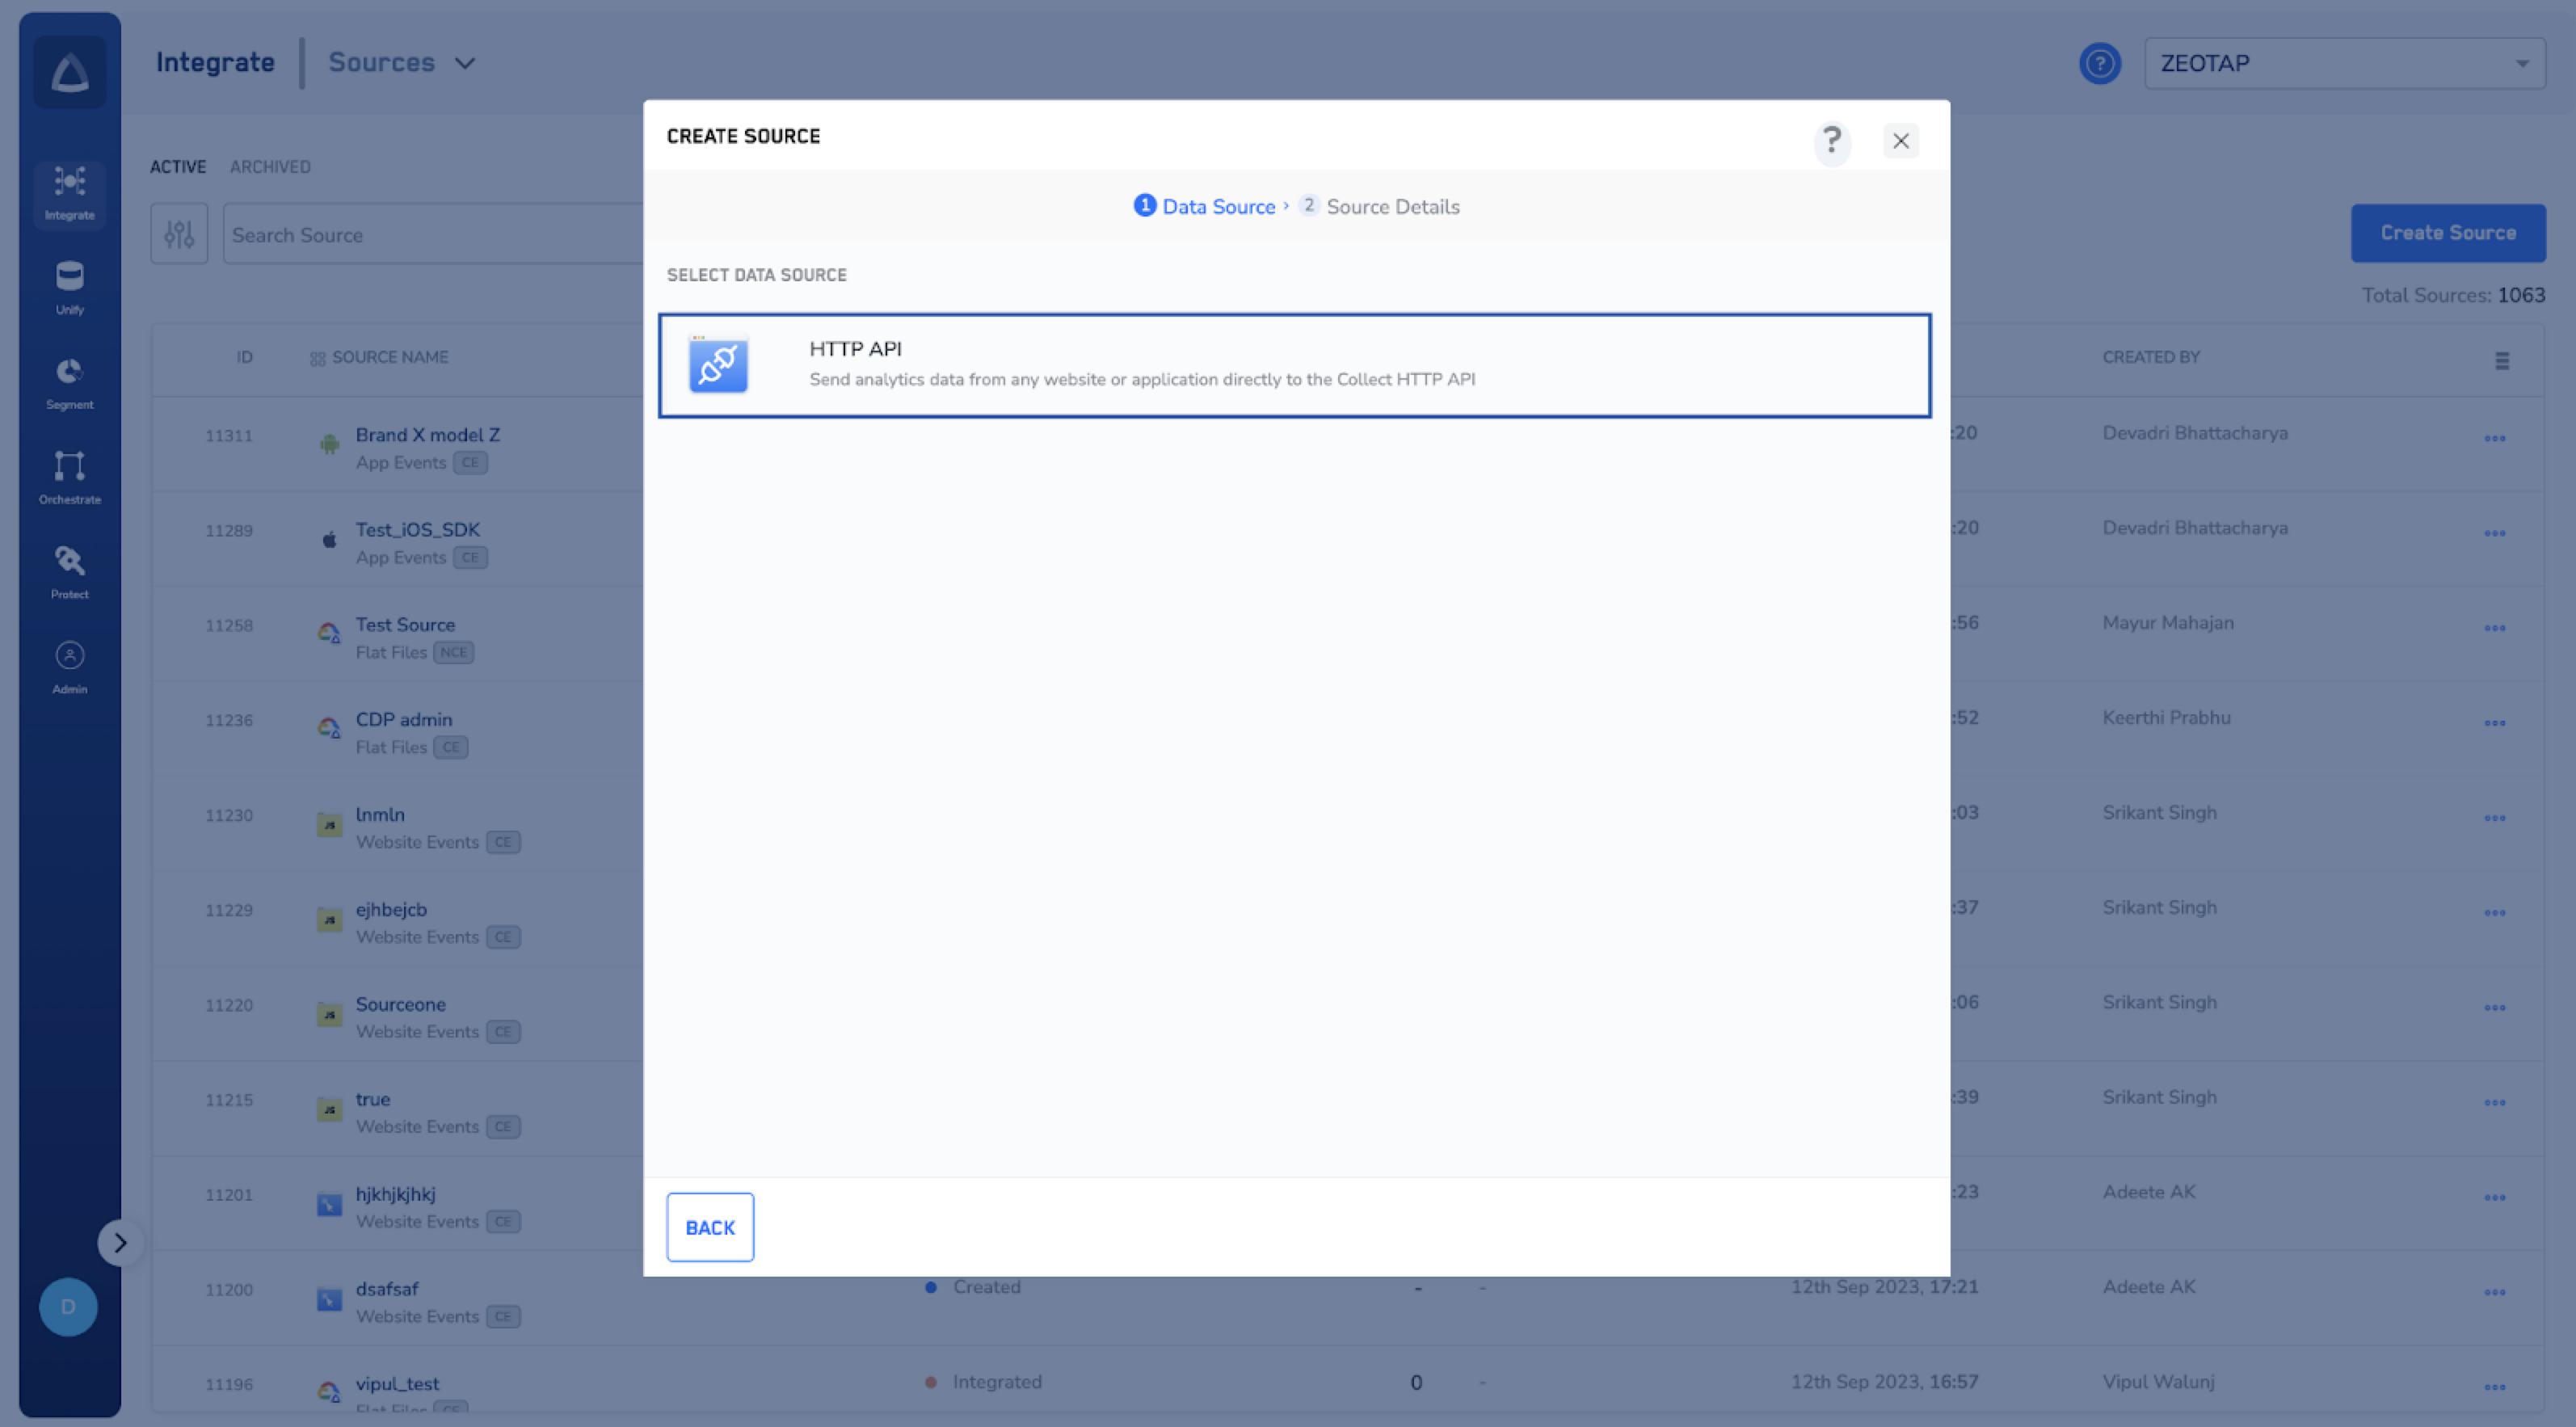 In the window that appears, provide the following details:
a. Enter a short and descriptive name for the Source.
b. Choose the **region** of upload where the data needs to be stored. [Learn more](/articles/integrate-customer/region-of-storage)
c. Under **Data Entity**, depending on the type of data that you want to ingest, choose either Customer Data or Non Customer Data and proceed with the source creation. [Learn more](https://docs.zeotap.com/smart/project-unify/supported-data-entities)
In the window that appears, provide the following details:
a. Enter a short and descriptive name for the Source.
b. Choose the **region** of upload where the data needs to be stored. [Learn more](/articles/integrate-customer/region-of-storage)
c. Under **Data Entity**, depending on the type of data that you want to ingest, choose either Customer Data or Non Customer Data and proceed with the source creation. [Learn more](https://docs.zeotap.com/smart/project-unify/supported-data-entities)
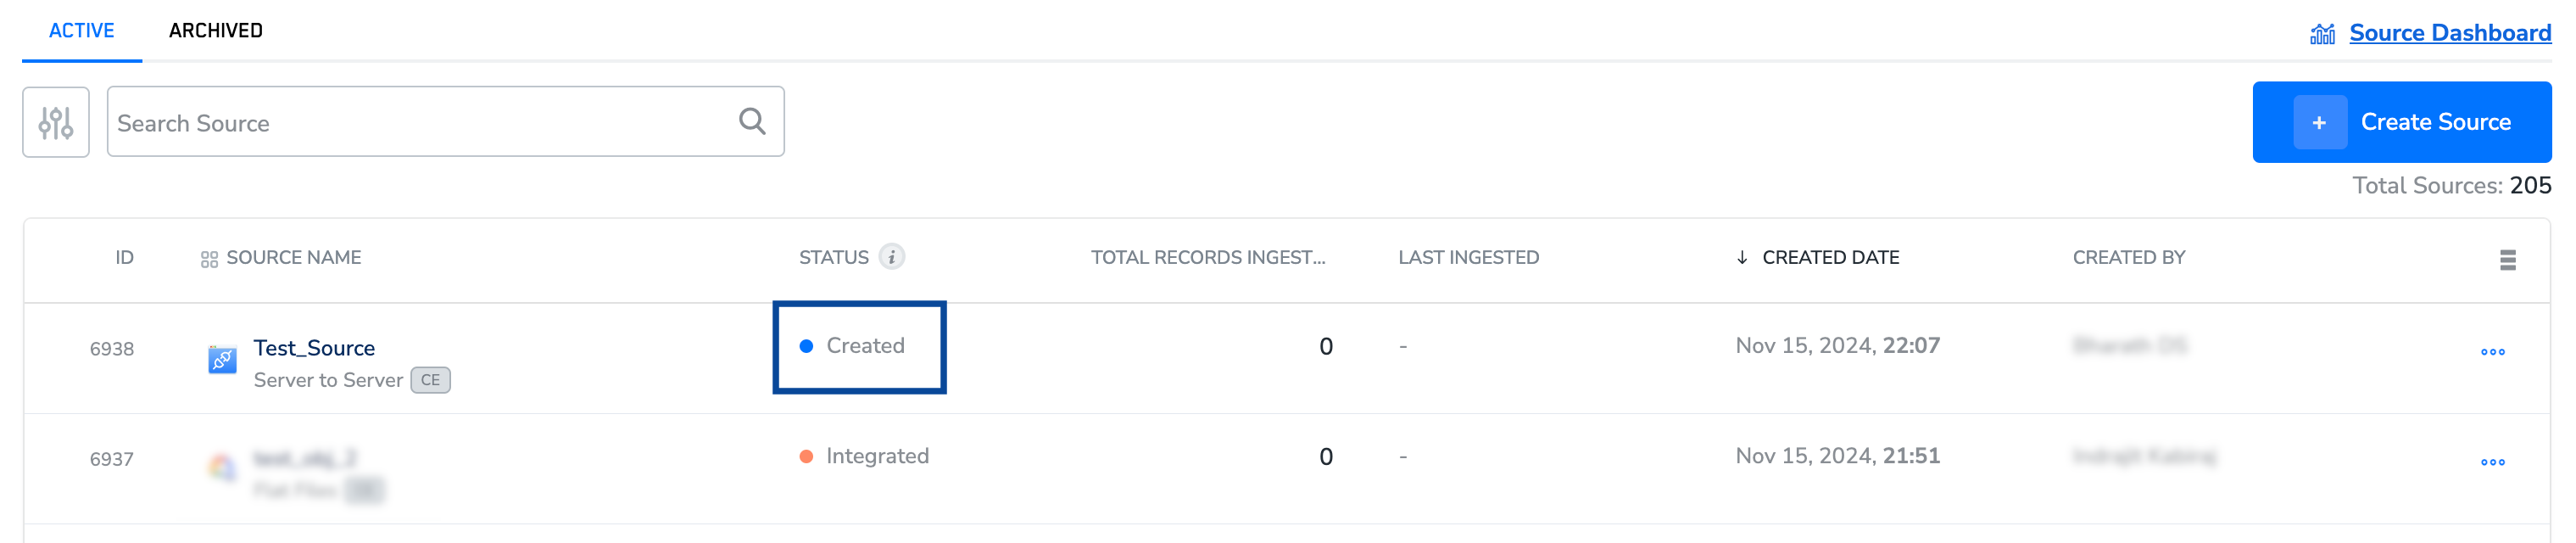
 Click **+ Create Source**. The created source appears on the source listing page. At this point, the source is assigned the **Created** status, as shown in the below example.
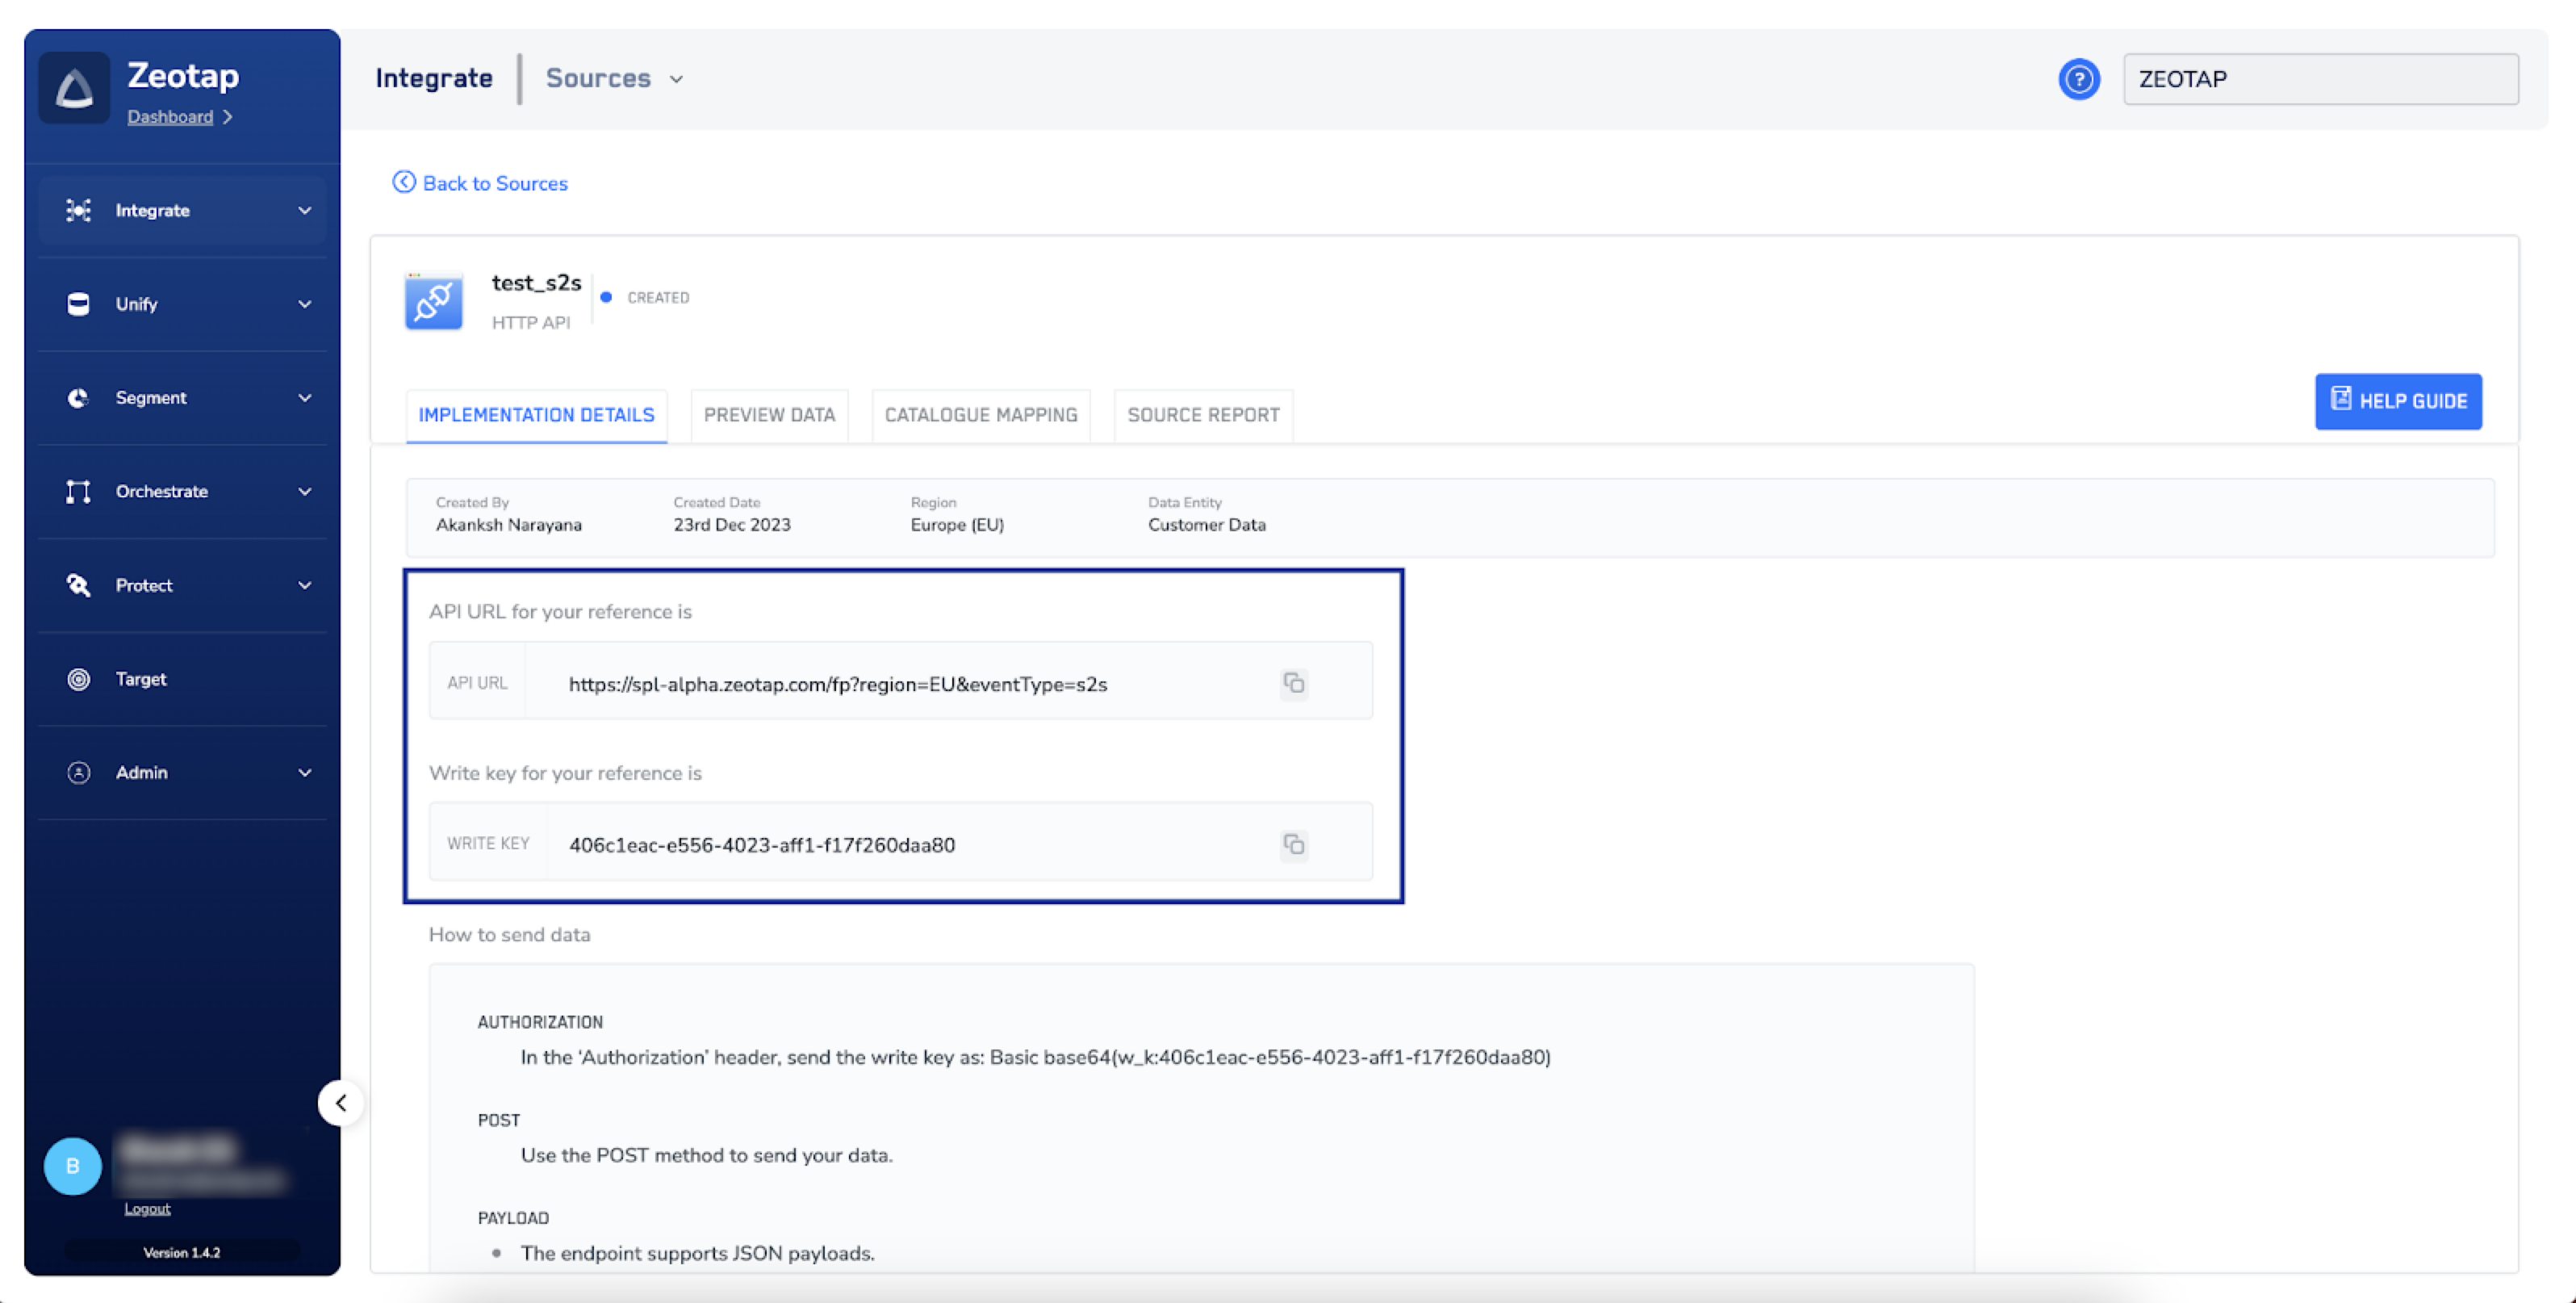
 In the **IMPLEMENTATION DETAILS** tab, you can find information such as the write key and API URL (Zeotap CDP Server's API endpoint).Use this information to make API calls for sending data to Zeotap CDP server.
**Note:**
**Note that you need to wait 30 minutes before using this write key to make API calls.**
In the **IMPLEMENTATION DETAILS** tab, you can find information such as the write key and API URL (Zeotap CDP Server's API endpoint).Use this information to make API calls for sending data to Zeotap CDP server.
**Note:**
**Note that you need to wait 30 minutes before using this write key to make API calls.**
 ## Step 2 - Set up the Server-to-Server Source to Transfer Data Using HTTP API
After creating a Server-to-Server source successfully, you can transfer data through one of the following methods:
* **Using Real Time API -**
This enables immediate communication and data exchange between your server and Zeotap CDP's server. Data is processed and transferred with minimal delay, ensuring near-instant updates and responsiveness. Below is a skeletal payload structure.
```js Code theme={null}
{
"event": {
...
},
"page": {
...
},
"user": {
...
},
"consent": {
...
},
"device": {
...
}
}
```
* **Using Batch API -** This allows multiple requests to be bundled or grouped together and submitted as a single batch for processing. Instead of sending individual requests one by one, a batch API enables the client to efficiently send a collection or batch of requests in a single API call.
The set-up and authorisation process for sending data in batches is the same as Real Time API. However, the events must be batched as events object with an array of events inside the object. Below is a skeletal payload structure.
```js Code theme={null}
{
"events": [
{
"event": {...},
"user": {...}
},
{
"event": {...},
"user": {...}
},
]
}
```
### Data Transfer in Server to Server Integration
You can transfer data from your server to Zeotap CDP in real time or in batches, depending on your requirement. The setup and authorization process for sending data remain the same. However, the key difference lies in batching the events. Perform the following steps to transfer data in the Server-to-Server integration:
Once the Server to Server source is created in the Sources application, navigate to the **IMPLEMENTATION DETAILS** tab and copy the `API URL` and `Write_Key` of the created source.
## Step 2 - Set up the Server-to-Server Source to Transfer Data Using HTTP API
After creating a Server-to-Server source successfully, you can transfer data through one of the following methods:
* **Using Real Time API -**
This enables immediate communication and data exchange between your server and Zeotap CDP's server. Data is processed and transferred with minimal delay, ensuring near-instant updates and responsiveness. Below is a skeletal payload structure.
```js Code theme={null}
{
"event": {
...
},
"page": {
...
},
"user": {
...
},
"consent": {
...
},
"device": {
...
}
}
```
* **Using Batch API -** This allows multiple requests to be bundled or grouped together and submitted as a single batch for processing. Instead of sending individual requests one by one, a batch API enables the client to efficiently send a collection or batch of requests in a single API call.
The set-up and authorisation process for sending data in batches is the same as Real Time API. However, the events must be batched as events object with an array of events inside the object. Below is a skeletal payload structure.
```js Code theme={null}
{
"events": [
{
"event": {...},
"user": {...}
},
{
"event": {...},
"user": {...}
},
]
}
```
### Data Transfer in Server to Server Integration
You can transfer data from your server to Zeotap CDP in real time or in batches, depending on your requirement. The setup and authorization process for sending data remain the same. However, the key difference lies in batching the events. Perform the following steps to transfer data in the Server-to-Server integration:
Once the Server to Server source is created in the Sources application, navigate to the **IMPLEMENTATION DETAILS** tab and copy the `API URL` and `Write_Key` of the created source.
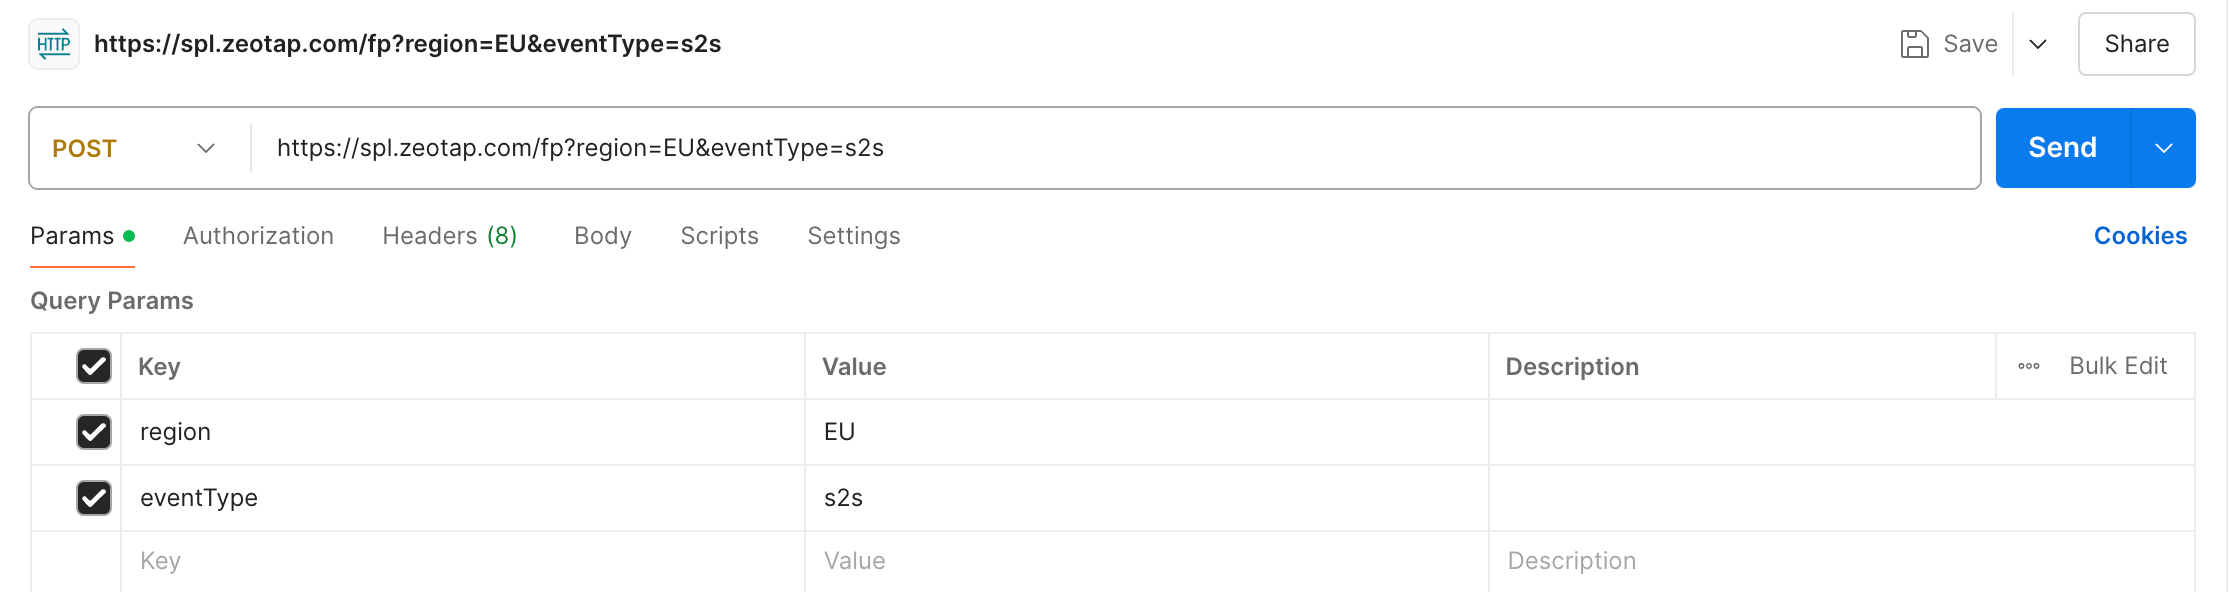
 Open an API tool such as Postman and create a **HTTP** **POST** request with the following details:
a. Provide the `API URL` copied earlier as the endpoint URL for making API calls. The **region** and **eventType** are displayed in the *Params* section as shown below.
Open an API tool such as Postman and create a **HTTP** **POST** request with the following details:
a. Provide the `API URL` copied earlier as the endpoint URL for making API calls. The **region** and **eventType** are displayed in the *Params* section as shown below.
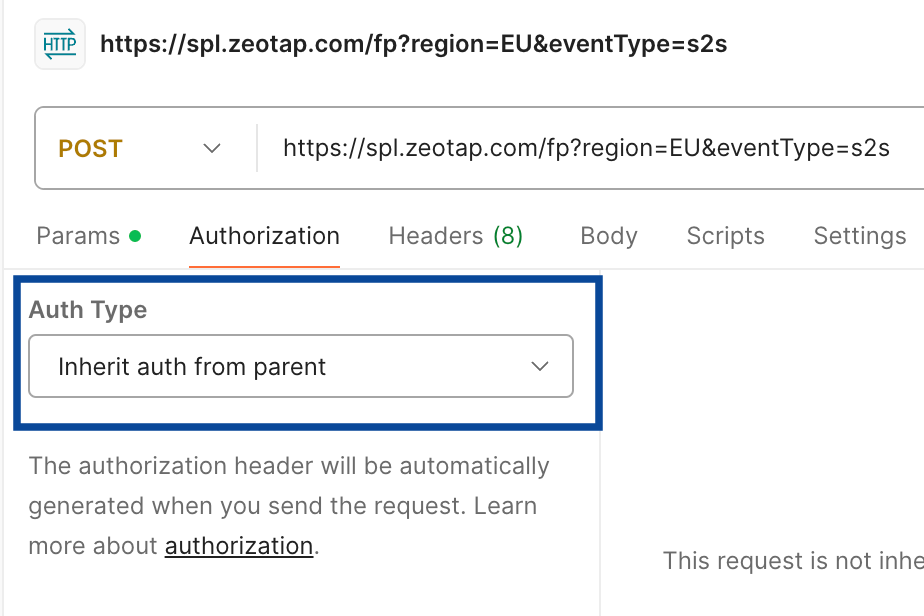
 b. Under the **Authorization** tab, ensure that the Auth Type is set to **Inherit auth from parent**.
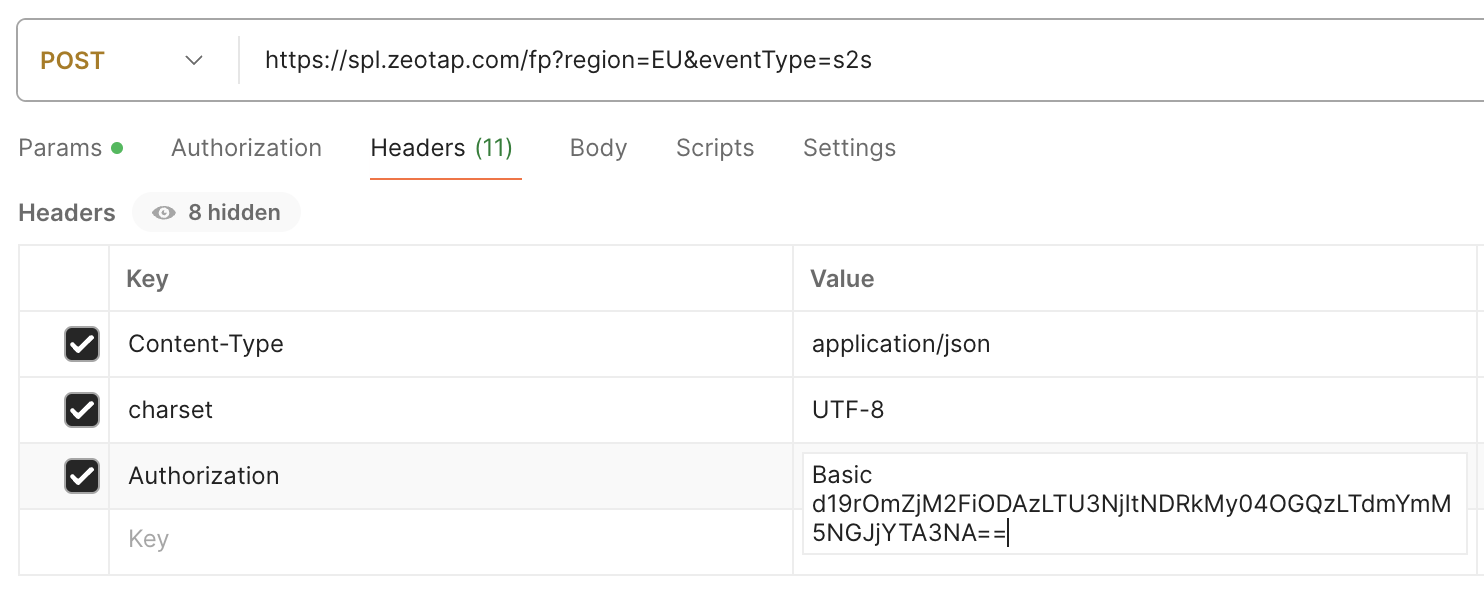
 c. Under the **Headers** tab, perform the following steps:
i. Set the `content-Type` header to `application/JSON` and Charset to UTF-8.
ii. Set the `Authorization` header to `Basic base64(w_k:)`. For example, if your assigned write key is `fc3ab803-5762-44d3-88d3-7fbc94bca074`, then perform the following steps before entering it in the `Authorization` header:
1. Add the prefix `w_k:` to the write key without any spaces, resulting in `w_k:fc3ab803-5762-44d3-88d3-7fbc94bca074`
2. Encode the modified key `w_k:fc3ab803-5762-44d3-88d3-7fbc94bca074` using Base64 encoding. In this case, the encode value is `d19rOmZjM2FiODAzLTU3NjItNDRkMy04OGQzLTdmYmM5NGJjYTA3NA==`
3. Combine the string "Basic" followed by a space and the Base64-encoded value as shown below.
`Basic d19rOmZjM2FiODAzLTU3NjItNDRkMy04OGQzLTdmYmM5NGJjYTA3NA==`
4. Paste the resulting string in the `Authorization` header.
c. Under the **Headers** tab, perform the following steps:
i. Set the `content-Type` header to `application/JSON` and Charset to UTF-8.
ii. Set the `Authorization` header to `Basic base64(w_k:)`. For example, if your assigned write key is `fc3ab803-5762-44d3-88d3-7fbc94bca074`, then perform the following steps before entering it in the `Authorization` header:
1. Add the prefix `w_k:` to the write key without any spaces, resulting in `w_k:fc3ab803-5762-44d3-88d3-7fbc94bca074`
2. Encode the modified key `w_k:fc3ab803-5762-44d3-88d3-7fbc94bca074` using Base64 encoding. In this case, the encode value is `d19rOmZjM2FiODAzLTU3NjItNDRkMy04OGQzLTdmYmM5NGJjYTA3NA==`
3. Combine the string "Basic" followed by a space and the Base64-encoded value as shown below.
`Basic d19rOmZjM2FiODAzLTU3NjItNDRkMy04OGQzLTdmYmM5NGJjYTA3NA==`
4. Paste the resulting string in the `Authorization` header.
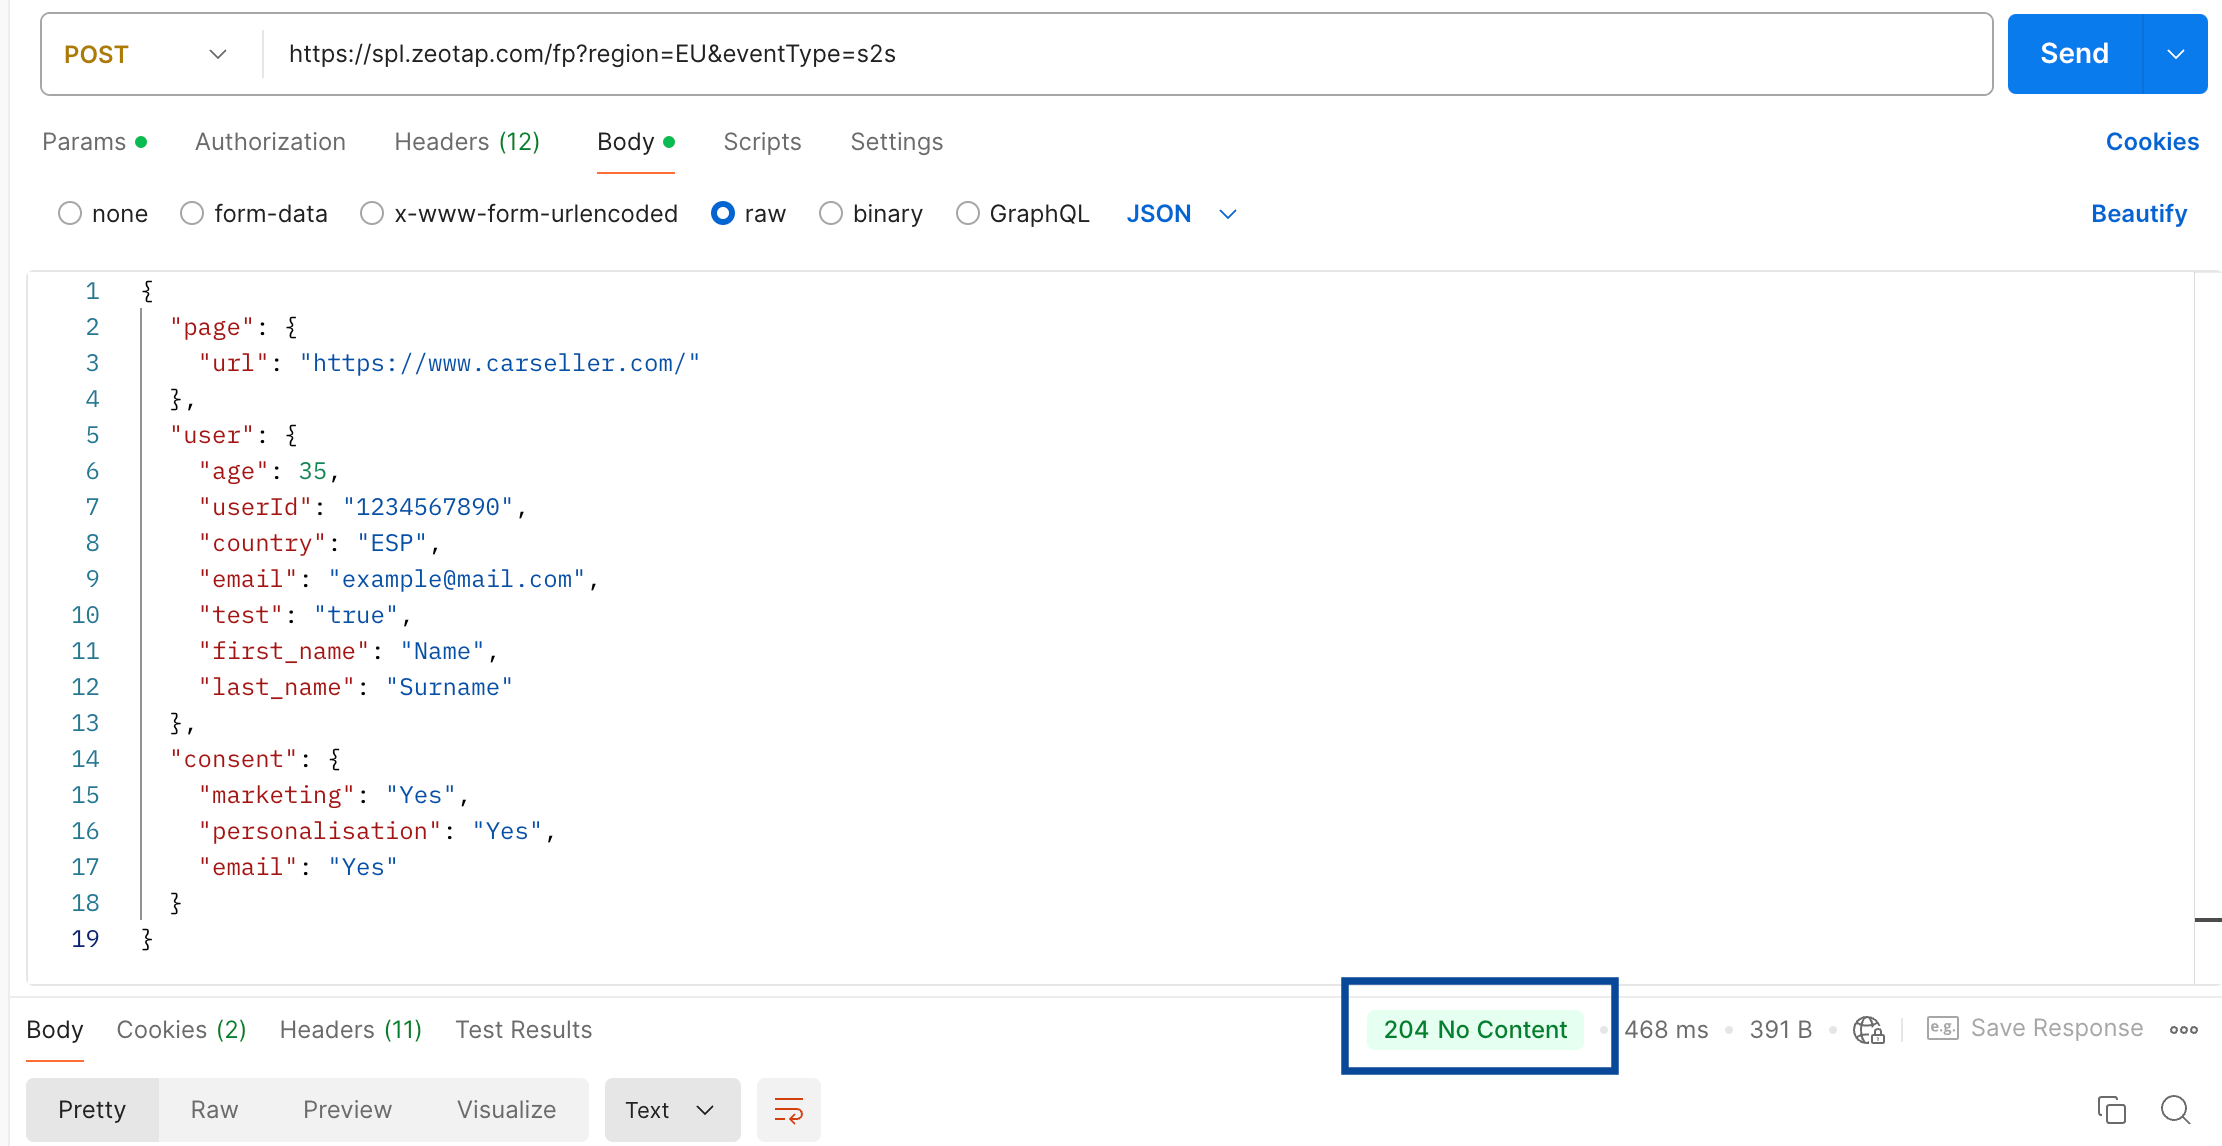
 d. Under the **Body** tab, paste a valid JSON Payload as shown below.
```json JSON theme={null}
{
"page": {
"url": "https://www.carseller.com/"
},
"user": {
"age": 35,
"userId": "1234567890",
"country": "ESP",
"email": "example@mail.com",
"test": "true",
"first_name": "Name",
"last_name": "Surname"
},
"consent": {
"marketing": "Yes",
"personalisation": "Yes",
"email": "Yes"
}
}
```
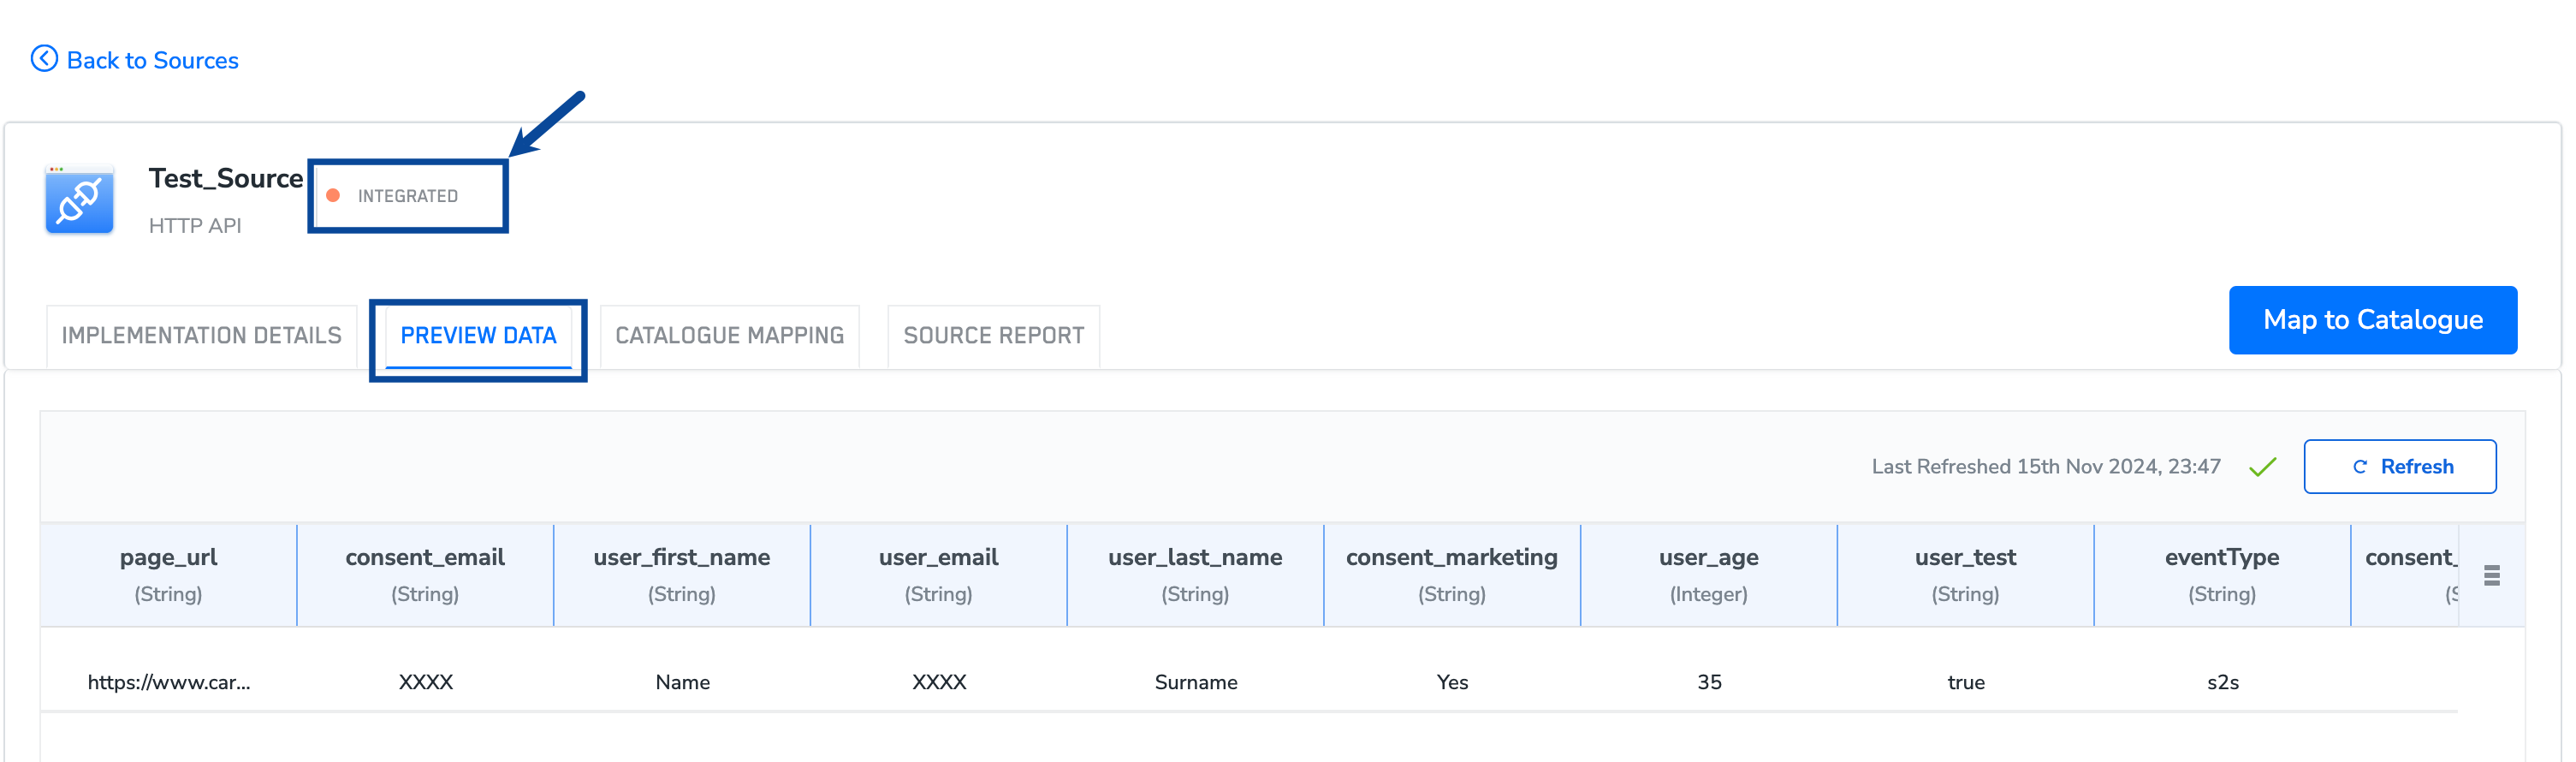
Once all the inputs are entered, click **Send**. The API returns a `204 No Content` response if the API call is successful. Once the API request is successful, the data is transferred to Zeotap CDP. Use the **[PREVIEW](/articles/integrate-customer/knowing-the-fields-on-the-preview-data-tab)** tab to see incoming data. Note that at this point, the source transitions to the **INTEGRATED** state.
d. Under the **Body** tab, paste a valid JSON Payload as shown below.
```json JSON theme={null}
{
"page": {
"url": "https://www.carseller.com/"
},
"user": {
"age": 35,
"userId": "1234567890",
"country": "ESP",
"email": "example@mail.com",
"test": "true",
"first_name": "Name",
"last_name": "Surname"
},
"consent": {
"marketing": "Yes",
"personalisation": "Yes",
"email": "Yes"
}
}
```
Once all the inputs are entered, click **Send**. The API returns a `204 No Content` response if the API call is successful. Once the API request is successful, the data is transferred to Zeotap CDP. Use the **[PREVIEW](/articles/integrate-customer/knowing-the-fields-on-the-preview-data-tab)** tab to see incoming data. Note that at this point, the source transitions to the **INTEGRATED** state.
 If you receive a `400 Bad Request` response, follow these troubleshooting steps:
a. In Params, ensure that a valid **region** is added, like 'EU' and the **eventType** is set to 's2s'.
b. Verify the endpoint URL and headers. Make sure the `Authorization` header follows the [required prerequisites](/articles/integrate-customer/implementing-server-to-server-source-2665709918#Authheaderprereq).
c. Validate the JSON payload body for correctness.
**For any assistance, reach out to the Zeotap Support team at [support@zeotap.com](mailto:support@zeotap.com).**
### JSON Payload Structuring Guidelines
We recommend structuring the payload body based on the type of data you want to send.
* Events data – All event-related information is recommended to be sent in the event object. The eventName and `eventTimestamp` objects are considered as the primary data points for sending the event-related information. Other attributes relating to the event, such as a user action (for example, `"discountSelected": "SPL25"`) or an event property (for example, `"cartVal":100`) can be sent within the event object.
* Page data – All page-related meta-information such as the URL, referrer, category, domain and path can be sent in the page object.
* User data – All user identifiers and profile information can be sent in the user object. If you want to send the profile information against the relevant ID(s), then set the corresponding `eventName` as `setUserProperties`.
* Consent data – All consents provided by the customer per purpose, along with regulation can be sent in the consent object.
* Device data – All device-related information such as OS, browser, device model and so on can be sent in the device object.
* User Identification – Zeotap cannot fetch cookies or MAIDs automatically in the server-to-server calls. Therefore, all data must contain at least one user ID.
* For data about the registered or known users, always attach the corresponding email, loginID or cell phone number hashes in the specific events along with device-based IDs if any.
* For anonymous users, device-based IDs such as first-party cookies, third-party cookies or MAIDs must be attached.
* Country Identification – Zeotap cannot infer the country of the user automatically from the IP Address in the server-to-server calls. Therefore, all data must contain the country information. If the country information is absent, the same is mandated to be hardcoded when setting up the mapping and ingestion in your Sources account.
**The set-up and authorisation process for sending data in batches is the same as Real Time API. However, the events must be batched as events object with an array of events inside the object.**
**Note:**
Zeotap supports flexible and configurable mapping of most JSON structures from external systems. Ensure that your data includes the following:
* **User Information**: Details about the user and their identifier(s).
* **Personal Information**: Relevant personal details.
* **Event Data**: All information about the event, such as the event name and timestamp. Use either a UNIX timestamp or a fully time-zone-qualified format according to ISO 8601 (For example, `2024-09-05T11:02:44Z`, `2024-09-04T23:02:44−12:00`, `2024-09-05T11:02:44+00:00`).
For the data format, use types that match the provided data:
* Numeric for numbers
* Strings for textual data
* Booleans for true/false values
* JSON objects for structured data
* Arrays for lists
* Null where applicable
## Sample API Requests
### Sample Payload Request for Real Time API
Below is an example of a sample payload request for Real Time API.
```json JSON theme={null}
{
"page": {
"url": "https://www.carseller.com/"
},
"user": {
"age": 35,
"userId": "1234567890",
"country": "ESP",
"email": "example@mail.com",
"test": "true",
"first_name": "Name",
"last_name": "Surname"
},
"consent": {
"marketing": "Yes",
"personalisation": "Yes",
"email": "Yes"
}
}
```
### Sample Payload Request for Batch API
Below is an example of a sample payload request for Batch API.
```json JSON expandable theme={null}
{
"events": [
{
"user": {
"visitorId": "123436",
"email": "example1@gmail.com",
"contactId": "con12346"
},
"event": {
"eventType": "View Product",
"timestamp": "1687113601",
"userAgent": "Mozilla/5.0 (Windows; U; Windows NT 5.2) AppleWebKit/533.1.5 (KHTML, like Gecko) Version/5.0.1 Safari/533.1.5",
"sessionId": "7afde13d-f164-4d50-0519-6c72e32f45e8",
"productName": "Phone",
"cartQuantity": "",
"paymentType": "Cash",
"orderId": "OD212",
"amountReceivedCoupons": " 1.893,76 € ",
"birthdate": "1880-05-21",
"addressLine1": "Na Chmelnici 9",
"countryCode": "DEU"
},
"consent": {
"gdpr_consent_marketing": "yes"
},
"page": {
"eventUrl": "https://www.example.com/Esmara",
"pageTitle": "Phone"
}
},
{
"user": {
"visitorId": "1234567",
"email": "example2@gmail.com",
"contactId": "con12348"
},
"event": {
"eventType": "addToCart",
"timestamp": "1689113601",
"userAgent": "Mozilla/5.0 (Windows; U; Windows NT 5.2) AppleWebKit/533.1.5 (KHTML, like Gecko) Version/5.0.1 Safari/533.1.5",
"sessionId": "7afde13d-f164-4d50-0519-6c72e00005e8",
"productName": "Sneakers",
"cartQuantity": "",
"paymentType": "Credit",
"orderId": "OD472",
"amountReceivedCoupons": " 493,76 € ",
"birthdate": "1990-05-21",
"addressLine1": "Na Chmelnici 9",
"countryCode": "DEU"
},
"consent": {
"gdpr_consent_marketing": "yes"
},
"page": {
"eventUrl": "https://www.example.com/Esmara",
"pageTitle": "Sneakers"
}
},
{
"user": {
"visitorId": "1234568",
"email": "example3@gmail.com",
"contactId": "con12380"
},
"event": {
"eventType": "Checkout",
"timestamp": "1687413601",
"userAgent": "Mozilla/5.0 (Windows; U; Windows NT 5.2) AppleWebKit/533.1.5 (KHTML, like Gecko) Version/5.0.1 Safari/533.1.5",
"sessionId": "7afde13d-f164-4d50-0519-6c11132f45e8",
"productName": "Chair",
"cartQuantity": "",
"paymentType": "Cheque",
"orderId": "OD714",
"amountReceivedCoupons": " 2.013,70 € ",
"birthdate": "1987-05-21",
"addressLine1": "Na Chmelnici 9",
"countryCode": "DEU"
},
"consent": {
"gdpr_consent_marketing": "yes"
},
"page": {
"eventUrl": "https://www.example.com/Esmara",
"pageTitle": "Chair"
}
}
]
}
```
### Sample Payload Request for NCE Batch API
Below is an example of a sample payload request for the Batch API when sending Non-Customer Entity (NCE) data. Note that NCE payloads only require the `event` object within each event — `user`, `consent`, and `page` objects are not needed.
```json JSON expandable theme={null}
{
"events": [
{
"event": {
"eventName": "market_offer_assignment",
"eventId": "1df964e5-6073-41e0-8fd3-41e0b1e9a186",
"ValidFrom": "2026-03-01",
"ValidTo": "2026-03-31",
"MarketGLN": "1234567890173",
"OfferIDs": "101,102,103",
"eventTimestamp": "2026-03-03T09:00:00.000Z"
}
},
{
"event": {
"eventName": "market_offer_assignment",
"eventId": "2c2ca32e-4b16-4640-6bee-4296765b9a70",
"ValidFrom": "2026-04-01",
"ValidTo": "2026-04-30",
"MarketGLN": "1234567890174",
"OfferIDs": "201,202,203",
"eventTimestamp": "2026-03-16T13:59:23.000Z"
}
}
]
}
```
## Performance
### Query Per Second
We have an auto-scaling cluster. Therefore, we can support high Query Per Second (QPS). Reach out to your Zeotap POC to notify you about the set-up in advance, so that the same can be set up for active monitoring. This is especially important if you expect QPS to exceed 200.
### Batch Size
When setting up batched events, ensure that the payload size does not exceed 20 MB.
## Status Codes and Responses
| **Response Code** | **Description** |
| :----------------- | :---------------------------------------------------------------------------------------------------------------------------------------------------------------------------------------------------------------------------- |
| `204 No Content ` | The request is successful. |
| `400 Bad Request ` | The error is published to the x-zeo-debug header. For example, this could contain the error details as the value. [Learn more](/articles/integrate-customer/implementing-server-to-server-source-2665709918#Authheaderprereq) |
## Related Topics
Once you have created and implemented a Server-to-Server source, map the ingested data in the **Catalogue**. Below are some quick links to help with mapping.
* To learn how to map the Catalogue for Customer Data (CE), refer [here](https://docs.zeotap.com/articles/unify-customer/map-the-catalogue-for-customer-data).
* To learn how to map the Catalogue for Non-Customer Entity (NCE) data, refer [here](https://docs.zeotap.com/articles/unify-customer/map-the-catalogue-for-non-customer-entity-data).
* To learn how to add a Non-Customer Entity (NCE) attribute in the Catalogue, refer [here](https://docs.zeotap.com/articles/unify-customer/adding-a-non-customer-entity-category).
* To learn about Join Key Enricher and how to configure it, refer [here](https://docs.zeotap.com/articles/unify-customer/configuring-the-join-key-enricher).
If you receive a `400 Bad Request` response, follow these troubleshooting steps:
a. In Params, ensure that a valid **region** is added, like 'EU' and the **eventType** is set to 's2s'.
b. Verify the endpoint URL and headers. Make sure the `Authorization` header follows the [required prerequisites](/articles/integrate-customer/implementing-server-to-server-source-2665709918#Authheaderprereq).
c. Validate the JSON payload body for correctness.
**For any assistance, reach out to the Zeotap Support team at [support@zeotap.com](mailto:support@zeotap.com).**
### JSON Payload Structuring Guidelines
We recommend structuring the payload body based on the type of data you want to send.
* Events data – All event-related information is recommended to be sent in the event object. The eventName and `eventTimestamp` objects are considered as the primary data points for sending the event-related information. Other attributes relating to the event, such as a user action (for example, `"discountSelected": "SPL25"`) or an event property (for example, `"cartVal":100`) can be sent within the event object.
* Page data – All page-related meta-information such as the URL, referrer, category, domain and path can be sent in the page object.
* User data – All user identifiers and profile information can be sent in the user object. If you want to send the profile information against the relevant ID(s), then set the corresponding `eventName` as `setUserProperties`.
* Consent data – All consents provided by the customer per purpose, along with regulation can be sent in the consent object.
* Device data – All device-related information such as OS, browser, device model and so on can be sent in the device object.
* User Identification – Zeotap cannot fetch cookies or MAIDs automatically in the server-to-server calls. Therefore, all data must contain at least one user ID.
* For data about the registered or known users, always attach the corresponding email, loginID or cell phone number hashes in the specific events along with device-based IDs if any.
* For anonymous users, device-based IDs such as first-party cookies, third-party cookies or MAIDs must be attached.
* Country Identification – Zeotap cannot infer the country of the user automatically from the IP Address in the server-to-server calls. Therefore, all data must contain the country information. If the country information is absent, the same is mandated to be hardcoded when setting up the mapping and ingestion in your Sources account.
**The set-up and authorisation process for sending data in batches is the same as Real Time API. However, the events must be batched as events object with an array of events inside the object.**
**Note:**
Zeotap supports flexible and configurable mapping of most JSON structures from external systems. Ensure that your data includes the following:
* **User Information**: Details about the user and their identifier(s).
* **Personal Information**: Relevant personal details.
* **Event Data**: All information about the event, such as the event name and timestamp. Use either a UNIX timestamp or a fully time-zone-qualified format according to ISO 8601 (For example, `2024-09-05T11:02:44Z`, `2024-09-04T23:02:44−12:00`, `2024-09-05T11:02:44+00:00`).
For the data format, use types that match the provided data:
* Numeric for numbers
* Strings for textual data
* Booleans for true/false values
* JSON objects for structured data
* Arrays for lists
* Null where applicable
## Sample API Requests
### Sample Payload Request for Real Time API
Below is an example of a sample payload request for Real Time API.
```json JSON theme={null}
{
"page": {
"url": "https://www.carseller.com/"
},
"user": {
"age": 35,
"userId": "1234567890",
"country": "ESP",
"email": "example@mail.com",
"test": "true",
"first_name": "Name",
"last_name": "Surname"
},
"consent": {
"marketing": "Yes",
"personalisation": "Yes",
"email": "Yes"
}
}
```
### Sample Payload Request for Batch API
Below is an example of a sample payload request for Batch API.
```json JSON expandable theme={null}
{
"events": [
{
"user": {
"visitorId": "123436",
"email": "example1@gmail.com",
"contactId": "con12346"
},
"event": {
"eventType": "View Product",
"timestamp": "1687113601",
"userAgent": "Mozilla/5.0 (Windows; U; Windows NT 5.2) AppleWebKit/533.1.5 (KHTML, like Gecko) Version/5.0.1 Safari/533.1.5",
"sessionId": "7afde13d-f164-4d50-0519-6c72e32f45e8",
"productName": "Phone",
"cartQuantity": "",
"paymentType": "Cash",
"orderId": "OD212",
"amountReceivedCoupons": " 1.893,76 € ",
"birthdate": "1880-05-21",
"addressLine1": "Na Chmelnici 9",
"countryCode": "DEU"
},
"consent": {
"gdpr_consent_marketing": "yes"
},
"page": {
"eventUrl": "https://www.example.com/Esmara",
"pageTitle": "Phone"
}
},
{
"user": {
"visitorId": "1234567",
"email": "example2@gmail.com",
"contactId": "con12348"
},
"event": {
"eventType": "addToCart",
"timestamp": "1689113601",
"userAgent": "Mozilla/5.0 (Windows; U; Windows NT 5.2) AppleWebKit/533.1.5 (KHTML, like Gecko) Version/5.0.1 Safari/533.1.5",
"sessionId": "7afde13d-f164-4d50-0519-6c72e00005e8",
"productName": "Sneakers",
"cartQuantity": "",
"paymentType": "Credit",
"orderId": "OD472",
"amountReceivedCoupons": " 493,76 € ",
"birthdate": "1990-05-21",
"addressLine1": "Na Chmelnici 9",
"countryCode": "DEU"
},
"consent": {
"gdpr_consent_marketing": "yes"
},
"page": {
"eventUrl": "https://www.example.com/Esmara",
"pageTitle": "Sneakers"
}
},
{
"user": {
"visitorId": "1234568",
"email": "example3@gmail.com",
"contactId": "con12380"
},
"event": {
"eventType": "Checkout",
"timestamp": "1687413601",
"userAgent": "Mozilla/5.0 (Windows; U; Windows NT 5.2) AppleWebKit/533.1.5 (KHTML, like Gecko) Version/5.0.1 Safari/533.1.5",
"sessionId": "7afde13d-f164-4d50-0519-6c11132f45e8",
"productName": "Chair",
"cartQuantity": "",
"paymentType": "Cheque",
"orderId": "OD714",
"amountReceivedCoupons": " 2.013,70 € ",
"birthdate": "1987-05-21",
"addressLine1": "Na Chmelnici 9",
"countryCode": "DEU"
},
"consent": {
"gdpr_consent_marketing": "yes"
},
"page": {
"eventUrl": "https://www.example.com/Esmara",
"pageTitle": "Chair"
}
}
]
}
```
### Sample Payload Request for NCE Batch API
Below is an example of a sample payload request for the Batch API when sending Non-Customer Entity (NCE) data. Note that NCE payloads only require the `event` object within each event — `user`, `consent`, and `page` objects are not needed.
```json JSON expandable theme={null}
{
"events": [
{
"event": {
"eventName": "market_offer_assignment",
"eventId": "1df964e5-6073-41e0-8fd3-41e0b1e9a186",
"ValidFrom": "2026-03-01",
"ValidTo": "2026-03-31",
"MarketGLN": "1234567890173",
"OfferIDs": "101,102,103",
"eventTimestamp": "2026-03-03T09:00:00.000Z"
}
},
{
"event": {
"eventName": "market_offer_assignment",
"eventId": "2c2ca32e-4b16-4640-6bee-4296765b9a70",
"ValidFrom": "2026-04-01",
"ValidTo": "2026-04-30",
"MarketGLN": "1234567890174",
"OfferIDs": "201,202,203",
"eventTimestamp": "2026-03-16T13:59:23.000Z"
}
}
]
}
```
## Performance
### Query Per Second
We have an auto-scaling cluster. Therefore, we can support high Query Per Second (QPS). Reach out to your Zeotap POC to notify you about the set-up in advance, so that the same can be set up for active monitoring. This is especially important if you expect QPS to exceed 200.
### Batch Size
When setting up batched events, ensure that the payload size does not exceed 20 MB.
## Status Codes and Responses
| **Response Code** | **Description** |
| :----------------- | :---------------------------------------------------------------------------------------------------------------------------------------------------------------------------------------------------------------------------- |
| `204 No Content ` | The request is successful. |
| `400 Bad Request ` | The error is published to the x-zeo-debug header. For example, this could contain the error details as the value. [Learn more](/articles/integrate-customer/implementing-server-to-server-source-2665709918#Authheaderprereq) |
## Related Topics
Once you have created and implemented a Server-to-Server source, map the ingested data in the **Catalogue**. Below are some quick links to help with mapping.
* To learn how to map the Catalogue for Customer Data (CE), refer [here](https://docs.zeotap.com/articles/unify-customer/map-the-catalogue-for-customer-data).
* To learn how to map the Catalogue for Non-Customer Entity (NCE) data, refer [here](https://docs.zeotap.com/articles/unify-customer/map-the-catalogue-for-non-customer-entity-data).
* To learn how to add a Non-Customer Entity (NCE) attribute in the Catalogue, refer [here](https://docs.zeotap.com/articles/unify-customer/adding-a-non-customer-entity-category).
* To learn about Join Key Enricher and how to configure it, refer [here](https://docs.zeotap.com/articles/unify-customer/configuring-the-join-key-enricher).