> ## Documentation Index
> Fetch the complete documentation index at: https://docs.zeotap.com/llms.txt
> Use this file to discover all available pages before exploring further.
# Implement the Google Tag Manager Source
Google Tag Manager (GTM) is a useful tool that allows you to manage and deploy marketing tags, snippets of code or tracking pixels on your website or mobile app without having to modify the code. With the GTM integrated, you have multiple tags stored in one place and therefore it becomes handy for the Marketer to manage all the codes on their own.
There are three main parts to GTM:
* **Tags** – Snippets of JavaScript or tracking pixels
* **Triggers** – This tells GTM when or how to fire a tag
* **Variables** – Additional information GTM may need for the tag and trigger to work
## Before you Begin
Ensure that you have created your GTM account and installed the GTM container to use the Zeotap Collect Tag Template. For more information about Tags, Account and Containers, and how to set them up in Google Tag Manager, refer to [Setting up and Installing Tag Manager.](https://support.google.com/tagmanager/answer/6103696?hl=en).
## Overview of Zeotap Collect Tag Template
The Zeotap Collect Tag is available as a custom template on Google Tag Manager (GTM) for easy integration. This is a JavaScript (JS) tag that is used to capture events and user information as customers navigate your websites. It is asynchronous and does not affect the loading of the site or the end-user experience.
The Zeotap Collect tag requires a data layer to be set up on your websites. This data layer would be used for capturing event information. The data layer ensures that all the relevant information for segment activation or event orchestration is available. The data layer object is flattened and used in the corresponding collection calls.
GTM's custom templates allow you to write your own tag and variable definitions so that others within your organization can use them alongside the built-in tag and variable templates. These custom templates allow you to build a user interface around the custom code you might want to run on your website using GTM. This user interface comprises text input fields, settings, tables, labels, drop-down menus and so forth.
## Steps to Configure Zeotap Collect Tag in GTM
Perform the following steps to configure the Zeotap Collect Tag in Google Tag Manager (GTM):
1. [Add/Import the Zeotap Collect Tag Template](#step-1-add/import-the-zeotap-collect-tag-template)
2. [Add the Tag](#step-2-add-the-tag)
3. [Configure the Tag](#step-3-configure-the-tag)
a. [Initialisation Options](#initialisation-options)
b. [Tracking page views and events](#tracking-page-views-and-events)
c. [Login and Identities Setting](#login-and-identities-settings)
d. [Google Analytics Configuration](#google-analytics-configuration)
e. [Advanced Settings](#advanced-settings)
4. [Set up the Trigger](#step-4-set-up-the-trigger)
5. [Validate the Configured Collect Tag](#step-5-validate-the-configured-collect-tag)
## Step 1 - Add/Import the Zeotap Collect Tag Template
You can add the Zeotap Collect Tag Template in one of the following ways:
### Method 1
Perform the following steps to add the Zeotap Collect Tag Template in GTM as mentioned in Method 1:
Log into your GTM account and click **Templates** from the left menu.
Under **Tag Templates**, click the **Search Gallery** on the top-right corner.
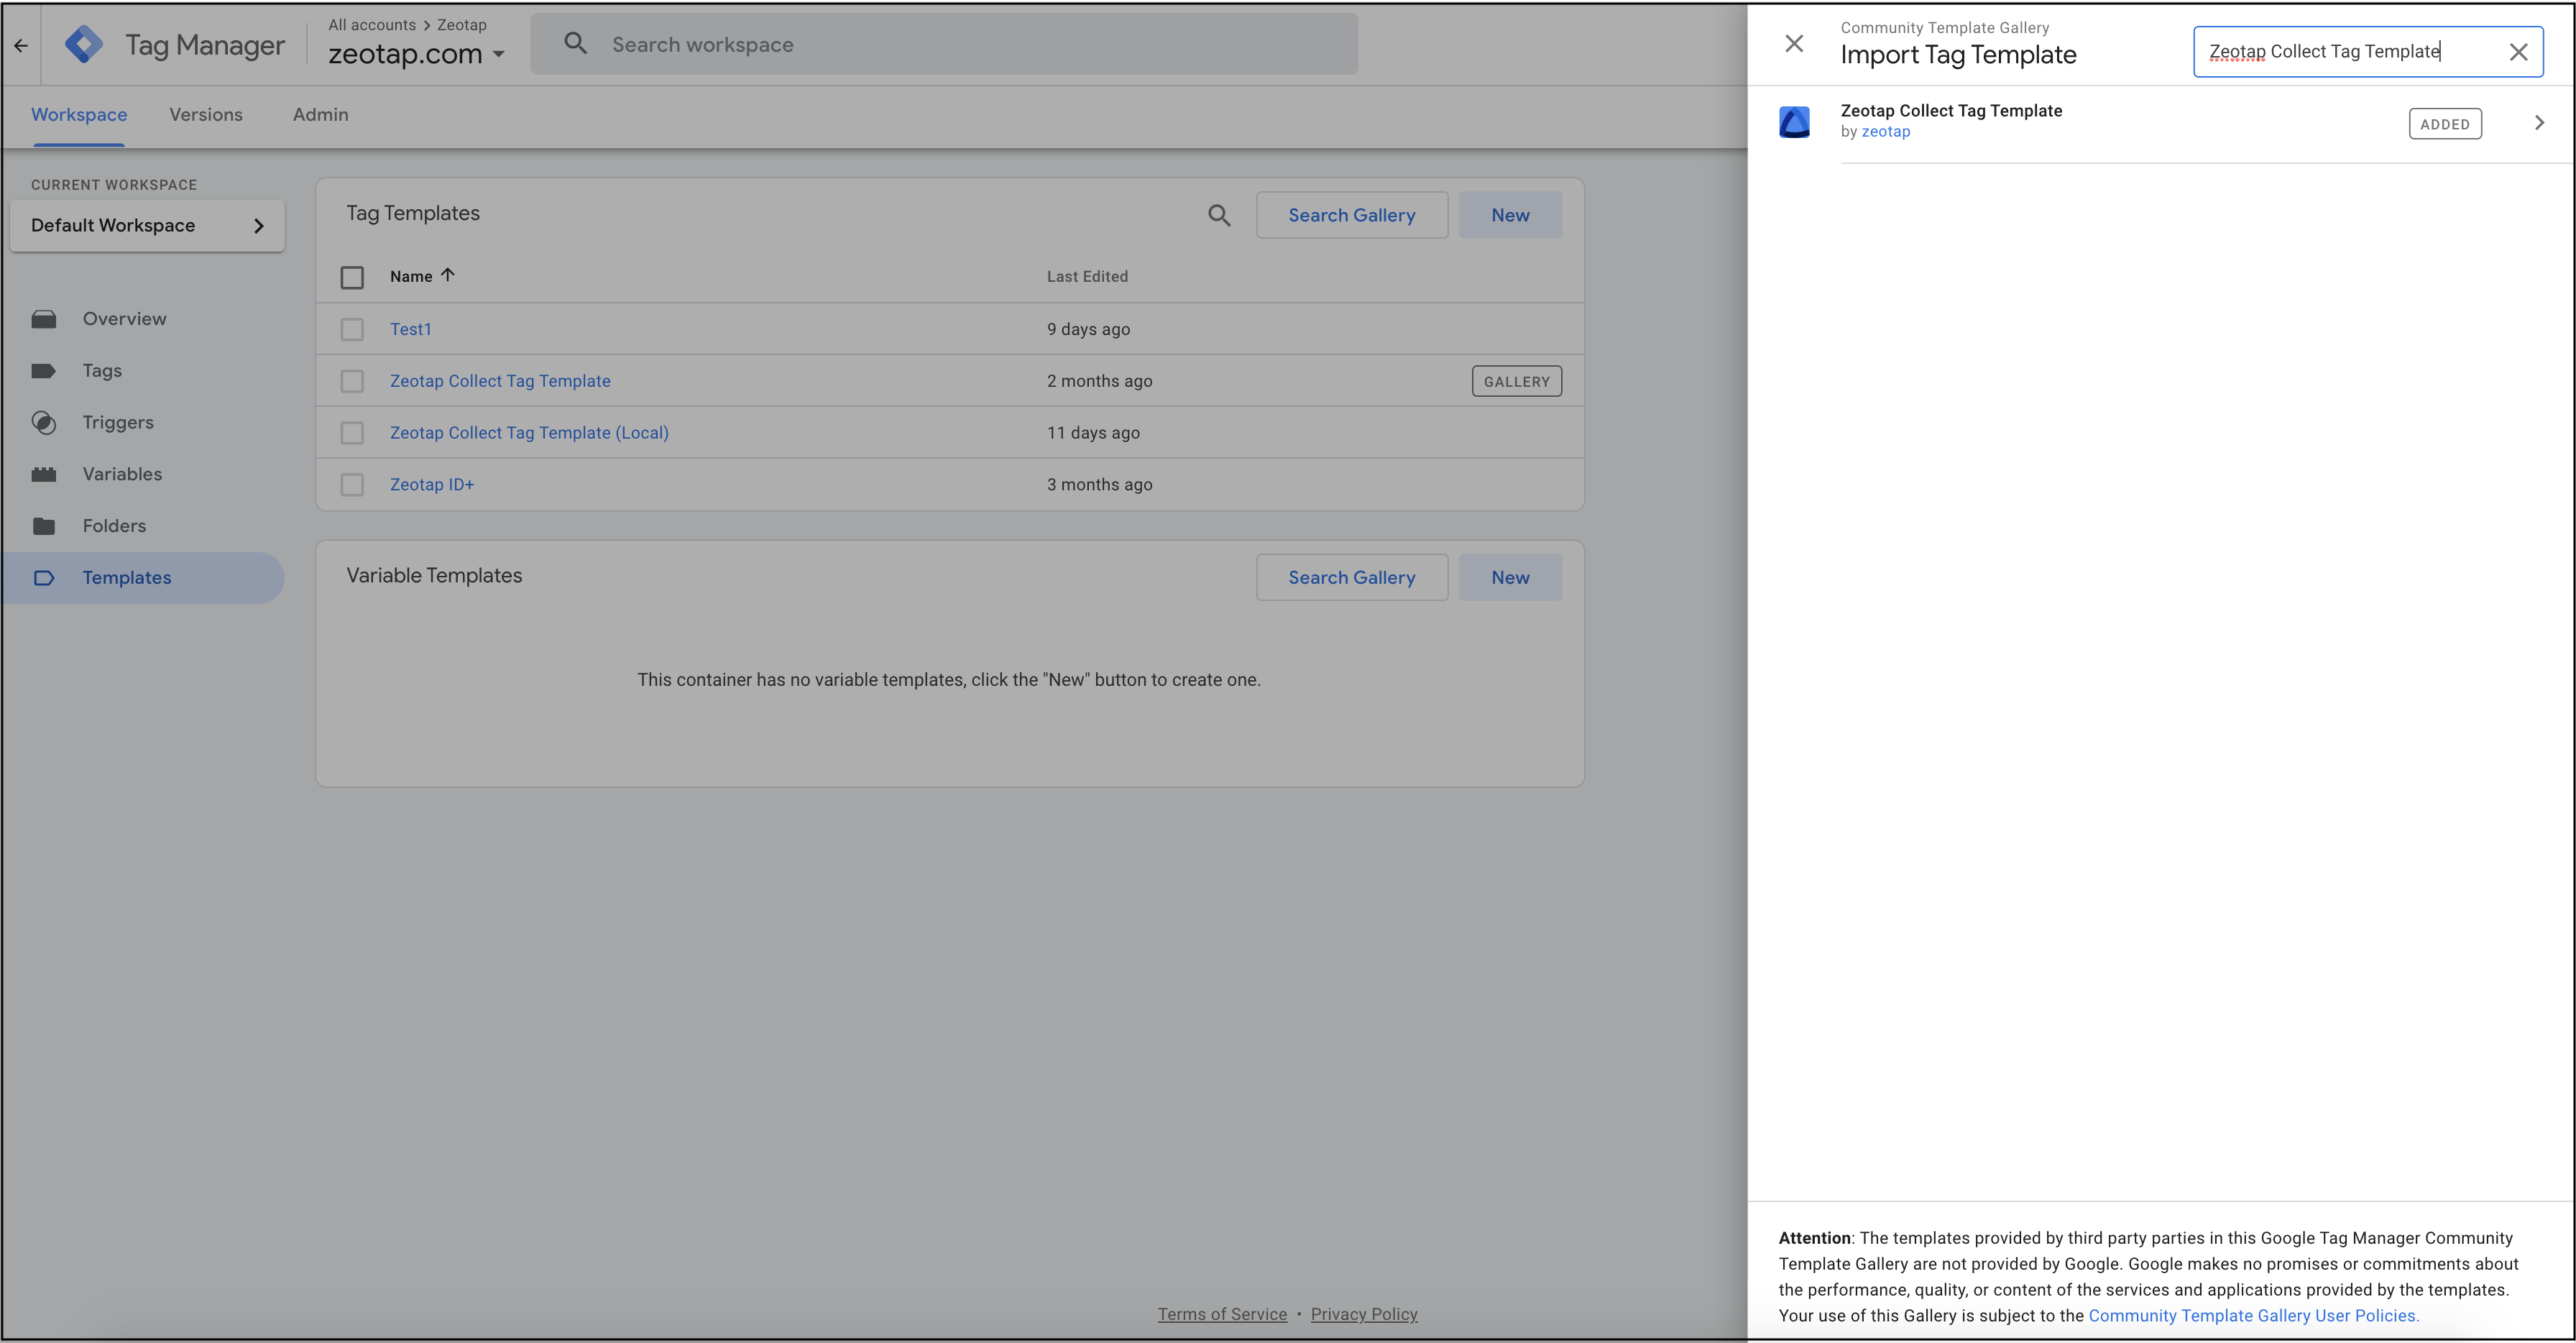 Search and choose **Zeotap Collect Tag** **Template** from the list.
Click **Add to your workspace** to add the Tag Template for further usage.
### Method 2
Perform the following steps to add the Zeotap Collect Tag Template as mentioned in Method 2:
Check with your Zeotap Product Operations Manager for the template file. It is shared as a `.tpl ` file.
Log into your GTM account and click **Templates** from the left menu.
Under **Tag Templates**, click **New** on the top-right corner.
In the top-right corner, click the vertical ellipses and select **Import**.
Search and choose **Zeotap Collect Tag** **Template** from the list.
Click **Add to your workspace** to add the Tag Template for further usage.
### Method 2
Perform the following steps to add the Zeotap Collect Tag Template as mentioned in Method 2:
Check with your Zeotap Product Operations Manager for the template file. It is shared as a `.tpl ` file.
Log into your GTM account and click **Templates** from the left menu.
Under **Tag Templates**, click **New** on the top-right corner.
In the top-right corner, click the vertical ellipses and select **Import**.
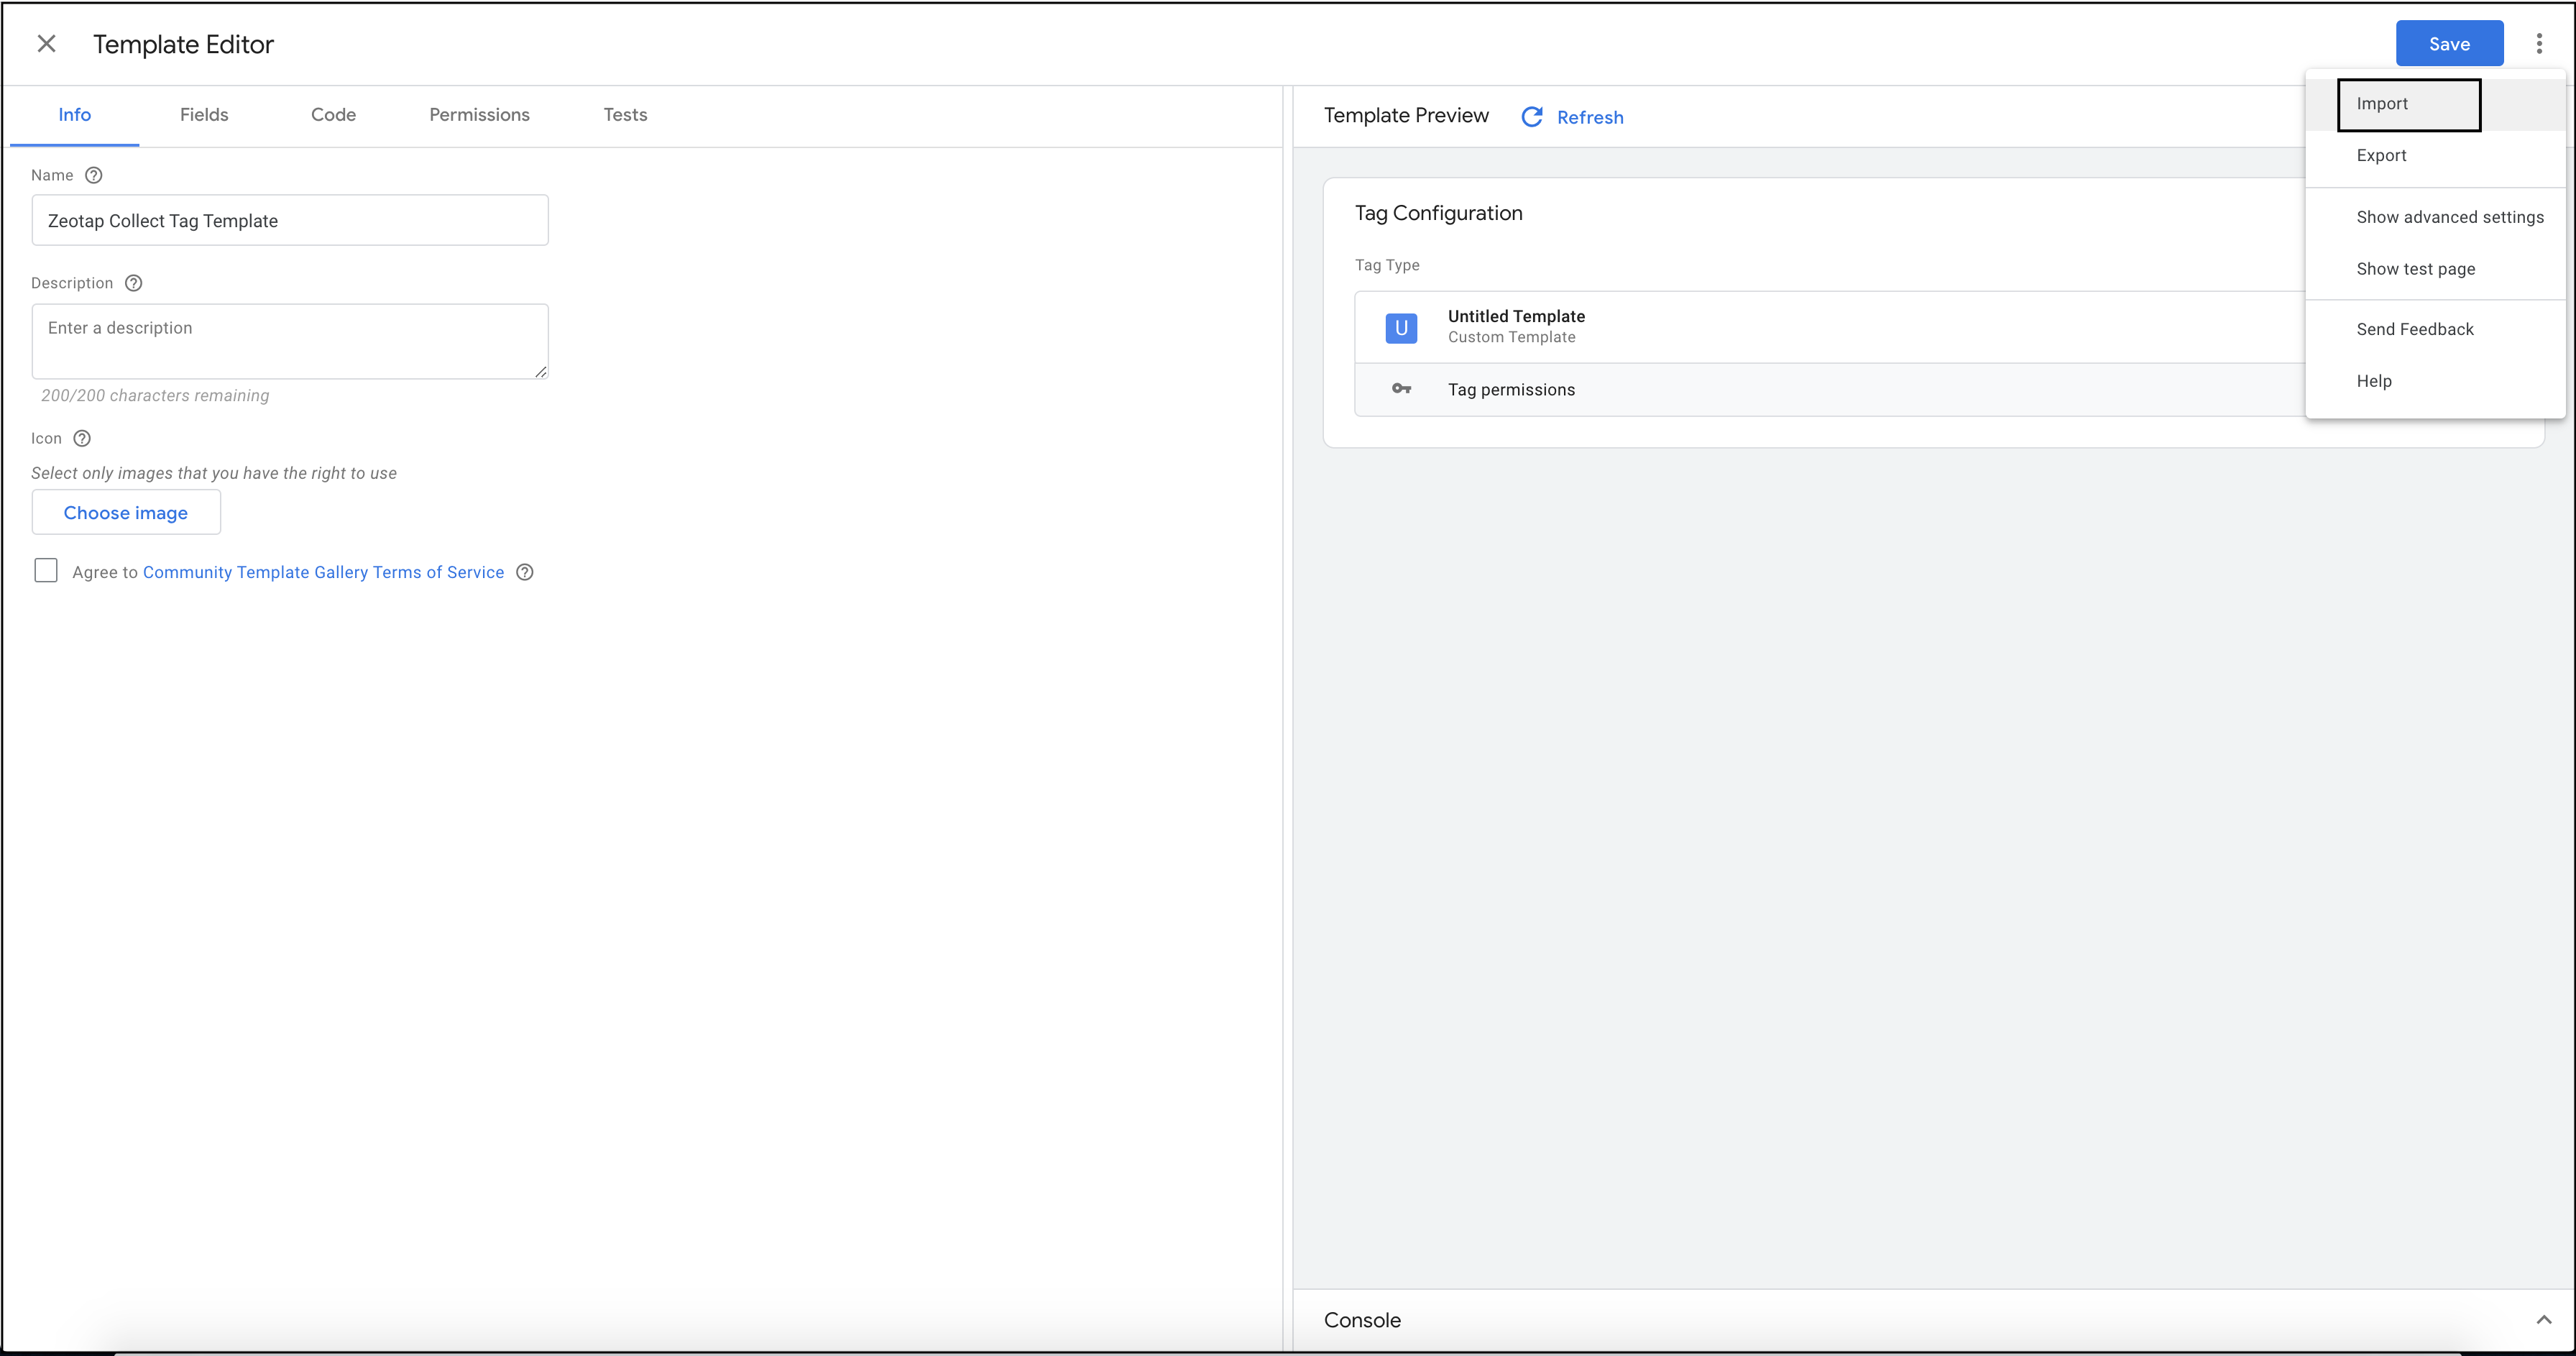 Select the `.tpl` file shared in step 1 above.
Name the template as **Zeotap Collect Tag** and save it for further usage.
## Step 2 - Add the Tag
Once you have added the Tag Template, the next step is to add the tag. Perform the following steps to add the Tag:
Log into your GTM account and click **Tags** from the left menu.
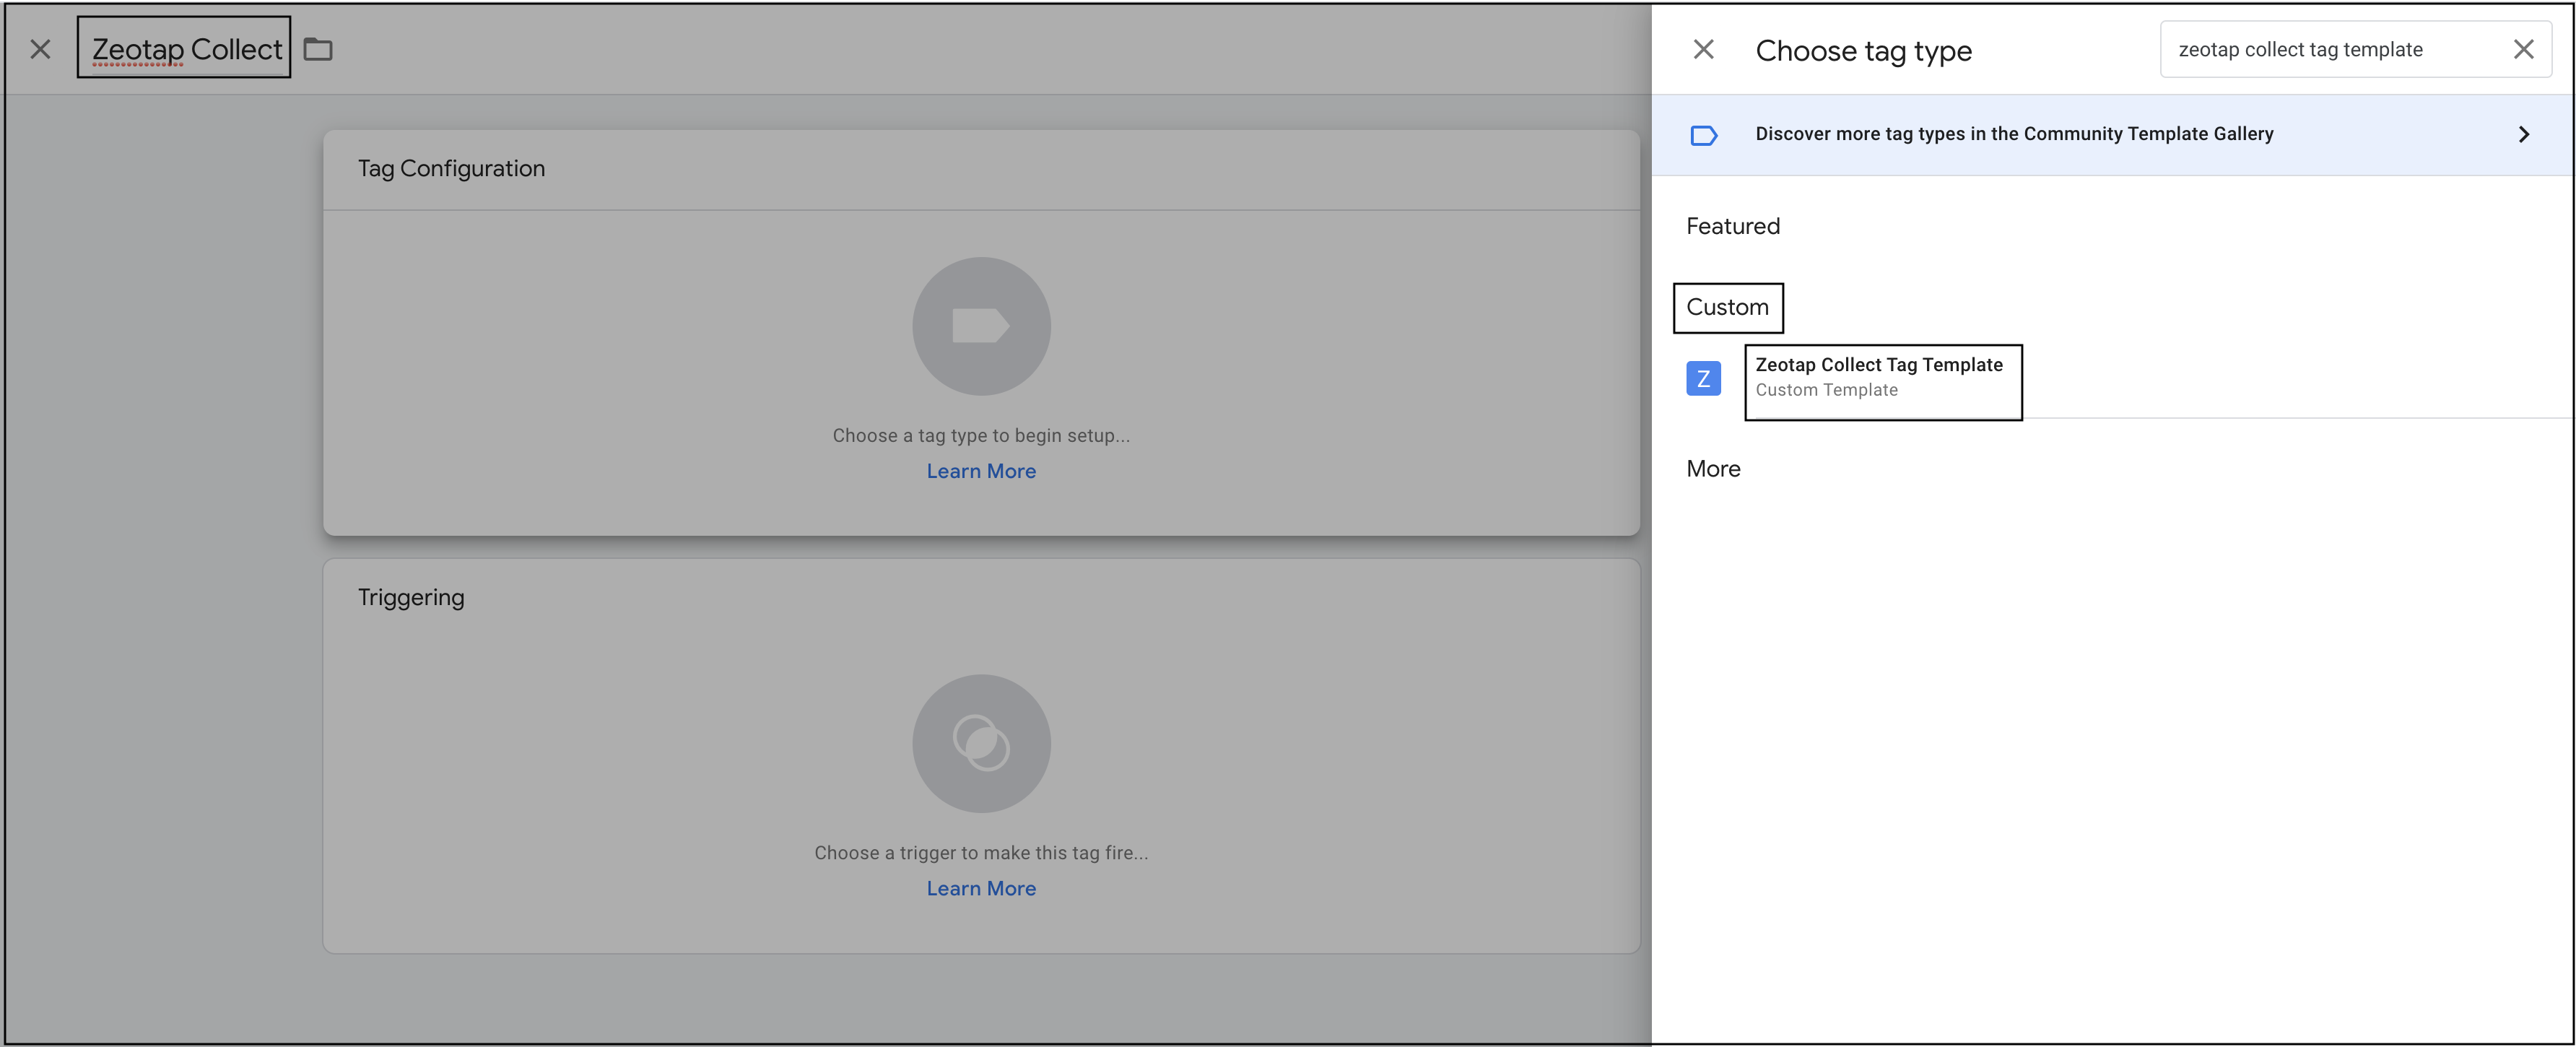
Click **New** and name the tag descriptively. For example, **Zeotap Collect.**
Click **Tag Configuration** and search for **Zeotap Collect Tag Template**. The Tag is listed under the **Custom** tab.
Click **Zeotap Collect Tag Template**. To configure the tag, follow the steps mentioned under **Configure the Tag.**
Select the `.tpl` file shared in step 1 above.
Name the template as **Zeotap Collect Tag** and save it for further usage.
## Step 2 - Add the Tag
Once you have added the Tag Template, the next step is to add the tag. Perform the following steps to add the Tag:
Log into your GTM account and click **Tags** from the left menu.
Click **New** and name the tag descriptively. For example, **Zeotap Collect.**
Click **Tag Configuration** and search for **Zeotap Collect Tag Template**. The Tag is listed under the **Custom** tab.
Click **Zeotap Collect Tag Template**. To configure the tag, follow the steps mentioned under **Configure the Tag.**
 ## Step 3 - Configure the Tag
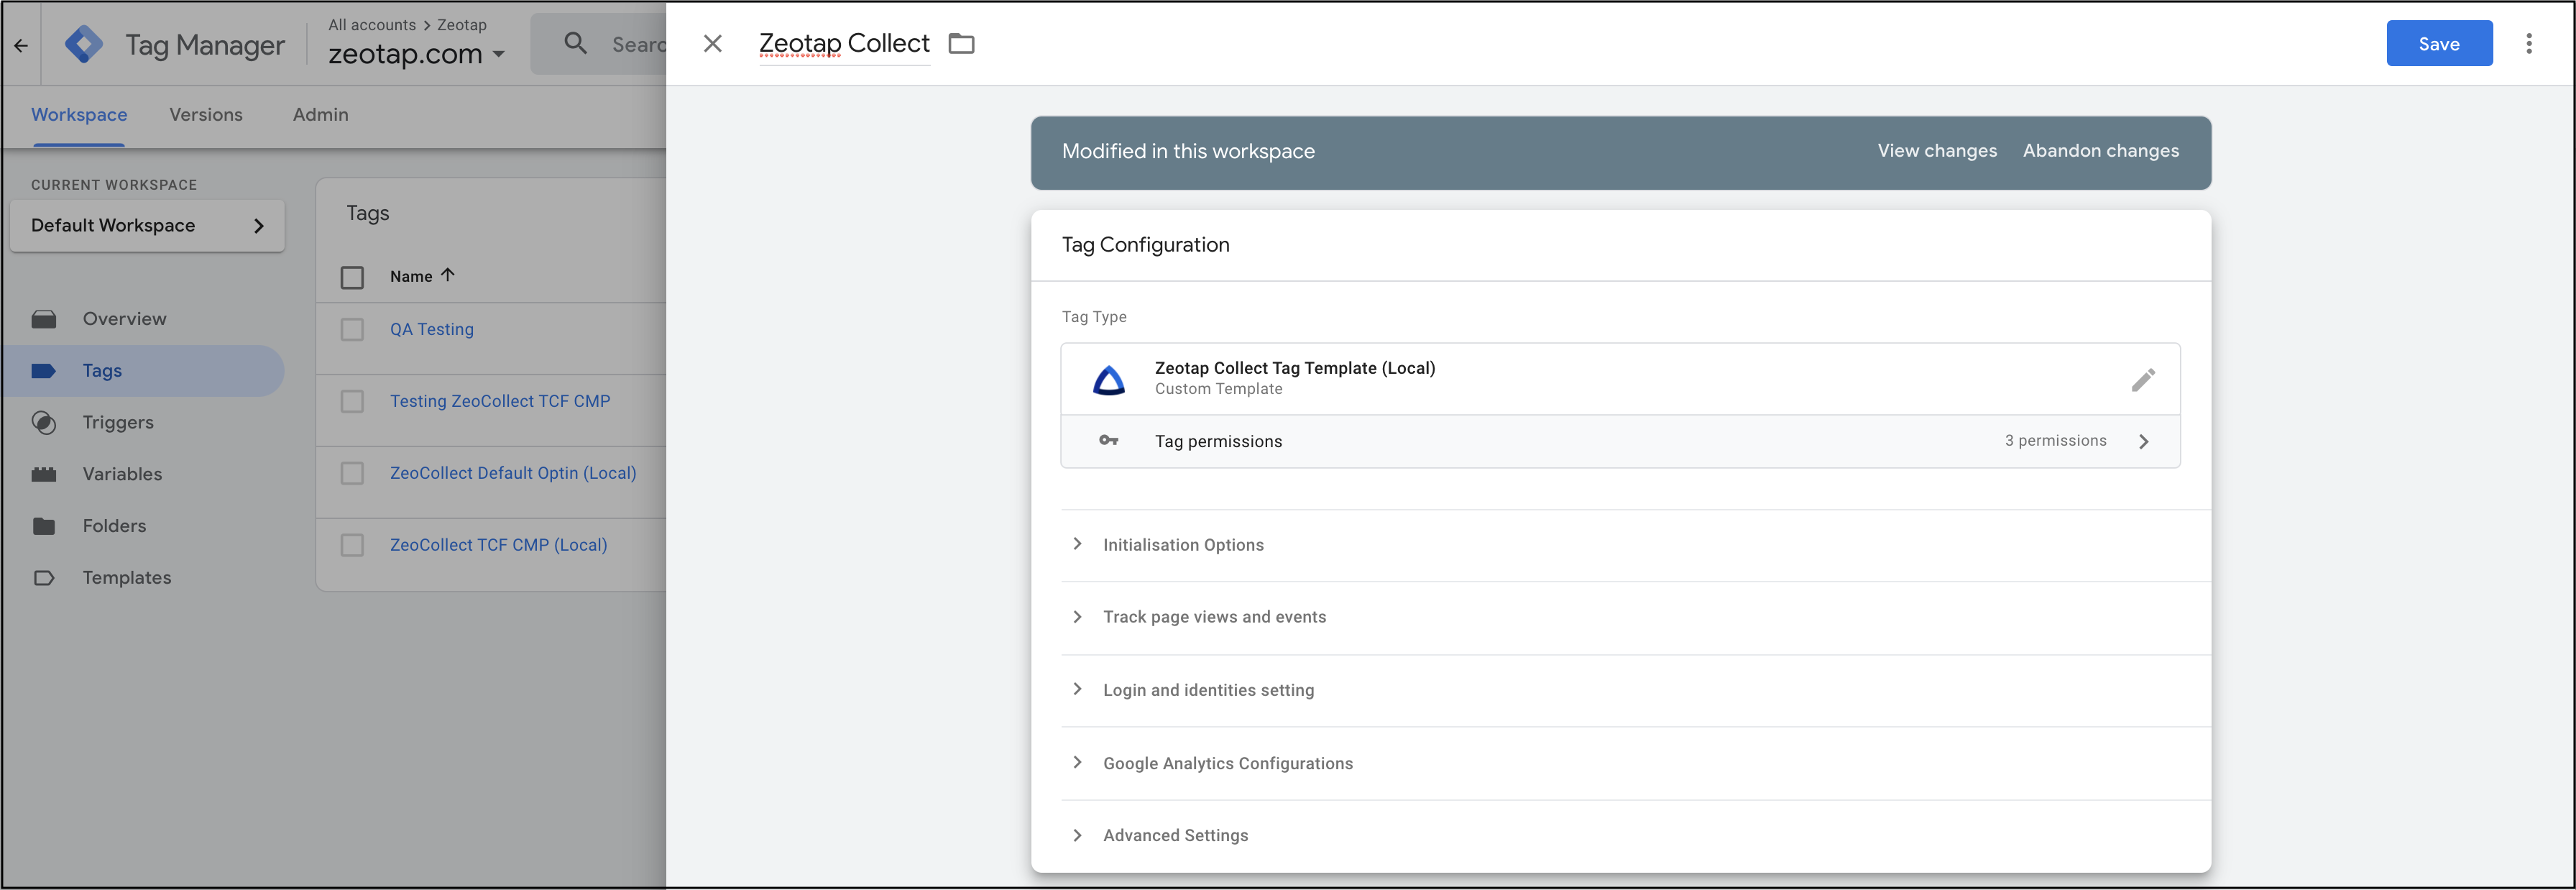
The process of configuring a Tag is divided into the following sections:
* Initialisation Options
* Tracking page views and events
* Login and identities setting
* Google Analytics Configurations
* Advanced Settings
## Step 3 - Configure the Tag
The process of configuring a Tag is divided into the following sections:
* Initialisation Options
* Tracking page views and events
* Login and identities setting
* Google Analytics Configurations
* Advanced Settings
 ### Initialisation Options
Enter the following details to configure the initialisation options:
* **Write Key** - When you create a GTM-based source in your Zeotap CDP account, a write key is provided in the source details. This is a mandatory field for recording events.
* **User Country** - This is the [ISO Alpha 3 country code](https://www.iban.com/country-codes) that is used to determine the region for storage. If this country code is not sent, then the Zeotap servers use the IP Address to determine the same. Therefore, use this country code if your account is set up only for specific regions.
* **Event Key** - This the key against which event names are stored in the `dataLayer` object. You can choose not to fill this if you are using the GTM's default key - event.
* **Data Persistence** - In case of multi-domain websites, the identifiers are reset once the user navigates to a webpage with a different domain name. In such scenarios, you can click the **Persist data in cookie storage** check box, which continues to store their identifiers in the *Cookie storage,* irrespective of the domain name of the web page they browse through.
* **Consent Method**\* -The Collect SDK has three options that can be used to determine consent actions. **.**
a. **Default Opt-in** - This option sets the `optOut` option to `false` and is used to record events. Choose this option to fire the tag only for the consented users. The consent communication happens through other methods such as API integration, file upload and so on. You can also use the options available under Additional Consent Settings to send TC string and custom brand consent.
### Initialisation Options
Enter the following details to configure the initialisation options:
* **Write Key** - When you create a GTM-based source in your Zeotap CDP account, a write key is provided in the source details. This is a mandatory field for recording events.
* **User Country** - This is the [ISO Alpha 3 country code](https://www.iban.com/country-codes) that is used to determine the region for storage. If this country code is not sent, then the Zeotap servers use the IP Address to determine the same. Therefore, use this country code if your account is set up only for specific regions.
* **Event Key** - This the key against which event names are stored in the `dataLayer` object. You can choose not to fill this if you are using the GTM's default key - event.
* **Data Persistence** - In case of multi-domain websites, the identifiers are reset once the user navigates to a webpage with a different domain name. In such scenarios, you can click the **Persist data in cookie storage** check box, which continues to store their identifiers in the *Cookie storage,* irrespective of the domain name of the web page they browse through.
* **Consent Method**\* -The Collect SDK has three options that can be used to determine consent actions. **.**
a. **Default Opt-in** - This option sets the `optOut` option to `false` and is used to record events. Choose this option to fire the tag only for the consented users. The consent communication happens through other methods such as API integration, file upload and so on. You can also use the options available under Additional Consent Settings to send TC string and custom brand consent.
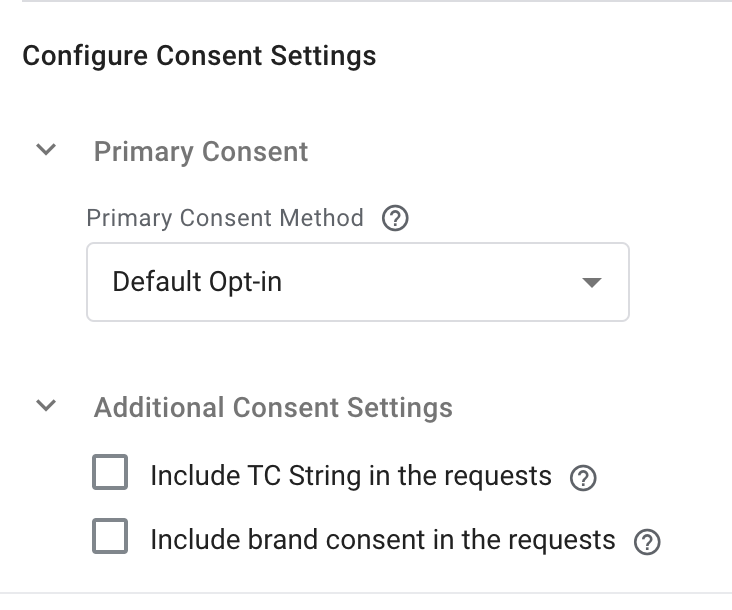 b. **Check TCF CMP**– This option sets the `useConsent` and `checkForCMP` options to `true`. The JS automatically checks for the presence of the `cmp.js` script and the `__cmp` variable in the global scope. The JS also queries the `TCF API` to fetch the latest Publisher consent before recording the events on each JS load.
Ensure that you configure the parameter Purposes for tracking of events, while using the GDPR consent module. This option is used to pass a list of purpose IDs, based on which you can manage the consent for tracking. By default, the three options shown in the image below are selected. However, you can modify them based on your requirement. You can also use the option available under Additional Consent Settings to send custom brand consent.
b. **Check TCF CMP**– This option sets the `useConsent` and `checkForCMP` options to `true`. The JS automatically checks for the presence of the `cmp.js` script and the `__cmp` variable in the global scope. The JS also queries the `TCF API` to fetch the latest Publisher consent before recording the events on each JS load.
Ensure that you configure the parameter Purposes for tracking of events, while using the GDPR consent module. This option is used to pass a list of purpose IDs, based on which you can manage the consent for tracking. By default, the three options shown in the image below are selected. However, you can modify them based on your requirement. You can also use the option available under Additional Consent Settings to send custom brand consent.
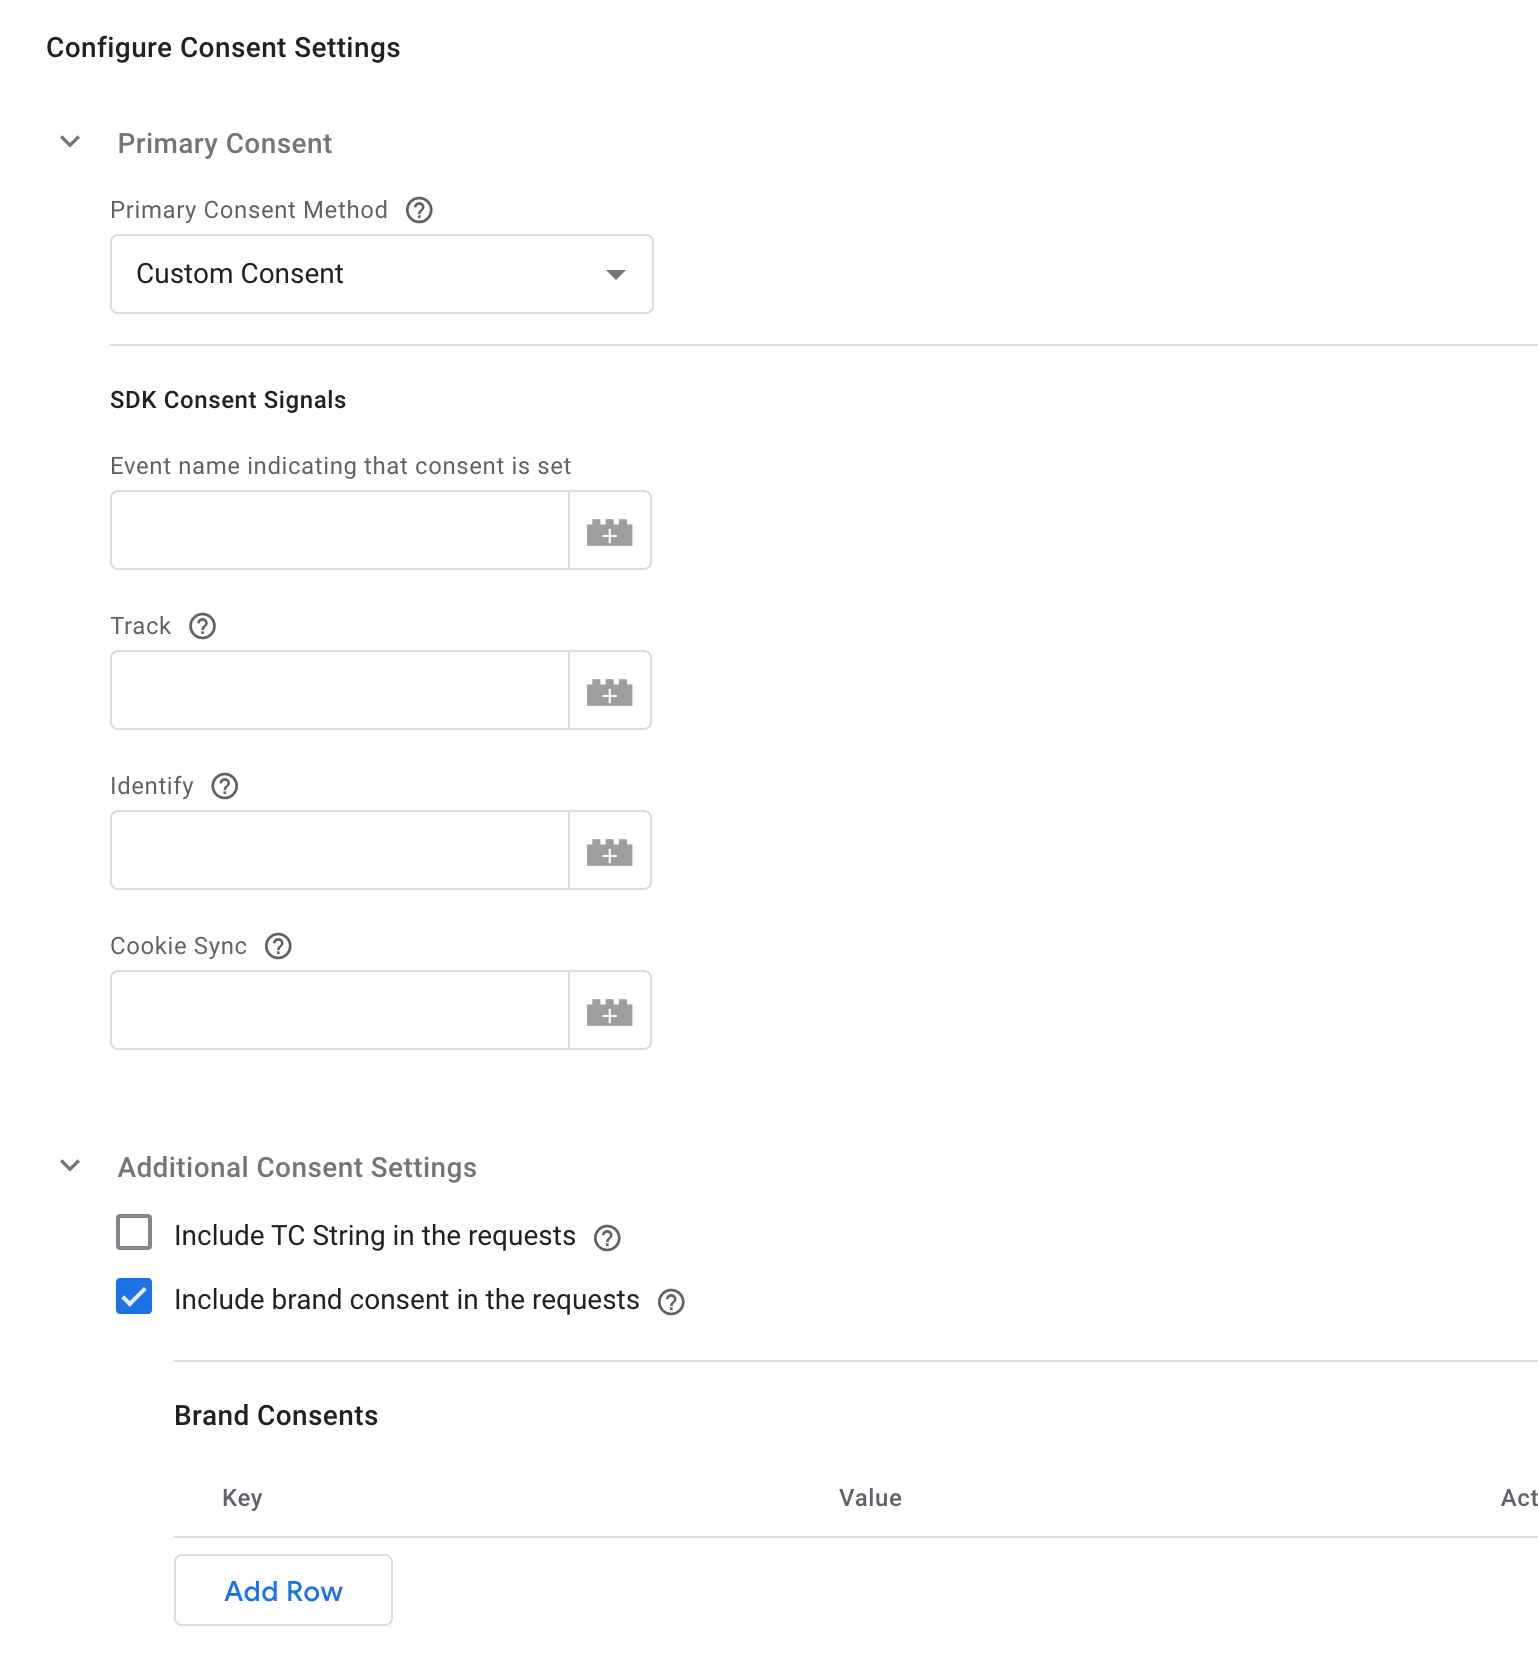
 c. **Custom Consent** – To configure custom consent, select **Custom Consent** as the consent method under the **Initialization Options**. Then, specify the following details in the SDK Consent Signals section:
**NOTE**:
You can also use the option available under Additional Consent Settings to send TC string and custom brand consent.
* Event name: Choose the `dataLayer` event that is fired when custom consent is set.
* Other Variables: Choose the `dataLayer` variables for setting the values of **Track**, **Identify** and **Cookie Sync** signals.
c. **Custom Consent** – To configure custom consent, select **Custom Consent** as the consent method under the **Initialization Options**. Then, specify the following details in the SDK Consent Signals section:
**NOTE**:
You can also use the option available under Additional Consent Settings to send TC string and custom brand consent.
* Event name: Choose the `dataLayer` event that is fired when custom consent is set.
* Other Variables: Choose the `dataLayer` variables for setting the values of **Track**, **Identify** and **Cookie Sync** signals.
 ### Tracking Page Views and Events
Enter the following details to configure the tracking options:
* **Page View Tracking Event Name**\*–\* By default, we track page view for the `gtm.js` event name. When using some other event name, ensure to update that event name in the input for overriding.
* **Event Tracking** – Enter a regex pattern that matches all the event names you want to track. If you want to track just a single event, then just enter that event name. By default, we use the `.*` pattern to identify the events.
* **Special Events** – If you want to track event names apart from the regex provided, then add all such events here.
* **Pre Defined Properties** – Input the properties that you want to attach or override. You can either define the values from your variables or provide static values for them.
* **PII to be excluded** – Enter all the PII and user-related fields in the dataLayer that need to be from in the event properties. For example, email is pushed into the dataLayer in the raw form. This option is also used to exclude other non-essential keys that need not be recorded.
**Note:**
*The records for the `country` and `city` columns are blacklisted for ingestion because SPL uses the user's IP address to find out the country and city automatically. For the complete list of blacklisted fields, click [here](/articles/integrate-customer/blacklisted-fields-for-data-ingestion).*
### Login and Identities Settings
Enter the following details to configure the login and identities settings:
* **Login Event** – Choose the `dataLayer` event that is fired on user login.
* **Are your identities hashed?** – Based on whether you want your identities to be hashed or not, perform one of the following actions:
* *If your identities are hashed –* Select this checkbox and make the following selections for the identities:
* **Hashed Email**– Select the **Capture hashed email** checkbox and then proceed to add a row for the hash algorithm. Click **Add Row** and then choose the appropriate **Hash Algorithm** and its corresponding **Hashed Email Variable** from the drop-down menus. You can add more rows as per your requirement.
* **Hashed Cellphone with country code** – Select the **Capture hashed cellphone number with country code** checkbox and then proceed to add a row for the hash algorithm. Click **Add Row** and then choose the appropriate **Hash Algorithm** and its corresponding **Hashed Cellphone Number Variable** from the drop-down menus. You can add more rows as per your requirement.
* **Hashed Loginid** – Select the **Capture hashed Loginid** checkbox and then proceed to add a row for the hash algorithm. Click **Add Row** and then choose the appropriate **Hash Algorithm** and its corresponding **Hashed Loginid Variable** from the drop-down menus. You can add more rows as per your requirement.
* *If your identities are not hashed –* Then do not select this checkbox and proceed to the next option.
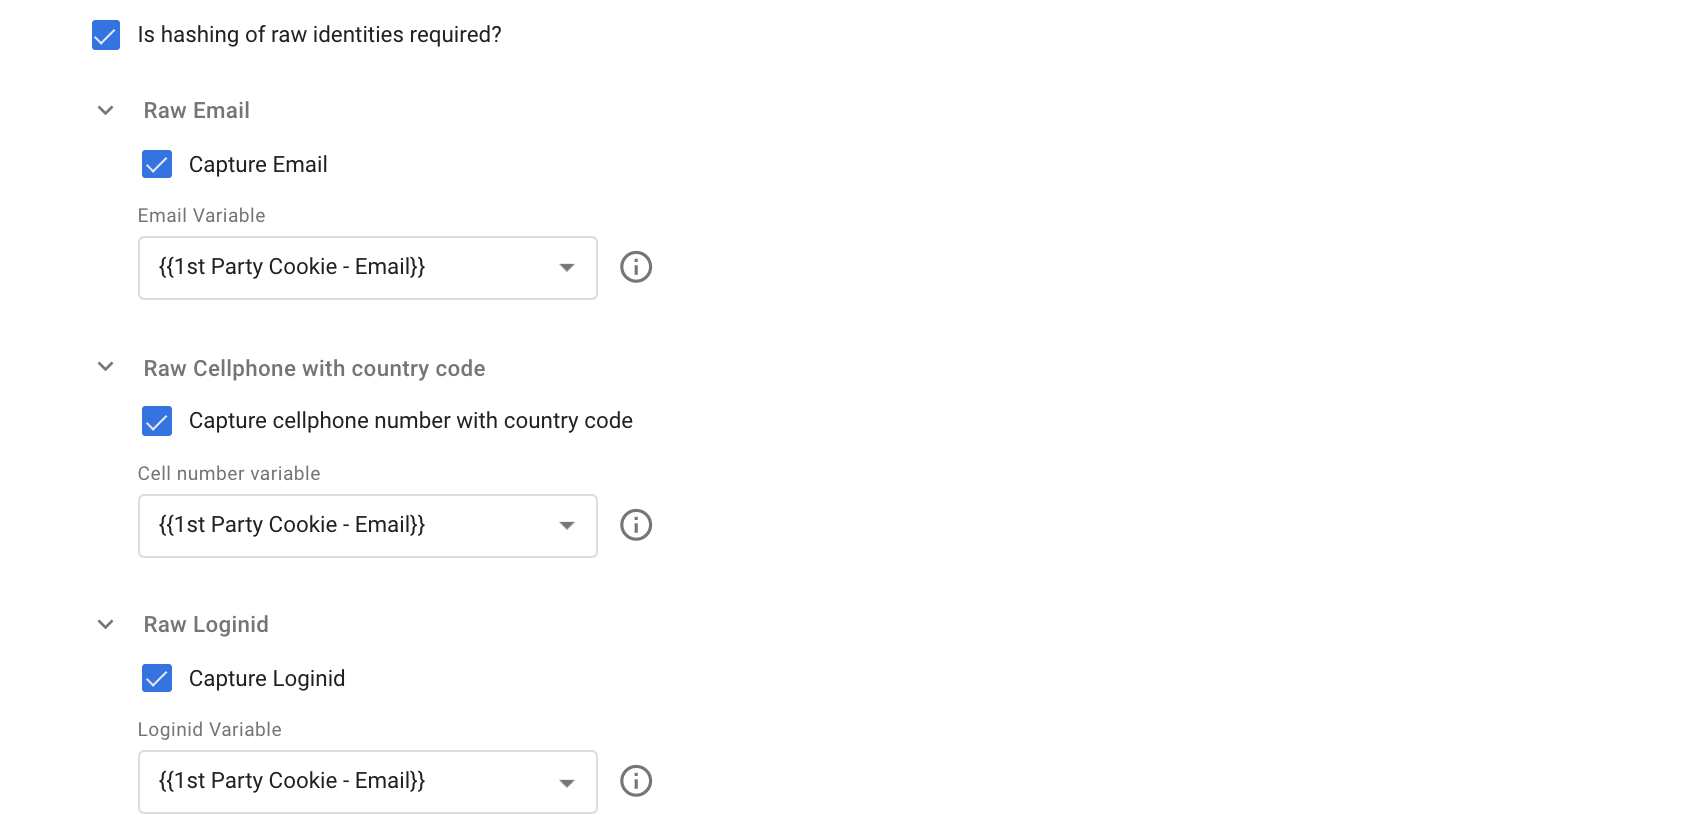
* **Is hashing of raw identities required?**– Based on whether you want to hash the raw identities or not, perform one of the following actions:
* *If hashing of the raw identities is required – Select this checkbox and make the following selections for the identities:*
* **Raw Email**– Select the **Capture Email** checkbox and then choose the appropriate **Email Variable** from the drop-down menu.
* **Raw Cellphone with country code**– Select the **Capture cellphone number with country code** checkbox and then choose the appropriate **Cell number variable** from the drop-down menu.
* **Raw Loginid**– Select the **Capture Loginid** checkbox and then choose the appropriate **Loginid Variable** from the drop-down menu.
### Tracking Page Views and Events
Enter the following details to configure the tracking options:
* **Page View Tracking Event Name**\*–\* By default, we track page view for the `gtm.js` event name. When using some other event name, ensure to update that event name in the input for overriding.
* **Event Tracking** – Enter a regex pattern that matches all the event names you want to track. If you want to track just a single event, then just enter that event name. By default, we use the `.*` pattern to identify the events.
* **Special Events** – If you want to track event names apart from the regex provided, then add all such events here.
* **Pre Defined Properties** – Input the properties that you want to attach or override. You can either define the values from your variables or provide static values for them.
* **PII to be excluded** – Enter all the PII and user-related fields in the dataLayer that need to be from in the event properties. For example, email is pushed into the dataLayer in the raw form. This option is also used to exclude other non-essential keys that need not be recorded.
**Note:**
*The records for the `country` and `city` columns are blacklisted for ingestion because SPL uses the user's IP address to find out the country and city automatically. For the complete list of blacklisted fields, click [here](/articles/integrate-customer/blacklisted-fields-for-data-ingestion).*
### Login and Identities Settings
Enter the following details to configure the login and identities settings:
* **Login Event** – Choose the `dataLayer` event that is fired on user login.
* **Are your identities hashed?** – Based on whether you want your identities to be hashed or not, perform one of the following actions:
* *If your identities are hashed –* Select this checkbox and make the following selections for the identities:
* **Hashed Email**– Select the **Capture hashed email** checkbox and then proceed to add a row for the hash algorithm. Click **Add Row** and then choose the appropriate **Hash Algorithm** and its corresponding **Hashed Email Variable** from the drop-down menus. You can add more rows as per your requirement.
* **Hashed Cellphone with country code** – Select the **Capture hashed cellphone number with country code** checkbox and then proceed to add a row for the hash algorithm. Click **Add Row** and then choose the appropriate **Hash Algorithm** and its corresponding **Hashed Cellphone Number Variable** from the drop-down menus. You can add more rows as per your requirement.
* **Hashed Loginid** – Select the **Capture hashed Loginid** checkbox and then proceed to add a row for the hash algorithm. Click **Add Row** and then choose the appropriate **Hash Algorithm** and its corresponding **Hashed Loginid Variable** from the drop-down menus. You can add more rows as per your requirement.
* *If your identities are not hashed –* Then do not select this checkbox and proceed to the next option.
* **Is hashing of raw identities required?**– Based on whether you want to hash the raw identities or not, perform one of the following actions:
* *If hashing of the raw identities is required – Select this checkbox and make the following selections for the identities:*
* **Raw Email**– Select the **Capture Email** checkbox and then choose the appropriate **Email Variable** from the drop-down menu.
* **Raw Cellphone with country code**– Select the **Capture cellphone number with country code** checkbox and then choose the appropriate **Cell number variable** from the drop-down menu.
* **Raw Loginid**– Select the **Capture Loginid** checkbox and then choose the appropriate **Loginid Variable** from the drop-down menu.
 * *If hashing of the raw identities is not required –* Then do not select this checkbox and proceed to the next option.
**Note:**
To know about the hashing guidelines for email and cell phone numbers, refer [here](https://docs.zeotap.com/smart/project-unify/hashing-guidelines).
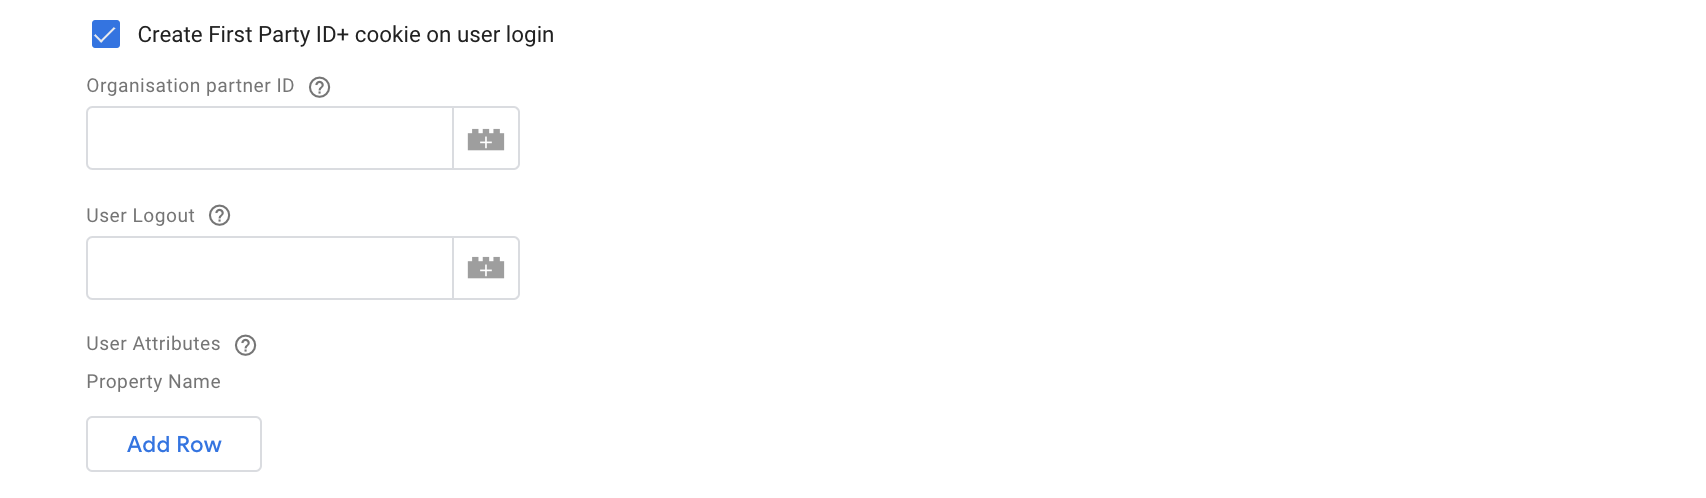
* **Create First Party ID+ cookie on user login** – If you are a Publisher who is using Zeotap's ID+ services, then ensure to select this checkbox to activate the ID+ calls.
* **Organisation partner ID** – This ID is provided by Zeotap after enabling ID+ for your organisation. Ensure that the ID is properly added.
* **User Logout** – Specify the `dataLayer` event that captures the user logout. The same event is used to unset the email address, phone number or loginid from the subsequent events.
* **User Attributes** – Specify the `dataLayer` variables that contain user-related information. The same variable is passed in the `setUserProperties` call.
* *If hashing of the raw identities is not required –* Then do not select this checkbox and proceed to the next option.
**Note:**
To know about the hashing guidelines for email and cell phone numbers, refer [here](https://docs.zeotap.com/smart/project-unify/hashing-guidelines).
* **Create First Party ID+ cookie on user login** – If you are a Publisher who is using Zeotap's ID+ services, then ensure to select this checkbox to activate the ID+ calls.
* **Organisation partner ID** – This ID is provided by Zeotap after enabling ID+ for your organisation. Ensure that the ID is properly added.
* **User Logout** – Specify the `dataLayer` event that captures the user logout. The same event is used to unset the email address, phone number or loginid from the subsequent events.
* **User Attributes** – Specify the `dataLayer` variables that contain user-related information. The same variable is passed in the `setUserProperties` call.
 ### Google Analytics Configuration
If you want to capture IDs relating to your Google Analytics (GA) account for ID completeness, reporting or outward integration (for example, `Optimize360`), you can configure the settings in this section to capture the same.
* **Pick Google Analytics client ID** – Select this checkbox if you want the Zeotap tag to pick the Google Analytics client ID that is used for user identification.
* **GA Client ID Cookie Prefix** – If your GA cookie is configured with a cookie prefix, you can add the same here. For example, a typical GA cookie that was named `_ga`, may be configured with a brand name prefix User ID variable in your GA settings, you can configure the corresponding cookie name here.
* **Use only for Login Event** – If this checkbox is selected, then the GA User ID is attached only for the post-login events.
### Advanced Settings
Under the **Advanced Settings** section, choose the **Once per event** option from the **Tag firing** drop-down menu. At this moment, we only support this option. Note that under the **Advanced Settings** section you need not make any other selection.
## Step 4 - Set up the Trigger
The inputs for the template help the tag to track all the relevant events happening on the web application. So the recommended trigger would be for all the real events that you want to capture using the tag.
The following are the various events for which you can fire the tag:
* If you want to fire the tag only for tracking page views, then use the **All Pages** built-in trigger.
* If you want to fire the tag to capture all the events, then use the **All Events** trigger.
You can either add a preconfigured trigger to a tag or create a trigger within the tag. The section below explains the two methods in detail.
### Method 1
Perform the following steps to set up the trigger as mentioned in Method 1:
Go to the **Trigger Configuration** section from your left menu.
Click **New** to add a trigger.
Provide a descriptive name for the Trigger.
Click anywhere on the Trigger Configuration block. This will open up the **Choose trigger type** slider window on the screen.
Under **Other**, choose **Custom Event** as the **Trigger Type**.
Type 'Login event' as the event name.
Select the **Use regex matching** checkbox to add your own regex, if your events follow a specific naming convention. Type `^(?!gtm\.load)(?!gtm\.dom).*` if you want to set this regex for all the events.
**Note:**
This regex sets the trigger for all the events except GTM's internal events, gtm.load and gtm.dom.
Select the **All Custom Events** radio button. Note that the trigger is set for the login event only.
Click **Save**.
### Google Analytics Configuration
If you want to capture IDs relating to your Google Analytics (GA) account for ID completeness, reporting or outward integration (for example, `Optimize360`), you can configure the settings in this section to capture the same.
* **Pick Google Analytics client ID** – Select this checkbox if you want the Zeotap tag to pick the Google Analytics client ID that is used for user identification.
* **GA Client ID Cookie Prefix** – If your GA cookie is configured with a cookie prefix, you can add the same here. For example, a typical GA cookie that was named `_ga`, may be configured with a brand name prefix User ID variable in your GA settings, you can configure the corresponding cookie name here.
* **Use only for Login Event** – If this checkbox is selected, then the GA User ID is attached only for the post-login events.
### Advanced Settings
Under the **Advanced Settings** section, choose the **Once per event** option from the **Tag firing** drop-down menu. At this moment, we only support this option. Note that under the **Advanced Settings** section you need not make any other selection.
## Step 4 - Set up the Trigger
The inputs for the template help the tag to track all the relevant events happening on the web application. So the recommended trigger would be for all the real events that you want to capture using the tag.
The following are the various events for which you can fire the tag:
* If you want to fire the tag only for tracking page views, then use the **All Pages** built-in trigger.
* If you want to fire the tag to capture all the events, then use the **All Events** trigger.
You can either add a preconfigured trigger to a tag or create a trigger within the tag. The section below explains the two methods in detail.
### Method 1
Perform the following steps to set up the trigger as mentioned in Method 1:
Go to the **Trigger Configuration** section from your left menu.
Click **New** to add a trigger.
Provide a descriptive name for the Trigger.
Click anywhere on the Trigger Configuration block. This will open up the **Choose trigger type** slider window on the screen.
Under **Other**, choose **Custom Event** as the **Trigger Type**.
Type 'Login event' as the event name.
Select the **Use regex matching** checkbox to add your own regex, if your events follow a specific naming convention. Type `^(?!gtm\.load)(?!gtm\.dom).*` if you want to set this regex for all the events.
**Note:**
This regex sets the trigger for all the events except GTM's internal events, gtm.load and gtm.dom.
Select the **All Custom Events** radio button. Note that the trigger is set for the login event only.
Click **Save**.
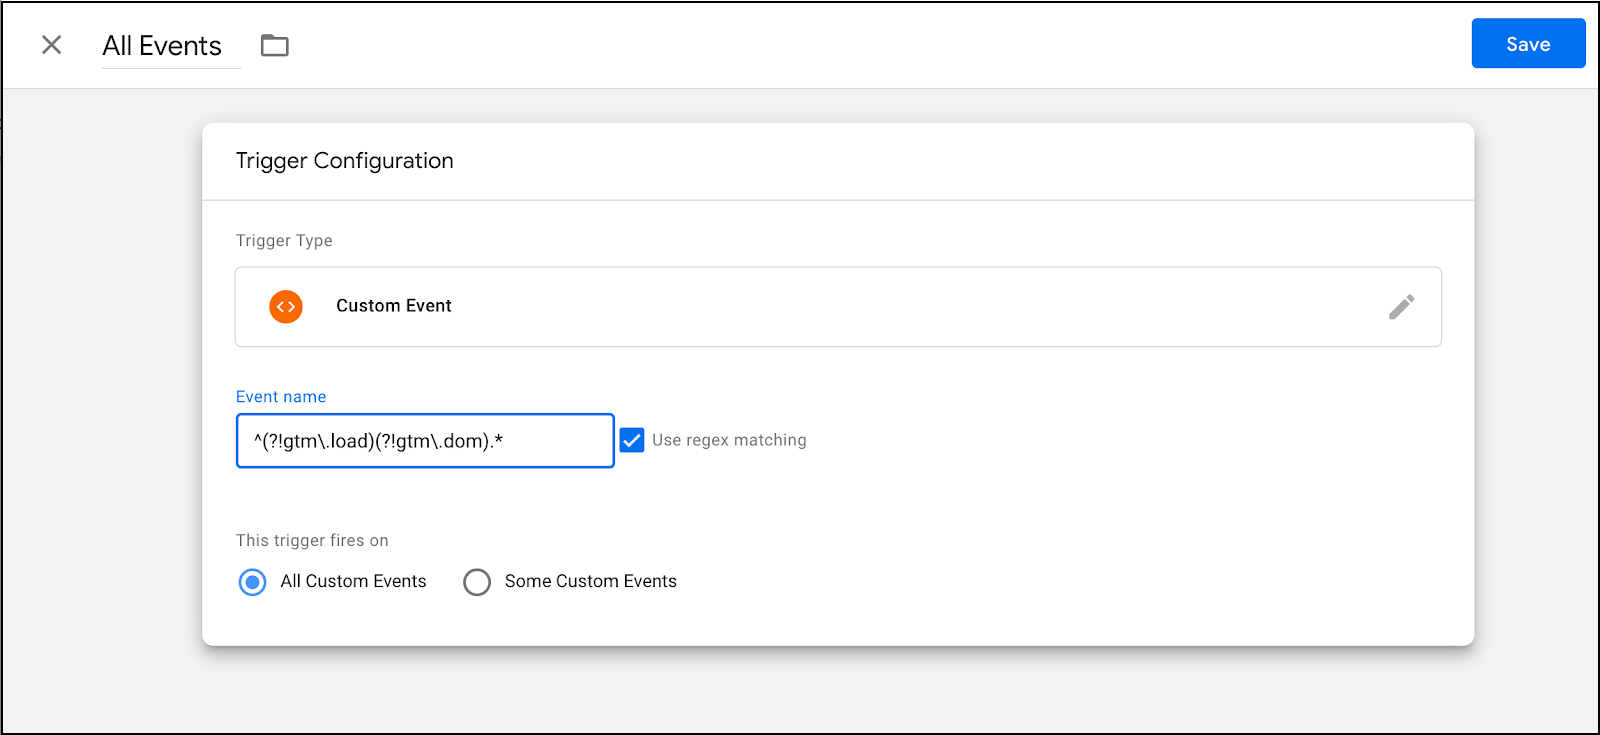 In the Tag addition, add this as the trigger for the Zeotap Collect tag. This means, our JS will fire an event collection call for each event on the website.
 ### Method 2
Perform the following steps to set up the trigger as mentioned in Method 2:
You can also set a trigger to a tag while configuring it. Perform the following steps to set a trigger to a tag from the **Tag Configuration** section.
Navigate to the **Tag Configuration** section of the tag to which you want to attach a trigger.
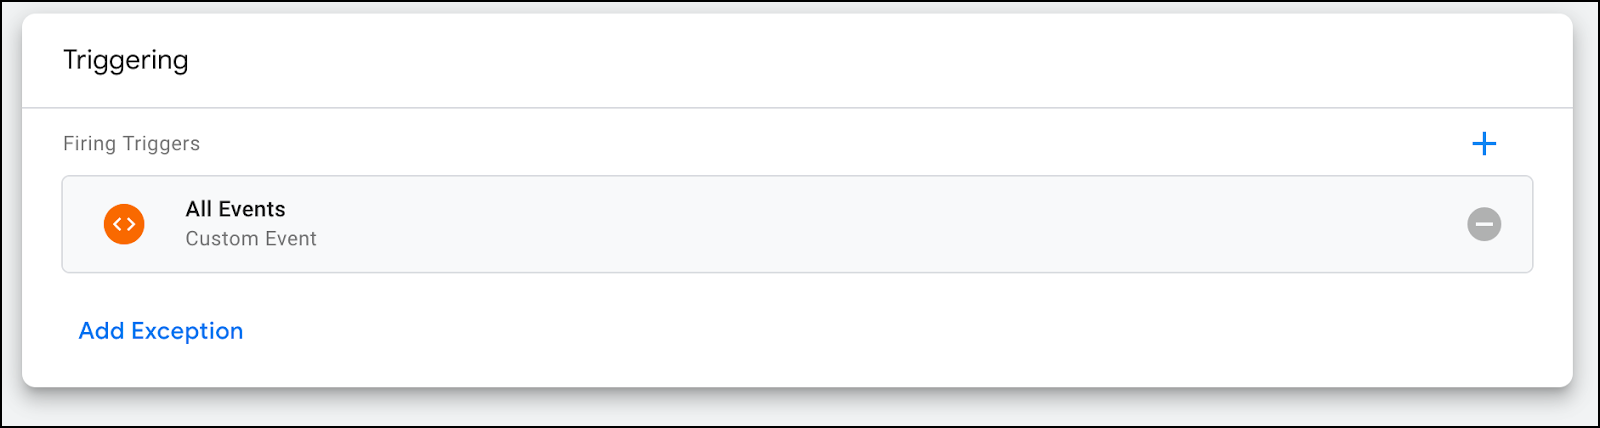
Click **+** under the **Triggering** section.
In the **Choose a trigger** window that appears click **+**.
Choose **Custom Event** as the **Trigger Type**.
Type your 'Login event' as the event name.
Select the **Use regex matching** checkbox to add your own regex, if your events follow a specific naming convention. Type `^(?!gtm\.load)(?!gtm\.dom).*` if you want to set this regex for all the events.
**Note:**
This regex sets the trigger for all the events except GTM's internal events, `gtm.load` and `gtm.dom`.
Select the **All Custom Events** radio button. The trigger is set for the login event only.
## Step 5 - Validate the Configured Collect Tag
After you have added the Zeotap Collect Tag, configure the same and set the trigger to perform the following steps to evaluate how it works:
Click **Tags** from the left menu. Of all the tags that are listed, ensure that your tag is in an inactive state and has not been paused.
Click the **Preview** button that appears on the top right corner. You are taken to the **Tag Assistant** page.
In the **Google Tag Assistant** window that appears, enter the website where you have integrated the GTM and then click **Start**. Refer to the image below from a sample website.
You are redirected to the website URL that you had entered. Perform any action of the website.
After performing any action on the website, right-click on the web page and click **Inspect**.
Go to the **Console** tab of the **DevTools** window that opens and under **dataLayer** look for the event name that you have configured.
Go back to the **Tag Assistant** window and click **Continue**.
Under **Tags Fired** you can find the tag that was fired.
### Method 2
Perform the following steps to set up the trigger as mentioned in Method 2:
You can also set a trigger to a tag while configuring it. Perform the following steps to set a trigger to a tag from the **Tag Configuration** section.
Navigate to the **Tag Configuration** section of the tag to which you want to attach a trigger.
Click **+** under the **Triggering** section.
In the **Choose a trigger** window that appears click **+**.
Choose **Custom Event** as the **Trigger Type**.
Type your 'Login event' as the event name.
Select the **Use regex matching** checkbox to add your own regex, if your events follow a specific naming convention. Type `^(?!gtm\.load)(?!gtm\.dom).*` if you want to set this regex for all the events.
**Note:**
This regex sets the trigger for all the events except GTM's internal events, `gtm.load` and `gtm.dom`.
Select the **All Custom Events** radio button. The trigger is set for the login event only.
## Step 5 - Validate the Configured Collect Tag
After you have added the Zeotap Collect Tag, configure the same and set the trigger to perform the following steps to evaluate how it works:
Click **Tags** from the left menu. Of all the tags that are listed, ensure that your tag is in an inactive state and has not been paused.
Click the **Preview** button that appears on the top right corner. You are taken to the **Tag Assistant** page.
In the **Google Tag Assistant** window that appears, enter the website where you have integrated the GTM and then click **Start**. Refer to the image below from a sample website.
You are redirected to the website URL that you had entered. Perform any action of the website.
After performing any action on the website, right-click on the web page and click **Inspect**.
Go to the **Console** tab of the **DevTools** window that opens and under **dataLayer** look for the event name that you have configured.
Go back to the **Tag Assistant** window and click **Continue**.
Under **Tags Fired** you can find the tag that was fired.