> ## Documentation Index
> Fetch the complete documentation index at: https://docs.zeotap.com/llms.txt
> Use this file to discover all available pages before exploring further.
# Hello Charles
> Sync contacts and audience segments from Zeotap CDP to Hello Charles for conversational commerce and WhatsApp messaging. Upserts contacts in batches with tags and custom properties so you can rebuild your Zeotap audiences inside Hello Charles.
## Overview
This integration allows you to send contacts and audience segments from Zeotap CDP directly into **Hello Charles**, so your conversational commerce and WhatsApp messaging workflows always run on fresh customer data. Once you set up the Hello Charles destination and attach it to an audience, Zeotap automatically upserts contacts in Hello Charles in batches — creating new contacts and updating existing ones based on the external reference ID you map. You can also send **tags** and **custom properties** so you can recreate your Zeotap audience segmentation inside Hello Charles for downstream filtering and outreach.
The Hello Charles Batched Contacts API is currently in **closed beta**. You will need approval from your Hello Charles success manager before this integration can be enabled.
## How It Works
When you attach the Hello Charles destination to an audience in Zeotap CDP, the following happens automatically behind the scenes:
1. You set up Hello Charles as a **destination** in Zeotap CDP by entering your **API Key** and your customer-specific **Base URL**.
2. You select the **Send Contacts to Hello Charles** action and configure the **field mapping** — telling Zeotap which identifier, names, phone numbers, emails, tags, and custom properties to send.
3. You **attach the destination to an audience** in Zeotap.
4. Zeotap **upserts the contacts** in Hello Charles in batches of up to 1,000 — existing contacts are updated and new contacts are created, matched by the **external reference ID** you map.
5. Tags and custom properties land alongside the contact data, letting you filter and segment those contacts inside Hello Charles afterwards.
## Before You Begin
Make sure you have everything ready before starting the setup.
**In Hello Charles:**
* An active Hello Charles account with **API access** enabled.
* Approval from a **Hello Charles success manager** to access the closed-beta Batched Contacts API.
* Your customer-specific **Base URL** (the subdomain segment of your Hello Charles workspace URL).
* A valid **API Key** generated from your Hello Charles account.
* Any **tags** you plan to send already created in Hello Charles (**Settings → Manage Tags**).
* Any **custom properties** you plan to send already created in Hello Charles, with their **technical names** noted.
**In Zeotap CDP:**
* Access to the **Integrate** module with permission to create new destinations.
* An audience segment ready to send to Hello Charles.
* The user identifier you plan to use as the **external reference ID** (usually a phone number).
* Phone numbers in your audience formatted correctly — see [Important Notes](#important-notes-and-limitations) below.
Treat the API Key like a password — anyone with this key can read and write contact data in your Hello Charles account. Never share it in client-side code, screenshots, or chat messages.
## Get Your API Key from Hello Charles
Before connecting Zeotap to Hello Charles, generate (or copy) the API Key Zeotap will use to authenticate.
Log in to **Hello Charles** and navigate to **Settings → API Keys**.
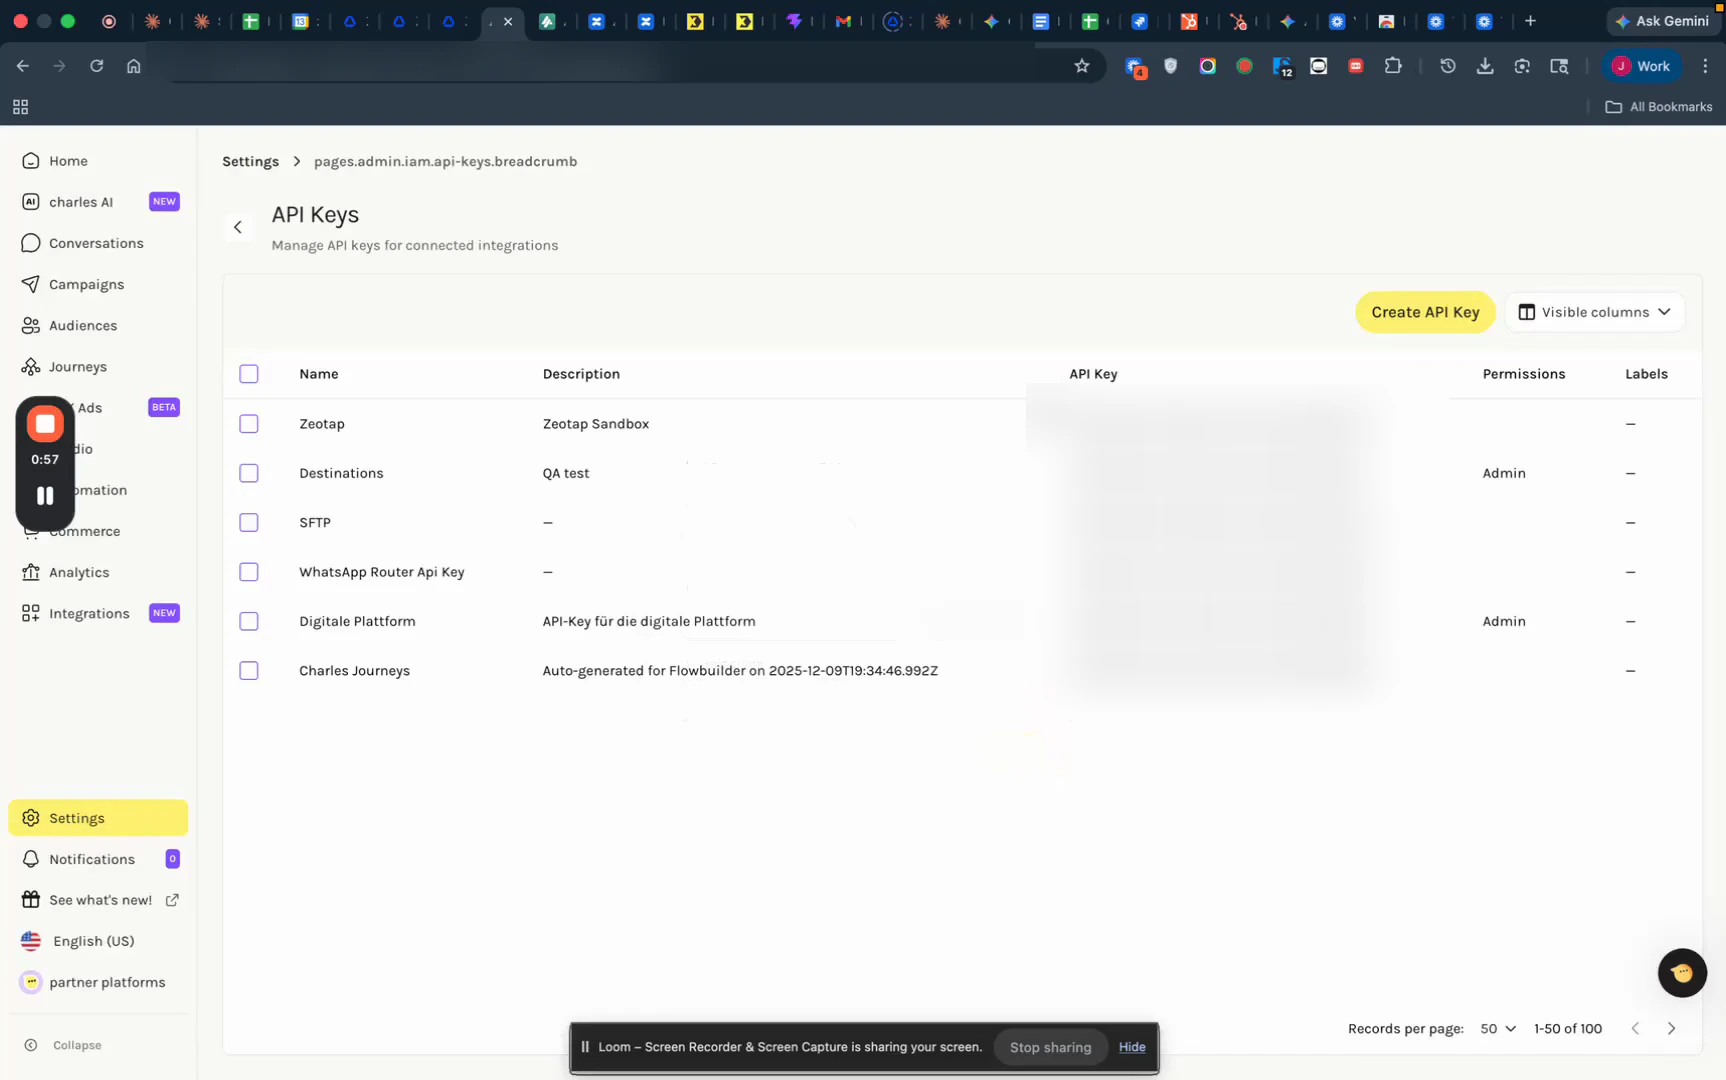 Click **Create API Key**, then:
* Enter a recognisable **name** (e.g., `Zeotap CDP Integration`) and a short **description**.
* Set the **permissions** — **admin permissions are recommended** so the integration can both upsert contacts and write tags / custom properties.
* Click **Save**.
Use the **show** button next to the key, then copy it. Store the value somewhere secure — you will paste it into Zeotap shortly.
## Pre-create Tags and Custom Properties in Hello Charles
This is a critical preparation step. **Tags and custom properties must exist in Hello Charles before you send them from Zeotap** — otherwise Hello Charles will not ingest those values.
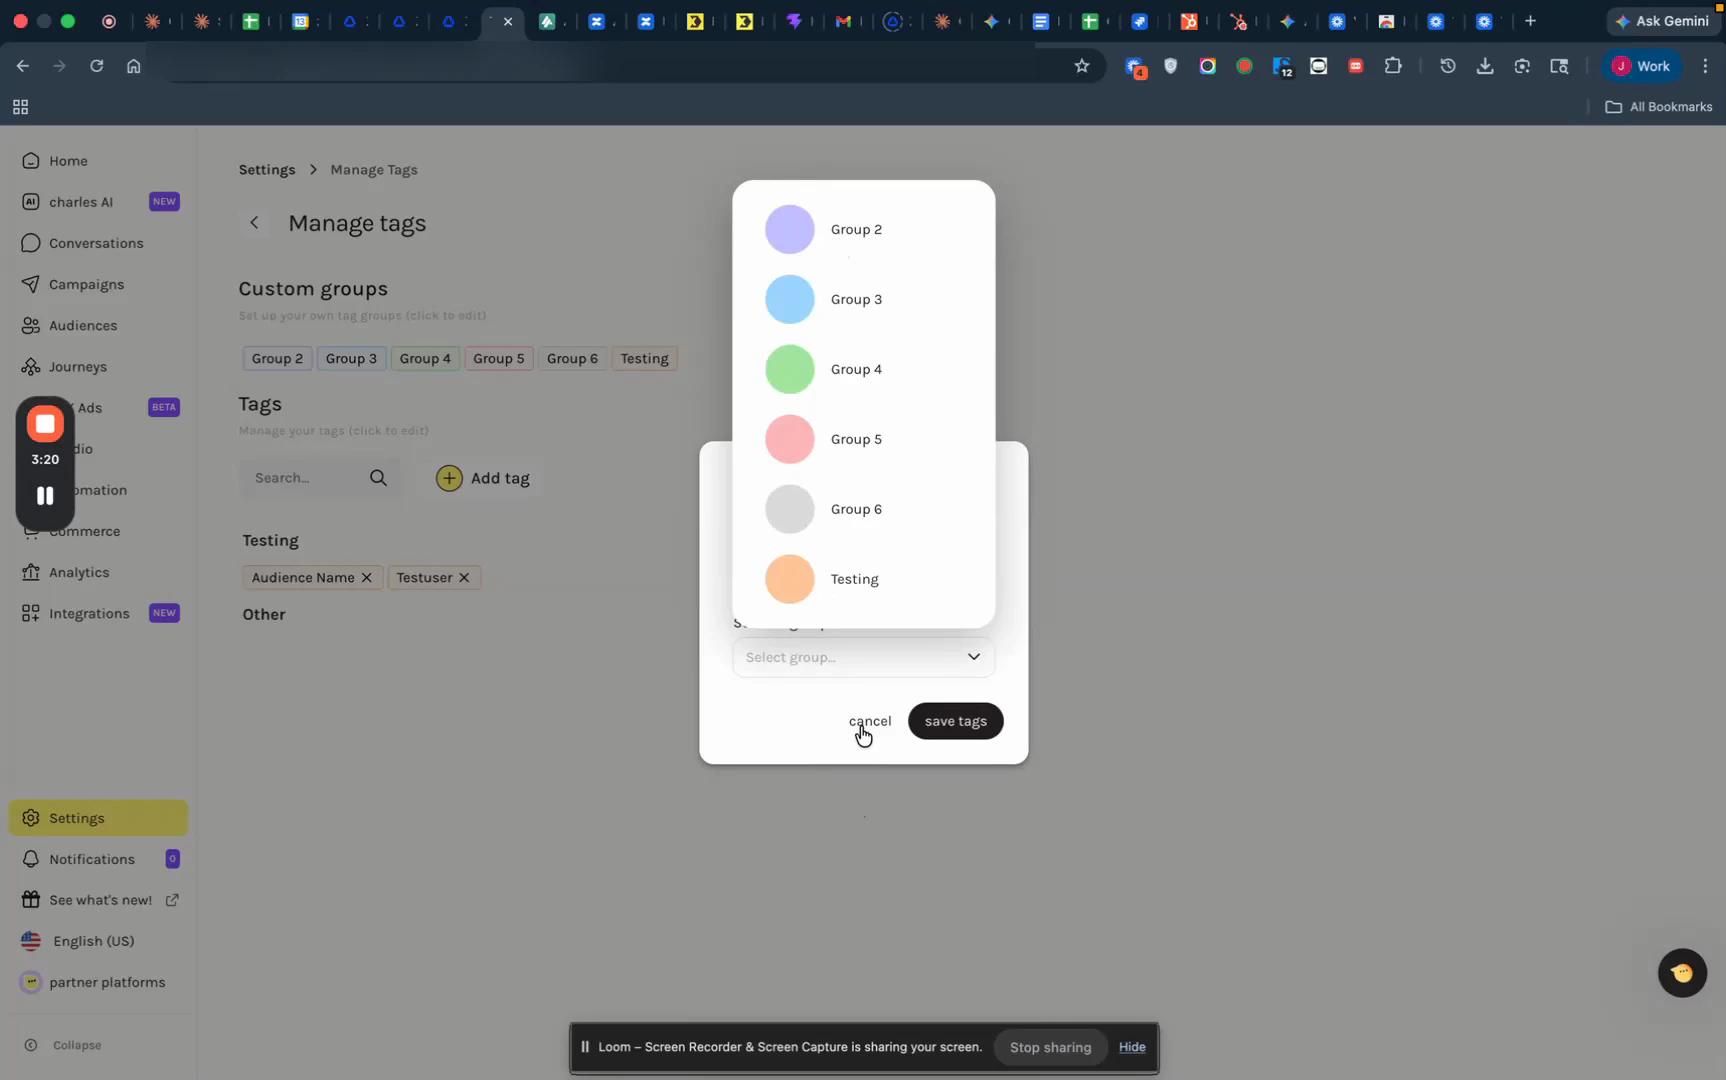
Navigate to **Settings → Manage Tags**. Create any tags you plan to send from Zeotap. For example, if you want to mark contacts in an audience with ID `984`, create a tag called `984` (or any label that fits your taxonomy).
Click **Create API Key**, then:
* Enter a recognisable **name** (e.g., `Zeotap CDP Integration`) and a short **description**.
* Set the **permissions** — **admin permissions are recommended** so the integration can both upsert contacts and write tags / custom properties.
* Click **Save**.
Use the **show** button next to the key, then copy it. Store the value somewhere secure — you will paste it into Zeotap shortly.
## Pre-create Tags and Custom Properties in Hello Charles
This is a critical preparation step. **Tags and custom properties must exist in Hello Charles before you send them from Zeotap** — otherwise Hello Charles will not ingest those values.
Navigate to **Settings → Manage Tags**. Create any tags you plan to send from Zeotap. For example, if you want to mark contacts in an audience with ID `984`, create a tag called `984` (or any label that fits your taxonomy).
 Navigate to the **Custom Properties** area in your Hello Charles workspace. For each custom property you want to send (e.g., loyalty tier, last purchase date, audience name), create the property and **note its technical name** — this is the exact string you will use as the mapping key in Zeotap.
Use this step to mirror your Zeotap audience structure in Hello Charles. For example, create a custom property called `zeotap_audience_name` (or `zeotap_audience_id`) so every contact carries the Zeotap audience they came from — making it easy to rebuild the same segment in Hello Charles later.
## Create the Hello Charles Destination in Zeotap CDP
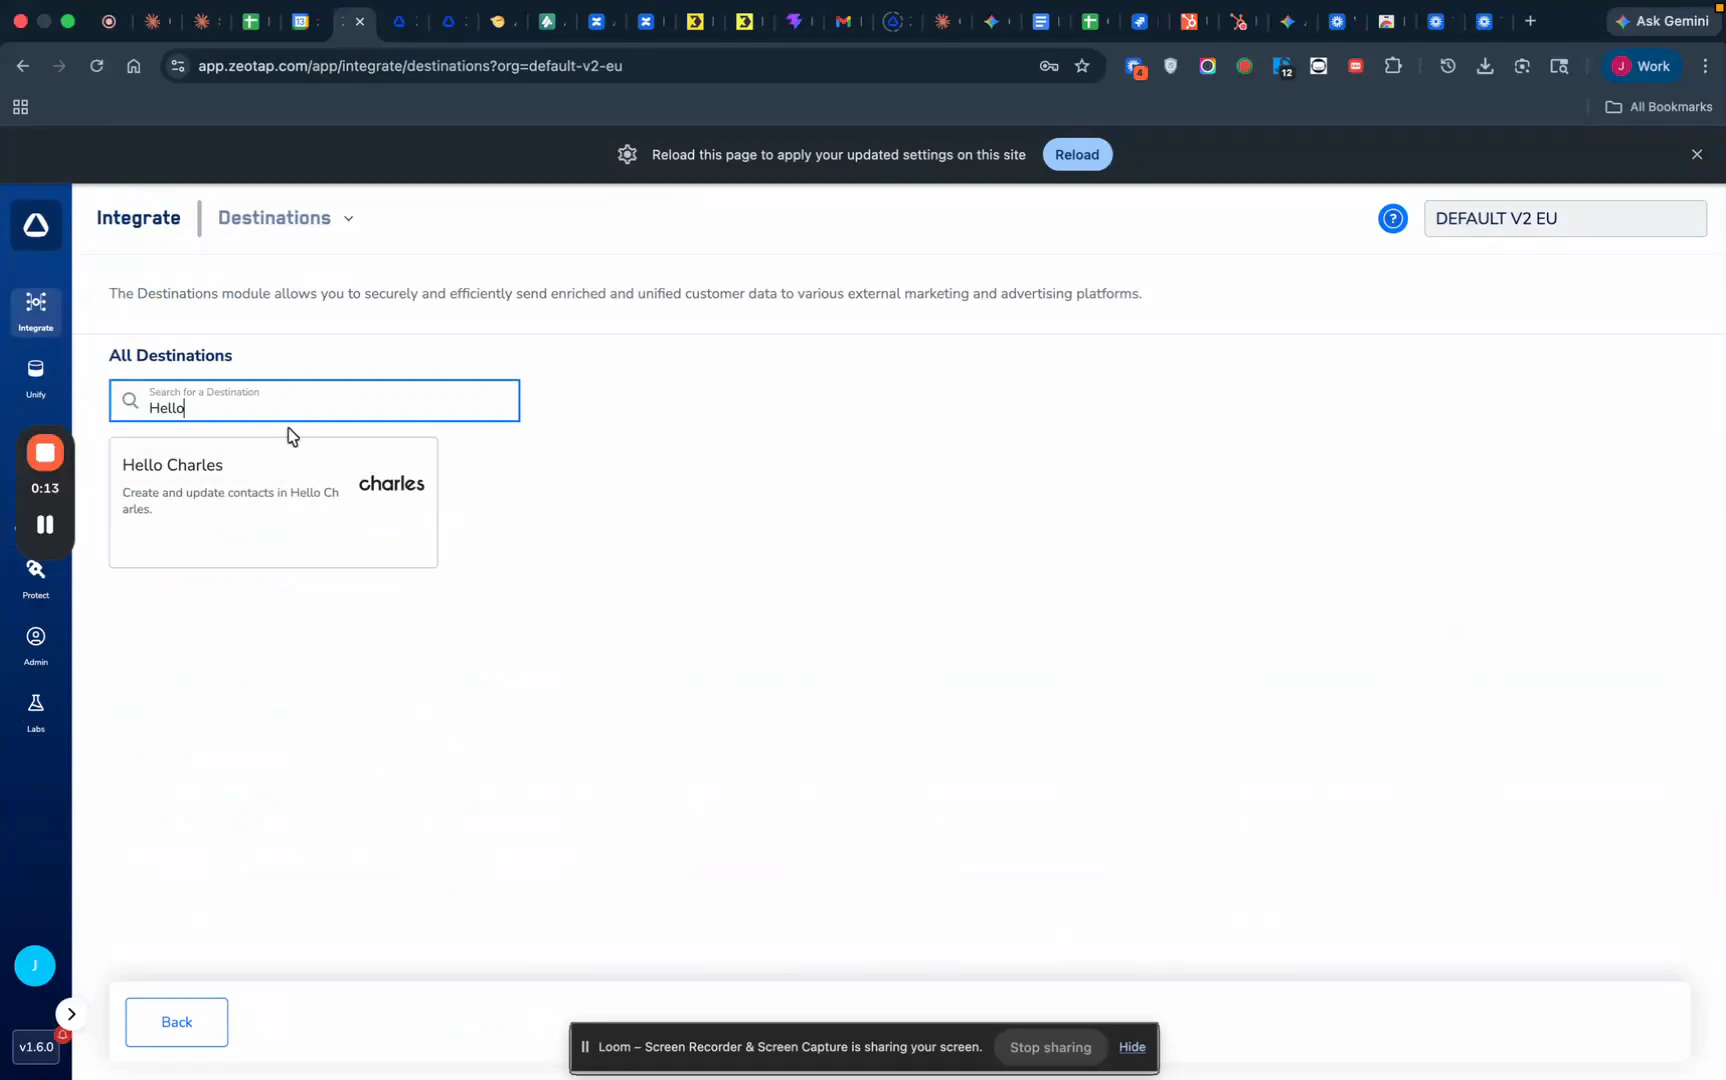
Log in to **Zeotap CDP** and go to **Integrate → Destinations**. Click **+ Create Destination**, then search for **Hello Charles** in the catalogue and select the **Hello Charles** card.
Navigate to the **Custom Properties** area in your Hello Charles workspace. For each custom property you want to send (e.g., loyalty tier, last purchase date, audience name), create the property and **note its technical name** — this is the exact string you will use as the mapping key in Zeotap.
Use this step to mirror your Zeotap audience structure in Hello Charles. For example, create a custom property called `zeotap_audience_name` (or `zeotap_audience_id`) so every contact carries the Zeotap audience they came from — making it easy to rebuild the same segment in Hello Charles later.
## Create the Hello Charles Destination in Zeotap CDP
Log in to **Zeotap CDP** and go to **Integrate → Destinations**. Click **+ Create Destination**, then search for **Hello Charles** in the catalogue and select the **Hello Charles** card.
 Fill in the configuration fields:
* **Destination Name** — a descriptive label (e.g., `Hello Charles V1 Testing` or `Hello Charles — VIP Sync`).
* **Base URL** — the Base URL for your Hello Charles API endpoint (the subdomain segment of your Hello Charles workspace URL).
* **API Key** — paste the API Key you copied from Hello Charles. The field is masked once saved.
Fill in the configuration fields:
* **Destination Name** — a descriptive label (e.g., `Hello Charles V1 Testing` or `Hello Charles — VIP Sync`).
* **Base URL** — the Base URL for your Hello Charles API endpoint (the subdomain segment of your Hello Charles workspace URL).
* **API Key** — paste the API Key you copied from Hello Charles. The field is masked once saved.
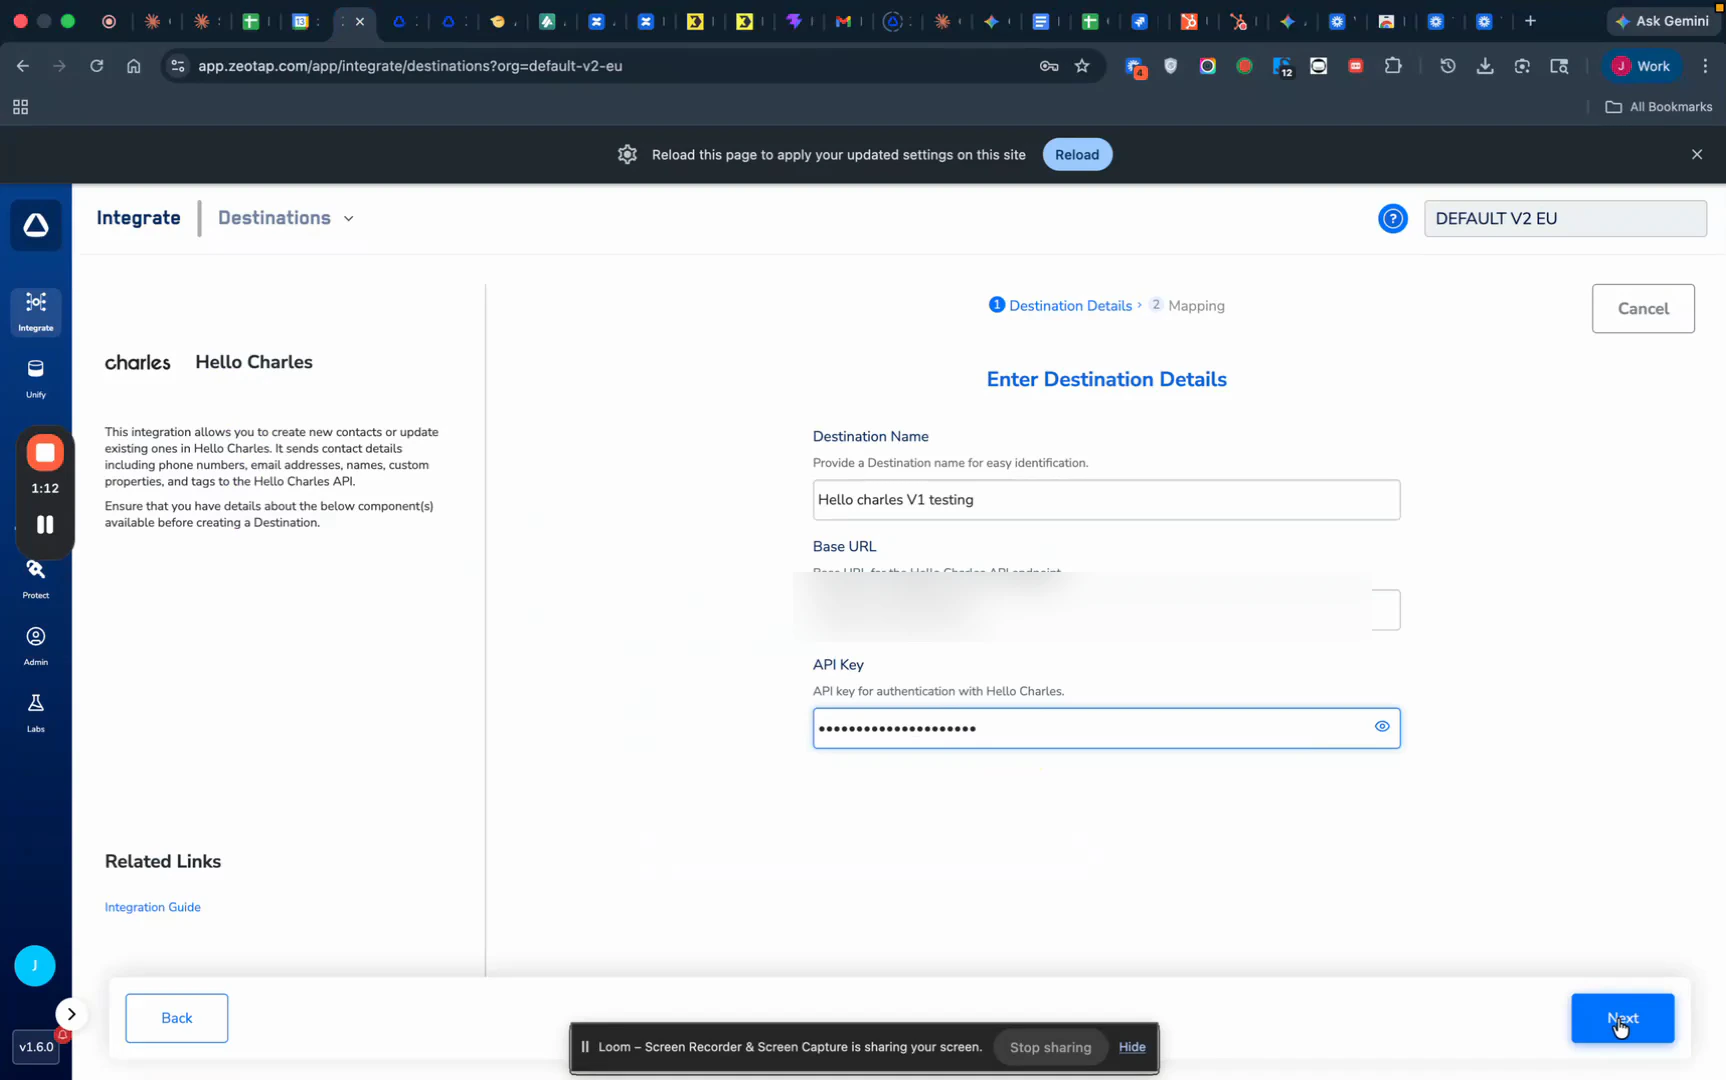 Click **Next** to proceed to mapping.
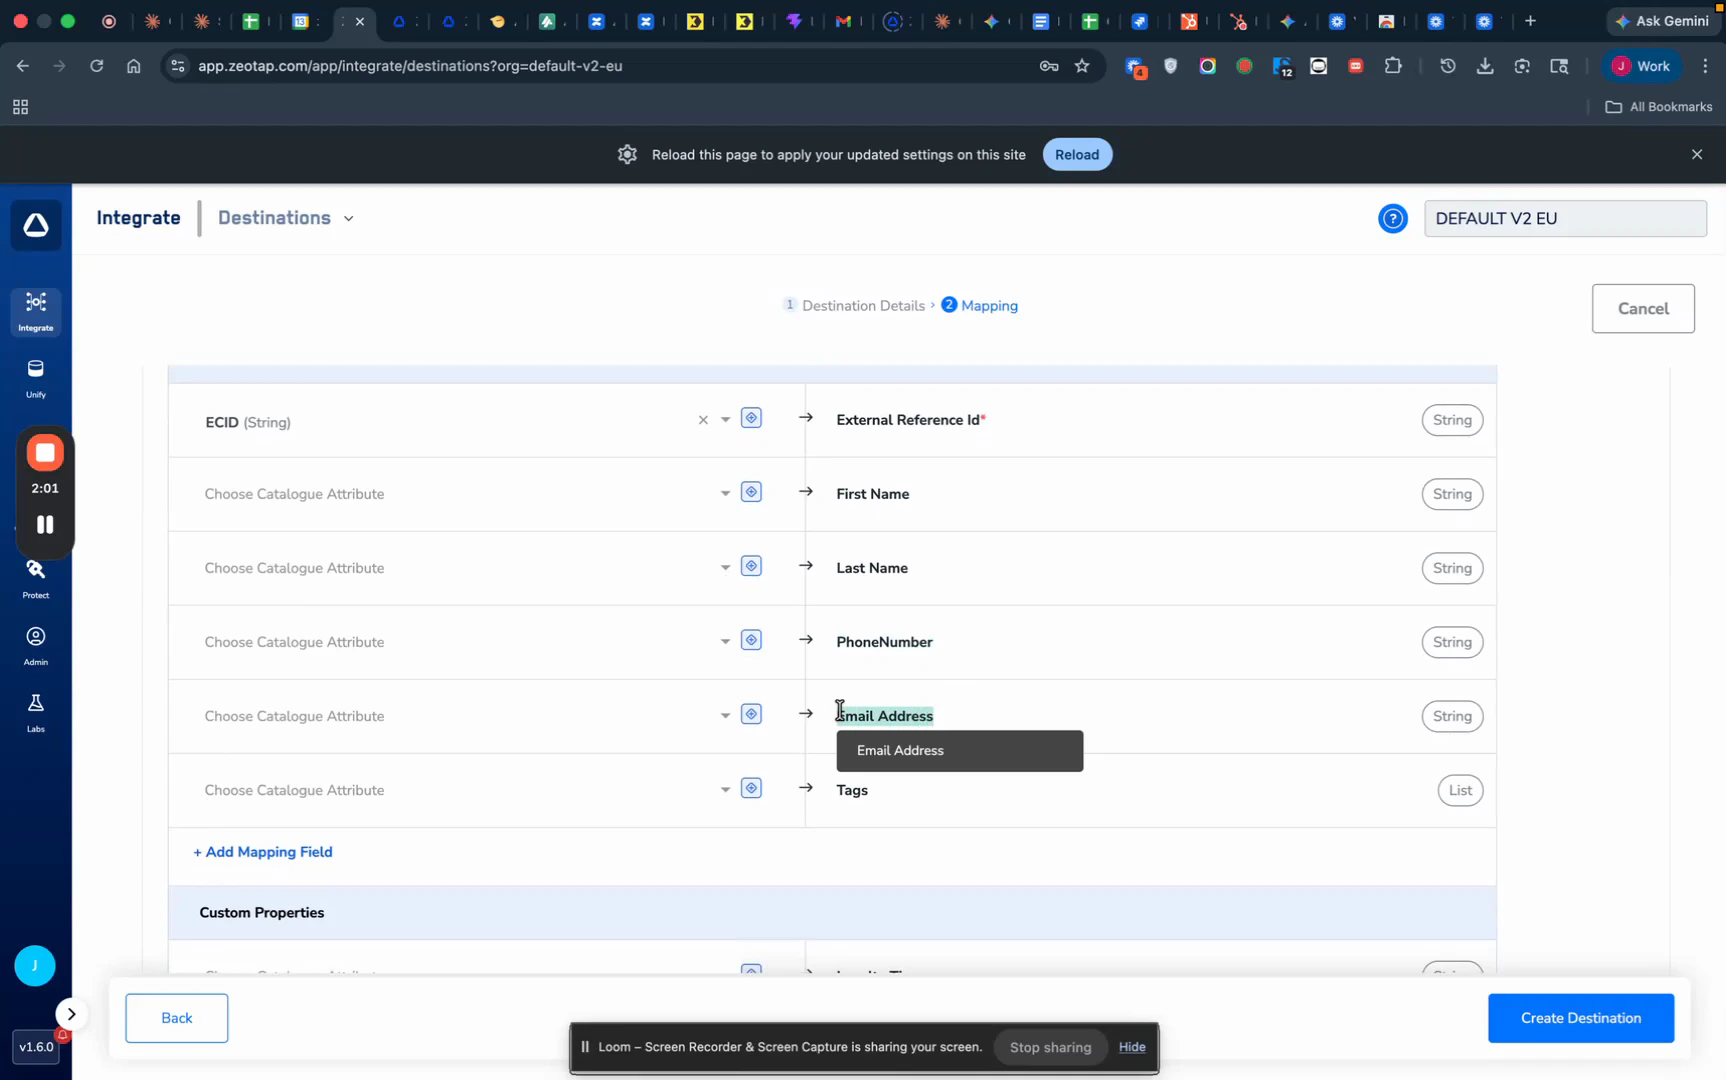
On the **Mapping** screen:
1. Under **Choose your Action**, select **Send Contacts to Hello Charles** — this is the only action available for this destination.
2. In the **Map the Fields** area, map your Zeotap catalogue fields to the Hello Charles destination fields:
| Zeotap Catalogue Field | Hello Charles Destination Field | Required? | Notes |
| ---------------------- | ------------------------------- | ------------ | ------------------------------------------------------------------------------------------------------------------------------------------------------------------------------------------------------------------------------- |
| User ID / Phone Number | **External Reference Id** | **Required** | Used to match existing contacts for upsert. Typically a phone number in international format. |
| First Name | **First Name** | Optional | |
| Last Name | **Last Name** | Optional | |
| Phone Number | **PhoneNumber** | Optional | Sent to Hello Charles as the contact's **main phone number** by default — it will not populate other phone slots. Required only when creating new contacts; can be omitted when updating existing contacts or adding tags only. |
| Email | **Email Address** | Optional | Sent to Hello Charles as the contact's **main email address** by default. Required only when creating new contacts; can be omitted when updating existing contacts or adding tags only. |
| Tags | **Tags** | Optional | Each tag must already exist in Hello Charles. |
| Custom Properties | **Custom Properties** | Optional | Keys must match Hello Charles **technical names** exactly. |
Click **Next** to proceed to mapping.
On the **Mapping** screen:
1. Under **Choose your Action**, select **Send Contacts to Hello Charles** — this is the only action available for this destination.
2. In the **Map the Fields** area, map your Zeotap catalogue fields to the Hello Charles destination fields:
| Zeotap Catalogue Field | Hello Charles Destination Field | Required? | Notes |
| ---------------------- | ------------------------------- | ------------ | ------------------------------------------------------------------------------------------------------------------------------------------------------------------------------------------------------------------------------- |
| User ID / Phone Number | **External Reference Id** | **Required** | Used to match existing contacts for upsert. Typically a phone number in international format. |
| First Name | **First Name** | Optional | |
| Last Name | **Last Name** | Optional | |
| Phone Number | **PhoneNumber** | Optional | Sent to Hello Charles as the contact's **main phone number** by default — it will not populate other phone slots. Required only when creating new contacts; can be omitted when updating existing contacts or adding tags only. |
| Email | **Email Address** | Optional | Sent to Hello Charles as the contact's **main email address** by default. Required only when creating new contacts; can be omitted when updating existing contacts or adding tags only. |
| Tags | **Tags** | Optional | Each tag must already exist in Hello Charles. |
| Custom Properties | **Custom Properties** | Optional | Keys must match Hello Charles **technical names** exactly. |
 If you are only sending tags to update existing contacts, you can map just the **External Reference Id** and **Tags** — phone, email, and name fields are not required in that case.
## Map Audience or Segment Data for Segmentation
To recreate your Zeotap audience structure inside Hello Charles, use a **tag** or **custom property** to carry the audience identifier.
Decide how you want to represent audience membership in Hello Charles:
* **Option A — Tag**: Map your Zeotap audience ID (or the **Segment Membership (List)** catalogue field) to **Tags** so every contact in this sync gets tagged with that audience ID.
* **Option B — Custom Property**: Map the Zeotap audience name or ID to a custom property like `zeotap_audience_name` so the value is stored as a structured field on the contact.
Confirm the tag or custom property you chose was pre-created in Hello Charles (see the previous section), then save the mapping.
If you are only sending tags to update existing contacts, you can map just the **External Reference Id** and **Tags** — phone, email, and name fields are not required in that case.
## Map Audience or Segment Data for Segmentation
To recreate your Zeotap audience structure inside Hello Charles, use a **tag** or **custom property** to carry the audience identifier.
Decide how you want to represent audience membership in Hello Charles:
* **Option A — Tag**: Map your Zeotap audience ID (or the **Segment Membership (List)** catalogue field) to **Tags** so every contact in this sync gets tagged with that audience ID.
* **Option B — Custom Property**: Map the Zeotap audience name or ID to a custom property like `zeotap_audience_name` so the value is stored as a structured field on the contact.
Confirm the tag or custom property you chose was pre-created in Hello Charles (see the previous section), then save the mapping.
 Custom properties are usually more durable than tags — they let you build precise filter conditions in Hello Charles segments later (e.g., "all contacts where `zeotap_audience_name` contains a given value").
## Attach the Destination to an Audience
With the destination and mapping saved, link it to your audience.
Navigate to your **Audience** flow in Zeotap CDP and select the audience containing the fields you want to send (e.g., email, phone, last name).
Drag and drop the **Hello Charles** destination into the audience flow, then select the **mapping** you saved in the previous section.
Custom properties are usually more durable than tags — they let you build precise filter conditions in Hello Charles segments later (e.g., "all contacts where `zeotap_audience_name` contains a given value").
## Attach the Destination to an Audience
With the destination and mapping saved, link it to your audience.
Navigate to your **Audience** flow in Zeotap CDP and select the audience containing the fields you want to send (e.g., email, phone, last name).
Drag and drop the **Hello Charles** destination into the audience flow, then select the **mapping** you saved in the previous section.
 Click **Save Destination** and save the audience setup. Zeotap will begin sending the audience data to Hello Charles in batches of up to 1,000 contacts per request.
## Field Mapping
Below is the complete reference for how data from Zeotap CDP maps to Hello Charles.
### Contact Fields
| Zeotap Field | Required / Optional | Notes |
| --------------------- | ------------------- | -------------------------------------------------------------------------------------------------------------------- |
| External Reference Id | **Required** | The unique identifier used to upsert contacts — typically a phone number in international format. |
| First Name | Optional | |
| Last Name | Optional | |
| PhoneNumber | Optional | Phone in international format (`+CountryCodeNumber`). Sent to Hello Charles as the **main phone number** by default. |
| Email Address | Optional | A valid email address. Sent to Hello Charles as the **main email address** by default. |
| Tags | Optional | Each tag must already exist in **Hello Charles → Settings → Manage Tags**. |
| Custom Properties | Optional | Keys must match Hello Charles **technical names** exactly. Values can be strings, numbers, or dates. |
### How Upsert Works
* Contacts are matched on **External Reference Id**.
* If a matching contact exists in Hello Charles, it is **updated** with the new field values.
* If no match exists, a **new contact** is created.
* Sending a tag adds it to the contact's tag list; sending a custom property sets or overwrites that property.
## Activate and Test the Integration
Once the audience is attached and saved, follow these steps to verify the sync.
Zeotap pushes the audience in batches of up to 1,000 contacts.
Log in to **Hello Charles** and navigate to the **Contacts** area. Search for one of the contacts from your Zeotap audience (e.g., by phone number or External Reference Id) and confirm:
* The contact appears with the **name, phone, and email** you mapped.
* The **tags** you sent are attached to the contact.
* The **custom properties** you sent appear with the correct values.
Navigate to **Segments & Lists** in Hello Charles and create a new segment. Filter by the tag or custom property you used to mark this audience — for example, `Contact's custom property → Zeotap Audience Name contains `. Confirm the contact count matches (or closely matches) the audience size in Zeotap.
Click **Save Destination** and save the audience setup. Zeotap will begin sending the audience data to Hello Charles in batches of up to 1,000 contacts per request.
## Field Mapping
Below is the complete reference for how data from Zeotap CDP maps to Hello Charles.
### Contact Fields
| Zeotap Field | Required / Optional | Notes |
| --------------------- | ------------------- | -------------------------------------------------------------------------------------------------------------------- |
| External Reference Id | **Required** | The unique identifier used to upsert contacts — typically a phone number in international format. |
| First Name | Optional | |
| Last Name | Optional | |
| PhoneNumber | Optional | Phone in international format (`+CountryCodeNumber`). Sent to Hello Charles as the **main phone number** by default. |
| Email Address | Optional | A valid email address. Sent to Hello Charles as the **main email address** by default. |
| Tags | Optional | Each tag must already exist in **Hello Charles → Settings → Manage Tags**. |
| Custom Properties | Optional | Keys must match Hello Charles **technical names** exactly. Values can be strings, numbers, or dates. |
### How Upsert Works
* Contacts are matched on **External Reference Id**.
* If a matching contact exists in Hello Charles, it is **updated** with the new field values.
* If no match exists, a **new contact** is created.
* Sending a tag adds it to the contact's tag list; sending a custom property sets or overwrites that property.
## Activate and Test the Integration
Once the audience is attached and saved, follow these steps to verify the sync.
Zeotap pushes the audience in batches of up to 1,000 contacts.
Log in to **Hello Charles** and navigate to the **Contacts** area. Search for one of the contacts from your Zeotap audience (e.g., by phone number or External Reference Id) and confirm:
* The contact appears with the **name, phone, and email** you mapped.
* The **tags** you sent are attached to the contact.
* The **custom properties** you sent appear with the correct values.
Navigate to **Segments & Lists** in Hello Charles and create a new segment. Filter by the tag or custom property you used to mark this audience — for example, `Contact's custom property → Zeotap Audience Name contains `. Confirm the contact count matches (or closely matches) the audience size in Zeotap.
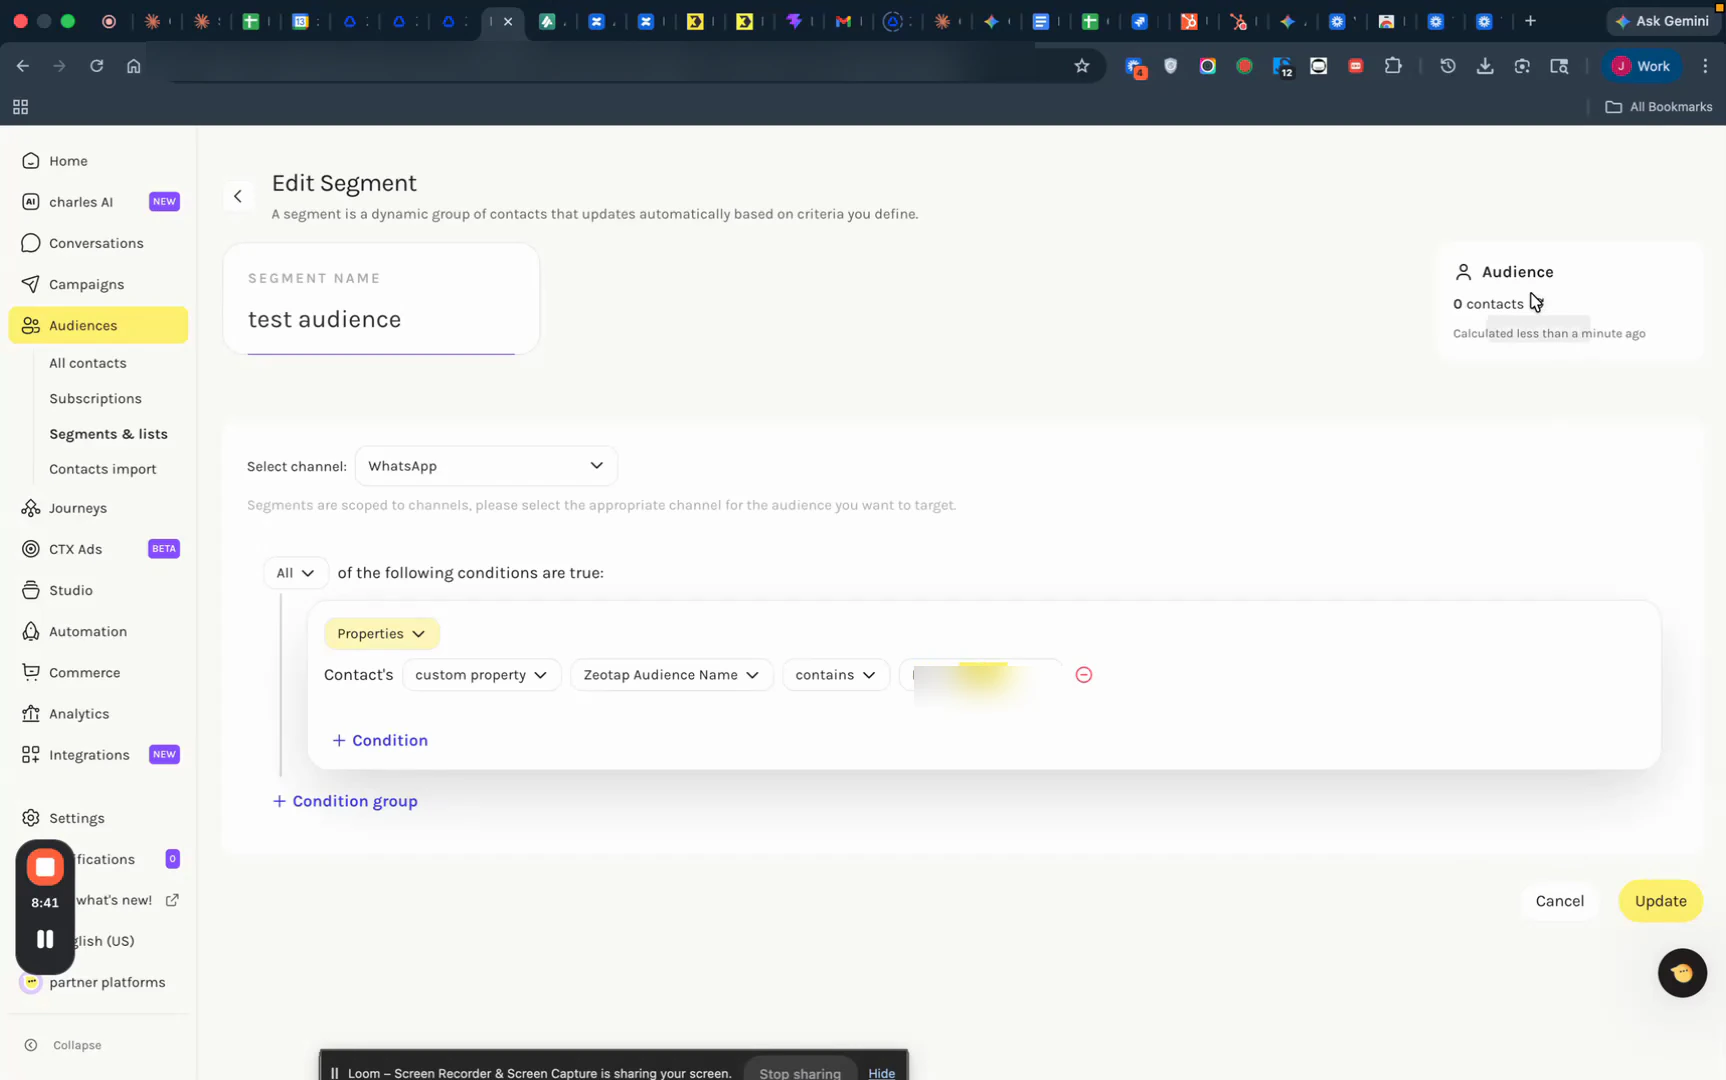 A successful integration looks like this: contacts appear in Hello Charles with the correct profile data, tags, and custom properties — and you can rebuild the original Zeotap audience as a Hello Charles segment.
## Important Notes and Limitations
**Closed beta.** The Hello Charles Batched Contacts API is in closed beta. You must have your Hello Charles success manager approve API access before this integration will work.
**Phone number formatting is the most common cause of sync failures.** Phone numbers must follow international format:
* Start with a plus sign (`+`).
* Include the **country code**.
* Follow with the local number, with **no spaces, dashes, parentheses, or other special characters**.
* Example: `+15551234567`.
If a phone number is malformed, the upsert will fail for that contact.
**Email validation is lighter.** Hello Charles is primarily used for WhatsApp activation, so email addresses are less strictly validated than phone numbers. They are still stored on the contact, but malformed emails are less likely to cause a sync failure.
**Tags must exist in Hello Charles before they are sent.** If you map a tag value that does not yet exist as a tag in **Settings → Manage Tags**, Hello Charles will not ingest it. Pre-create every tag you plan to send.
**Custom property keys must match technical names exactly.** When you create a custom property in Hello Charles, it has a display name *and* a technical name (the internal key). Use the **technical name** in your Zeotap mapping — not the display name.
**Batch size.** Each request to Hello Charles supports up to **1,000 contacts**. For audiences larger than 1,000, Zeotap automatically splits the payload into multiple sequential requests.
**Upsert semantics.** Existing contacts are matched on **External Reference Id** and updated in place. If you want to add tags to contacts that already exist in Hello Charles, you can map just the External Reference Id and Tags — phone, email, and name are not required.
**Closed-beta endpoints may change.** Because the API is in closed beta, behaviours such as rate limits, field semantics, or response shapes may evolve. Confirm with your Hello Charles success manager if you see unexpected results.
**Keep your API Key private.** This key authenticates every request to your Hello Charles workspace. Never expose it in client-side code, public repositories, or shared documents.
## Support
If you run into any issues during setup, please reach out to your Zeotap account manager or contact the Zeotap support team. For Hello Charles-specific questions (API access, tag setup, custom properties), contact your Hello Charles success manager.
A successful integration looks like this: contacts appear in Hello Charles with the correct profile data, tags, and custom properties — and you can rebuild the original Zeotap audience as a Hello Charles segment.
## Important Notes and Limitations
**Closed beta.** The Hello Charles Batched Contacts API is in closed beta. You must have your Hello Charles success manager approve API access before this integration will work.
**Phone number formatting is the most common cause of sync failures.** Phone numbers must follow international format:
* Start with a plus sign (`+`).
* Include the **country code**.
* Follow with the local number, with **no spaces, dashes, parentheses, or other special characters**.
* Example: `+15551234567`.
If a phone number is malformed, the upsert will fail for that contact.
**Email validation is lighter.** Hello Charles is primarily used for WhatsApp activation, so email addresses are less strictly validated than phone numbers. They are still stored on the contact, but malformed emails are less likely to cause a sync failure.
**Tags must exist in Hello Charles before they are sent.** If you map a tag value that does not yet exist as a tag in **Settings → Manage Tags**, Hello Charles will not ingest it. Pre-create every tag you plan to send.
**Custom property keys must match technical names exactly.** When you create a custom property in Hello Charles, it has a display name *and* a technical name (the internal key). Use the **technical name** in your Zeotap mapping — not the display name.
**Batch size.** Each request to Hello Charles supports up to **1,000 contacts**. For audiences larger than 1,000, Zeotap automatically splits the payload into multiple sequential requests.
**Upsert semantics.** Existing contacts are matched on **External Reference Id** and updated in place. If you want to add tags to contacts that already exist in Hello Charles, you can map just the External Reference Id and Tags — phone, email, and name are not required.
**Closed-beta endpoints may change.** Because the API is in closed beta, behaviours such as rate limits, field semantics, or response shapes may evolve. Confirm with your Hello Charles success manager if you see unexpected results.
**Keep your API Key private.** This key authenticates every request to your Hello Charles workspace. Never expose it in client-side code, public repositories, or shared documents.
## Support
If you run into any issues during setup, please reach out to your Zeotap account manager or contact the Zeotap support team. For Hello Charles-specific questions (API access, tag setup, custom properties), contact your Hello Charles success manager.