> ## Documentation Index
> Fetch the complete documentation index at: https://docs.zeotap.com/llms.txt
> Use this file to discover all available pages before exploring further.
# Google Pub/Sub
## Overview
Google Pub/Sub is an asynchronous and scalable messaging service that decouples services producing messages from services processing those messages. Pub/Sub is used for streaming analytics and data integration pipelines to ingest and distribute data.
## Prerequisites
Ensure that you have the following details available before starting the integration:
* Project Id
* Topic Id
* Authentication
### Project Id
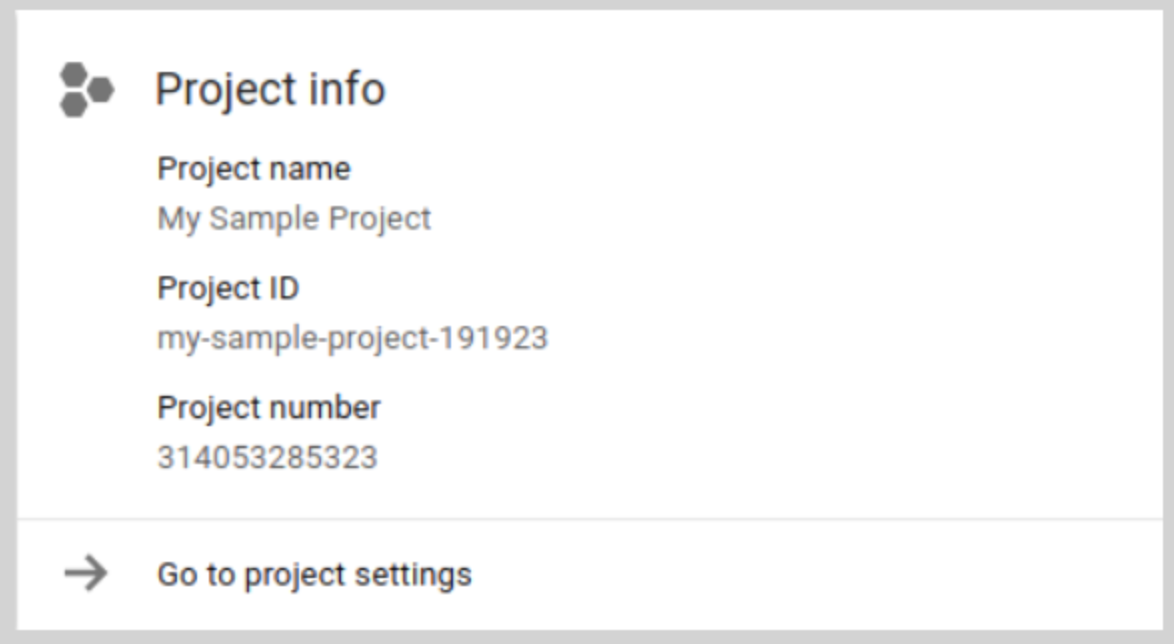
A Project ID is a unique string that differentiates your project from all others on Google Cloud. You can use the [Google Cloud console](https://cloud.google.com/resource-manager/docs/creating-managing-projects?hl=en\&ref_topic=6158848\&visit_id=638040066804795299-2594272843\&rd=1) to generate a Project ID. You can find the Project ID in the Google Cloud console - [Dashboard page](https://console.cloud.google.com/home). In the below example, the Project name is **My Sample Project** and the Project ID is **my-sample-project-191923**.
 ### Topic Id
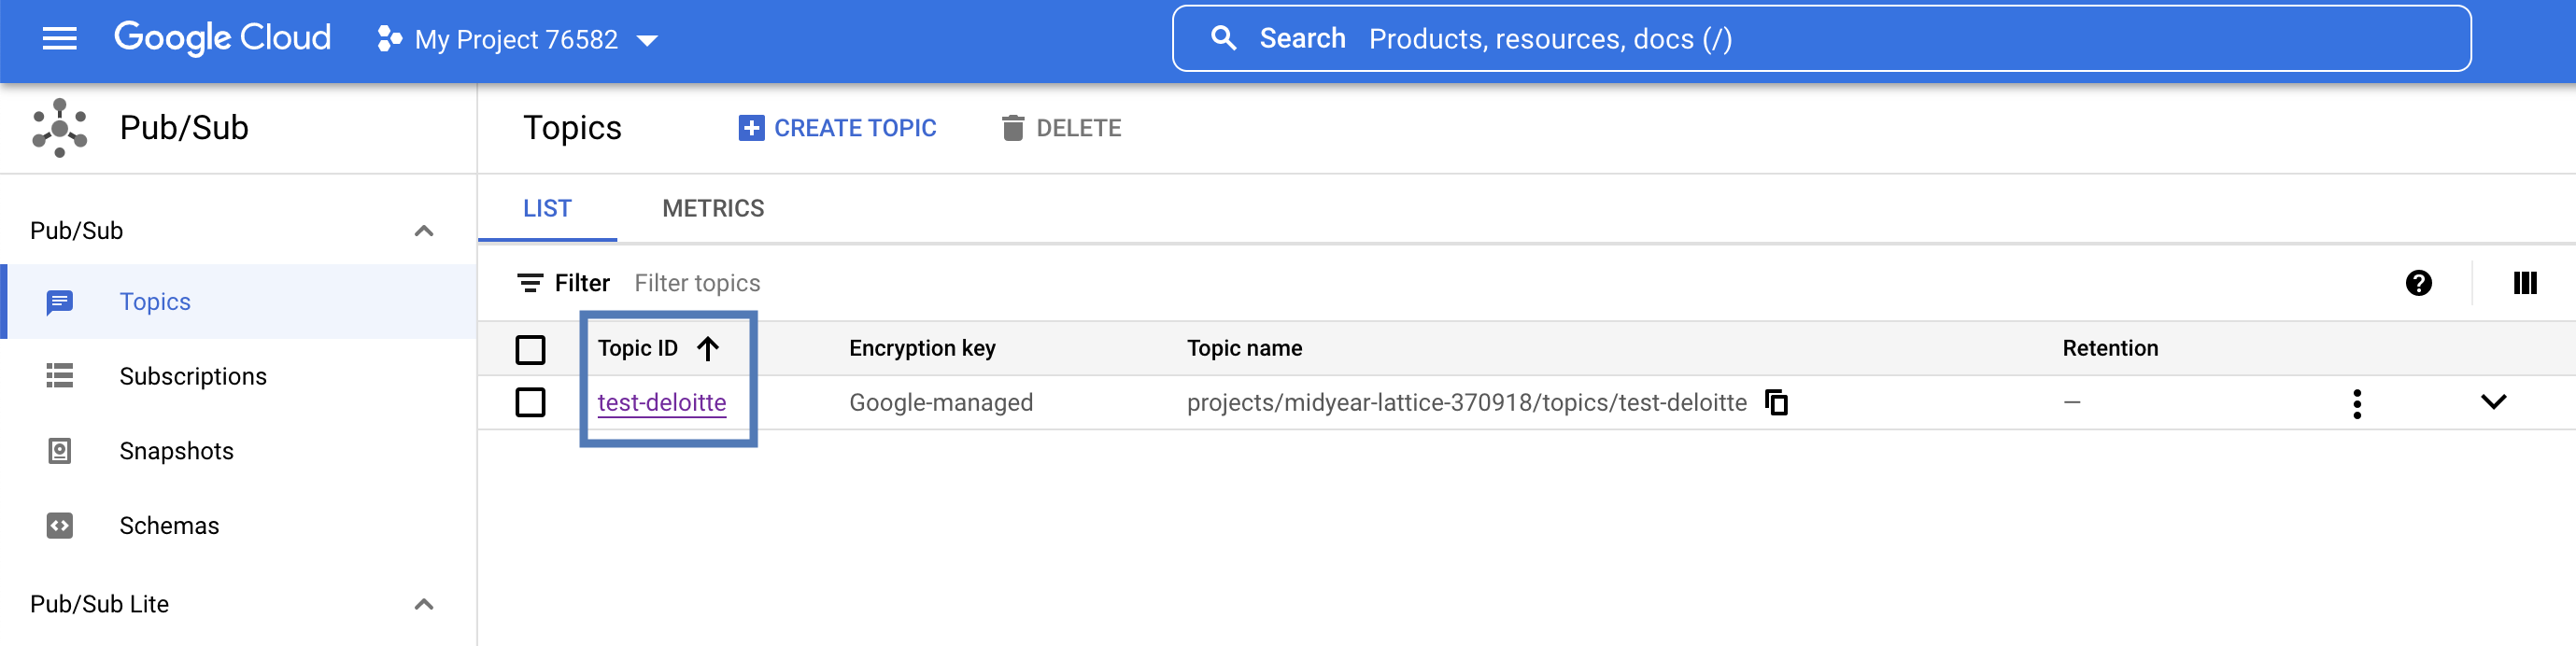
In the Google Cloud console, go to the [**Pub/Sub**](https://console.cloud.google.com/cloudpubsub/topicList?_ga=2.230005471.2138624224.1673155280-188740464.1653481288) page > **Topics**. A list of all the topics created appears. Copy the relevant Topic Id and use it for the destination setup.
### Topic Id
In the Google Cloud console, go to the [**Pub/Sub**](https://console.cloud.google.com/cloudpubsub/topicList?_ga=2.230005471.2138624224.1673155280-188740464.1653481288) page > **Topics**. A list of all the topics created appears. Copy the relevant Topic Id and use it for the destination setup.
 ### Authentication
The authentication method for the Pub/Sub destination can be **Refresh Token** or **Service Account**. Provide the required details based on the authentication method you choose.
#### Refresh Token Authentication
To authenticate using a Refresh Token, you need the following details:
* Client ID
* Client Secret
* Refresh Token
For this integration, if you decide to perform the authentication through the **Refresh Token**, then Zeotap CDP requires the **Client ID**, **Client Secret**, and **Refresh Token** to establish a connection with the Pub/Sub destination where you want to send data. In Google Cloud, these unique credentials can be used to authorise applications or services, such as Pub/Sub, through OAuth 2.0. For detailed steps to generate them, refer to [Google Pub/Sub documentation](https://developers.google.com/google-ads/api/docs/oauth/playground).
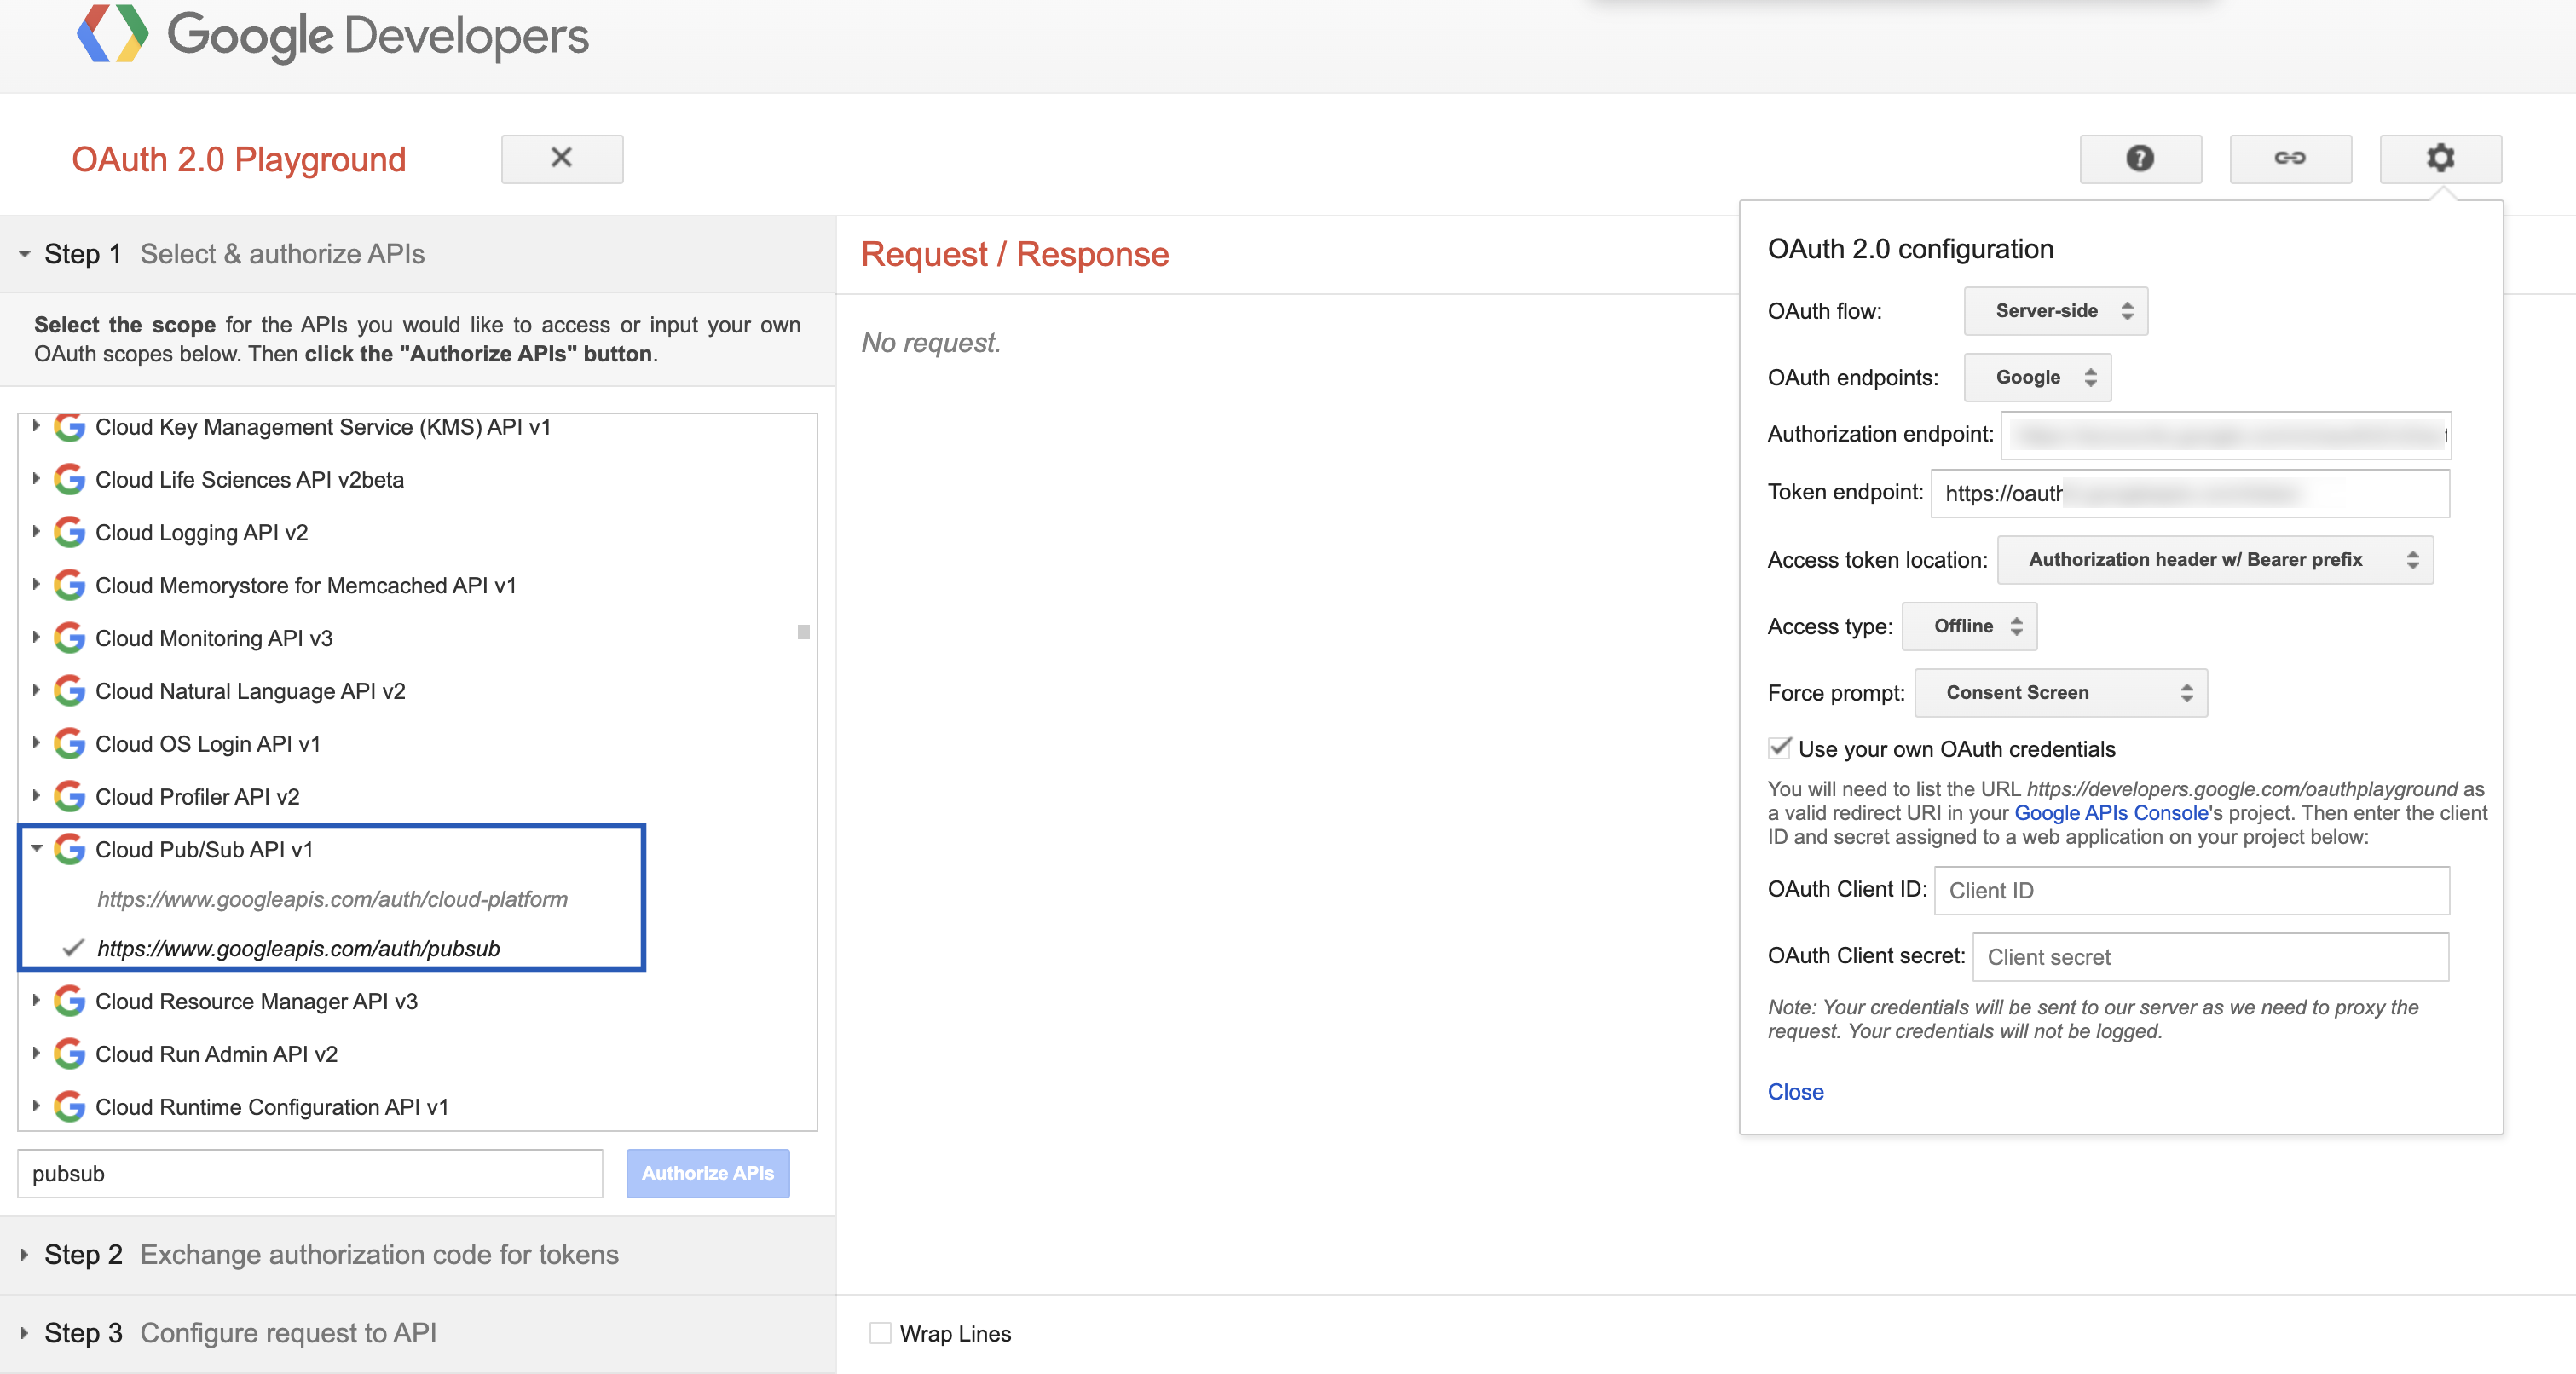
In the [Refresh Token generation steps](https://developers.google.com/google-ads/api/docs/oauth/playground#generate_tokens), add the **Cloud Pub/Sub API v1** scope when specifying API scopes, as shown in the image below.
### Authentication
The authentication method for the Pub/Sub destination can be **Refresh Token** or **Service Account**. Provide the required details based on the authentication method you choose.
#### Refresh Token Authentication
To authenticate using a Refresh Token, you need the following details:
* Client ID
* Client Secret
* Refresh Token
For this integration, if you decide to perform the authentication through the **Refresh Token**, then Zeotap CDP requires the **Client ID**, **Client Secret**, and **Refresh Token** to establish a connection with the Pub/Sub destination where you want to send data. In Google Cloud, these unique credentials can be used to authorise applications or services, such as Pub/Sub, through OAuth 2.0. For detailed steps to generate them, refer to [Google Pub/Sub documentation](https://developers.google.com/google-ads/api/docs/oauth/playground).
In the [Refresh Token generation steps](https://developers.google.com/google-ads/api/docs/oauth/playground#generate_tokens), add the **Cloud Pub/Sub API v1** scope when specifying API scopes, as shown in the image below.
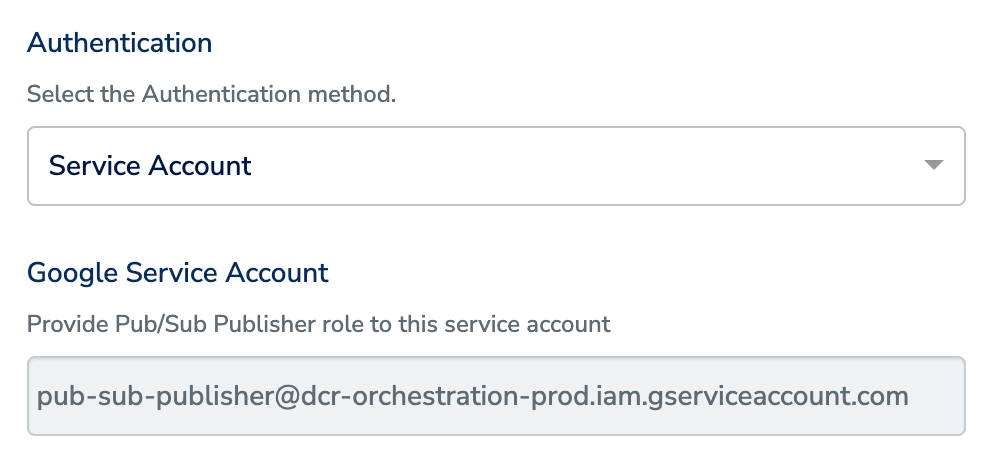
 #### Service Account Authentication
To authenticate using a Service Account, you must assign the **Pub/Sub Publisher** role to the "[pub-sub-publisher@dcr-orchestration-prod.iam.gserviceaccount.com](mailto:pub-sub-publisher@dcr-orchestration-prod.iam.gserviceaccount.com)" service account within Pub/Sub as shown below.
#### Service Account Authentication
To authenticate using a Service Account, you must assign the **Pub/Sub Publisher** role to the "[pub-sub-publisher@dcr-orchestration-prod.iam.gserviceaccount.com](mailto:pub-sub-publisher@dcr-orchestration-prod.iam.gserviceaccount.com)" service account within Pub/Sub as shown below.
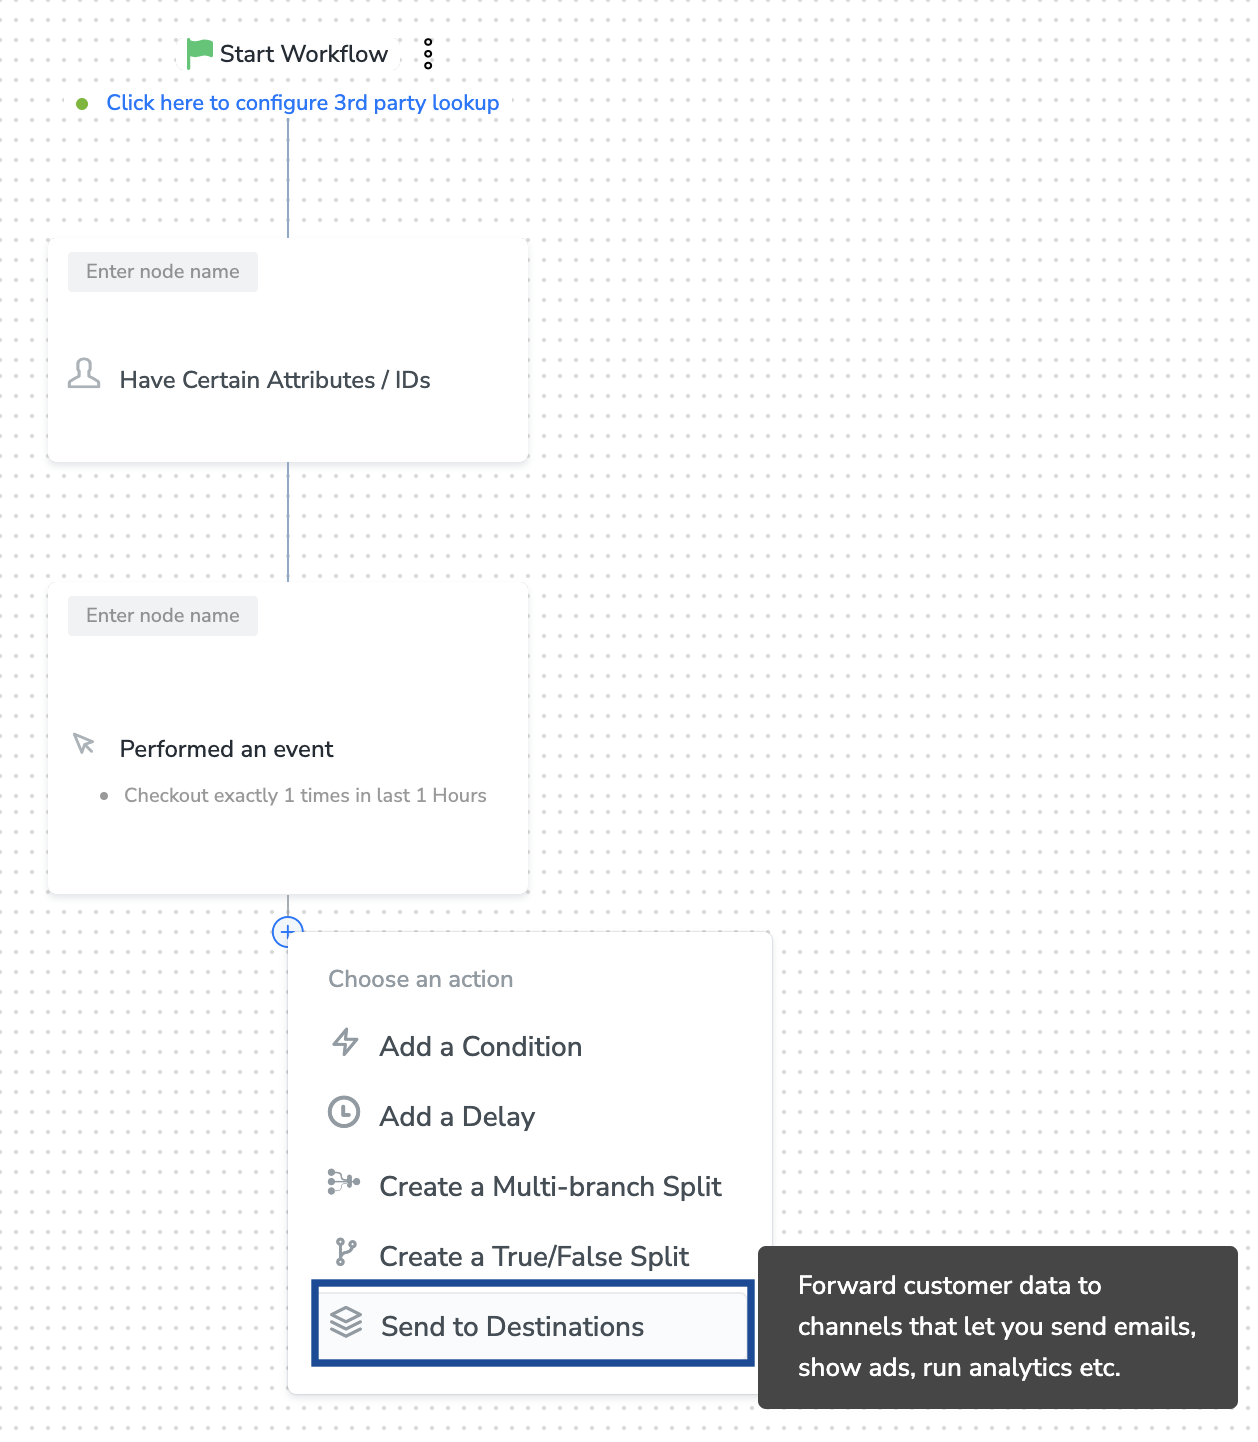
 ## Destination Setup
Once you have taken care of the prerequisites mentioned above, you can proceed to [creating workflow in Journeys](https://docs.zeotap.com/articles/orchestrate-customer/create-a-workflow) (Zeotap CDP). After you have applied filters or added conditions for your users in Journeys as mentioned in [Create a Workflow](https://docs.zeotap.com/articles/orchestrate-customer/create-a-workflow), you can activate them in Google Pub/Sub in the **Send to Destinations** node as shown below.
## Destination Setup
Once you have taken care of the prerequisites mentioned above, you can proceed to [creating workflow in Journeys](https://docs.zeotap.com/articles/orchestrate-customer/create-a-workflow) (Zeotap CDP). After you have applied filters or added conditions for your users in Journeys as mentioned in [Create a Workflow](https://docs.zeotap.com/articles/orchestrate-customer/create-a-workflow), you can activate them in Google Pub/Sub in the **Send to Destinations** node as shown below.
 A new window appears, where you can set up your destination. You can use an already existing destination from the list of available Destinations or create a new one by clicking **+ Add New Destination**.
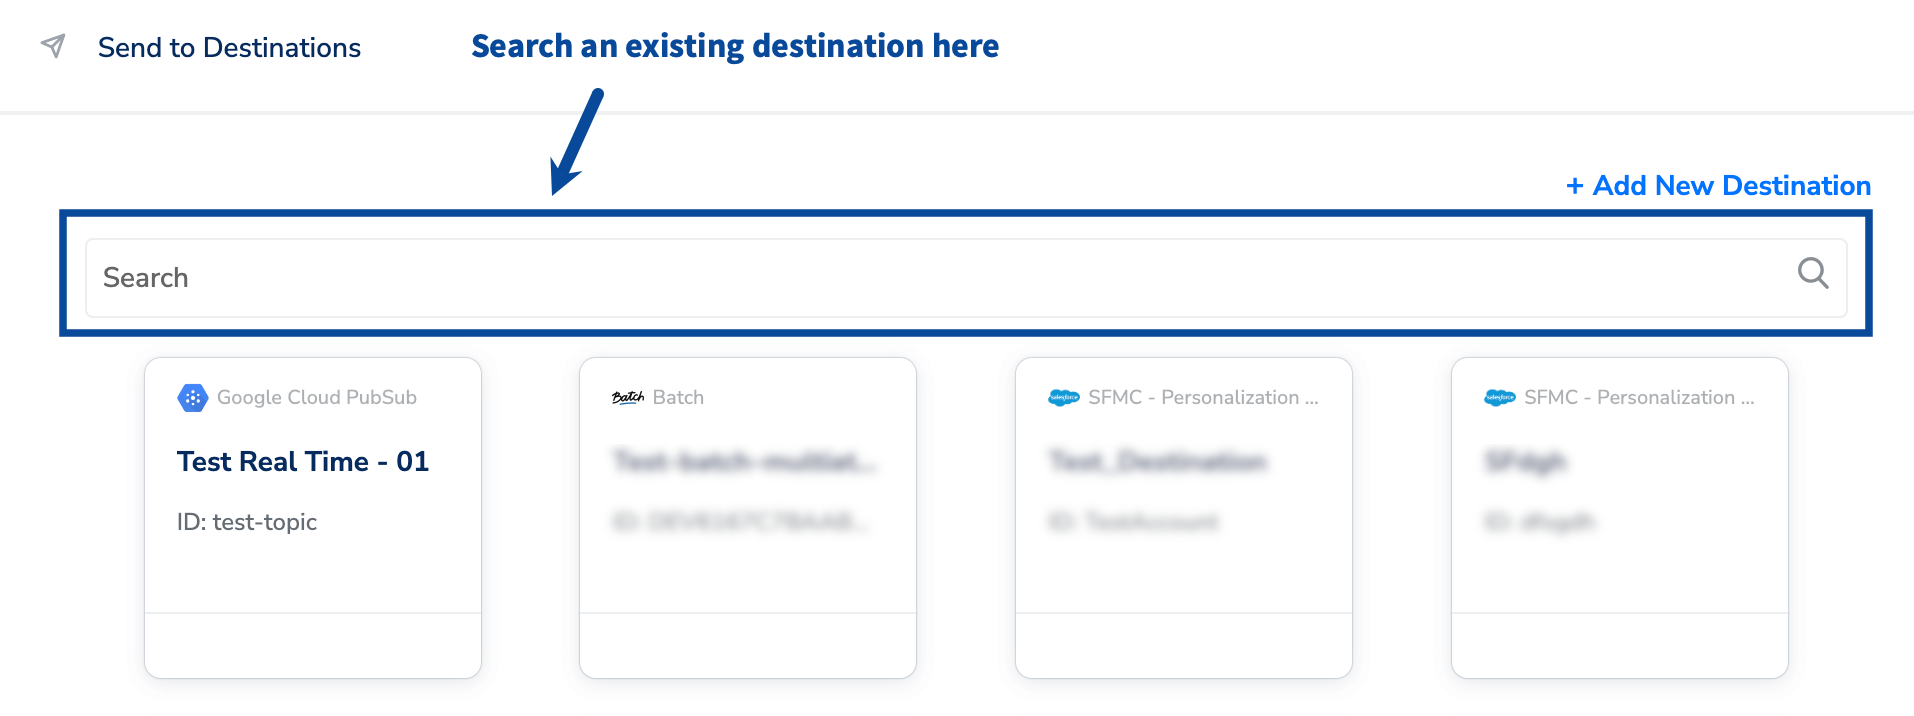 **Note:**
To use an existing destination for activation in Journeys, click [here](/articles/integrate-customer/google-pub-sub#h2__290574186).
### Add New Destination
Perform the following steps to add a new destination:
Click **Add New Destination.**
Search for **Google Pub/Sub.**
Click **Google Pub/Sub** and enter a name for the Destination.
Enter the **Instance**, which is an internal field for the Destination.
Provide the **Project Id** and **Topic Id** obtained from your Google Cloud. [Learn more](/articles/integrate-customer/google-pub-sub#h4_2023180516)
**Note:**
To use an existing destination for activation in Journeys, click [here](/articles/integrate-customer/google-pub-sub#h2__290574186).
### Add New Destination
Perform the following steps to add a new destination:
Click **Add New Destination.**
Search for **Google Pub/Sub.**
Click **Google Pub/Sub** and enter a name for the Destination.
Enter the **Instance**, which is an internal field for the Destination.
Provide the **Project Id** and **Topic Id** obtained from your Google Cloud. [Learn more](/articles/integrate-customer/google-pub-sub#h4_2023180516)
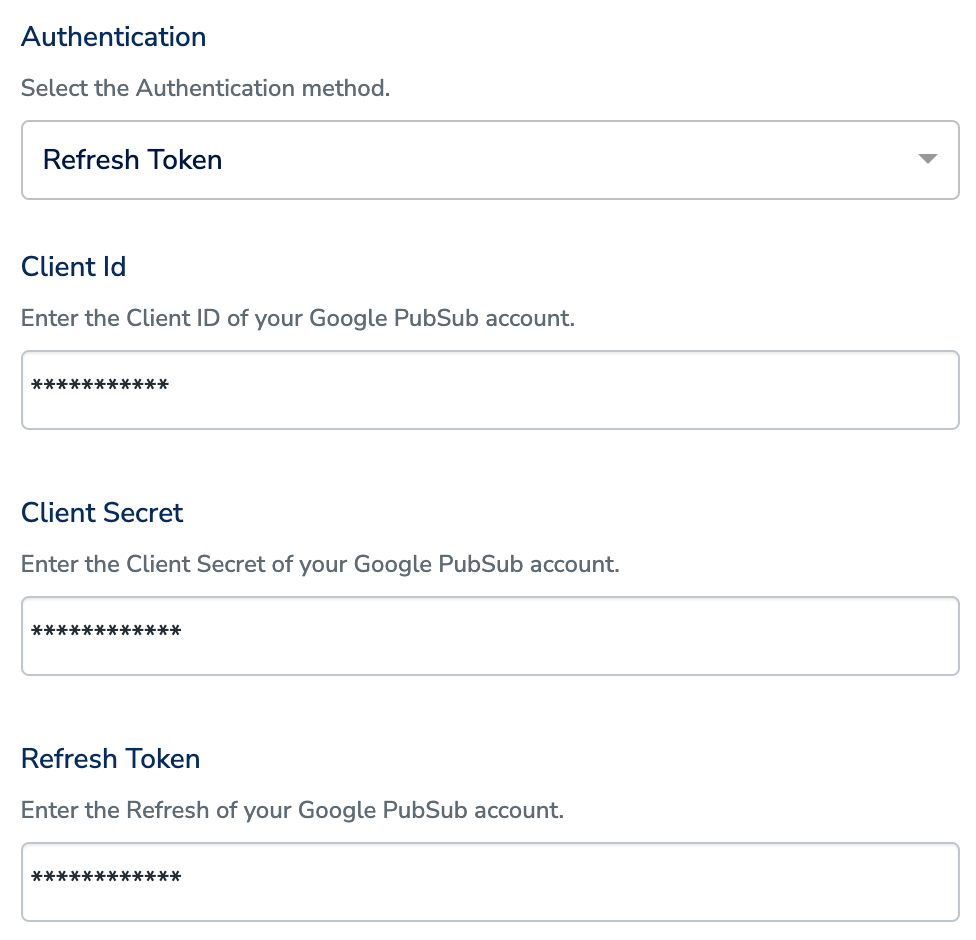
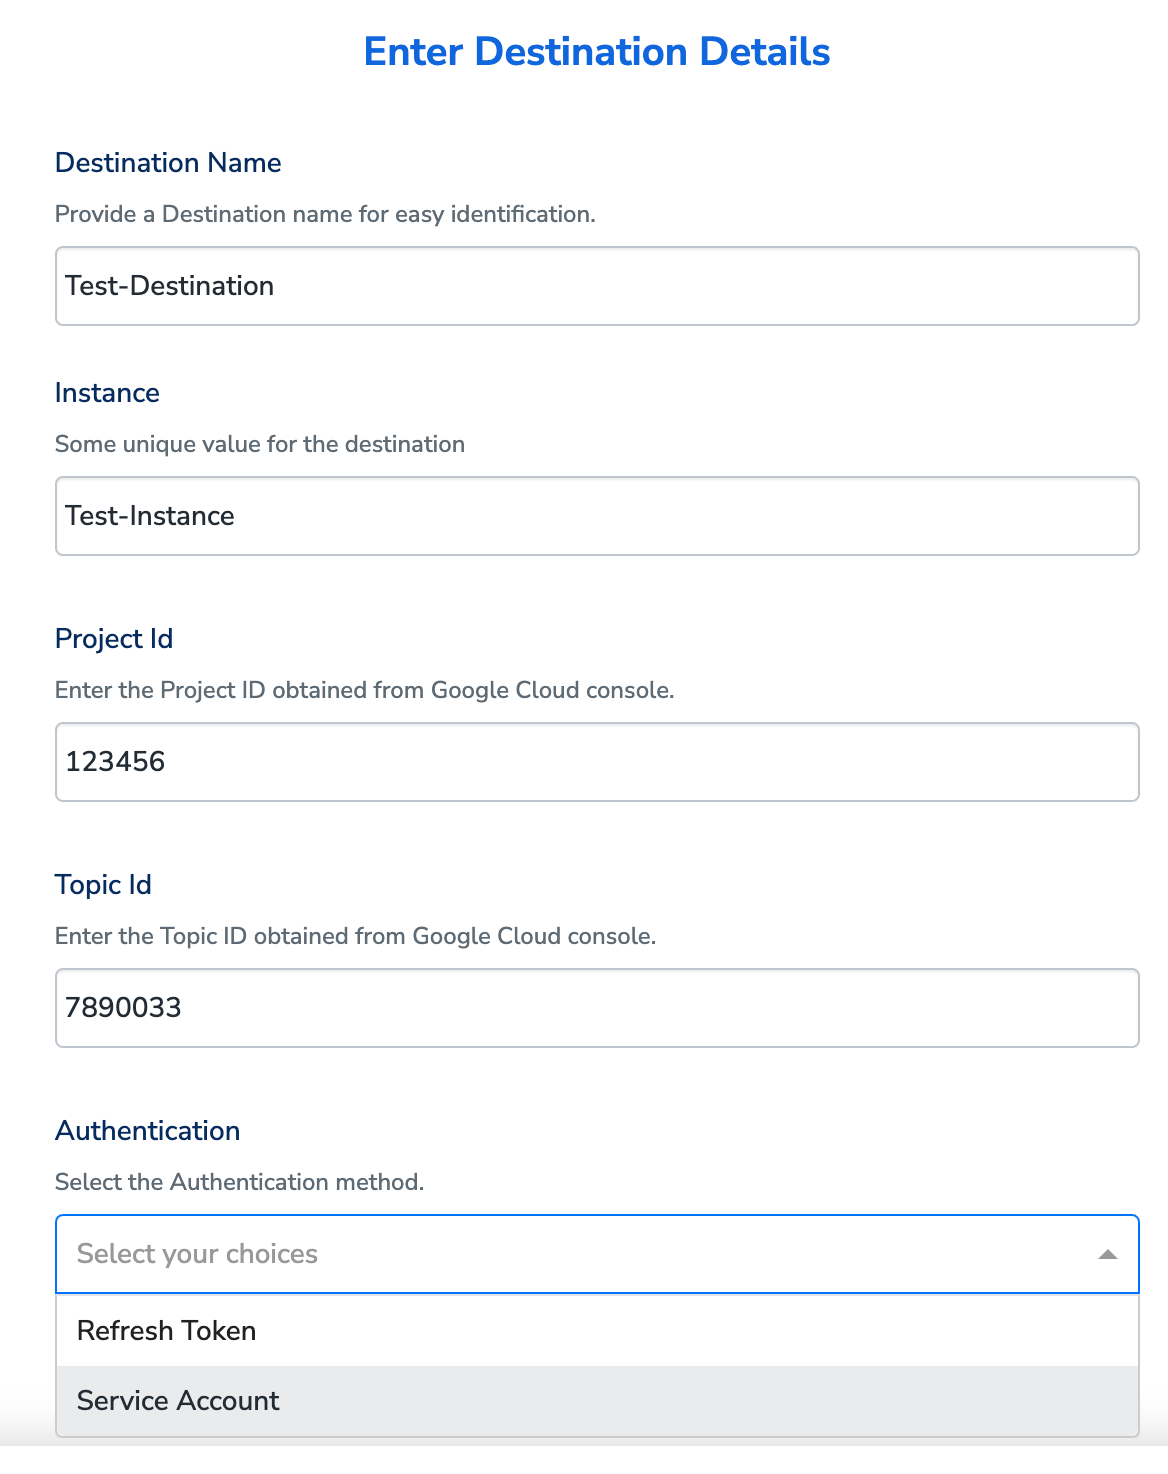 Choose either **Refresh Token** or **Service Account** as your Authentication method, based on your requirement.
a. If you choose **Refresh Token**, then provide the **Client Id**, **Client Secret** and **Refresh Token** details in the respective fields. [Learn more](/articles/integrate-customer/google-pub-sub#h4__107804704)
Choose either **Refresh Token** or **Service Account** as your Authentication method, based on your requirement.
a. If you choose **Refresh Token**, then provide the **Client Id**, **Client Secret** and **Refresh Token** details in the respective fields. [Learn more](/articles/integrate-customer/google-pub-sub#h4__107804704)
 b. If you choose **Service Account**, then the following **Google** **Service Account** is displayed. Ensure to provide "**Pub/Sub Publisher**" role to this service account within Pub/Sub. [Learn more](/articles/integrate-customer/google-pub-sub#h3__1953899986)
**Service Account:** [pub-sub-publisher@dcr-orchestration-prod.iam.gserviceaccount.com](mailto:pub-sub-publisher@dcr-orchestration-prod.iam.gserviceaccount.com)
b. If you choose **Service Account**, then the following **Google** **Service Account** is displayed. Ensure to provide "**Pub/Sub Publisher**" role to this service account within Pub/Sub. [Learn more](/articles/integrate-customer/google-pub-sub#h3__1953899986)
**Service Account:** [pub-sub-publisher@dcr-orchestration-prod.iam.gserviceaccount.com](mailto:pub-sub-publisher@dcr-orchestration-prod.iam.gserviceaccount.com)
 In the mapping screen that appears, under **Choose your Action**, select **Send identifiers to Google Cloud PubSub in realtime** as the action for sending data from the workflow created in Journeys.
Under **Map the Fields**, use **+ Add Mapping Field** to add any custom field that you wish to send to Google Pub/Sub. Ensure that you map at least one attribute. Otherwise, the data does not flow to the Pub/Sub destination.
In the mapping screen that appears, under **Choose your Action**, select **Send identifiers to Google Cloud PubSub in realtime** as the action for sending data from the workflow created in Journeys.
Under **Map the Fields**, use **+ Add Mapping Field** to add any custom field that you wish to send to Google Pub/Sub. Ensure that you map at least one attribute. Otherwise, the data does not flow to the Pub/Sub destination.
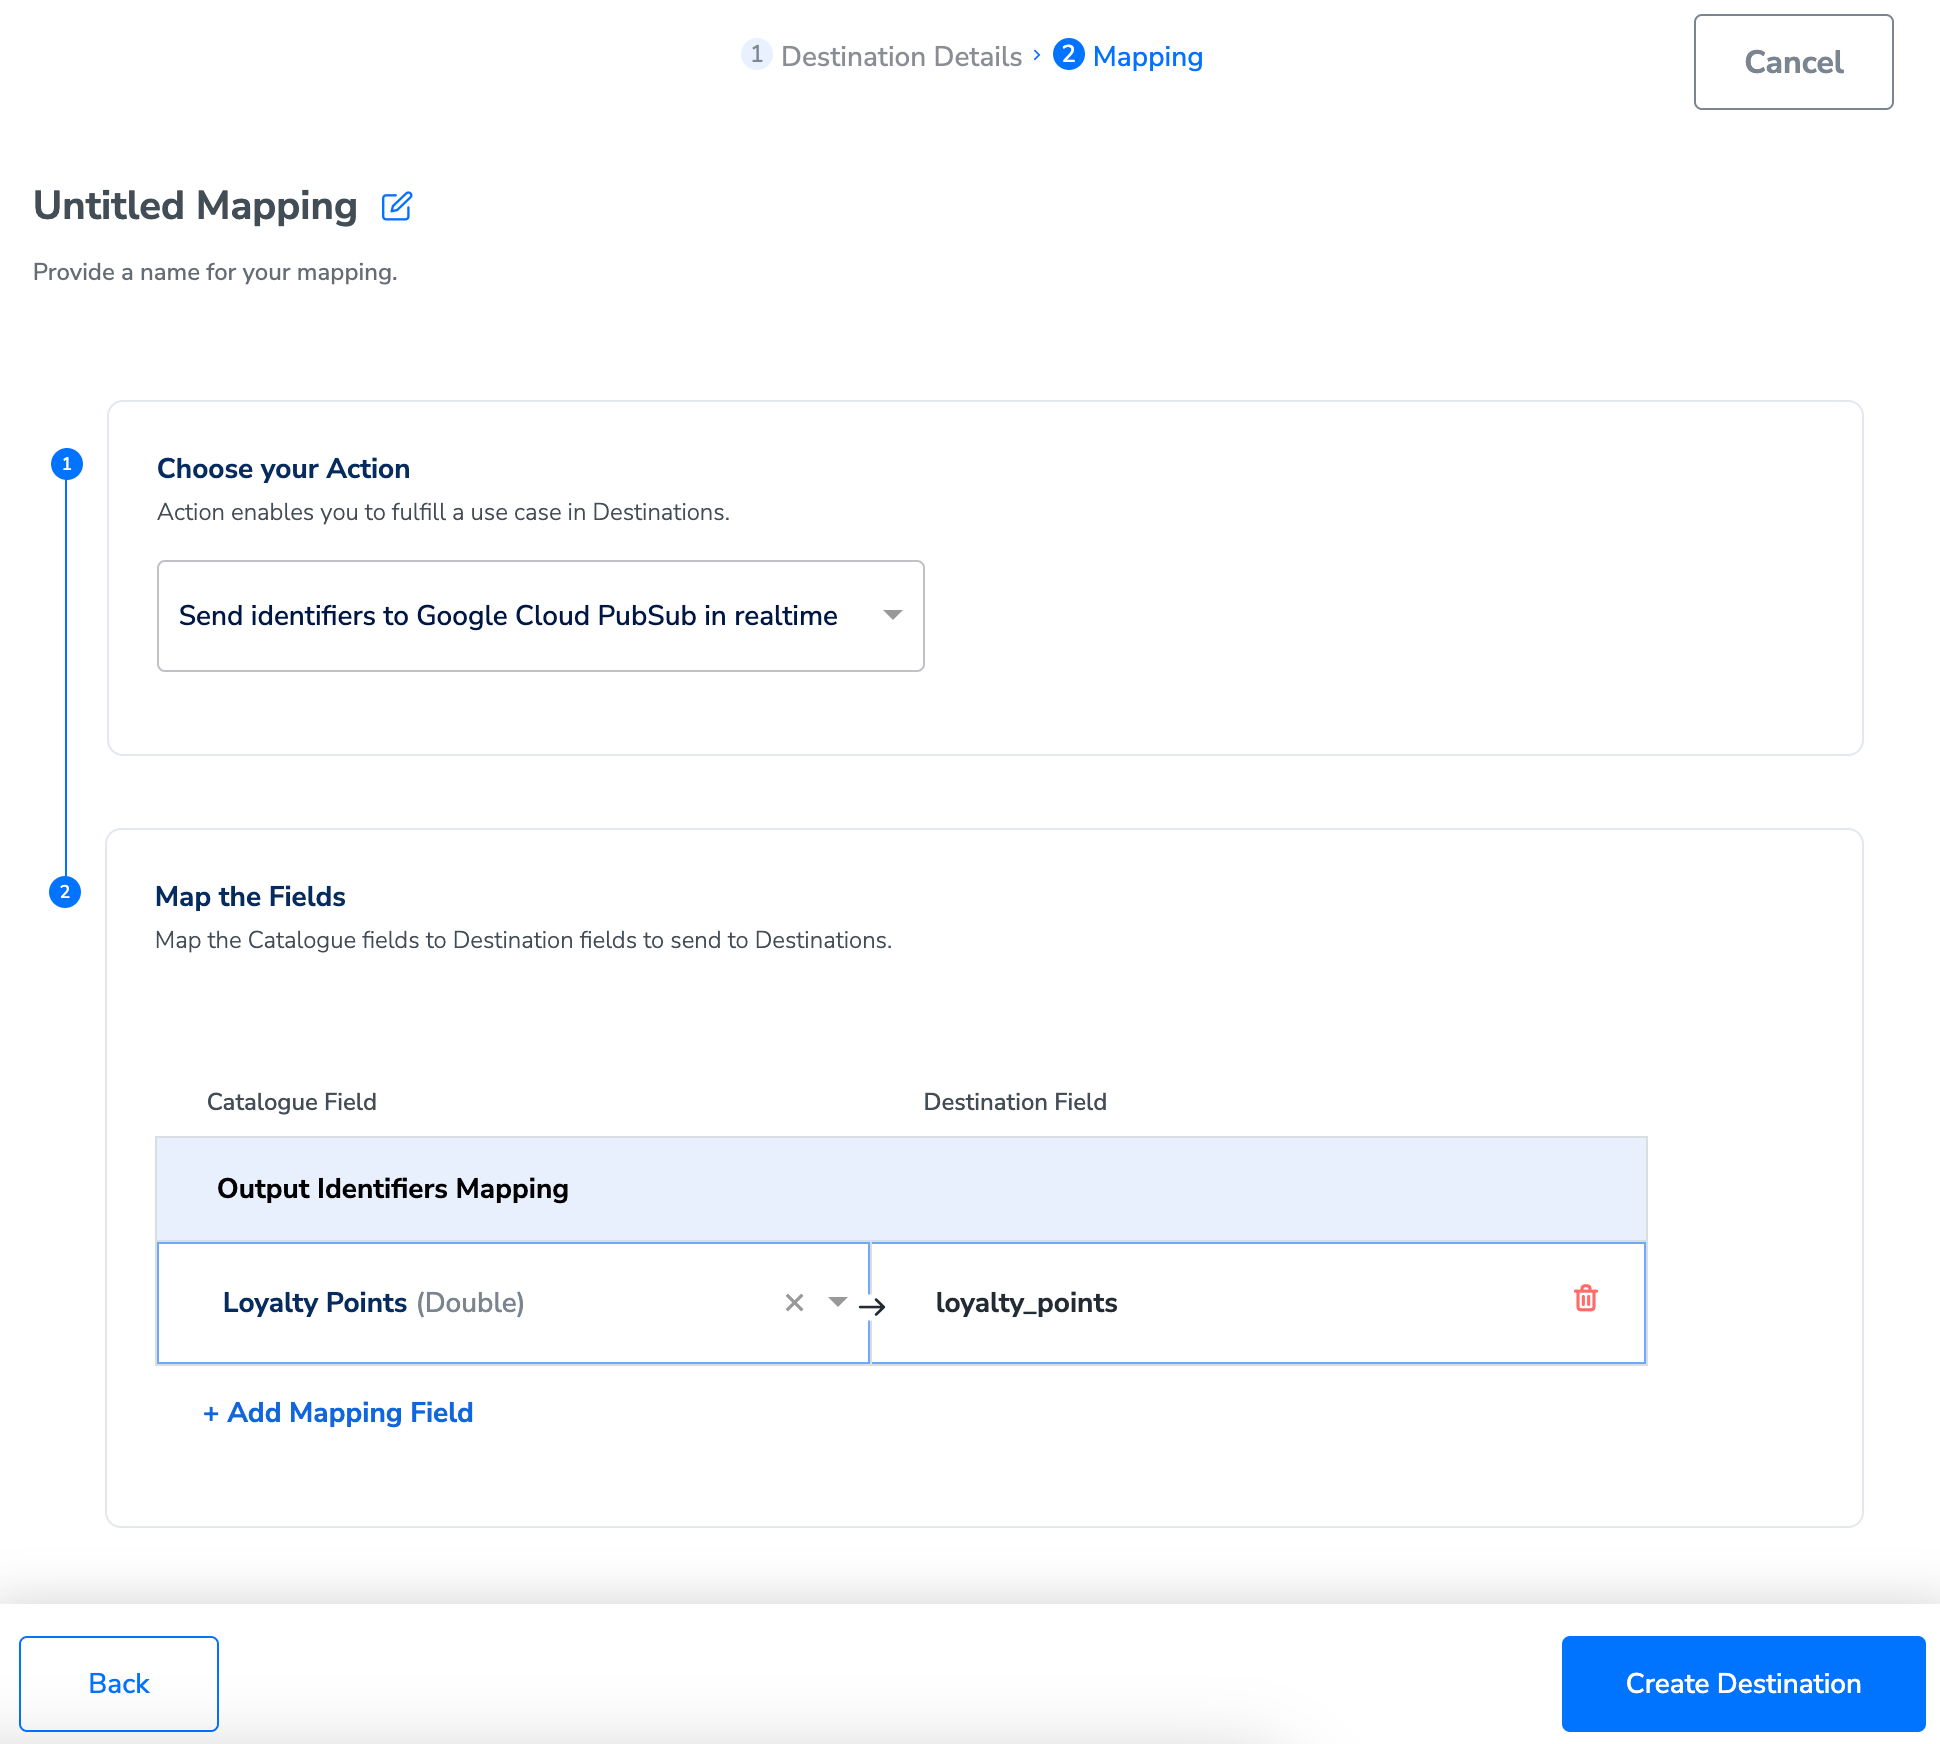 Once the mapping is complete, click **Create Destination**. The destination is created and made available for activation on Journeys as shown below.
 ## Activate the Destination on Journeys
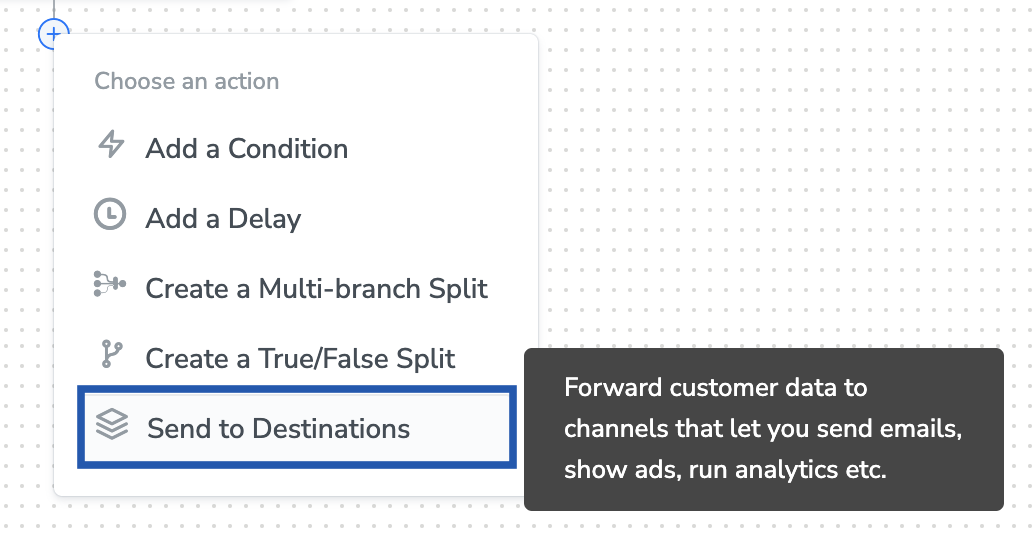
After creating a destination, next, you need to link it in the **Send to Destination** node within the workflow, as explained below.
In the workflow, click **+** and choose **Send to Destinations**.
## Activate the Destination on Journeys
After creating a destination, next, you need to link it in the **Send to Destination** node within the workflow, as explained below.
In the workflow, click **+** and choose **Send to Destinations**.
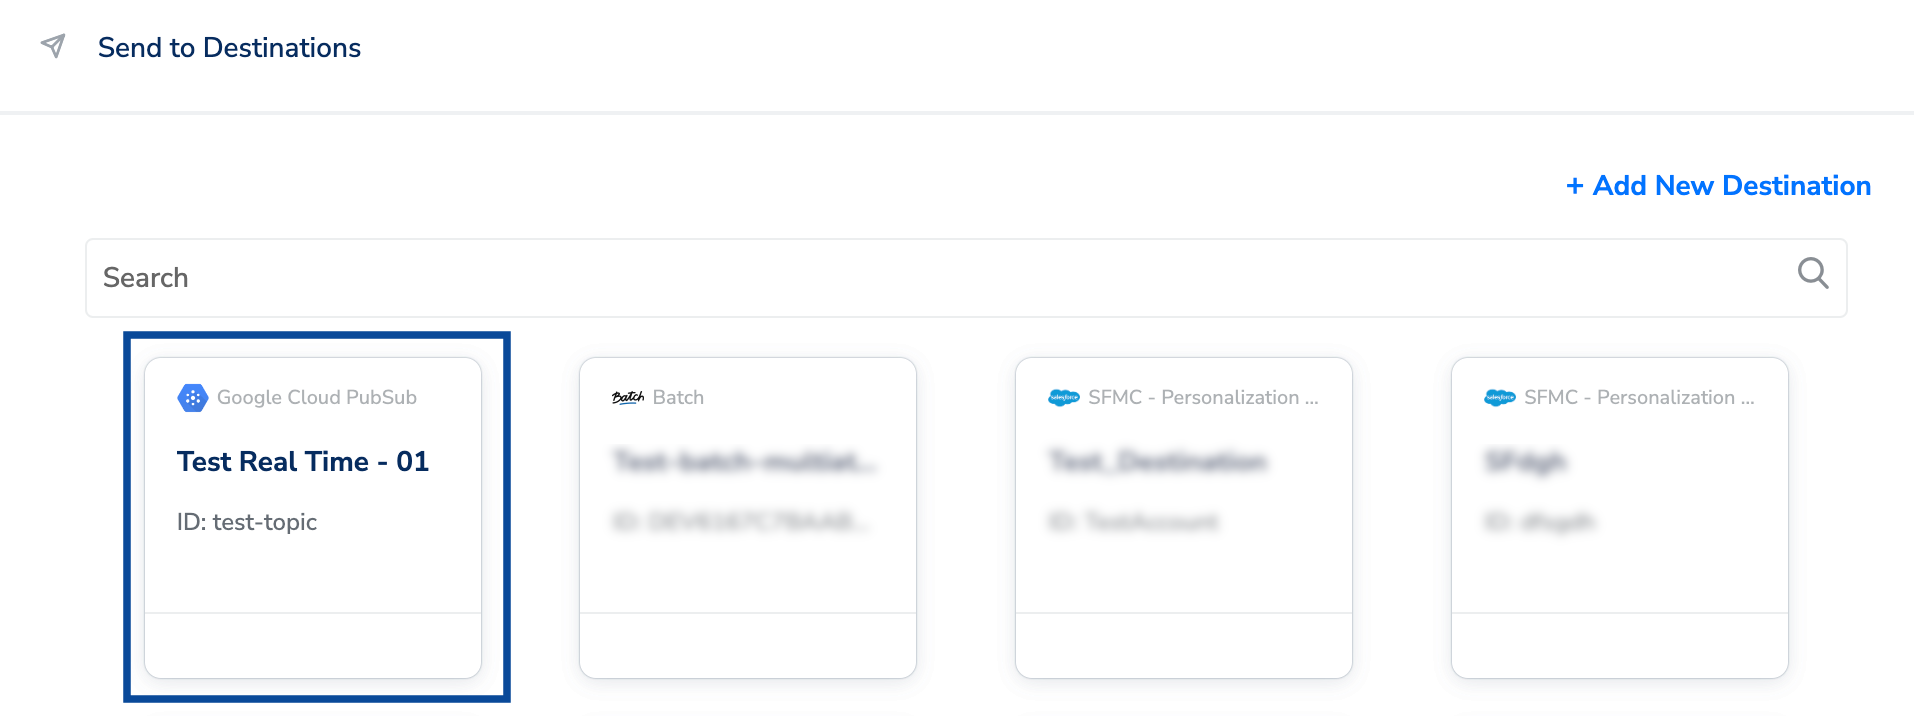
 Choose the destination from the list of available destinations by using the search feature.
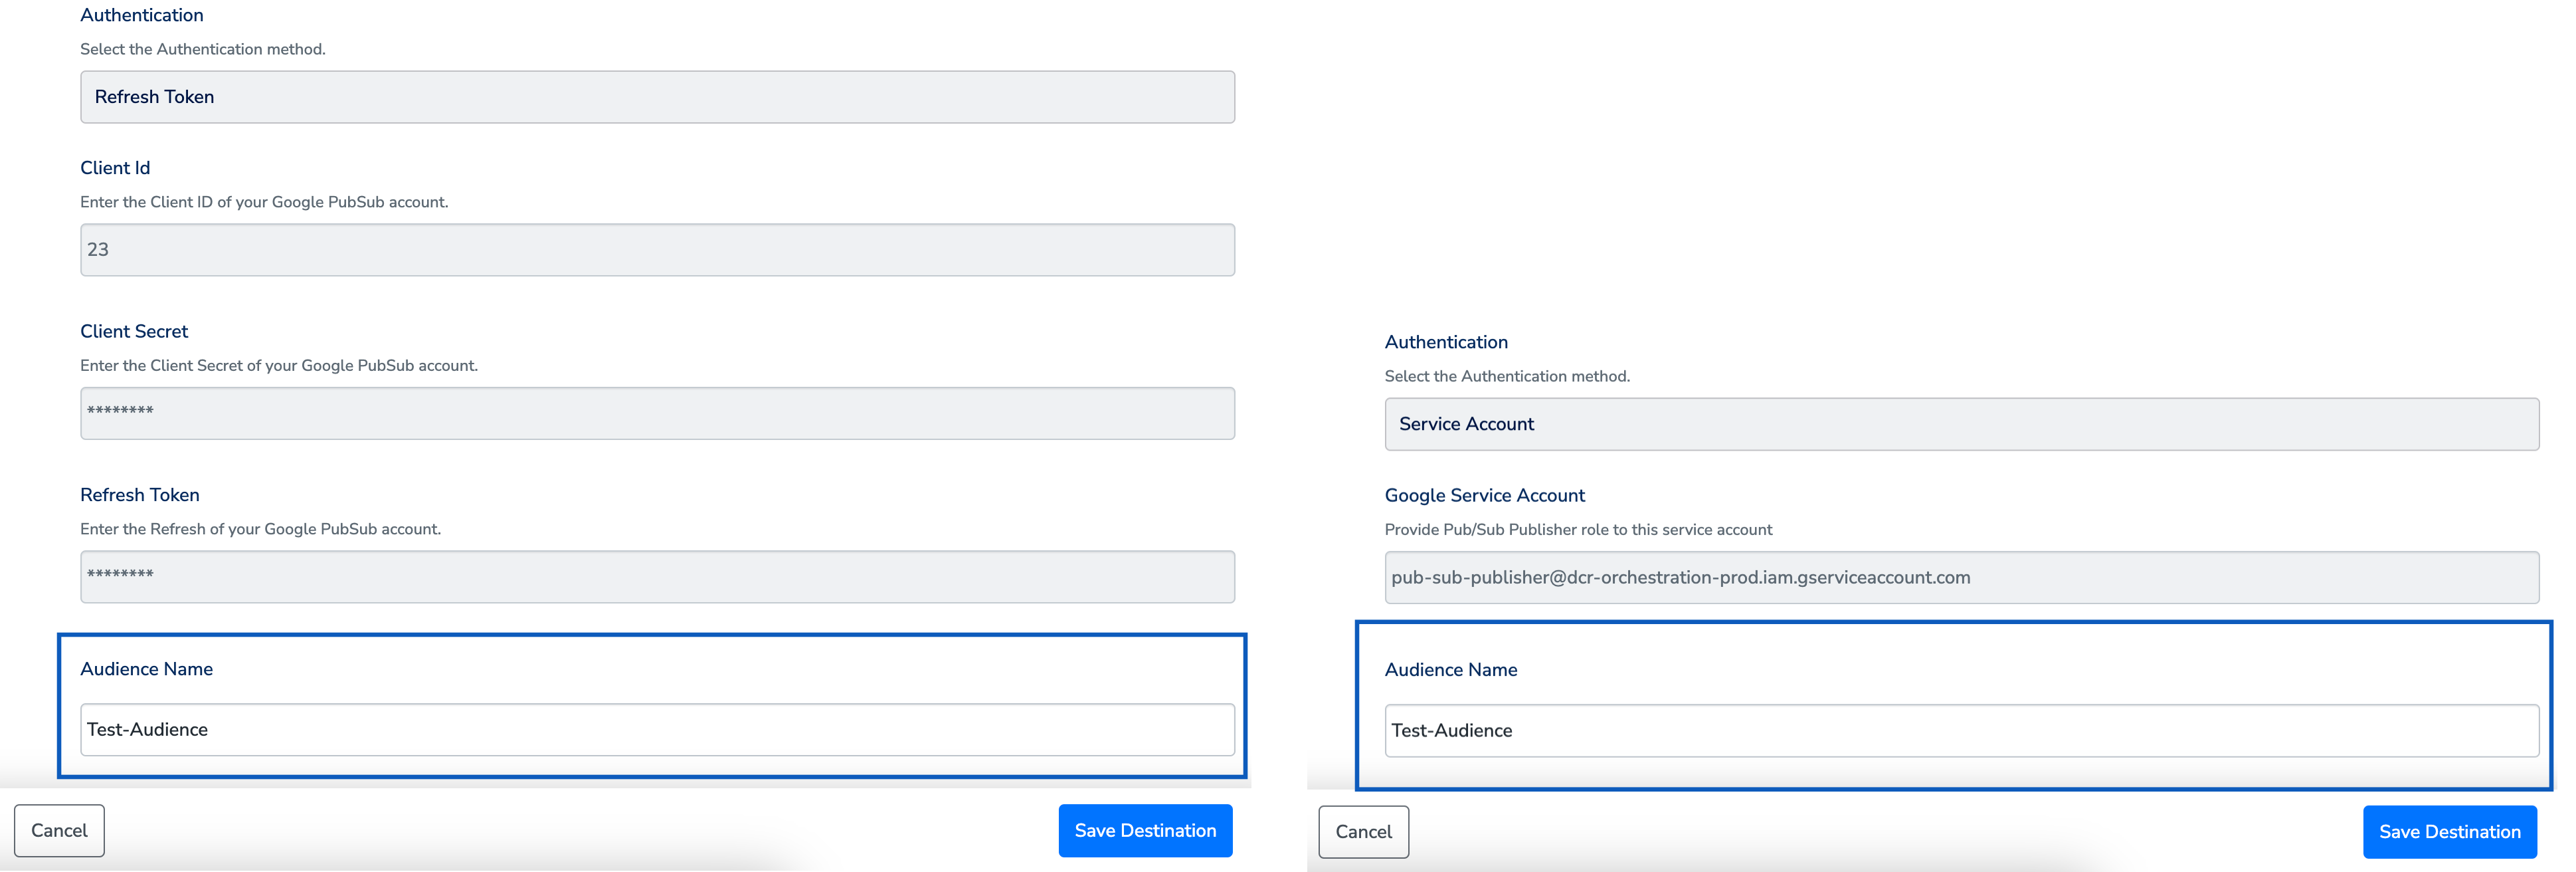
Under the **Destination Details** tab, based on the authentication type you have chosen, the **Instance,** **Project Id, Topic Id, Authentication (Refresh Token/Service Account) and other fields** as shown in the image below automatically populates based on the values that you have entered while creating the destination. However, you need to provide an **Audience Name** to save the Destination.
Choose the destination from the list of available destinations by using the search feature.
Under the **Destination Details** tab, based on the authentication type you have chosen, the **Instance,** **Project Id, Topic Id, Authentication (Refresh Token/Service Account) and other fields** as shown in the image below automatically populates based on the values that you have entered while creating the destination. However, you need to provide an **Audience Name** to save the Destination.
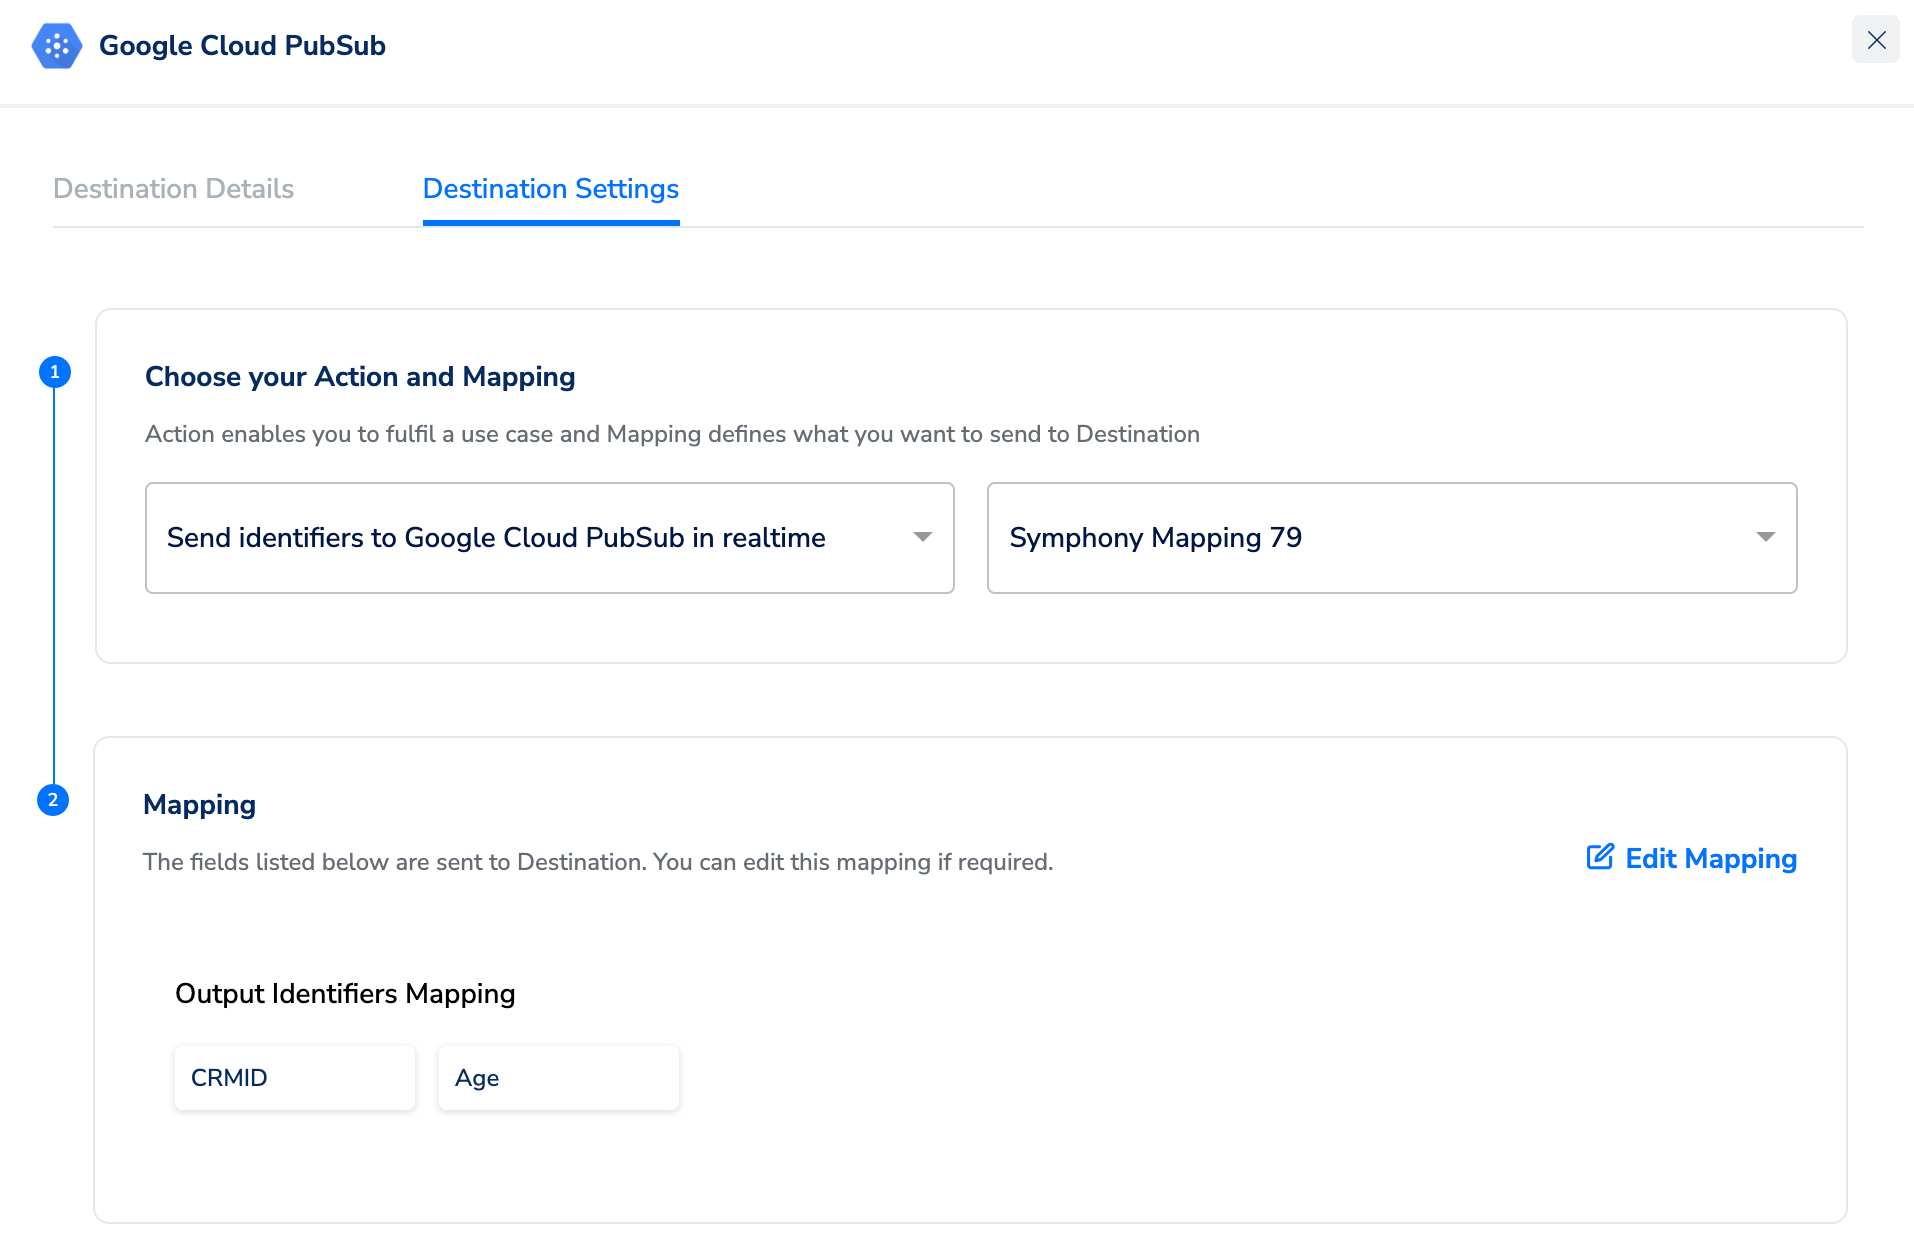
 Under the **Destination Settings** tab, choose the action and mapping as per your requirement.
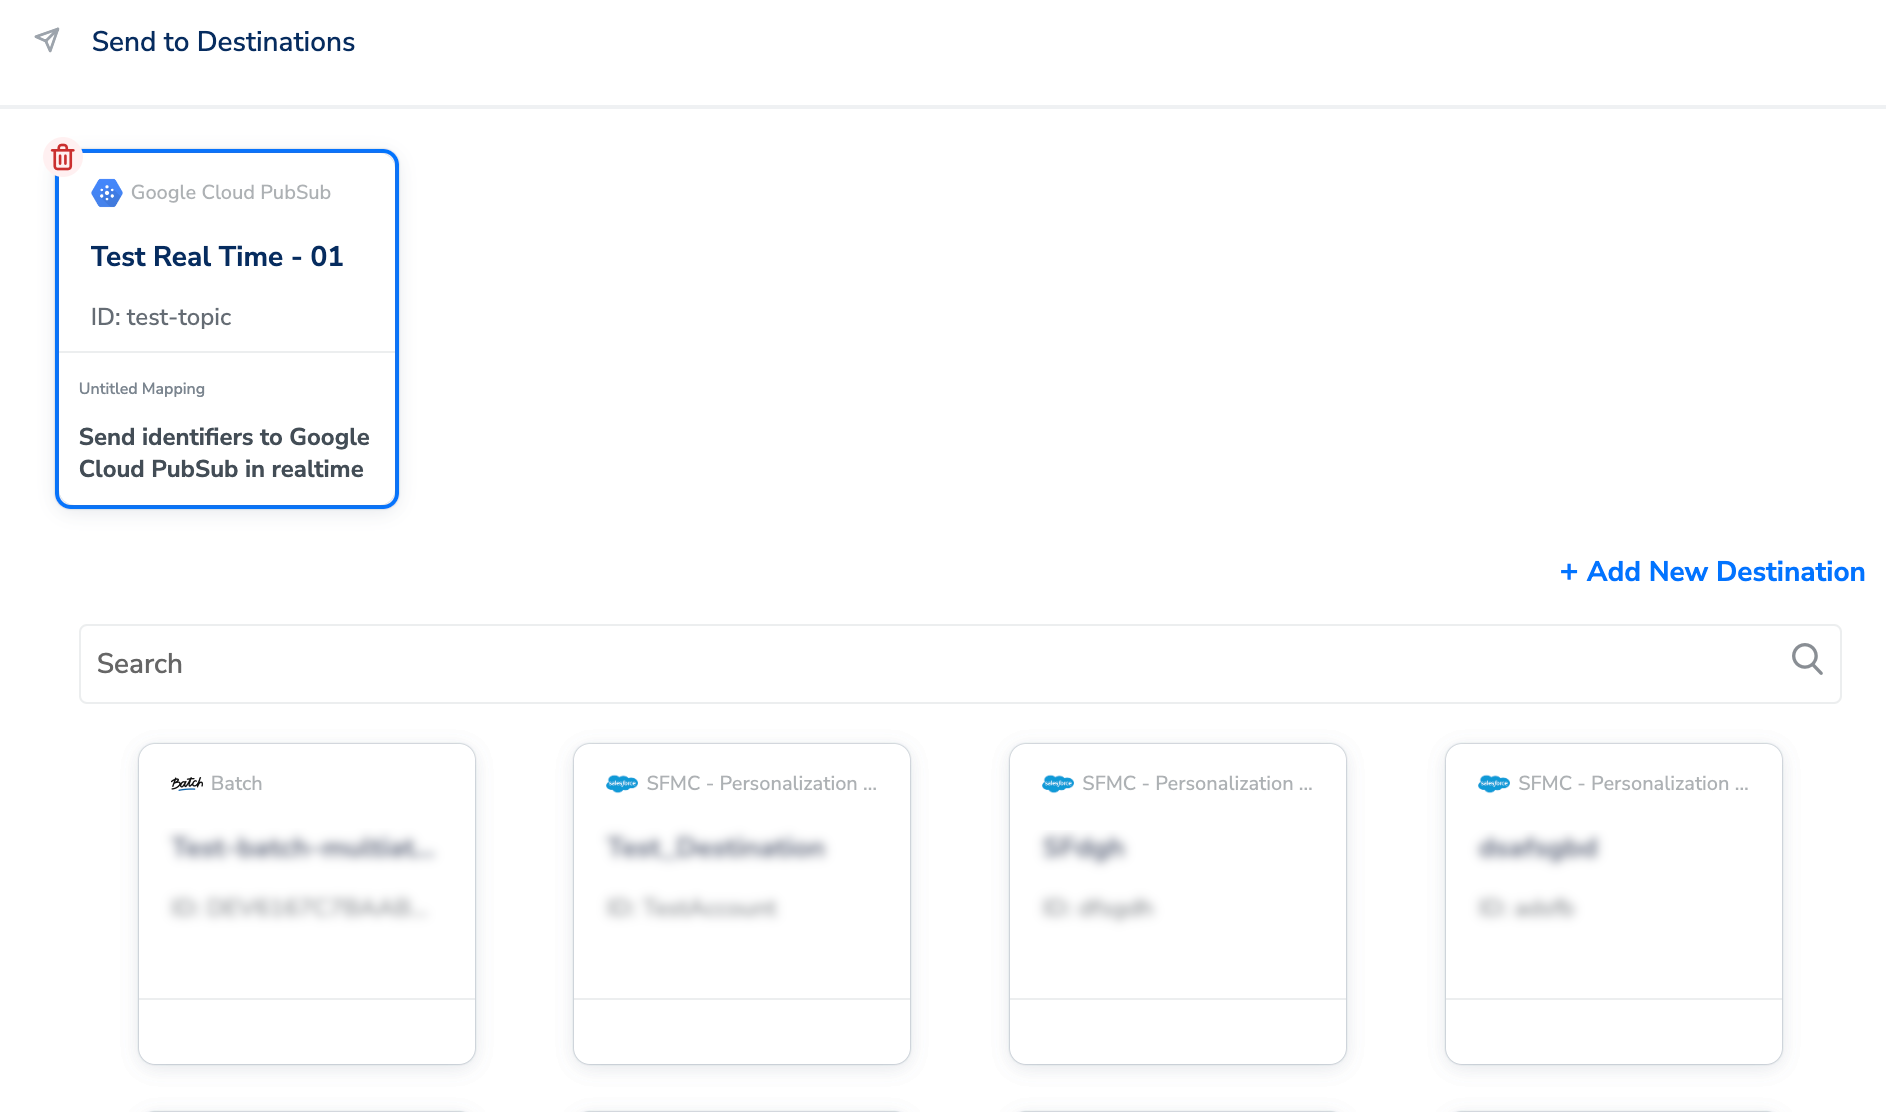
 Upon clicking **Save Destination**. The destination is attached as shown in the image below.
 Click **Add Destinations** at the bottom right corner of the screen. Note that you can also add multiple destinations at this step if needed.
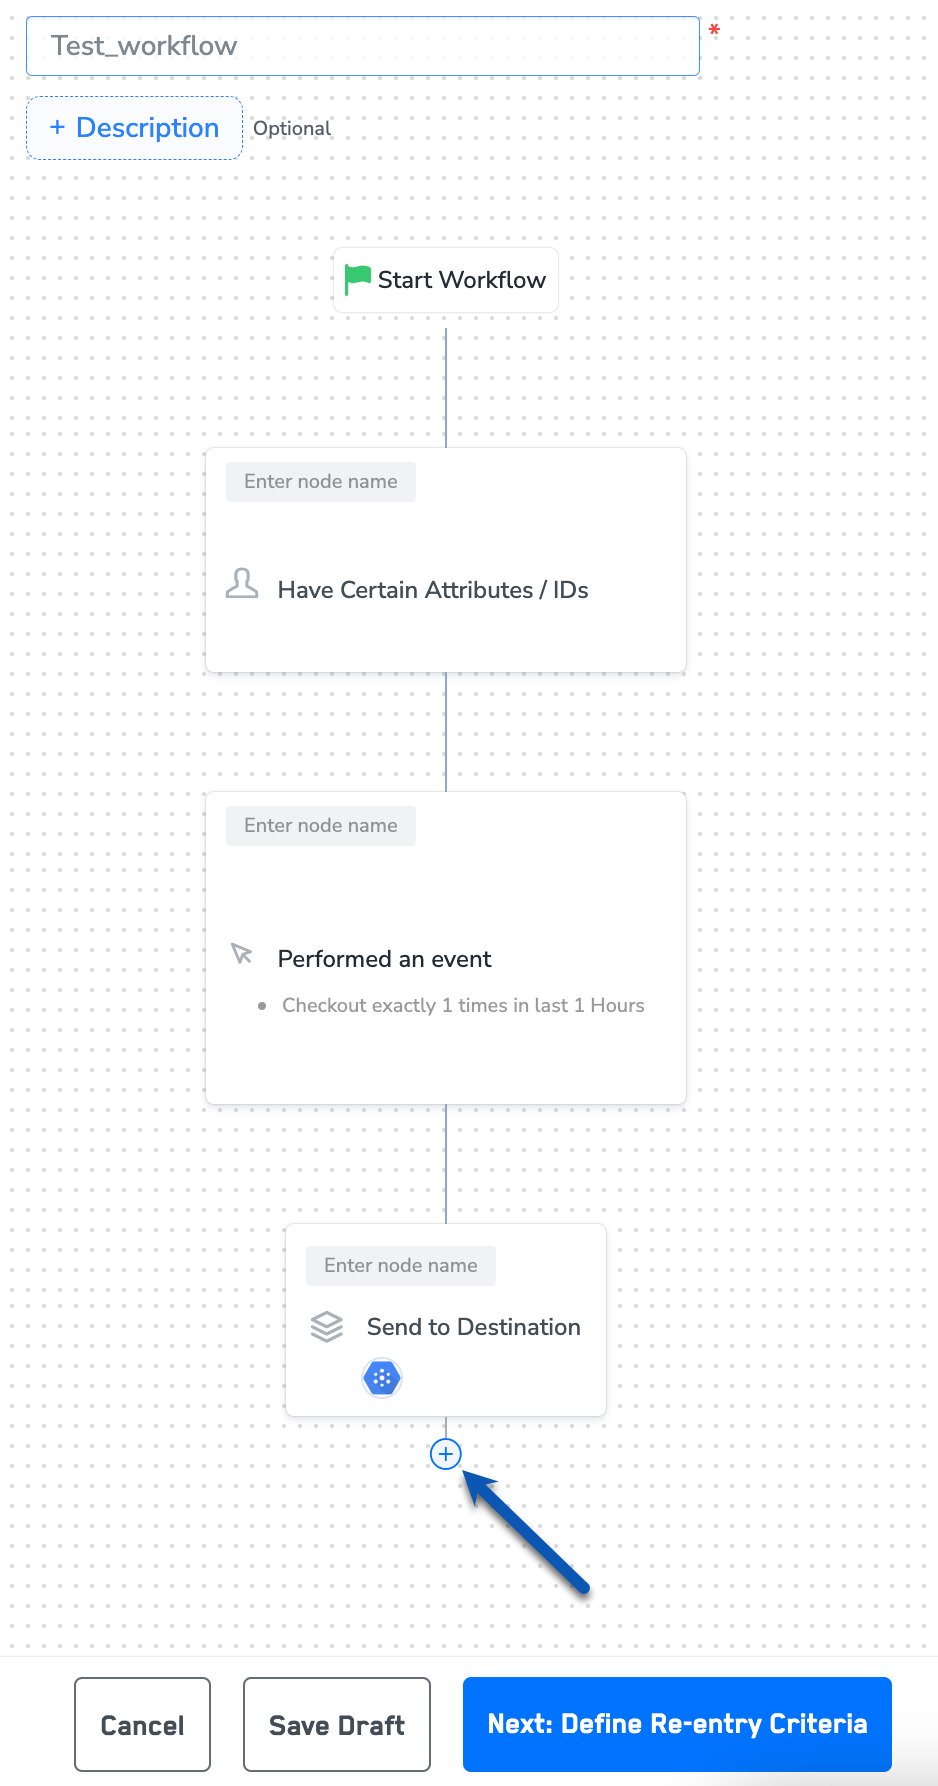
The linked Destinations appear in the **Send to Destinations** node within the workflow as shown below. Further, you can then build and customise your workflow as needed by clicking '+' . Note that you must enter a name for your workflow in the provided text box to save it.
Click **Add Destinations** at the bottom right corner of the screen. Note that you can also add multiple destinations at this step if needed.
The linked Destinations appear in the **Send to Destinations** node within the workflow as shown below. Further, you can then build and customise your workflow as needed by clicking '+' . Note that you must enter a name for your workflow in the provided text box to save it.
 After adding conditions and filters for users, choose one of the following options:
* **Save Draft**: Enables you to revisit and edit the workflow before publishing.
* **Next: Re-entry Condition**: Determines whether a user can re-enter the same workflow.
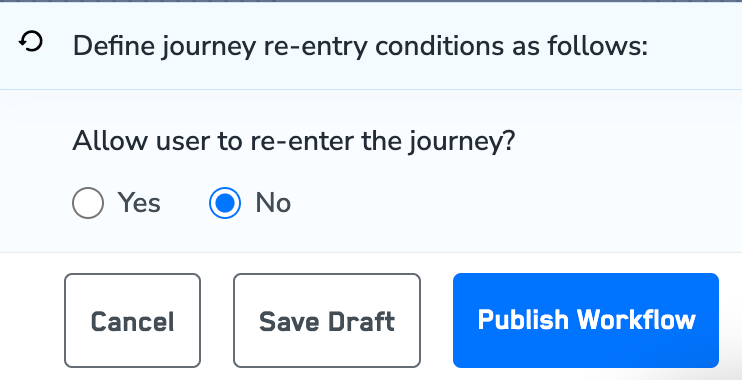
After defining the re-entry criteria, click **Publish Workflow**. The workflow appears in the Workflow listing screen with a **Published** status.
After adding conditions and filters for users, choose one of the following options:
* **Save Draft**: Enables you to revisit and edit the workflow before publishing.
* **Next: Re-entry Condition**: Determines whether a user can re-enter the same workflow.
After defining the re-entry criteria, click **Publish Workflow**. The workflow appears in the Workflow listing screen with a **Published** status.