> ## Documentation Index
> Fetch the complete documentation index at: https://docs.zeotap.com/llms.txt
> Use this file to discover all available pages before exploring further.
# Google DMP
**Note:**
*As per the [Google's EU User Consent Policy](https://www.google.com/about/company/user-consent-policy/), the `process_consent` flag needs to be set for this integration. Accordingly, Zeotap CDP sends `process_consent=True`. Therefore, whenever you send first-party seed data through this integration, always ensure that you obtain end-user consent before sharing it with Zeotap CDP. To know more about how this consent is processed, refer [here](https://developers.google.com/authorized-buyers/rtb/bulk-uploader#process_consent_in_bulk_upload_request).*
## Overview
Google DMP (data management platform) specialises in online advertising and analytics for both enterprises and small businesses. Integrated with Zeotap, it enables marketers to manage and optimize their digital advertising campaigns.
By choosing the appropriate product type in the UI, you can establish either a Google Ad Manager connection or a DV 360 connection, as per your specific requirements and use case. The inputs to be provided while creating destination varies based on the selected product type. For more information, refer to [Client Product Type](/articles/integrate-customer/google-dmp#GoogleDMP-ClientProductType).
The following comparison table helps you to decide the connection that best suits your business needs.
| **Feature** | **Google Ad Manager** | **DV 360 Connection** |
| :-------------------------- | :--------------------------------------------------------------------------------------------------------------------------------------------------------------------------- | :------------------------------------------------------------------------------------------------------- |
| **Focus** | Ad management platform that enables publishers to sell, schedule, and measure digital ad inventory across websites, apps, and video content. | Programmatic platform covering display, video, audio, and native advertising. |
| **Audience Targeting** | Precise segmentation based on demographics, interests, geography, and behavior. | Granular targeting based on interests, demographics, and behavior. |
| **Inventory** | Empowers publishers to manage and optimize ad space across websites, mobile apps, and video content, supporting both direct ad sales and programmatic advertising. | Access to a larger pool of inventory from various ad exchanges and publishers. |
| **Ad Formats** | Offers display, video, native ads, providing flexibility for publishers to match content and audience preferences. | Offers a wider range of ad formats, including programmatic native and audio ads. |
| **Reporting and Analytics** | Provides detailed insights into ad performance, audience engagement, and revenue metrics, with real-time reporting and integration options with third-party analytics tools. | Provides more advanced reporting capabilities and supports integration with third-party analytics tools. |
## Supported Identifiers
This integration supports MAIDS and Google cookies.
## Available Actions and Supported Features
The following table lists the available action types for the integration and the supported features for each action type:
| Action Name | [ID EXTENSION](/articles/segment-customer/extend-your-audience#id-extension) | [DELETE](https://docs.zeotap.com/articles/#!integrate-customer/delta-upload-and-delete-functions) | [DELTA UPLOAD](https://docs.zeotap.com/articles/#!integrate-customer/delta-upload-and-delete-functions) |
| :----------------------------- | :--------------------------------------------------------------------------- | :------------------------------------------------------------------------------------------------ | :------------------------------------------------------------------------------------------------------ |
| Send identifiers to Adform DMP | ✅ | ✅ | - |
## Prerequisites
Before pushing DMP segments to an account for the first time, ask the client to contact their Technical Account Manager/Google representative to request the mapping between Zeotap (222-560-7447) and the client's accounts. Without this step, the segment creation fails.
Perform the following steps before sharing a segment with the client using Google DMP:
The clients interested in Zeotap data has to sign the Data Usage agreement with Zeotap.
The clients interested in Zeotap data (DBM or DFP) must contact their Google Account Team.
Google Account Team sends the legal agreement to the clients.
The clients must sign the legal agreement confirming that they allow Zeotap DMP to access their DBM/DFP account so that Zeotap can create segments in their DBM/DFP account.
The Google Account Team does the formal whitelisting (or "pairing") of the Zeotap DMP with the client's DBM/DFP account, so that Zeotap can start creating segments.
## Components of Google DMP
Ensure that you have details about the below components of Google DMP available before creating a Destination.
### Seat ID
This is the ID for your Advertiser account. You can find it next to your account name. However, in the case of a Publisher account, this is the Audience Link ID.
### Client Product Type
The following are the supported Product Types:
* To establish a Google Ad Manager connection using your Publisher account, choose **DFP\_BY\_GOOGLE.**
* To establish a DV 360 connection using your Agency account choose **INVITE\_PARTNER** or **INVITE\_ADVERTISER** as per your account. For more information about how to identify the Product Type, read below.
#### How to identify the Product Type in Google Ad Manager?
Click **Admin** > **Global settings** > **Network settings**.
Find the numeric value next to **Audience link ID**. Note that your audience link ID is not the same as your network code.
#### How to identify the Product Type in DV 360?
You can check for the Product Type and Currency from the DV360 left panel by navigating to **Settings** > **Basic Details**.
* If the field name is **Partner ID**, then the Product Type is **INVITE\_PARTNER**.
* If the field name is **Advertiser ID**, then the Product Type is **INVITE\_ADVERTISER**.
## Create a Destination for Google DMP (Google Ad Manager or DV 360)
Perform the following steps to create a Destination for Google DMP:
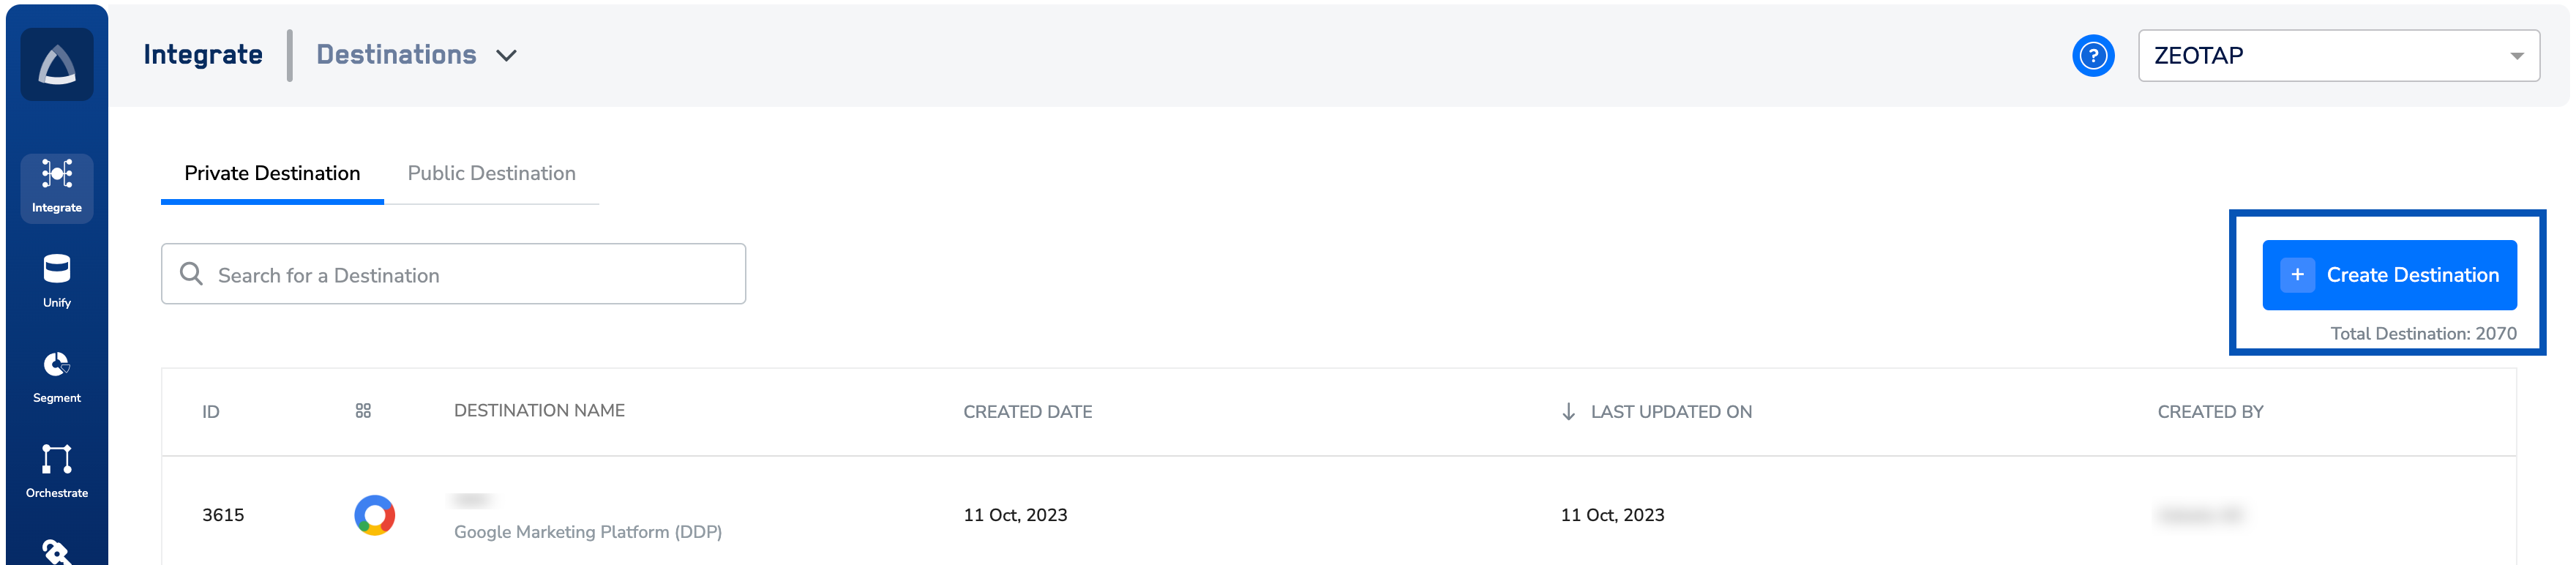
Log into the Zeotap CDP App and go to the **DESTINATIONS** application.
Click **+ Create Destination**.
 Under **All Destinations**, search for **Google DMP**.
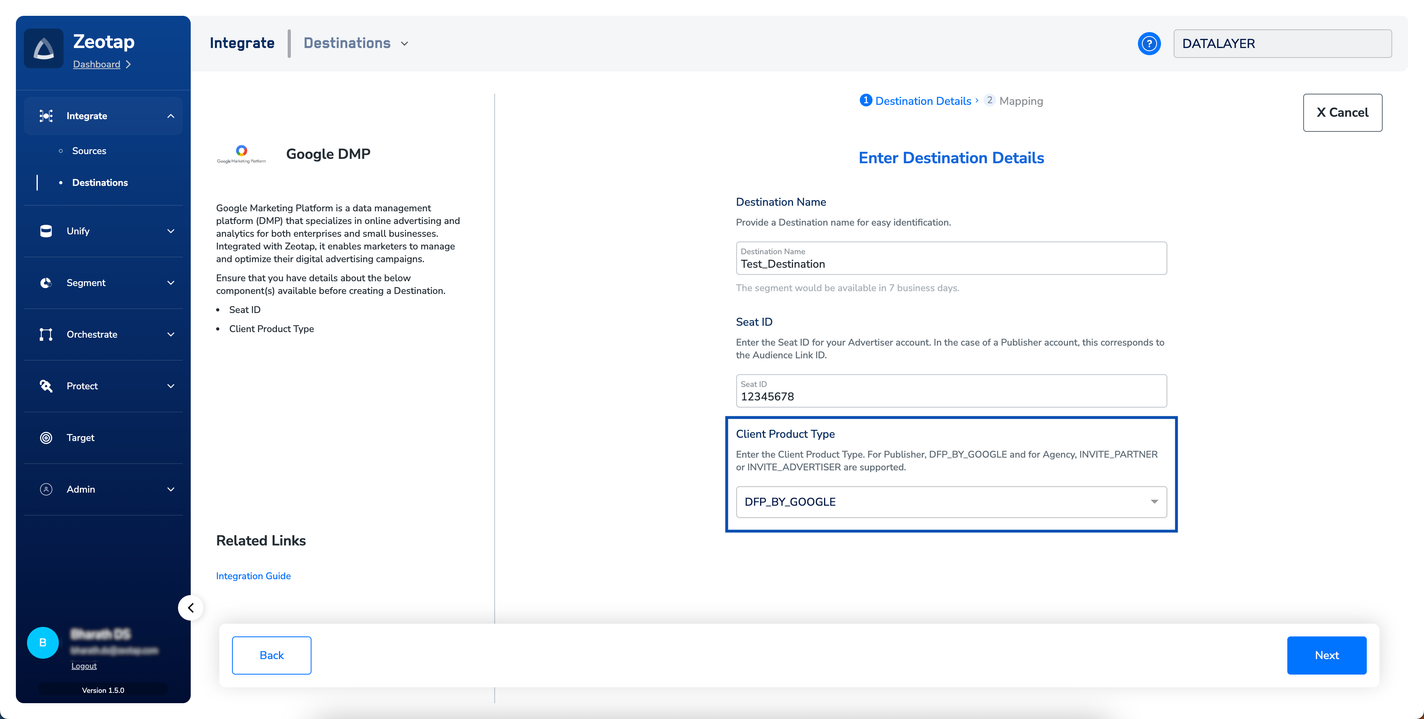
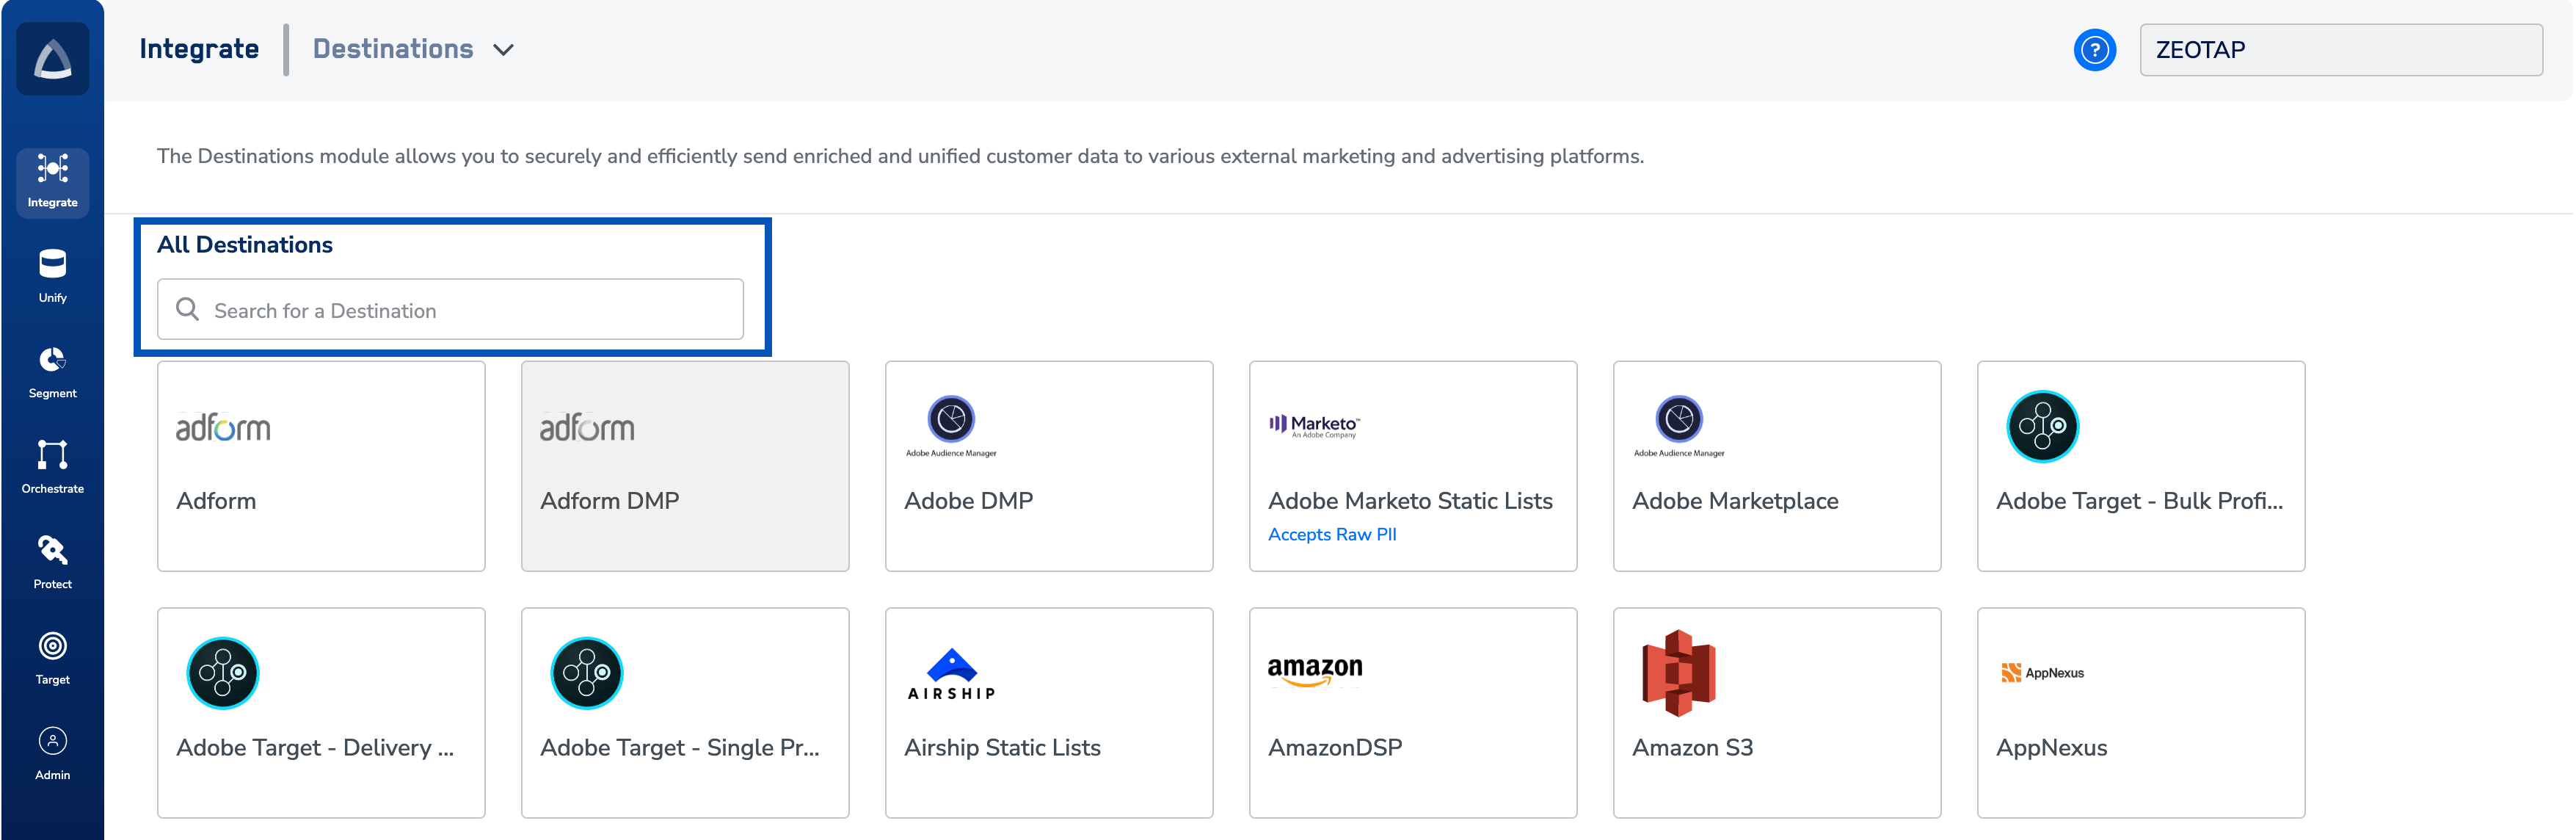 Click **Google DMP**. A screen appears displaying details about the particular destination towards the left. On the right-hand side of the screen find a list of fields that are required for the integration to be established. Enter the required details as mentioned in the following steps:
a. Enter a name for the Destination.
b. Enter the **Seat ID.** This is the ID for your *Advertiser* account. You can find it next to your account name. However, in the case of a *Publisher* account, this is the *Audience Link ID*.
c. Under **Client Product Type**, choose one of the following options based on the type of connection that you wish to set up:
i. Choose **DFP\_BY\_GOOGLE** to set up a Google Ad Manager connection.
ii. Choose either **INVITE\_PARTNER** or **INVITE\_ADVERTISER** to set up a DV 360 connection as per your need.
d. Review all the values entered above and then click **Next** to proceed.
Click **Google DMP**. A screen appears displaying details about the particular destination towards the left. On the right-hand side of the screen find a list of fields that are required for the integration to be established. Enter the required details as mentioned in the following steps:
a. Enter a name for the Destination.
b. Enter the **Seat ID.** This is the ID for your *Advertiser* account. You can find it next to your account name. However, in the case of a *Publisher* account, this is the *Audience Link ID*.
c. Under **Client Product Type**, choose one of the following options based on the type of connection that you wish to set up:
i. Choose **DFP\_BY\_GOOGLE** to set up a Google Ad Manager connection.
ii. Choose either **INVITE\_PARTNER** or **INVITE\_ADVERTISER** to set up a DV 360 connection as per your need.
d. Review all the values entered above and then click **Next** to proceed.
 In the new screen that appears, choose the appropriate Action and mapping as explained below.
a. Choose the desired [action](/articles/integrate-customer/destinations#actionsanchor) under **Choose your Action** and then choose the corresponding identifiers under **Map the Fields**. By default, the [Output Identifiers](https://docs.zeotap.com/articles/segment-customer/choose-the-output-identifiers) that are accepted by the platform such as, MAIDs and Cookies are displayed. However, you can edit, add or remove an identifier from the list. To do so, refer [here](/articles/integrate-customer/destinations#mappingsanchor).
b. Click **Create Destination**. The created Destination gets listed in the **Target, Connect** and **Audiences** applications, which can be linked to an Audience/segment.
In the new screen that appears, choose the appropriate Action and mapping as explained below.
a. Choose the desired [action](/articles/integrate-customer/destinations#actionsanchor) under **Choose your Action** and then choose the corresponding identifiers under **Map the Fields**. By default, the [Output Identifiers](https://docs.zeotap.com/articles/segment-customer/choose-the-output-identifiers) that are accepted by the platform such as, MAIDs and Cookies are displayed. However, you can edit, add or remove an identifier from the list. To do so, refer [here](/articles/integrate-customer/destinations#mappingsanchor).
b. Click **Create Destination**. The created Destination gets listed in the **Target, Connect** and **Audiences** applications, which can be linked to an Audience/segment.
 ## Link an Audience to the Google DMP Destination
For information about how to link an Audience or segment to the created Destination in **Connect**, **Audiences** and **Target** applications, refer [here](/articles/integrate-customer/link-an-audience-to-the-destination). Note that it can take up to 7 business days for segments to be available at the Google DMP seat.
**Note:**
The terms *Audiences* and *Segments* are used interchangeably to refer to customer cohorts belonging to a specific category. For example, an Audience or a segment can be a specific group of customers who are over 18 years of age and have performed an `addToCart` event within the last 30 days.
## User Disqualification from Audiences
This integration supports user disqualification from audiences. That is, a user can be disqualified from an audience (segment) for various reasons, such as not meeting audience criteria, consent requirements or other conditions set for a particular audience.
* When a user disqualifies from an audience, Zeotap CDP initiates a user deletion request in the next refresh cycle. These requests are sent to the audiences linked to the specific destination.
* The disqualified users are excluded from the audiences based on the configured refresh frequency for a particular audience.
* User disqualification is a programmatic process that works automatically. You do not need to specify anything to trigger the disqualification and exclusion of users from audiences.
## Link an Audience to the Google DMP Destination
For information about how to link an Audience or segment to the created Destination in **Connect**, **Audiences** and **Target** applications, refer [here](/articles/integrate-customer/link-an-audience-to-the-destination). Note that it can take up to 7 business days for segments to be available at the Google DMP seat.
**Note:**
The terms *Audiences* and *Segments* are used interchangeably to refer to customer cohorts belonging to a specific category. For example, an Audience or a segment can be a specific group of customers who are over 18 years of age and have performed an `addToCart` event within the last 30 days.
## User Disqualification from Audiences
This integration supports user disqualification from audiences. That is, a user can be disqualified from an audience (segment) for various reasons, such as not meeting audience criteria, consent requirements or other conditions set for a particular audience.
* When a user disqualifies from an audience, Zeotap CDP initiates a user deletion request in the next refresh cycle. These requests are sent to the audiences linked to the specific destination.
* The disqualified users are excluded from the audiences based on the configured refresh frequency for a particular audience.
* User disqualification is a programmatic process that works automatically. You do not need to specify anything to trigger the disqualification and exclusion of users from audiences.