> ## Documentation Index
> Fetch the complete documentation index at: https://docs.zeotap.com/llms.txt
> Use this file to discover all available pages before exploring further.
# Google Cloud Storage
## Overview
Google Cloud Storage (GCS) is a cloud-based object storage service provided by Google Cloud Platform (GCP). It allows you to store and retrieve data in a highly scalable, durable, and secure manner. Integrated with Zeotap CDP, it enables you to push the audiences (segments) from Zeotap CDP to Google Cloud Storage in CSV format. The data sent from Zeotap CDP to GCS can be used for several use cases such as automation of campaigns, creation of personalised notifications, optimisation of campaigns and more.
## Prerequisites
Before you create a Google Cloud Storage Destination in Zeotap CDP, note that you must have an account with Google Cloud Storage.
## Supported Identifiers
This integration supports MAIDs, Hashed email addresses, Hashed mobile numbers and CRM IDs. Note that you can send any number of identifiers and attributes to Google Cloud Storage using this integration.
## Available Actions and Supported Features
The following table lists the available action types for the integration and the supported features for each action type:
| Action Name | [ID EXTENSION](/articles/segment-customer/extend-your-audience#id-extension) | [DELETE](https://docs.zeotap.com/articles/#!integrate-customer/delta-upload-and-delete-functions) | [DELTA UPLOAD](https://docs.zeotap.com/articles/#!integrate-customer/delta-upload-and-delete-functions) |
| :------------------------------------------------------ | :--------------------------------------------------------------------------- | :------------------------------------------------------------------------------------------------ | :------------------------------------------------------------------------------------------------------ |
| Send identifiers to Google Cloud Storage | ✅ | - | - |
| Send attributes and identifiers to Google Cloud Storage | - | - | - |
## Components of Google Cloud Storage
Ensure that you have the details about the below components of the Google Cloud Storage account before creating a Destination.
### Bucket
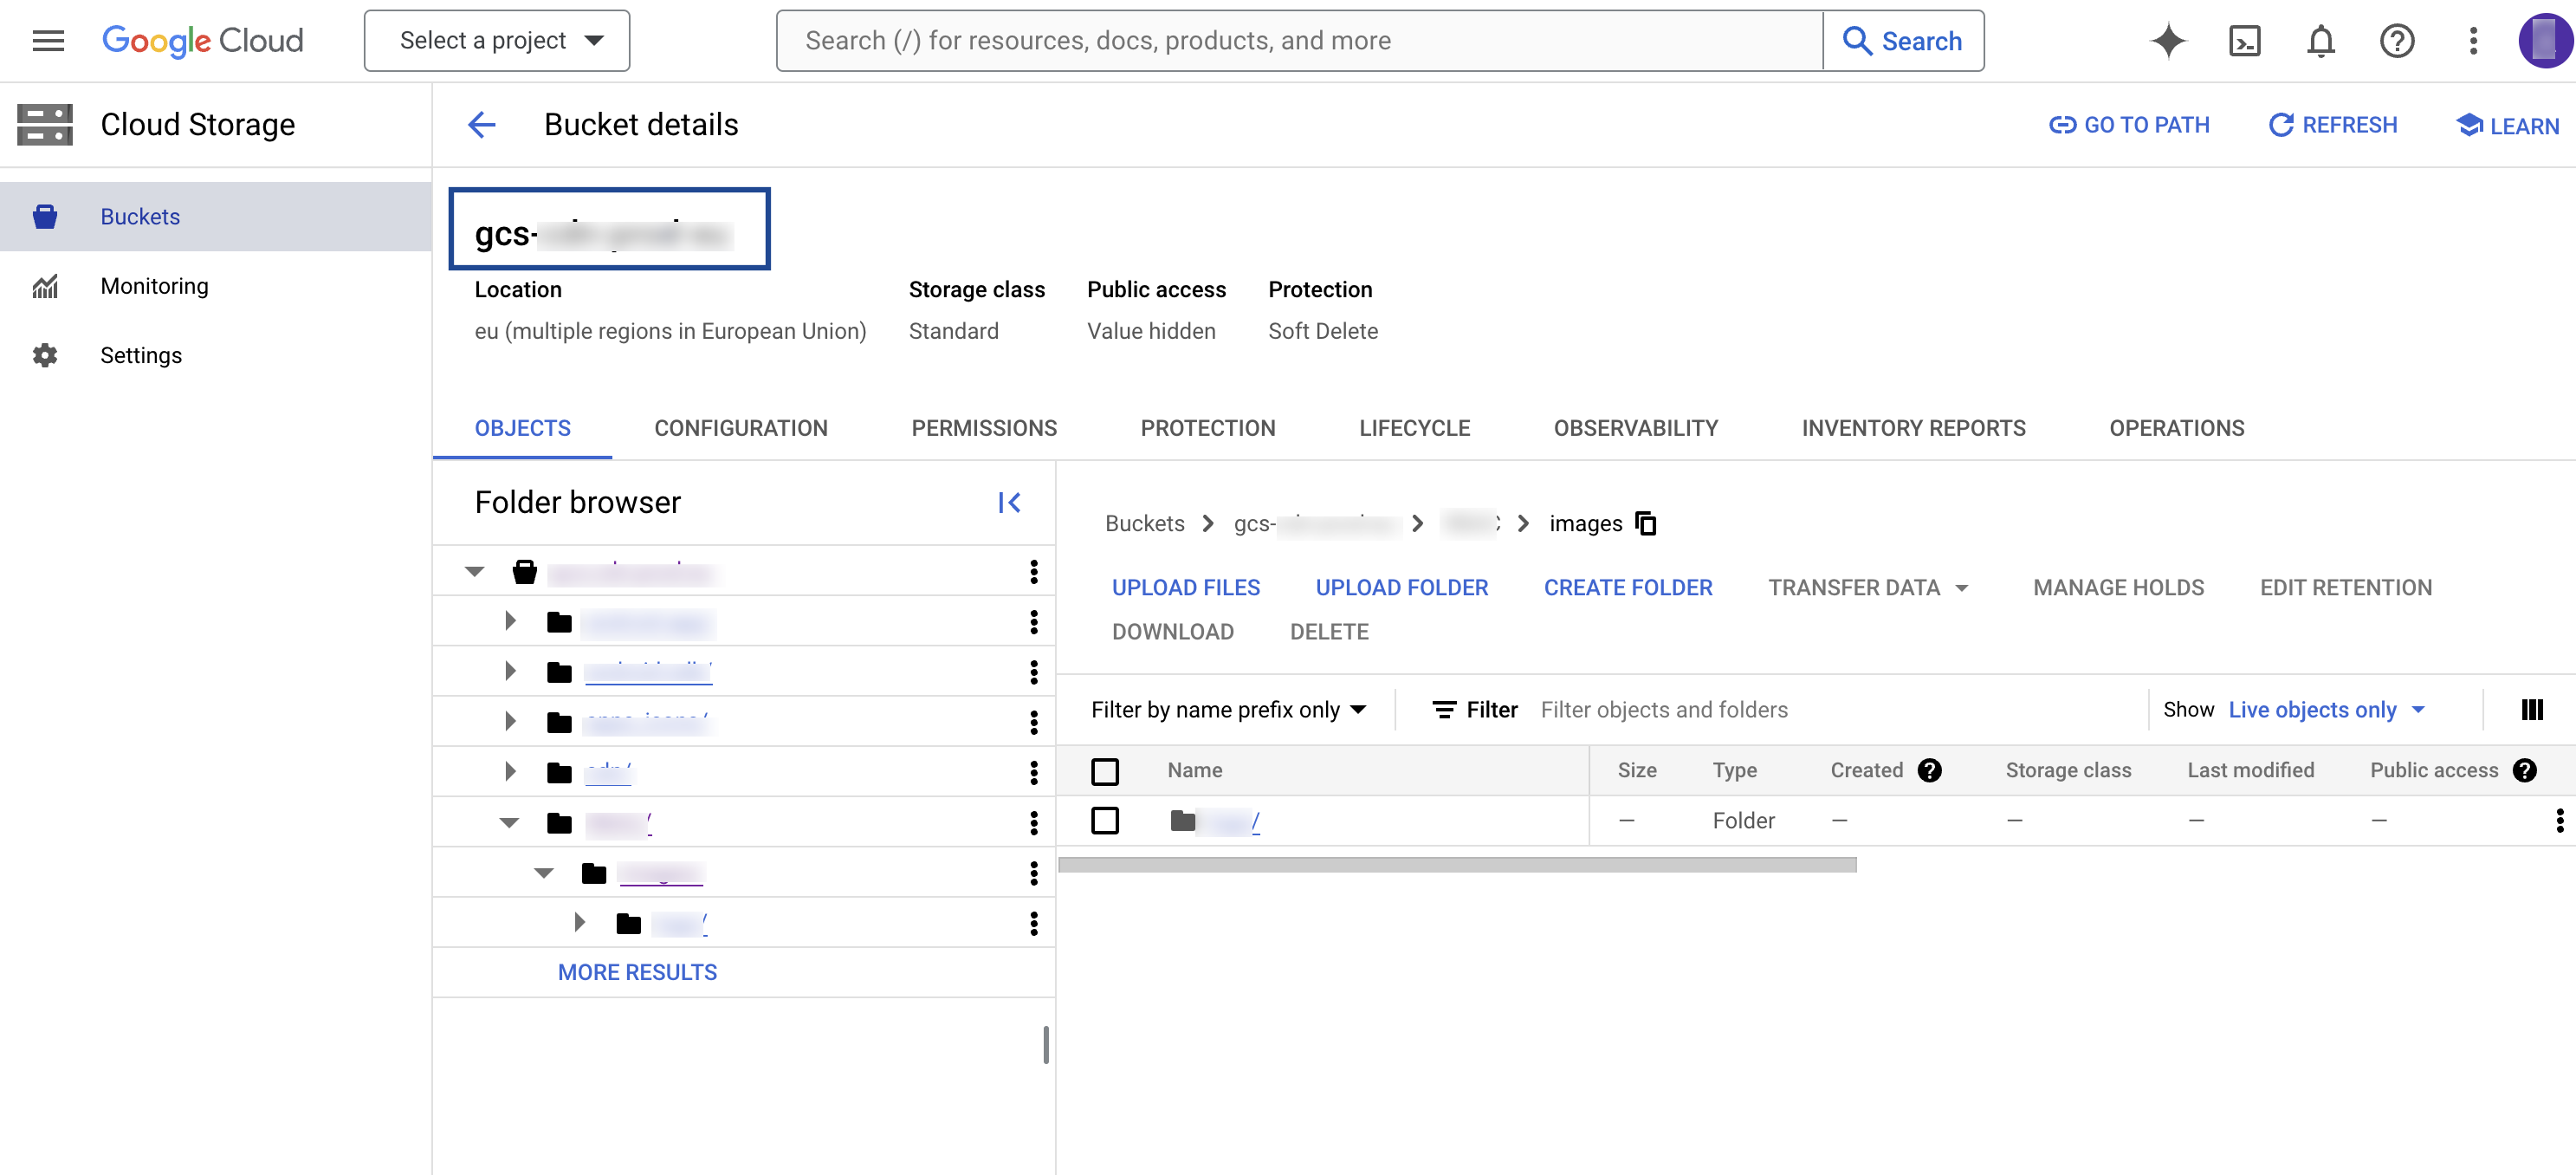
This is the name of your Google Cloud Storage Bucket. You can obtain this information from your Google Cloud Storage account as shown in the image below.
 ### Folder
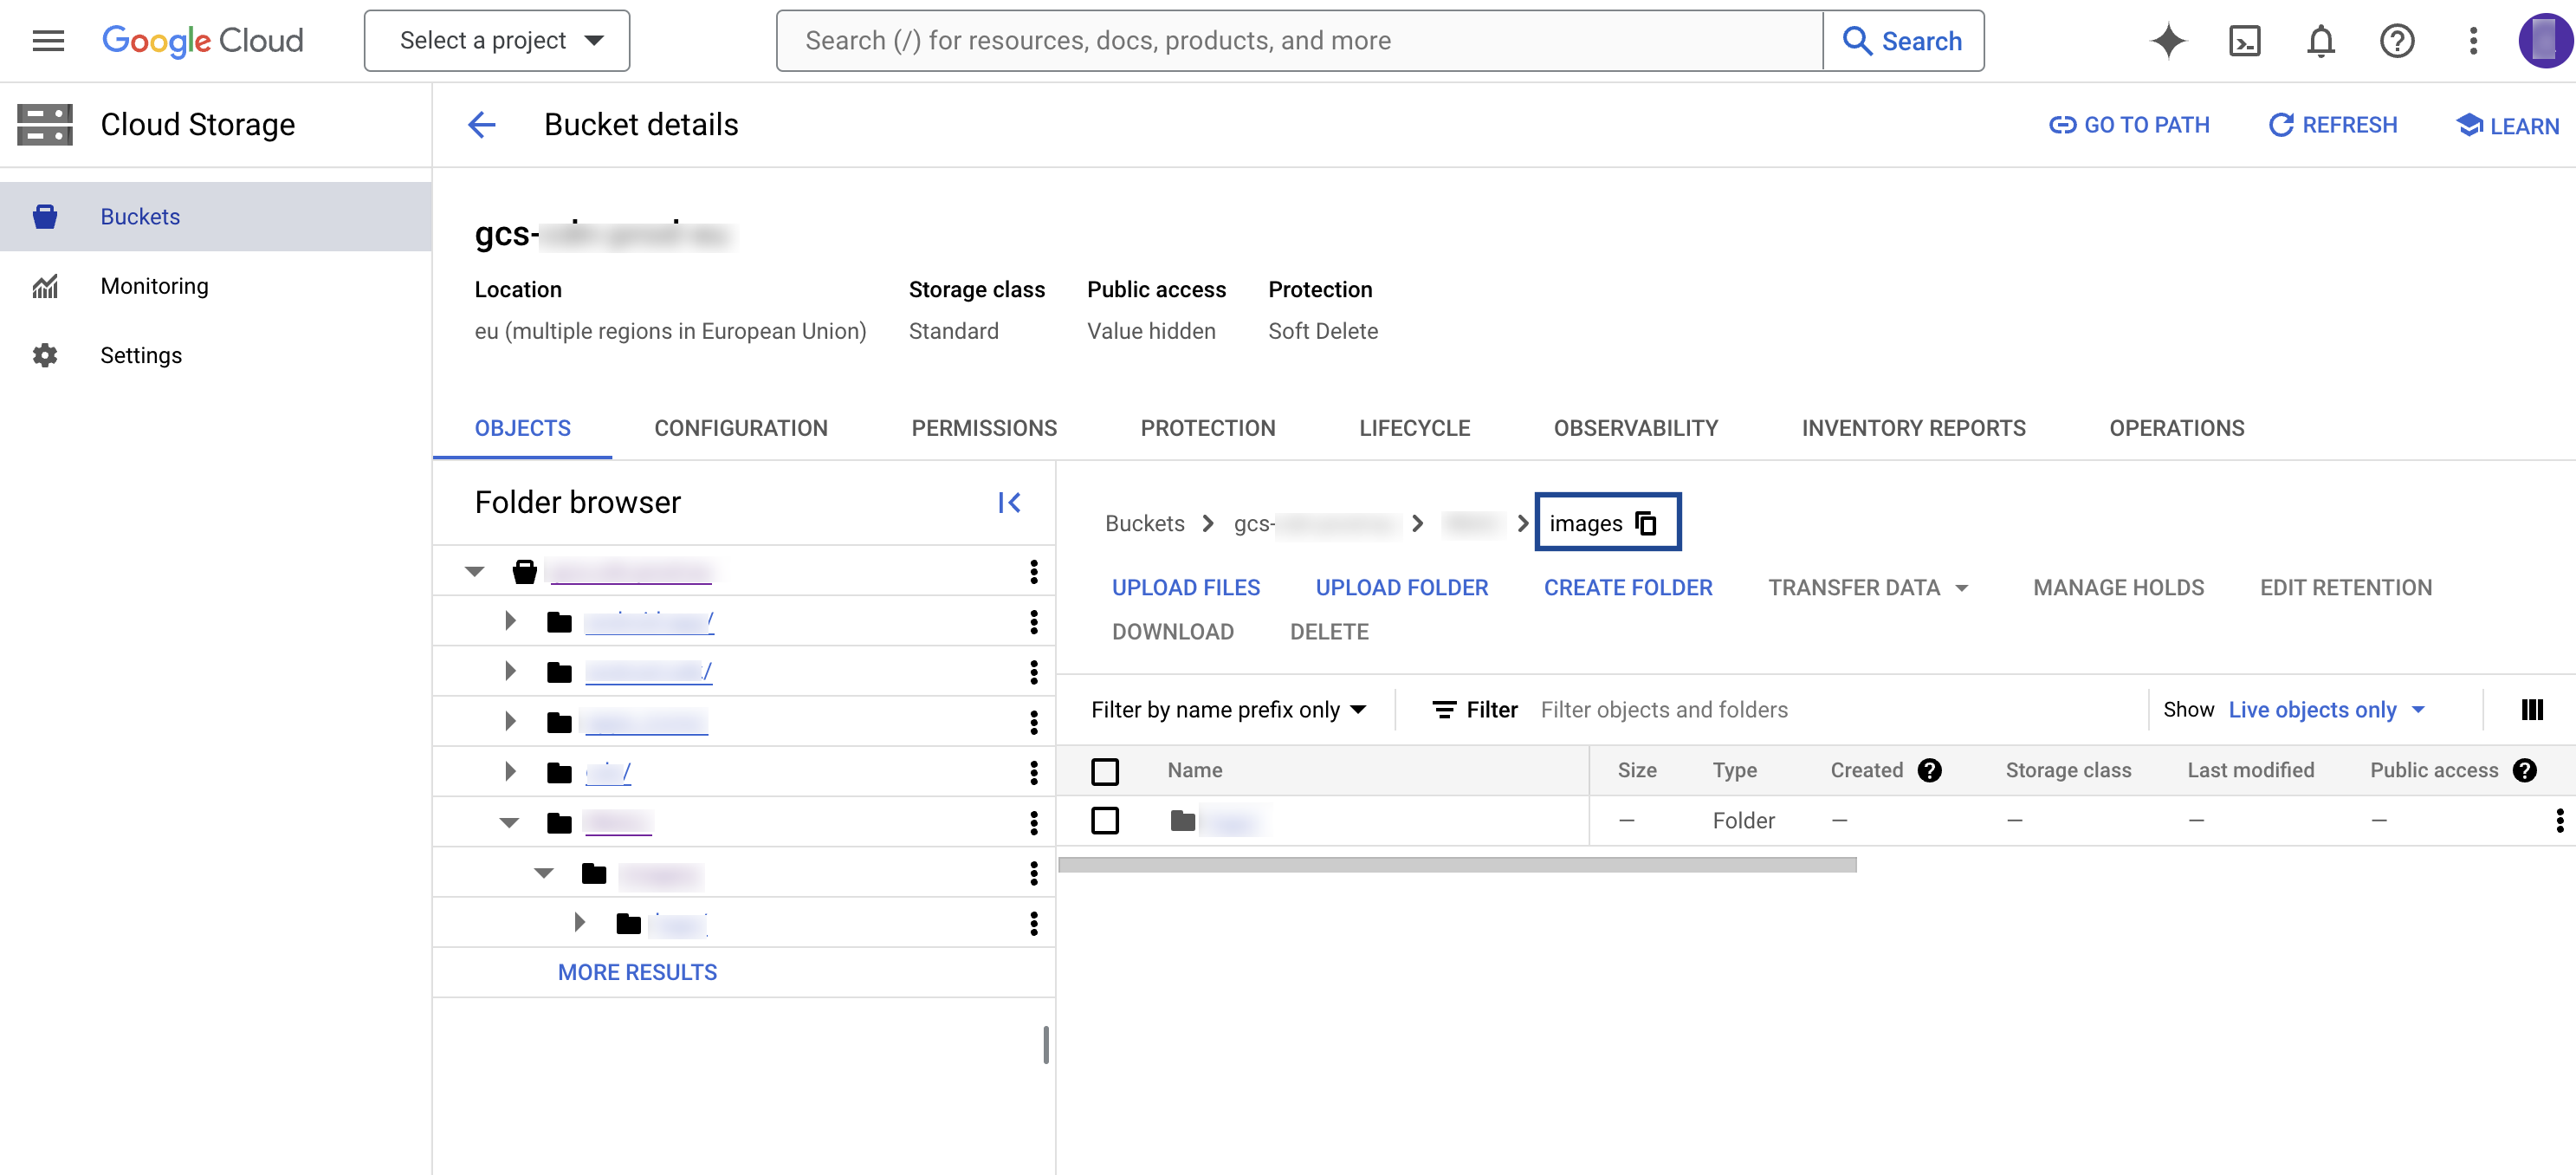
In Google Cloud Storage, a folder serves as a logical container for organising stored objects within a bucket. In reality, there are no actual folders in Google Cloud Storage. Instead, the folder concept is emulated by employing object key names containing slashes ("/") to replicate a hierarchical arrangement. You can obtain this information from your Google Cloud Storage account as shown in the image below.
### Folder
In Google Cloud Storage, a folder serves as a logical container for organising stored objects within a bucket. In reality, there are no actual folders in Google Cloud Storage. Instead, the folder concept is emulated by employing object key names containing slashes ("/") to replicate a hierarchical arrangement. You can obtain this information from your Google Cloud Storage account as shown in the image below.
 ### Account
This is the Zeotap Service Account that is used to access the Google Cloud Storage account. Ensure that you whitelist the Zeotap Service Account to successfully push audiences (segments) from Zeotap CDP to Google Cloud Storage.
## Create a Destination for Google Cloud Storage
Perform the following steps to create a Destination for Google Cloud Storage:
Log into the Zeotap CDP App and go to the **DESTINATIONS** application.
Click **+ Create Destination**.
### Account
This is the Zeotap Service Account that is used to access the Google Cloud Storage account. Ensure that you whitelist the Zeotap Service Account to successfully push audiences (segments) from Zeotap CDP to Google Cloud Storage.
## Create a Destination for Google Cloud Storage
Perform the following steps to create a Destination for Google Cloud Storage:
Log into the Zeotap CDP App and go to the **DESTINATIONS** application.
Click **+ Create Destination**.
.png?fit=max&auto=format&n=UNwlFBI6l-jpipWP&q=85&s=562fa59a1a1e2b76442fa98f6e6f991e) Under the **All Destinations** section, search for **Google Cloud Storage**.
Under the **All Destinations** section, search for **Google Cloud Storage**.
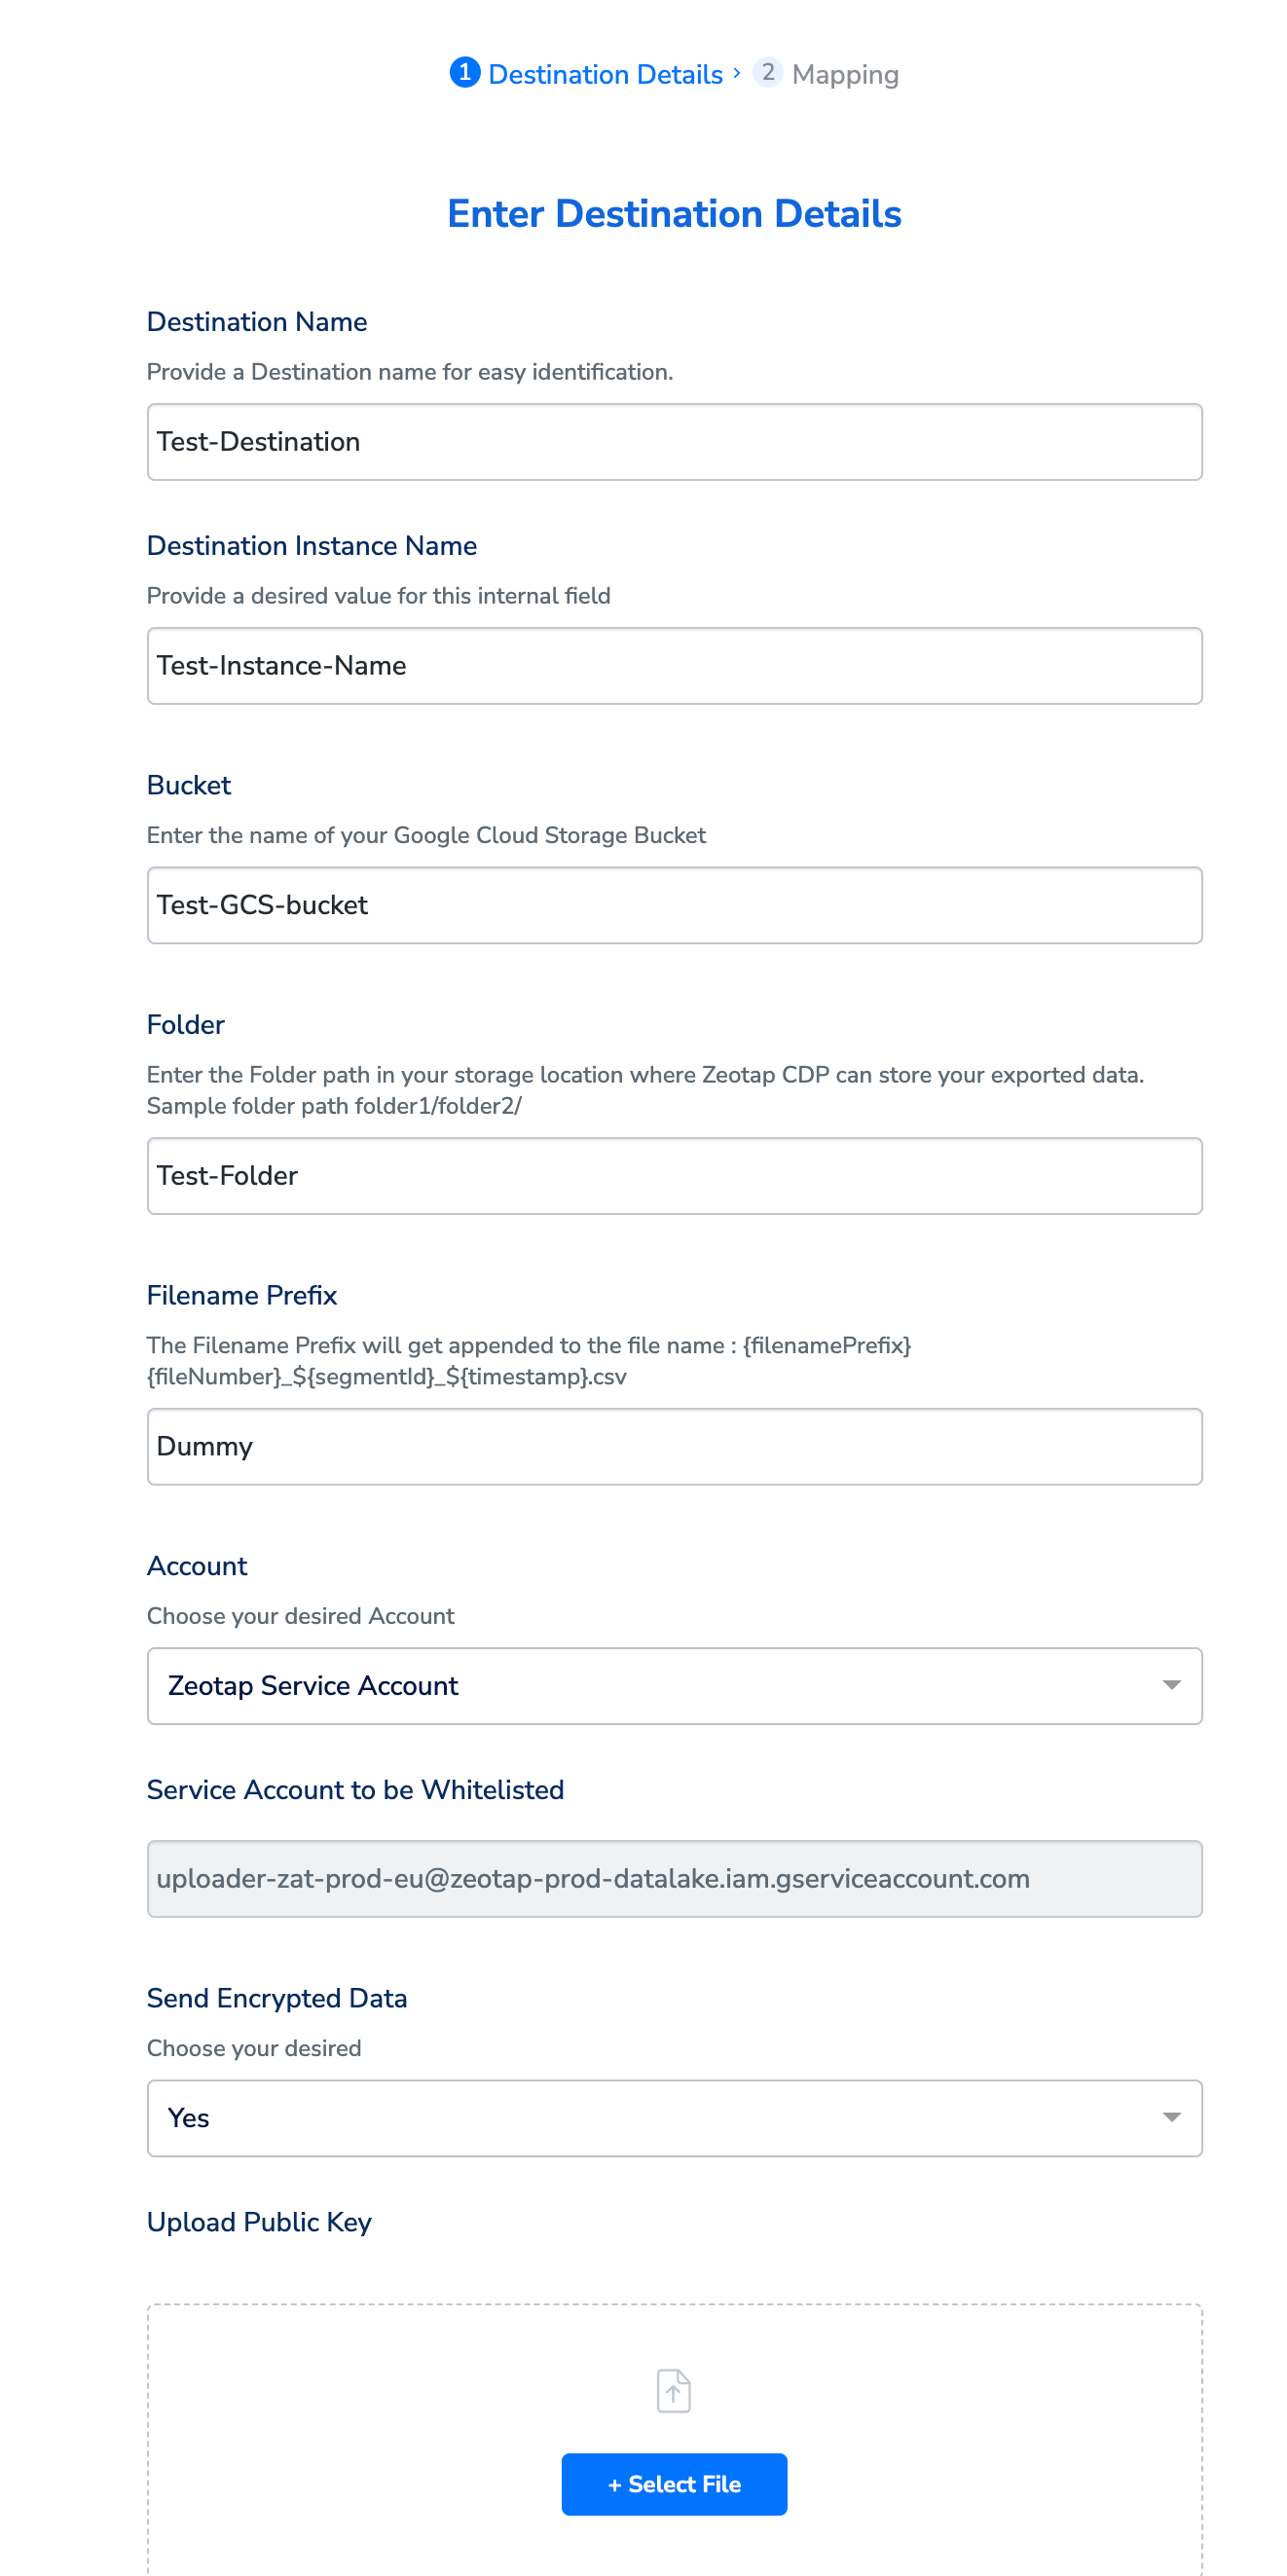
.png?fit=max&auto=format&n=UNwlFBI6l-jpipWP&q=85&s=653728565c7ed5863548171765d4086f) Click **Google Cloud Storage**. A screen appears displaying details about the particular destination towards the left. On the right-hand side of the screen find a list of fields that are required for the integration to be established. Provide the required details as mentioned in the following steps:
a. Enter a name for the Destination.
b. In the **Destination Instance Name** field, provide a desired value for this internal field.
c. In the **Bucket** field, provide the name of the Google Cloud Storage Bucket.
d. In the **Folder** field, provide the folder path in your storage location where Zeotap CDP can store your exported data.
**Note:**
Ensure to follow the below points while providing the folder path:
* The folder path should follow the below structure:
* `folder_name/sub_folder_name/`
* The folder name should not start with a `/`
* The folder name and sub-folder name should end with a `/`
e. Under **Filename Prefix,** enter a text value without special characters, such as underscores (\_), spaces, or symbols (`#, @, $, %, &, \*`). Note that the file name follows the format: `${filenamePrefix}part-${sequence}_${destinationAudienceId}_${timestamp}`.csv, where the timestamp is in yyyy-MM-dd format and destinationAudienceId is the ID associated with your audience (segment) in Zeotap CDP, which is generated by the Zeotap CDP after the audience (segment) is linked to a Destination.
Click **Google Cloud Storage**. A screen appears displaying details about the particular destination towards the left. On the right-hand side of the screen find a list of fields that are required for the integration to be established. Provide the required details as mentioned in the following steps:
a. Enter a name for the Destination.
b. In the **Destination Instance Name** field, provide a desired value for this internal field.
c. In the **Bucket** field, provide the name of the Google Cloud Storage Bucket.
d. In the **Folder** field, provide the folder path in your storage location where Zeotap CDP can store your exported data.
**Note:**
Ensure to follow the below points while providing the folder path:
* The folder path should follow the below structure:
* `folder_name/sub_folder_name/`
* The folder name should not start with a `/`
* The folder name and sub-folder name should end with a `/`
e. Under **Filename Prefix,** enter a text value without special characters, such as underscores (\_), spaces, or symbols (`#, @, $, %, &, \*`). Note that the file name follows the format: `${filenamePrefix}part-${sequence}_${destinationAudienceId}_${timestamp}`.csv, where the timestamp is in yyyy-MM-dd format and destinationAudienceId is the ID associated with your audience (segment) in Zeotap CDP, which is generated by the Zeotap CDP after the audience (segment) is linked to a Destination.
 | Variable | Description |
| :------------------------- | :------------------------------------------------------------------------------------------------------------------------ |
| `filenamePrefix` | The prefix for the file name, typically indicating the context or purpose of the file (e.g., the segment or export type). |
| `part-${sequence}` | A sequential number or identifier indicating the part or chunk number if the data is split across multiple files. |
| `${destinationAudienceId}` | The unique ID assigned by Zeotap CDP to the audience (segment) after it is linked to a Destination. |
| `${timestamp}` | The date when the file is generated, formatted as `yyyy-MM-dd` (e.g., 2024-08-06). |
| `.csv` | The file extension, indicating that the file is in CSV (Comma-Separated Values) format. |
**Example File Name:**
`exportpart-01_894548842_2024-08-06.csv`
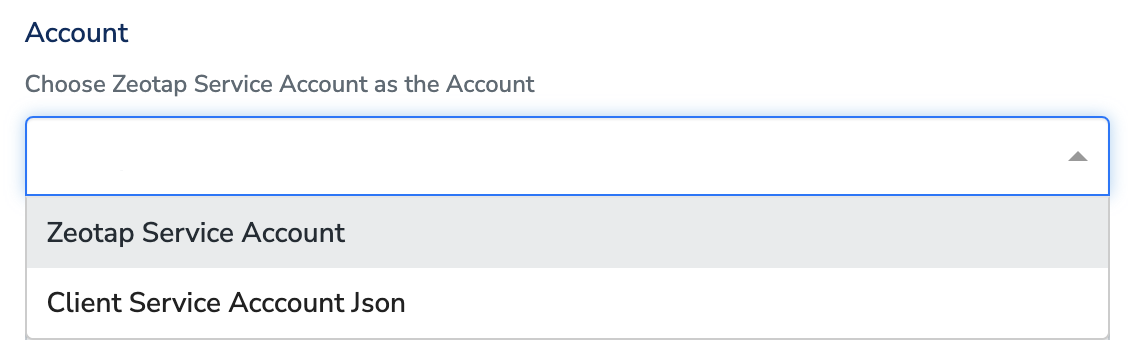
f. Under **Account,** choose either **Zeotap Service Account** or **Client Service Account Json** using the drop-down menu based on the type of authentication you need. If you wish to use Zeotap Service Account, then ensure that you whitelist this it to push audiences (segments) from Zeotap CDP to Google Cloud Storage Platform.
| Variable | Description |
| :------------------------- | :------------------------------------------------------------------------------------------------------------------------ |
| `filenamePrefix` | The prefix for the file name, typically indicating the context or purpose of the file (e.g., the segment or export type). |
| `part-${sequence}` | A sequential number or identifier indicating the part or chunk number if the data is split across multiple files. |
| `${destinationAudienceId}` | The unique ID assigned by Zeotap CDP to the audience (segment) after it is linked to a Destination. |
| `${timestamp}` | The date when the file is generated, formatted as `yyyy-MM-dd` (e.g., 2024-08-06). |
| `.csv` | The file extension, indicating that the file is in CSV (Comma-Separated Values) format. |
**Example File Name:**
`exportpart-01_894548842_2024-08-06.csv`
f. Under **Account,** choose either **Zeotap Service Account** or **Client Service Account Json** using the drop-down menu based on the type of authentication you need. If you wish to use Zeotap Service Account, then ensure that you whitelist this it to push audiences (segments) from Zeotap CDP to Google Cloud Storage Platform.
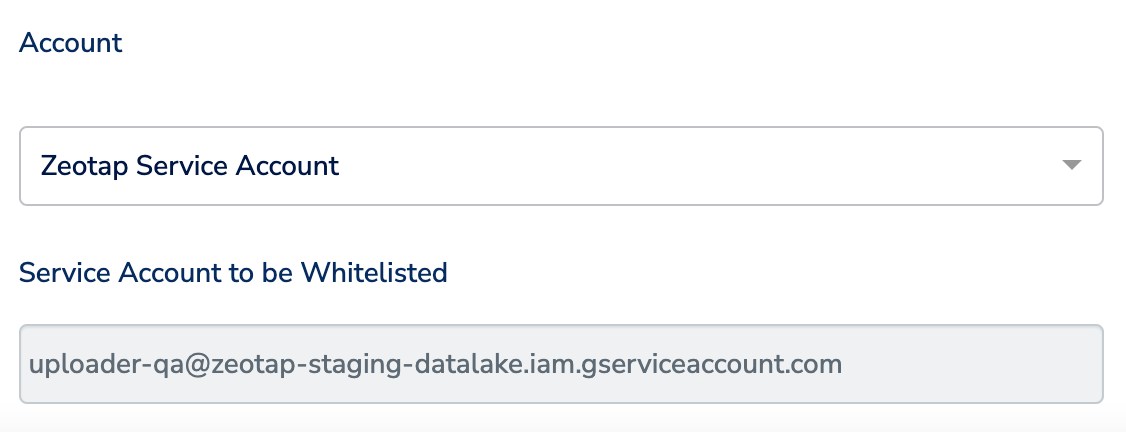
 i. If you choose **Zeotap Service Account** as the Account, then ensure that you whitelist the service account provided by Zeotap CDP to push the audiences (segments) from Zeotap CDP to Google Cloud Storage Platform. This service account information auto-populates under **Service Account to be Whitelisted** as shown in the image below.
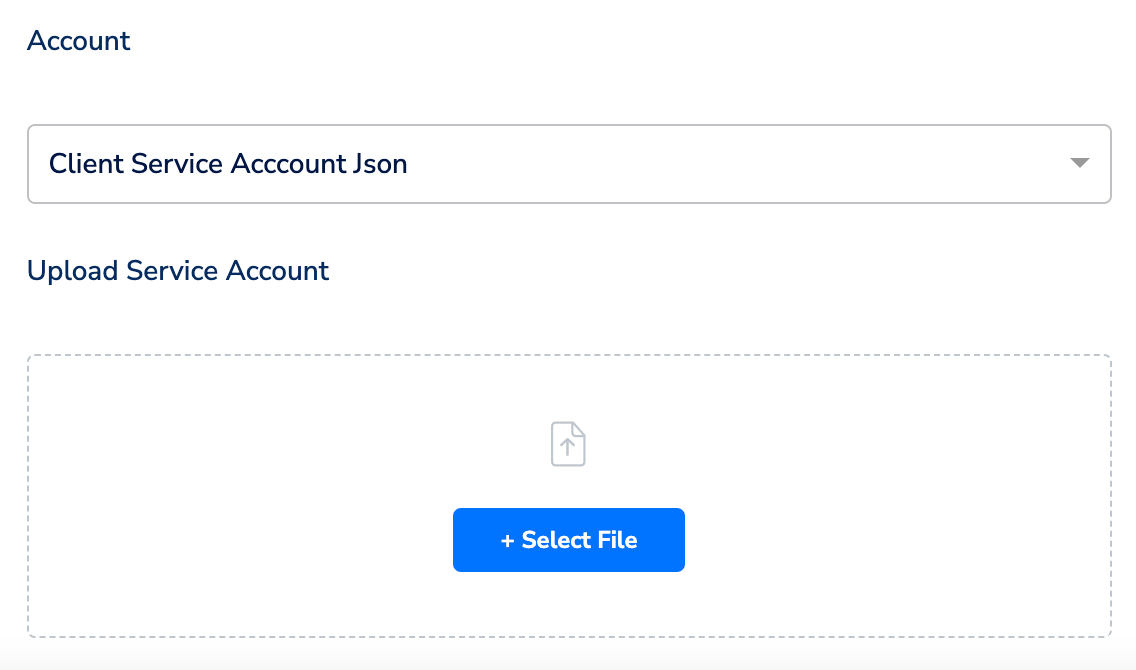
 ii. If you choose **Client Service Account** **Json** as the Account, then you need to upload the JSON file with the required authentication information using the **+ Select File** option so that Zeotap CDP can push the audiences to Google Cloud Storage Platform.
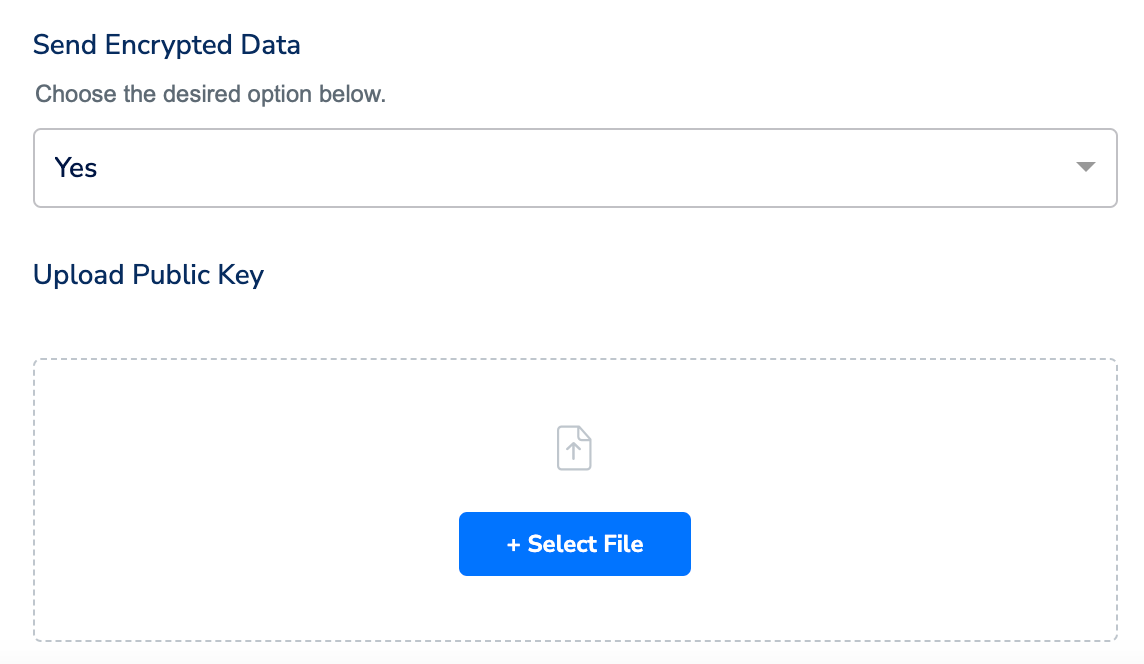
 g. Under **Send Encrypted Data**, choose whether you want to encrypt your data using the PGP ([Pretty Good Privacy](https://en.wikipedia.org/wiki/Pretty_Good_Privacy)) data transfer mechanism. If you choose **Yes**, then ensure that you upload the Public Key. For more information about PGP encryption, refer [here](/articles/integrate-customer/pgp-encryption-in-destinations).
 h. Review all the values entered above and then click **Next** to proceed.
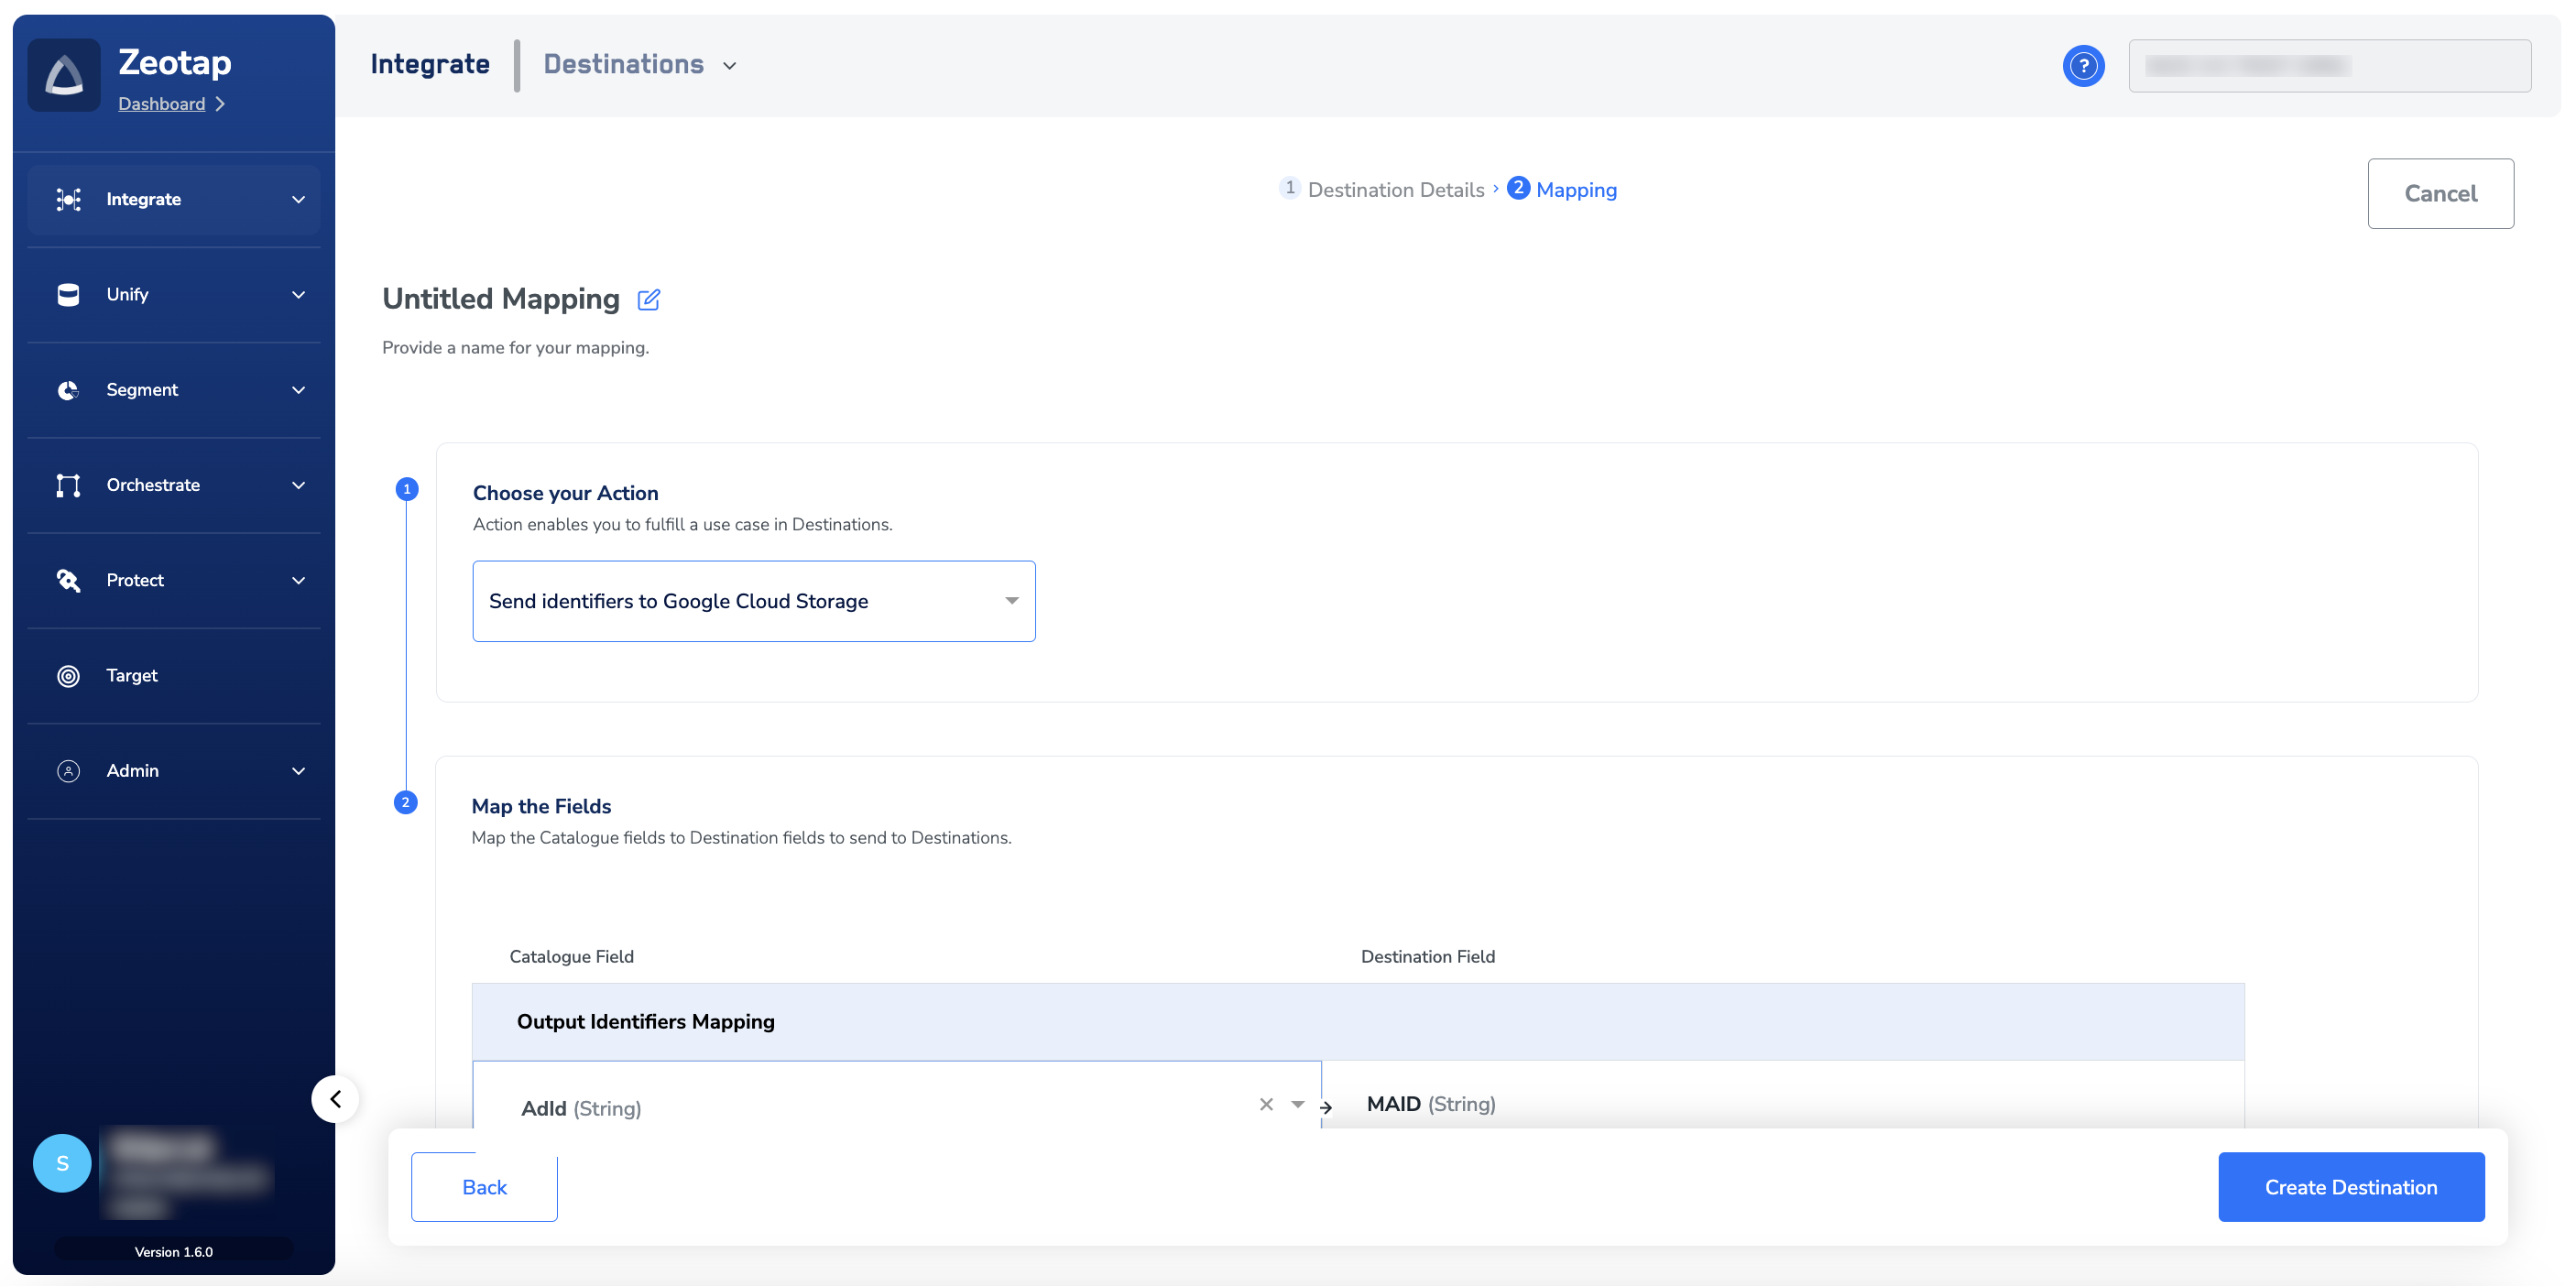
 In the new screen that appears, choose the appropriate action and mapping as explained below. Under **Choose your Action**, you can either choose **Send Identifiers to Google Cloud Storage** or **Send attributes and identifiers to Google Cloud Storage** as the action for activating your audience in Audiences.
a. If you choose **Send Identifiers to Google Cloud Storage** as your action, then you can send **MAIDS** and **raw email addresses** to Google Cloud Storage.
In the new screen that appears, choose the appropriate action and mapping as explained below. Under **Choose your Action**, you can either choose **Send Identifiers to Google Cloud Storage** or **Send attributes and identifiers to Google Cloud Storage** as the action for activating your audience in Audiences.
a. If you choose **Send Identifiers to Google Cloud Storage** as your action, then you can send **MAIDS** and **raw email addresses** to Google Cloud Storage.
 b. If you choose **Send attributes and identifiers to Google Cloud Storage** as your action, then you can send any attributes and identifiers to Google Cloud Storage.
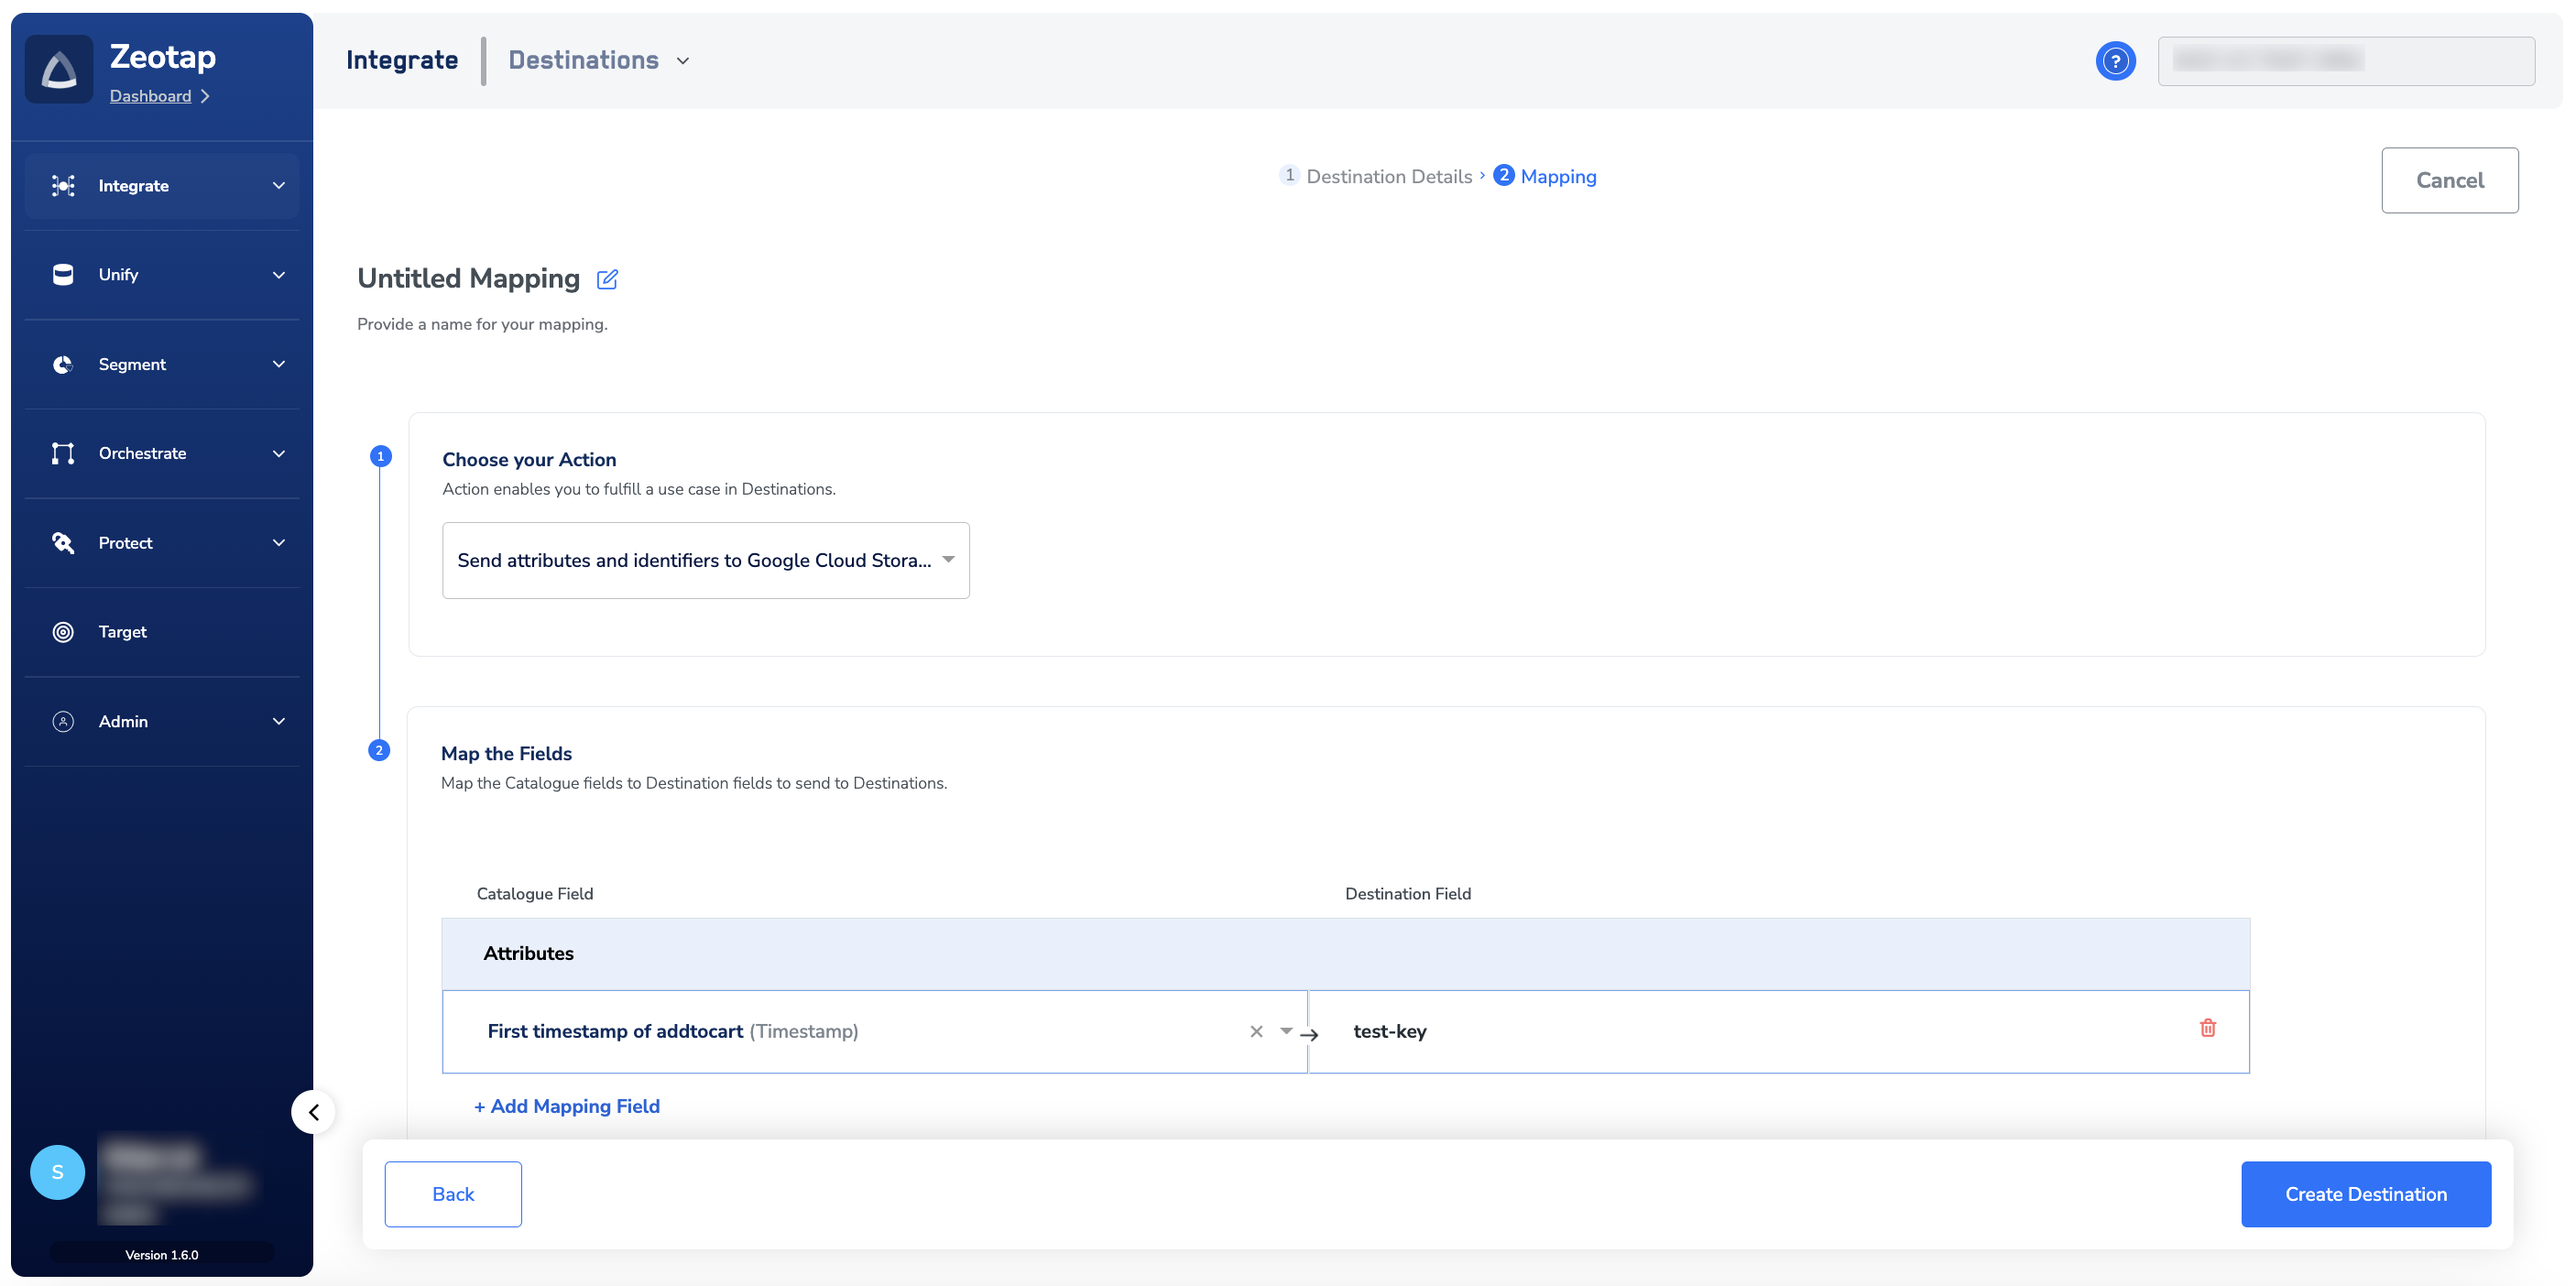 After finalising the attributes and identifiers to send, click **Create Destination**. The created Destination gets listed in the Audiences application, which can be linked to an audience.
## Identify Segment Files in the Google Cloud Storage Bucket
After an Audience is linked to a Destination, Zeotap CDP generates segment files in CSV format with the following naming convention:
`{filenamePrefix}{fileNumber}_${channelId}_${timestamp}`.csv, where the timestamp is in epoch format.
In case of multipart upload, the format is `{partNumber}_{filenamePrefix}{fileNumber}_${channelId}_${timestamp}`.csv
where,
* `partNumber` refers to the parts or segments of a multipart upload in Google Cloud Storage. Multipart uploads allows you to upload large files in multiple parts or chunks rather than uploading the entire file in one go. In the above naming convention, Part 0 refers to the first part of the multipart upload.
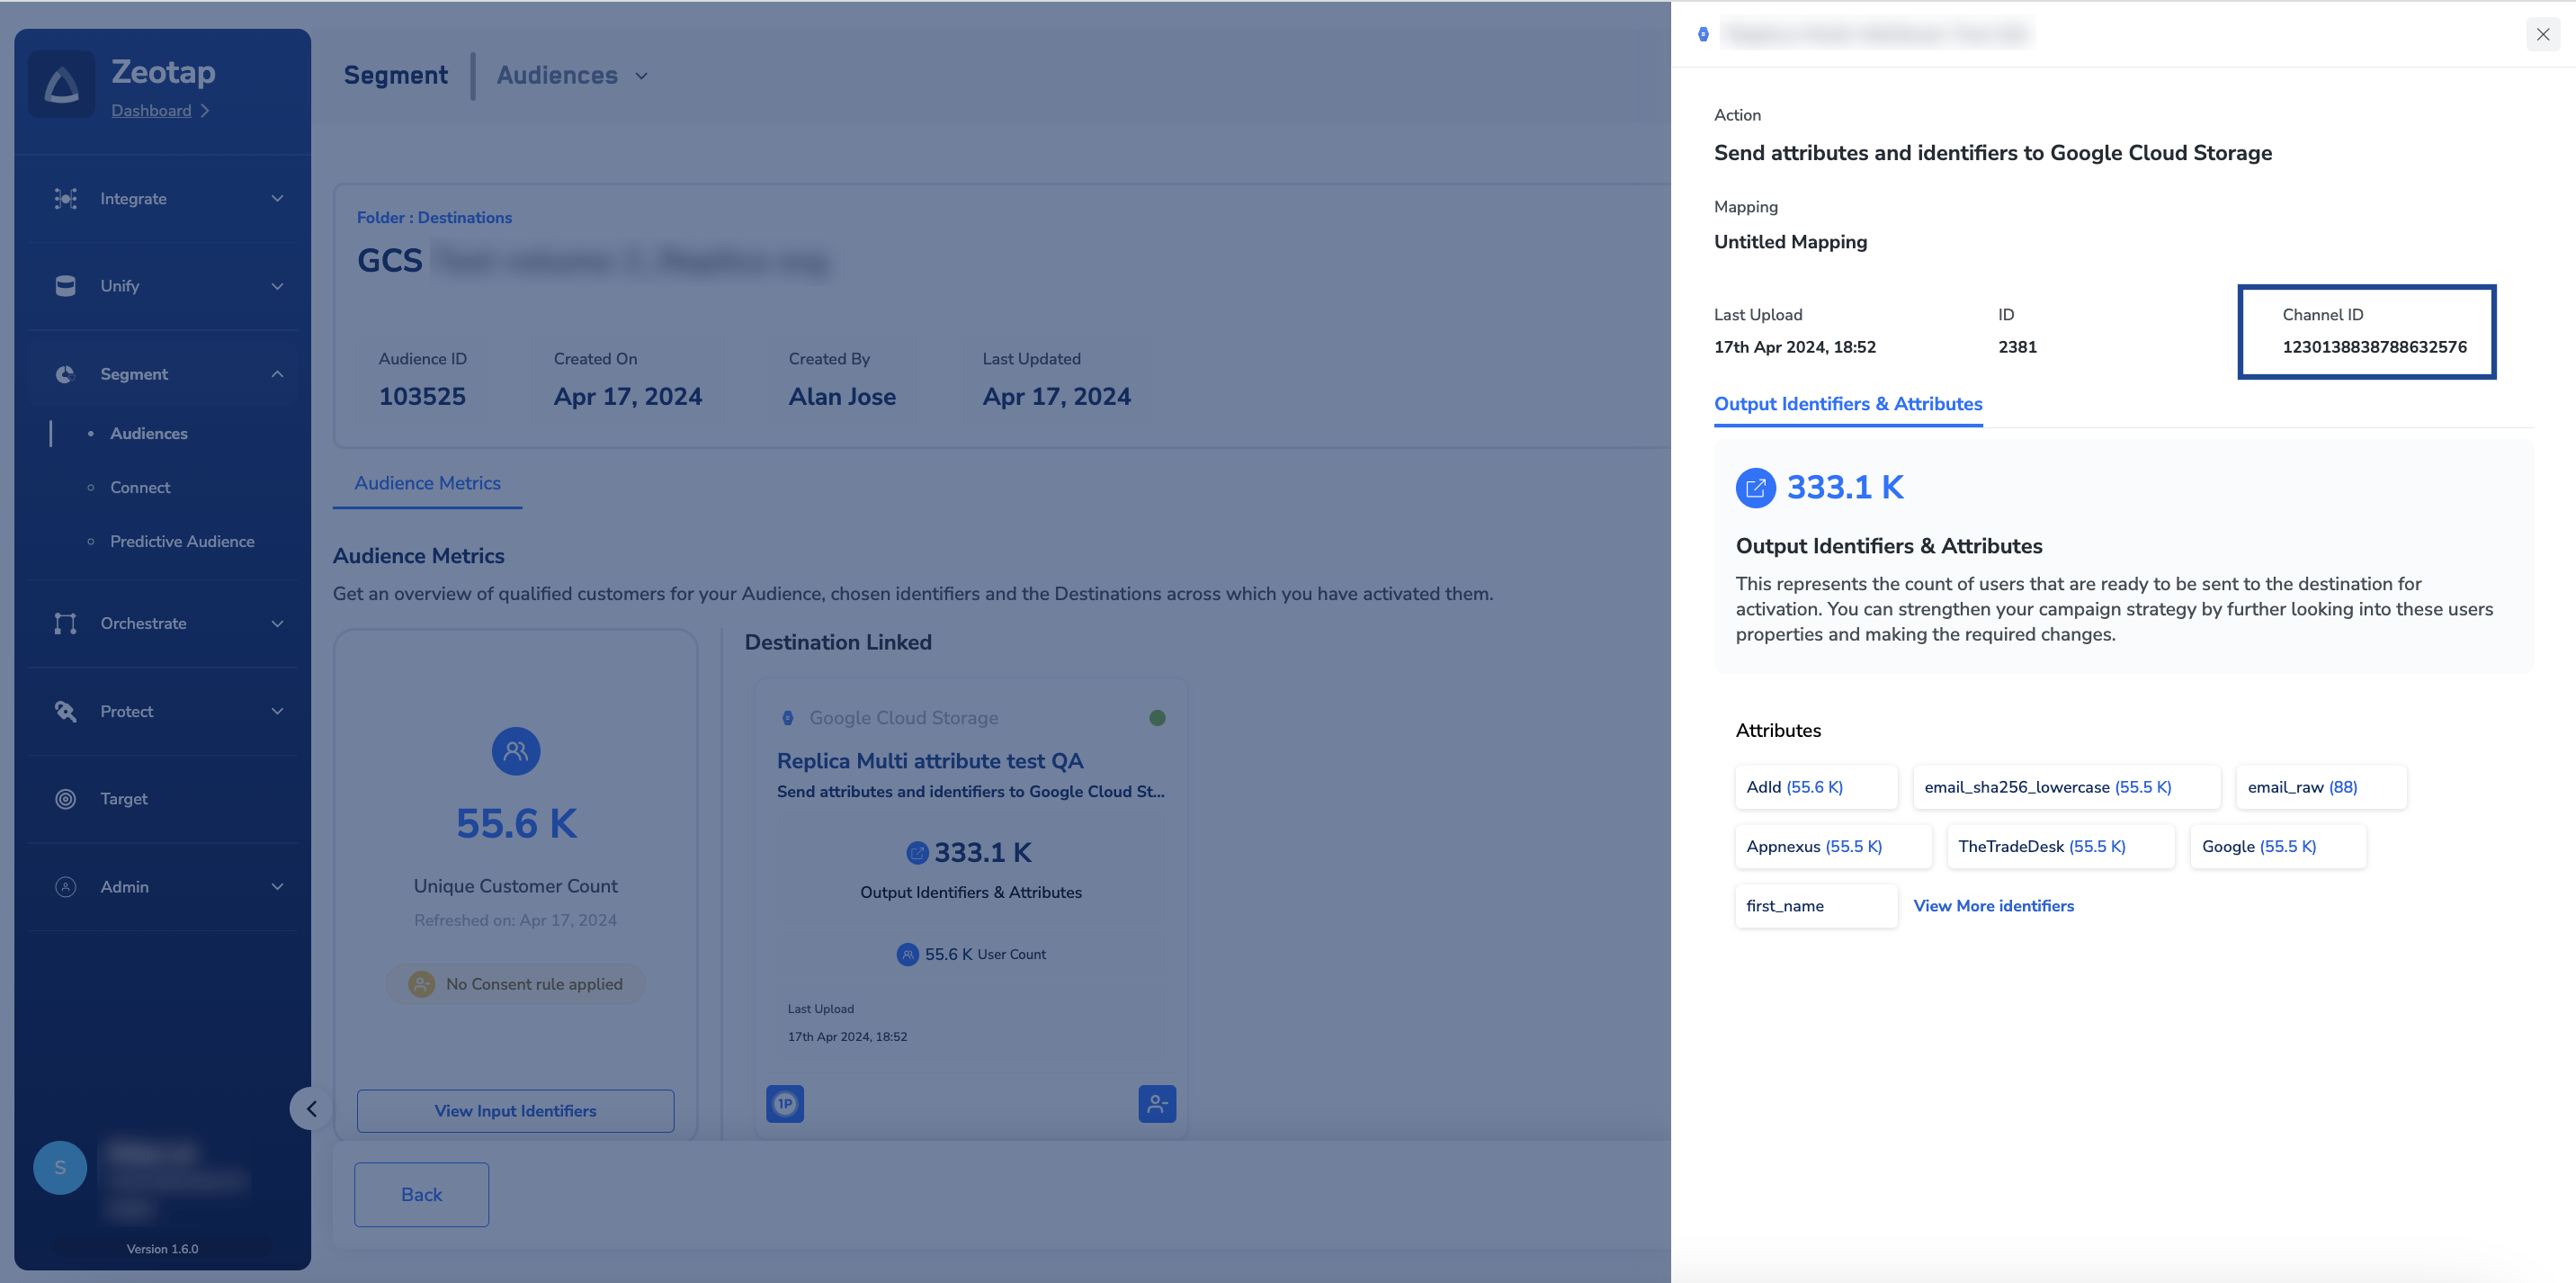
* `channelId` is the ID associated with your audience (segment) in Zeotap CDP. This is generated by the Zeotap CDP after the audience (segment) is linked to a Destination. You can obtain this information as shown in the image below.
After finalising the attributes and identifiers to send, click **Create Destination**. The created Destination gets listed in the Audiences application, which can be linked to an audience.
## Identify Segment Files in the Google Cloud Storage Bucket
After an Audience is linked to a Destination, Zeotap CDP generates segment files in CSV format with the following naming convention:
`{filenamePrefix}{fileNumber}_${channelId}_${timestamp}`.csv, where the timestamp is in epoch format.
In case of multipart upload, the format is `{partNumber}_{filenamePrefix}{fileNumber}_${channelId}_${timestamp}`.csv
where,
* `partNumber` refers to the parts or segments of a multipart upload in Google Cloud Storage. Multipart uploads allows you to upload large files in multiple parts or chunks rather than uploading the entire file in one go. In the above naming convention, Part 0 refers to the first part of the multipart upload.
* `channelId` is the ID associated with your audience (segment) in Zeotap CDP. This is generated by the Zeotap CDP after the audience (segment) is linked to a Destination. You can obtain this information as shown in the image below.
 * `epochmilliTimestamp` is the timestamp in epoch format.
Let's understand this with an example. Suppose you create an audience segment called **PublicAbove18** with **Channel ID** `12345678`, a **filename prefix** `testprefix`, and a **file number** `98765`. The timestamp information in **epoch milliseconds** is `1625138600`. When this file is uploaded to GCS as the first part of the multipart upload, the file is named as follows:
`Part0_testprefix98765_12345678_1625138600.csv`
## Link an Audience to the Google Cloud Storage Destination
For information about how to link an audience or segment to the created Destination in Audiences application, refer [here](/articles/integrate-customer/link-an-audience-to-the-destination).
**Note:**
The terms *Audiences* and *Segments* are used interchangeably to refer to customer cohorts belonging to a specific category. For example, an Audience or a segment could be a specific group of customers who are over 18 years of age and who have performed an `addToCart` event within the last 30 days.
* `epochmilliTimestamp` is the timestamp in epoch format.
Let's understand this with an example. Suppose you create an audience segment called **PublicAbove18** with **Channel ID** `12345678`, a **filename prefix** `testprefix`, and a **file number** `98765`. The timestamp information in **epoch milliseconds** is `1625138600`. When this file is uploaded to GCS as the first part of the multipart upload, the file is named as follows:
`Part0_testprefix98765_12345678_1625138600.csv`
## Link an Audience to the Google Cloud Storage Destination
For information about how to link an audience or segment to the created Destination in Audiences application, refer [here](/articles/integrate-customer/link-an-audience-to-the-destination).
**Note:**
The terms *Audiences* and *Segments* are used interchangeably to refer to customer cohorts belonging to a specific category. For example, an Audience or a segment could be a specific group of customers who are over 18 years of age and who have performed an `addToCart` event within the last 30 days.