> ## Documentation Index
> Fetch the complete documentation index at: https://docs.zeotap.com/llms.txt
> Use this file to discover all available pages before exploring further.
# Emarsys
## Overview
Emarsys is a marketing automation platform that enables businesses to create personalised marketing campaigns. Integrated with Zeotap, it uses email marketing as the primary medium to deliver highly targeted messages, thereby optimising customer engagement and enhancing marketing effectiveness.
## Supported Identifiers/Attributes
This integration accepts the following identifiers and attributes:
* Email addresses (raw)
* First Name
* Last Name
* Gender
* Date of birth
* Phone
* Mobile
* City
* Company
* Company address
* City (office)
* Opt-in – Acceptable values are Yes/No or True/False. For other values, contact your Zeotap POC
* Custom Fields (Identifiers/attributes)
## Available Actions and Supported Features
The following table lists the available action types for the integration and the supported features for each action type:
| Action Name | [ID EXTENSION](/articles/segment-customer/extend-your-audience#id-extension) | [DELETE](https://docs.zeotap.com/articles/#!integrate-customer/delta-upload-and-delete-functions) | [DELTA UPLOAD](https://docs.zeotap.com/articles/#!integrate-customer/delta-upload-and-delete-functions) |
| :--------------------------------------- | :--------------------------------------------------------------------------- | :------------------------------------------------------------------------------------------------ | :------------------------------------------------------------------------------------------------------ |
| Send identifiers to Emarsys (Deprecated) | ✅ | - | - |
| Send contact to contact list (Audience) | - | - | - |
| Send triggered event (Audience) | - | - | - |
## Prerequisites
Ensure that you have the details about the below components of Emarsys account before creating a Destination.
### User name (API ID) and Secret
In Emarsys, the **User name (API ID)** and **Secret** details are used to authenticate the API calls and gain access to certain features or functionalities on the Emarsys platform.
Perform the following steps to obtain your User name (ID in Emarsys) and the Client Secret from the Emarsys console:
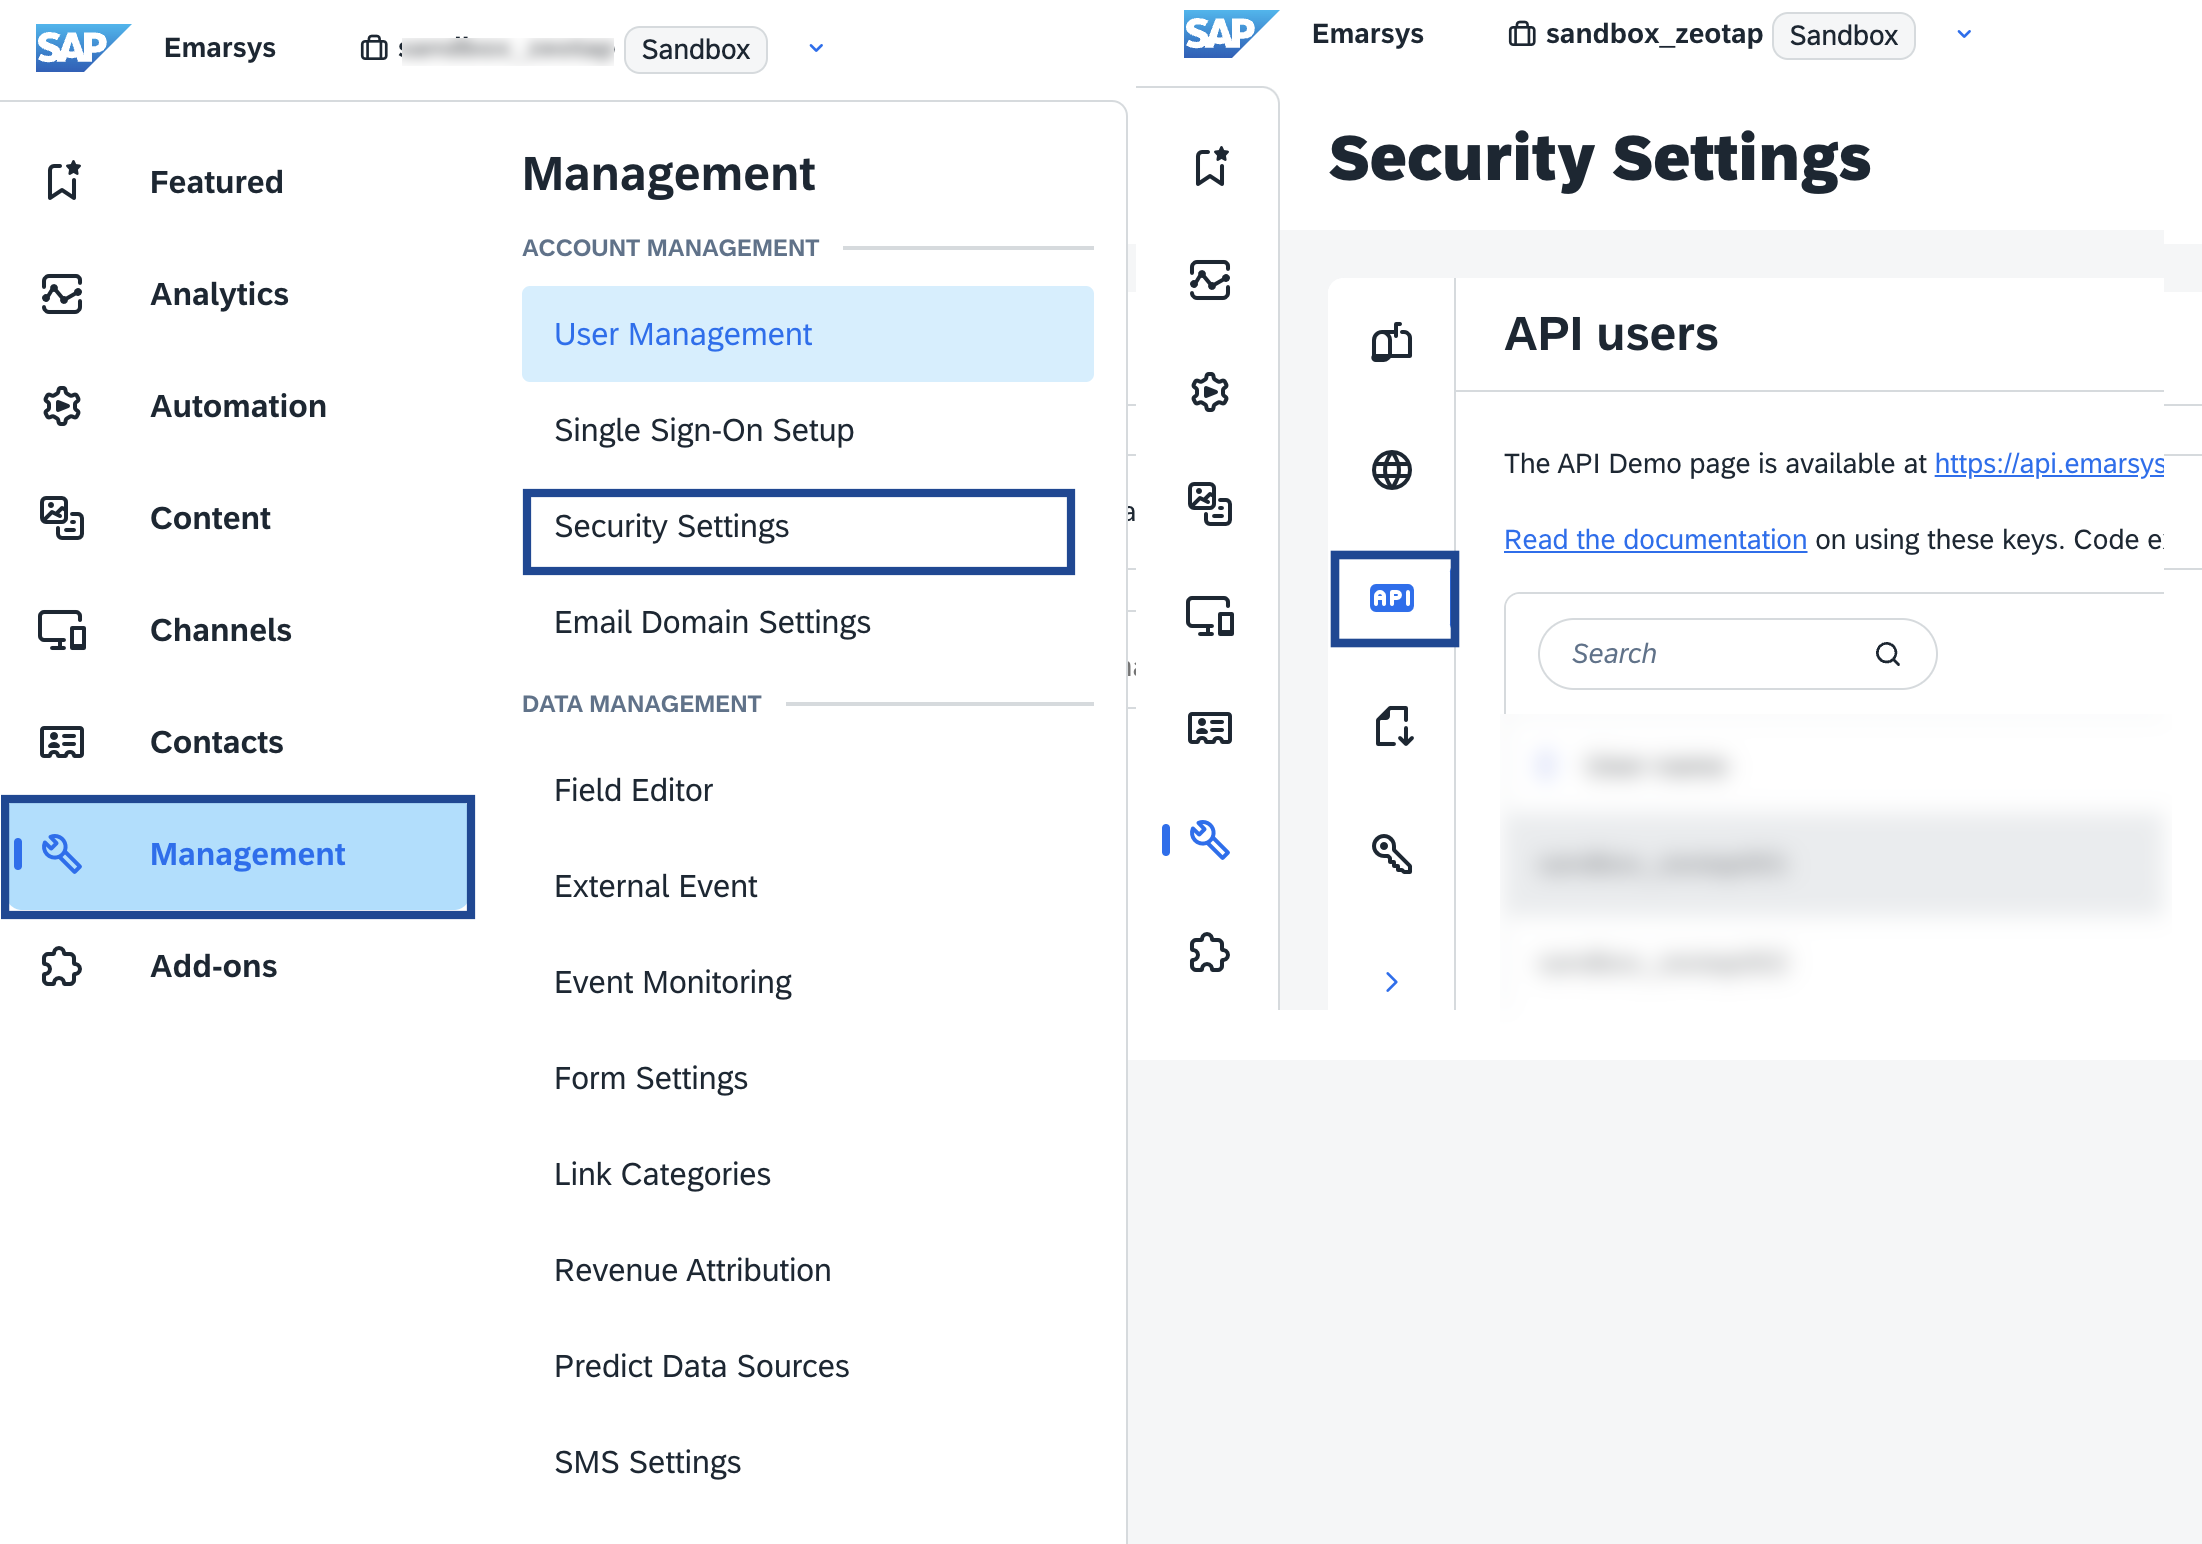
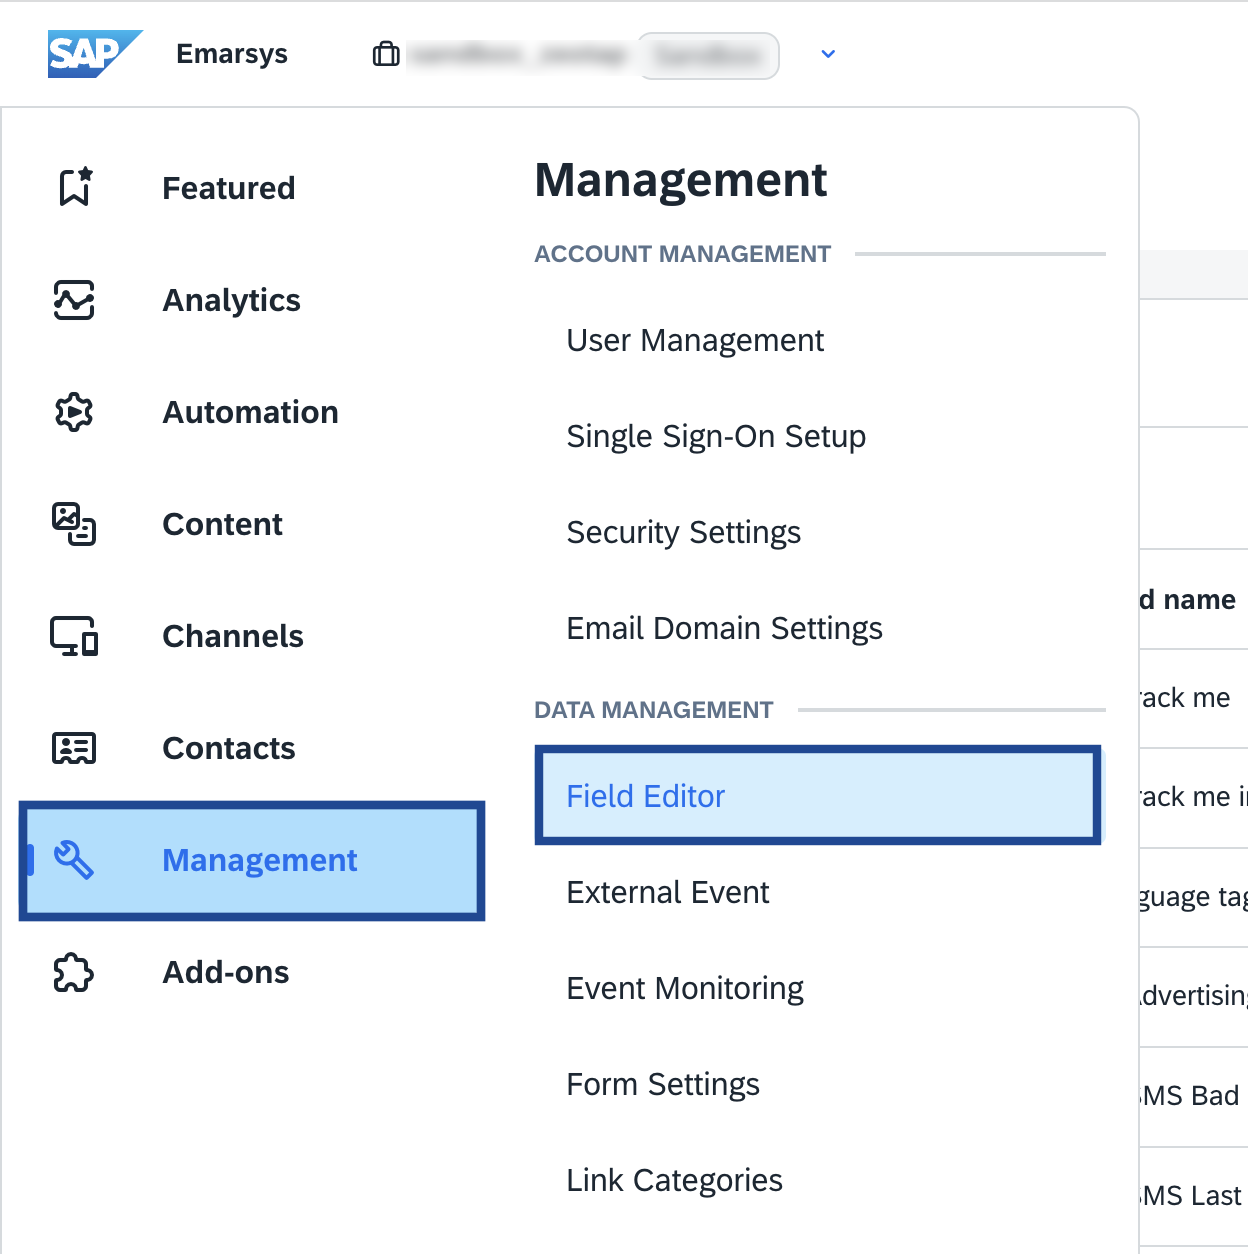
Log into your Emarsys account and navigate to **Management > Security Settings > API** as shown in the image below.
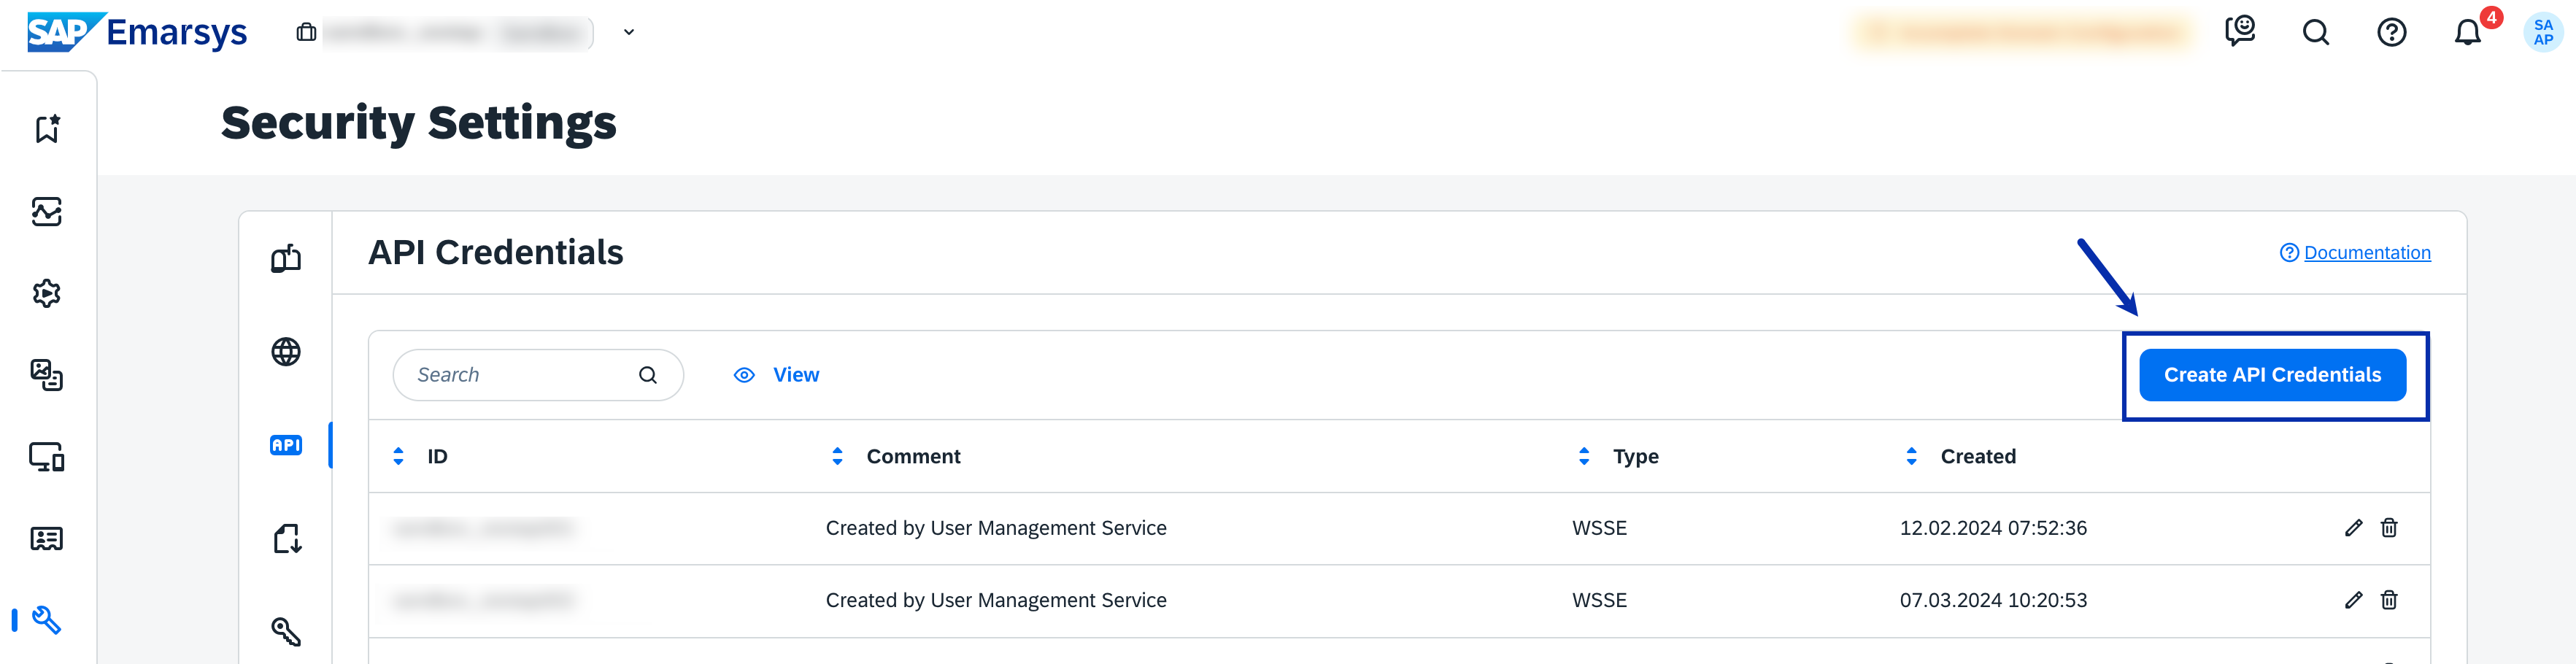
 In the new screen that appears, under **API Credentials**, click **Create API Credentials**.
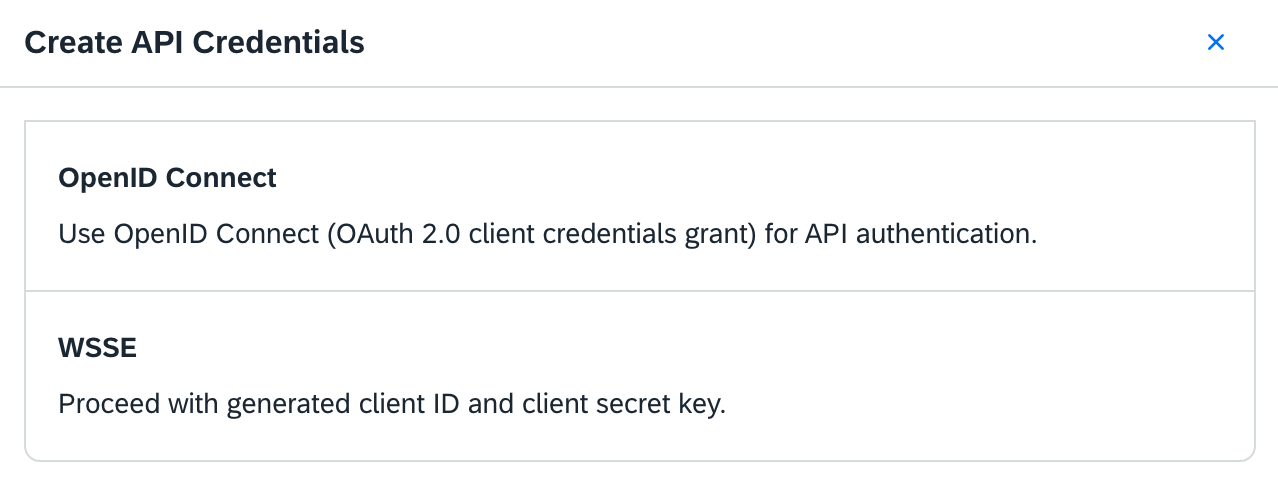
 In the window that appears, under **Create API Credentials**, choose your preferred API authentication method. Currently only **WSSE** authentication is supported. We will be releasing an enhancement to support Open ID Connect soon..
a. **WSSE** (Web Services Security Extensions)–By selecting the **WSSE** option, you create API credentials that use WSSE authentication over SSL for secure communication. This method requires adding a custom `X-WSSE` header to each request. [Learn more](https://dev.emarsys.com/docs/emarsys-core-api-guides/branches/main/b3c3a1eba8515-authentication)
In the window that appears, under **Create API Credentials**, choose your preferred API authentication method. Currently only **WSSE** authentication is supported. We will be releasing an enhancement to support Open ID Connect soon..
a. **WSSE** (Web Services Security Extensions)–By selecting the **WSSE** option, you create API credentials that use WSSE authentication over SSL for secure communication. This method requires adding a custom `X-WSSE` header to each request. [Learn more](https://dev.emarsys.com/docs/emarsys-core-api-guides/branches/main/b3c3a1eba8515-authentication)
 In the new screen that appears, enter the **Password** associated with your Emarsys account and complete the API credentials creation process.
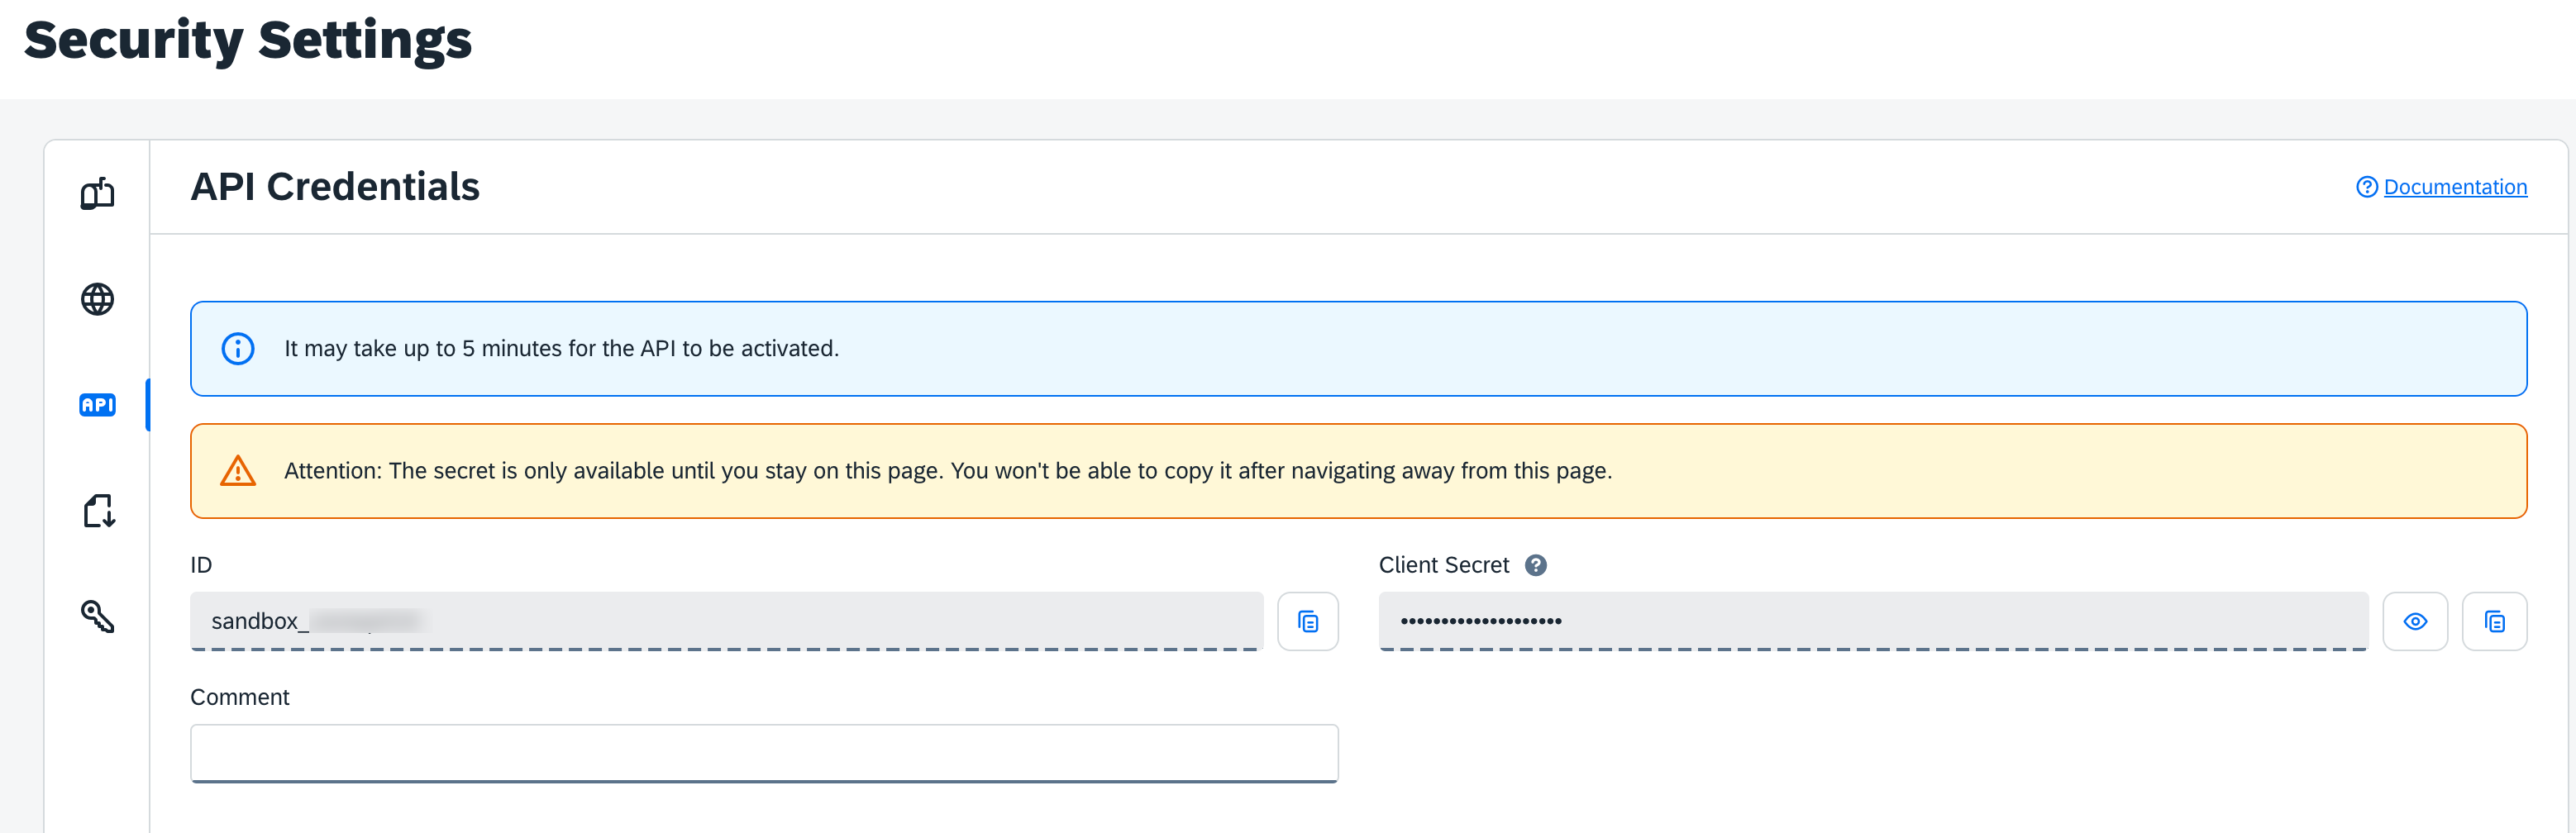
Upon successfully creating the API credentials, you can find the **ID** (User name in Zeotap CDP) and **Client** **Secret** details under the **API Credentials**section as shown below. **Note that the secret is only available until you stay on this page. You will not be able to copy it after navigating away from this page.**
In the new screen that appears, enter the **Password** associated with your Emarsys account and complete the API credentials creation process.
Upon successfully creating the API credentials, you can find the **ID** (User name in Zeotap CDP) and **Client** **Secret** details under the **API Credentials**section as shown below. **Note that the secret is only available until you stay on this page. You will not be able to copy it after navigating away from this page.**
 Copy the API credentials and scroll down to **Permissions**.
Here, you need to enable the following permissions for the user:
a. Under **contact**, a list of permissions as shown in the image below appears, wherein, you need to enable **contacts.update**.
Copy the API credentials and scroll down to **Permissions**.
Here, you need to enable the following permissions for the user:
a. Under **contact**, a list of permissions as shown in the image below appears, wherein, you need to enable **contacts.update**.
.png?fit=max&auto=format&n=vzDgpNKaht27Bxzv&q=85&s=a5423545ea54ae11e2d0e29b6508a6f7) b. Similarly, under **contactlis** **t**, you need to enable-
* **contactlist.contact.add**
* **contactlist.contact.delete**
* **contactlist.create**
b. Similarly, under **contactlis** **t**, you need to enable-
* **contactlist.contact.add**
* **contactlist.contact.delete**
* **contactlist.create**
.png?fit=max&auto=format&n=vzDgpNKaht27Bxzv&q=85&s=7af10a8163c4a7005333d49764811bdc) c. Under **externalevent**, you need to enable-
* **externalevent.create**
* **externalevent.trigger**
c. Under **externalevent**, you need to enable-
* **externalevent.create**
* **externalevent.trigger**
_(1).png?fit=max&auto=format&n=vzDgpNKaht27Bxzv&q=85&s=051956b8805f1b540b37163689a96fa6) ### Key ID (Field ID)
In Emarsys, this is the **Field ID** of your primary identifier, which you obtain from your Emarsys account. System fields such as raw email, first name, last name and so on, have predefined Key IDs. You can use these directly while creating the destination in Zeotap CDP. For more information about the system fields, refer to the [Emarsys documentation](https://help.emarsys.com/hc/en-us/articles/115004637665-Overview-The-Emarsys-system-fields).
**Note:**
*If you want to use a Custom ID as the main identifier, then you must create a custom field in Emarsys and use the corresponding Field ID while creating the destination in Zeotap CDP. **Ensure that the custom ID is activated through the [Emarsys Support Team](https://emarsys.zendesk.com/auth/v2/login/signin?return_to=https%3A%2F%2Fhelp.emarsys.com%2Fhc%2Fen-us%2Frequests%2Fnew\&theme=hc\&locale=en-us\&brand_id=38892\&auth_origin=38892%2Ctrue%2Ctrue)** **.***
### Key ID (Field ID)
In Emarsys, this is the **Field ID** of your primary identifier, which you obtain from your Emarsys account. System fields such as raw email, first name, last name and so on, have predefined Key IDs. You can use these directly while creating the destination in Zeotap CDP. For more information about the system fields, refer to the [Emarsys documentation](https://help.emarsys.com/hc/en-us/articles/115004637665-Overview-The-Emarsys-system-fields).
**Note:**
*If you want to use a Custom ID as the main identifier, then you must create a custom field in Emarsys and use the corresponding Field ID while creating the destination in Zeotap CDP. **Ensure that the custom ID is activated through the [Emarsys Support Team](https://emarsys.zendesk.com/auth/v2/login/signin?return_to=https%3A%2F%2Fhelp.emarsys.com%2Fhc%2Fen-us%2Frequests%2Fnew\&theme=hc\&locale=en-us\&brand_id=38892\&auth_origin=38892%2Ctrue%2Ctrue)** **.***
 Perform the following steps to create a Key ID (Field ID in Emarsys):
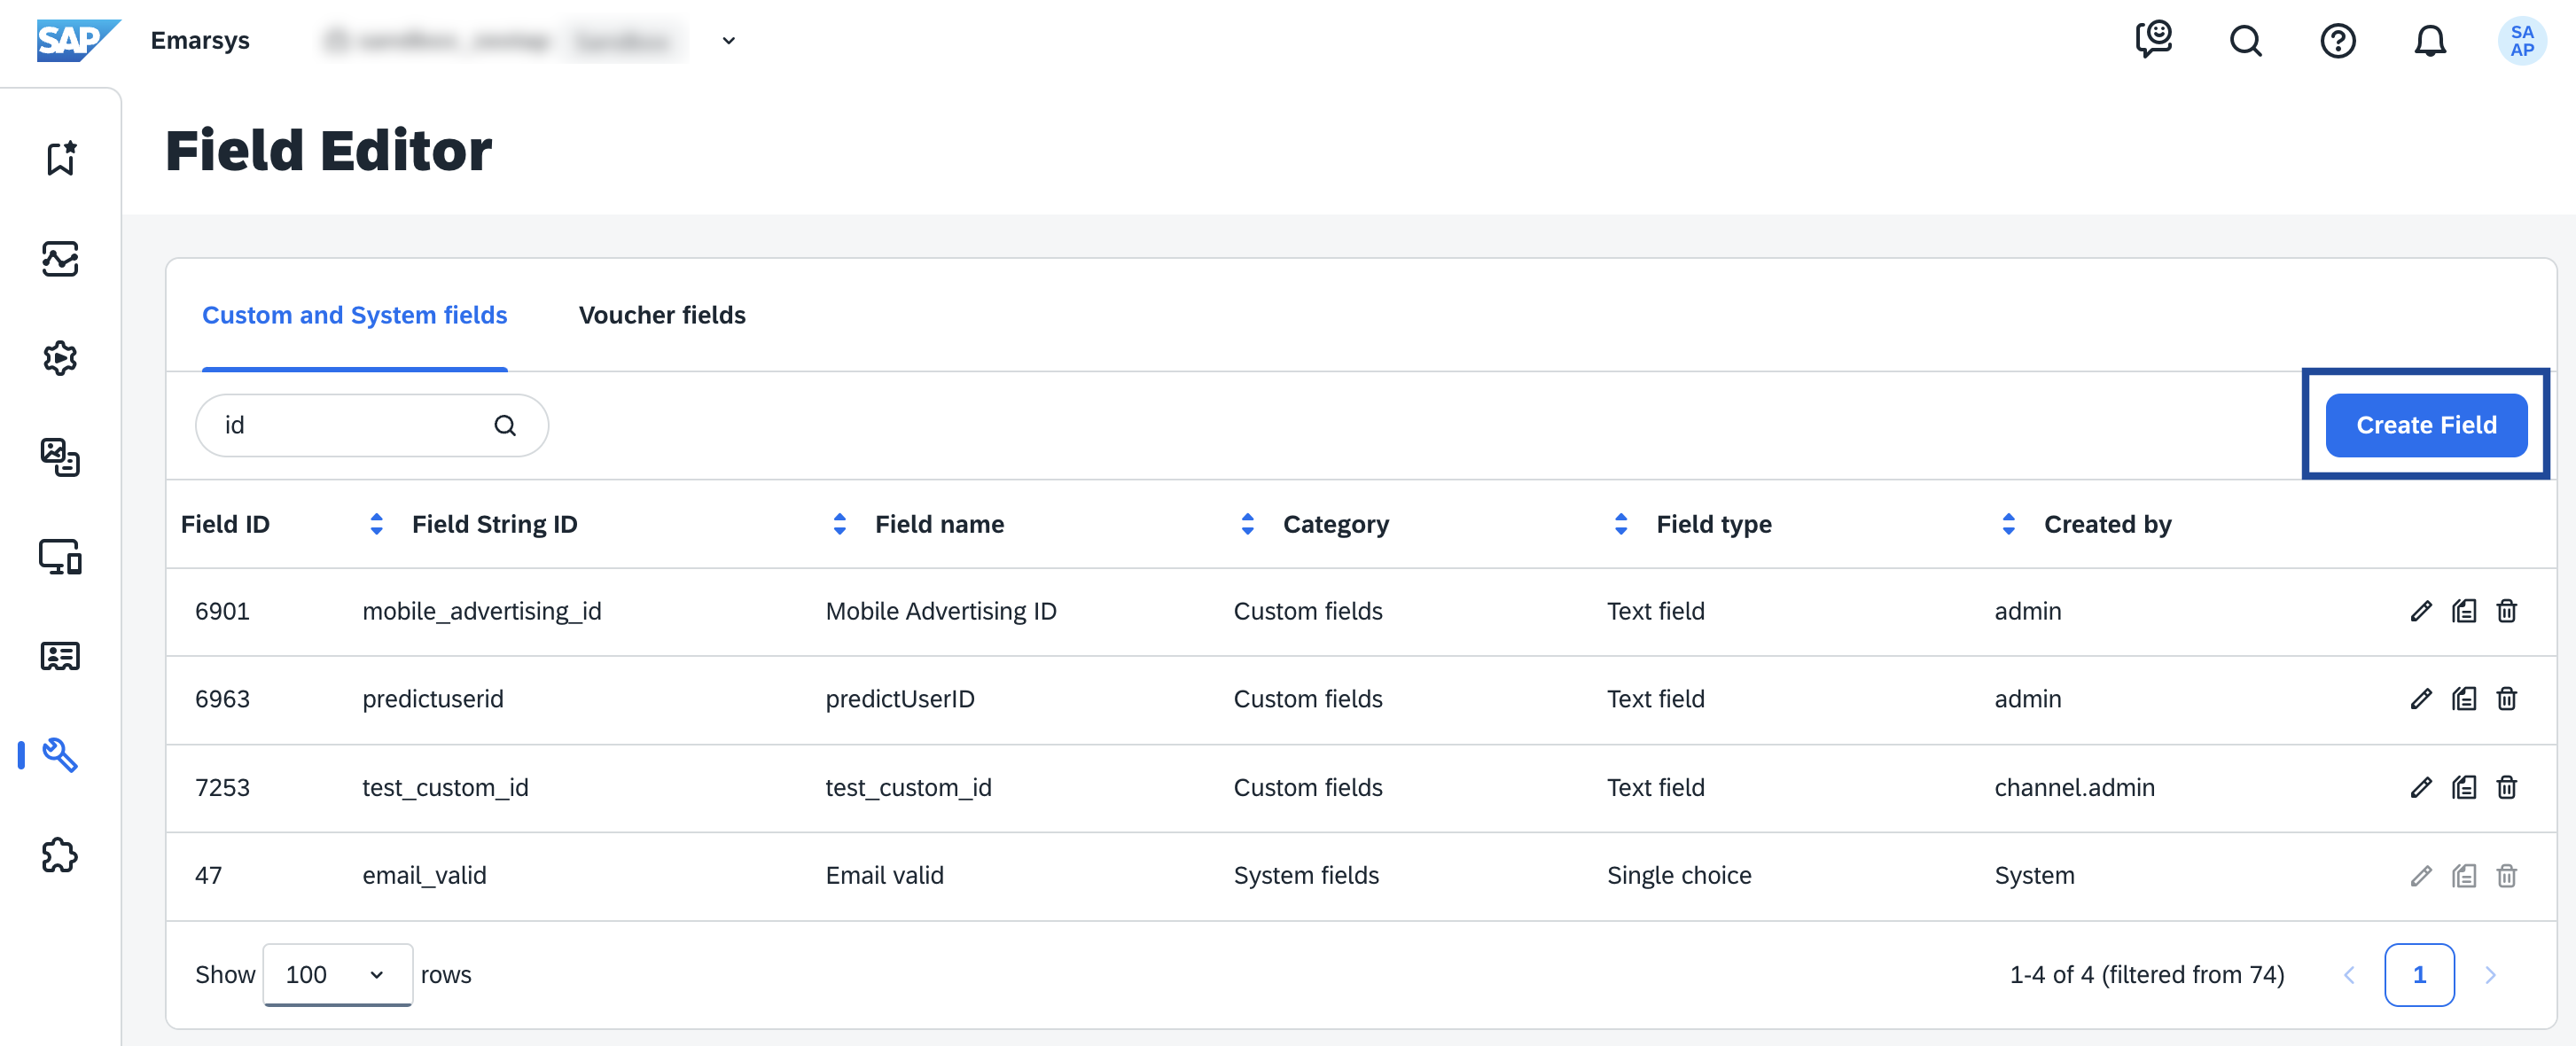
Log into Emarsys account and navigate to **Management** **>** **Field Editor**.
Perform the following steps to create a Key ID (Field ID in Emarsys):
Log into Emarsys account and navigate to **Management** **>** **Field Editor**.
 In the new screen that appears, click **Create Field**.
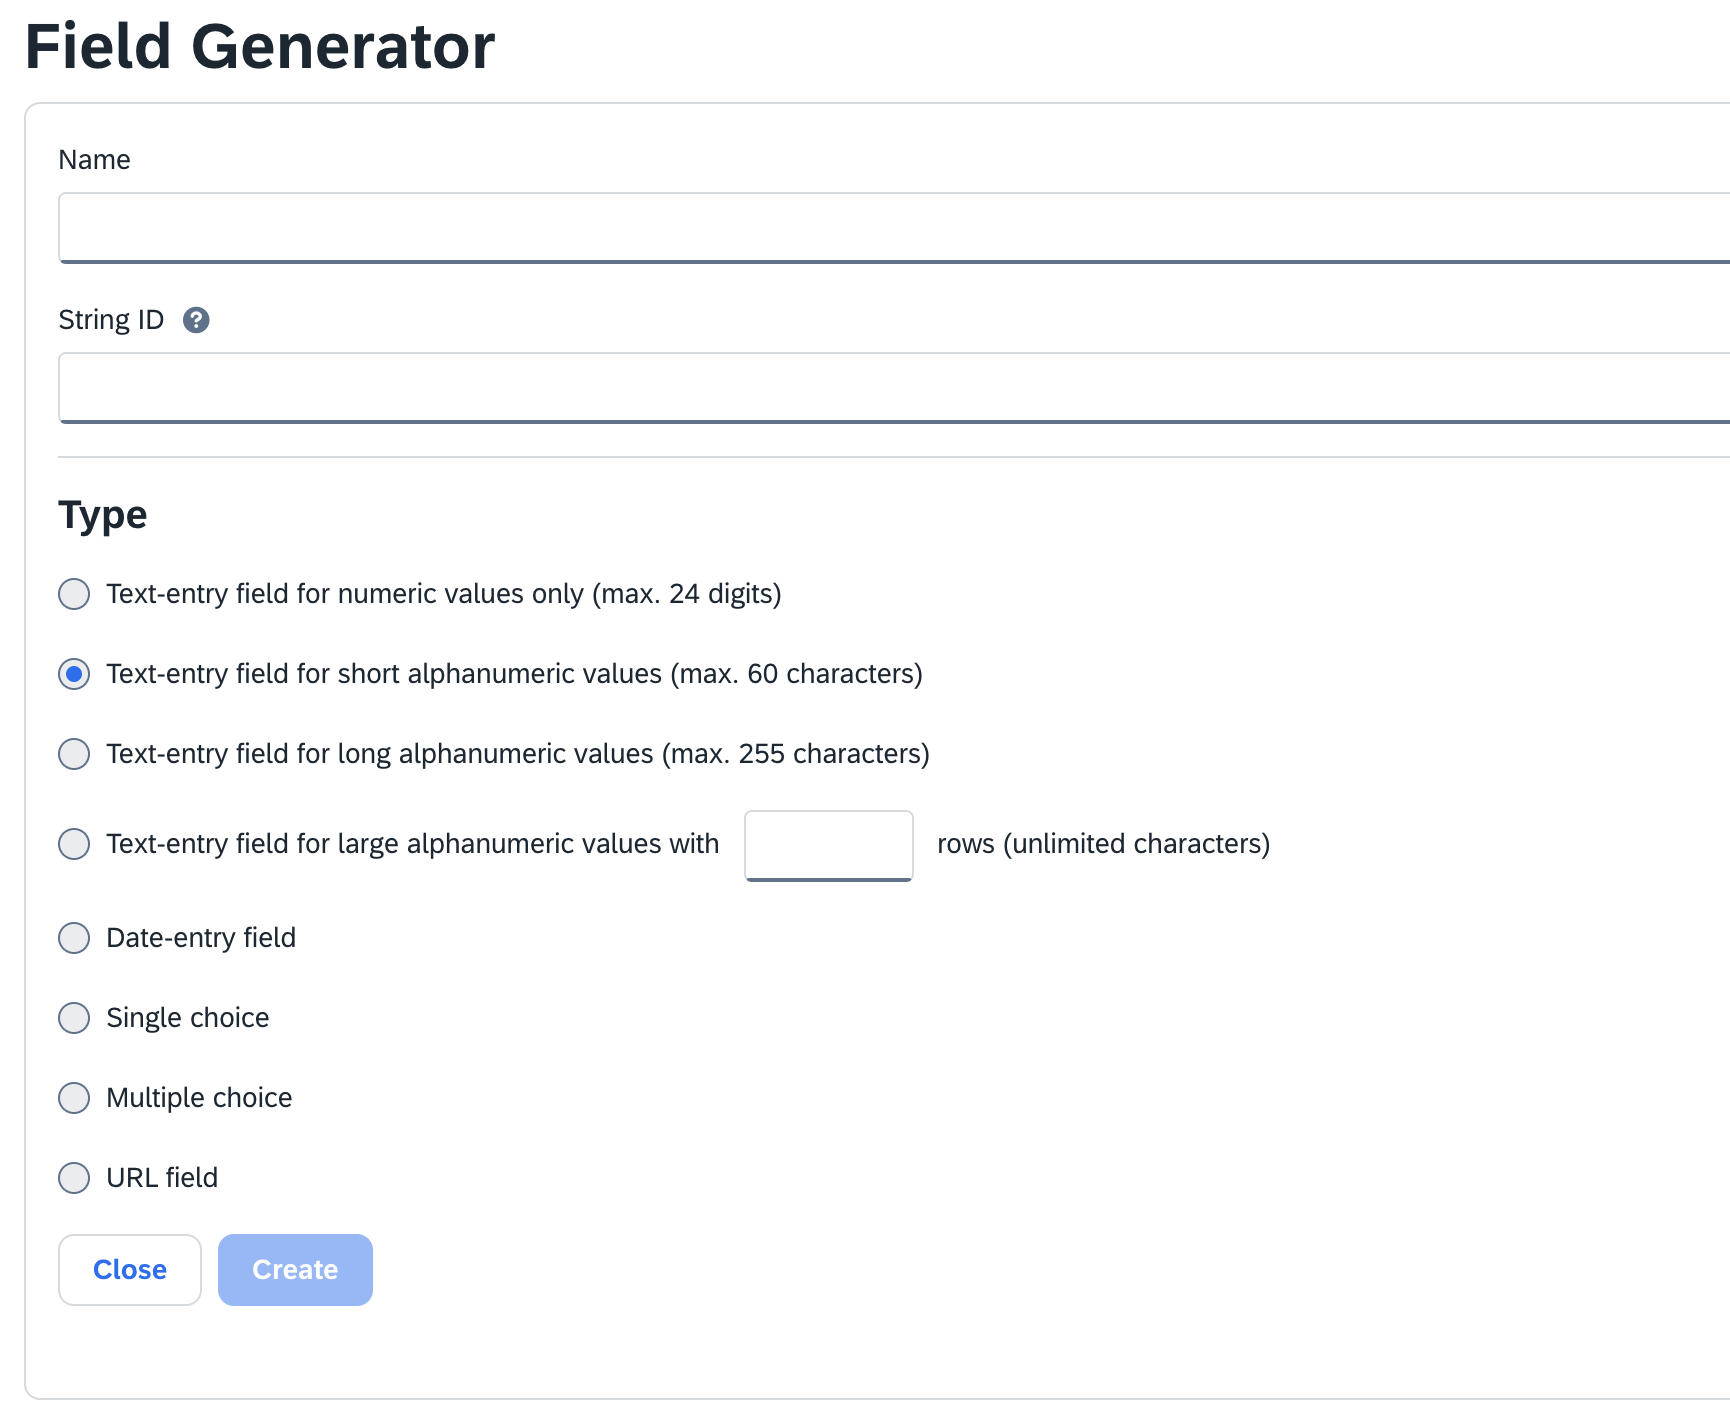
 In the **Field Generator** page that appears, provide the following details:
a. Enter **Name** for your identifier.
b. Provide a **String ID** for your identifier.
c. Choose the **Type** of your identifier.
d. Review all the details and click **Create**.
In the **Field Generator** page that appears, provide the following details:
a. Enter **Name** for your identifier.
b. Provide a **String ID** for your identifier.
c. Choose the **Type** of your identifier.
d. Review all the details and click **Create**.
 The created identifier gets listed in the **Field Editor** page. You can copy the **Field ID** against your identifier and provide it in the **Key ID** field while adding a new Destination in Zeotap CDP.
 ## Create a Destination for Emarsys
After obtaining the prerequisites as explained in the previous section, perform the following steps to create a Destination for Emarsys:
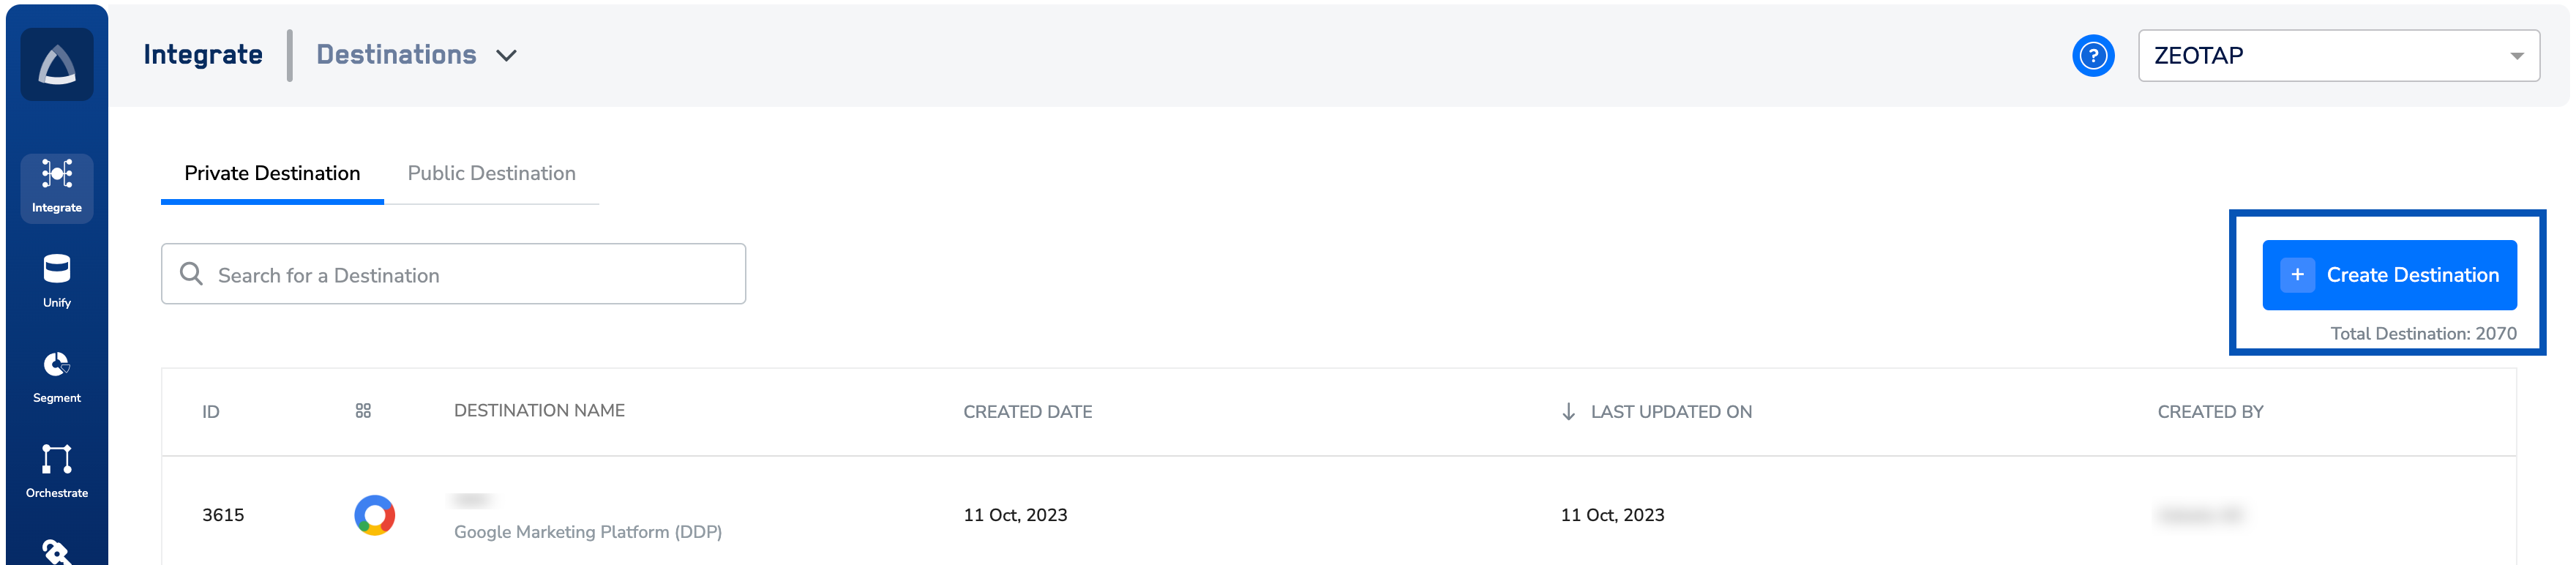
Log into the Zeotap CDP App and go to the **DESTINATIONS** application.
Click **+ Create Destination.**
## Create a Destination for Emarsys
After obtaining the prerequisites as explained in the previous section, perform the following steps to create a Destination for Emarsys:
Log into the Zeotap CDP App and go to the **DESTINATIONS** application.
Click **+ Create Destination.**
 Under **All Destinations**, search for **Emarsys**.
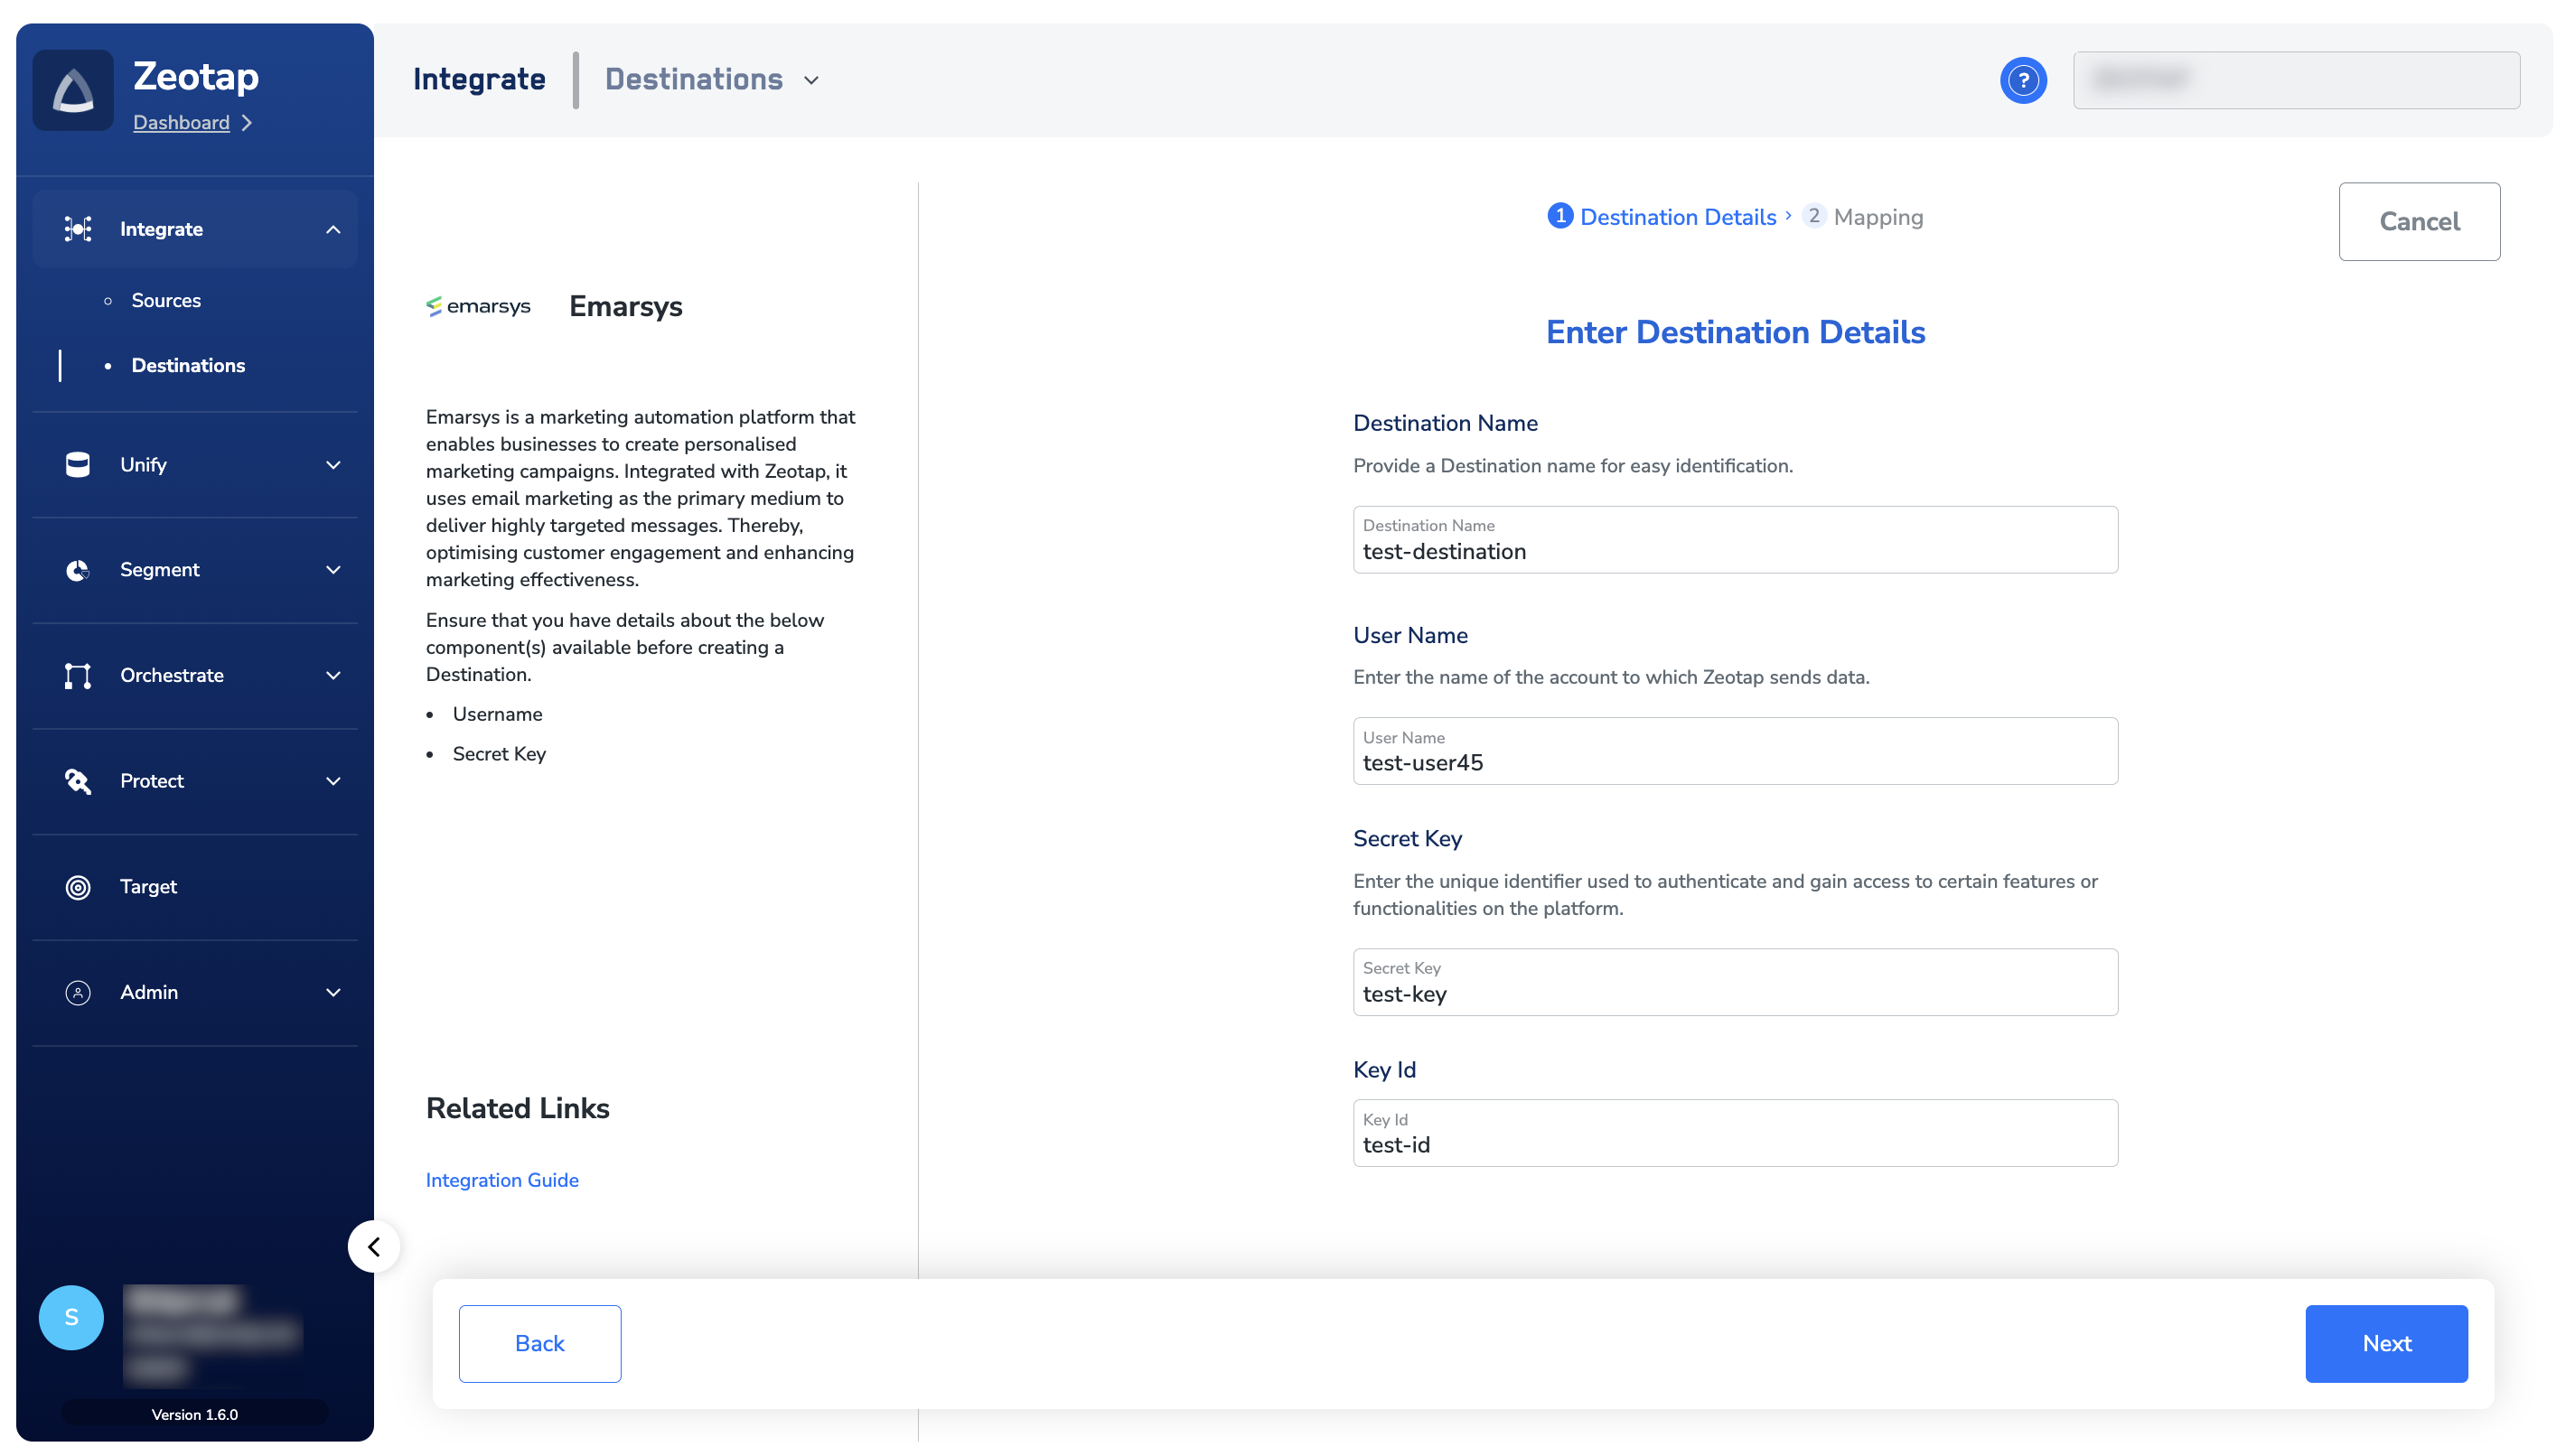
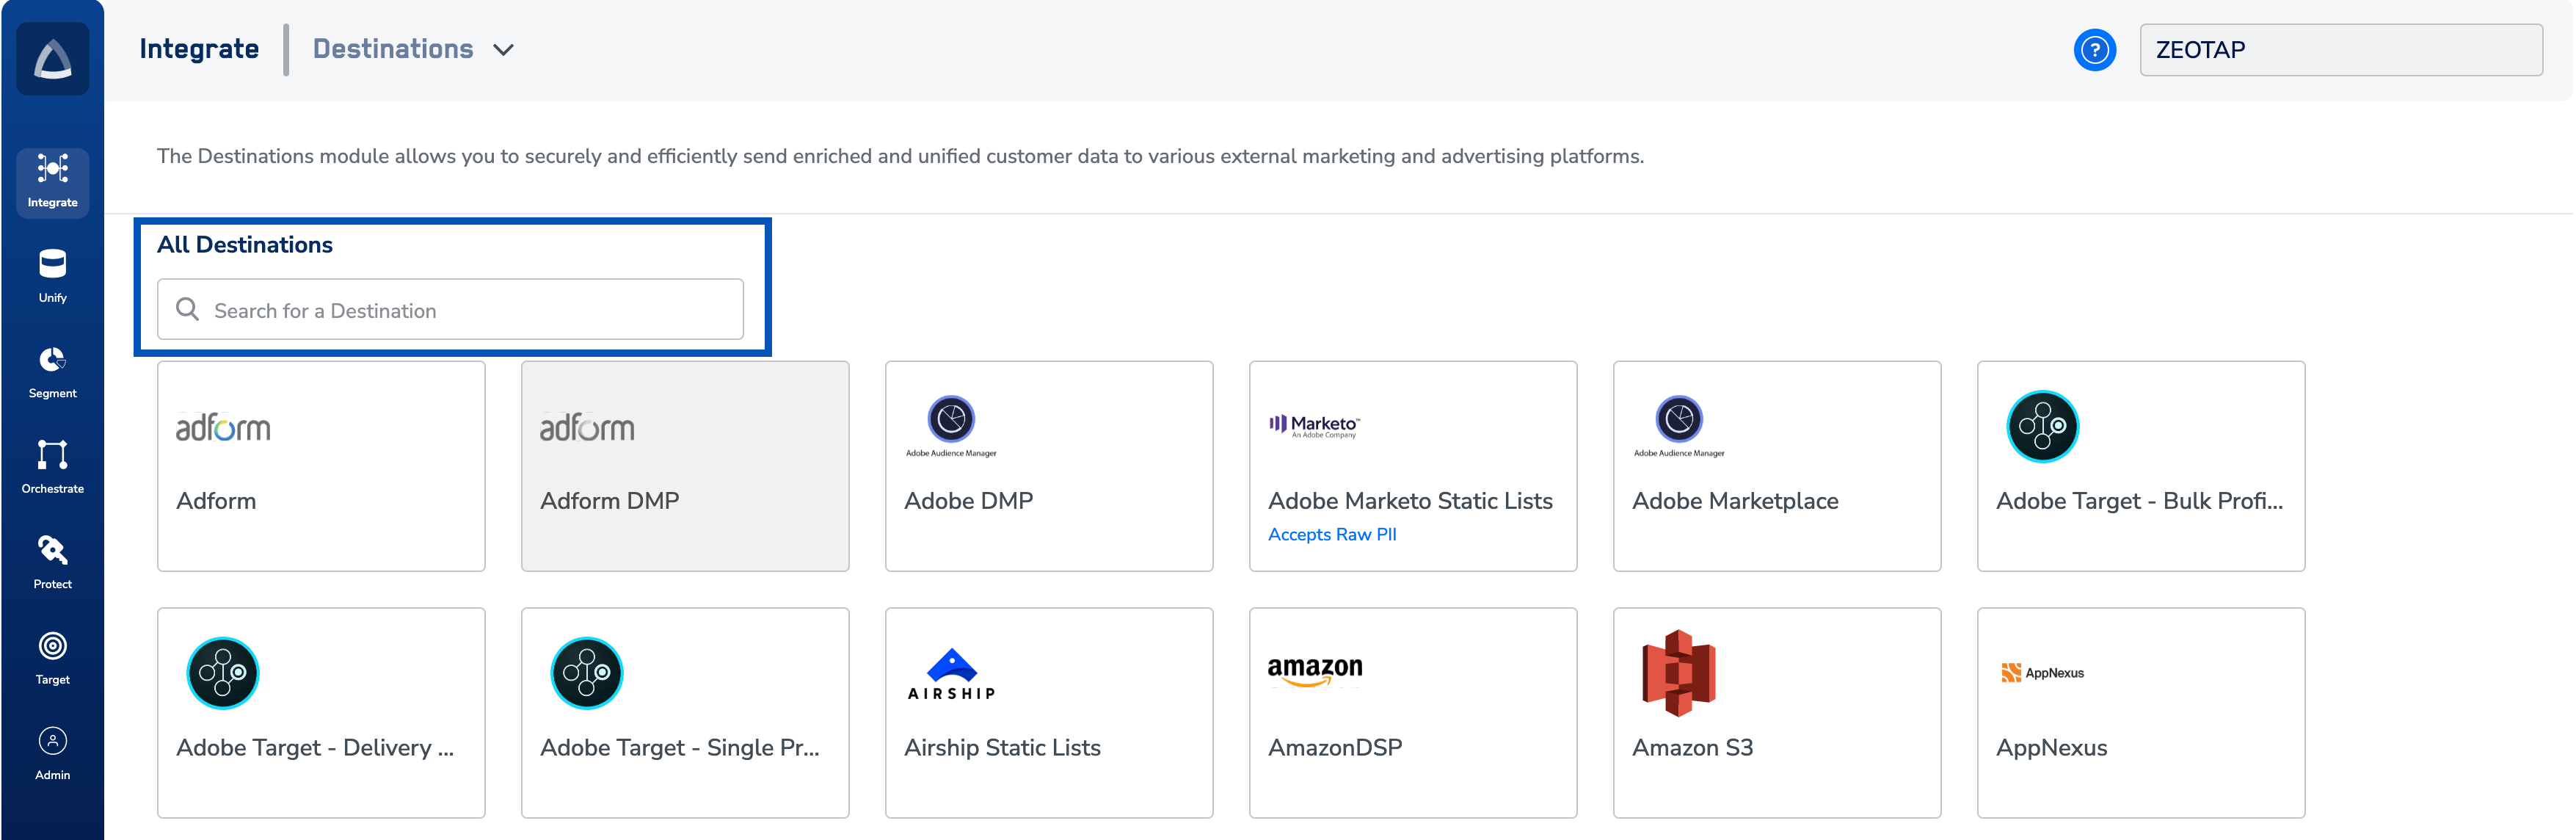 Click **Emarsys**. A screen appears displaying details about the particular destination towards the left. On the right-hand side of the screen, find a list of fields that are required for the integration to be established. Enter the required details as mentioned in the following steps:
a. Enter a name for the Destination.
b. Enter the **User name** of the account to which Zeotap sends data. For information about how to obtain this from Emarsys, refer to the [Prerequisites](/articles/integrate-customer/emarsys#h2_478947415)section.
c. Enter the **Secret Key** obtained from your Emarsys account. For information about how to obtain this from Emarsys, refer to the [Prerequisites](/articles/integrate-customer/emarsys#h2_478947415) section.
d. Enter the **Key ID**. For information about how to obtain this from Emarsys, refer to the [Prerequisites](/articles/integrate-customer/emarsys#h2_478947415) section.
**Note:**
*To use the 'custom\_ID' as the 'key\_ID', contact your Emarsys support to get it activated.*
e. Review all the values entered above and then click **Next** to proceed.
Click **Emarsys**. A screen appears displaying details about the particular destination towards the left. On the right-hand side of the screen, find a list of fields that are required for the integration to be established. Enter the required details as mentioned in the following steps:
a. Enter a name for the Destination.
b. Enter the **User name** of the account to which Zeotap sends data. For information about how to obtain this from Emarsys, refer to the [Prerequisites](/articles/integrate-customer/emarsys#h2_478947415)section.
c. Enter the **Secret Key** obtained from your Emarsys account. For information about how to obtain this from Emarsys, refer to the [Prerequisites](/articles/integrate-customer/emarsys#h2_478947415) section.
d. Enter the **Key ID**. For information about how to obtain this from Emarsys, refer to the [Prerequisites](/articles/integrate-customer/emarsys#h2_478947415) section.
**Note:**
*To use the 'custom\_ID' as the 'key\_ID', contact your Emarsys support to get it activated.*
e. Review all the values entered above and then click **Next** to proceed.
 In the new screen that appears, choose the appropriate Action and mapping as explained below. Under **Choose your Action**, you can either choose **Send Identifiers to Emarsys** or **Send attributes and identifiers to Emarsys** as the action based on the downstream system that you wish to use for activating your audience, that is, *Audiences*.
a. Choose **Send Identifiers to Emarsys (Deprecated)** as your action to send only email addresses to Emarsys.
In the new screen that appears, choose the appropriate Action and mapping as explained below. Under **Choose your Action**, you can either choose **Send Identifiers to Emarsys** or **Send attributes and identifiers to Emarsys** as the action based on the downstream system that you wish to use for activating your audience, that is, *Audiences*.
a. Choose **Send Identifiers to Emarsys (Deprecated)** as your action to send only email addresses to Emarsys.
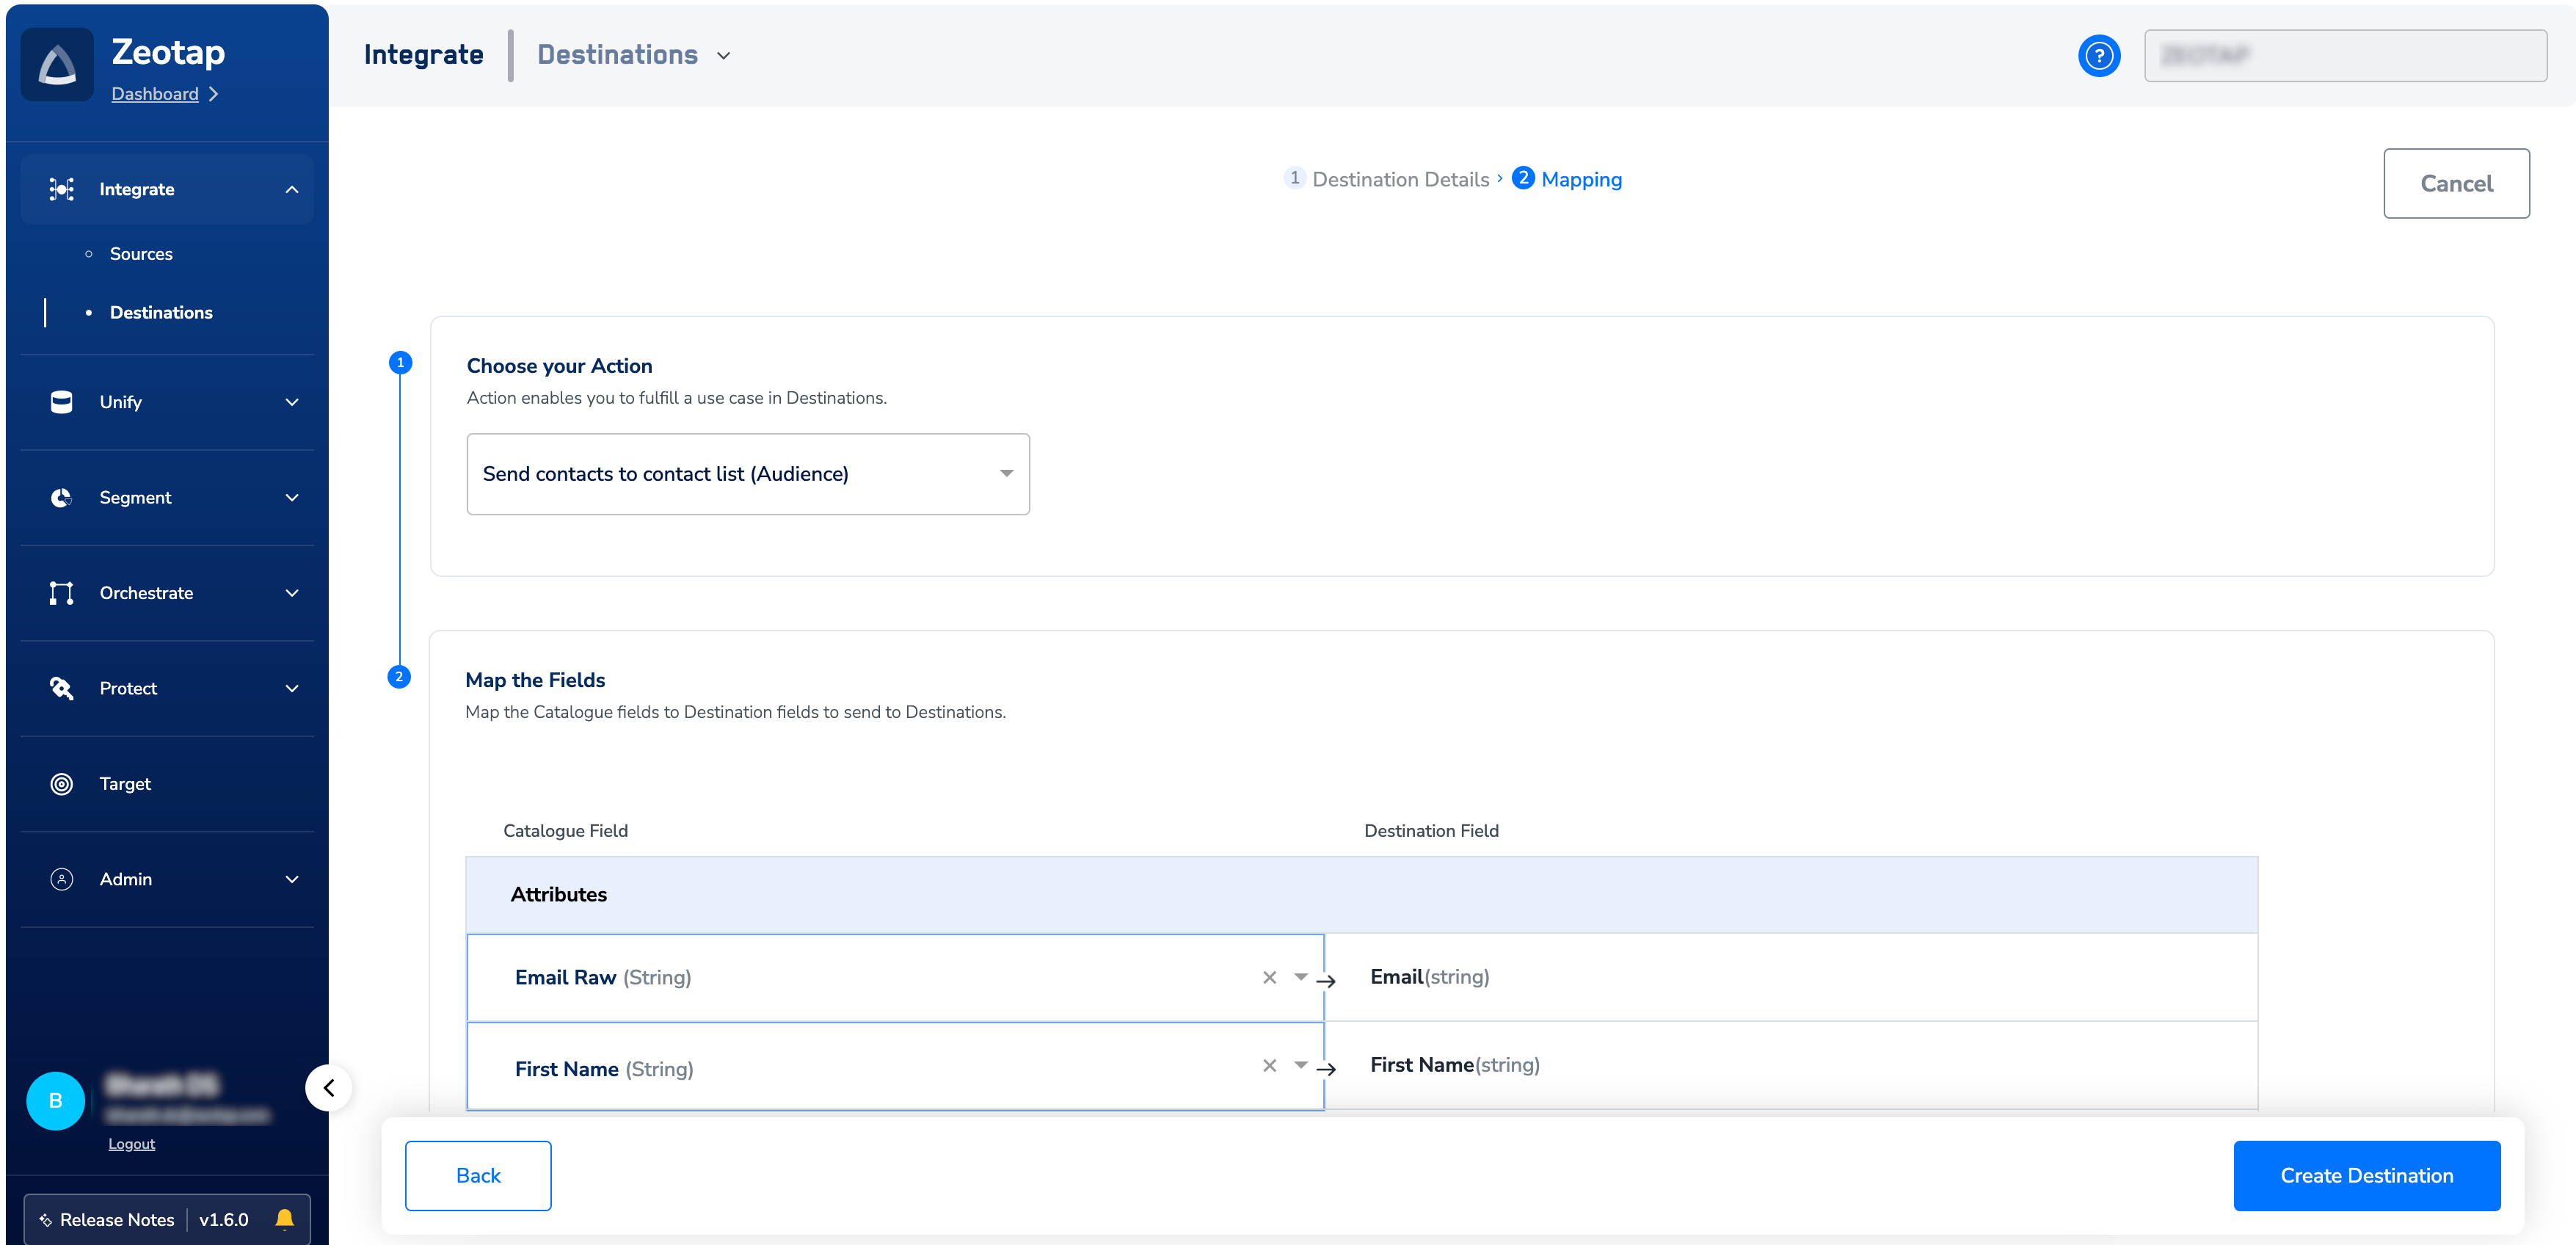
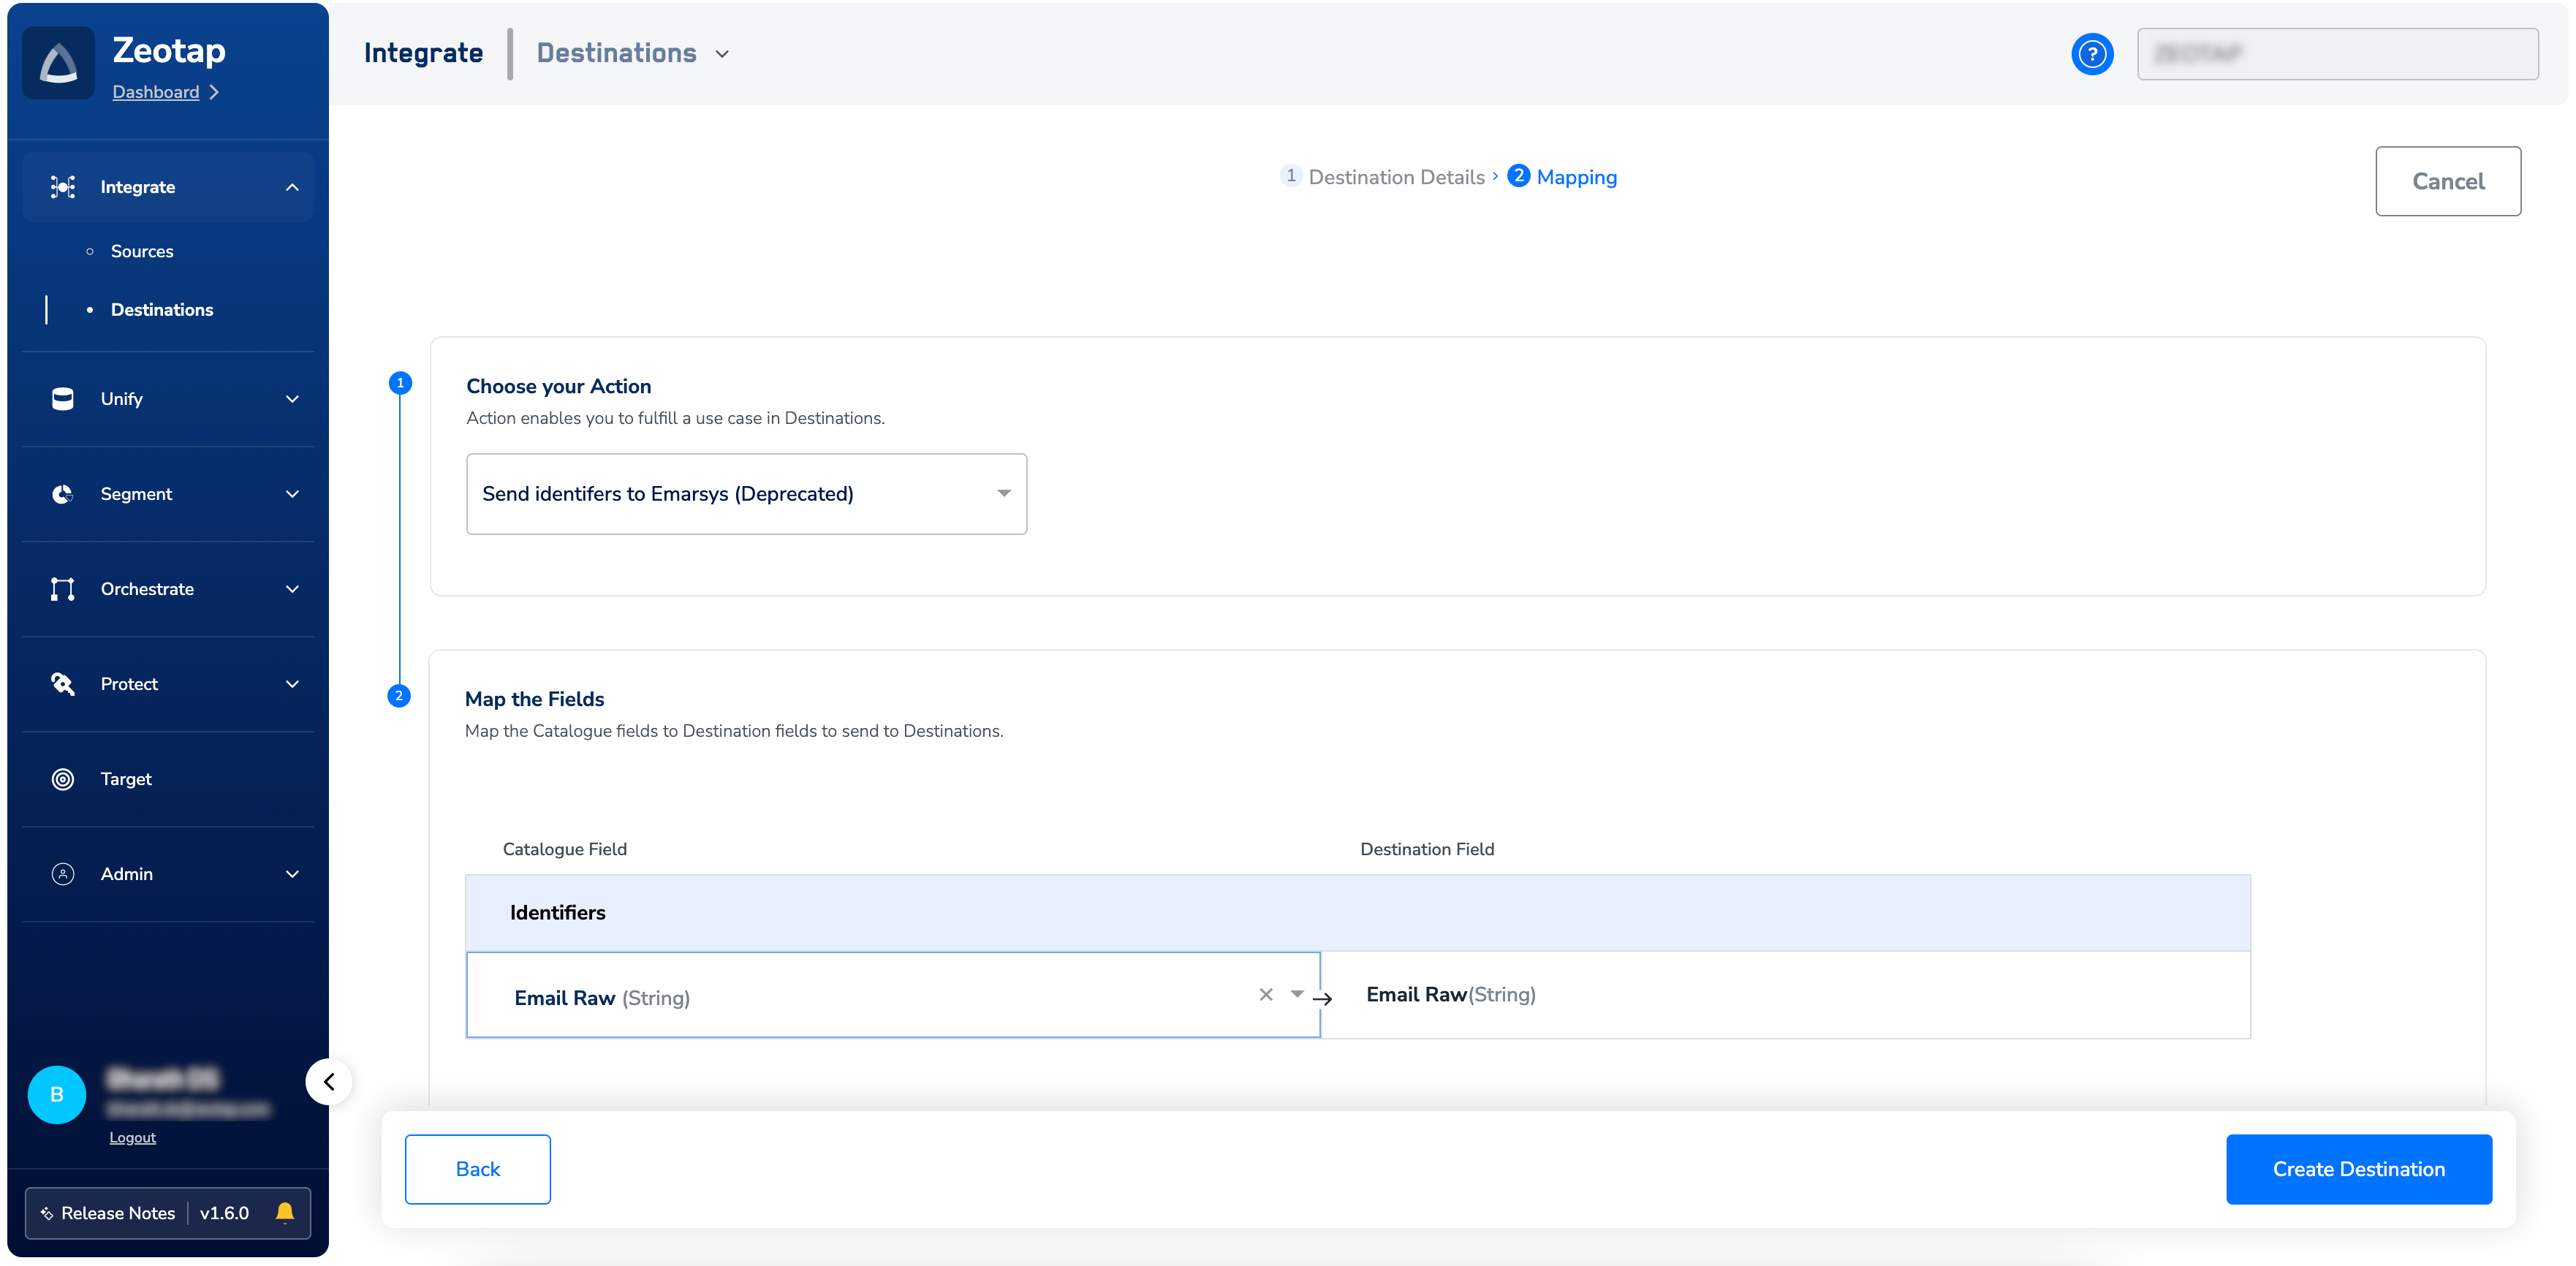 b. hoose **Send contacts to contact list (Audience)** as your action to send all the identifiers and attributes available under **Map the Fields** to **Emarsys.** Note that you can also map custom fields by clicking **Add Mapping Field** under the **Catalogue field** and provide the corresponding **Field ID** of the custom field you created in your Emarsys account under **Destination Field**.
For more information on how to obtain Field ID (Key ID) from Emarsys, refer to the [Prerequisites](/articles/integrate-customer/emarsys#h2_478947415) section.
b. hoose **Send contacts to contact list (Audience)** as your action to send all the identifiers and attributes available under **Map the Fields** to **Emarsys.** Note that you can also map custom fields by clicking **Add Mapping Field** under the **Catalogue field** and provide the corresponding **Field ID** of the custom field you created in your Emarsys account under **Destination Field**.
For more information on how to obtain Field ID (Key ID) from Emarsys, refer to the [Prerequisites](/articles/integrate-customer/emarsys#h2_478947415) section.
 c. Choose **Send triggered event (Audience)** as your action to send identifiers or attributes as:
* [Array/List of primitives](https://docs.zeotap.com/articles/unify-customer/data-types-in-catalogue/a/h2_299610936) (that is, List of String/Integer/Double/Boolean)
or
* [Objects](https://docs.zeotap.com/articles/unify-customer/data-types-in-catalogue/a/h2_2051284657) or [Array/List of Objects](https://docs.zeotap.com/articles/unify-customer/data-types-in-catalogue/a/h2_1596665070)
c. Choose **Send triggered event (Audience)** as your action to send identifiers or attributes as:
* [Array/List of primitives](https://docs.zeotap.com/articles/unify-customer/data-types-in-catalogue/a/h2_299610936) (that is, List of String/Integer/Double/Boolean)
or
* [Objects](https://docs.zeotap.com/articles/unify-customer/data-types-in-catalogue/a/h2_2051284657) or [Array/List of Objects](https://docs.zeotap.com/articles/unify-customer/data-types-in-catalogue/a/h2_1596665070)
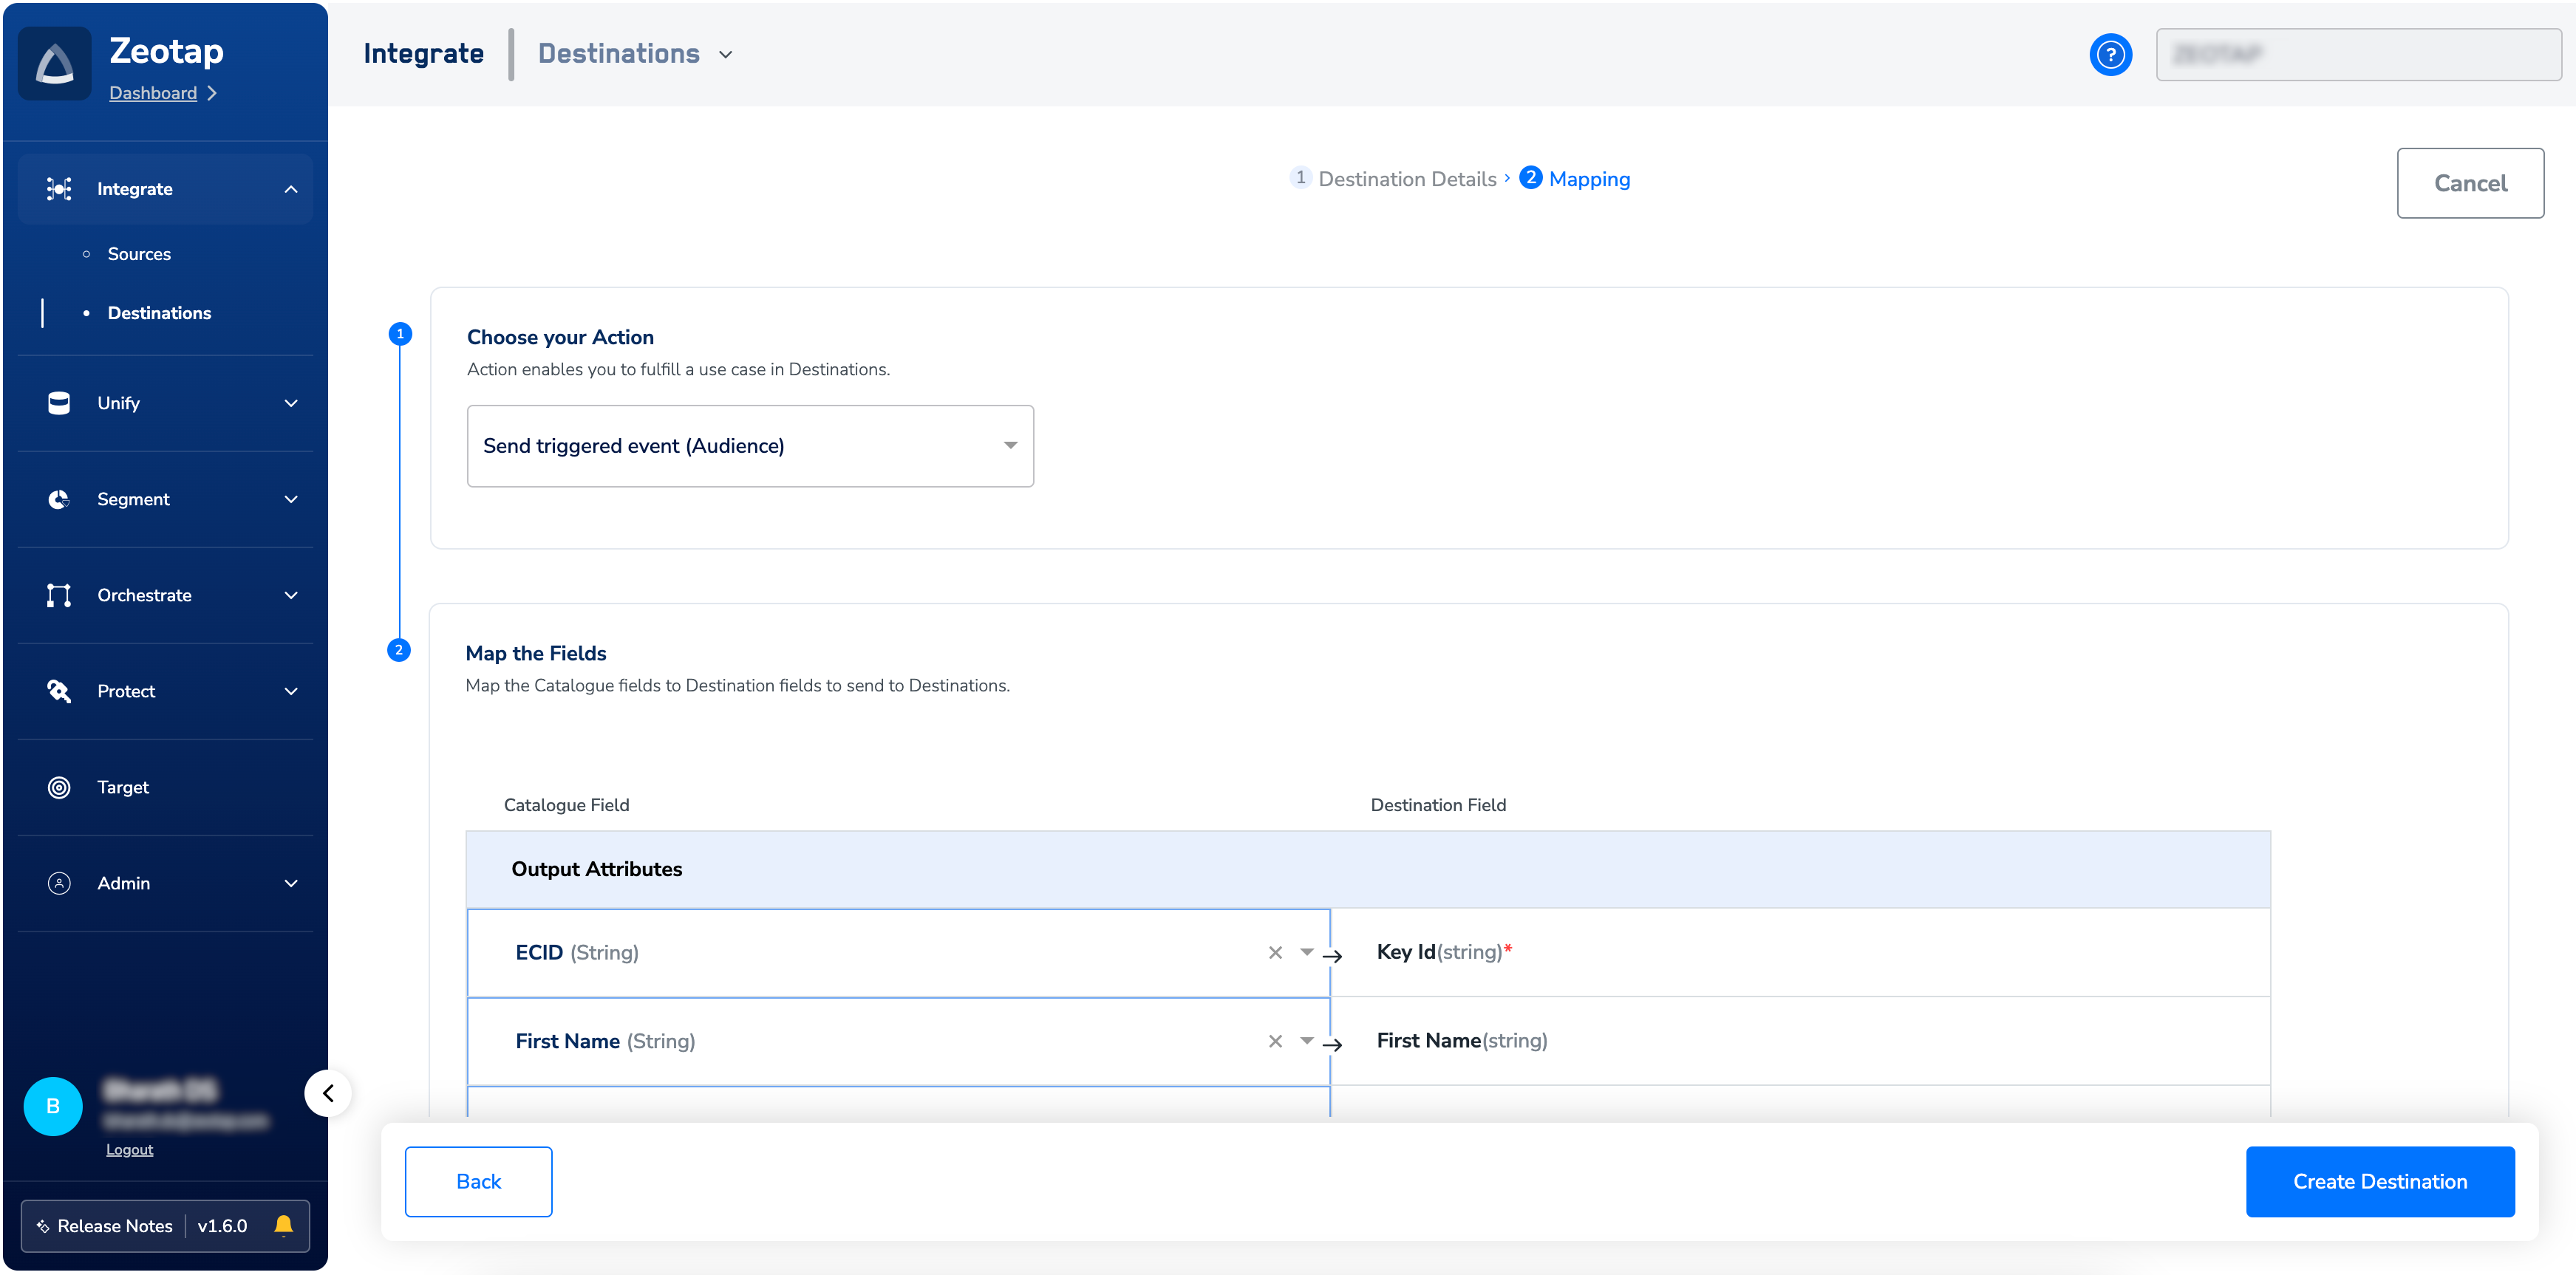 **For this action, creating a new field on the Emarsys side is not required (unlike other audience actions, where it is necessary)**. Use the drop-down menu shown in the image below to choose the data type for your attribute or identifier and map the corresponding Catalogue fields to the Destination fields. When creating custom attributes, assign any name to the RHS/Destination field. The attribute appears in Emarsys with the same name as the Destination field in Zeotap CDP.
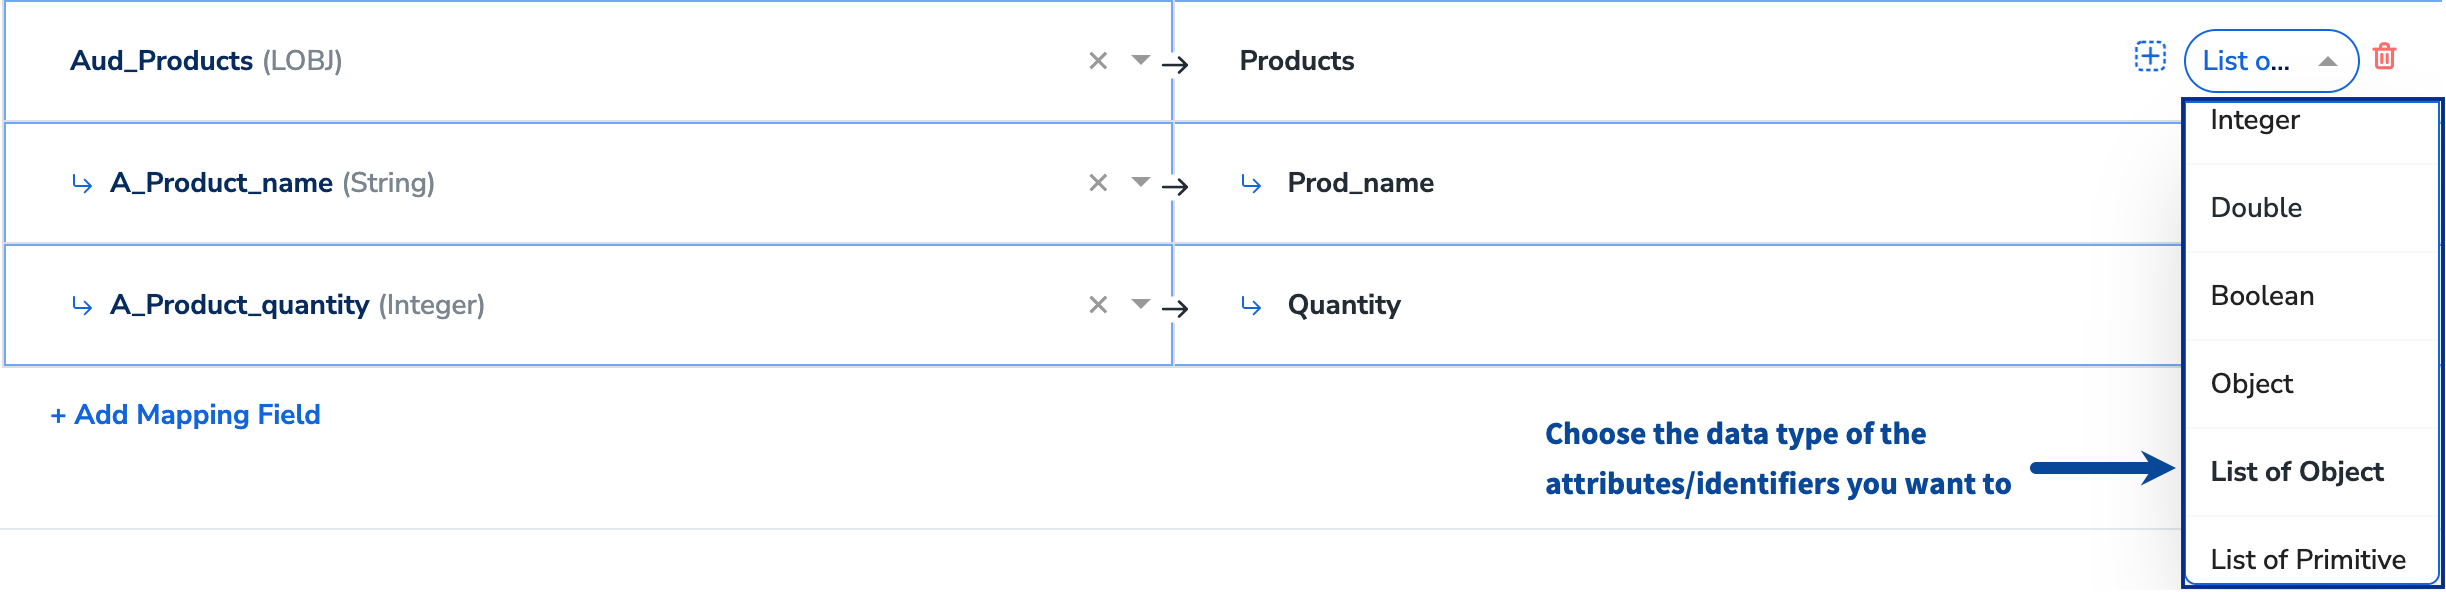
If you select **Objects** or **List of Objects**, then you must also map the object properties below the object, as shown below. For more information about the data types supported and when to use them, refer [here](https://docs.zeotap.com/articles/unify-customer/data-types-in-catalogue).
**For this action, creating a new field on the Emarsys side is not required (unlike other audience actions, where it is necessary)**. Use the drop-down menu shown in the image below to choose the data type for your attribute or identifier and map the corresponding Catalogue fields to the Destination fields. When creating custom attributes, assign any name to the RHS/Destination field. The attribute appears in Emarsys with the same name as the Destination field in Zeotap CDP.
If you select **Objects** or **List of Objects**, then you must also map the object properties below the object, as shown below. For more information about the data types supported and when to use them, refer [here](https://docs.zeotap.com/articles/unify-customer/data-types-in-catalogue).
 **Note:**
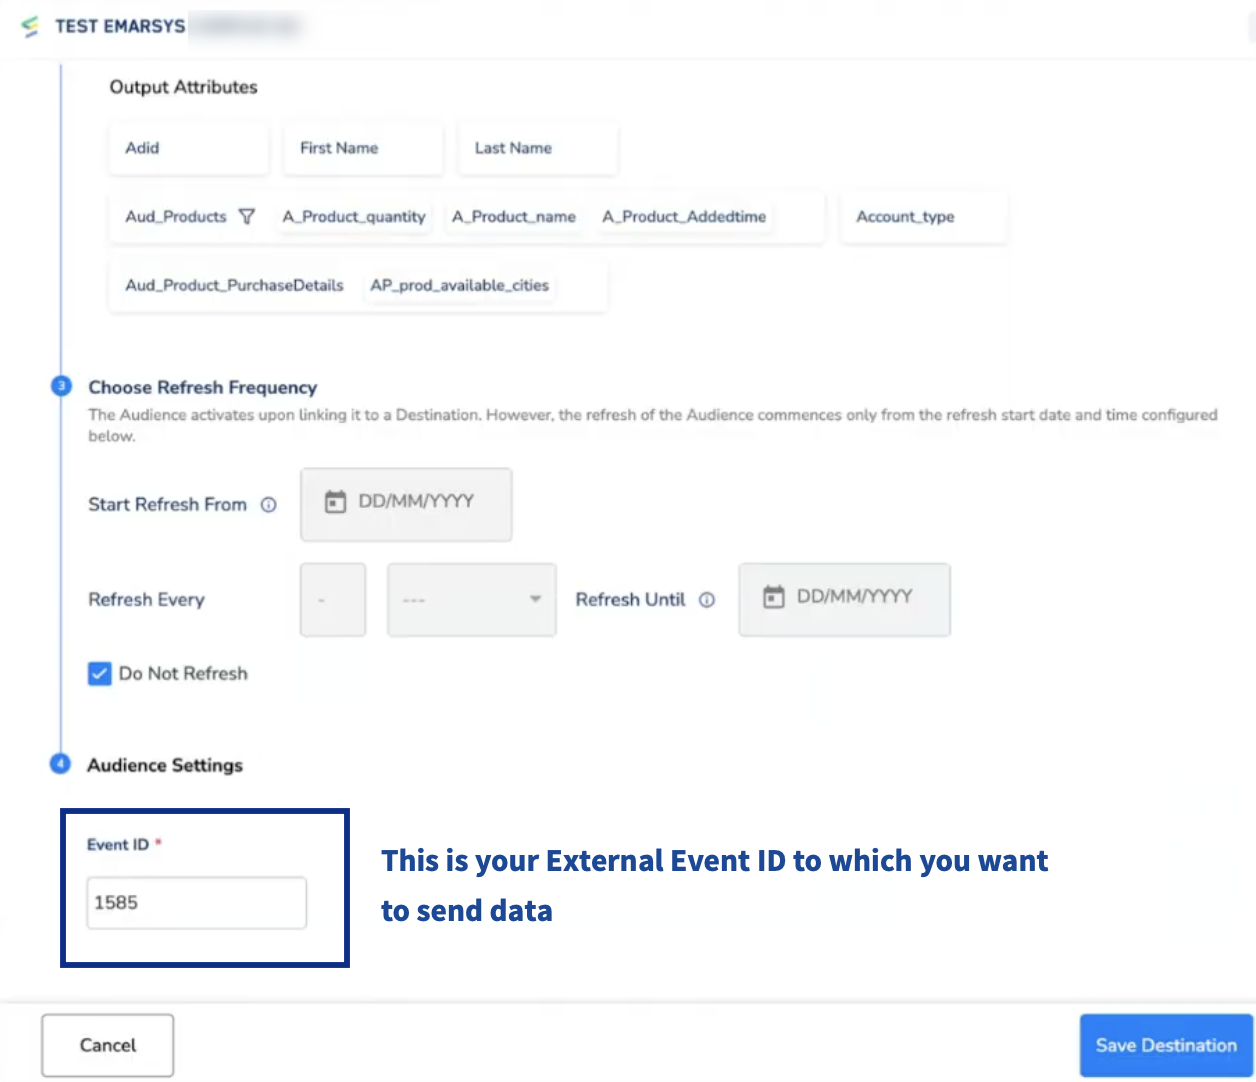
Note that, in the **Destinations Settings** window, you must provide the **Event ID** of the corresponding external event to which you want to send the data. To learn more about External Event and Event ID, refer [here](/articles/integrate-customer/emarsys-real-time-integration#h3_399174679).
**Note:**
Note that, in the **Destinations Settings** window, you must provide the **Event ID** of the corresponding external event to which you want to send the data. To learn more about External Event and Event ID, refer [here](/articles/integrate-customer/emarsys-real-time-integration#h3_399174679).
 Once the mapping is complete, click **Create Destination**. The created Destination gets listed in the **Audiences** application, which can be linked to an audience/segment.
## Link an Audience to the Emarsys Destination
For information about how to link an Audience or segment to the created Destination in the **Audiences**application, refer [here](/articles/integrate-customer/link-an-audience-to-the-destination).
**Note:**
The terms *Audiences* and *Segments* are used interchangeably to refer to customer cohorts belonging to a specific category.For example, an Audience or a segment can be a specific group of customers who are over 18 years of age and haveperformed an `addToCart` event within the last 30 days.
## View Audiences on Emarsys
Perform the following steps to view the pushed Audiences (segments) on the Emarsys platform:
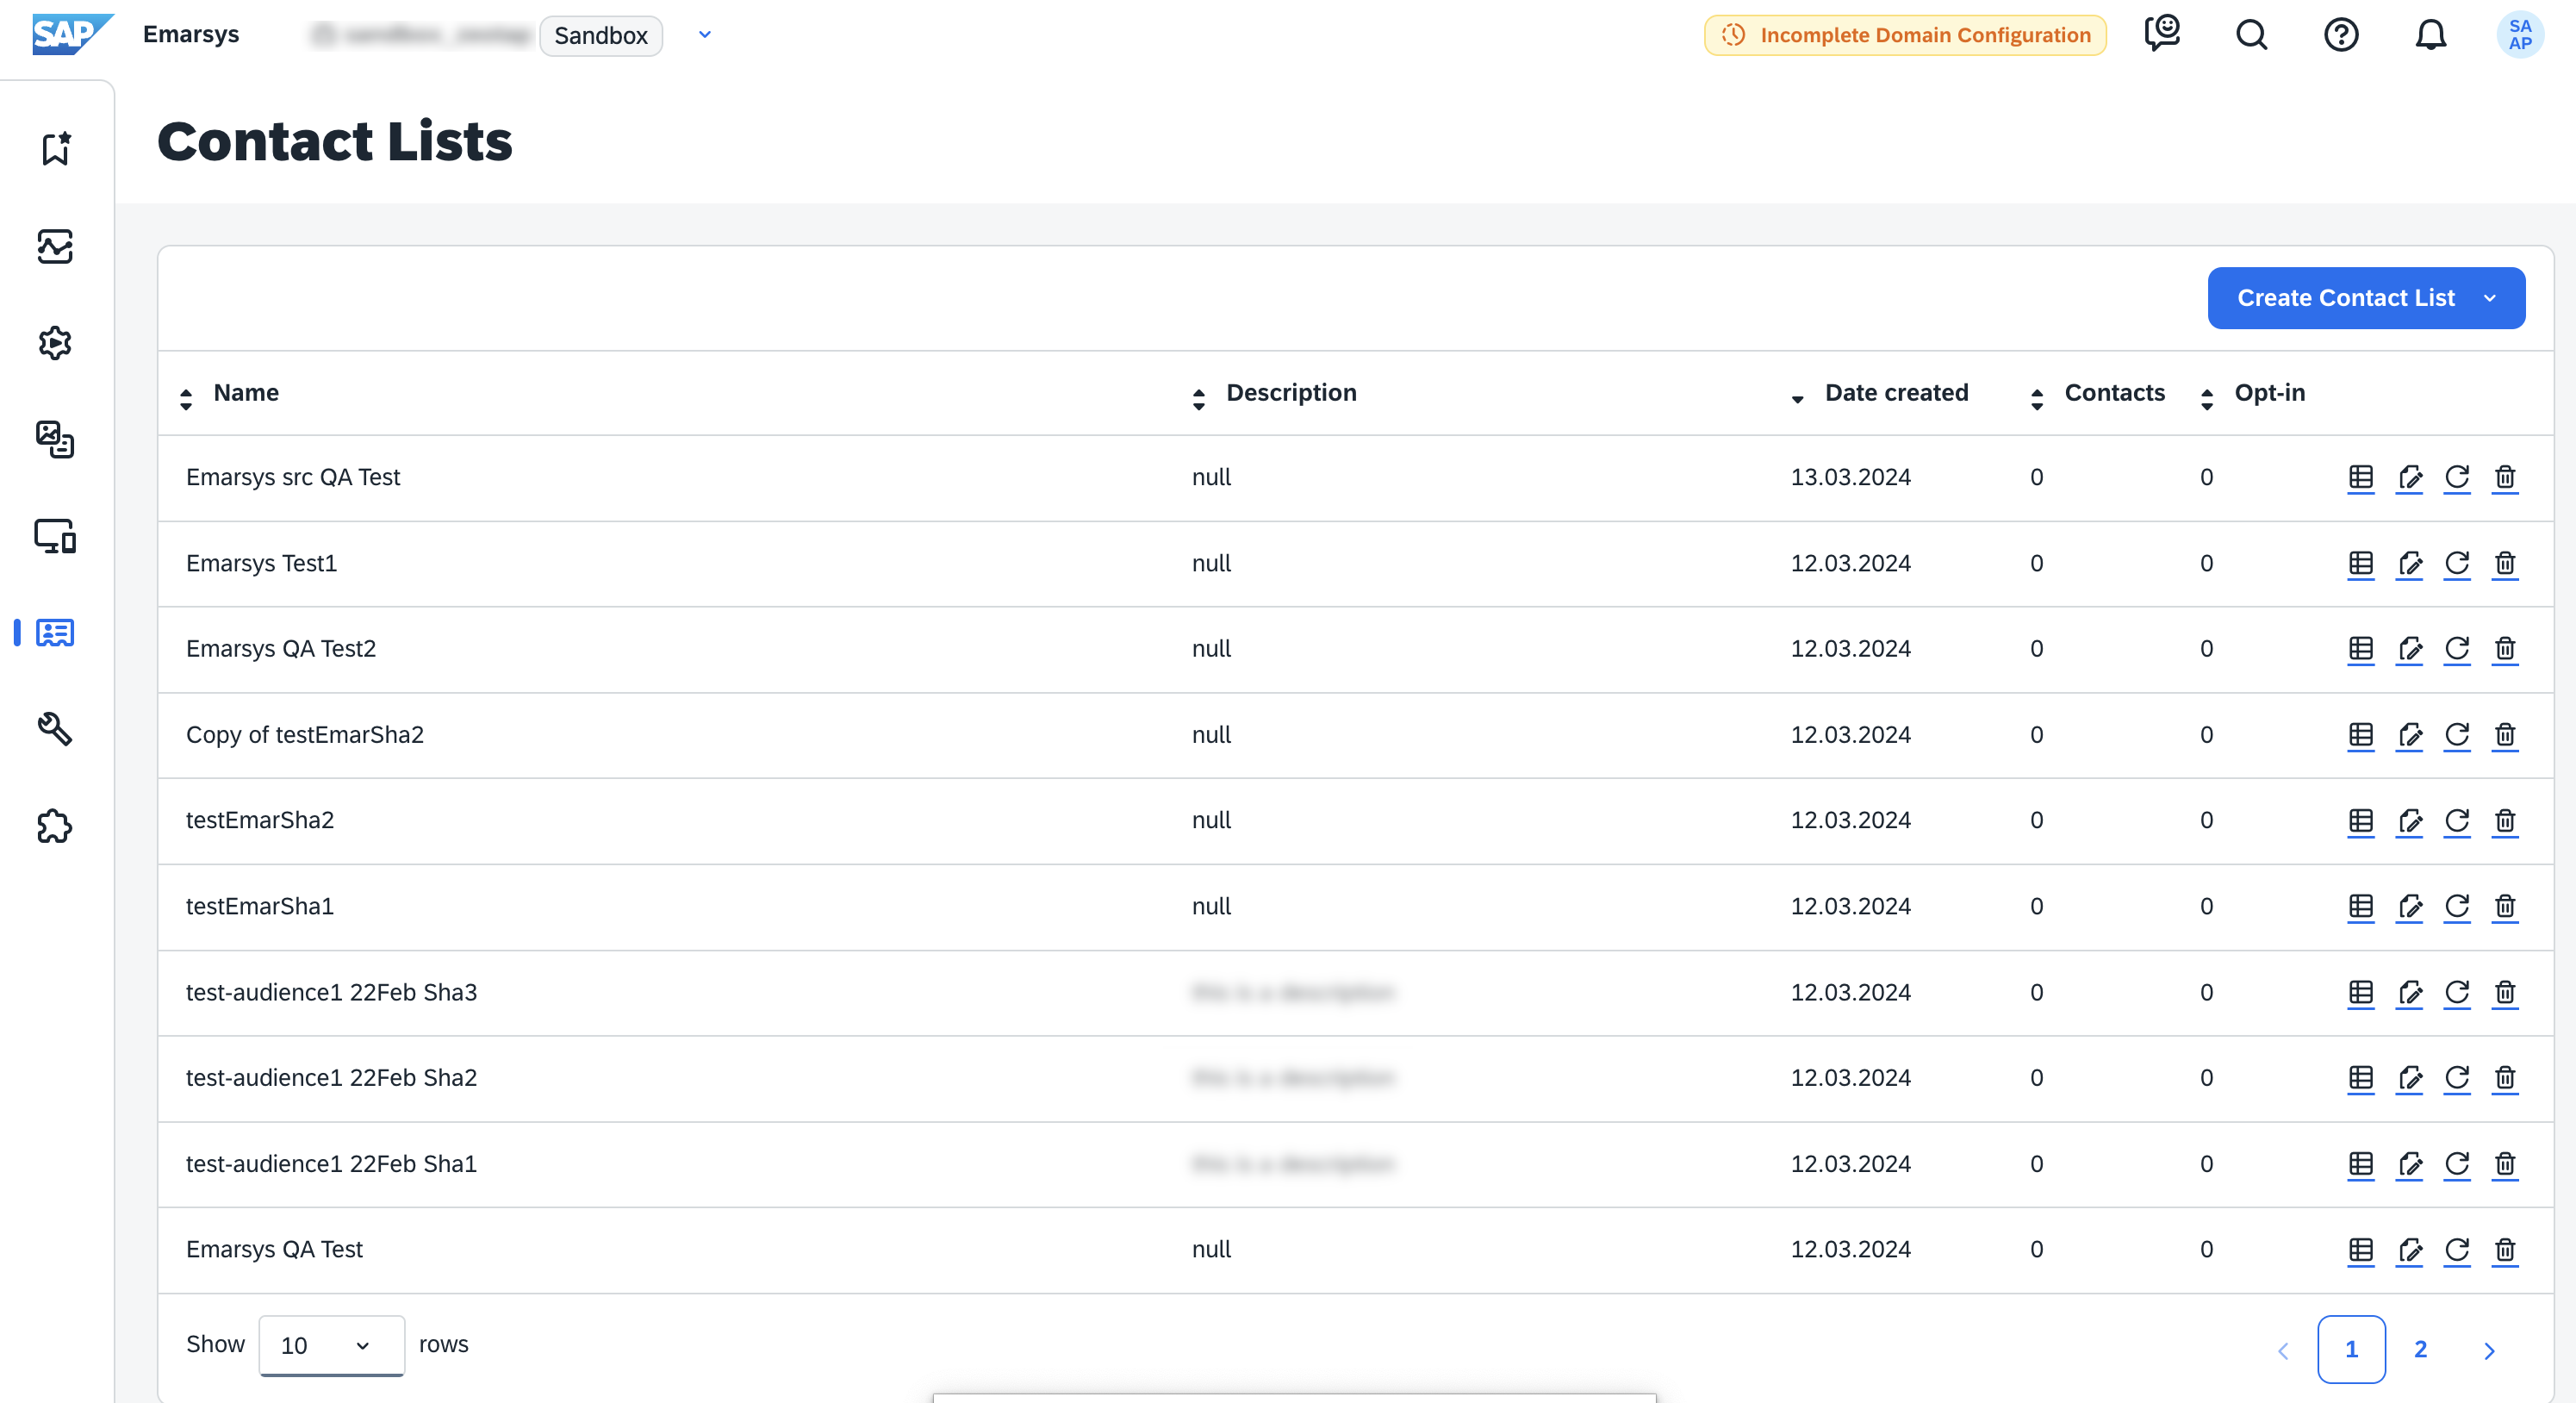
Log into Emarsys and navigate to **Contacts** > **Contact Lists**.
**Note:**
Contact List is an Audience (segment) of customers that is created within Zeotap CDP'sAudiences application and then pushed to Emarsys.
Once the mapping is complete, click **Create Destination**. The created Destination gets listed in the **Audiences** application, which can be linked to an audience/segment.
## Link an Audience to the Emarsys Destination
For information about how to link an Audience or segment to the created Destination in the **Audiences**application, refer [here](/articles/integrate-customer/link-an-audience-to-the-destination).
**Note:**
The terms *Audiences* and *Segments* are used interchangeably to refer to customer cohorts belonging to a specific category.For example, an Audience or a segment can be a specific group of customers who are over 18 years of age and haveperformed an `addToCart` event within the last 30 days.
## View Audiences on Emarsys
Perform the following steps to view the pushed Audiences (segments) on the Emarsys platform:
Log into Emarsys and navigate to **Contacts** > **Contact Lists**.
**Note:**
Contact List is an Audience (segment) of customers that is created within Zeotap CDP'sAudiences application and then pushed to Emarsys.
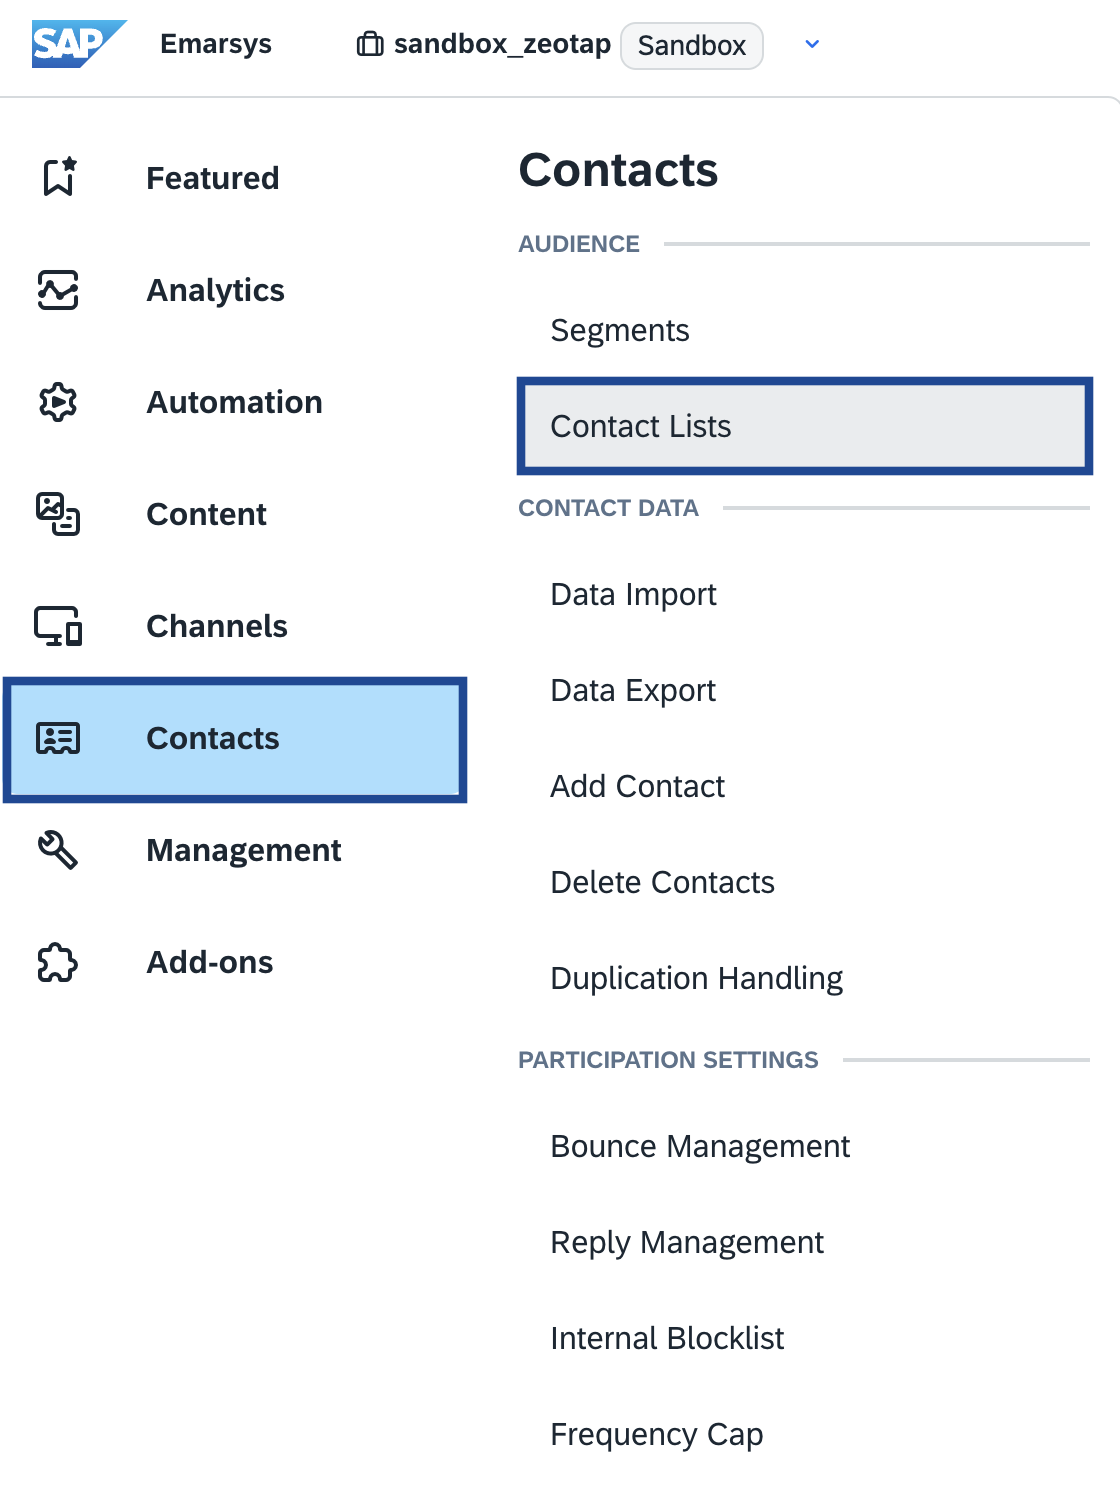 Under **Contact Lists**, you can view all the audiences (segments) that are pushed from Zeotap CDP to Emarsys as shown in the image below.