> ## Documentation Index
> Fetch the complete documentation index at: https://docs.zeotap.com/llms.txt
> Use this file to discover all available pages before exploring further.
# Emarsys Real Time Integration
## Overview
Emarsys is a marketing automation platform that helps businesses create personalized marketing campaigns. When integrated with Zeotap, all your customer events can be processed in real-time, ensuring timely and relevant interactions.
For example, Zeotap's real-time integration with Emarsys allows you to target customers who abandon their cart. This integration records these customers in Emarsys during the abandonment process, enabling you to send immediate follow-up messages with incentives to complete their purchase.
## Supported Attributes
This section provides information about the attributes supported in the Zeotap CDP\<>Emarsys integration:
| **Emarsys Field** | **Description** |
| :---------------- | :-------------------------------------------------------------------------------------------------------------------------------------------------------------------------------------------------------- |
| First Name | This is automatically mapped to First Name in the Zeotap Catalogue. You can edit the mapping as per your requirement. |
| Last Name | This is automatically mapped to Last Name in the Zeotap Catalogue. You can edit the mapping as per your requirement. |
| Annual Income | You need to map the relevant Catalogue field in the LHS. |
| Gender | You need to map the relevant Catalogue field in the LHS. |
| City | You need to map the relevant Catalogue field in the LHS. |
| Company | You need to map the relevant Catalogue field in the LHS. |
| Company Address | You need to map the relevant Catalogue field in the LHS. |
| Country | You need to map the relevant Catalogue field in the LHS. |
| Department | You need to map the relevant Catalogue field in the LHS. |
| Date of Birth | You need to map the relevant Catalogue field in the LHS. |
| Industry | You need to map the relevant Catalogue field in the LHS. |
| Job Position | You need to map the relevant Catalogue field in the LHS. |
| Office City | You need to map the relevant Catalogue field in the LHS. |
| Office Country | You need to map the relevant Catalogue field in the LHS. |
| Opt-in | You need to map the relevant Catalogue field in the LHS. Note that the acceptable values for this field are `Yes/No` or `True/False`. If you wish to send any other values, then contact your Zeotap POC. |
## Prerequisites
Ensure you complete the following prerequisites in the Emarsys Platform before proceeding with this integration in (Journeys) Zeotap CDP:
### 1. Create an External Event in Emarsys and copy the Event ID
External Events are triggers that allow you to respond to custom API events performed by your customers such as Cart Abandoned, Order Confirmation, Subscription Renewal and so on. That means, when a customer performs an action that matches these custom API events, the External Event triggers a response from the system based on the [automation configured](/articles/integrate-customer/emarsys-real-time-integration#h3_47323886).
Perform the following steps to create an External Event in Emarsys and obtain the Event ID associated it:
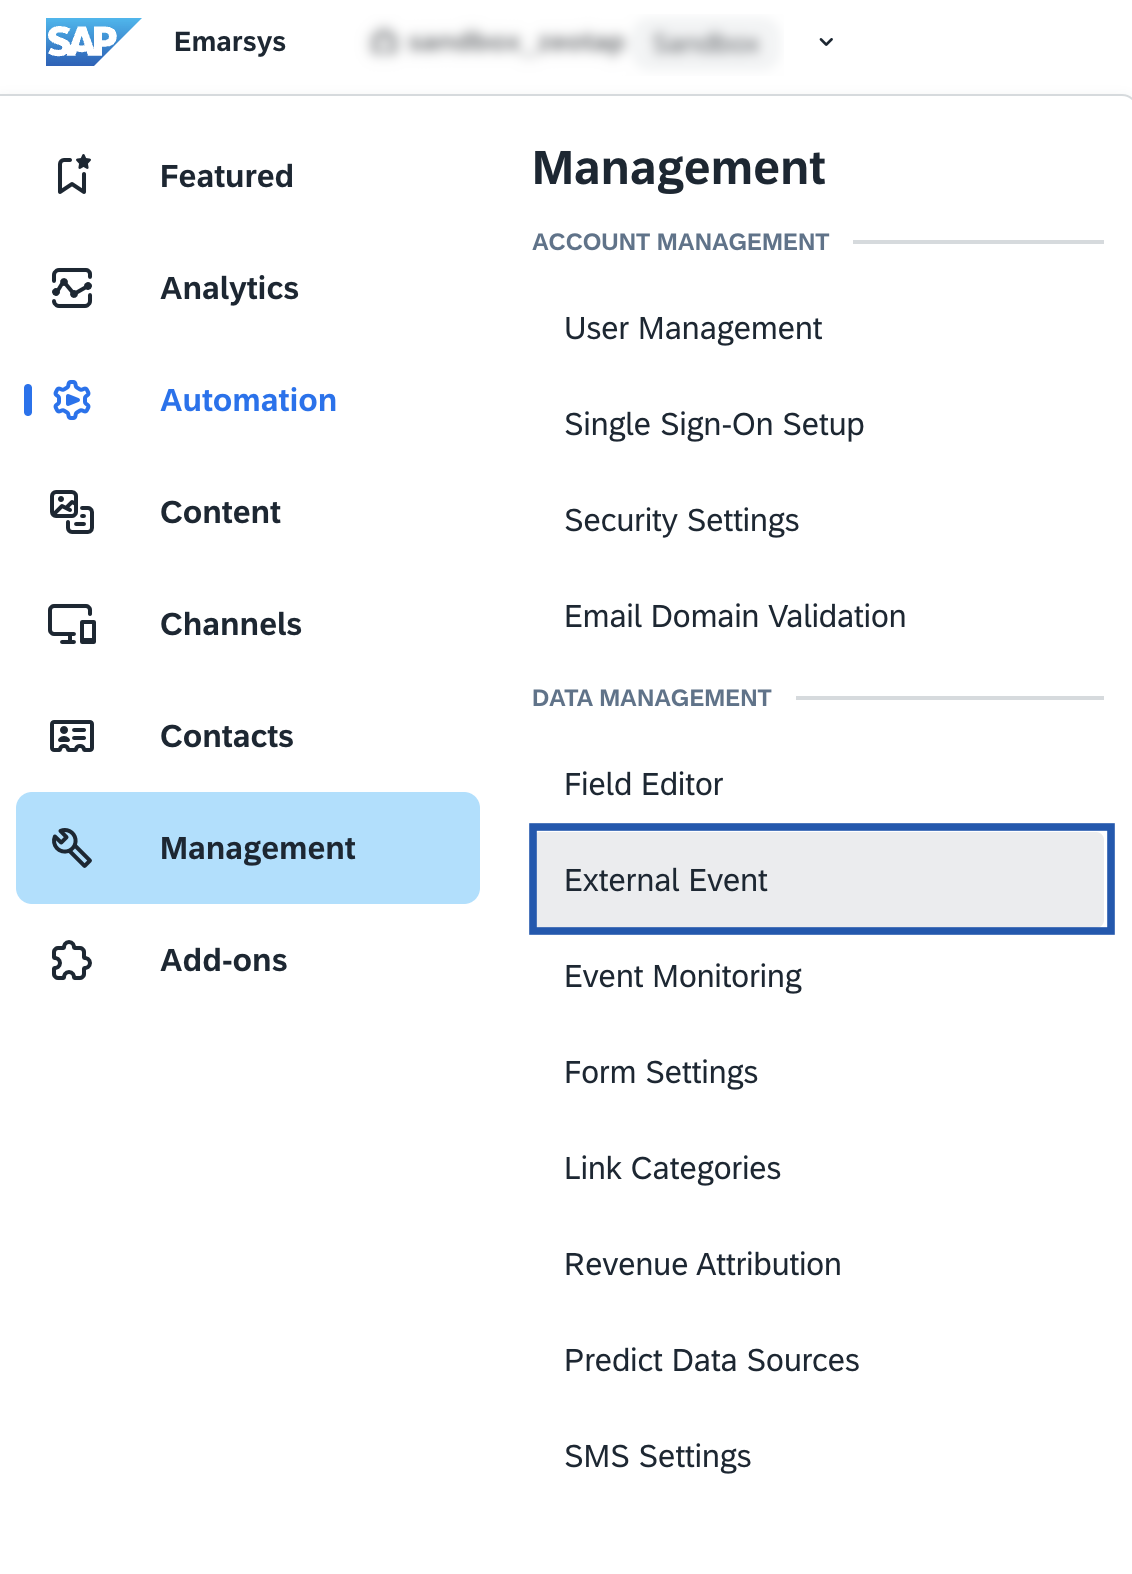
Log into your [Emarsys account](https://suite55.emarsys.net) and navigate to **Managemen**t **>** **External Events**.
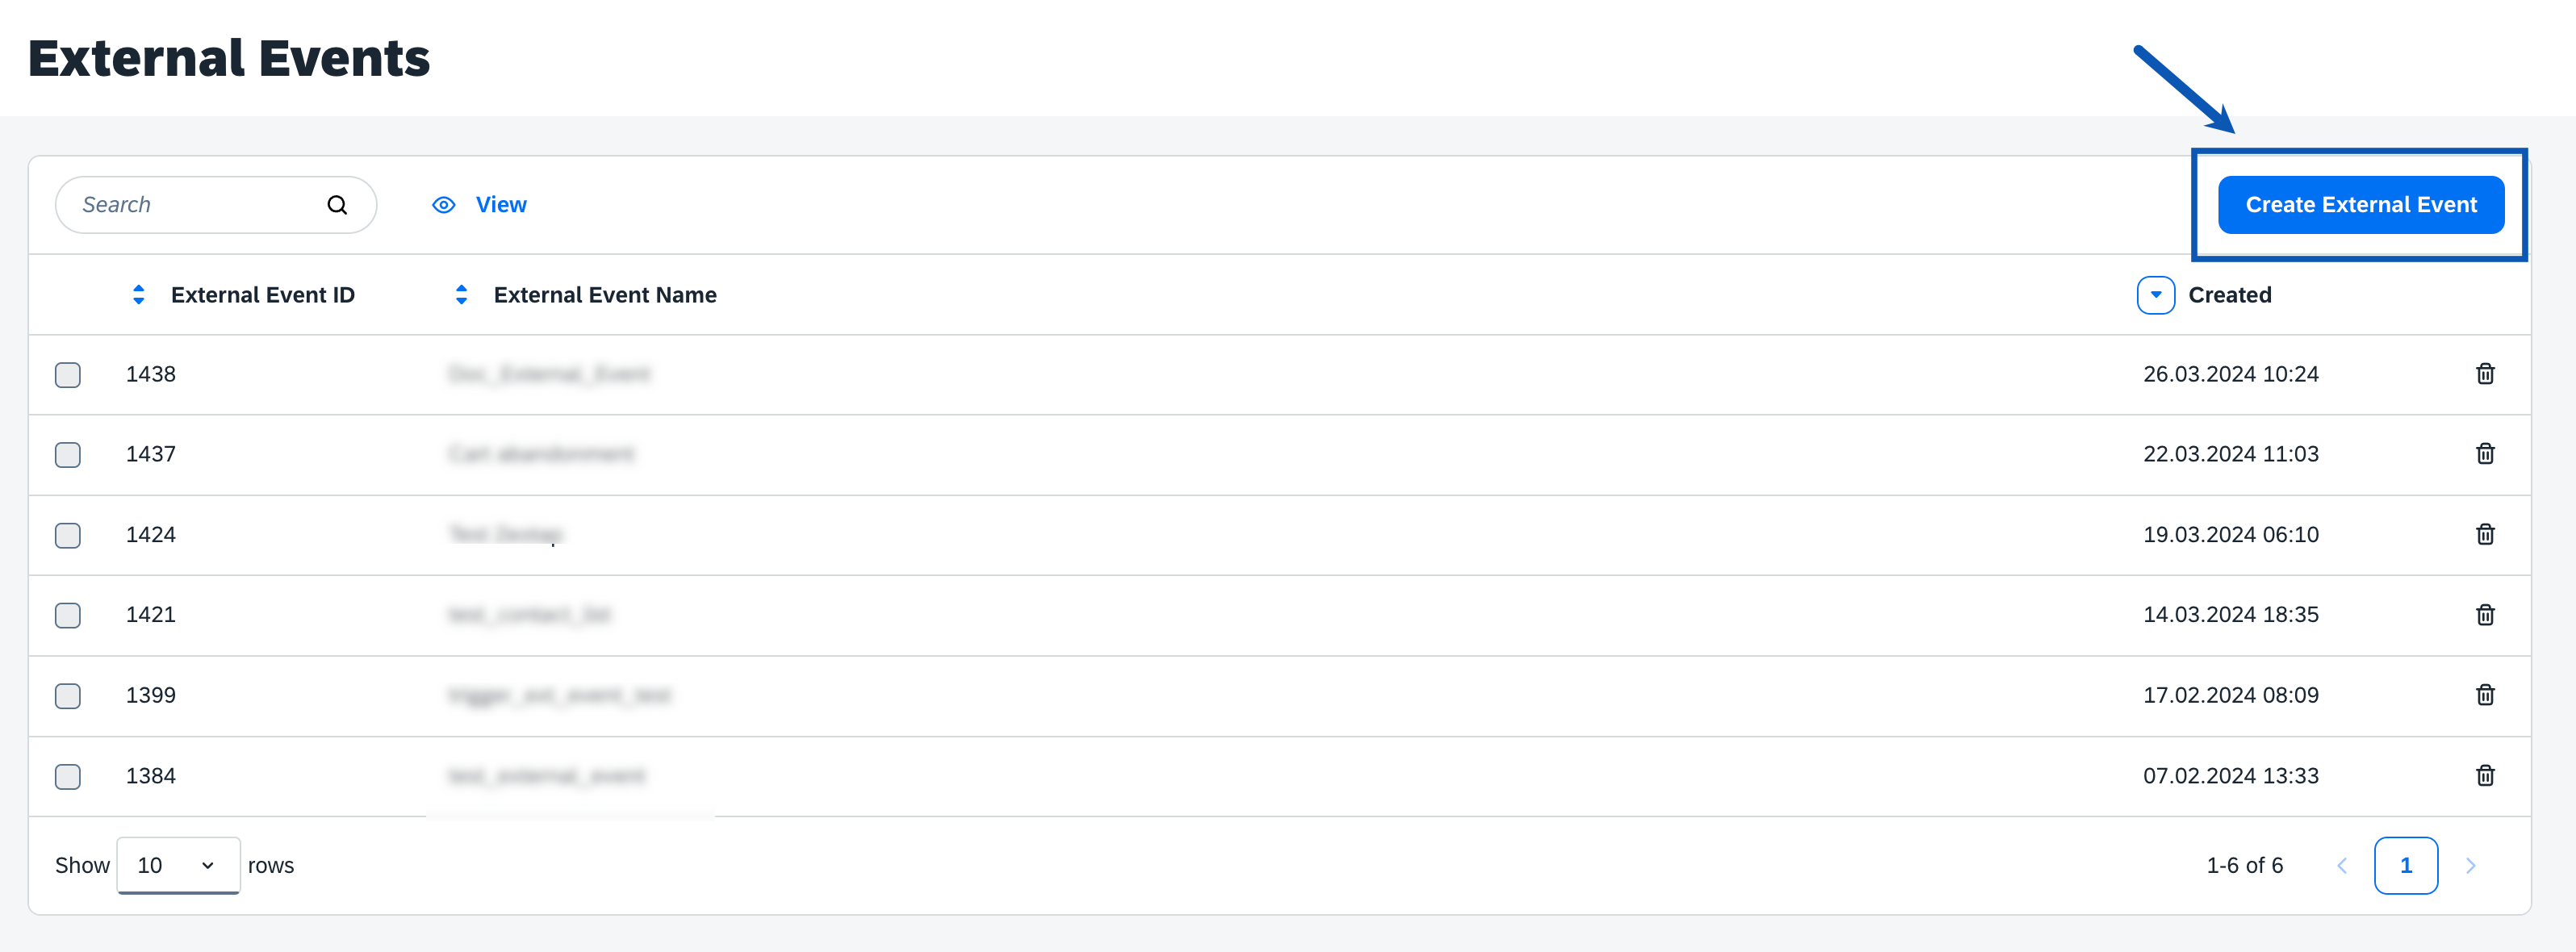
 Click **Create External Event**.
 In the window that appears, provide a **Name** for the external event and click **Create**. Ensure to provide the same name that you have provided for **External Event Name** as the **Workflow Title** while creating workflows in Journeys (Zeotap CDP). This helps you to identify your segments easily.
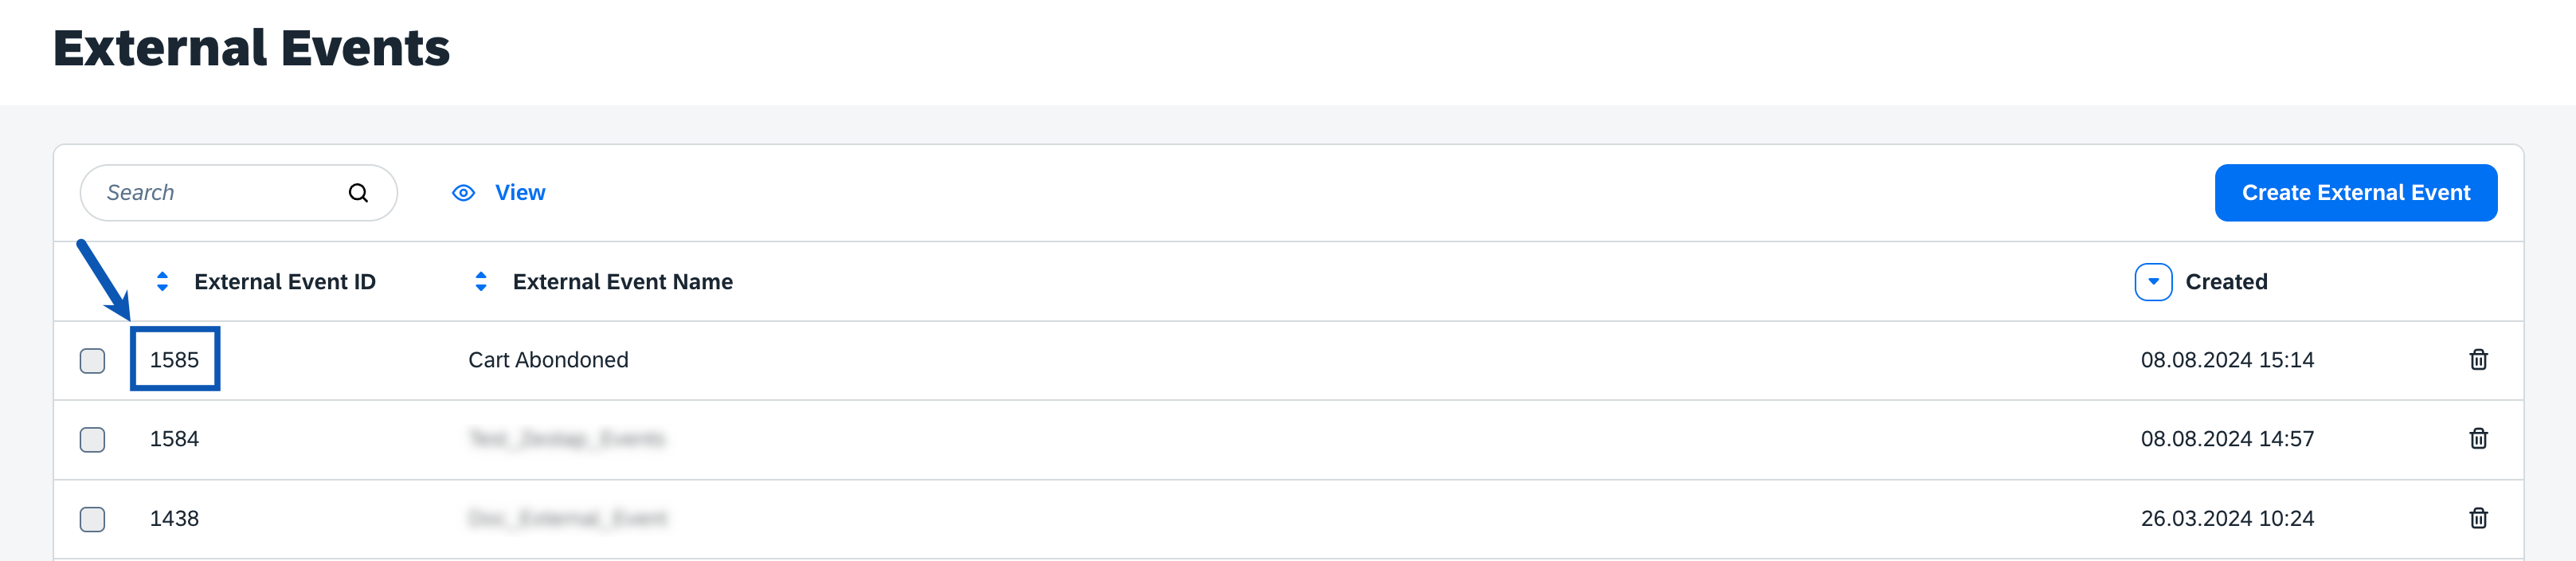
 The created event gets listed in the **External Events** page as shown below. Copy the **External Event ID** available\*\*\*\*against the external event that you created. This is the **Event ID** that needs to be provided while creating the Interaction Program in the next step. Note that this Event ID is also used as an input while [activating the Destination in Journeys (Zeotap CDP)](/articles/integrate-customer/emarsys-real-time-integration#h2__290574186).
 ### 2. Create an Interaction Program (Automation Program) in Emarsys
Interaction Programs in Emarsys are real-time responses to customer events and actions. They enable automated journeys that adapt to customer activities, allowing you to send timely, relevant, and personalised messages.
**Note:**
*Ensure to procure the **Interactions Program** add-on in Emarsys to use this integration.*
Some use cases of Interaction Programs:
* Sending delivery status updates, such as "Delivery Successful" or "Your Order Has Been Shipped".
* Preventing browse abandonment by targeting contacts who have visited product pages multiple times without adding items to their cart. For these contacts, show a free shipping Web Channel campaign while they are online.
Perform the following steps to create an Interactions Program in Emarsys:
Log into your [Emarsys account](https://suite55.emarsys.net) and navigate to **Automation** > **Automation Programs**.
### 2. Create an Interaction Program (Automation Program) in Emarsys
Interaction Programs in Emarsys are real-time responses to customer events and actions. They enable automated journeys that adapt to customer activities, allowing you to send timely, relevant, and personalised messages.
**Note:**
*Ensure to procure the **Interactions Program** add-on in Emarsys to use this integration.*
Some use cases of Interaction Programs:
* Sending delivery status updates, such as "Delivery Successful" or "Your Order Has Been Shipped".
* Preventing browse abandonment by targeting contacts who have visited product pages multiple times without adding items to their cart. For these contacts, show a free shipping Web Channel campaign while they are online.
Perform the following steps to create an Interactions Program in Emarsys:
Log into your [Emarsys account](https://suite55.emarsys.net) and navigate to **Automation** > **Automation Programs**.
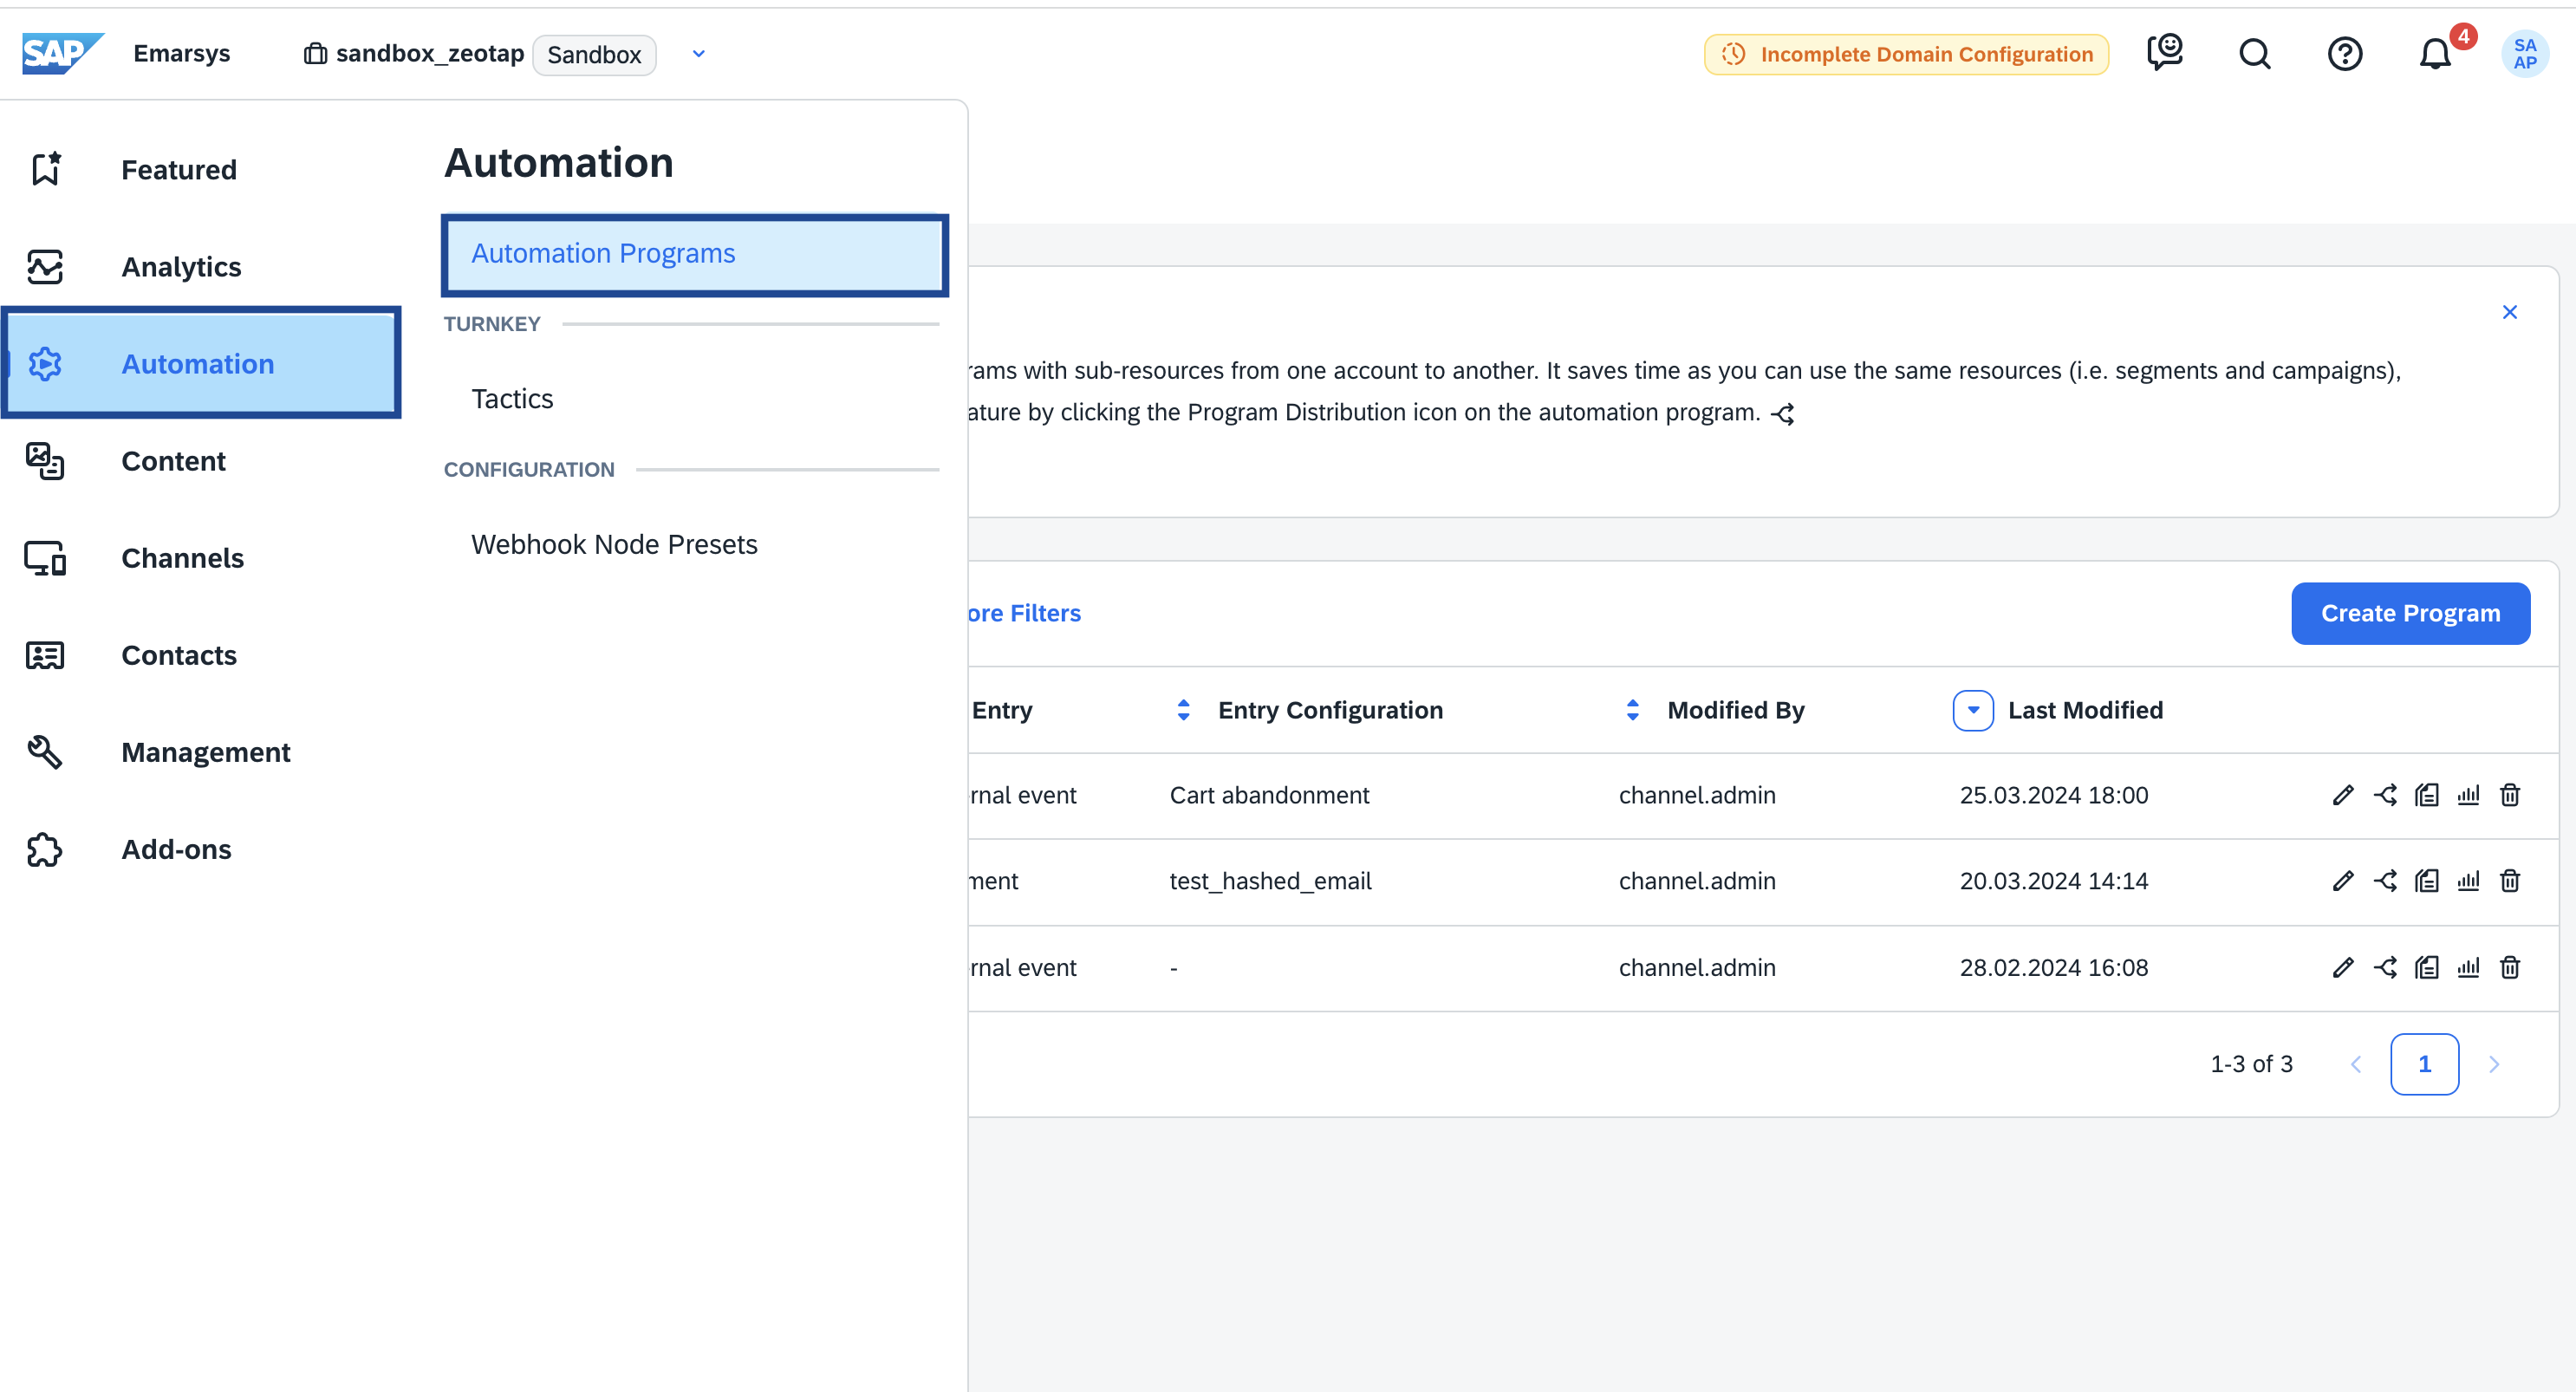 In the **Automation Programs** screen that appears, click **Create Program**.
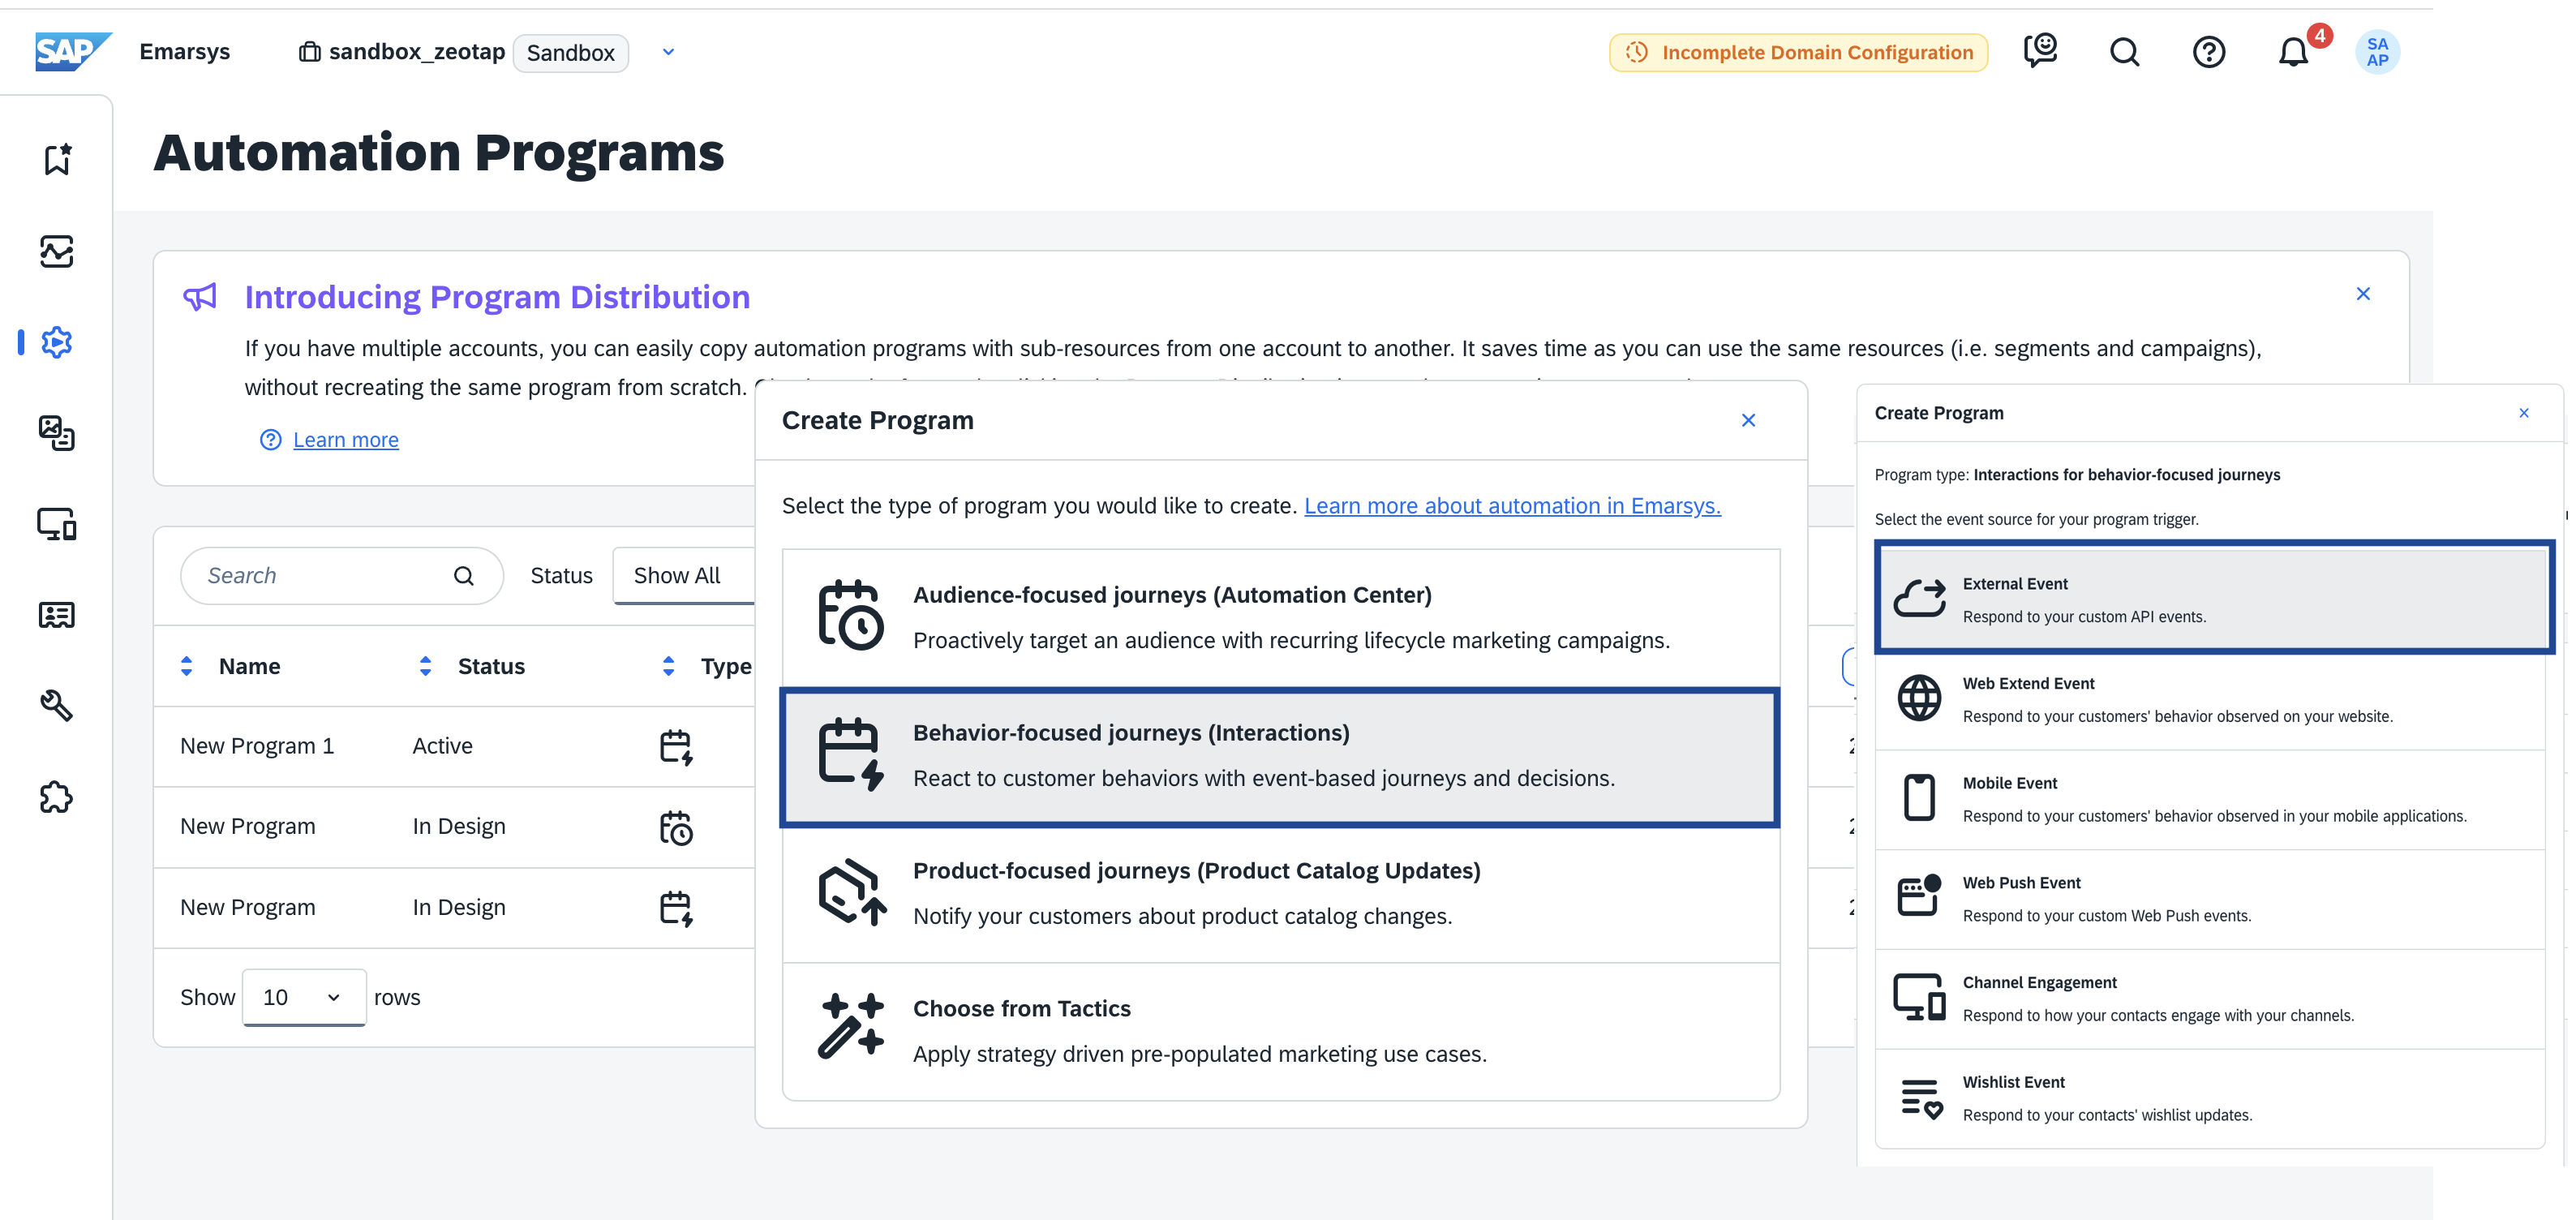
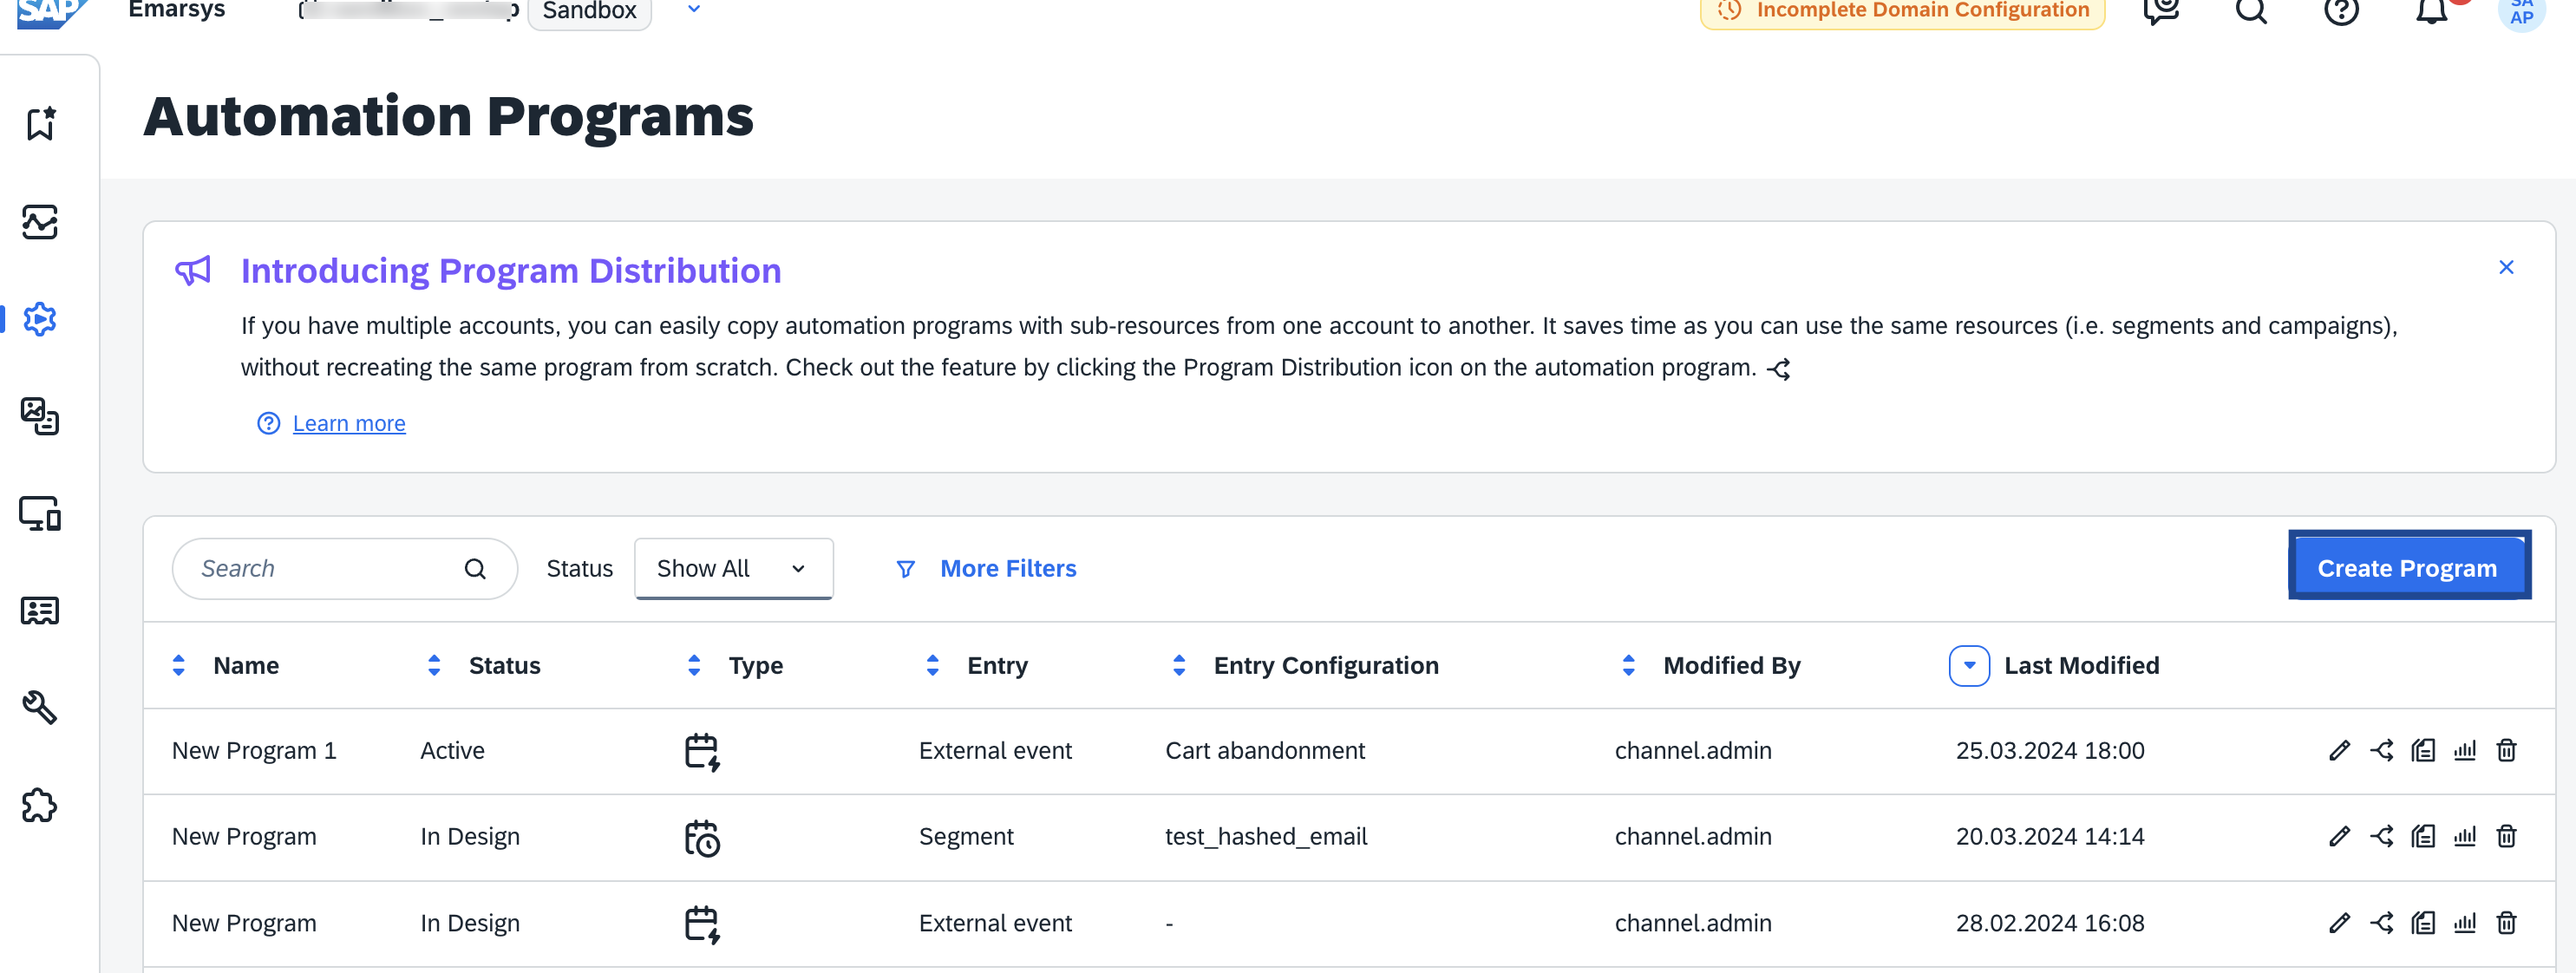 In the new window that appears, click **Behavior-focused journeys (Interactions) > External Event**.
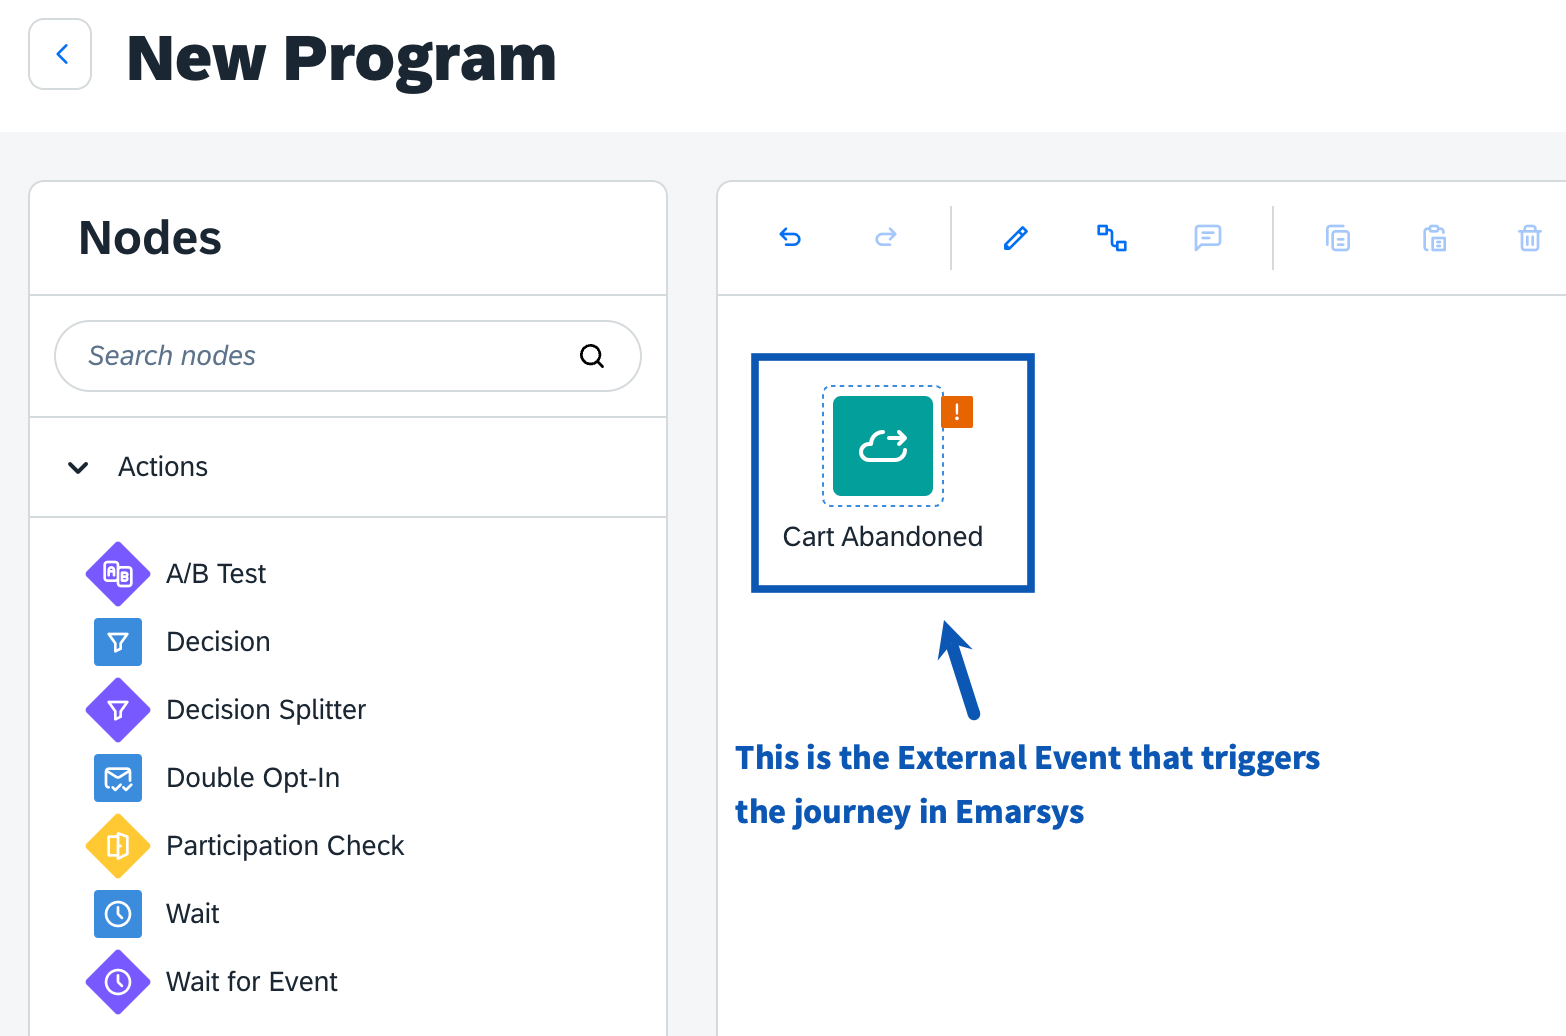
 In the new screen that appears, double-click the **External Event** trigger node. This acts has the entry point for your journey in Emarsys.
 In the new window that appears, perform the following steps:
a. Under **Trigger Event,** choose the [External Event](/articles/integrate-customer/emarsys-real-time-integration#h3_399174679) that you want to use as the trigger event for your Automation Program.
In the new window that appears, perform the following steps:
a. Under **Trigger Event,** choose the [External Event](/articles/integrate-customer/emarsys-real-time-integration#h3_399174679) that you want to use as the trigger event for your Automation Program.
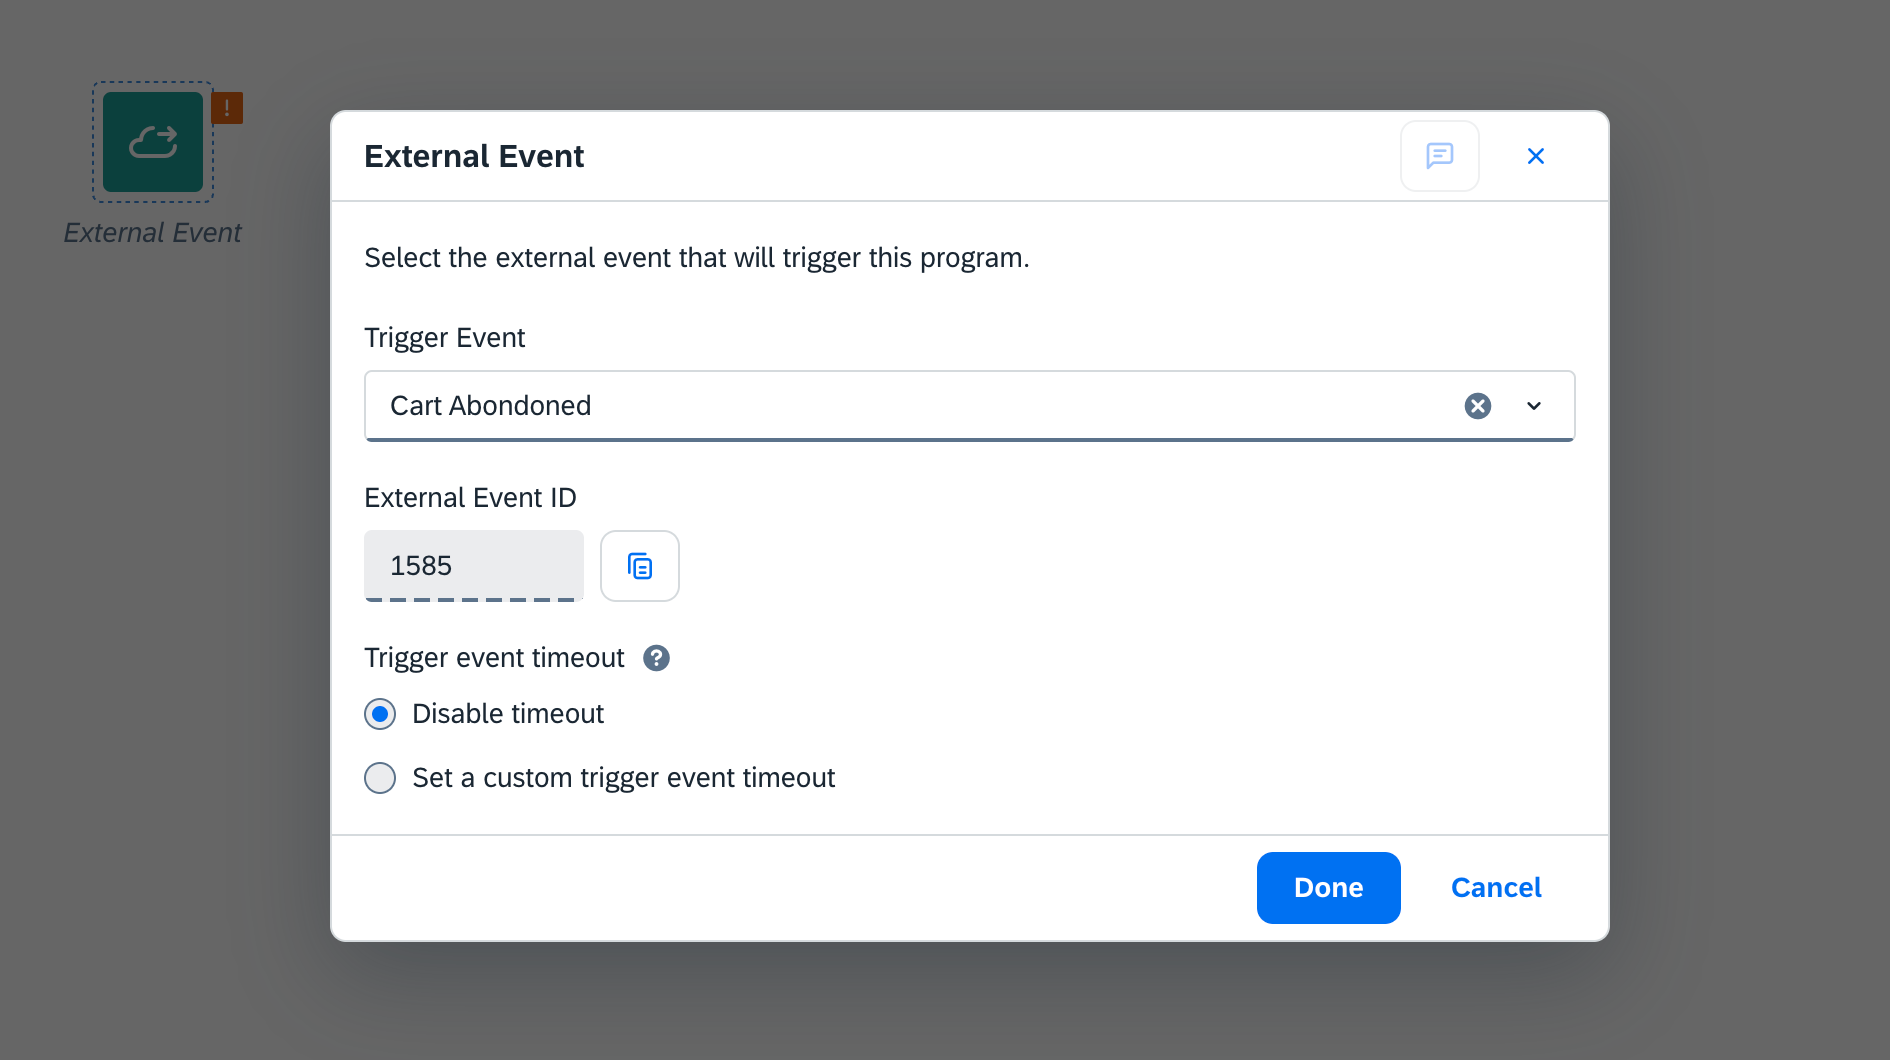 b. By default, the **Trigger event timeout** is set to **Disable timeout**. However, you can change it to **Set a custom trigger timeout** based on your requirement. [Learn more](https://help.emarsys.com/hc/en-us/articles/360016952737-End-user-guides-Setting-up-the-trigger-event-timeout)
c. Click **Done.**
**Note:**
*Ensure that the the contact information of your target customers exist in Emarsys under Contacts.Without this, the External Event cannot be triggered and the automation program will fail. [Learn more](https://help.emarsys.com/hc/en-us/articles/115004635409-Contact-lists-Managing-contact-lists)*
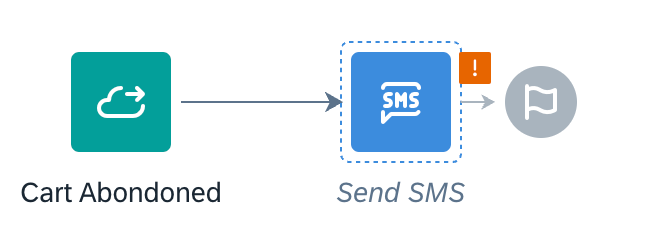
You can configure the journey for the [automation program](https://help.emarsys.com/hc/en-us/articles/360003898918-Overview-Interactions-Overview) based on your use cases as shown below. In the below example, the "Cart Abandoned" External Event acts as a trigger, sending the details of customers who abandoned their cart to the next node in the workflow, that is, the "Send SMS" node. It then sends follow-up messages to these customers with incentives to complete their purchase. Note that you need to create the SMS campaign prior to using it in the automation program.
b. By default, the **Trigger event timeout** is set to **Disable timeout**. However, you can change it to **Set a custom trigger timeout** based on your requirement. [Learn more](https://help.emarsys.com/hc/en-us/articles/360016952737-End-user-guides-Setting-up-the-trigger-event-timeout)
c. Click **Done.**
**Note:**
*Ensure that the the contact information of your target customers exist in Emarsys under Contacts.Without this, the External Event cannot be triggered and the automation program will fail. [Learn more](https://help.emarsys.com/hc/en-us/articles/115004635409-Contact-lists-Managing-contact-lists)*
You can configure the journey for the [automation program](https://help.emarsys.com/hc/en-us/articles/360003898918-Overview-Interactions-Overview) based on your use cases as shown below. In the below example, the "Cart Abandoned" External Event acts as a trigger, sending the details of customers who abandoned their cart to the next node in the workflow, that is, the "Send SMS" node. It then sends follow-up messages to these customers with incentives to complete their purchase. Note that you need to create the SMS campaign prior to using it in the automation program.
 Similarly, you can use the various options available under *[Actions](https://help.emarsys.com/hc/en-us/articles/360020803437-Nodes-Interactions-Action-nodes)* and *[Channels](https://help.emarsys.com/hc/en-us/articles/360020803397-Nodes-Interactions-Channel-nodes)* in Emarsys to create [automation programs](https://help.emarsys.com/hc/en-us/articles/360003898918-Overview-Interactions-Overview) based on your use case. In addition, you can also use attribute level information in your campaigns. For example, by tracking the customer's first name, you can personalise your targeting message by including their first name.
**Note:**
*You can create Contact Lists and update them as a part of your automation program. However, that adds a certain delay to your real-time journeys.*
### 3. Obtain the Field ID/Key ID in Emarsys
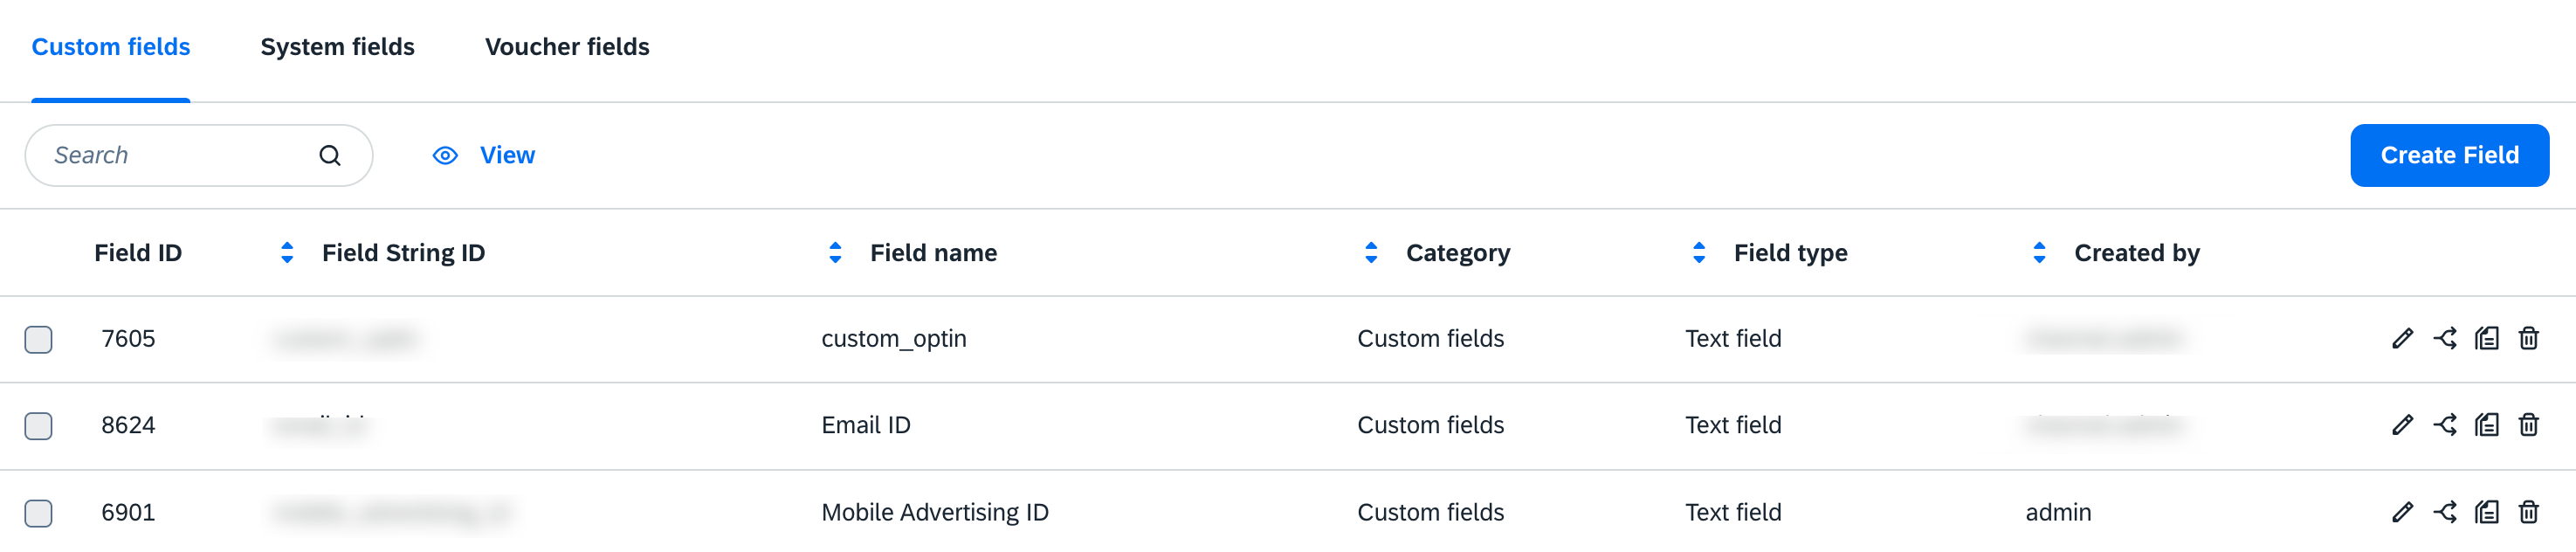
Next, you need to obtain the Field ID/Key ID of your main identifier. For example, the Key ID for 'Email' is '3'. The Field ID in Emarsys serves as a unique identifier for each contact data field. It ensures accurate data mapping and synchronisation between Emarsys and Zeotap CDP. Emarsys accounts include approximately 50 standard fields for storing contact data, known as **[system fields](https://help.emarsys.com/hc/en-us/articles/115004637605-Overview-Contact-data-fields-Overview).** In addition to these, you can create **[custom fields](https://help.emarsys.com/hc/en-us/articles/115004634689-End-user-guides-Creating-custom-fields)** tailored to your needs. You can use this Field ID as the Key ID value while [creating a Destination in Journeys within Zeotap CDP](/articles/integrate-customer/emarsys-real-time-integration#h3_488215169).
**Note:**
*If you want to use a Custom ID, then you must create a custom field in Emarsys and use the corresponding Field ID while creating the destination in Zeotap CDP. **Ensure that the custom ID is activated through the [Emarsys Support Team](https://emarsys.zendesk.com/auth/v2/login/signin?return_to=https%3A%2F%2Fhelp.emarsys.com%2Fhc%2Fen-us%2Frequests%2Fnew\&theme=hc\&locale=en-us\&brand_id=38892\&auth_origin=38892%2Ctrue%2Ctrue)** **.***
Similarly, you can use the various options available under *[Actions](https://help.emarsys.com/hc/en-us/articles/360020803437-Nodes-Interactions-Action-nodes)* and *[Channels](https://help.emarsys.com/hc/en-us/articles/360020803397-Nodes-Interactions-Channel-nodes)* in Emarsys to create [automation programs](https://help.emarsys.com/hc/en-us/articles/360003898918-Overview-Interactions-Overview) based on your use case. In addition, you can also use attribute level information in your campaigns. For example, by tracking the customer's first name, you can personalise your targeting message by including their first name.
**Note:**
*You can create Contact Lists and update them as a part of your automation program. However, that adds a certain delay to your real-time journeys.*
### 3. Obtain the Field ID/Key ID in Emarsys
Next, you need to obtain the Field ID/Key ID of your main identifier. For example, the Key ID for 'Email' is '3'. The Field ID in Emarsys serves as a unique identifier for each contact data field. It ensures accurate data mapping and synchronisation between Emarsys and Zeotap CDP. Emarsys accounts include approximately 50 standard fields for storing contact data, known as **[system fields](https://help.emarsys.com/hc/en-us/articles/115004637605-Overview-Contact-data-fields-Overview).** In addition to these, you can create **[custom fields](https://help.emarsys.com/hc/en-us/articles/115004634689-End-user-guides-Creating-custom-fields)** tailored to your needs. You can use this Field ID as the Key ID value while [creating a Destination in Journeys within Zeotap CDP](/articles/integrate-customer/emarsys-real-time-integration#h3_488215169).
**Note:**
*If you want to use a Custom ID, then you must create a custom field in Emarsys and use the corresponding Field ID while creating the destination in Zeotap CDP. **Ensure that the custom ID is activated through the [Emarsys Support Team](https://emarsys.zendesk.com/auth/v2/login/signin?return_to=https%3A%2F%2Fhelp.emarsys.com%2Fhc%2Fen-us%2Frequests%2Fnew\&theme=hc\&locale=en-us\&brand_id=38892\&auth_origin=38892%2Ctrue%2Ctrue)** **.***
 Perform the following steps to obtain Field ID/Key ID:
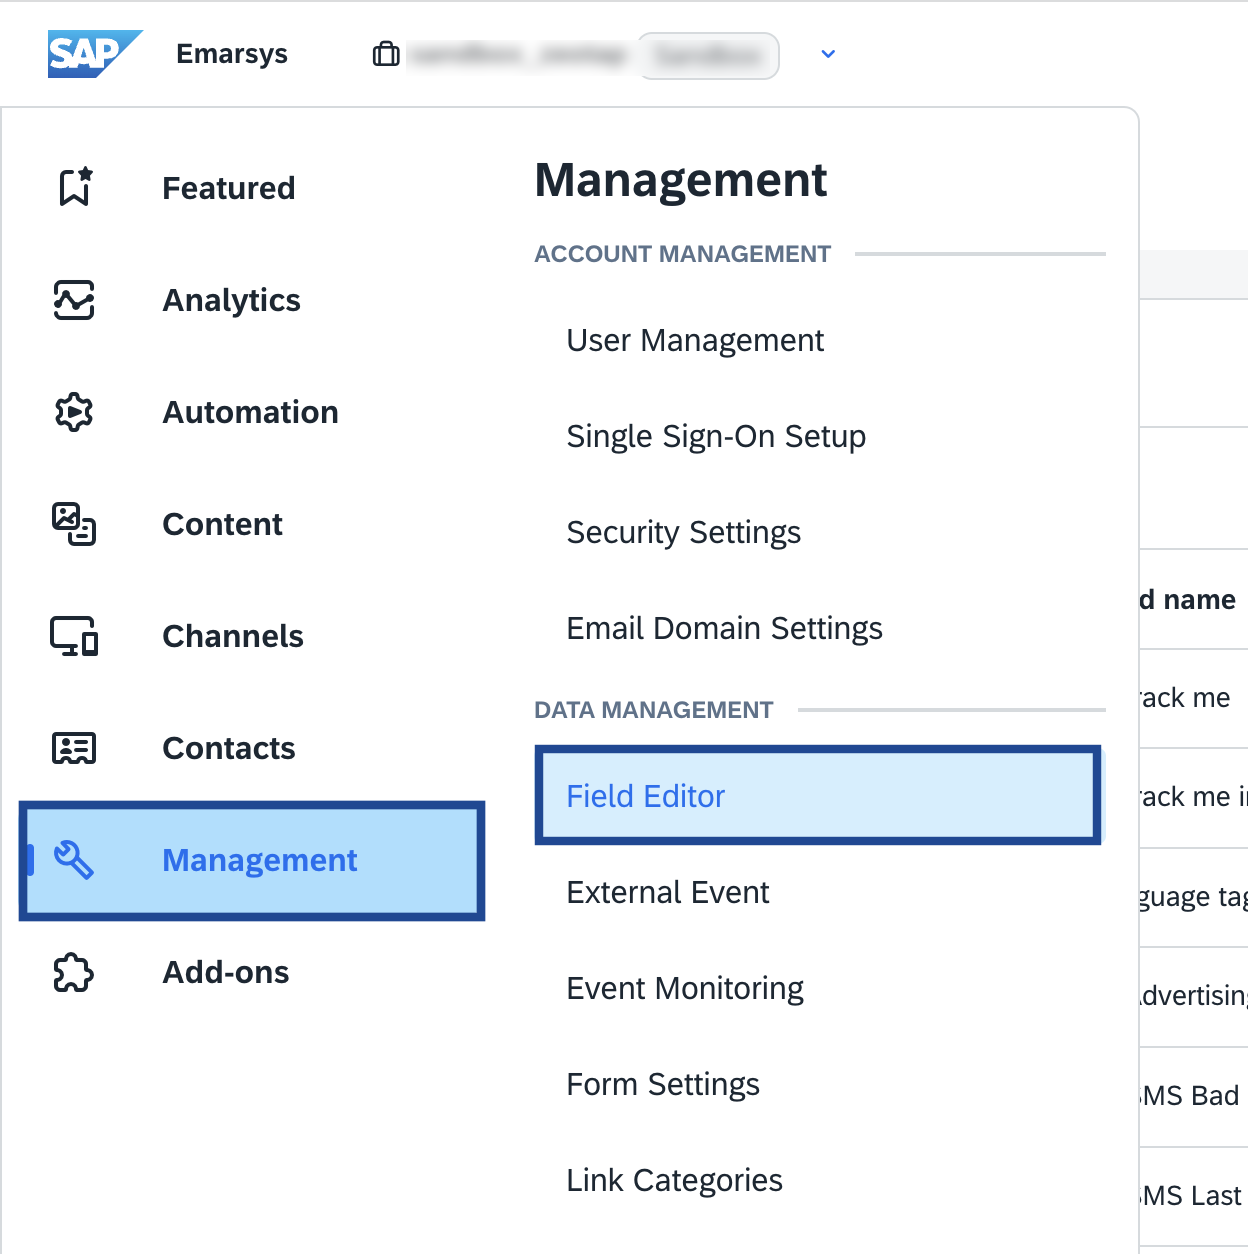
Log into your [Emarsys account](https://suite55.emarsys.net) and navigate to **Management** **>** **Field Editor**.
Perform the following steps to obtain Field ID/Key ID:
Log into your [Emarsys account](https://suite55.emarsys.net) and navigate to **Management** **>** **Field Editor**.
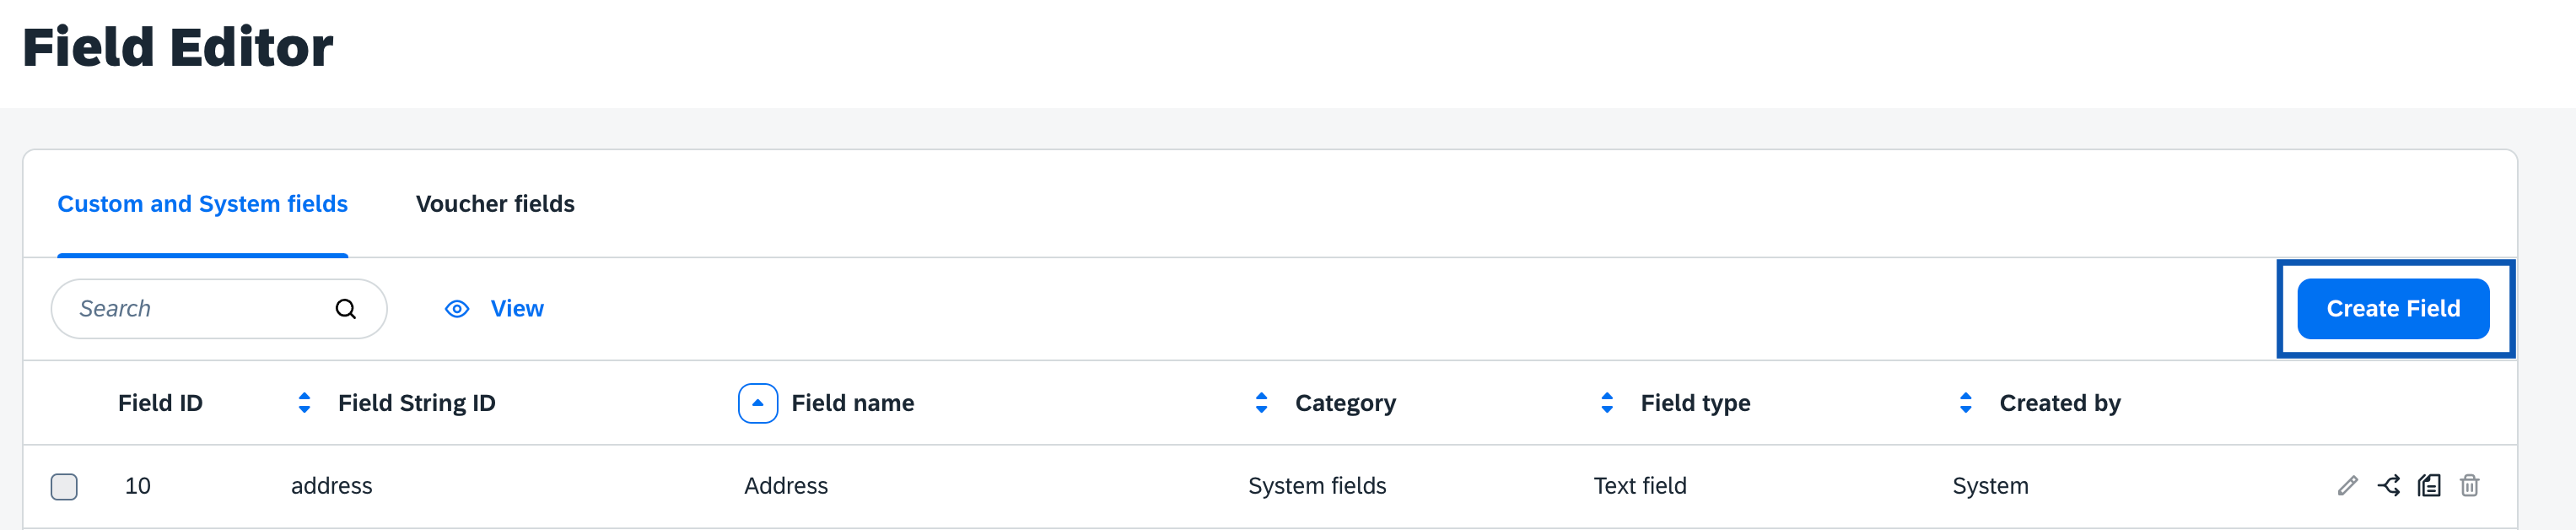
 In the new screen that appears, click **Create Field**.
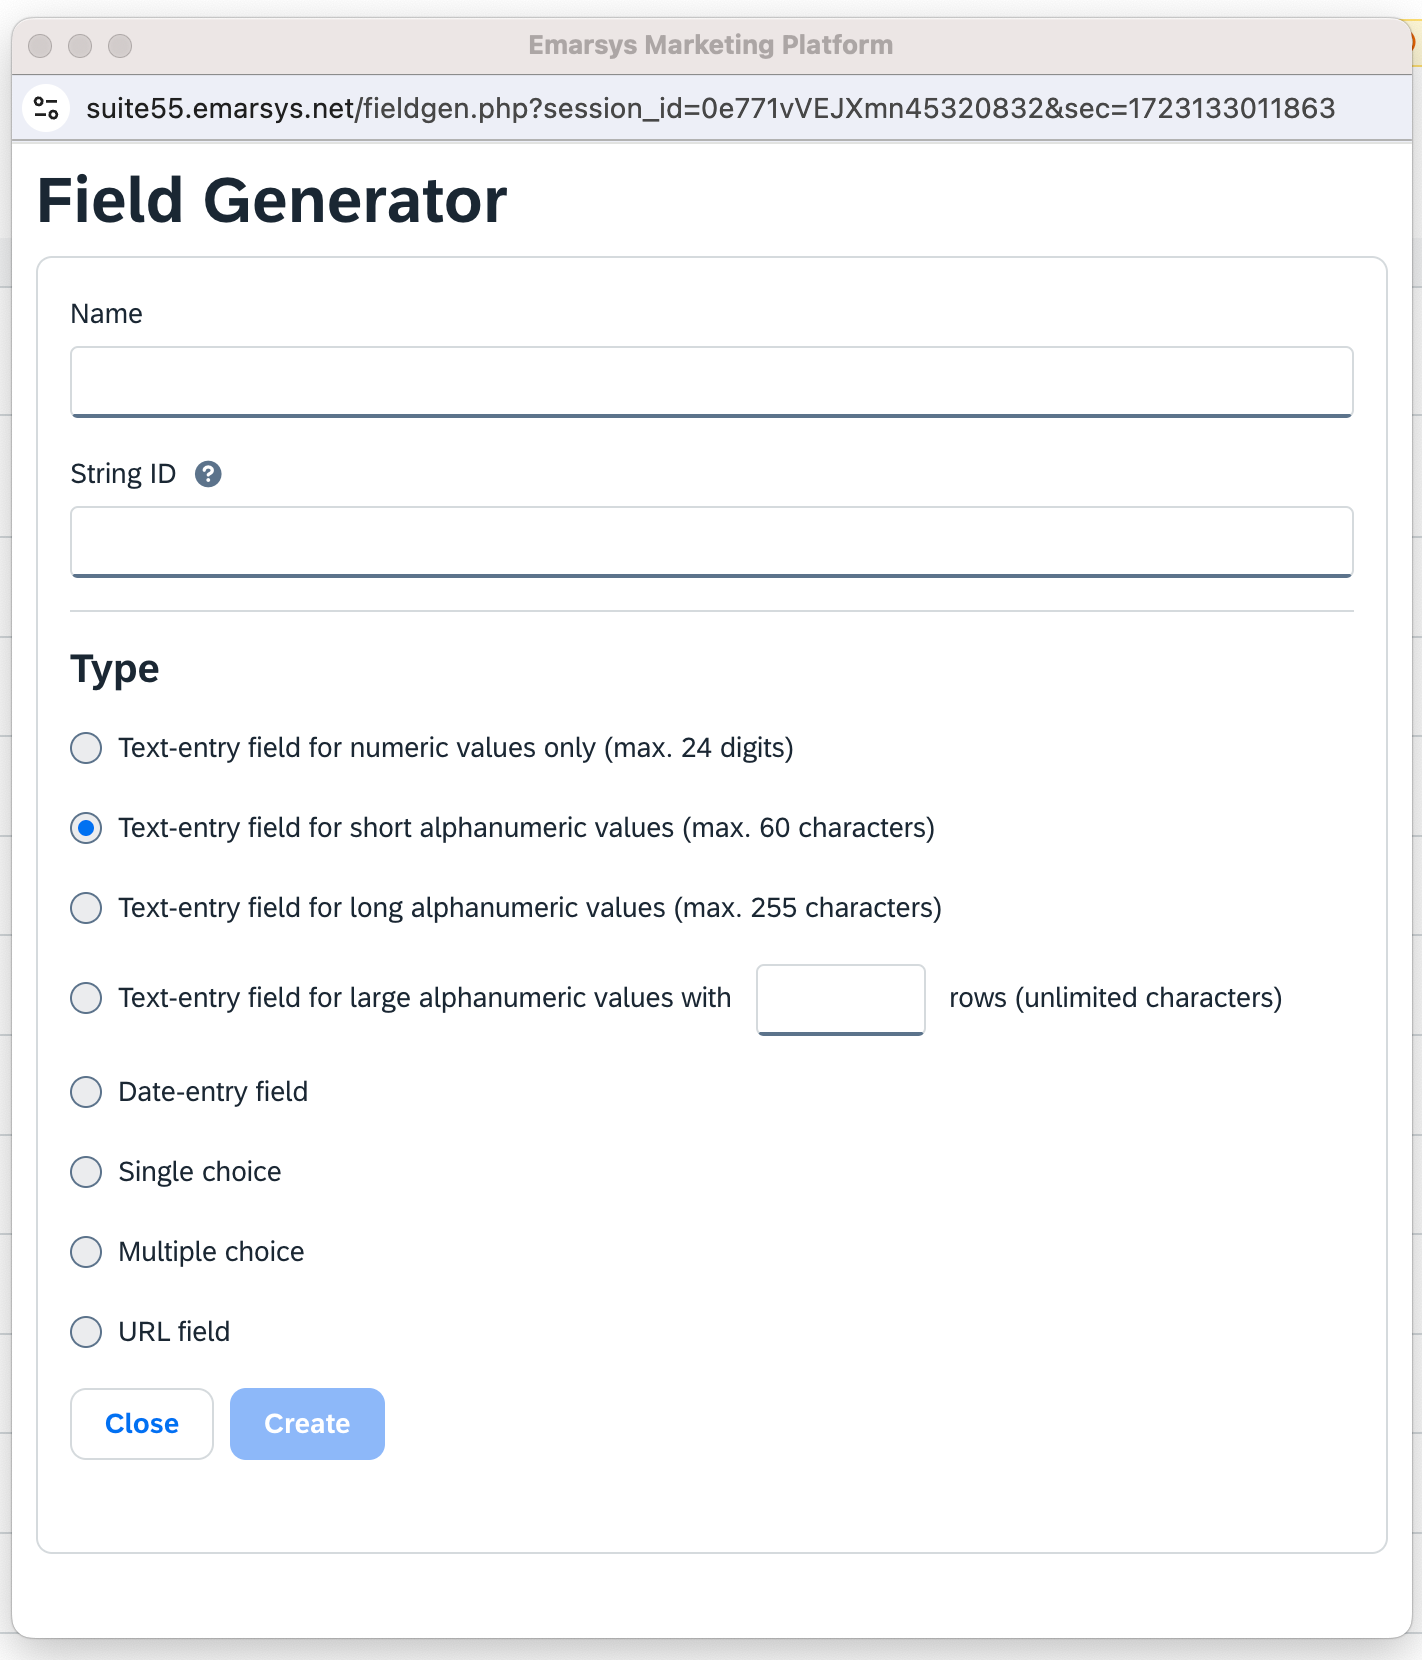
 In the **Field Generator**screen that appears, provide the following details:
a. Enter **Name** for your identifier.
b. Provide a **String ID** for your identifier.
c. Choose the **Type** of your identifier and click **Create**. [Learn more](https://help.emarsys.com/hc/en-us/articles/115004634729-Overview-Available-field-types)
In the **Field Generator**screen that appears, provide the following details:
a. Enter **Name** for your identifier.
b. Provide a **String ID** for your identifier.
c. Choose the **Type** of your identifier and click **Create**. [Learn more](https://help.emarsys.com/hc/en-us/articles/115004634729-Overview-Available-field-types)
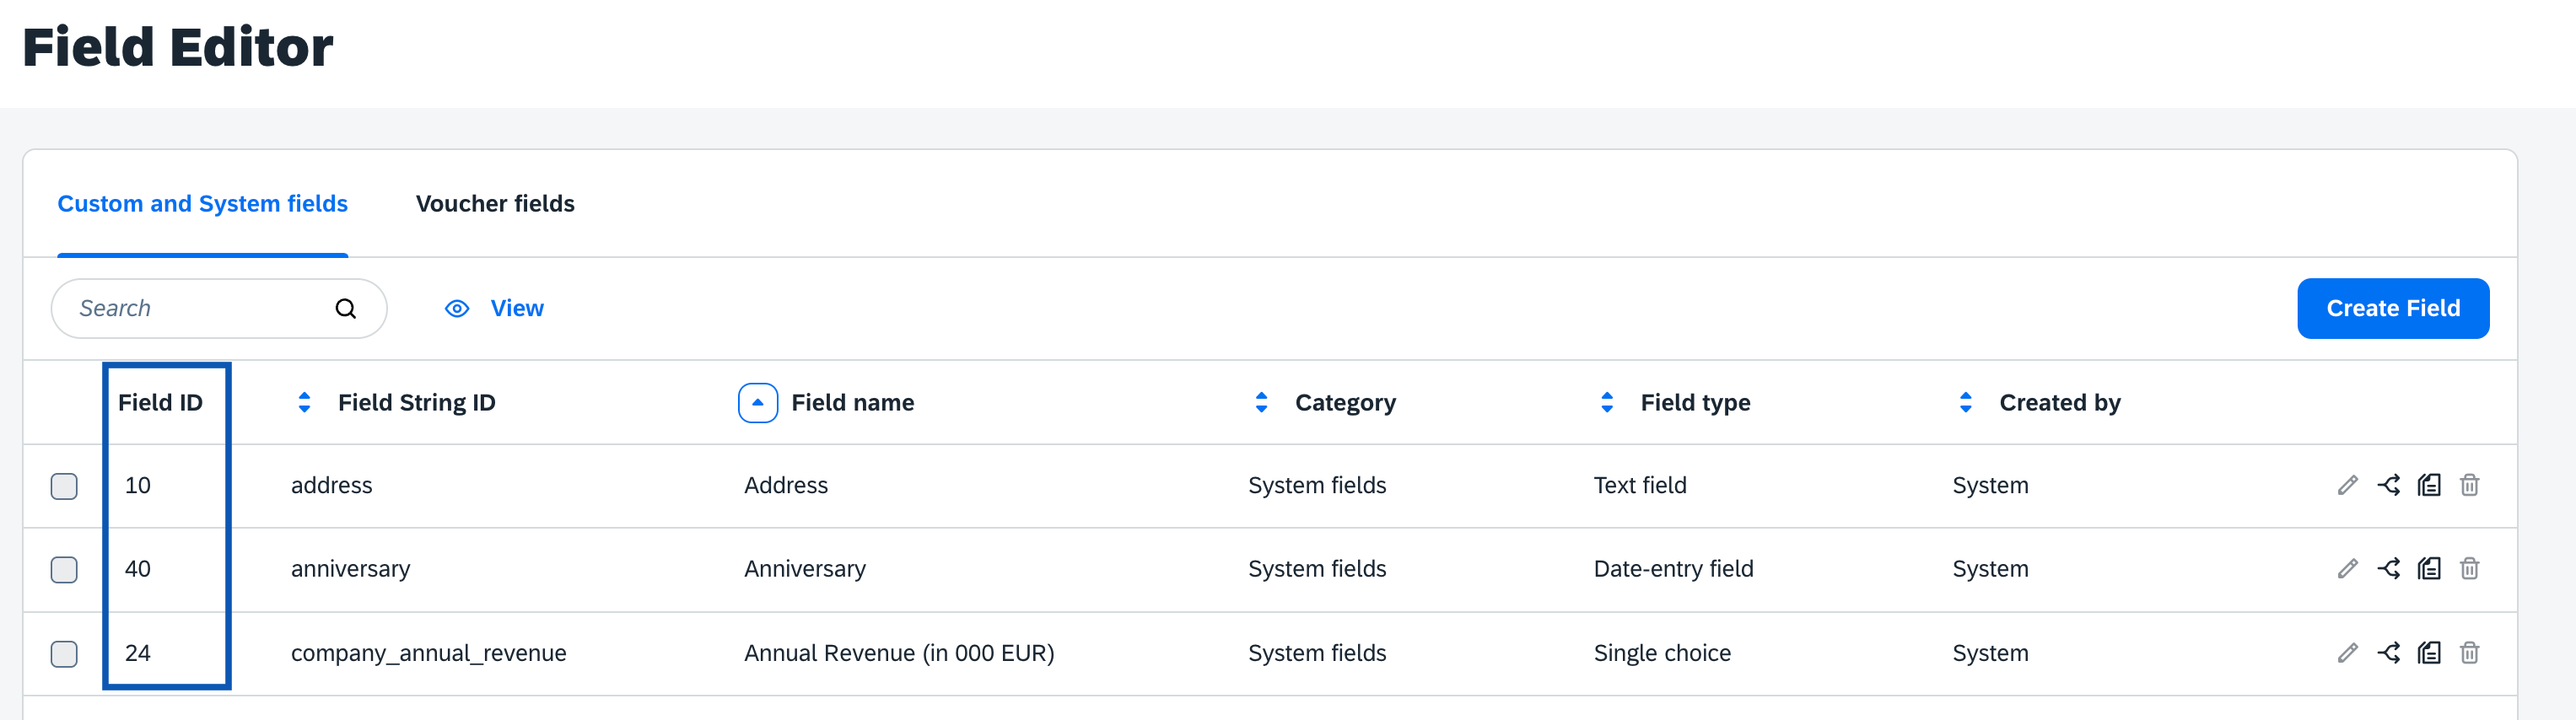
 The created identifier gets listed in the **Field Editor** page as shown below. You can copy the **Field ID** against your main identifier and provide it in the **Key ID** field [while adding a new Destination in Zeotap CDP](/articles/integrate-customer/emarsys-real-time-integration#h3_488215169).
 ### 4. Obtain the User name (API ID) and Secret in Emarsys
In Emarsys, the \*\*User name (API ID)\*\*and **Secret** details are used to authenticate the API calls and gain access to certain features or functionalities on the Emarsys platform.
Perform the following steps to obtain your User name (ID in Emarsys) and the Client Secret from the Emarsys console:
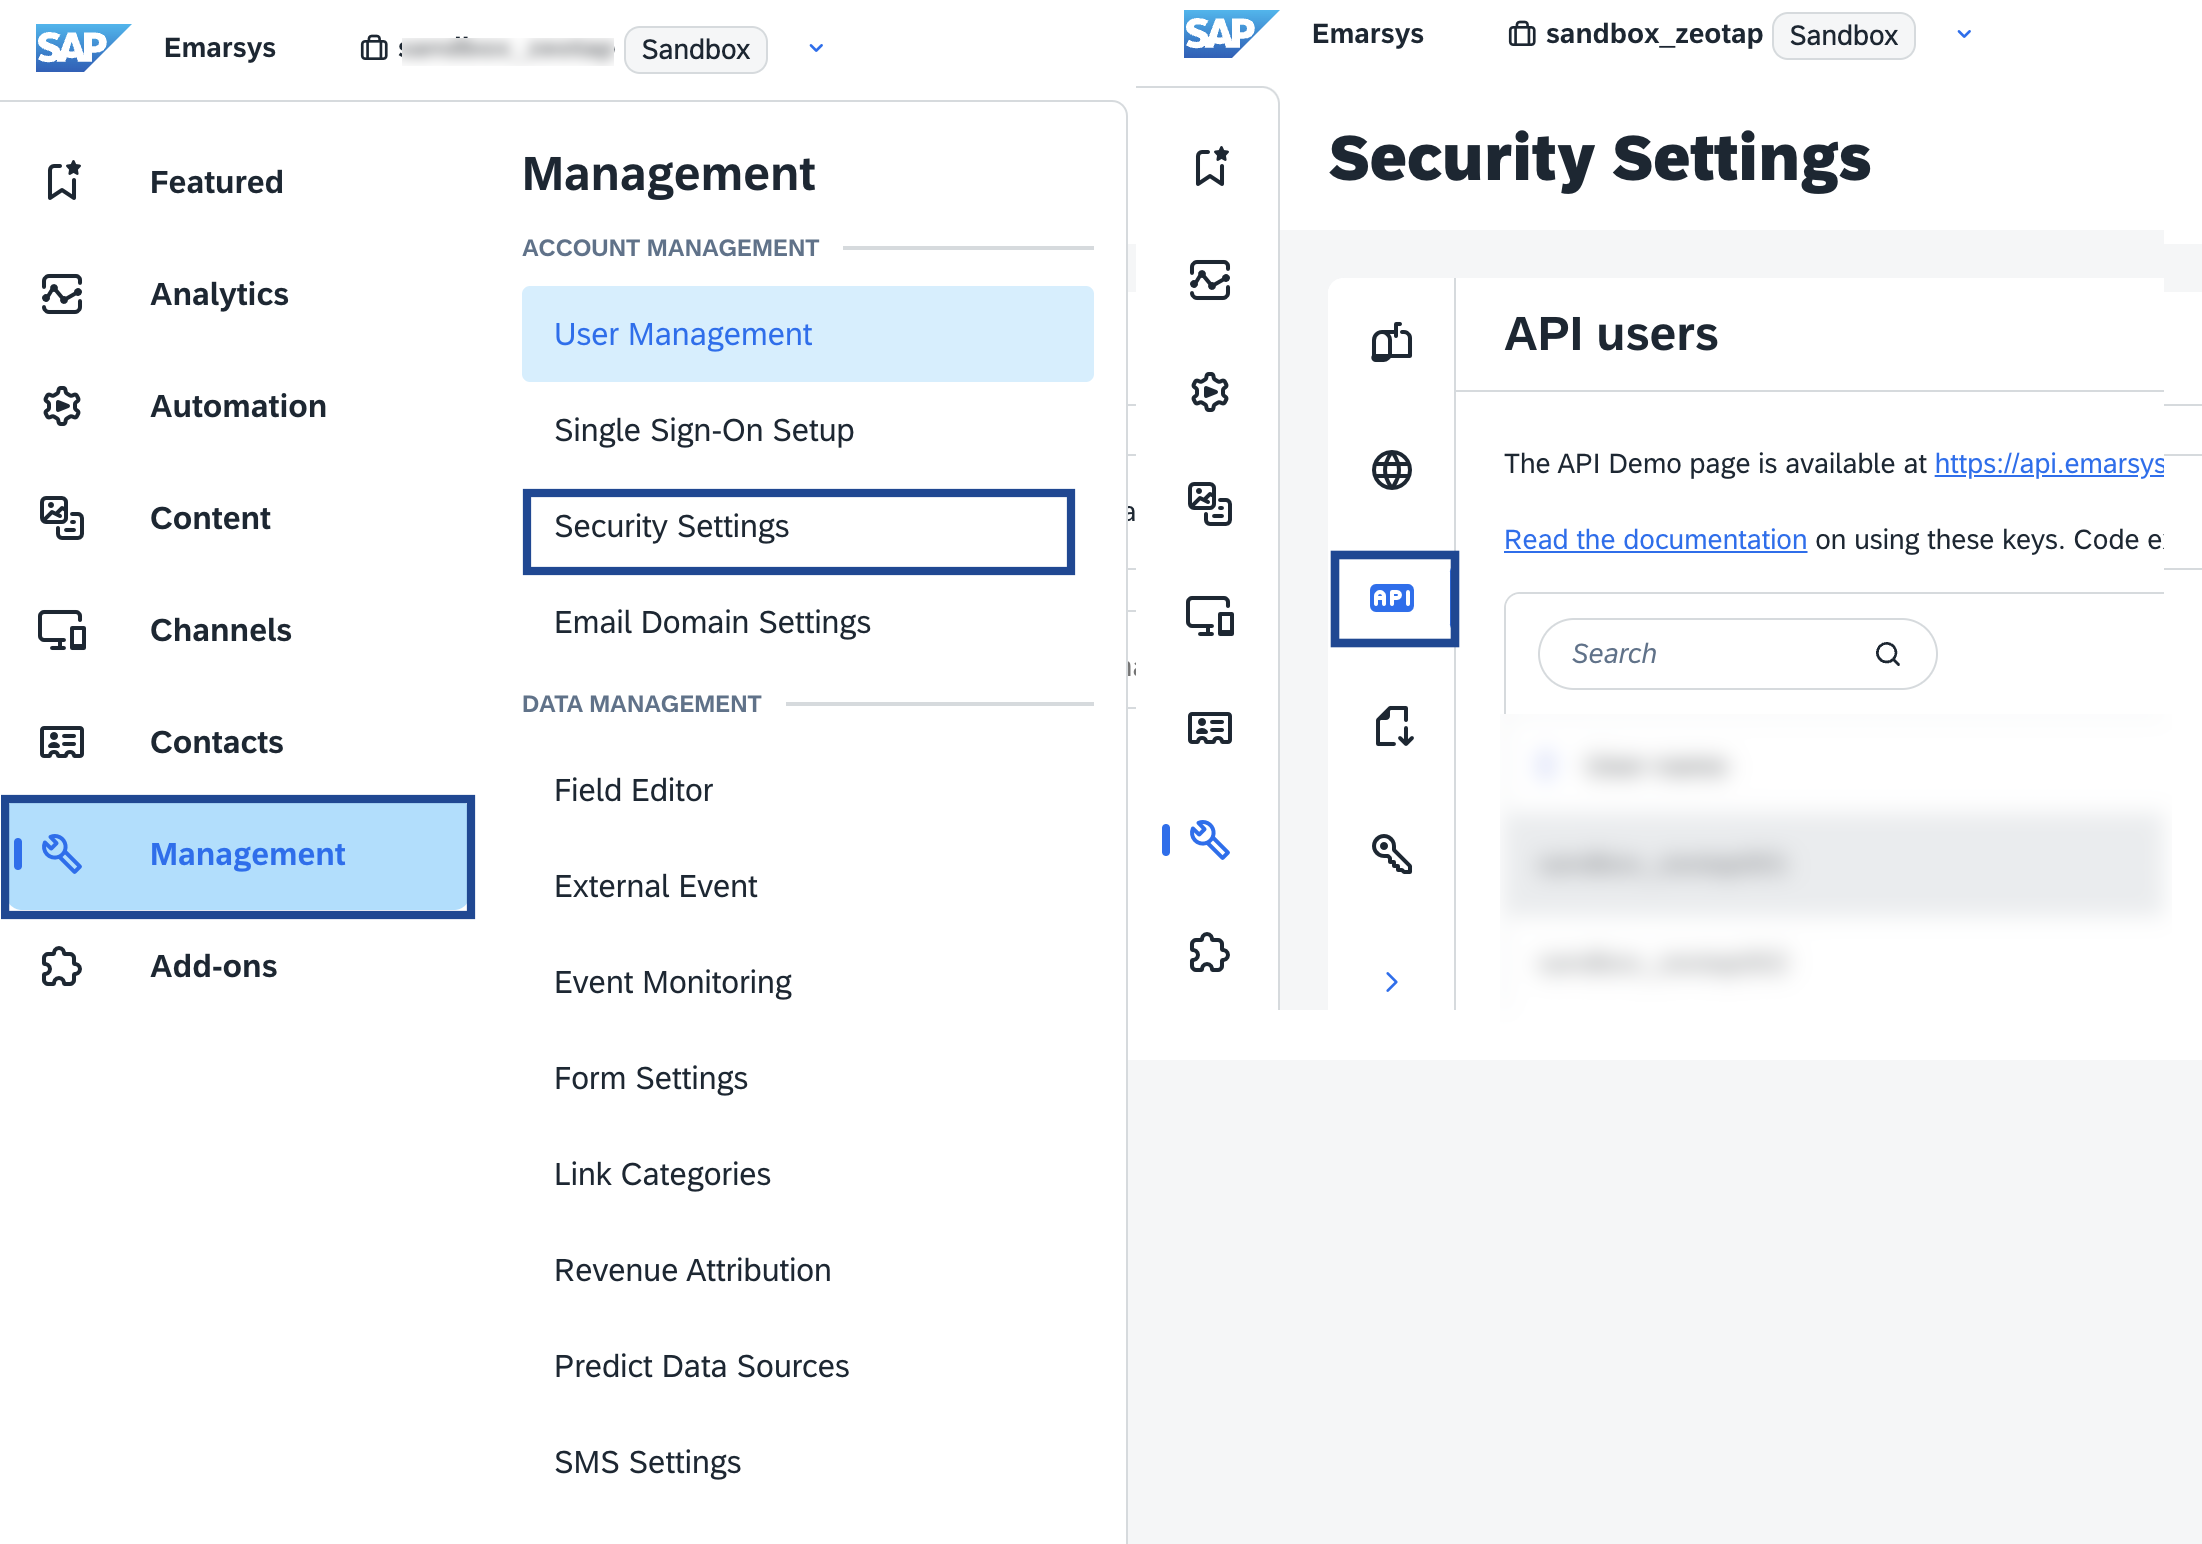
Log into your Emarsys account and navigate to **Management > Security Settings > API** as shown in the image below.
### 4. Obtain the User name (API ID) and Secret in Emarsys
In Emarsys, the \*\*User name (API ID)\*\*and **Secret** details are used to authenticate the API calls and gain access to certain features or functionalities on the Emarsys platform.
Perform the following steps to obtain your User name (ID in Emarsys) and the Client Secret from the Emarsys console:
Log into your Emarsys account and navigate to **Management > Security Settings > API** as shown in the image below.
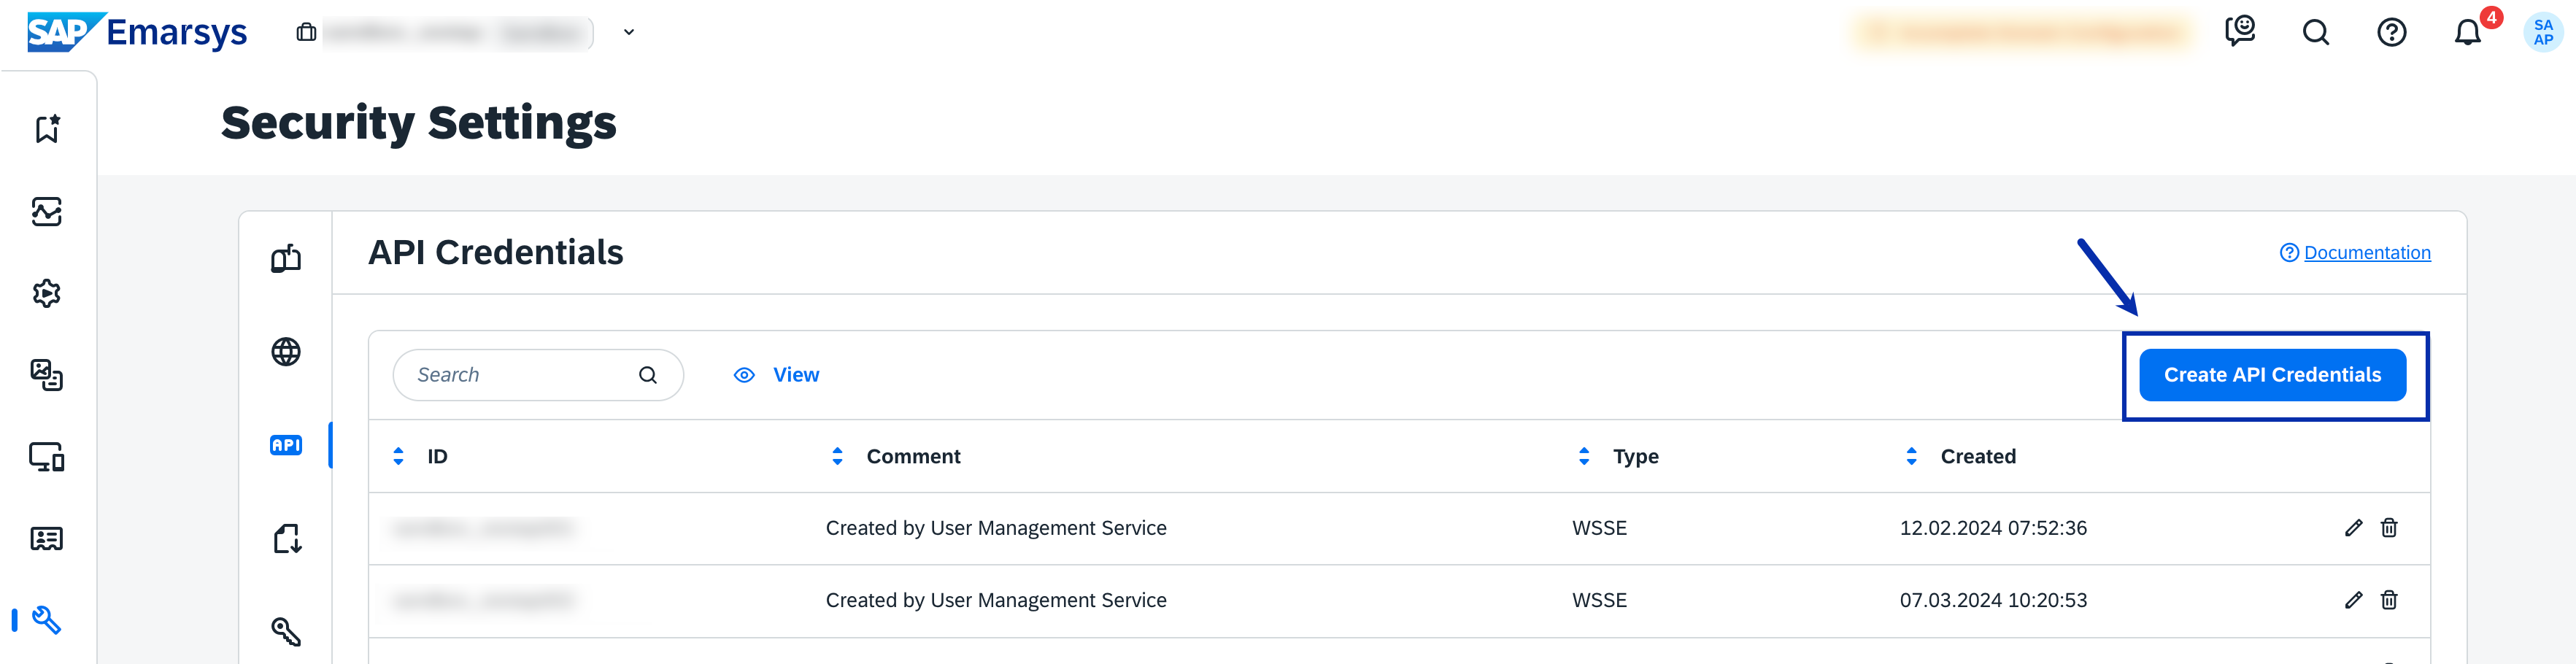
 In the new screen that appears, under **API Credentials**, click **Create API Credentials**.
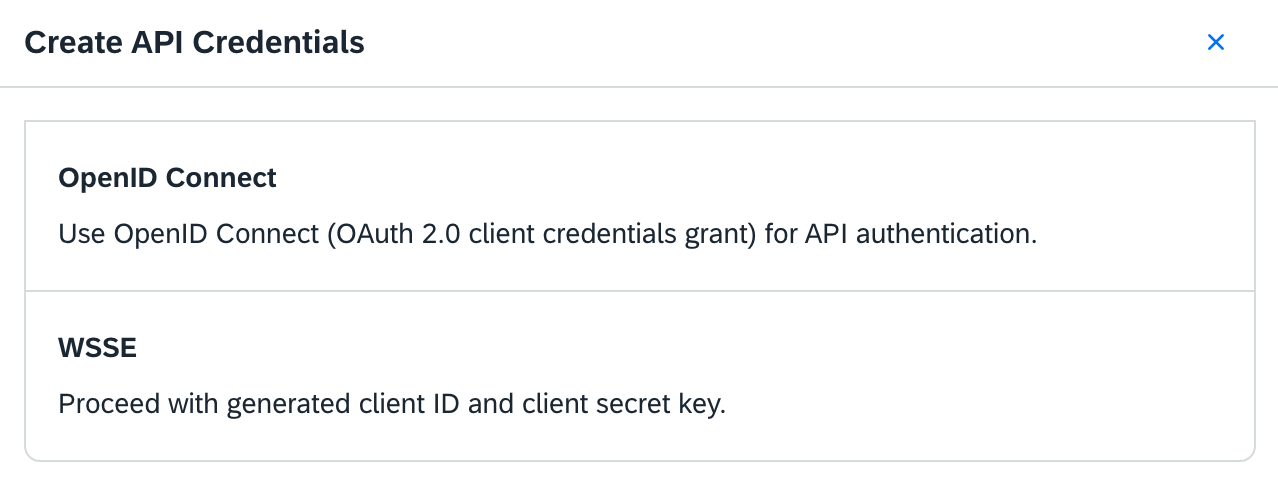
 In the window that appears, under **Create API Credentials**, choose your preferred API authentication method. Currently only **WSSE**authentication is supported. We will be releasing an enhancement to support Open ID Connect soon..
a. **WSSE** (Web Services Security Extensions)–By selecting the **WSSE** option, you create API credentials that use WSSE authentication over SSL for secure communication. This method requires adding a custom `X-WSSE` header to each request. [Learn more](https://dev.emarsys.com/docs/emarsys-core-api-guides/branches/main/b3c3a1eba8515-authentication)
In the window that appears, under **Create API Credentials**, choose your preferred API authentication method. Currently only **WSSE**authentication is supported. We will be releasing an enhancement to support Open ID Connect soon..
a. **WSSE** (Web Services Security Extensions)–By selecting the **WSSE** option, you create API credentials that use WSSE authentication over SSL for secure communication. This method requires adding a custom `X-WSSE` header to each request. [Learn more](https://dev.emarsys.com/docs/emarsys-core-api-guides/branches/main/b3c3a1eba8515-authentication)
 In the new screen that appears, enter the **Password** associated with your Emarsys account and complete the API credentials creation process.
Upon successfully creating the API credentials, you can find the **ID** (User name in Zeotap CDP) and **Client** **Secret** details under the **API Credentials**section as shown below. **Note that the secret is only available until you stay on this page. You will not be able to copy it after navigating away from this page.**
In the new screen that appears, enter the **Password** associated with your Emarsys account and complete the API credentials creation process.
Upon successfully creating the API credentials, you can find the **ID** (User name in Zeotap CDP) and **Client** **Secret** details under the **API Credentials**section as shown below. **Note that the secret is only available until you stay on this page. You will not be able to copy it after navigating away from this page.**
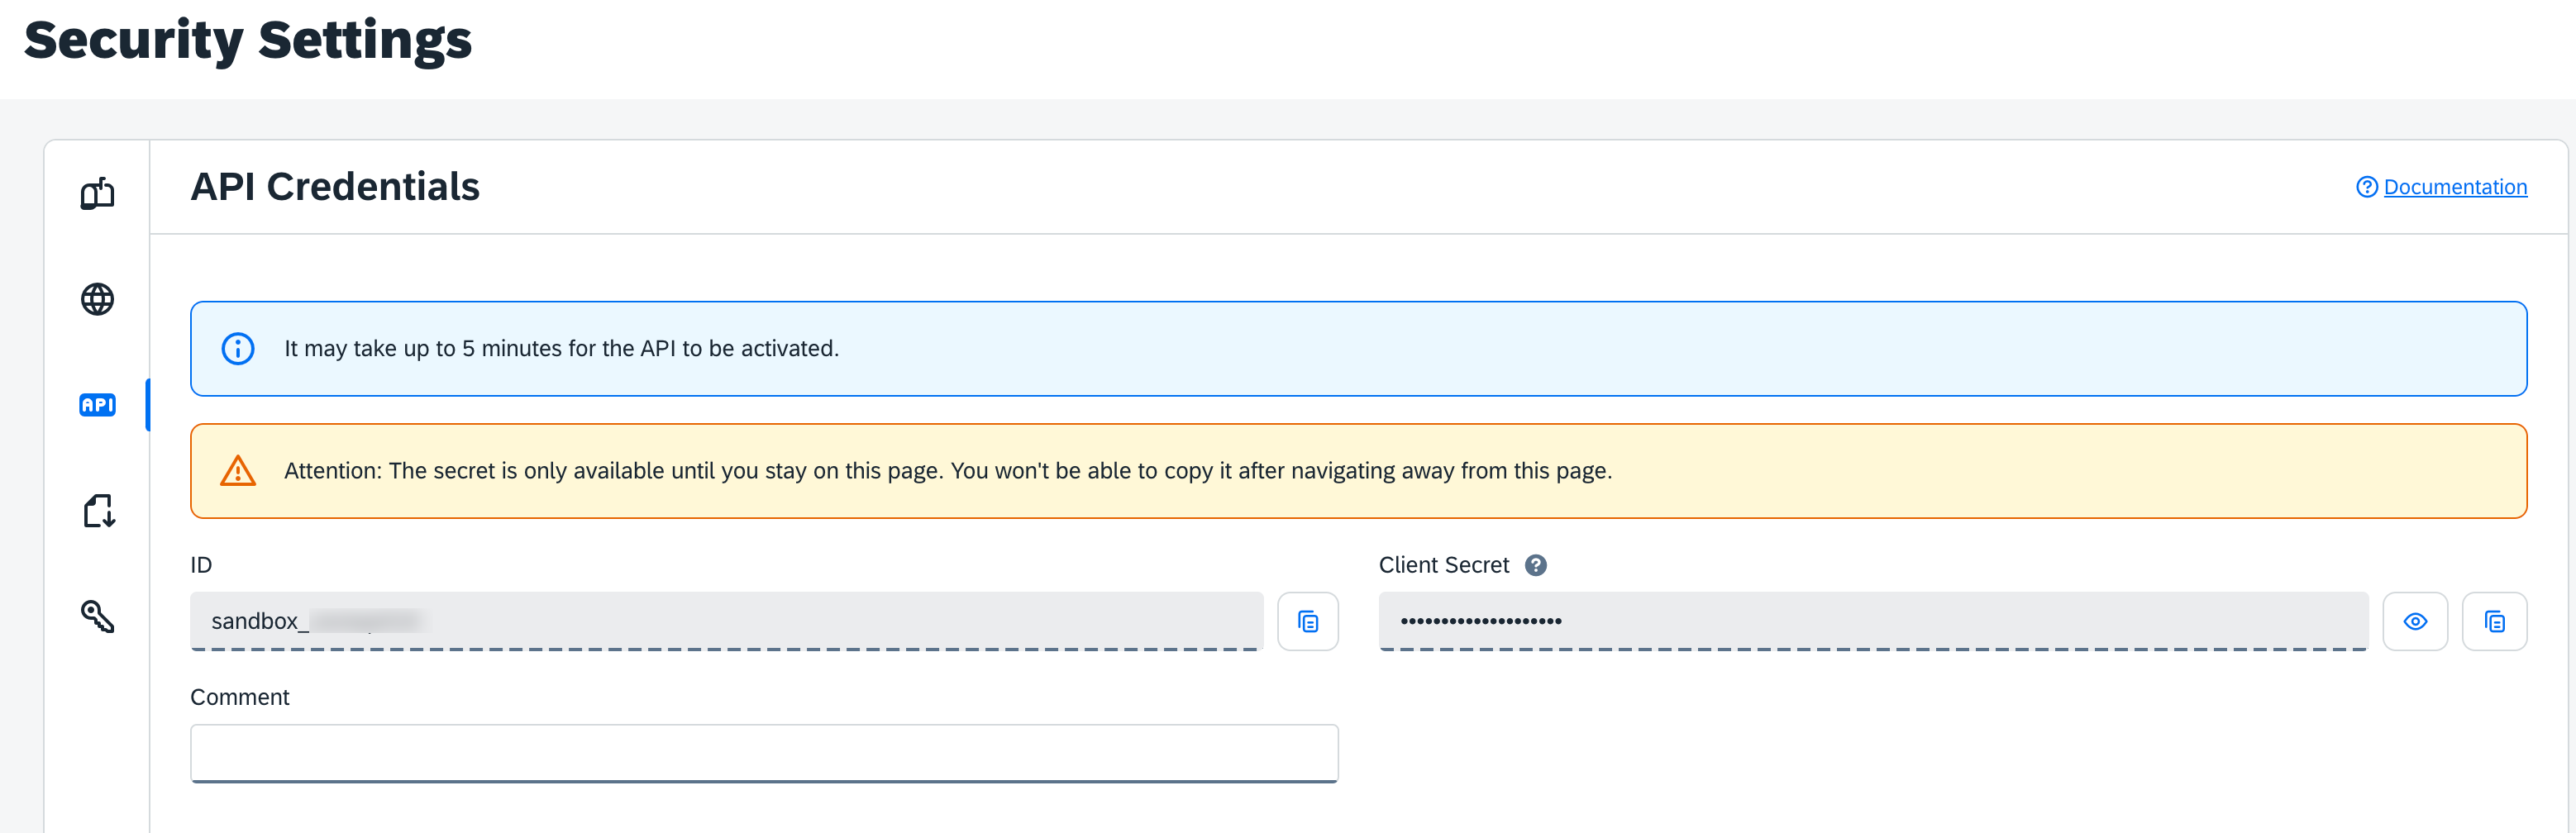 Copy the API credentials and scroll down to **Permissions**.
Here, you need to enable the following permissions for the user:
a. Under **contact**, a list of permissions as shown in the image below appears, wherein, you need to enable **contact.update** and **contact.create**. The **contact.delete** permission must be enabled to use the Delete contacts action.
Copy the API credentials and scroll down to **Permissions**.
Here, you need to enable the following permissions for the user:
a. Under **contact**, a list of permissions as shown in the image below appears, wherein, you need to enable **contact.update** and **contact.create**. The **contact.delete** permission must be enabled to use the Delete contacts action.
 b. Similarly, under **contactlis** **t**, you need to enable-
* **contactlist.contact.add**
* **contactlist.contact.delete**
* **contactlist.create**
b. Similarly, under **contactlis** **t**, you need to enable-
* **contactlist.contact.add**
* **contactlist.contact.delete**
* **contactlist.create**
.png?fit=max&auto=format&n=vzDgpNKaht27Bxzv&q=85&s=7af10a8163c4a7005333d49764811bdc) c. Under **externalevent**, you need to enable-
* externalevent.create
* externalevent.trigger
c. Under **externalevent**, you need to enable-
* externalevent.create
* externalevent.trigger
_(1).png?fit=max&auto=format&n=vzDgpNKaht27Bxzv&q=85&s=051956b8805f1b540b37163689a96fa6) ## Destination Setup in Journeys (Zeotap CDP)
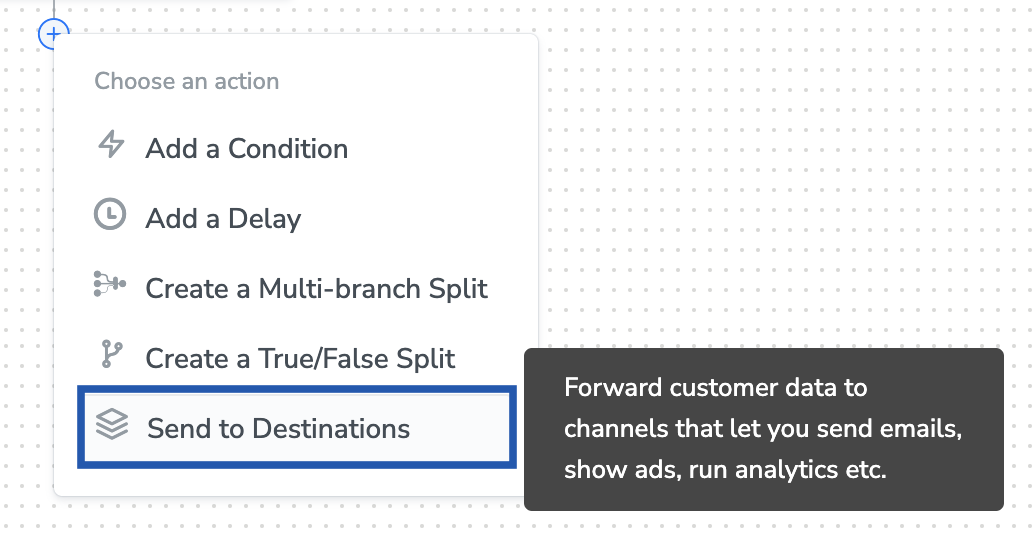
After configuring and obtaining the required fields from the Emarsys platform, you can [create a workflow in Journeys (Zeotap CDP)](https://docs.zeotap.com/articles/orchestrate-customer/create-a-workflow). Apply filters or add conditions for your users in Journeys, then activate them in Emarsys by clicking **Send to Destinations** at the node level, as shown in the image below. A new window appears where you can set up your destination. You can either select an existing destination from the list of available Destinations or create a new one by clicking **+ Add New Destination**.
## Destination Setup in Journeys (Zeotap CDP)
After configuring and obtaining the required fields from the Emarsys platform, you can [create a workflow in Journeys (Zeotap CDP)](https://docs.zeotap.com/articles/orchestrate-customer/create-a-workflow). Apply filters or add conditions for your users in Journeys, then activate them in Emarsys by clicking **Send to Destinations** at the node level, as shown in the image below. A new window appears where you can set up your destination. You can either select an existing destination from the list of available Destinations or create a new one by clicking **+ Add New Destination**.
 ### Add New Destination
Perform the following steps to add a new destination:
Click **Add New Destination.**
Search for **Emarsys.**
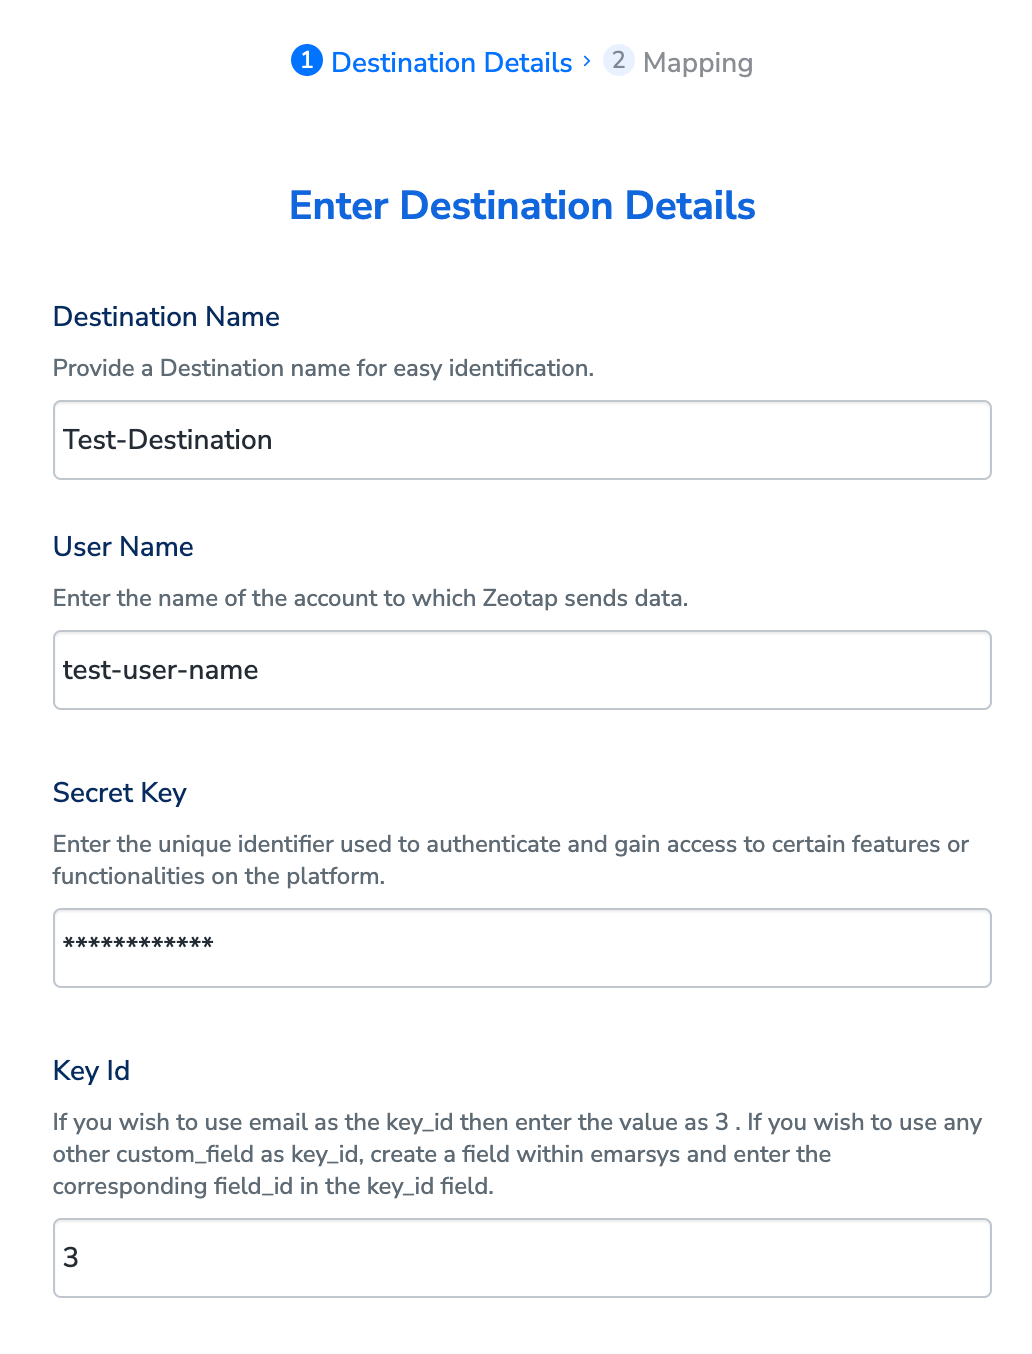
Click **Emarsys** and enter a name for the Destination.
Enter the **User name** of the account to which Zeotap sends data. For information about how to obtain this from Emarsys, refer [here](/articles/integrate-customer/emarsys-real-time-integration#h3_828772627).
Enter **Secret Key** obtained from your Emarsys account. For information about how to obtain this from Emarsys, refer [here](/articles/integrate-customer/emarsys-real-time-integration#h3_828772627).
Enter **Key ID**. For information about how to obtain this from Emarsys, refer [here](/articles/integrate-customer/emarsys-real-time-integration#h3__1919541831).
### Add New Destination
Perform the following steps to add a new destination:
Click **Add New Destination.**
Search for **Emarsys.**
Click **Emarsys** and enter a name for the Destination.
Enter the **User name** of the account to which Zeotap sends data. For information about how to obtain this from Emarsys, refer [here](/articles/integrate-customer/emarsys-real-time-integration#h3_828772627).
Enter **Secret Key** obtained from your Emarsys account. For information about how to obtain this from Emarsys, refer [here](/articles/integrate-customer/emarsys-real-time-integration#h3_828772627).
Enter **Key ID**. For information about how to obtain this from Emarsys, refer [here](/articles/integrate-customer/emarsys-real-time-integration#h3__1919541831).
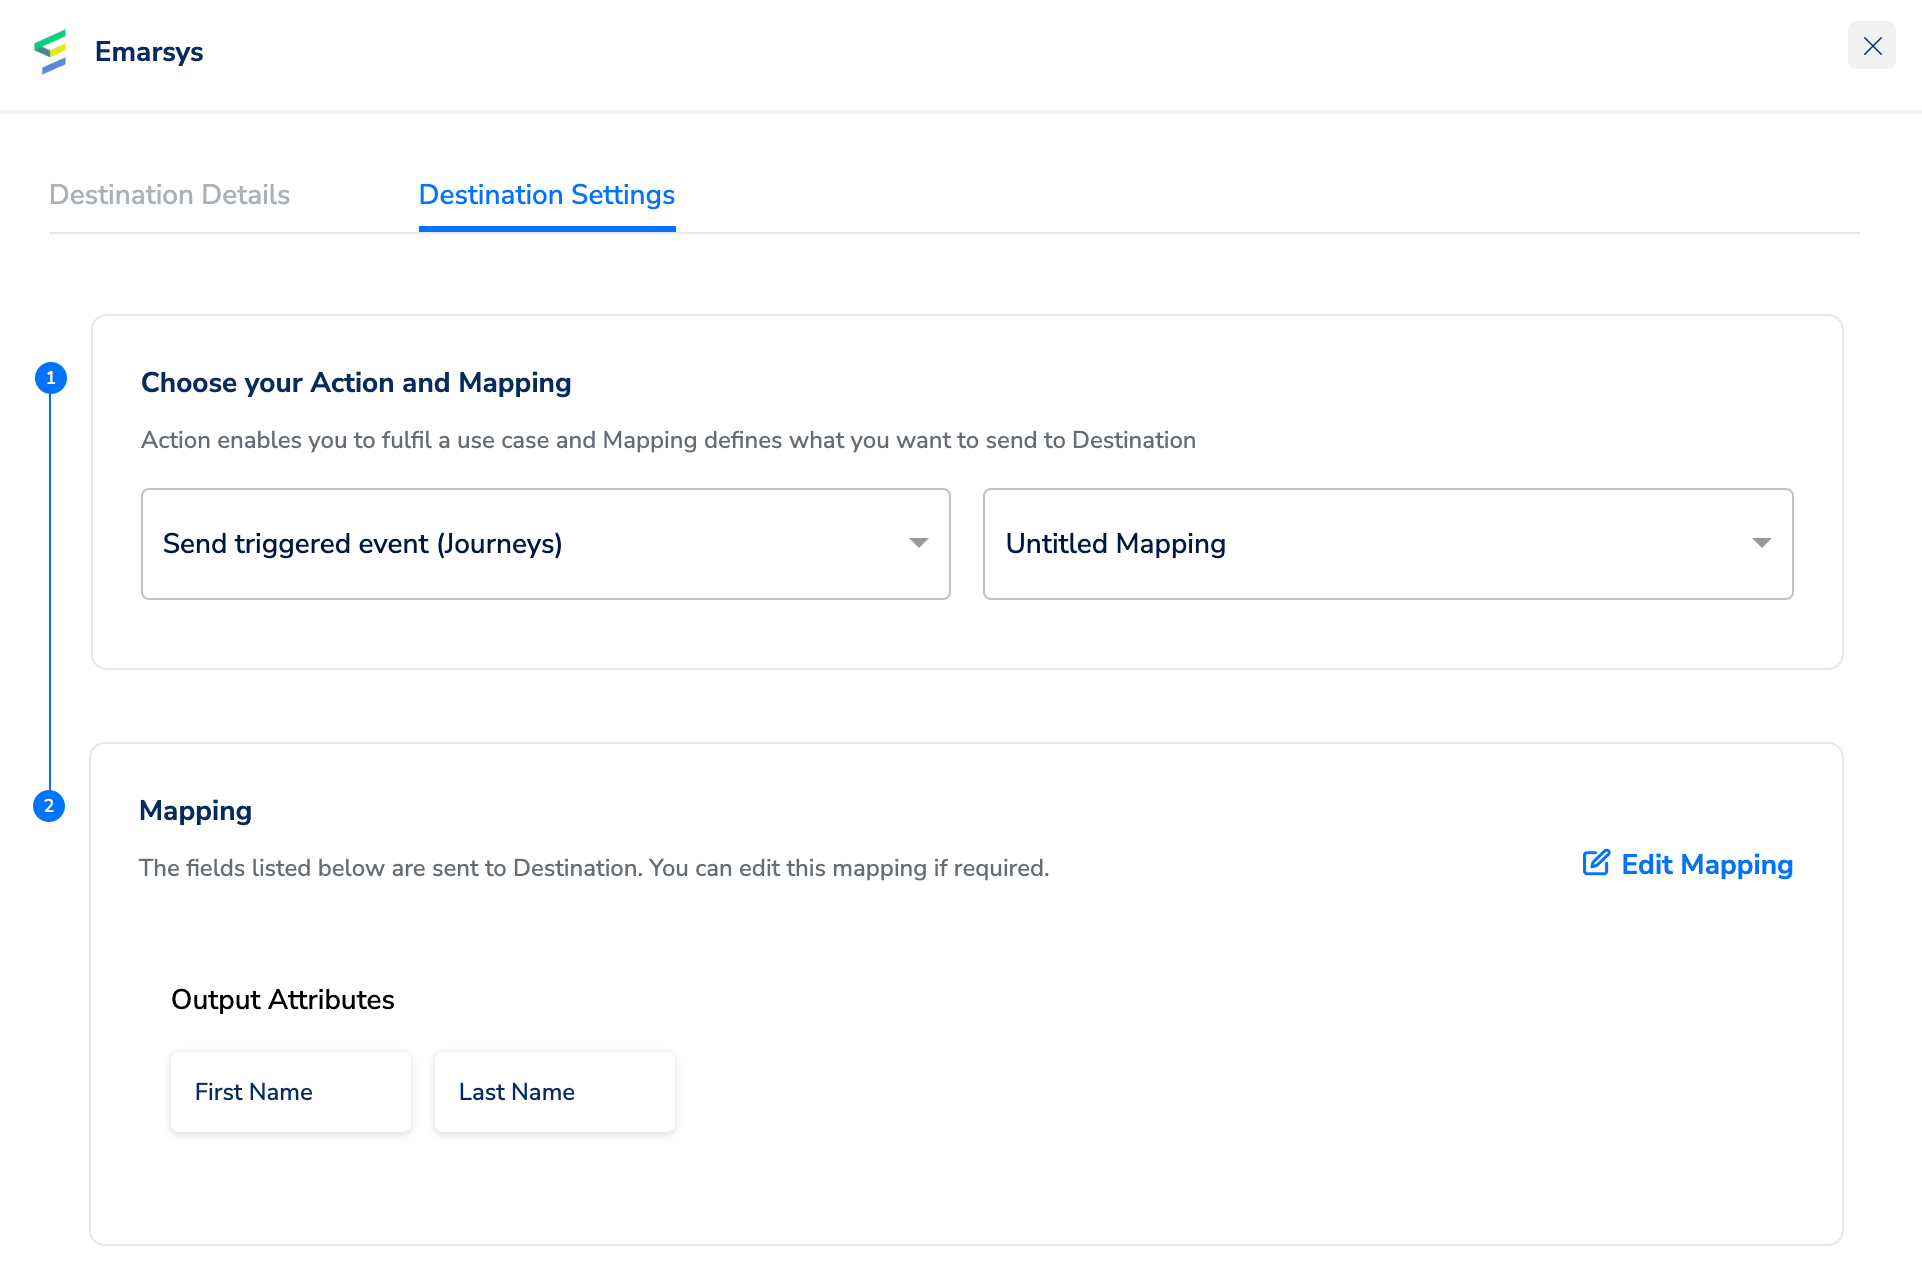
 In the mapping screen that appears, there would be two dropdown options available under **Choose your Action.**
a) Select **Send triggered event (Journeys)** as the action for sending data from the workflow created in Journeys. Under **Map the Fields**, a list of identifiers and attributes are populated. You can map the appropriate Catalogue fields to the Destination fields to send to Destinations. For any assistance with the mapping, reach out to your Zeotap POC.
In the mapping screen that appears, there would be two dropdown options available under **Choose your Action.**
a) Select **Send triggered event (Journeys)** as the action for sending data from the workflow created in Journeys. Under **Map the Fields**, a list of identifiers and attributes are populated. You can map the appropriate Catalogue fields to the Destination fields to send to Destinations. For any assistance with the mapping, reach out to your Zeotap POC.
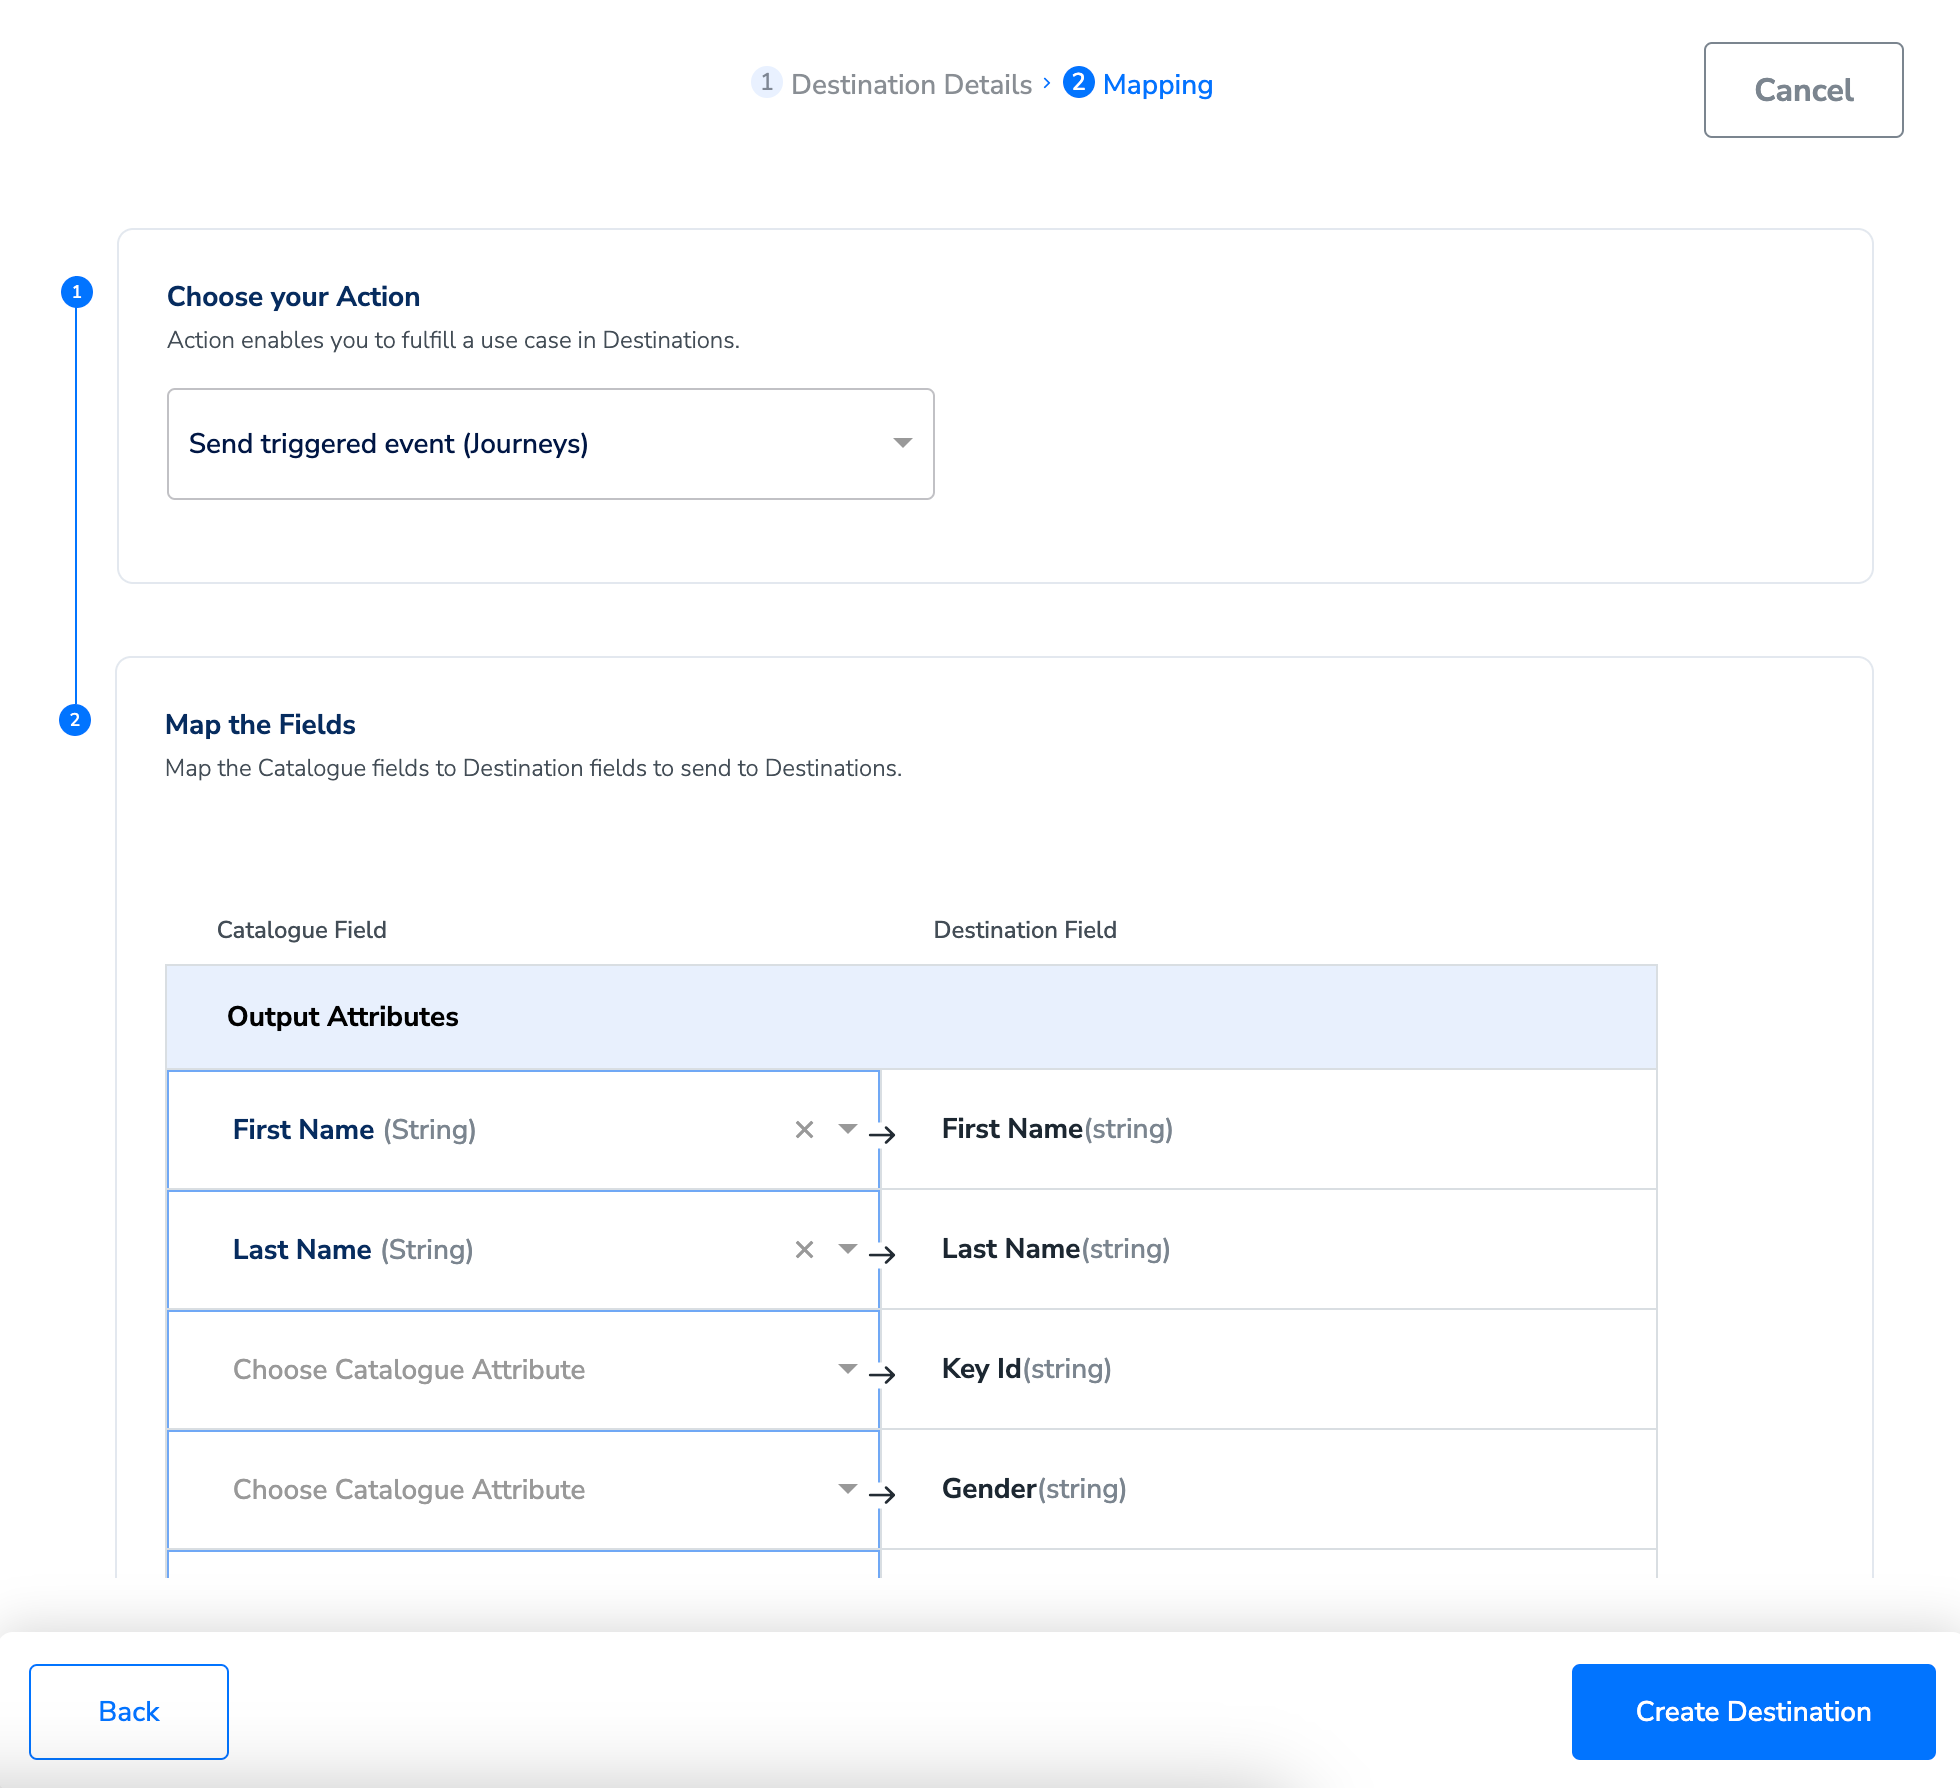 b) Select **Create or Update Contacts** as the action, which would create or update data in Emarsys based on the data sent from Journeys in Zeotap. Under **Map the Fields**, a list of identifiers and attributes are populated.You can map the appropriate Catalogue fields to the Destination fields to send to Destinations. For any assistance with the mapping, reach out to your Zeotap POC.
 c) Add the Key ID of Emarsys corresponding to the identifier through which you would like to delete the contact. For example, key ID 3 is email in emarsys and it is mapped to an email field from the catalogue. The contact will be deleted by the email that has moved through the journey. You can use different Key IDs instead of 3(email) as well. You can refer to the [contact fields](https://dev.emarsys.com/docs/core-api-reference/7f3e853b57d26-contact-system-fields)
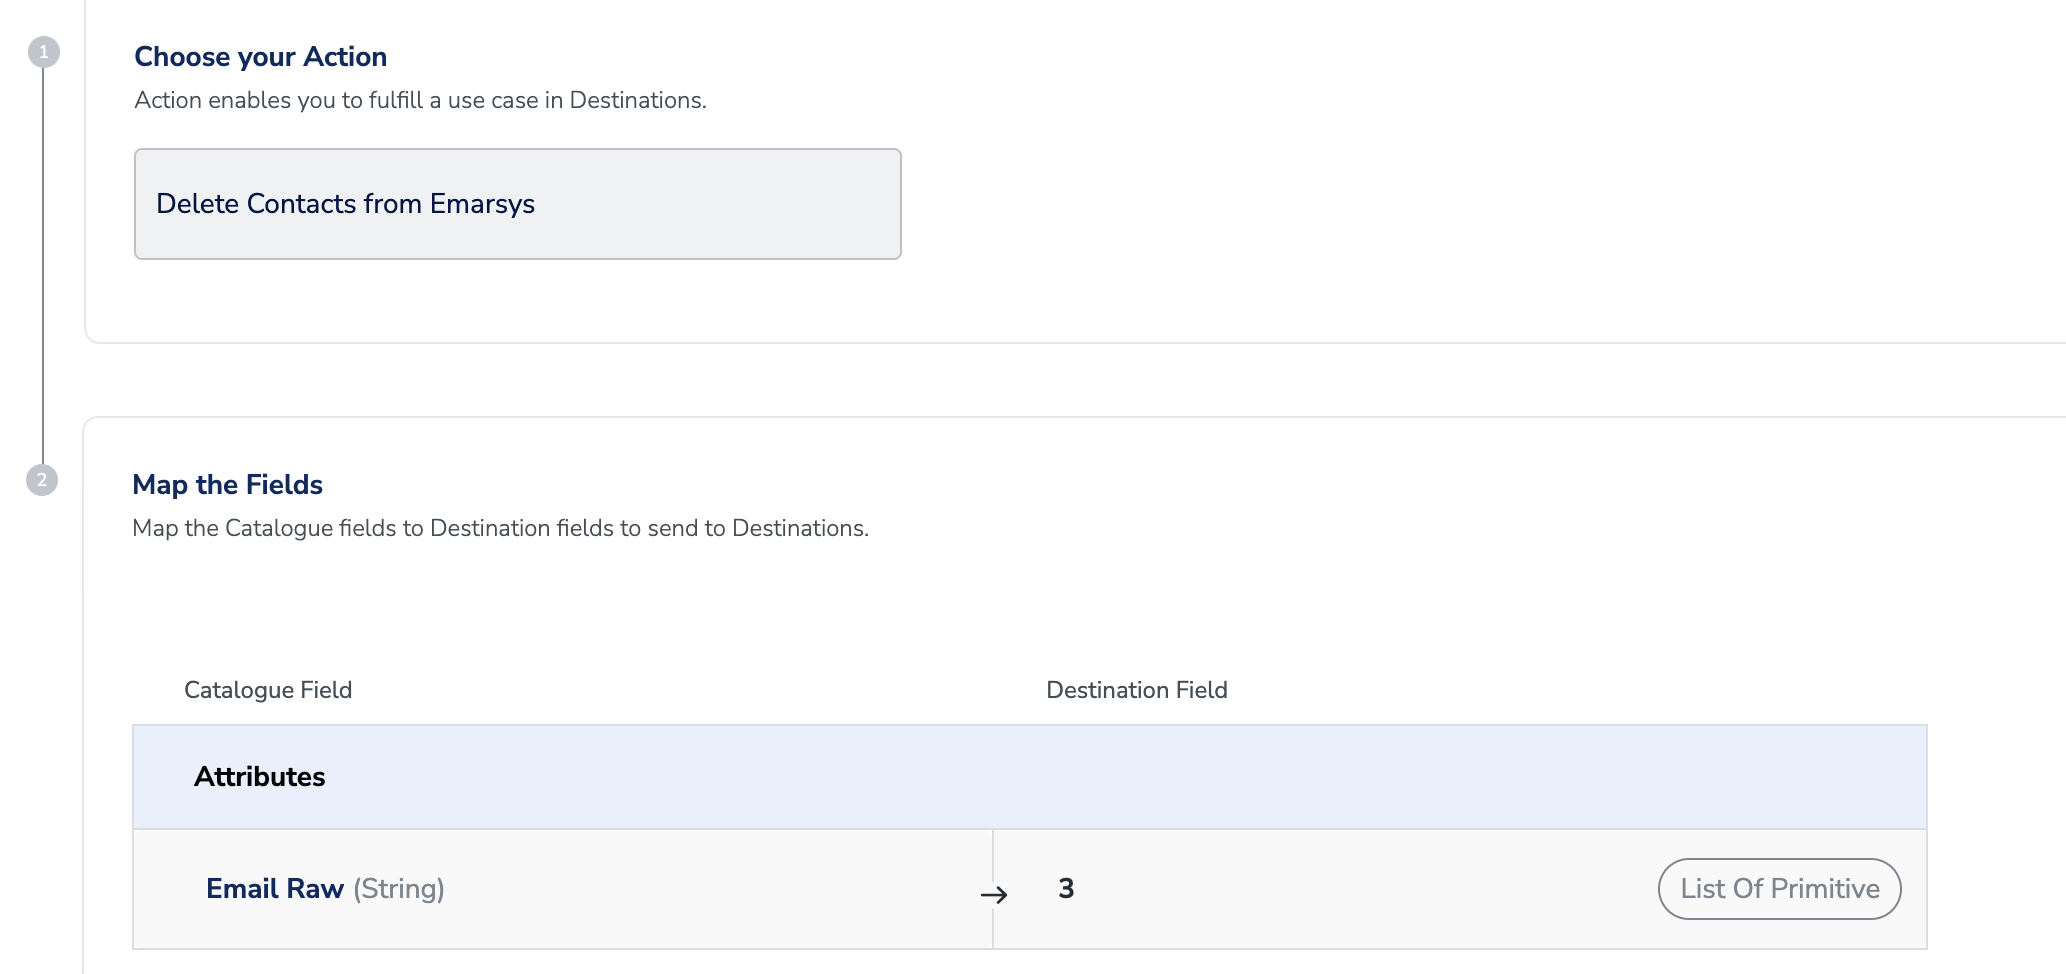 Once the mapping is complete, click **Create Destination**. The destination is created and made available for activation on Journeys.
## Activate the Destination on Journeys
After creating a destination, next, you need to link it in the **Send to Destination** node within the workflow, as explained below.
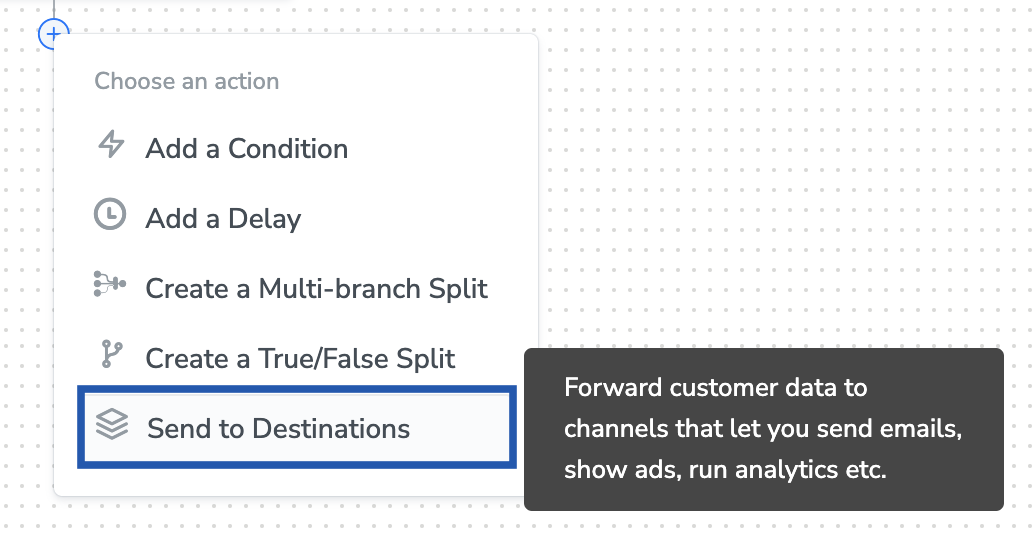
In the workflow, at the node level, click **+** and choose **Send to Destinations**.
Once the mapping is complete, click **Create Destination**. The destination is created and made available for activation on Journeys.
## Activate the Destination on Journeys
After creating a destination, next, you need to link it in the **Send to Destination** node within the workflow, as explained below.
In the workflow, at the node level, click **+** and choose **Send to Destinations**.
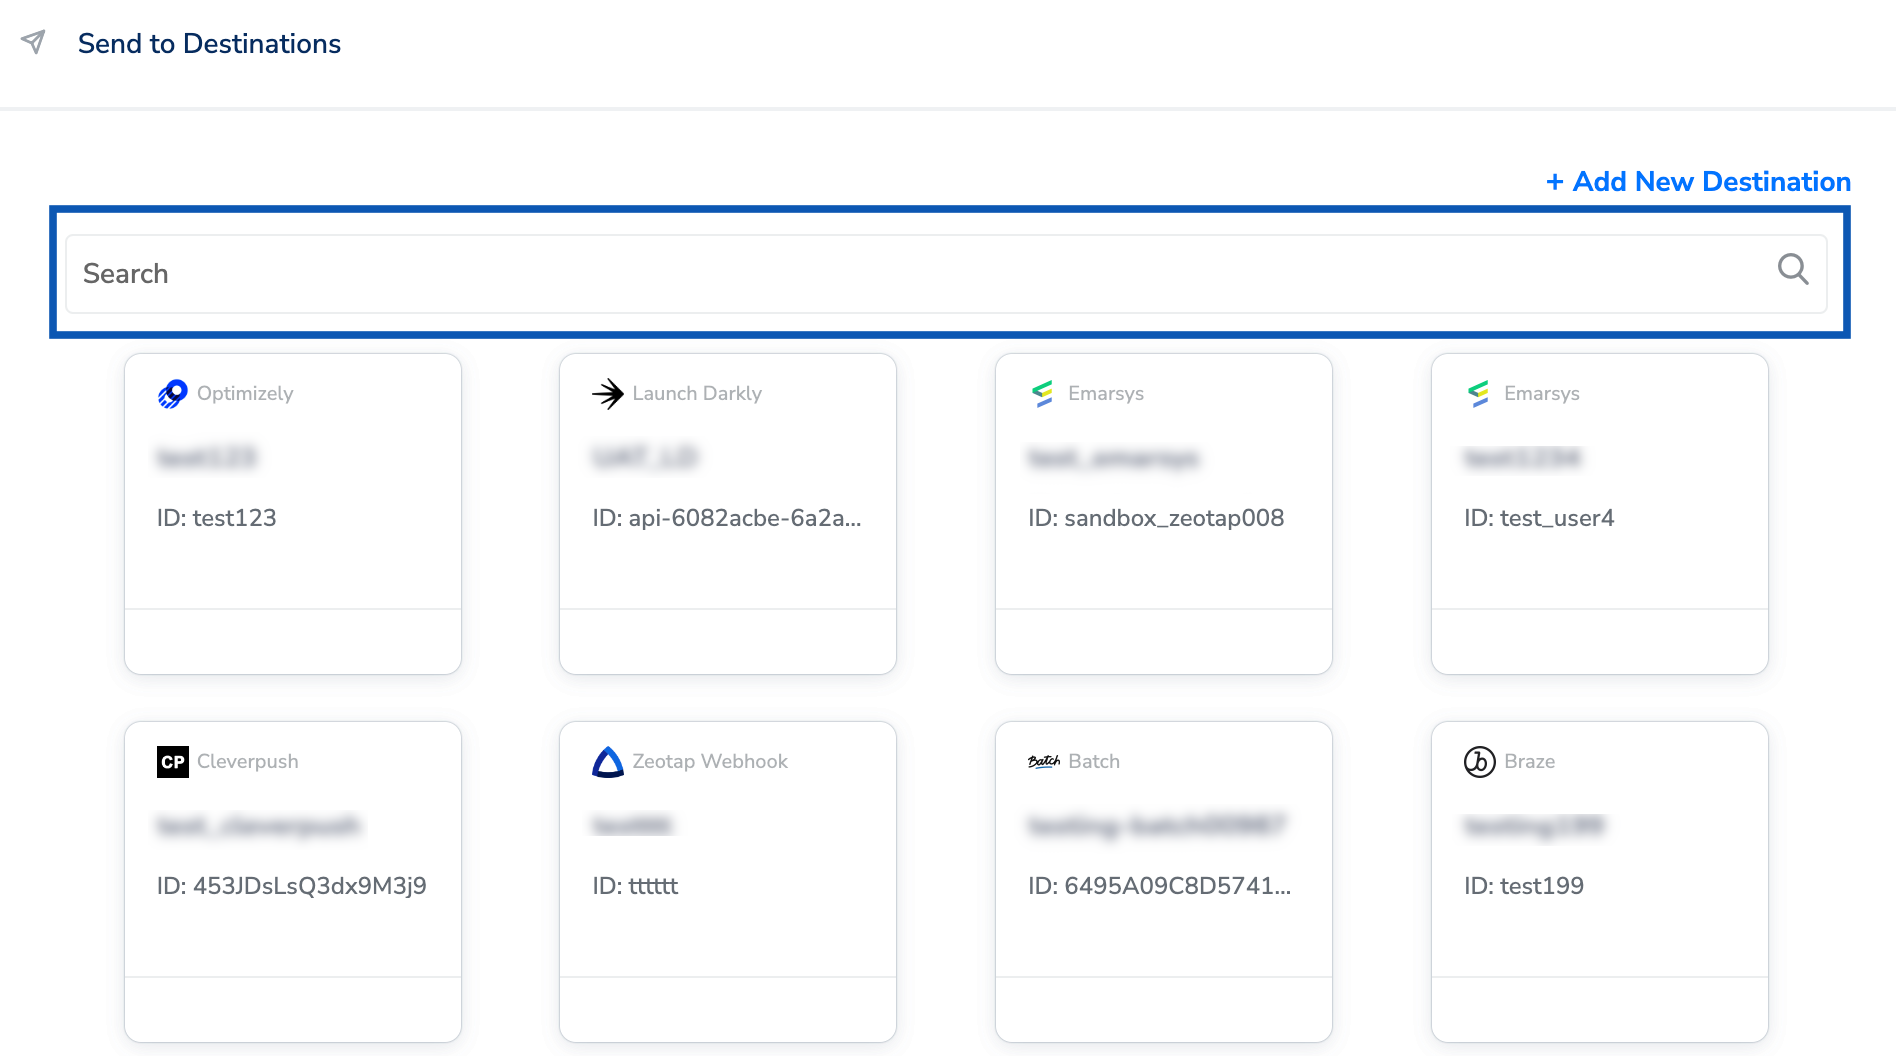
 Choose the destination from the list of available destinations by using the search feature.
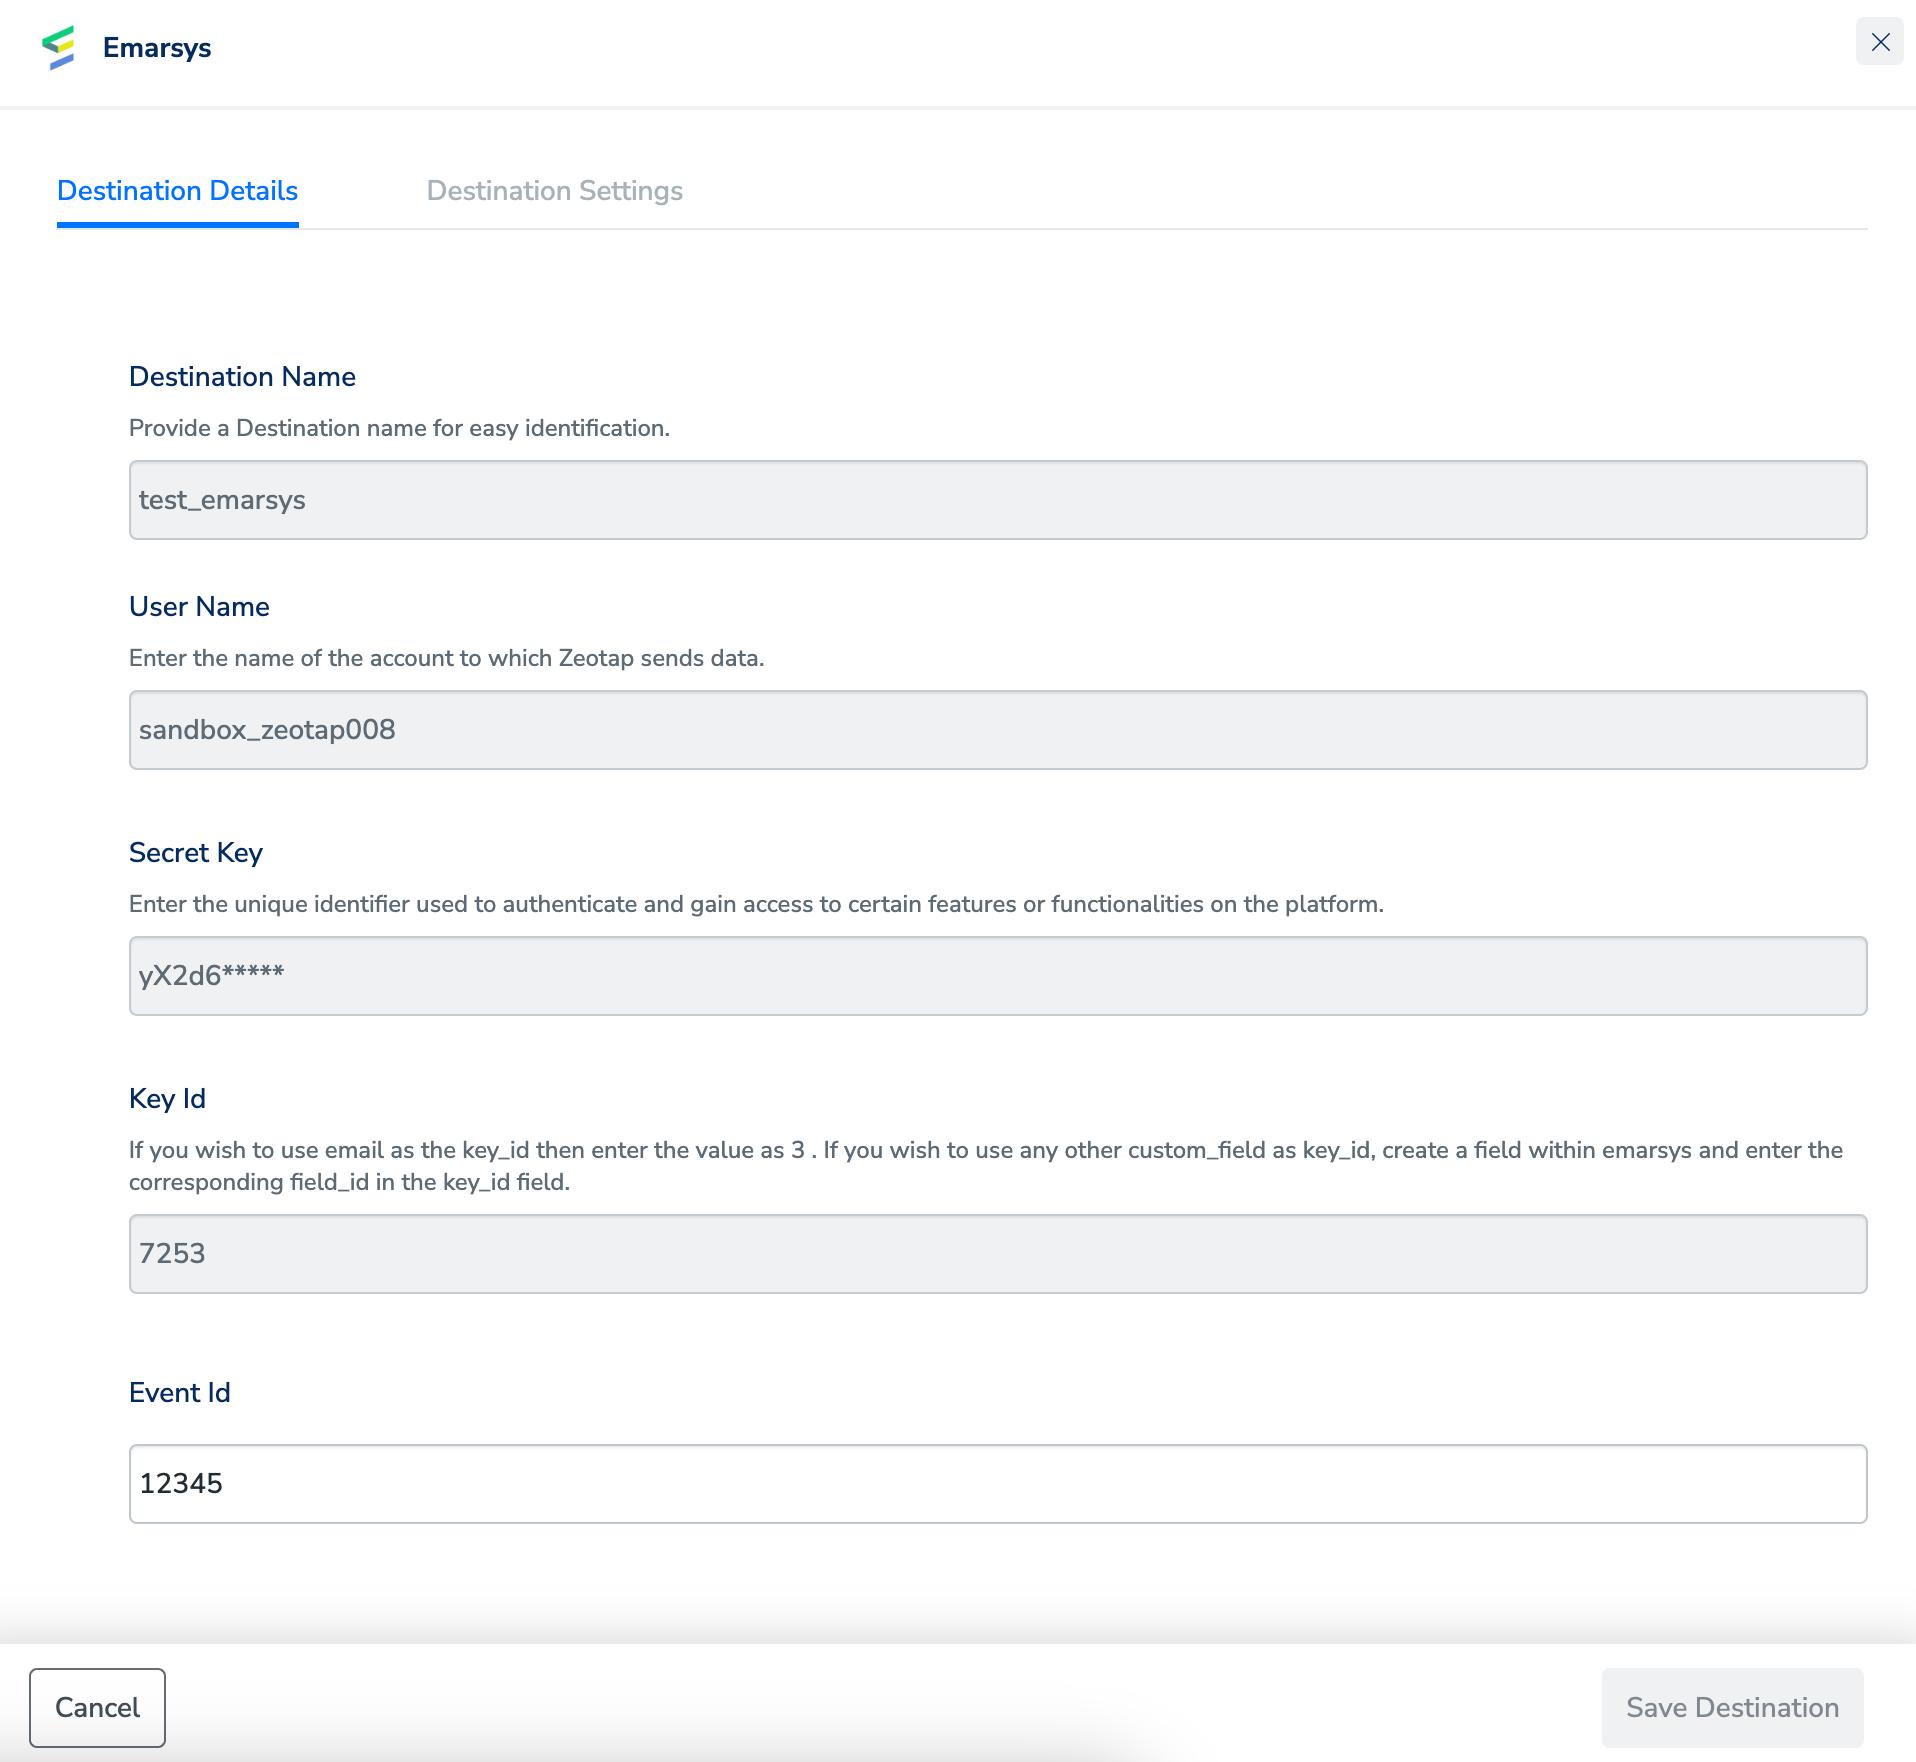
 Under the **Destination Details** tab, the **User Name, Secret Key** and **Key Id** fields are automatically populated based on the value that you had entered while creating the destination. However, you need to enter the [External Event ID](/articles/integrate-customer/emarsys-real-time-integration#h3_399174679) obtained from Emarsys, which is used as a trigger point in Emarsys.
 Under the **Destination Settings** tab, choose the Action and mapping as per your requirement.
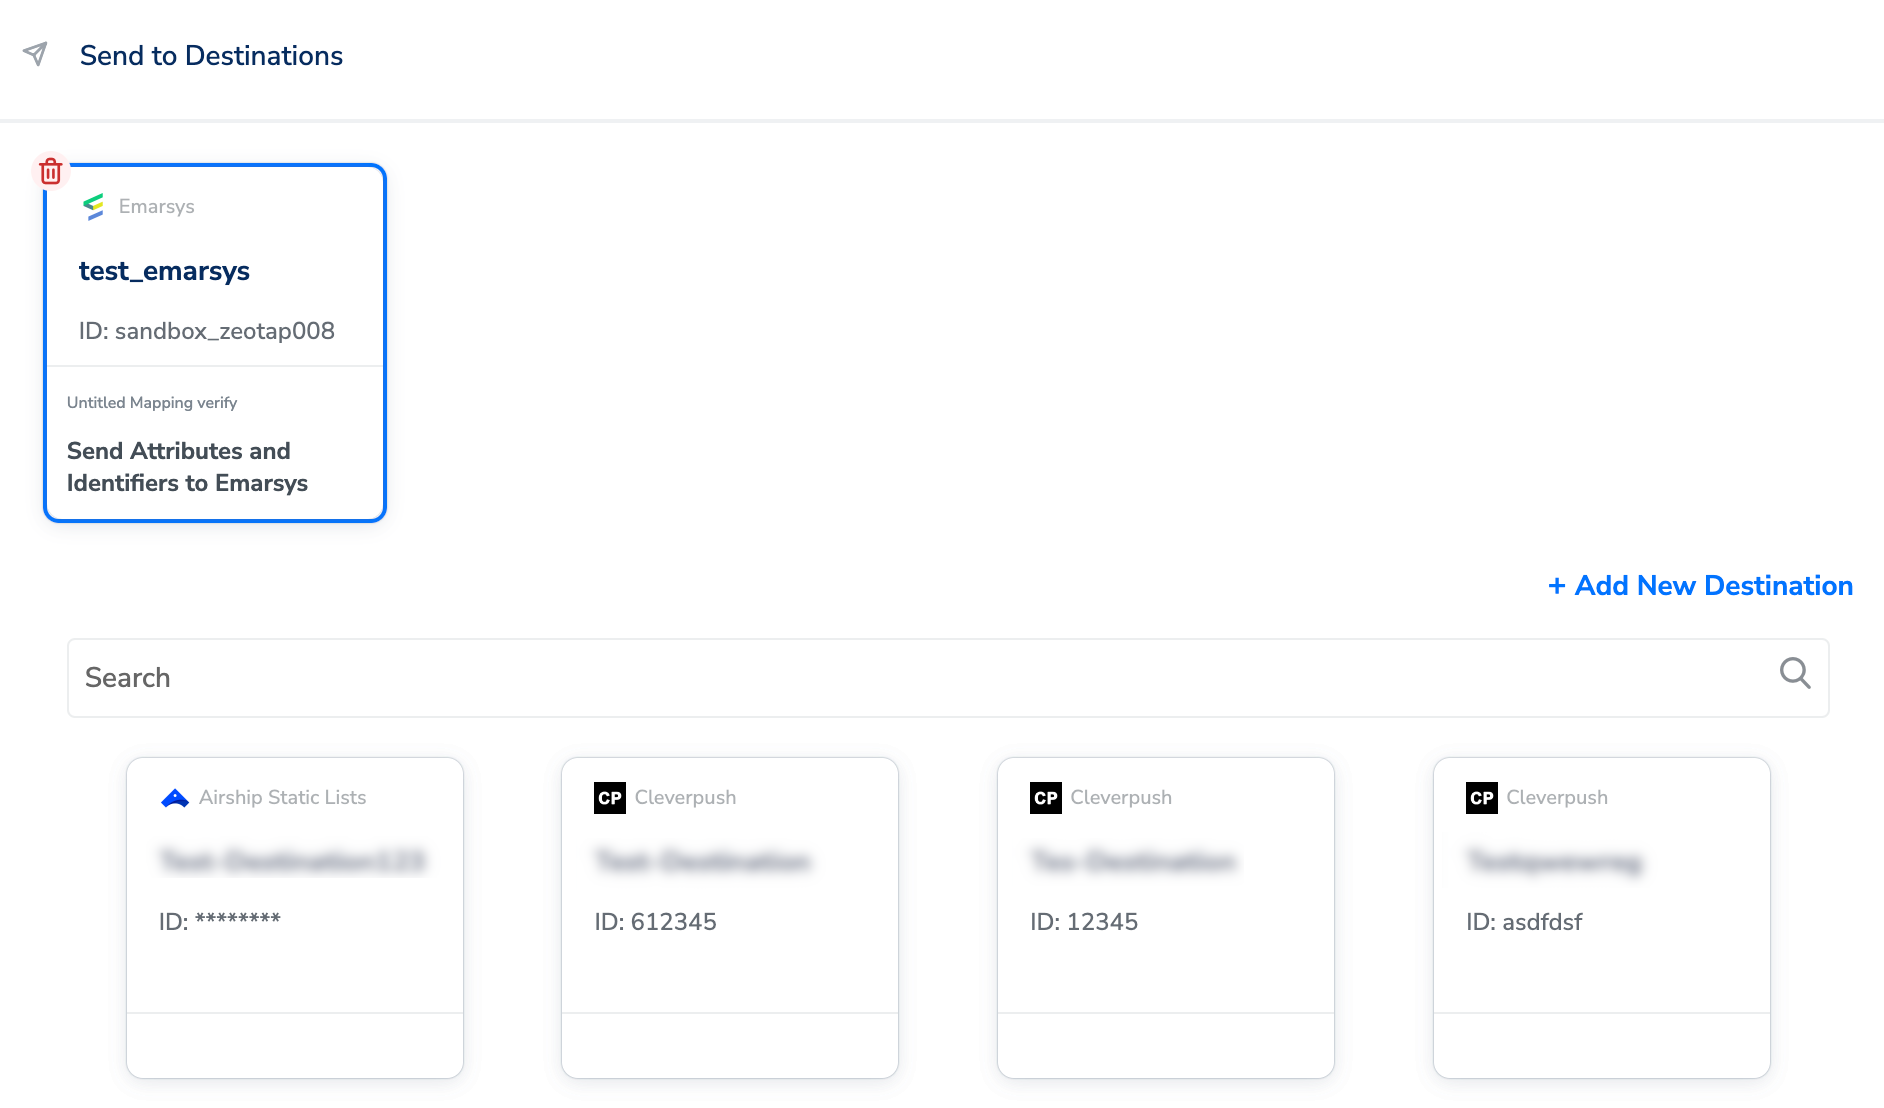
 Upon clicking **Save Destination**. The destination is attached as shown in the image below.
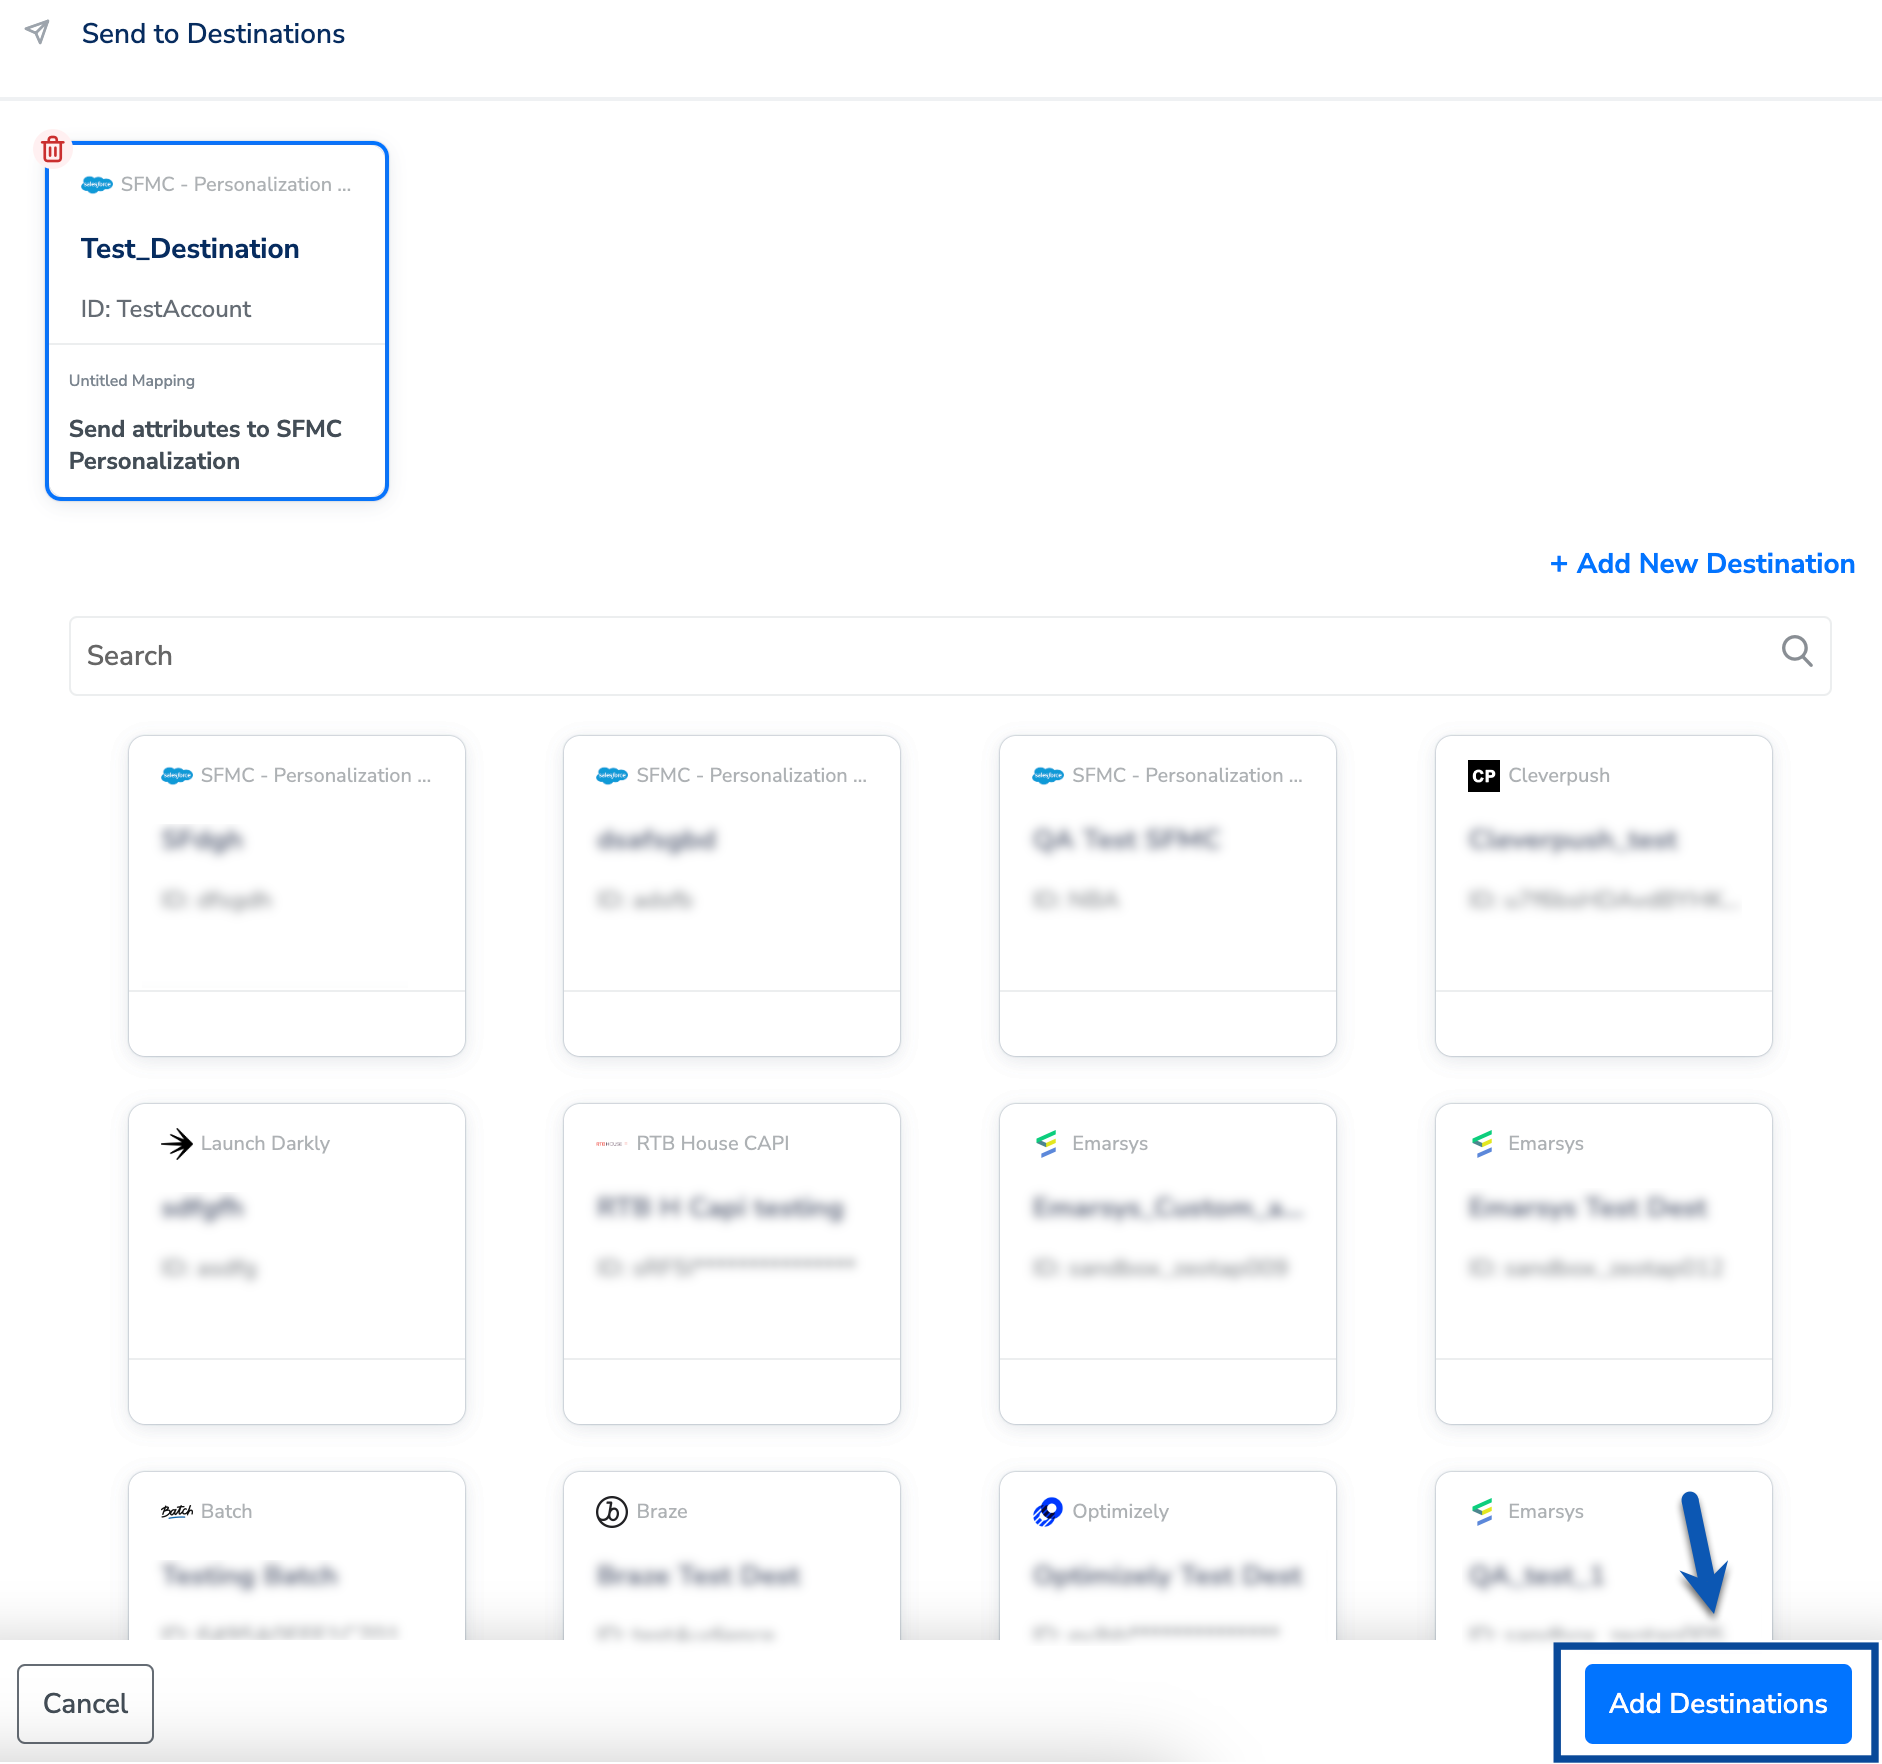
 Click **Add Destinations**. You can also add multiple destinations at this step if needed.
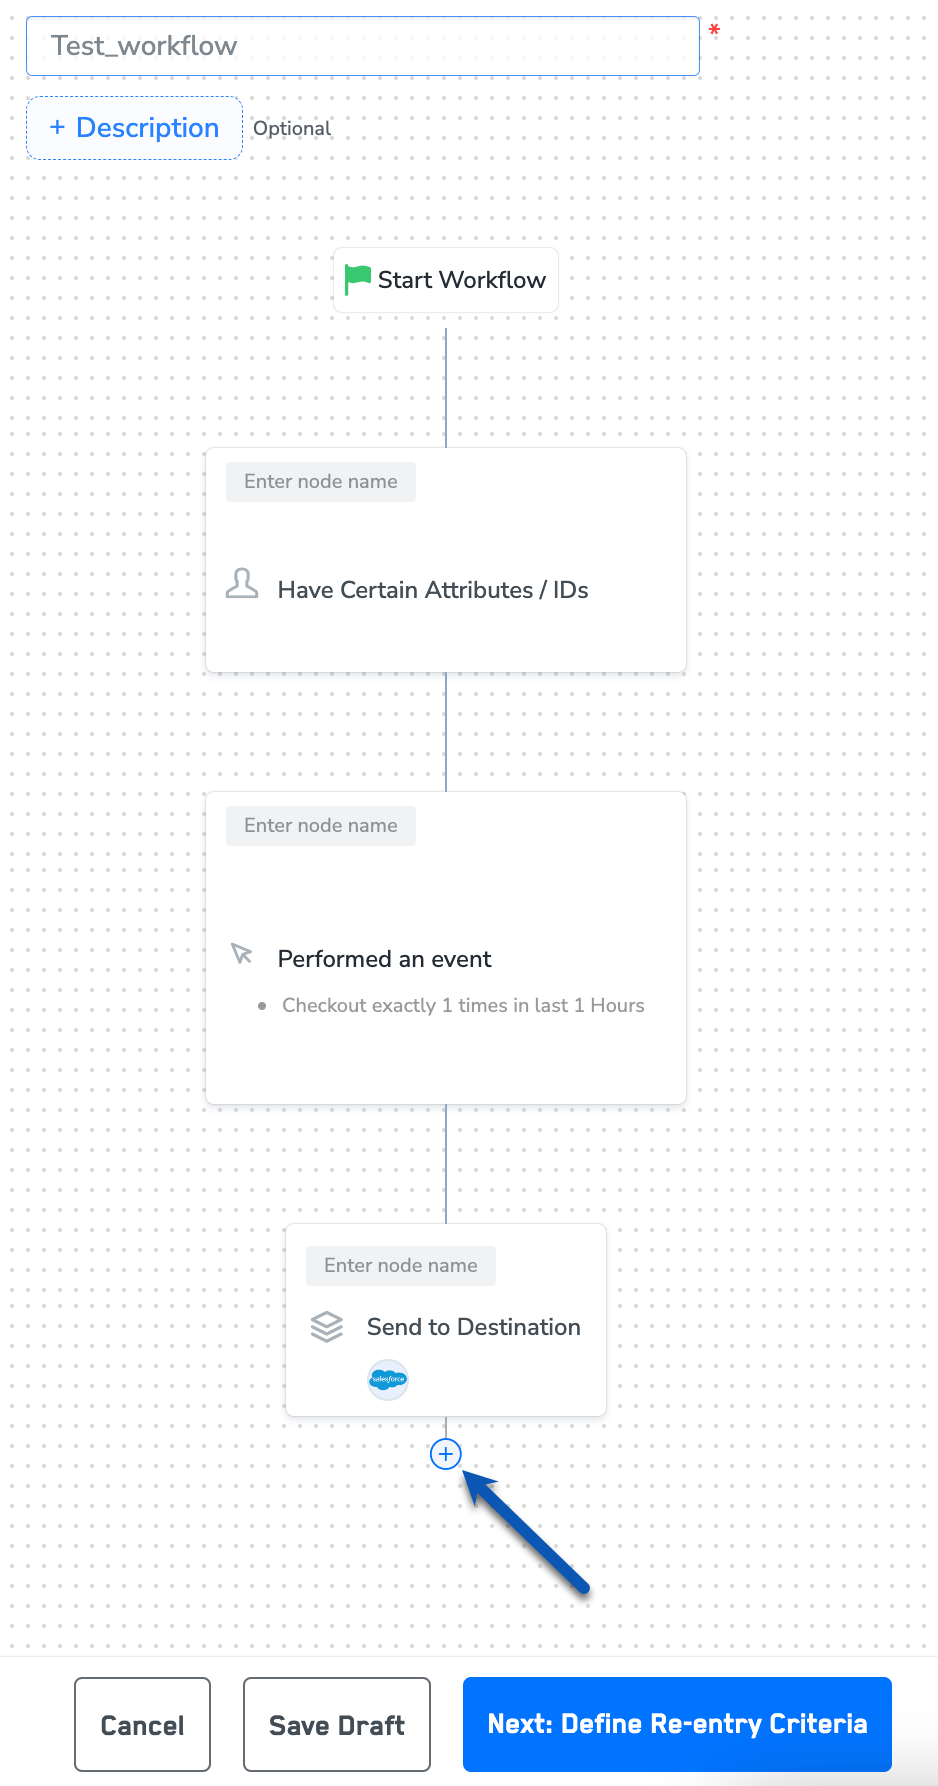
 The linked Destinations appear in the **Send to Destinations** node within the workflow as shown below. Further, you can then build and customise your workflow as needed by clicking '+' . Note that you must enter a name for your workflow in the provided text box to save it.
After adding conditions and filters for users, choose one of the following options:
a. **Save Draft**: Enables you to revisit and edit the workflow before publishing.
b. **Next: Re-entry Condition**: Determines whether a user can re-enter the same workflow.
The linked Destinations appear in the **Send to Destinations** node within the workflow as shown below. Further, you can then build and customise your workflow as needed by clicking '+' . Note that you must enter a name for your workflow in the provided text box to save it.
After adding conditions and filters for users, choose one of the following options:
a. **Save Draft**: Enables you to revisit and edit the workflow before publishing.
b. **Next: Re-entry Condition**: Determines whether a user can re-enter the same workflow.
 After defining the re-entry criteria, click **Publish Workflow**. The workflow appears in the Workflow listing screen with a **Published** status.