> ## Documentation Index
> Fetch the complete documentation index at: https://docs.zeotap.com/llms.txt
> Use this file to discover all available pages before exploring further.
# Create a Salesforce CRM Source
**Note:**
Refer to [Source - Salesforce CRM](https://docs.zeotap.com/smart/project-collect-customer/source-salesforce-crm) to know more about this source.
## Prerequisites
To proceed with Salesforce CRM creation, ensure that you adhere to the following points:
Create an account in[Salesforce](https://www.salesforce.com/in/?ir=1). If you already have a paid Salesforce account, then you can use your account.
If you do not have a paid account, then go to the [Salesforce Developer Edition](https://developer.salesforce.com/signup) and create a new developer account. Do not create a free trial account as sometimes you cannot enable the API for your Salesforce account using a free trial account.
After logging into your account, create a Connected App. Refer to the later sections to know more about how to create a [connected app](/articles/integrate-customer/creating-salesforce-crm#h2__306222009), obtain the [authorisation code](/articles/integrate-customer/creating-salesforce-crm#h2_1577431657) and [refresh token](/articles/integrate-customer/creating-salesforce-crm#h2__1011498130).
Also, ensure that you have the following information available with you:
a. Consumer Key and Consumer Secret – Refer to [Connected Apps](/articles/integrate-customer/creating-salesforce-crm#h2__306222009) to know more.
b. Refresh Token – Refer to [Refresh Token](/articles/integrate-customer/creating-salesforce-crm#h2__1011498130) to know more.
c. Domain – This is the URL using which you log into your Salesforce account. That is - `https://zeotap--devops.my.salesforce.com/`. In the URL, the part before `.my.salesforce.com/(zeotap--devops)`, is your Domain.
d. Callback URL – The Callback URL is `https://login.salesforce.com`. Refer to [Connected Apps](/articles/integrate-customer/creating-salesforce-crm#h2__306222009) to know more.
### How to Create a Connected App
Perform the following steps to create a Connected App:
Log in to Salesforce as an Administrator.
From the account drop-down list appearing in the top-right corner, click **Setup**.
In the left-hand pane, go to **Apps** > **App Manage** **r**.
Click **New Connected App** in the top-right corner.
On the **New Connected App** page, enter the following required fields under **Basic Information**:
a. **Connected App Name**
b. **API Name**
c. **Contact Email**
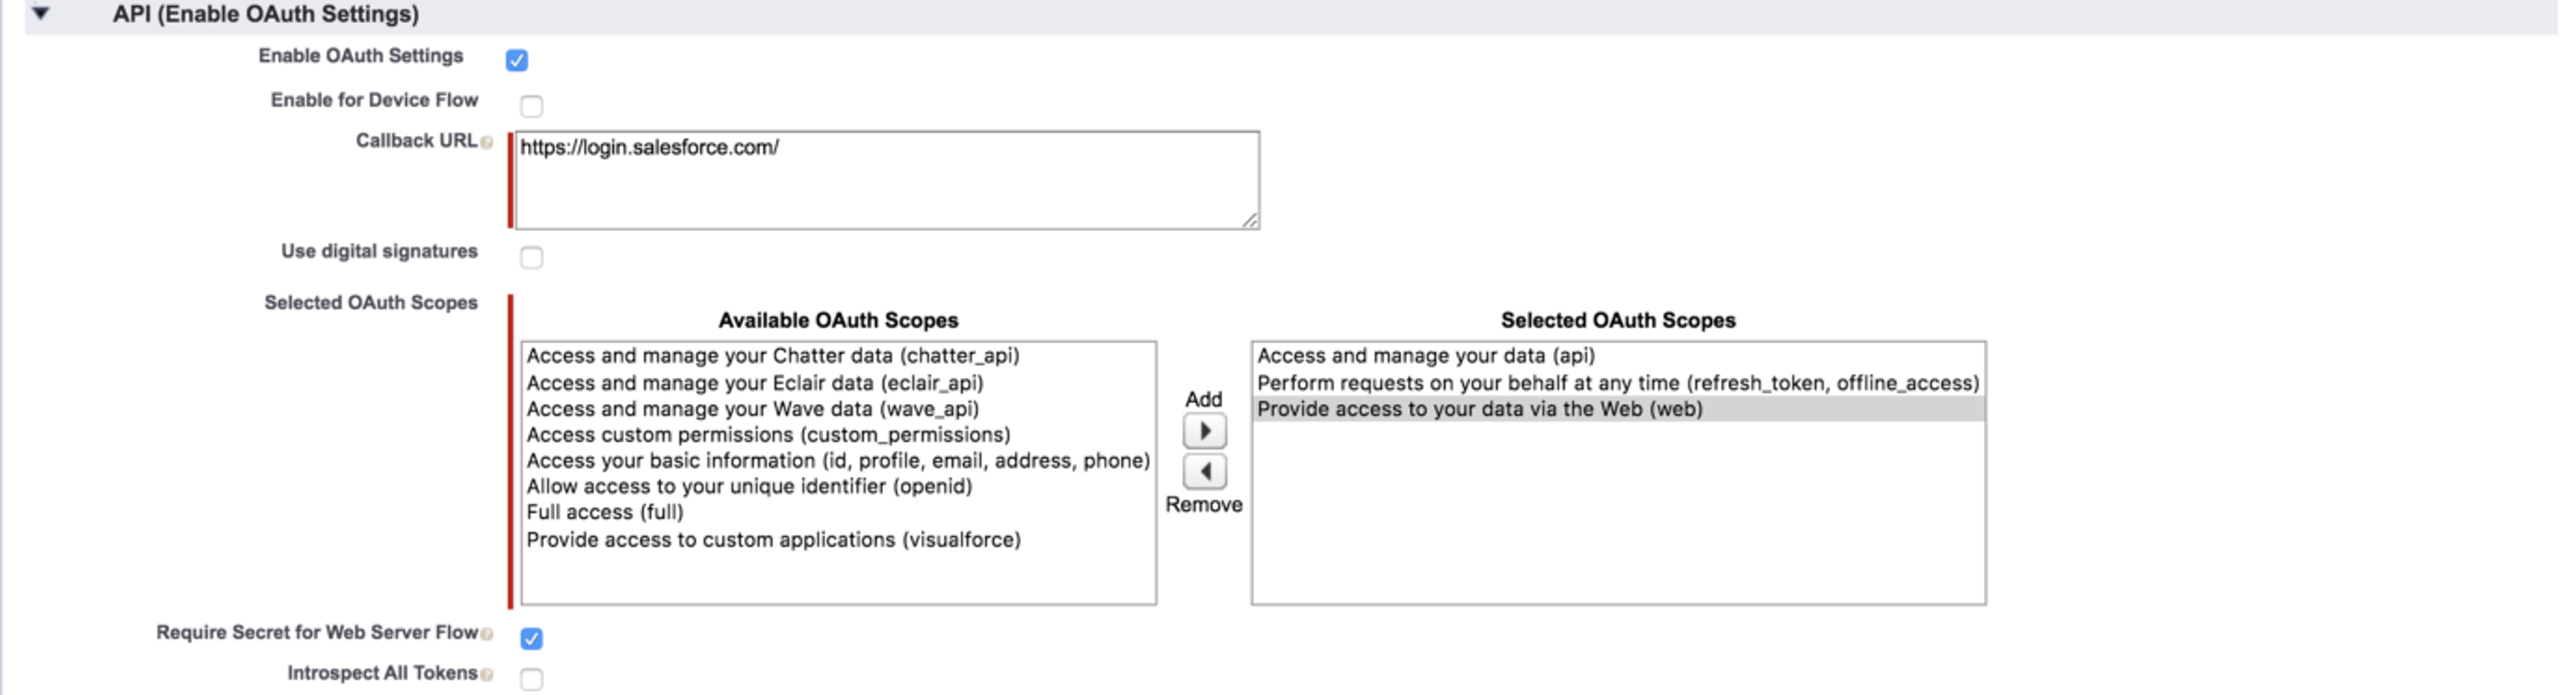
Go to **API (Enable OAuth Settings)** and select **Enable OAuth Settings**.
a. In the **Callback URL** field, enter **[https://login.salesforce.com/](https://login.salesforce.com/)**.
b. In the **Selected OAuth Scopes** field, select the following options:
i. **A** **ccess and manage your data (api)**
ii. **Perform requests on your behalf at any time (refresh\_token, offline\_access)**
iii. **Provide access to your data via the Web (web)**
c. Click **Add.**
Click **Save** to save the changes for the new Connected App.
 ### How to Manage a Connected App
In the **Connected Apps (Apps > App Manager)** list, perform the following steps to manage the App:
Find the App that you just created and then click **Manag** **e**.
On the page that opens, click **Edit**.
Under **OAuth Policies**, make the following selections:
a. In the **Permitted Users** drop-down list, select **All users may self-authorize**.
b. For **Refresh Token Polic** **y**, select the **Refresh Token is valid until revoked option**.
Save the changes.
### How to Manage a Connected App
In the **Connected Apps (Apps > App Manager)** list, perform the following steps to manage the App:
Find the App that you just created and then click **Manag** **e**.
On the page that opens, click **Edit**.
Under **OAuth Policies**, make the following selections:
a. In the **Permitted Users** drop-down list, select **All users may self-authorize**.
b. For **Refresh Token Polic** **y**, select the **Refresh Token is valid until revoked option**.
Save the changes.
.png?fit=max&auto=format&n=5K-Zf-MYwWXwJWp5&q=85&s=f8be21a1c0bc2e7e106d8504e08baec4) Go back to the **Connected Apps (Apps > App Manager)** list.
Click the App that you just created and then click **View**.
Go to the **API (Enable OAuth Settings)** section and note down the **Consumer Key** and **Consumer Secret**. These two details are required while creating the Salesforce CRM source in the Zeotap CDP App.
Go back to the **Connected Apps (Apps > App Manager)** list.
Click the App that you just created and then click **View**.
Go to the **API (Enable OAuth Settings)** section and note down the **Consumer Key** and **Consumer Secret**. These two details are required while creating the Salesforce CRM source in the Zeotap CDP App.
.png?fit=max&auto=format&n=5K-Zf-MYwWXwJWp5&q=85&s=bda20d6544ade053745818d215b483a0) ### How to Obtain the Authorisation Code
Perform the following steps to obtain the authorisation code from Salesforce:
Log in to Salesforce as an Administrator.
Enter the request URL mentioned below in a new tab to get the code.
i. Replace `CONSUMER_KEY>` with the Consumer Key that you obtained from the above section.
ii. Replace `YOUR_DOMAIN>` with your domain name.
```bash Code theme={null}
https://.my.salesforce.com/services/oauth2/authorize?response_type=code&client_id=&redirect_uri=https://login.salesforce.com/
```
Allow access to alert pop-ups if any. Your browser is redirected to a URL as this -
```bash Code theme={null}
https://login.salesforce.com/?code=aPrxYXyxzkuBzbDGdwv67qekAQredtrsWqty38LsdhfREyTRbvdjvTqdbvxPVC__4Cb9xGKDGErtOw%3D%3D
```
Obtain the authorisation code from the query string -
`aPrxYXyxzkuBzbDGdwv67qekAQredtrsWqty38LsdhfREyTRbvdjvTqdbvxPVC__4Cb9xGKDGErtOw%3D%3D`
### How to Obtain the Authorisation Code
Perform the following steps to obtain the authorisation code from Salesforce:
Log in to Salesforce as an Administrator.
Enter the request URL mentioned below in a new tab to get the code.
i. Replace `CONSUMER_KEY>` with the Consumer Key that you obtained from the above section.
ii. Replace `YOUR_DOMAIN>` with your domain name.
```bash Code theme={null}
https://.my.salesforce.com/services/oauth2/authorize?response_type=code&client_id=&redirect_uri=https://login.salesforce.com/
```
Allow access to alert pop-ups if any. Your browser is redirected to a URL as this -
```bash Code theme={null}
https://login.salesforce.com/?code=aPrxYXyxzkuBzbDGdwv67qekAQredtrsWqty38LsdhfREyTRbvdjvTqdbvxPVC__4Cb9xGKDGErtOw%3D%3D
```
Obtain the authorisation code from the query string -
`aPrxYXyxzkuBzbDGdwv67qekAQredtrsWqty38LsdhfREyTRbvdjvTqdbvxPVC__4Cb9xGKDGErtOw%3D%3D`
.png?fit=max&auto=format&n=5K-Zf-MYwWXwJWp5&q=85&s=f53e32fb0de2f18563c1733d1ce2cbec) ### How to Obtain Refresh Token
Perform the following steps to obtain the refresh token:
Hit the curl request mentioned below to obtain the refresh token. You can use the Postman client to import the below curl and hit the request.
a. Replace `` with your domain.
b. Replace `` with the authorisation code that you obtained from the above section.
c. Replace `` and `` with the keys that you obtained while creating the Connected App.
```bash Code theme={null}
curl --request POST 'https://.my.salesforce.com/services/oauth2/token?code=&grant_type=authorization_code&client_id=&client_secret=&redirect_uri=https://login.salesforce.com/'
```
You can obtain the `refresh_token` from the response mentioned below.
```json Code theme={null}
{
"access_token":"00D2v000001XKxi__SOMETHING",
"refresh_token":"5Aep861dlMxAL.LhVTuPRa__SOMETHING",
"signature":"MK/YGMNQhPSSnKtYicXlaU__SOMETHING",
"scope":"refresh_token web api",
"instance_url":"https://ap15.salesforce.com",
"id":"https://login.salesforce.com/id/00D2vKxiEAG/0045Q09vAAL",
"token_type":"Bearer",
"issued_at":"1570030000198"
}
```
### Troubleshooting Errors
While sending a request to the Salesforce API using the above credentials, you may encounter a few errors. This section provides a brief explanation of these errors and a resolution for them.
#### Error
`‘REST API is not enabled for this Organization’ Issue`
#### Description
The error denotes that the rest API is not enabled for this organization.
#### Resolution
Perform the following steps to resolve this error:
Click **Setup** on the top-right corner.
### How to Obtain Refresh Token
Perform the following steps to obtain the refresh token:
Hit the curl request mentioned below to obtain the refresh token. You can use the Postman client to import the below curl and hit the request.
a. Replace `` with your domain.
b. Replace `` with the authorisation code that you obtained from the above section.
c. Replace `` and `` with the keys that you obtained while creating the Connected App.
```bash Code theme={null}
curl --request POST 'https://.my.salesforce.com/services/oauth2/token?code=&grant_type=authorization_code&client_id=&client_secret=&redirect_uri=https://login.salesforce.com/'
```
You can obtain the `refresh_token` from the response mentioned below.
```json Code theme={null}
{
"access_token":"00D2v000001XKxi__SOMETHING",
"refresh_token":"5Aep861dlMxAL.LhVTuPRa__SOMETHING",
"signature":"MK/YGMNQhPSSnKtYicXlaU__SOMETHING",
"scope":"refresh_token web api",
"instance_url":"https://ap15.salesforce.com",
"id":"https://login.salesforce.com/id/00D2vKxiEAG/0045Q09vAAL",
"token_type":"Bearer",
"issued_at":"1570030000198"
}
```
### Troubleshooting Errors
While sending a request to the Salesforce API using the above credentials, you may encounter a few errors. This section provides a brief explanation of these errors and a resolution for them.
#### Error
`‘REST API is not enabled for this Organization’ Issue`
#### Description
The error denotes that the rest API is not enabled for this organization.
#### Resolution
Perform the following steps to resolve this error:
Click **Setup** on the top-right corner.
.png?fit=max&auto=format&n=xGzkHY-dcQy5tLit&q=85&s=df8d8d2fdd407674df5c307cceef3231) Navigate to **ADMINISTRATION > Manage Users** and click **Profiles**.
Navigate to **ADMINISTRATION > Manage Users** and click **Profiles**.
.png?fit=max&auto=format&n=xGzkHY-dcQy5tLit&q=85&s=8c857af23e0c1d09d7b5cfa74264eb02) Click **Edit** for the specific profile that you want to update.
Under the **Administrative Permissions** section, select the **API Enabled** checkbox.
Click **Edit** for the specific profile that you want to update.
Under the **Administrative Permissions** section, select the **API Enabled** checkbox.
.png?fit=max&auto=format&n=xGzkHY-dcQy5tLit&q=85&s=eeae13d3e8dbdf6b6f3a99d850b2748d) Scroll to the bottom of the page and click **Save** to save your changes.
## Create a Salesforce CRM Source
Perform the following steps to create a Salesforce CRM Source in the Zeotap CDP App:
Navigate to the Sources application in the Zeotap CDP App.
Click **CREATE SOURCE**.
Choose **CRM Data** as the **Category**.
Scroll to the bottom of the page and click **Save** to save your changes.
## Create a Salesforce CRM Source
Perform the following steps to create a Salesforce CRM Source in the Zeotap CDP App:
Navigate to the Sources application in the Zeotap CDP App.
Click **CREATE SOURCE**.
Choose **CRM Data** as the **Category**.
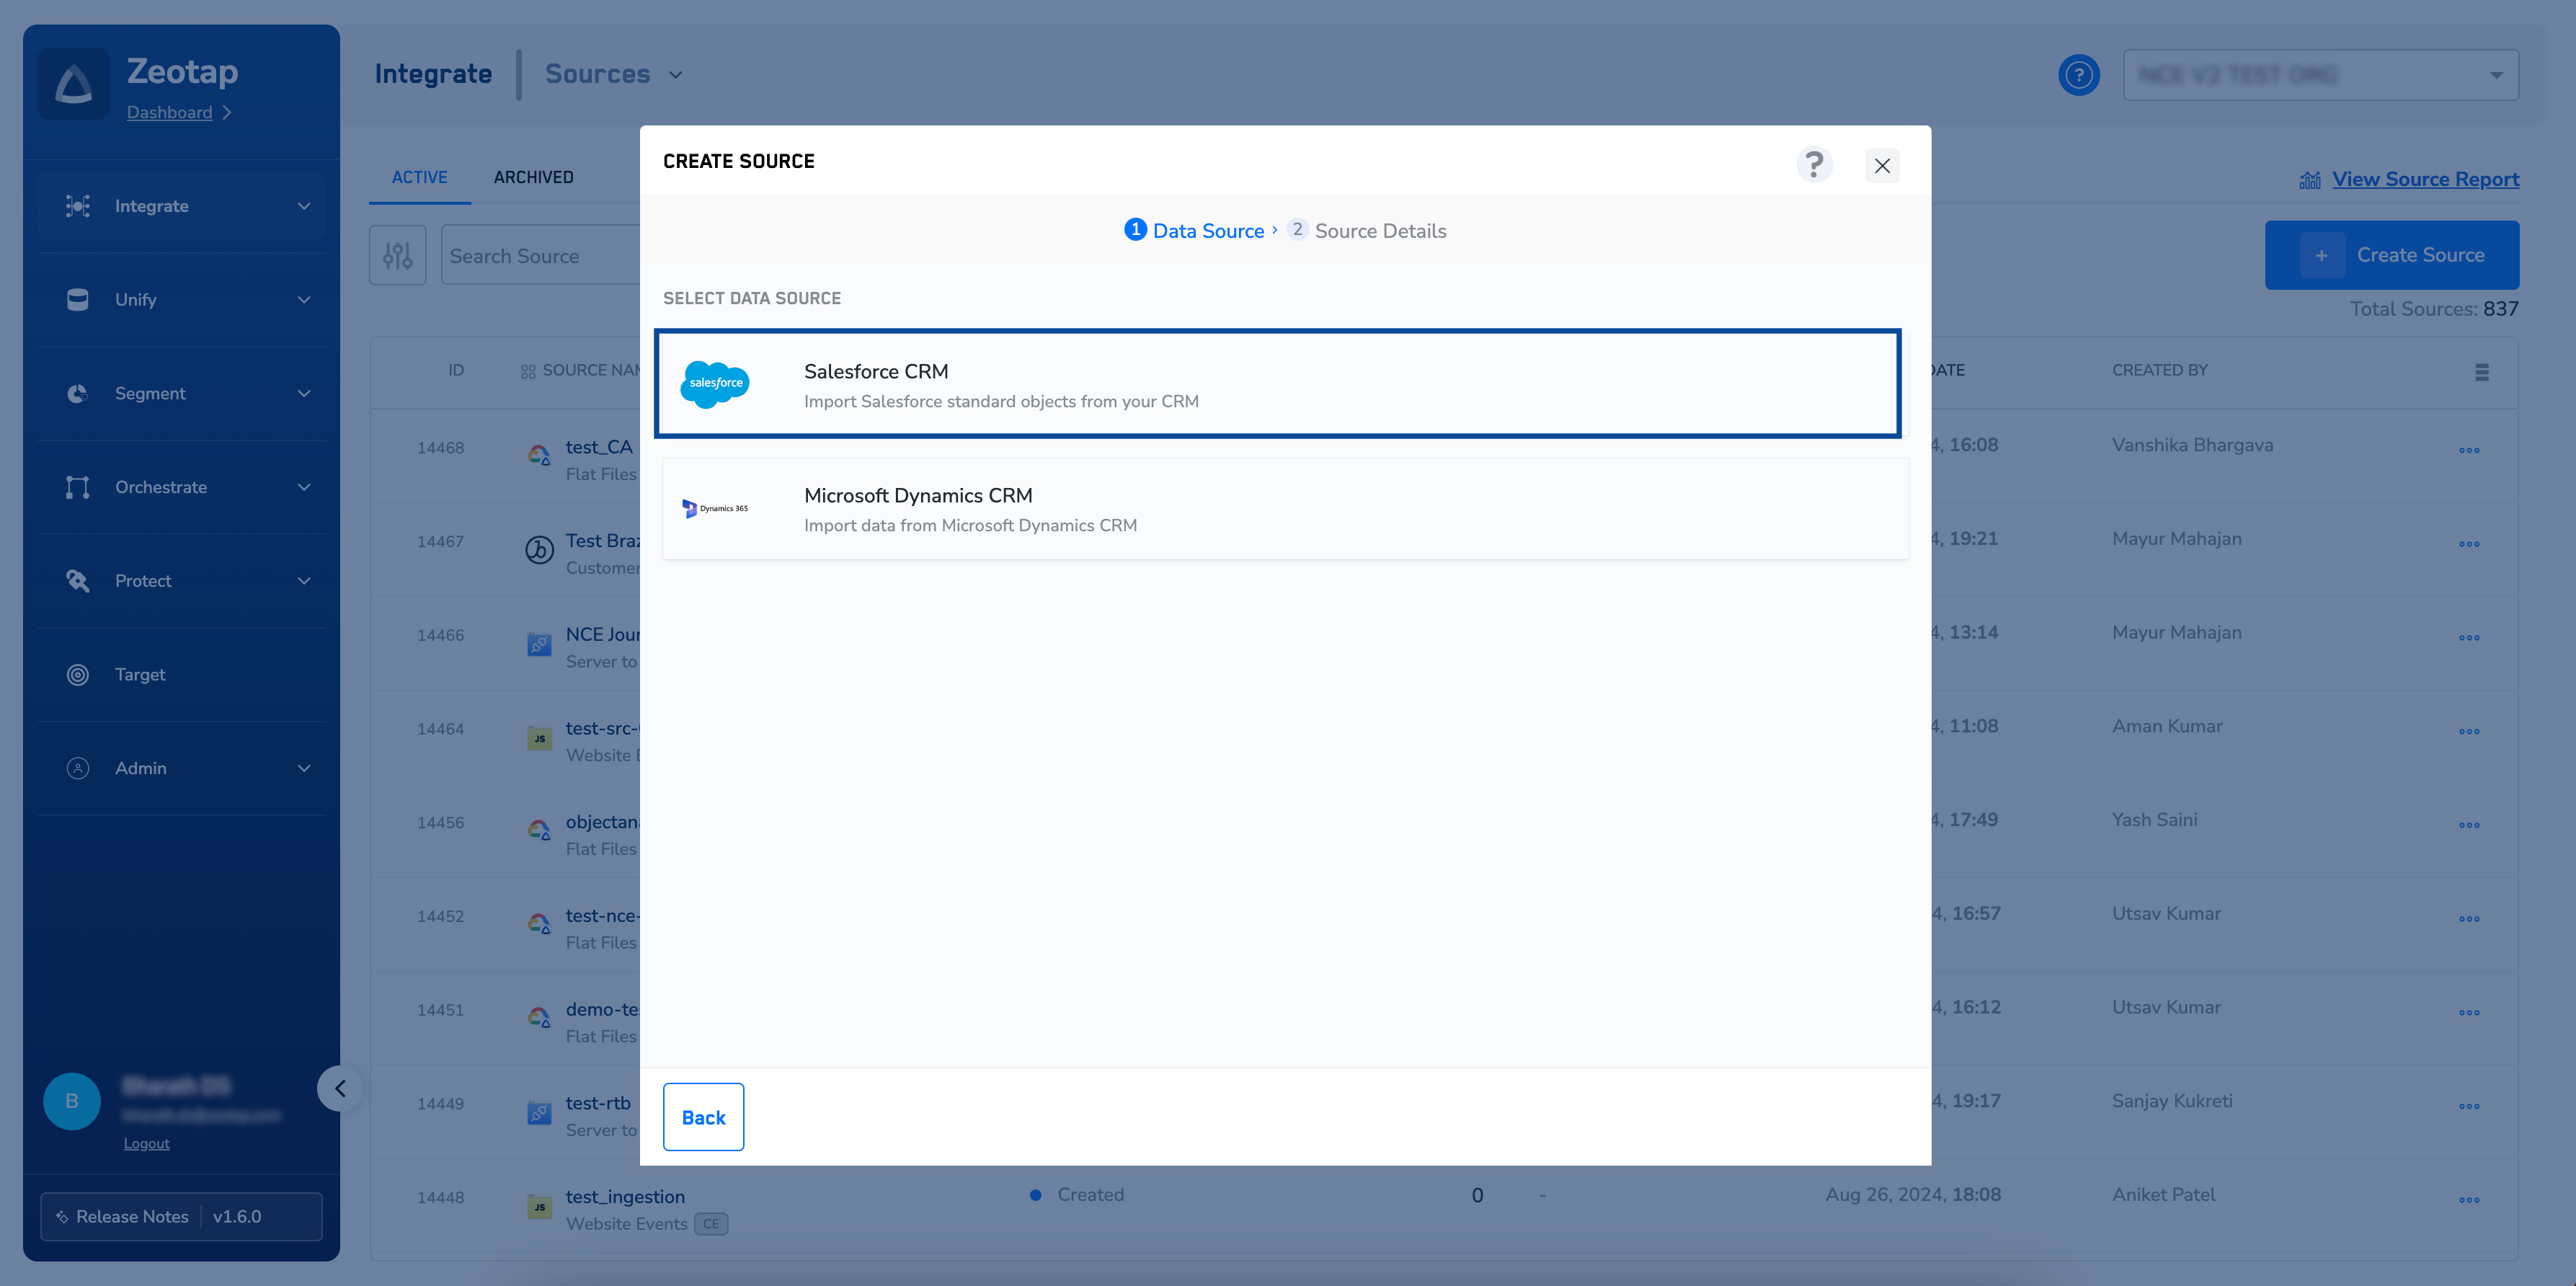
.png?fit=max&auto=format&n=5K-Zf-MYwWXwJWp5&q=85&s=388421943bae89eaef3119eecbb90159) Click **Salesforce CRM** at the **Data Source**.
Click **Salesforce CRM** at the **Data Source**.
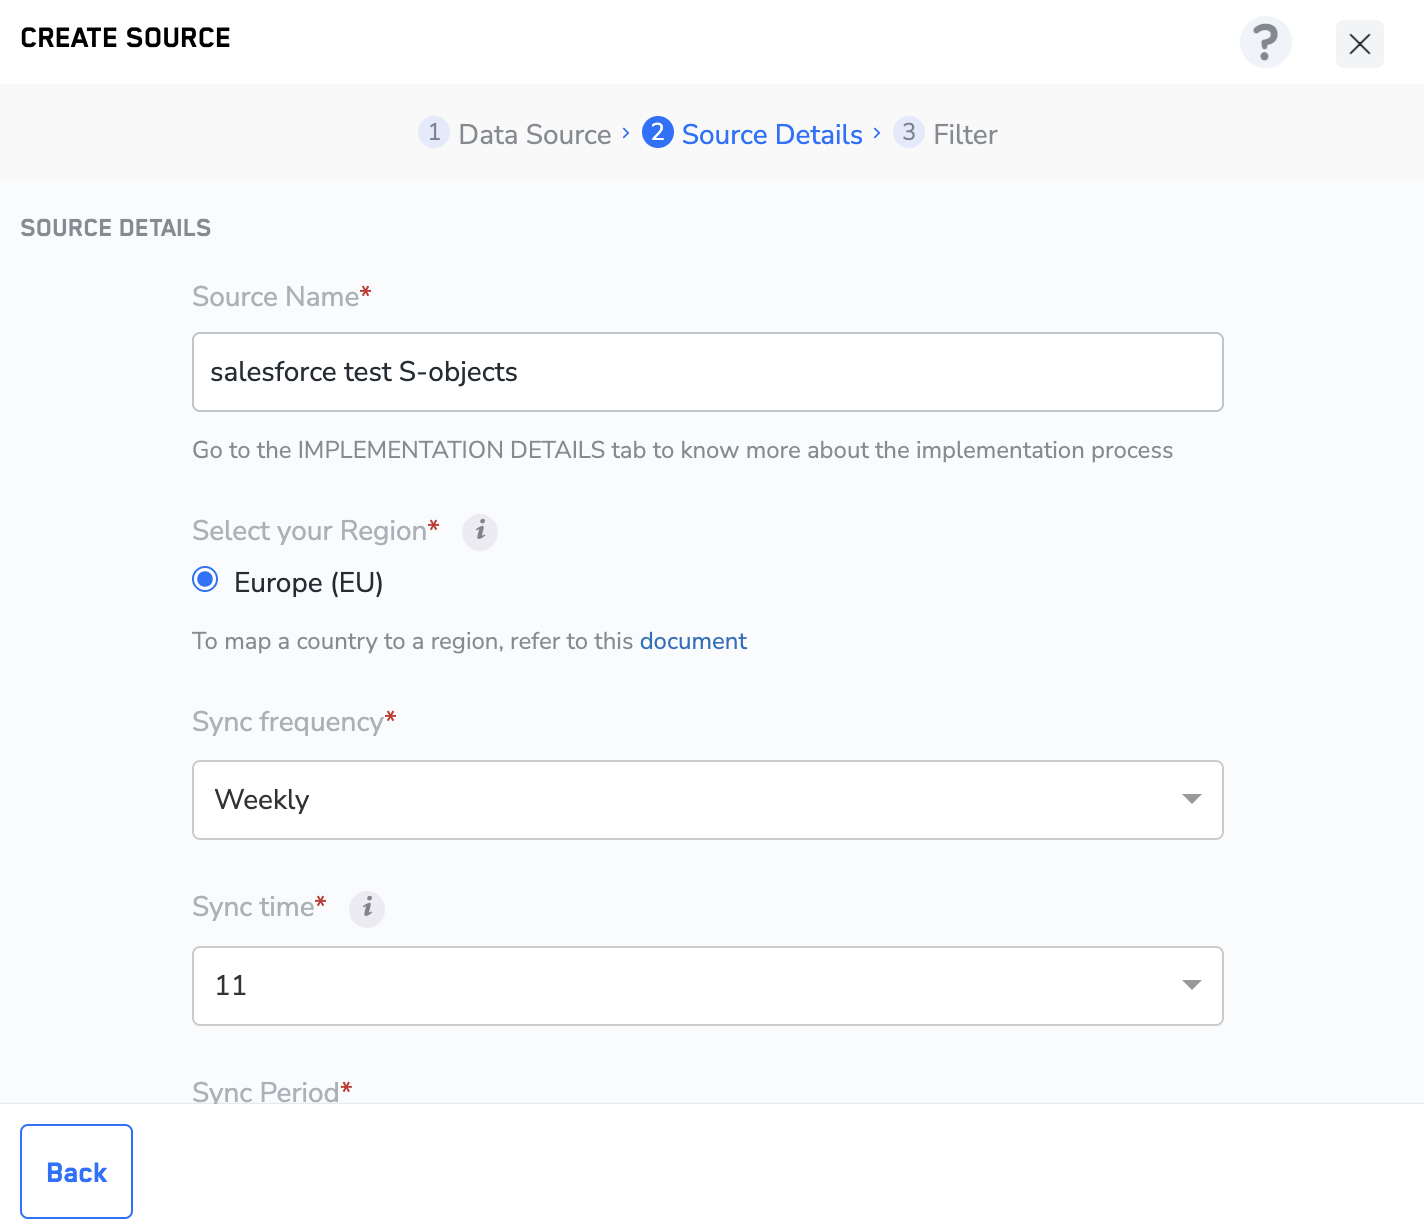
 Enter a short and descriptive name for the Source.
Select the Region of upload.
Choose the desired Sync Frequency from the drop-down list. The first sync takes place once you create the source. However, the subsequent syncs take place based on the sysc frequency you selected. Currently, we support the following sync frequencies
a. Sync once
b. Every hour
c. Every 3 hours
d. Every 6 hours
e. Every 12 hours,
f. Daily
g. Weekly
h. Monthly
i. **Sync Time**- When you choose **Daily**, **Weekly**, or **Monthly** as the sync frequency, you can specify the exact time for the sync to occur.
ii. **Sync Period**- Indicates whether the selected **Sync Time** is in the **AM** or **PM**.
iii. **Monthly Sync date**- If **Monthly** sync is selected, you can specify the **day of the month** on which the sync should run.
Enter the **Client ID**. This is the Consumer Key mentioned under [Create a Connected App](/articles/integrate-customer/creating-salesforce-crm#h2__306222009).
Enter the **Client Secret**. This is the Consumer Secret mentioned under [Create a Connected App](/articles/integrate-customer/creating-salesforce-crm#h2__306222009).
Enter the **Refresh Token** as mentioned under [Obtain the Refresh Token](/articles/integrate-customer/creating-salesforce-crm#h2__588064718).
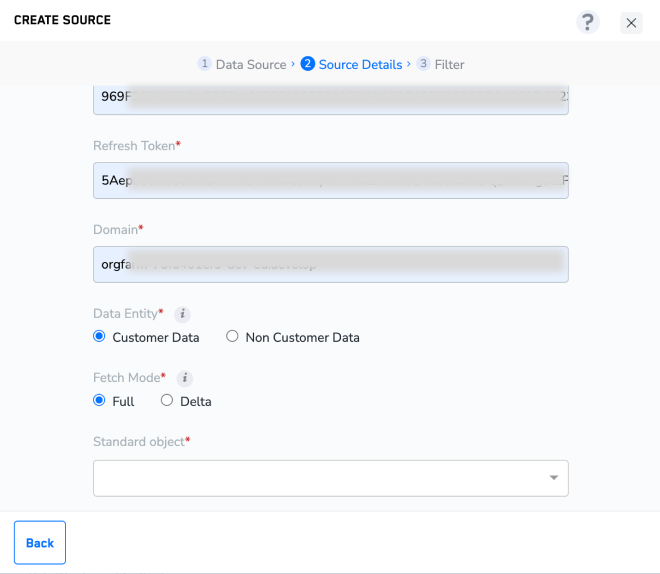
Enter the **Domain**.
Under **Data Entity**, depending on the type of data you want to ingest, choose either **Customer Data** or **Non Customer Data** and proceed with the Source creation. To know more about Customer Data and Non Customer Data, refer [here](https://docs.zeotap.com/articles/unify-customer/supported-data-entities).
Under **Fetch Mode**, select either **Full** or **Delta**based on the requirement.
a. **Full** - Receives all available data during the initial fetch and thereafter consistently fetches data as per the sync frequency configured.
b. **Delta** - Receives all available data during the initial fetch and thereafter exclusively gathers incremental updates (deltas) as per the sync frequency configures.
Enter a short and descriptive name for the Source.
Select the Region of upload.
Choose the desired Sync Frequency from the drop-down list. The first sync takes place once you create the source. However, the subsequent syncs take place based on the sysc frequency you selected. Currently, we support the following sync frequencies
a. Sync once
b. Every hour
c. Every 3 hours
d. Every 6 hours
e. Every 12 hours,
f. Daily
g. Weekly
h. Monthly
i. **Sync Time**- When you choose **Daily**, **Weekly**, or **Monthly** as the sync frequency, you can specify the exact time for the sync to occur.
ii. **Sync Period**- Indicates whether the selected **Sync Time** is in the **AM** or **PM**.
iii. **Monthly Sync date**- If **Monthly** sync is selected, you can specify the **day of the month** on which the sync should run.
Enter the **Client ID**. This is the Consumer Key mentioned under [Create a Connected App](/articles/integrate-customer/creating-salesforce-crm#h2__306222009).
Enter the **Client Secret**. This is the Consumer Secret mentioned under [Create a Connected App](/articles/integrate-customer/creating-salesforce-crm#h2__306222009).
Enter the **Refresh Token** as mentioned under [Obtain the Refresh Token](/articles/integrate-customer/creating-salesforce-crm#h2__588064718).
Enter the **Domain**.
Under **Data Entity**, depending on the type of data you want to ingest, choose either **Customer Data** or **Non Customer Data** and proceed with the Source creation. To know more about Customer Data and Non Customer Data, refer [here](https://docs.zeotap.com/articles/unify-customer/supported-data-entities).
Under **Fetch Mode**, select either **Full** or **Delta**based on the requirement.
a. **Full** - Receives all available data during the initial fetch and thereafter consistently fetches data as per the sync frequency configured.
b. **Delta** - Receives all available data during the initial fetch and thereafter exclusively gathers incremental updates (deltas) as per the sync frequency configures.
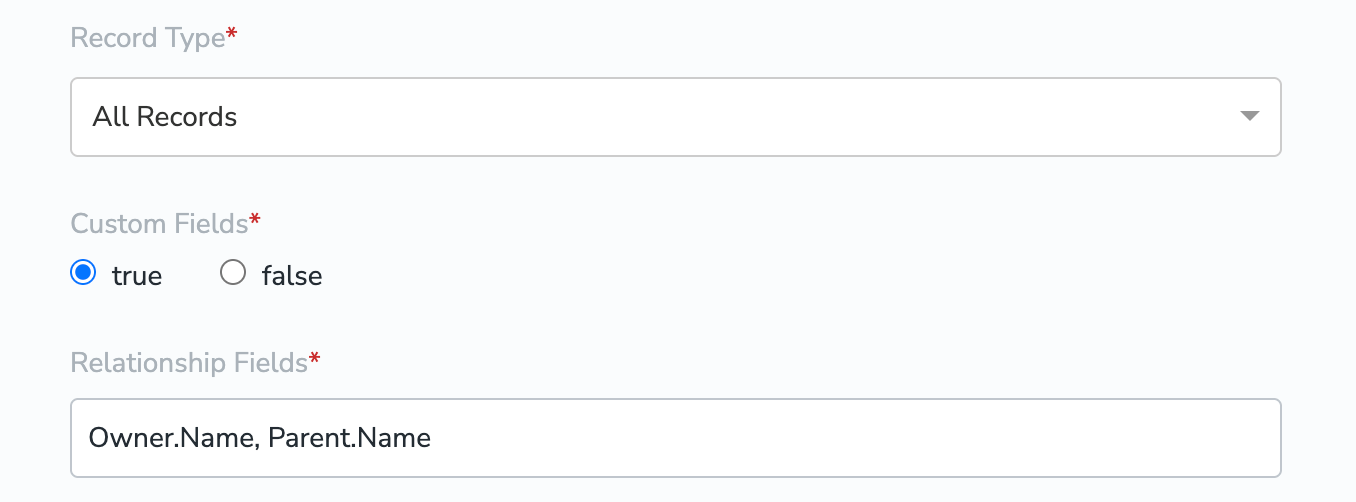
 Choose from the dropdown what **Record Type** you want to ingest:
a. **Active Records** — All non-deleted records.
b. **Deleted Records** — All deleted records.
c. **All Records** — All records.
If you want to add custom Relationship fields, set the **Custom Fields** checkbox to **true** and enter the Relationship fields you want to ingest in the text box that appears.
Choose from the dropdown what **Record Type** you want to ingest:
a. **Active Records** — All non-deleted records.
b. **Deleted Records** — All deleted records.
c. **All Records** — All records.
If you want to add custom Relationship fields, set the **Custom Fields** checkbox to **true** and enter the Relationship fields you want to ingest in the text box that appears.
 **Note:**
The relationship fields must be related to the object you are ingesting — otherwise the query will not work.
The relationship fields must be added in the same format as they are used in a query. For example: `Owner.Name, Parent.Name` for the Account object.
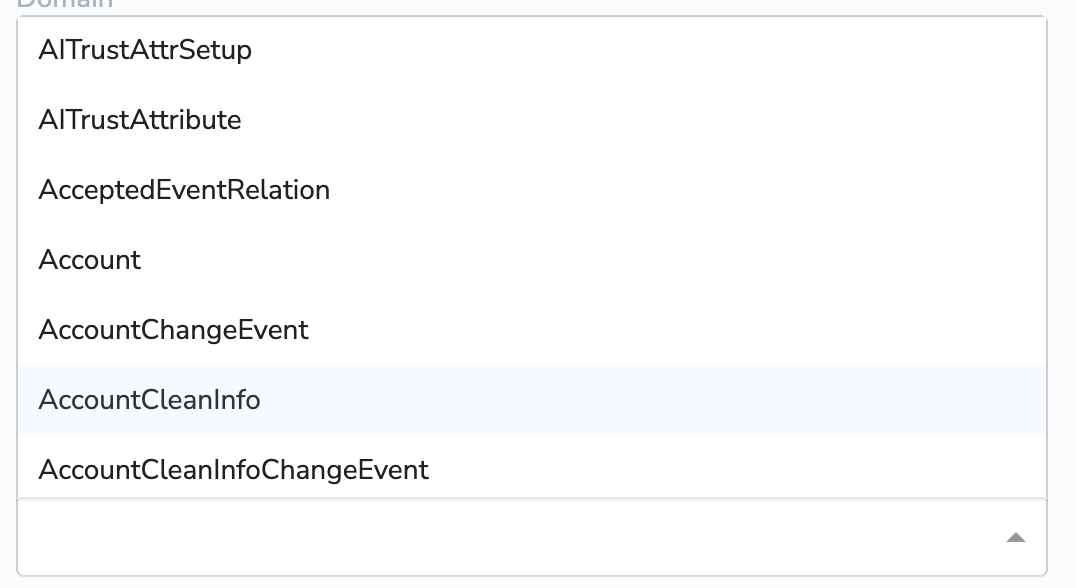
Choose the appropriate **Salesforce Object**. We automatically fetch all the standard and custom salesforce objects created in your Salesforce account.
**Note:**
The relationship fields must be related to the object you are ingesting — otherwise the query will not work.
The relationship fields must be added in the same format as they are used in a query. For example: `Owner.Name, Parent.Name` for the Account object.
Choose the appropriate **Salesforce Object**. We automatically fetch all the standard and custom salesforce objects created in your Salesforce account.
 Click **Next** to proceed to fields selection.
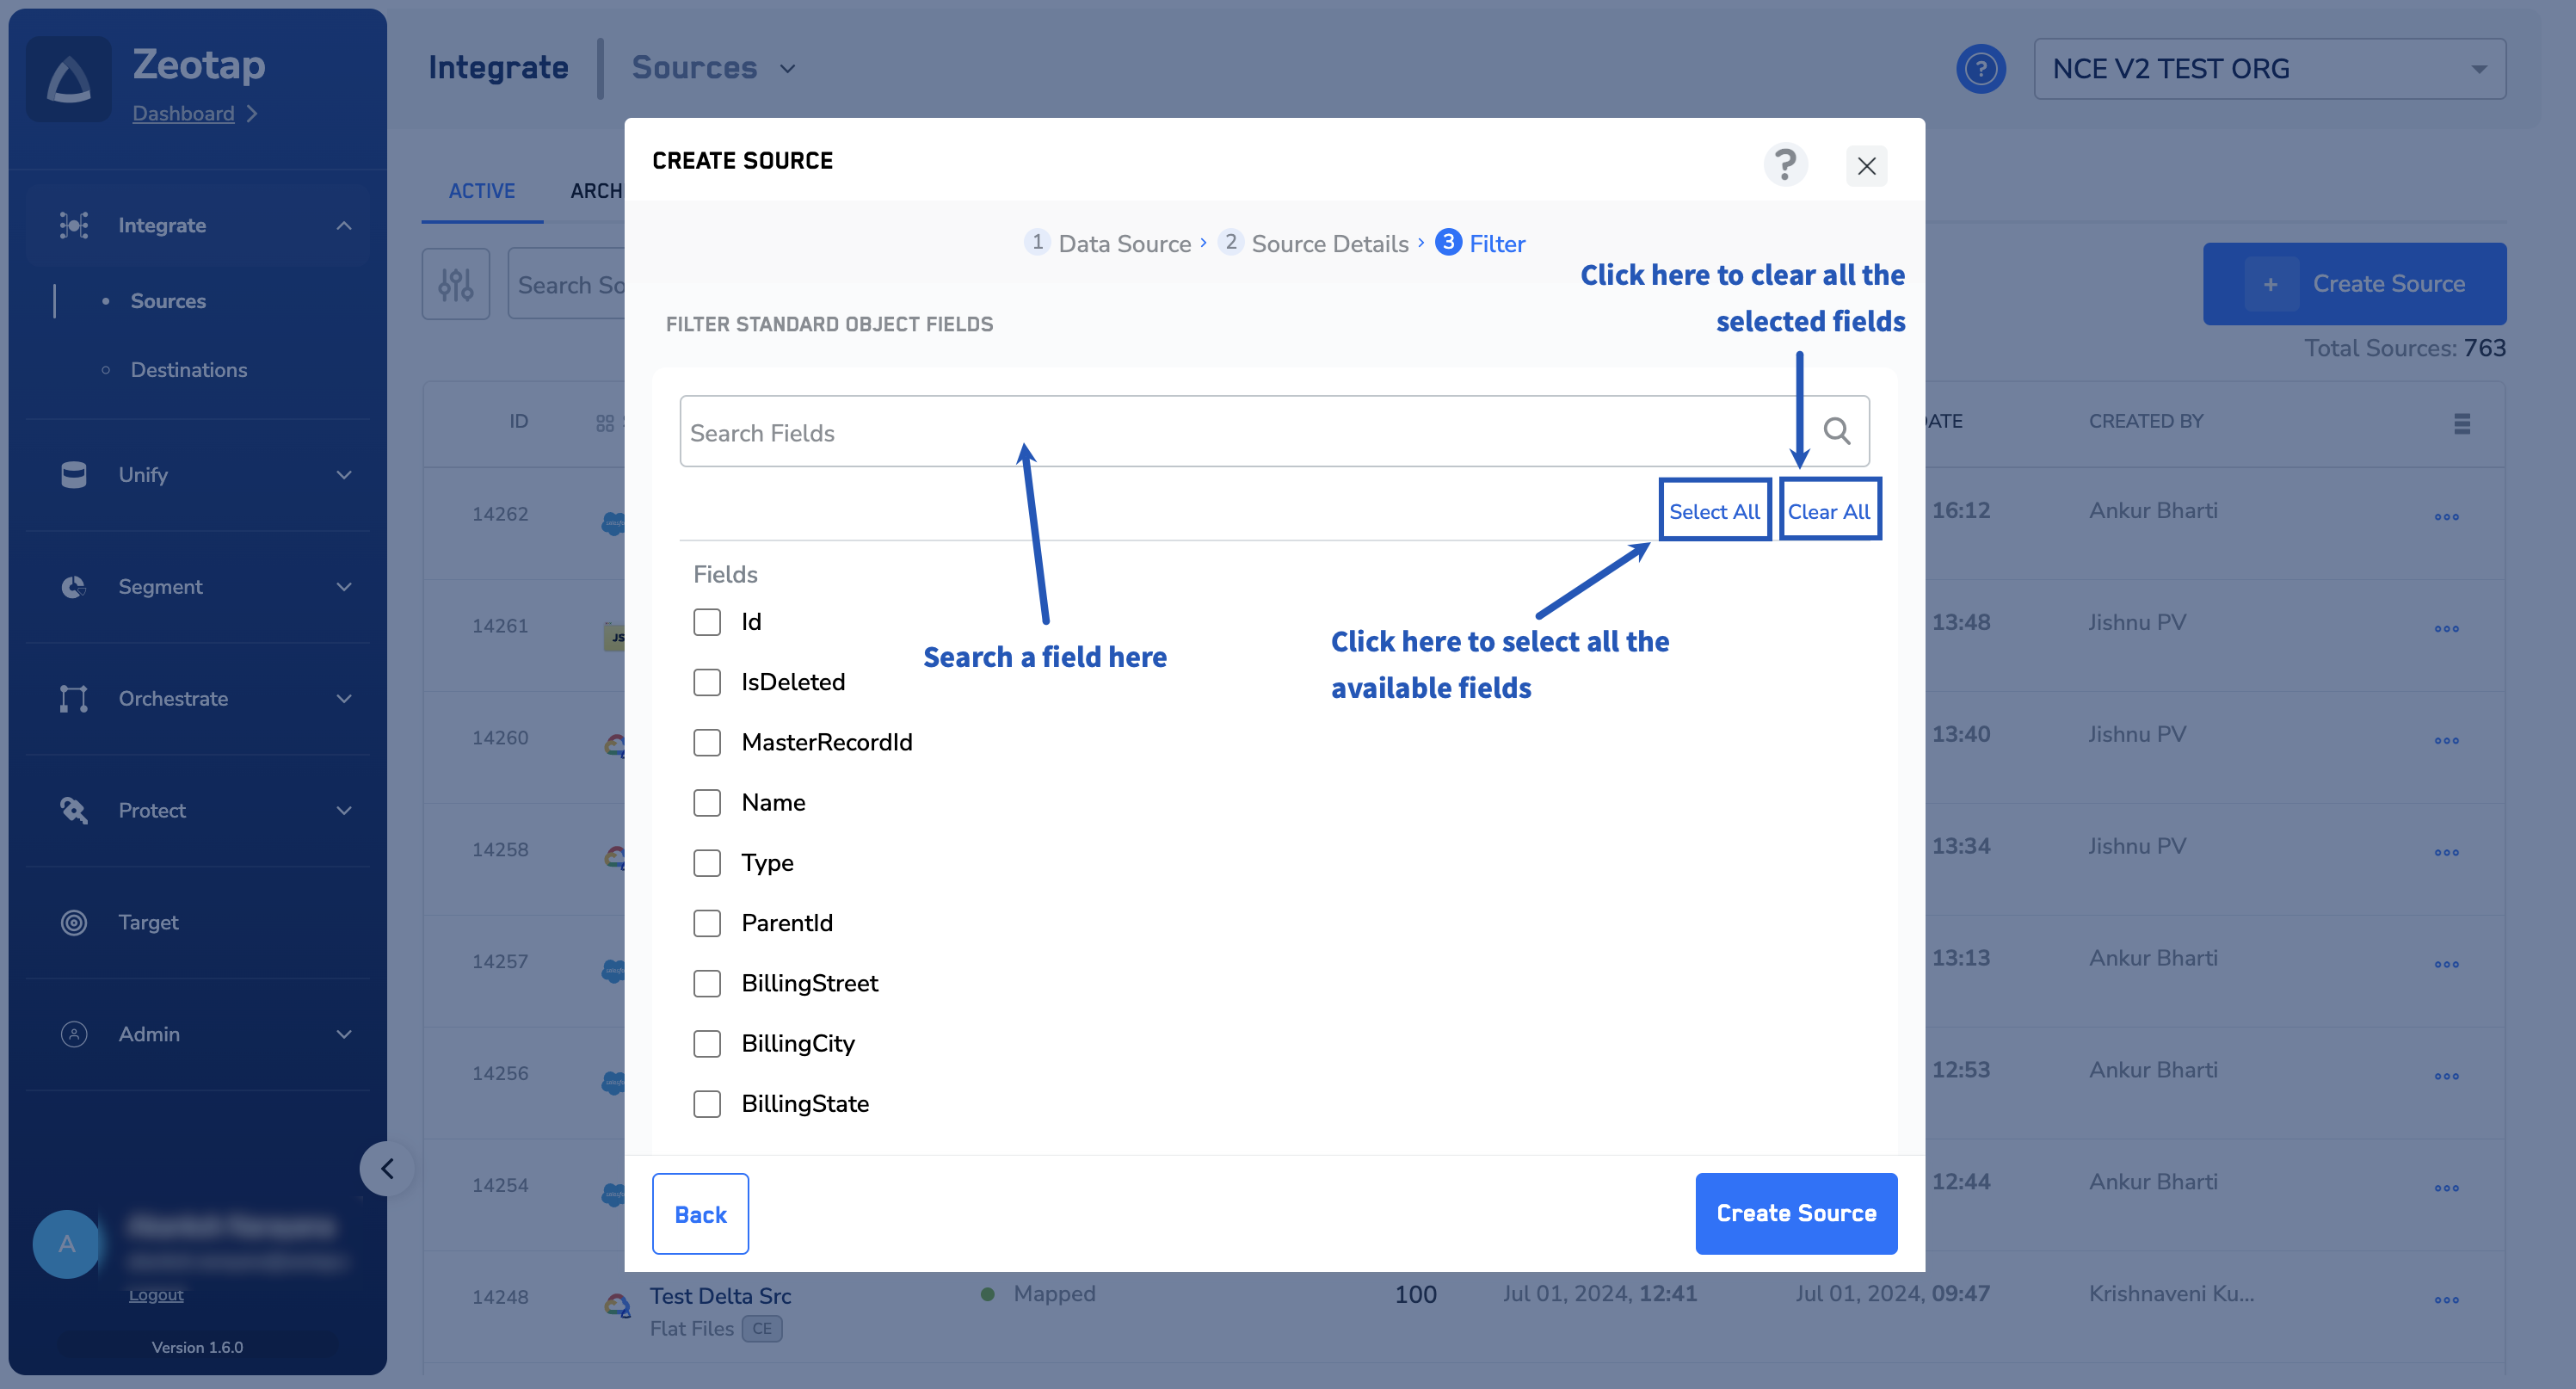
In the window that appears, based on the Object selected in the previous step, a list of fields are displayed. You can select the desired fields using the check boxes. Use **Select All**to select all the fields available for that Object in your Salesforce account. If you know the field names, you can select them after searching in the search box.
Click **Next** to proceed to fields selection.
In the window that appears, based on the Object selected in the previous step, a list of fields are displayed. You can select the desired fields using the check boxes. Use **Select All**to select all the fields available for that Object in your Salesforce account. If you know the field names, you can select them after searching in the search box.
 **Note:**
*Ensure that you consider the following points while choosing the fields in the above step:*
* *Currently, editing the field selection after source creation is not allowed. If you wish to do so, then you need to create a new source in Zeotap CDP.*
* *Zeotap CDP does not support the following compound fields (nested objects) and choosing them during source creation might cause ingestion failure:*
* `PersonMailingAddress `
* `PersonOtherAddress`
* `ShippingAddress`
* `BillingAddress`
* `Address`
* `MailingAddress`
* `OtherAddress`
* `Subject`
* `Description`
* `Comments`
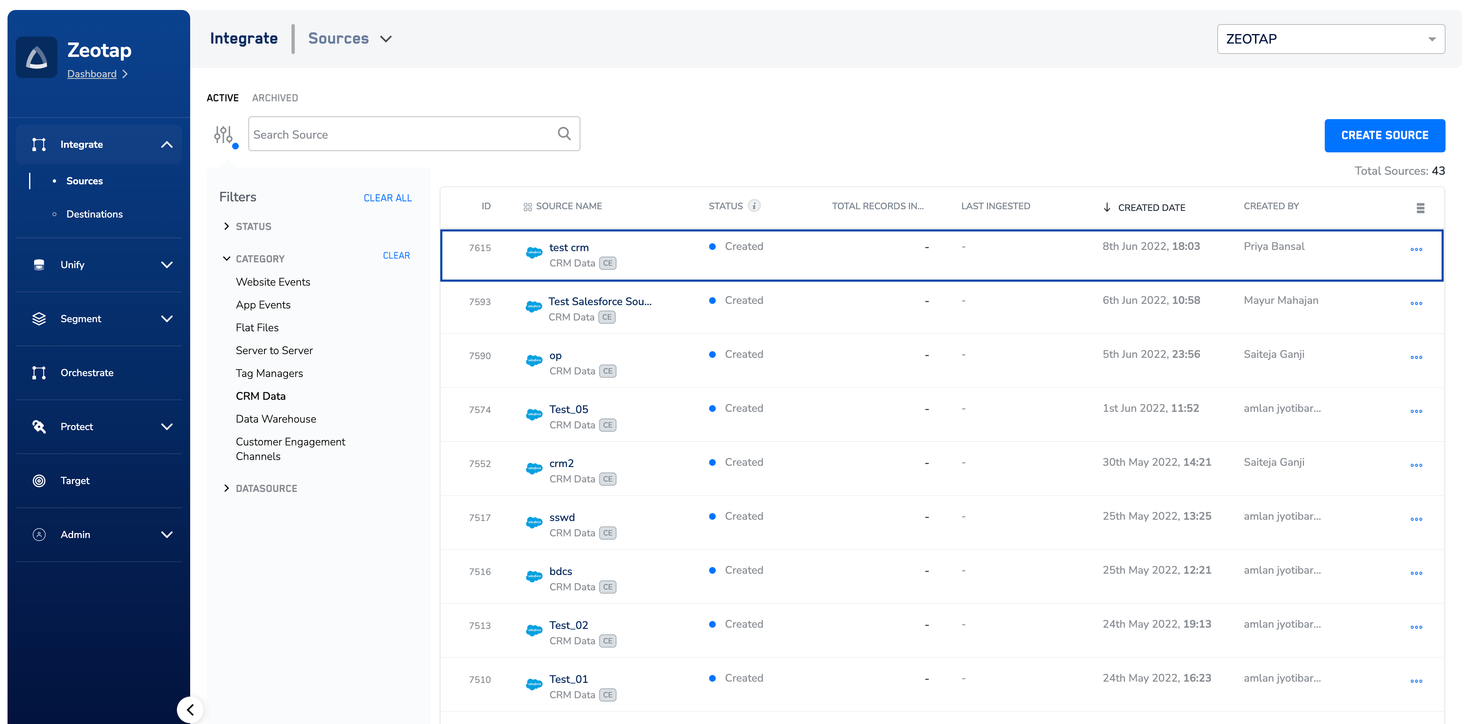
Review the selected fields and click **CREATE SOURCE**. The created Salesforce CRM source is listed on the source listing page as shown below.
**Note:**
*Ensure that you consider the following points while choosing the fields in the above step:*
* *Currently, editing the field selection after source creation is not allowed. If you wish to do so, then you need to create a new source in Zeotap CDP.*
* *Zeotap CDP does not support the following compound fields (nested objects) and choosing them during source creation might cause ingestion failure:*
* `PersonMailingAddress `
* `PersonOtherAddress`
* `ShippingAddress`
* `BillingAddress`
* `Address`
* `MailingAddress`
* `OtherAddress`
* `Subject`
* `Description`
* `Comments`
Review the selected fields and click **CREATE SOURCE**. The created Salesforce CRM source is listed on the source listing page as shown below.
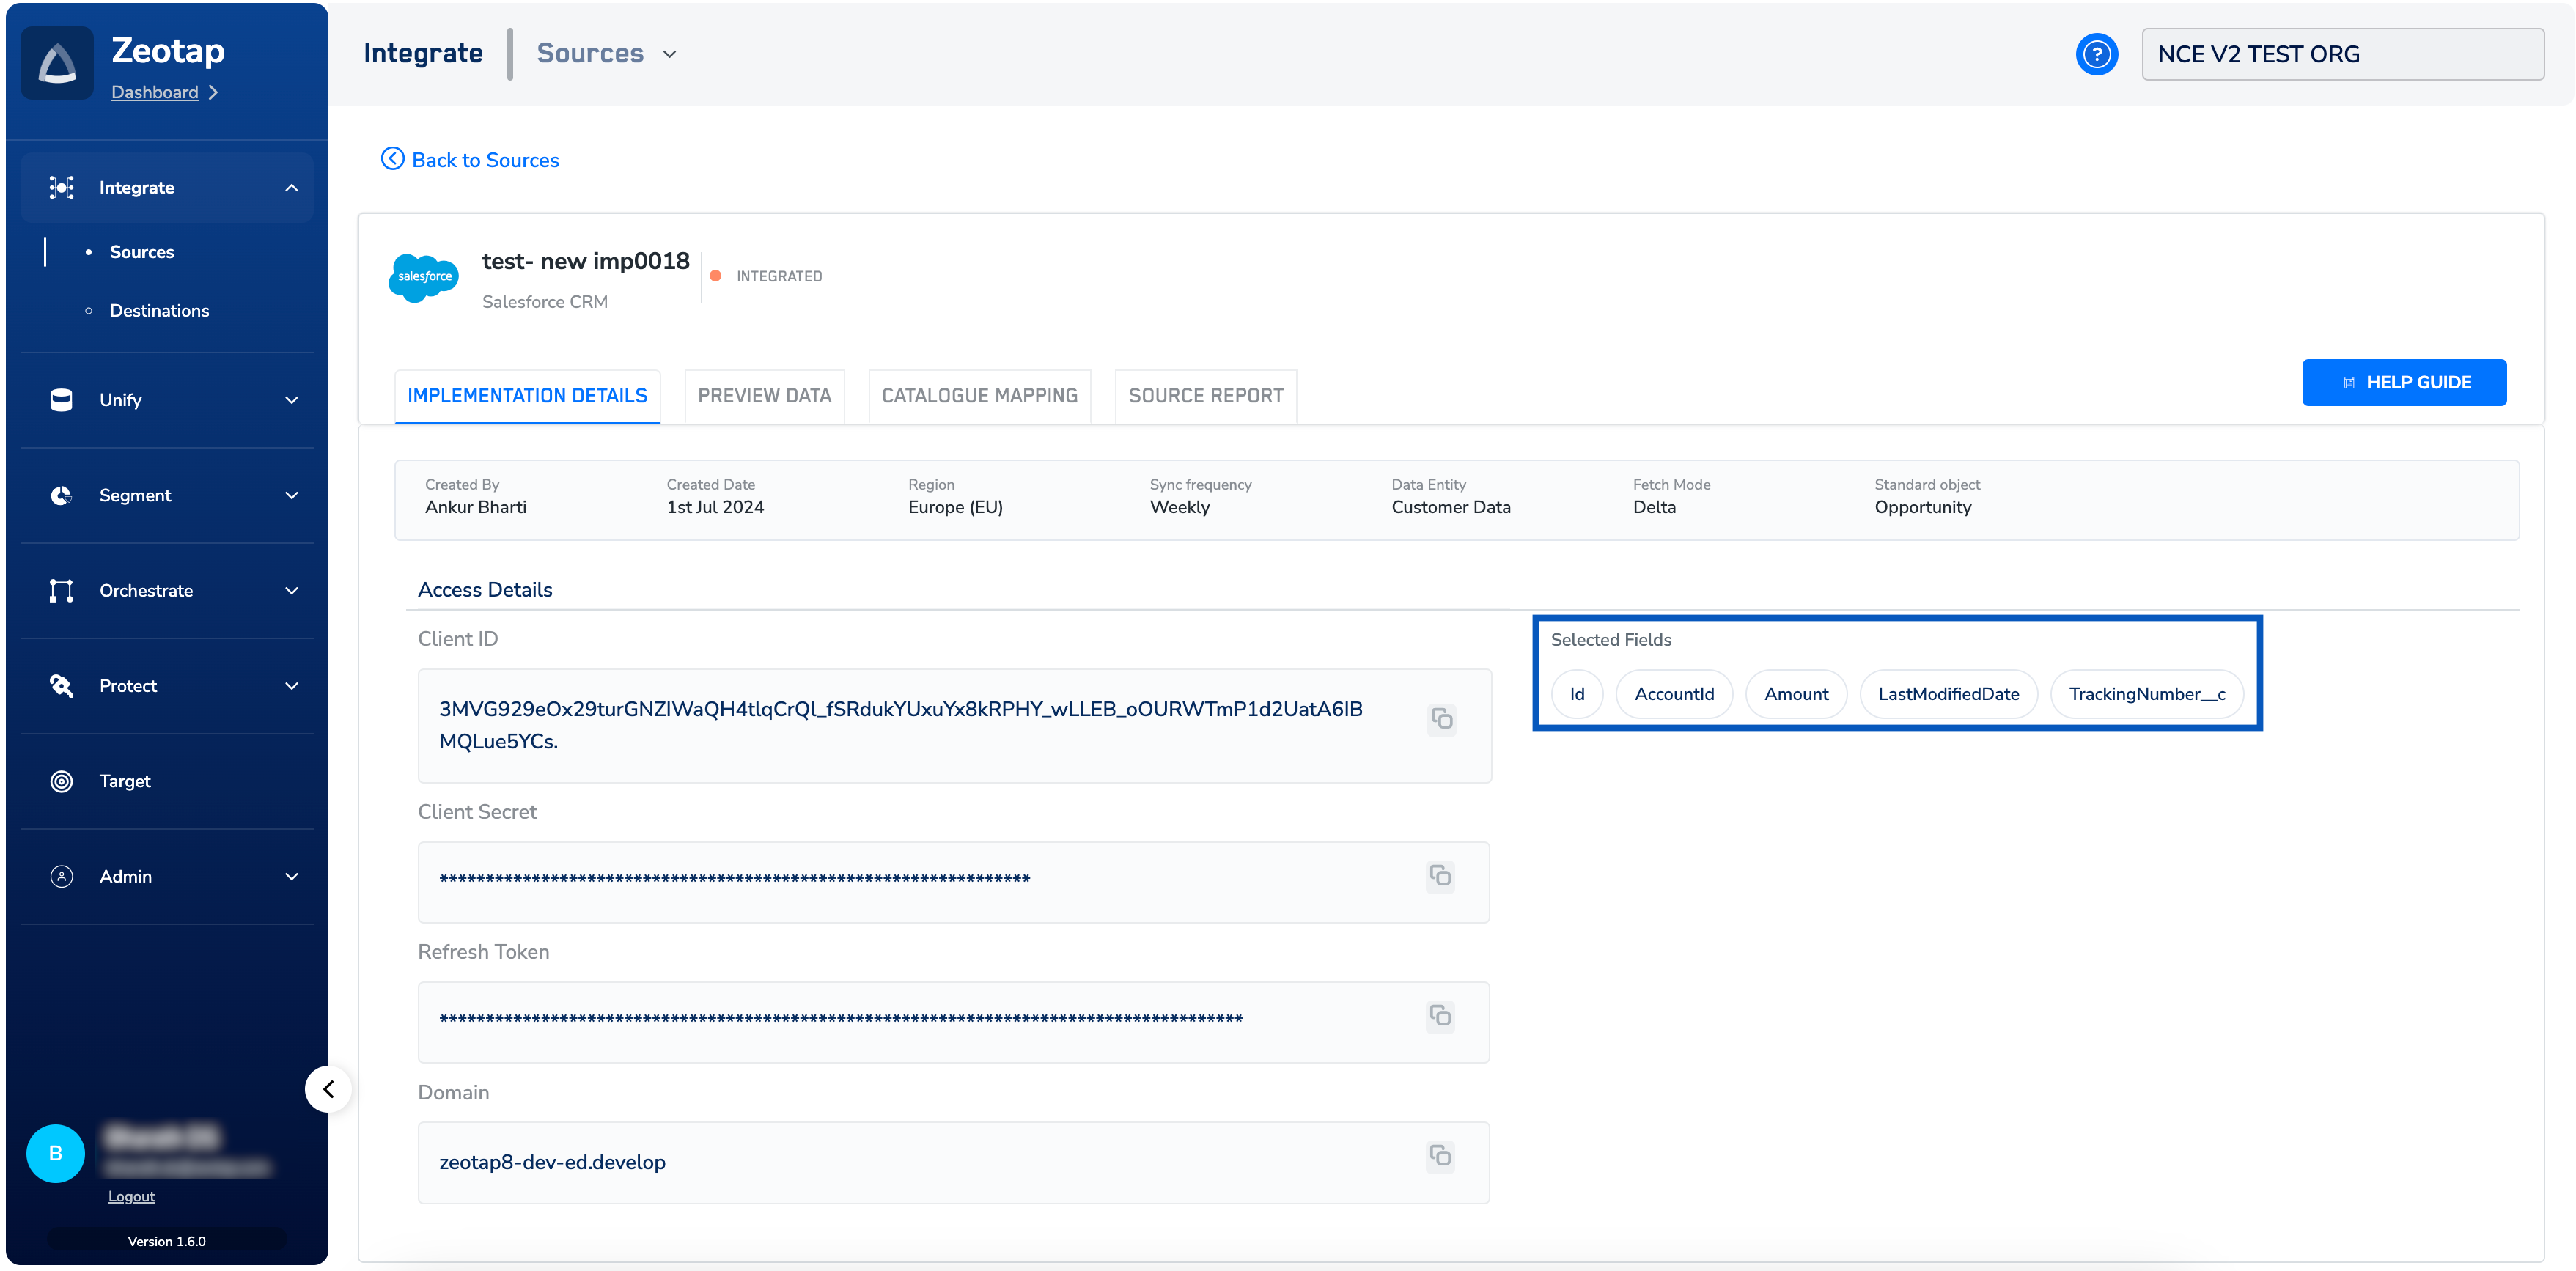
 In the **IMPLEMENTATION DETAILS** tab of the source, you can find details about the source and the selected fields for the Object.
 ## What Next?
If you want to edit the field selection at this stage, then you need to create a new source in Zeotap CDP. For further assistance or queries related to Salesforce CRM source creation, reach out to your Zeotap POC.
## Related Topics
* For information about what is a Customer Data, refer [here](https://docs.zeotap.com/articles/unify-customer/customer-data).
* For information about how to map the Catalogue for Customer Data (CE), refer [here](https://docs.zeotap.com/articles/unify-customer/map-the-catalogue-for-customer-data).
## What Next?
If you want to edit the field selection at this stage, then you need to create a new source in Zeotap CDP. For further assistance or queries related to Salesforce CRM source creation, reach out to your Zeotap POC.
## Related Topics
* For information about what is a Customer Data, refer [here](https://docs.zeotap.com/articles/unify-customer/customer-data).
* For information about how to map the Catalogue for Customer Data (CE), refer [here](https://docs.zeotap.com/articles/unify-customer/map-the-catalogue-for-customer-data).