> ## Documentation Index
> Fetch the complete documentation index at: https://docs.zeotap.com/llms.txt
> Use this file to discover all available pages before exploring further.
# Cleverpush
## Overview
Cleverpush is a web-based platform that enables website owners and developers to send push notifications to users who have subscribed to receive them. Integrated with Zeotap CDP, it enables marketers to engage with their customers in real-time and at scale. This integration lets you send notifications through mobile applications, websites and emails.
## Prerequisites
Ensure that you have created a Cleverpush source within Zeotap CDP to use the Cleverpush Destination. You would need the Cleverpush Subscription ID, which is obtained by connecting to the Cleverpush source or by ingesting the flat file, in order to use this destination.
## Supported Identifiers
This integration supports Subscription ID.
## Available Actions and Supported Features
The following table lists the available action types for the integration and the supported features for each action type:
| Action Name | [ID EXTENSION](/articles/segment-customer/extend-your-audience#id-extension) | [DELETE](https://docs.zeotap.com/articles/#!integrate-customer/delta-upload-and-delete-functions) | [DELTA UPLOAD](https://docs.zeotap.com/articles/#!integrate-customer/delta-upload-and-delete-functions) |
| :----------------------------- | :--------------------------------------------------------------------------- | :------------------------------------------------------------------------------------------------ | :------------------------------------------------------------------------------------------------------ |
| Send Identifiers to Cleverpush | - | - | - |
## Components of Cleverpush
Ensure that you have the details about the below components of the Cleverpush account available before creating a Destination.
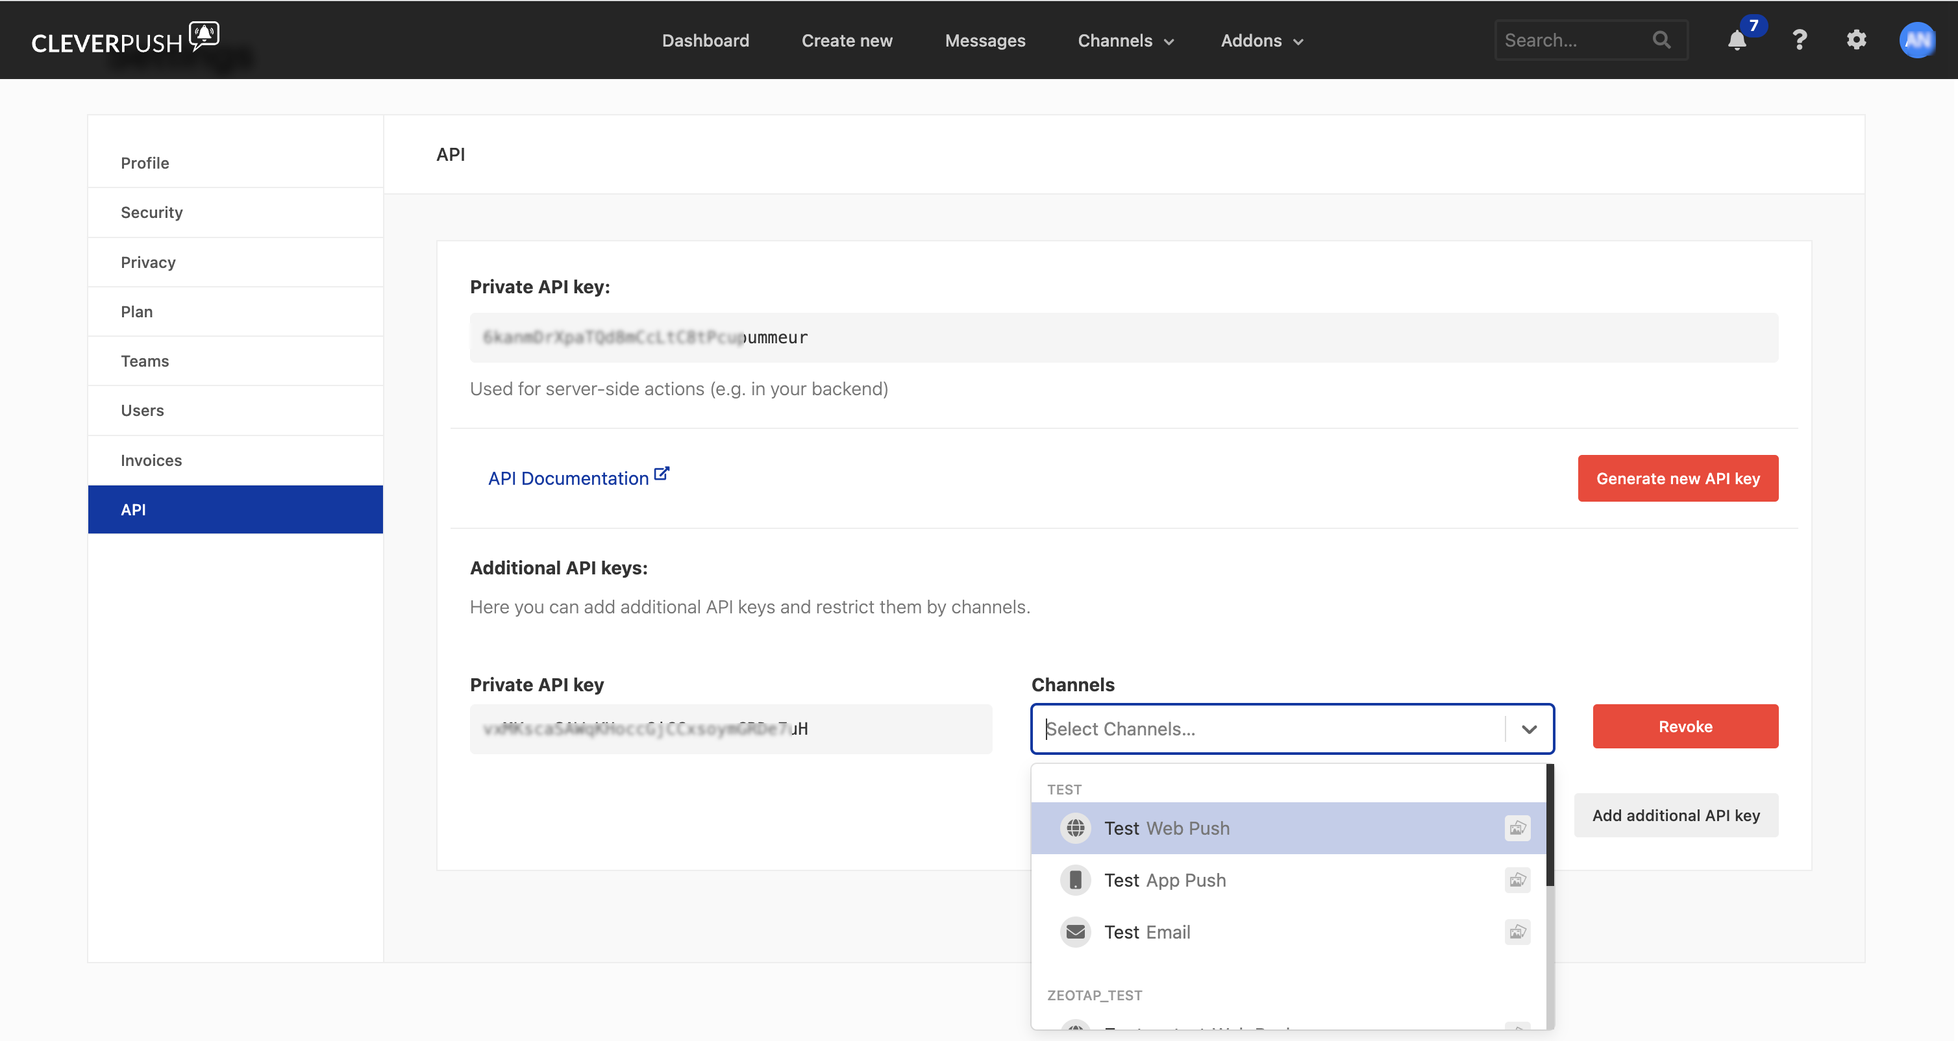
* **Private API Key-** A Private API Key is a unique identifier associated with your Cleverpush account. This is used to authenticate and authorise access to certain features or APIs of Cleverpush. Perform the following steps to obtain the Private API Key from Cleverpush:
Log into the Cleverpush console and navigate to **Settings**.
In the left panel, click **API** and copy the **Private API Key** displayed on the screen.
If you wish to add an additional API key, click **Add Additional API key** and select the channel where you intend to use this key.
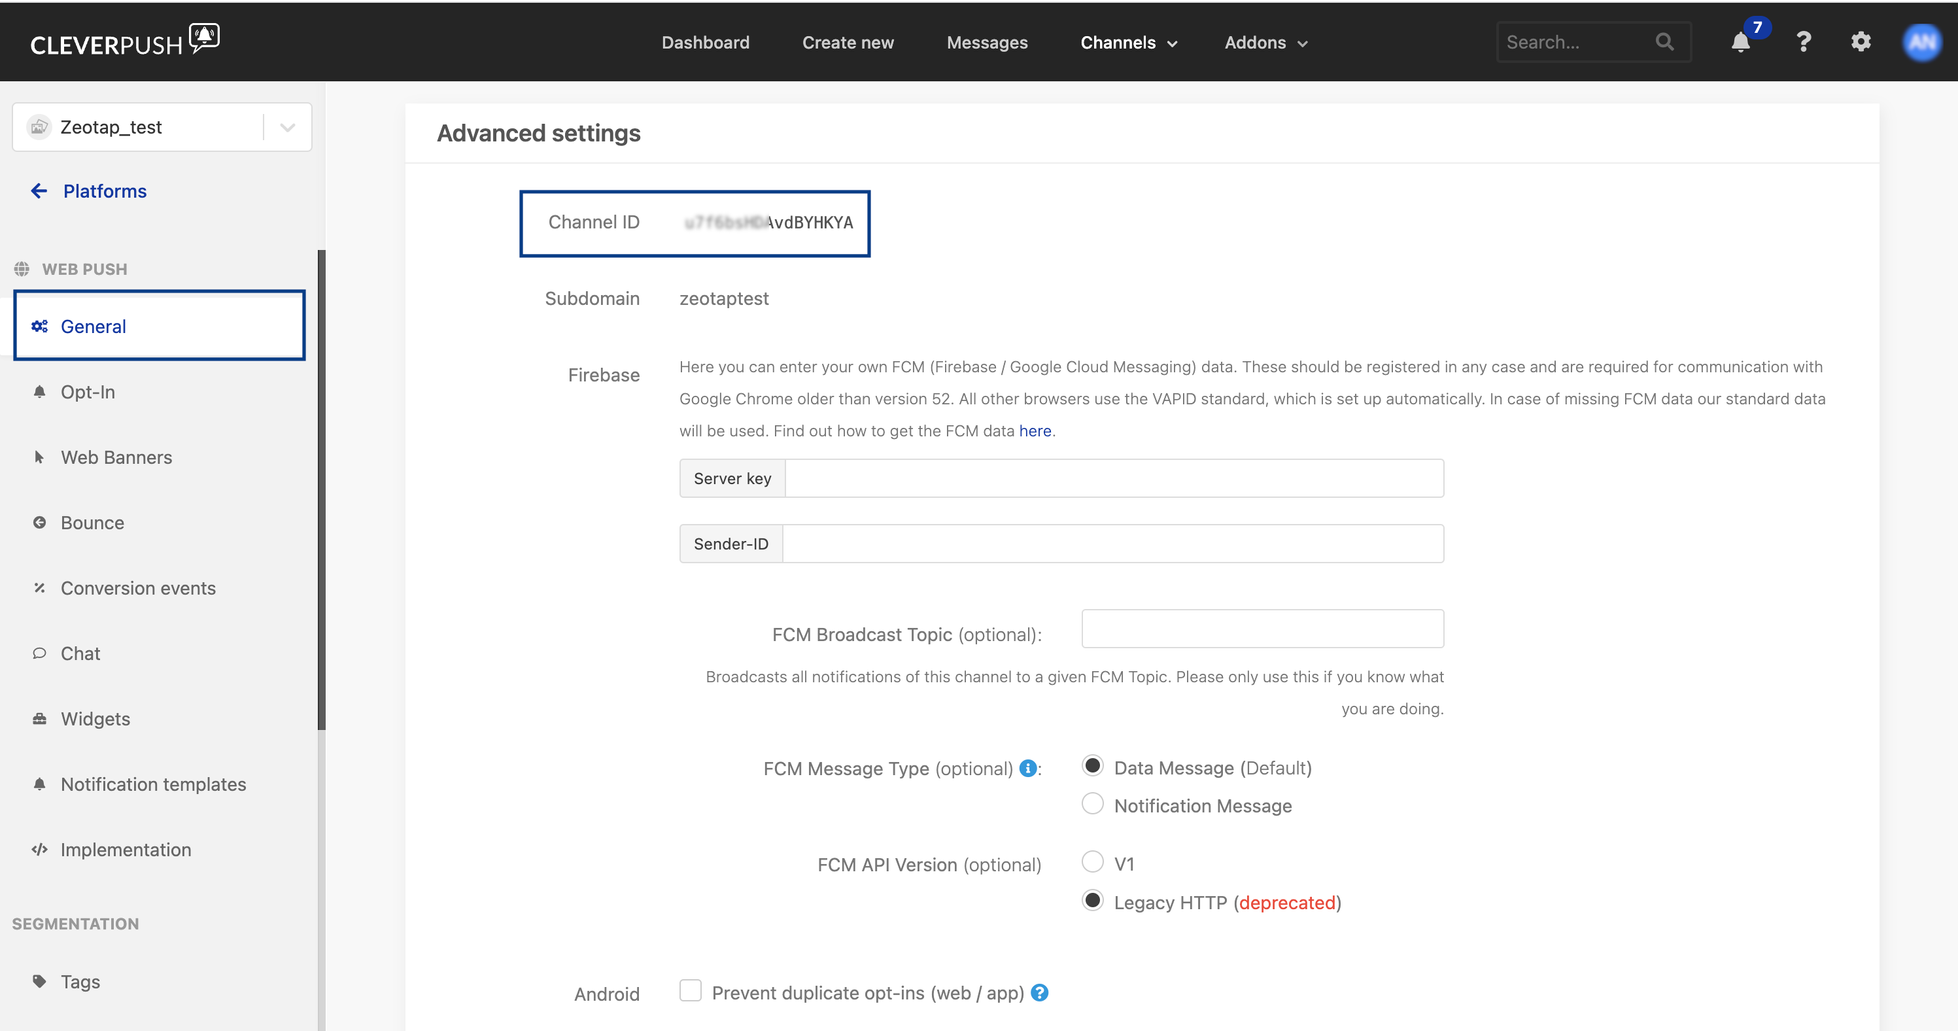
 **Channel ID-** A Channel ID is a unique identifier assigned to the push notification channel that you create within Cleverpush. Perform the following steps to obtain the Channel ID in Cleverpush:
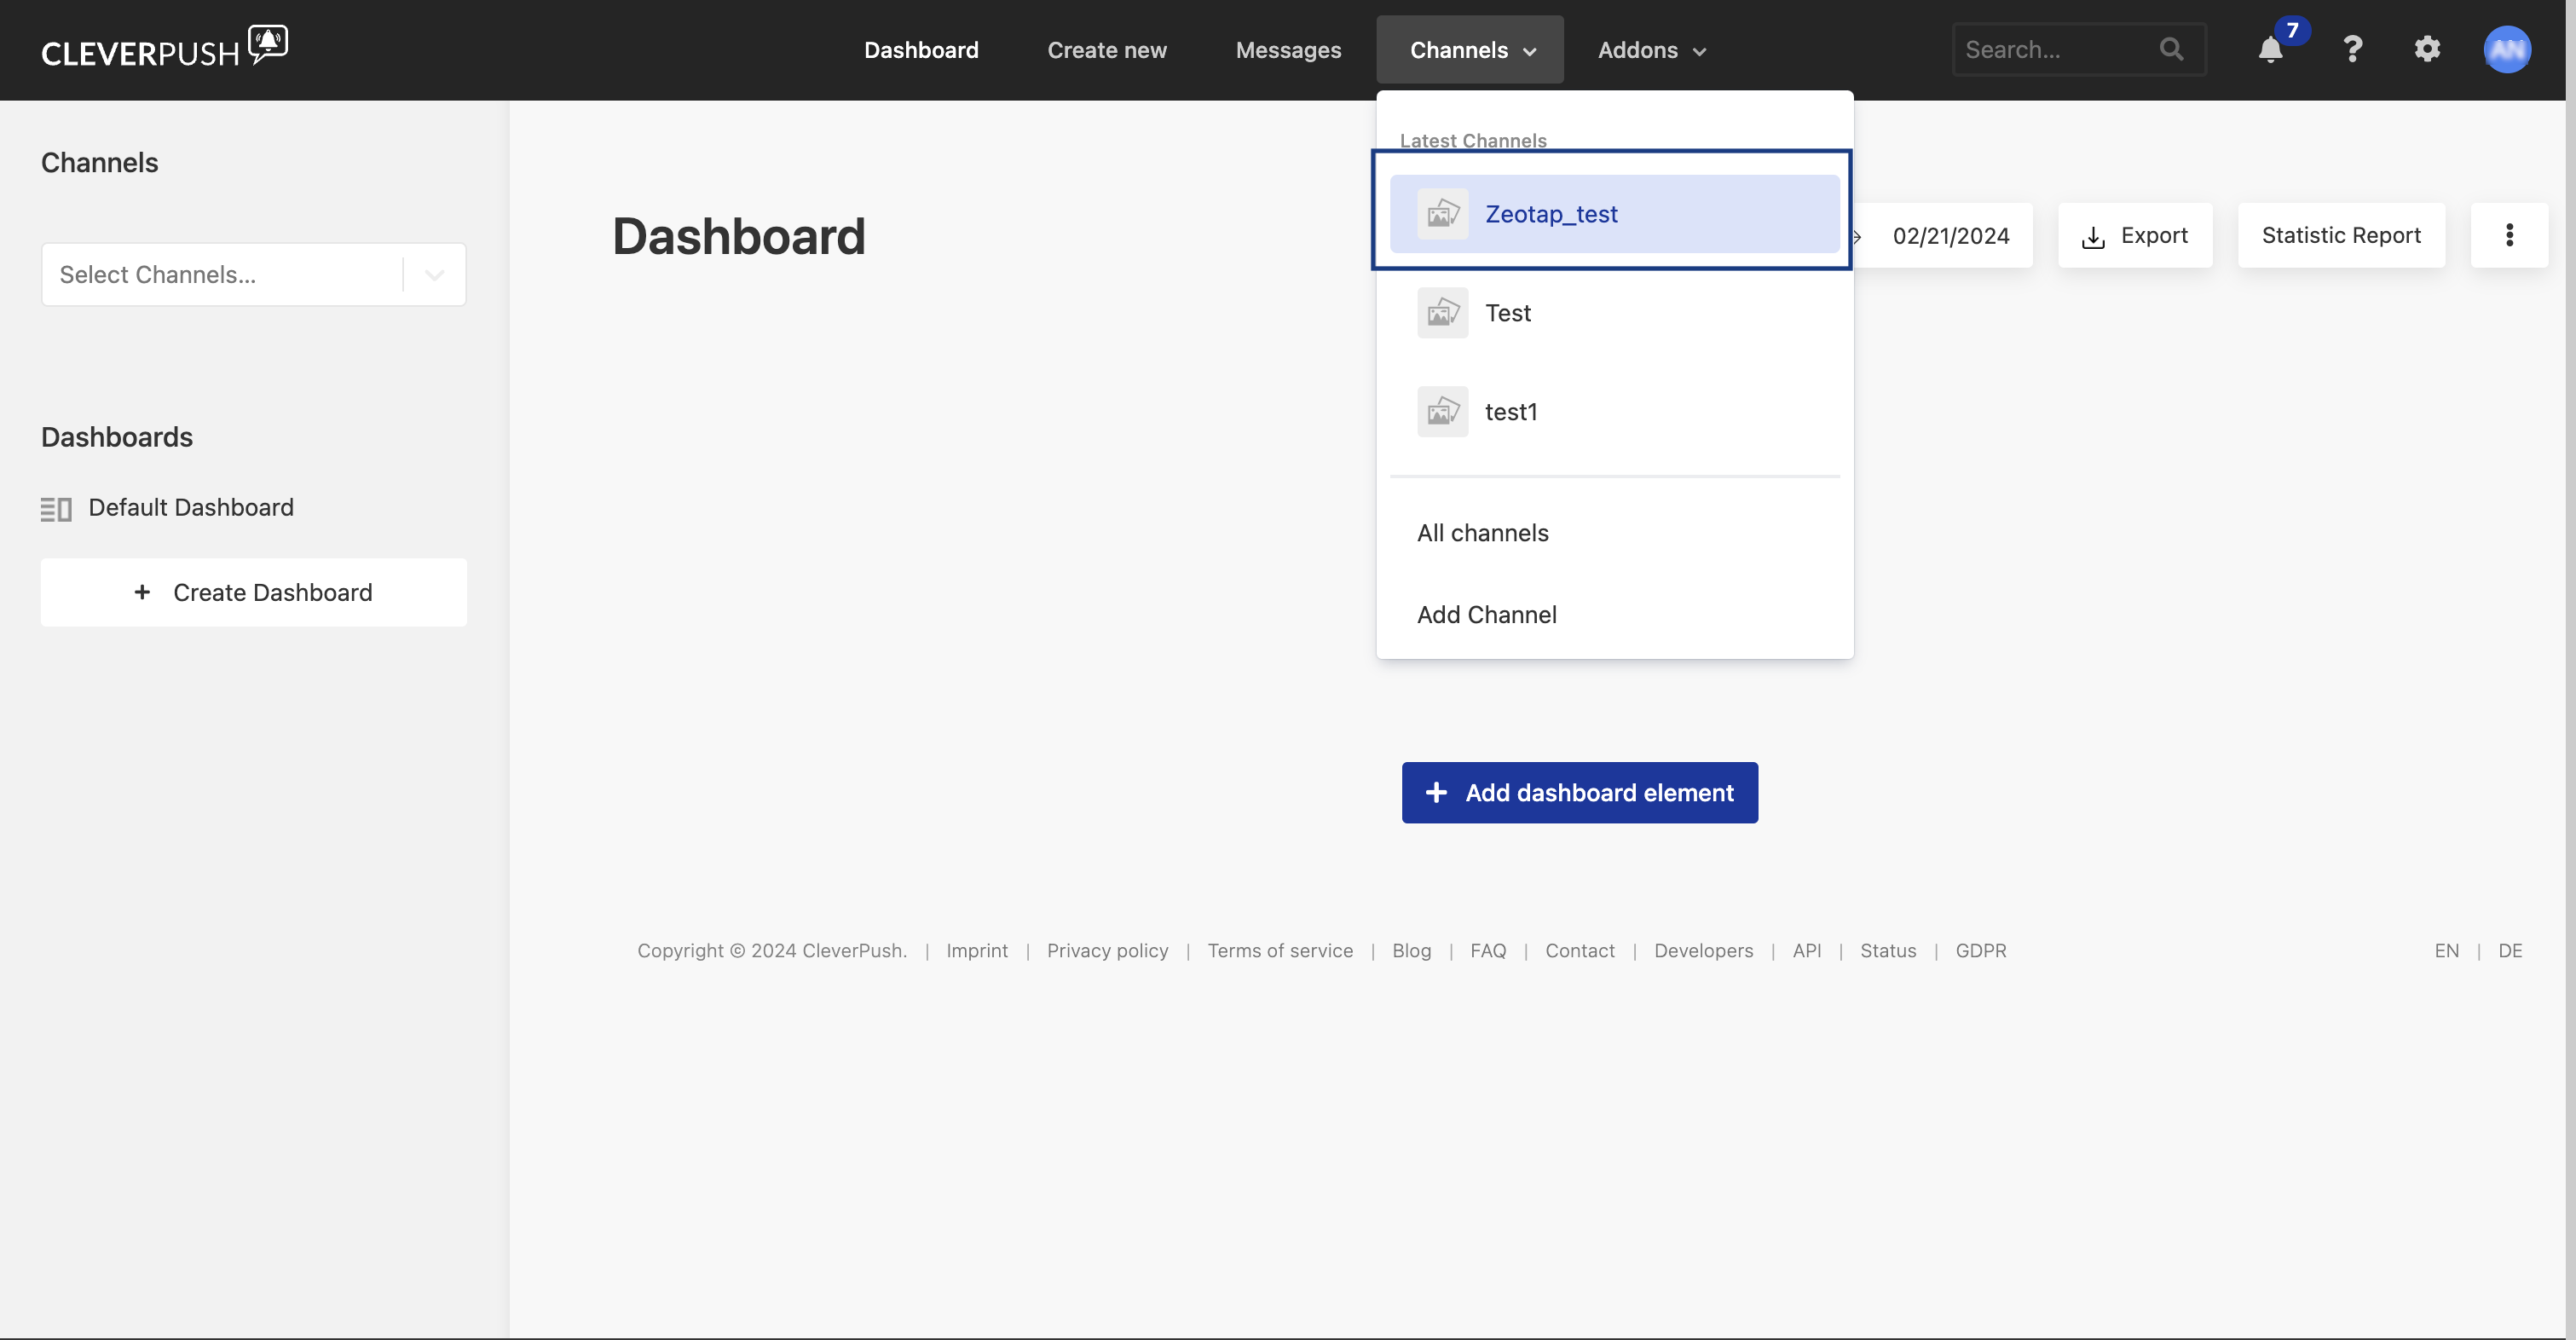
Log into Cleverpush console and navigate to **Channels** on the top navigation bar.
Under **Channels**, click the channel that you wish to use for sending push notifications. If the desired channel is not available, then you can create one by clicking **Add Channel** from the drop-down menu. For more information on how to create a channel in Cleverpush, refer .
**Channel ID-** A Channel ID is a unique identifier assigned to the push notification channel that you create within Cleverpush. Perform the following steps to obtain the Channel ID in Cleverpush:
Log into Cleverpush console and navigate to **Channels** on the top navigation bar.
Under **Channels**, click the channel that you wish to use for sending push notifications. If the desired channel is not available, then you can create one by clicking **Add Channel** from the drop-down menu. For more information on how to create a channel in Cleverpush, refer .
 Once the channel is created, you need to setup the platforms on which you want to send notifications. The following are the platforms that Zeotap CDP supports:
* Web Push
* App Push
* Email Push
**Note:**
For more information about how to set up these platforms, refer .
Once the channel is created, you need to setup the platforms on which you want to send notifications. The following are the platforms that Zeotap CDP supports:
* Web Push
* App Push
* Email Push
**Note:**
For more information about how to set up these platforms, refer .
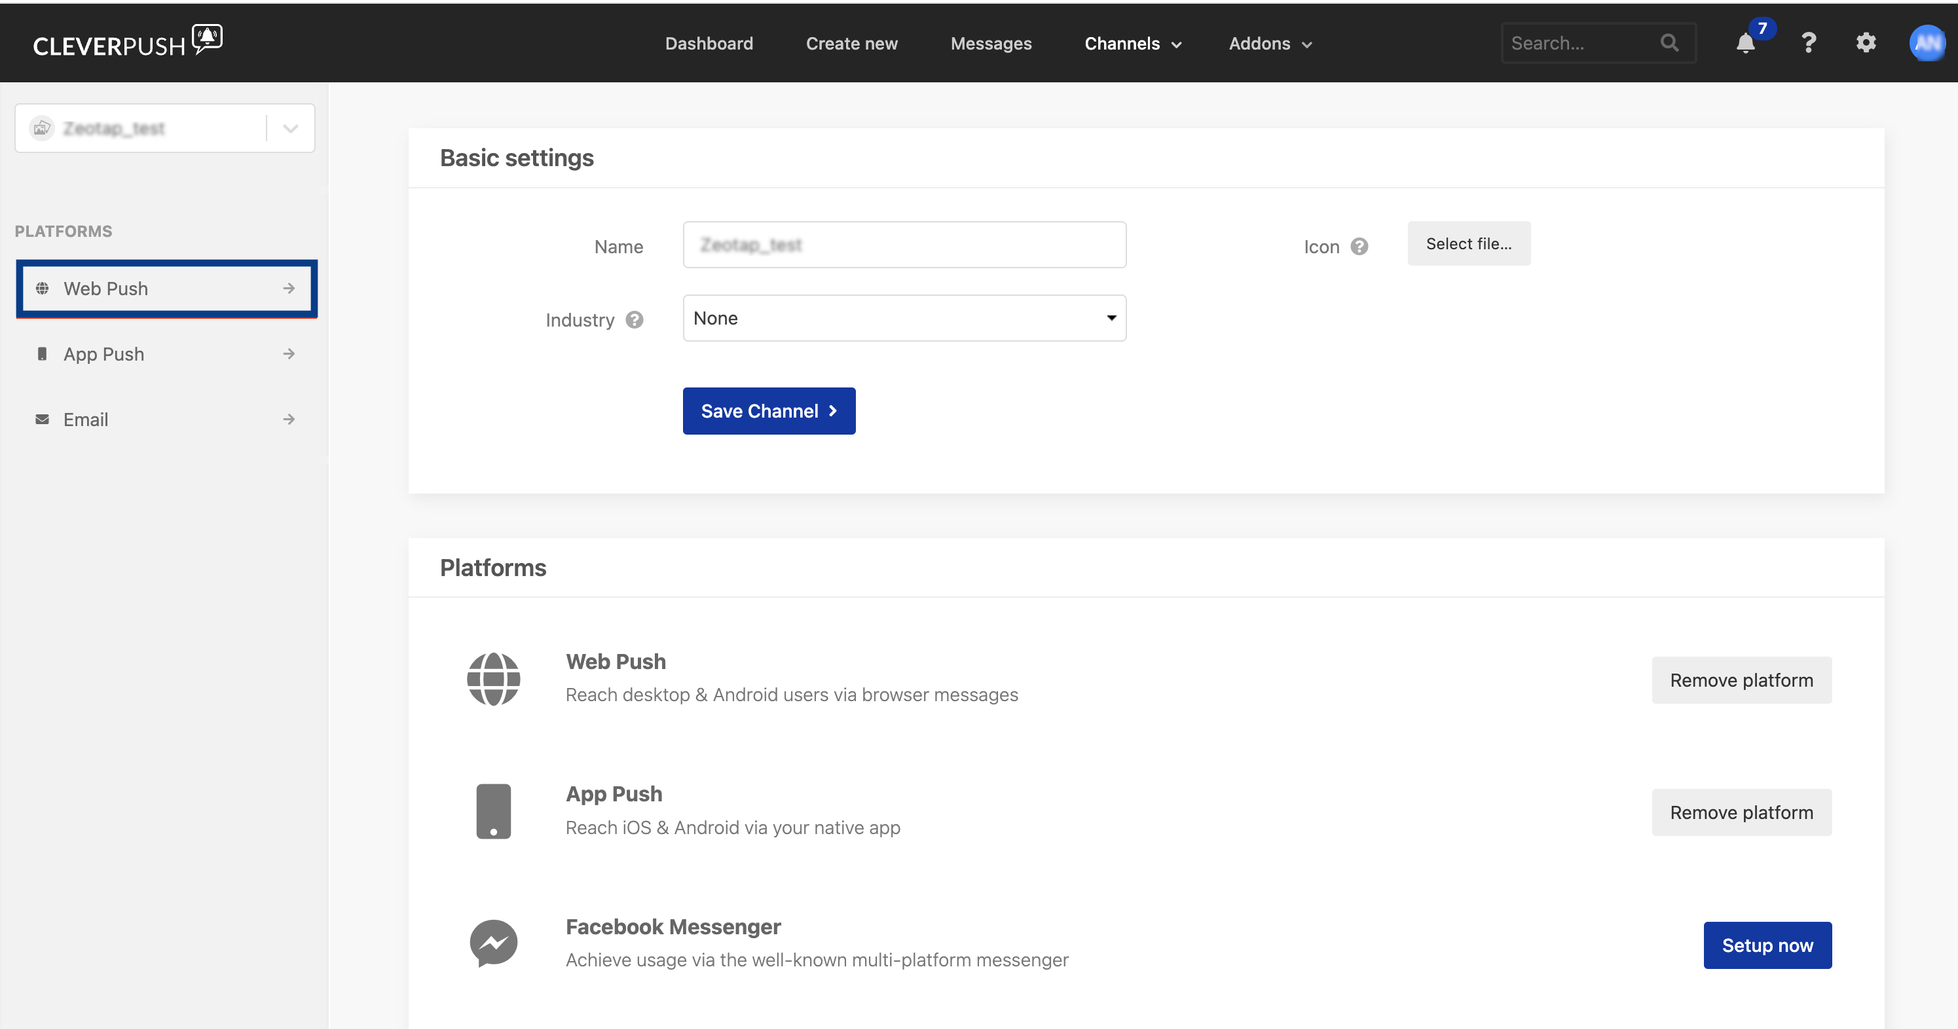 Click the desired platform and navigate to **General > Advance Settings > Channel ID**.
 ## Create a Destination for Cleverpush
Perform the following steps to create a Destination for Cleverpush:
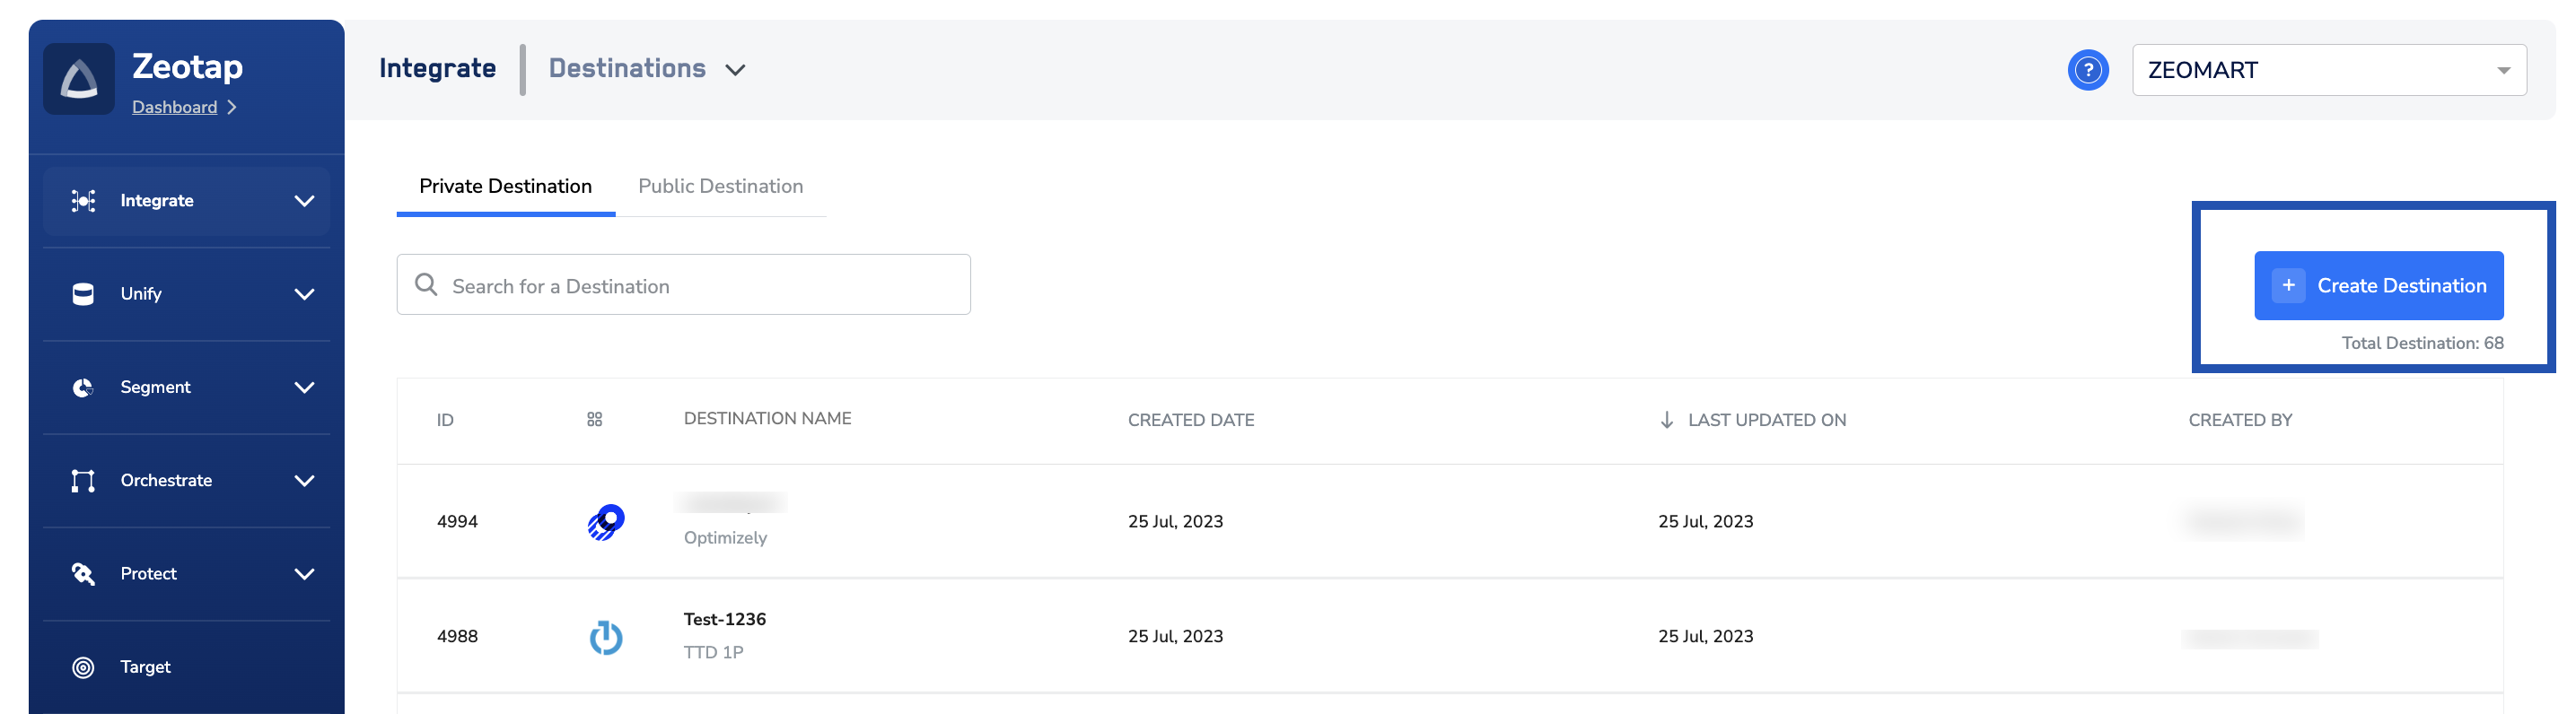
Log into the Zeotap CDP App and go to the **DESTINATIONS** application.
Click **+ Create Destination**.
## Create a Destination for Cleverpush
Perform the following steps to create a Destination for Cleverpush:
Log into the Zeotap CDP App and go to the **DESTINATIONS** application.
Click **+ Create Destination**.
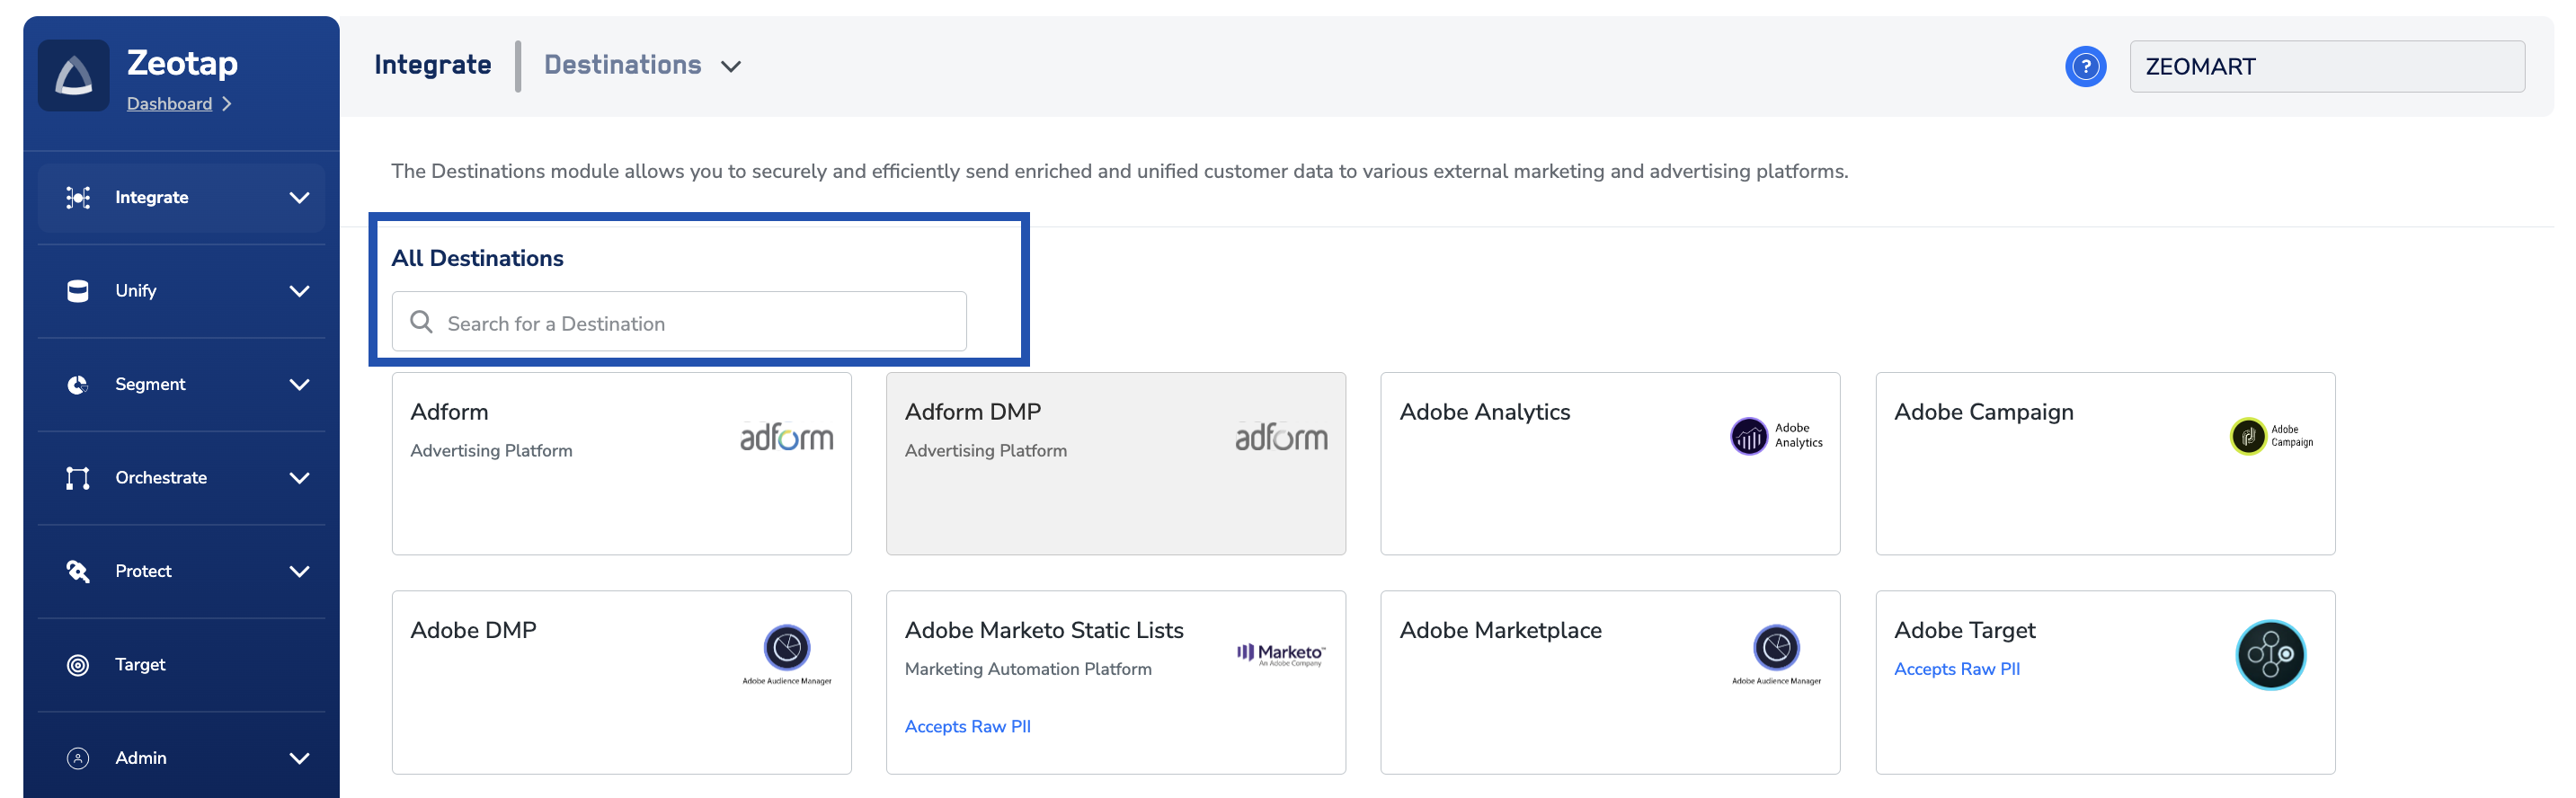
 Under the **All Destinations** section, search for **Cleverpush**.
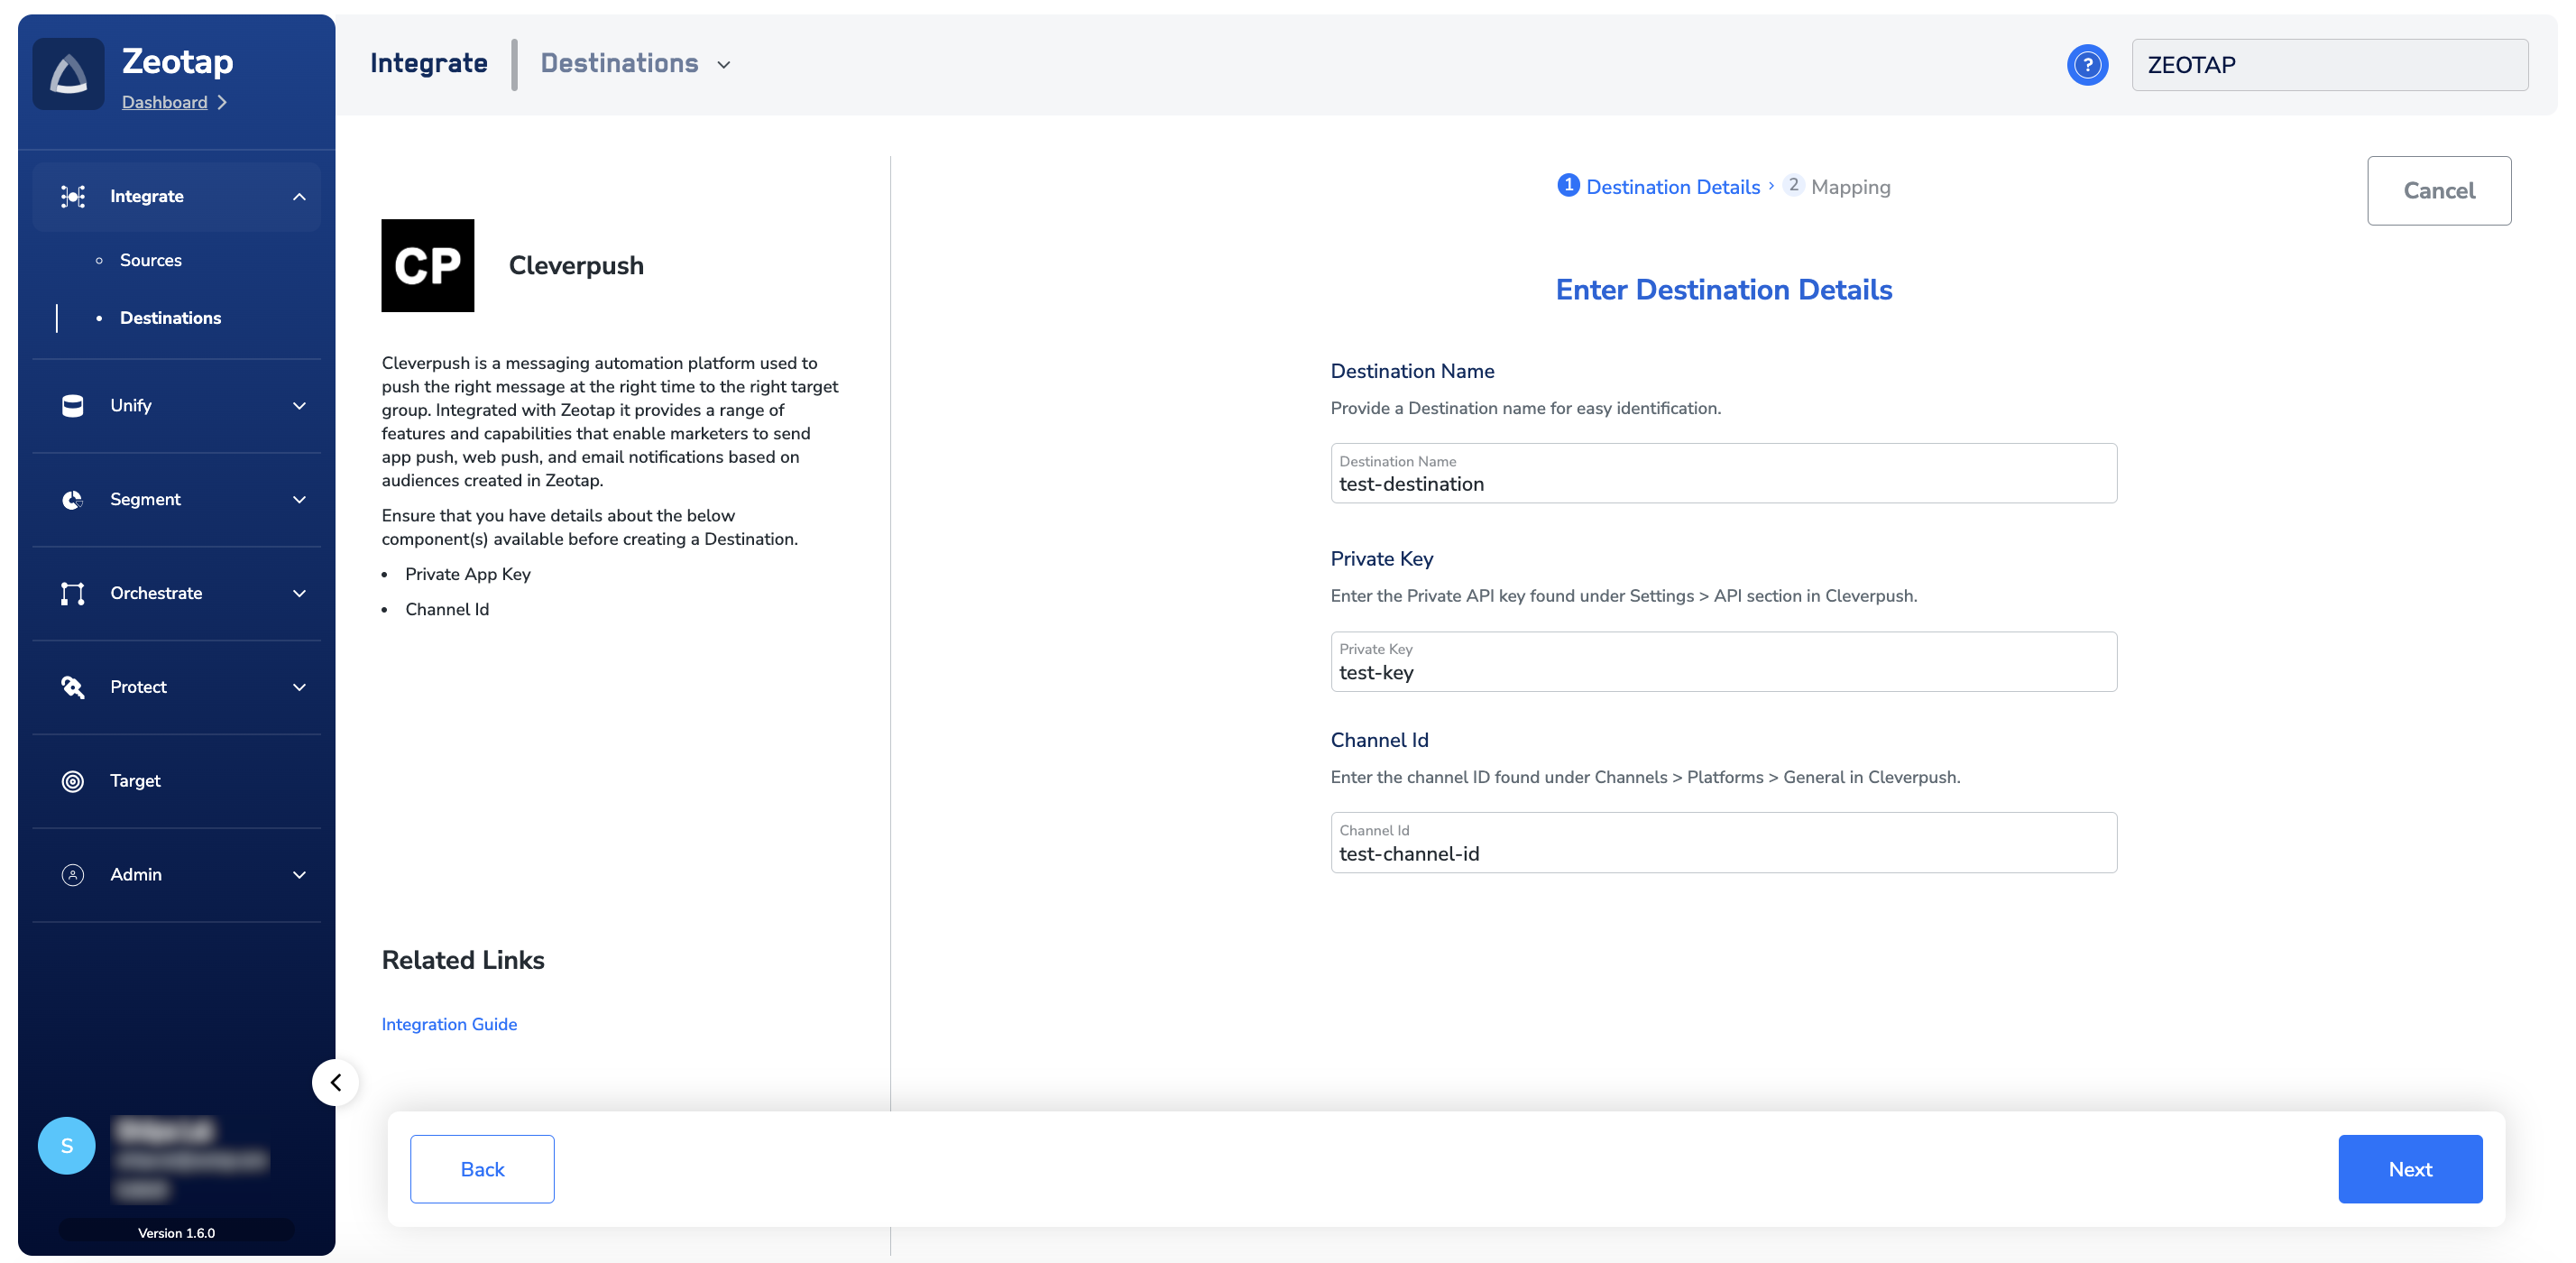
 Click **Cleverpush**. A screen appears displaying details about the particular destination towards the left. On the right-hand side of the screen find a list of fields that are required for the integration to be established. Enter the required details as mentioned in the following steps:
**Note:**
To access the help documentation for this integration, click **Integration Guide** under **Related Links**.
a. Enter a name for the Destination.
b. Enter the **Private API Key** associated with your Cleverpush account.
c. Enter the **Channel ID** associated with your push notification channel.
d. Review the fields and click **Next** to proceed.
Click **Cleverpush**. A screen appears displaying details about the particular destination towards the left. On the right-hand side of the screen find a list of fields that are required for the integration to be established. Enter the required details as mentioned in the following steps:
**Note:**
To access the help documentation for this integration, click **Integration Guide** under **Related Links**.
a. Enter a name for the Destination.
b. Enter the **Private API Key** associated with your Cleverpush account.
c. Enter the **Channel ID** associated with your push notification channel.
d. Review the fields and click **Next** to proceed.
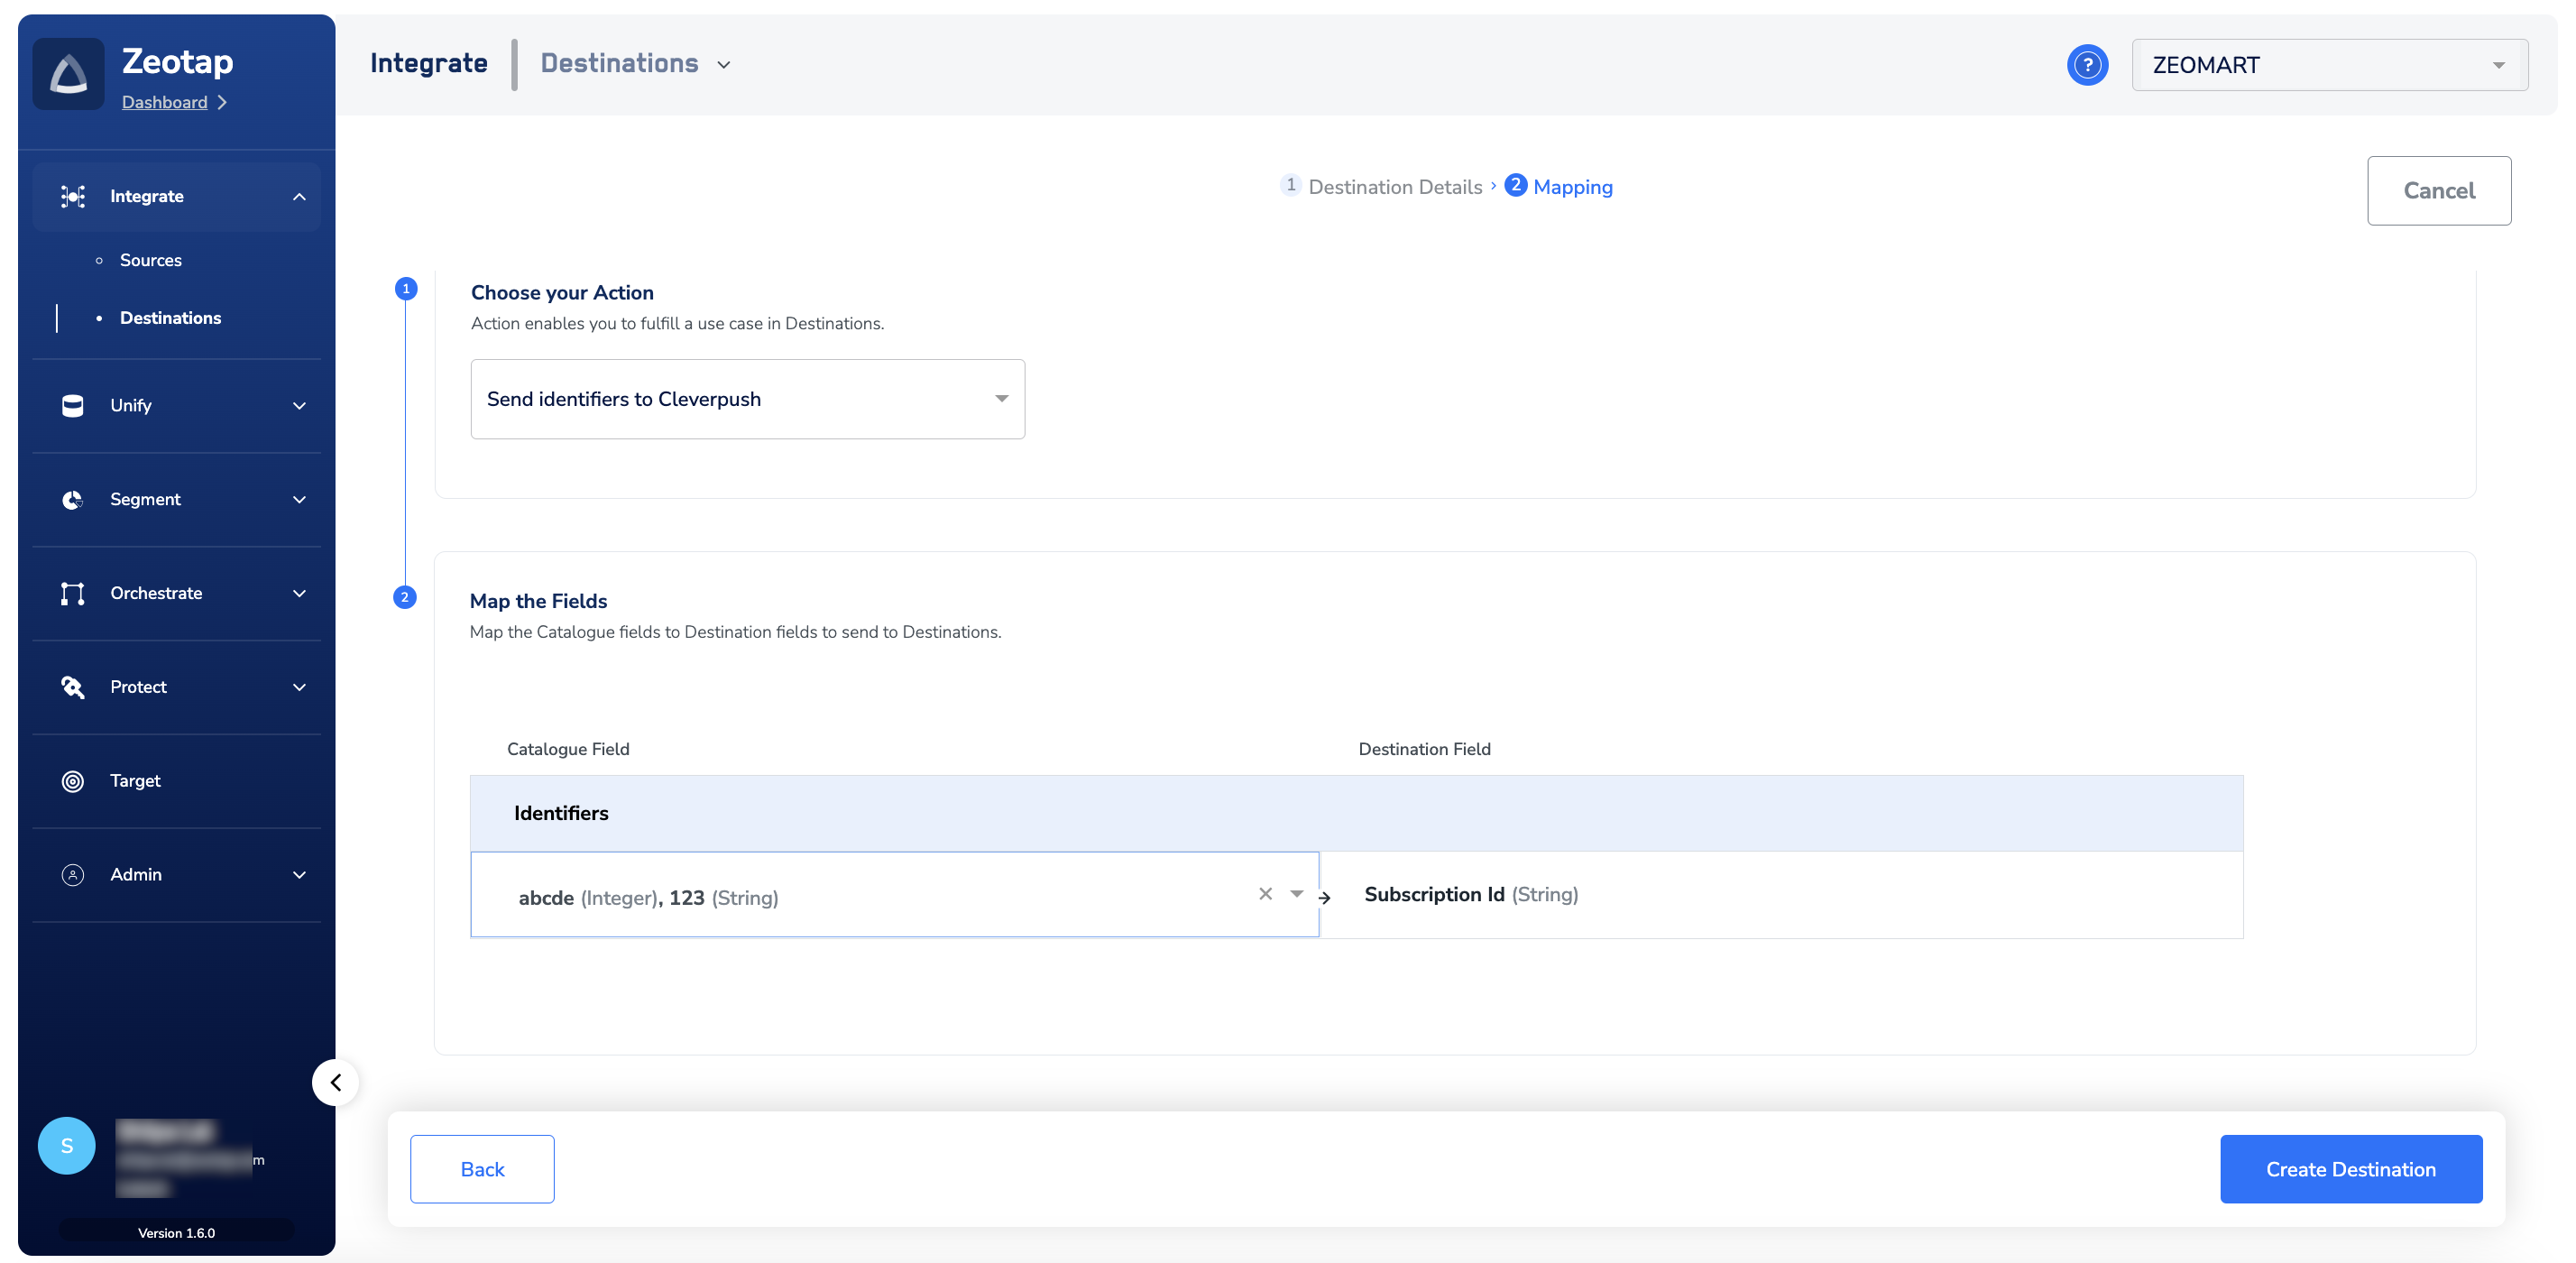
 In the new screen that appears, choose the appropriate Action and mapping as explained below.
a. Choose the desired [action](/articles/integrate-customer/destinations#actions) under **Choose your Action** and then choose the corresponding identifiers under **Map the Fields**. Ensure to select the identifier that is corresponding to the Subscription ID of the user in Cleverpush. By default, the [Output Identifiers](https://docs.zeotap.com/articles/segment-customer/choose-the-output-identifiers) that are accepted by the platform such as, MAIDs, Cookies, email Ids and more are displayed. However, you can edit, add or remove an identifier from the list. To do so, refer [here](/articles/integrate-customer/destinations#mappings).
b. Click **Create Destination**. The created Destination gets listed in the Audiences applications, which can be linked to an audience.
In the new screen that appears, choose the appropriate Action and mapping as explained below.
a. Choose the desired [action](/articles/integrate-customer/destinations#actions) under **Choose your Action** and then choose the corresponding identifiers under **Map the Fields**. Ensure to select the identifier that is corresponding to the Subscription ID of the user in Cleverpush. By default, the [Output Identifiers](https://docs.zeotap.com/articles/segment-customer/choose-the-output-identifiers) that are accepted by the platform such as, MAIDs, Cookies, email Ids and more are displayed. However, you can edit, add or remove an identifier from the list. To do so, refer [here](/articles/integrate-customer/destinations#mappings).
b. Click **Create Destination**. The created Destination gets listed in the Audiences applications, which can be linked to an audience.
 ## Link an Audience to the Cleverpush Destination
For information about how to link an Audience to the created Destination in Audiences applications, refer [here](/articles/integrate-customer/link-an-audience-to-the-destination). Note that it can take upto two hours for the audience (segment) to be available at the Cleverpush seat.
**Note:**
The terms *Audiences* and *Segments* are used interchangeably to refer to customer cohorts belonging to a specific category. For example, an Audience or a segment could be a specific group of customers who are over 18 years of age and who have performed an `addToCart` event within the last 30 days.
## Create Campaigns in Cleverpush
Perform the following steps to create campaigns in Cleverpush:
Log into the Cleverpush console and click **Create New**.
## Link an Audience to the Cleverpush Destination
For information about how to link an Audience to the created Destination in Audiences applications, refer [here](/articles/integrate-customer/link-an-audience-to-the-destination). Note that it can take upto two hours for the audience (segment) to be available at the Cleverpush seat.
**Note:**
The terms *Audiences* and *Segments* are used interchangeably to refer to customer cohorts belonging to a specific category. For example, an Audience or a segment could be a specific group of customers who are over 18 years of age and who have performed an `addToCart` event within the last 30 days.
## Create Campaigns in Cleverpush
Perform the following steps to create campaigns in Cleverpush:
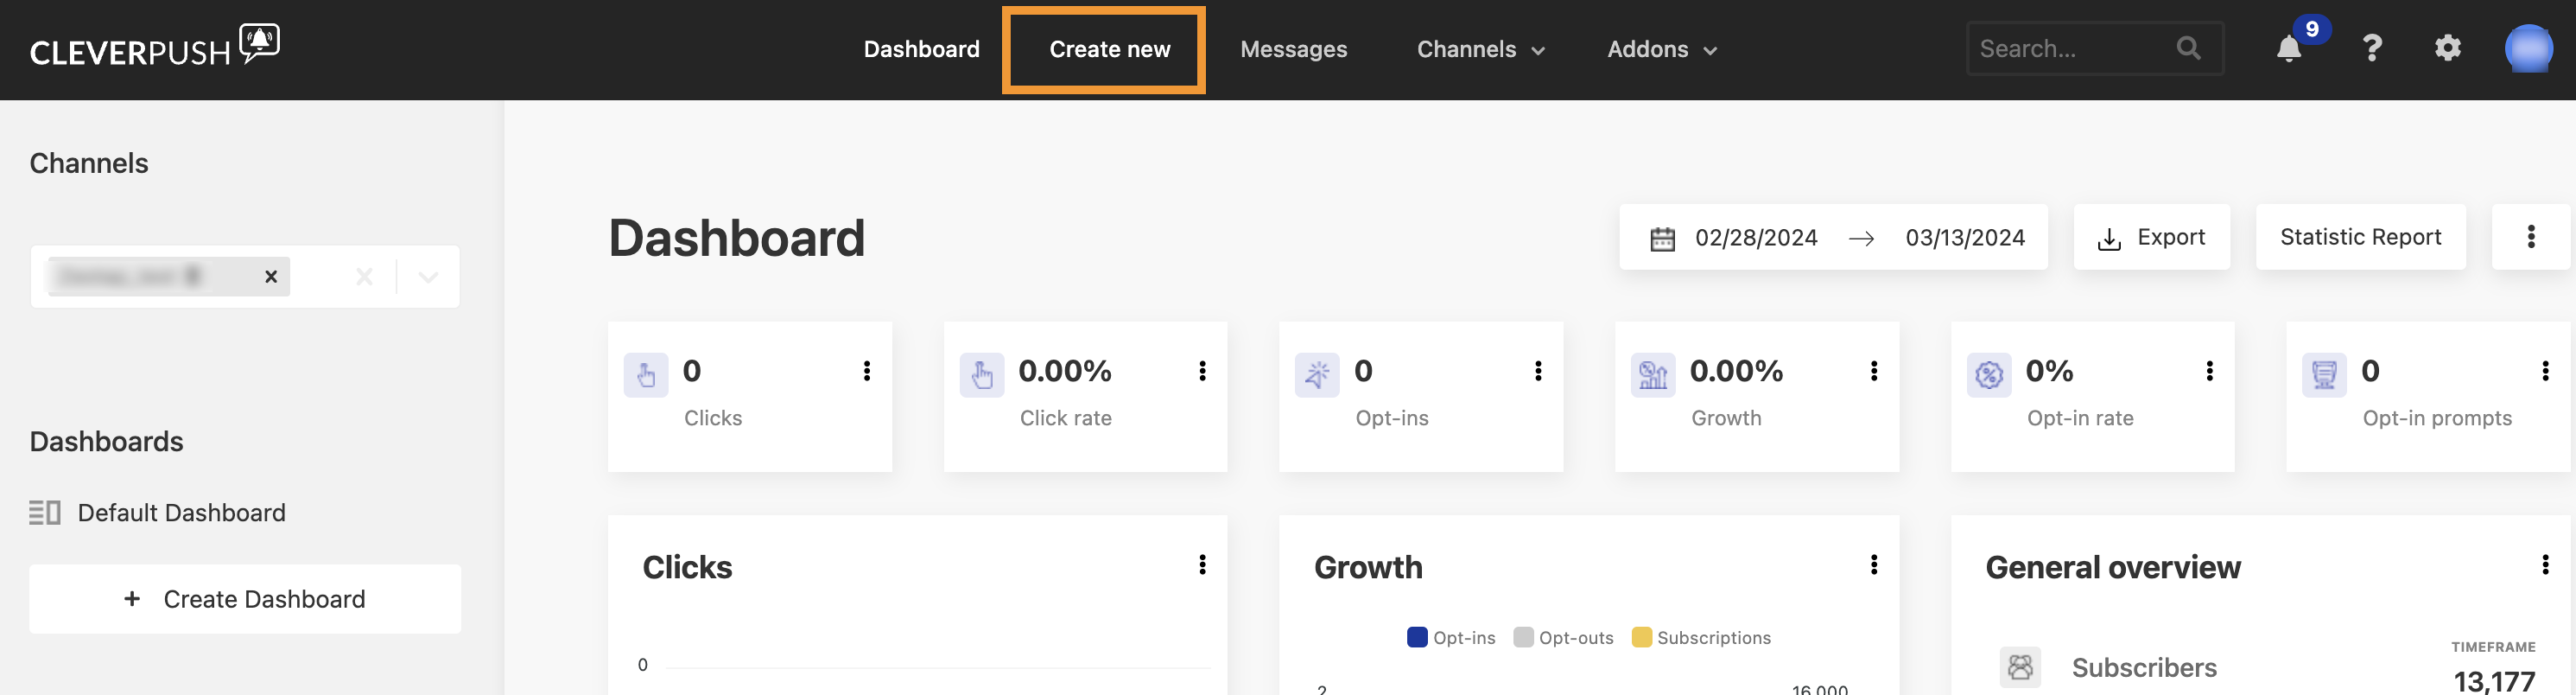
Log into the Cleverpush console and click **Create New**.
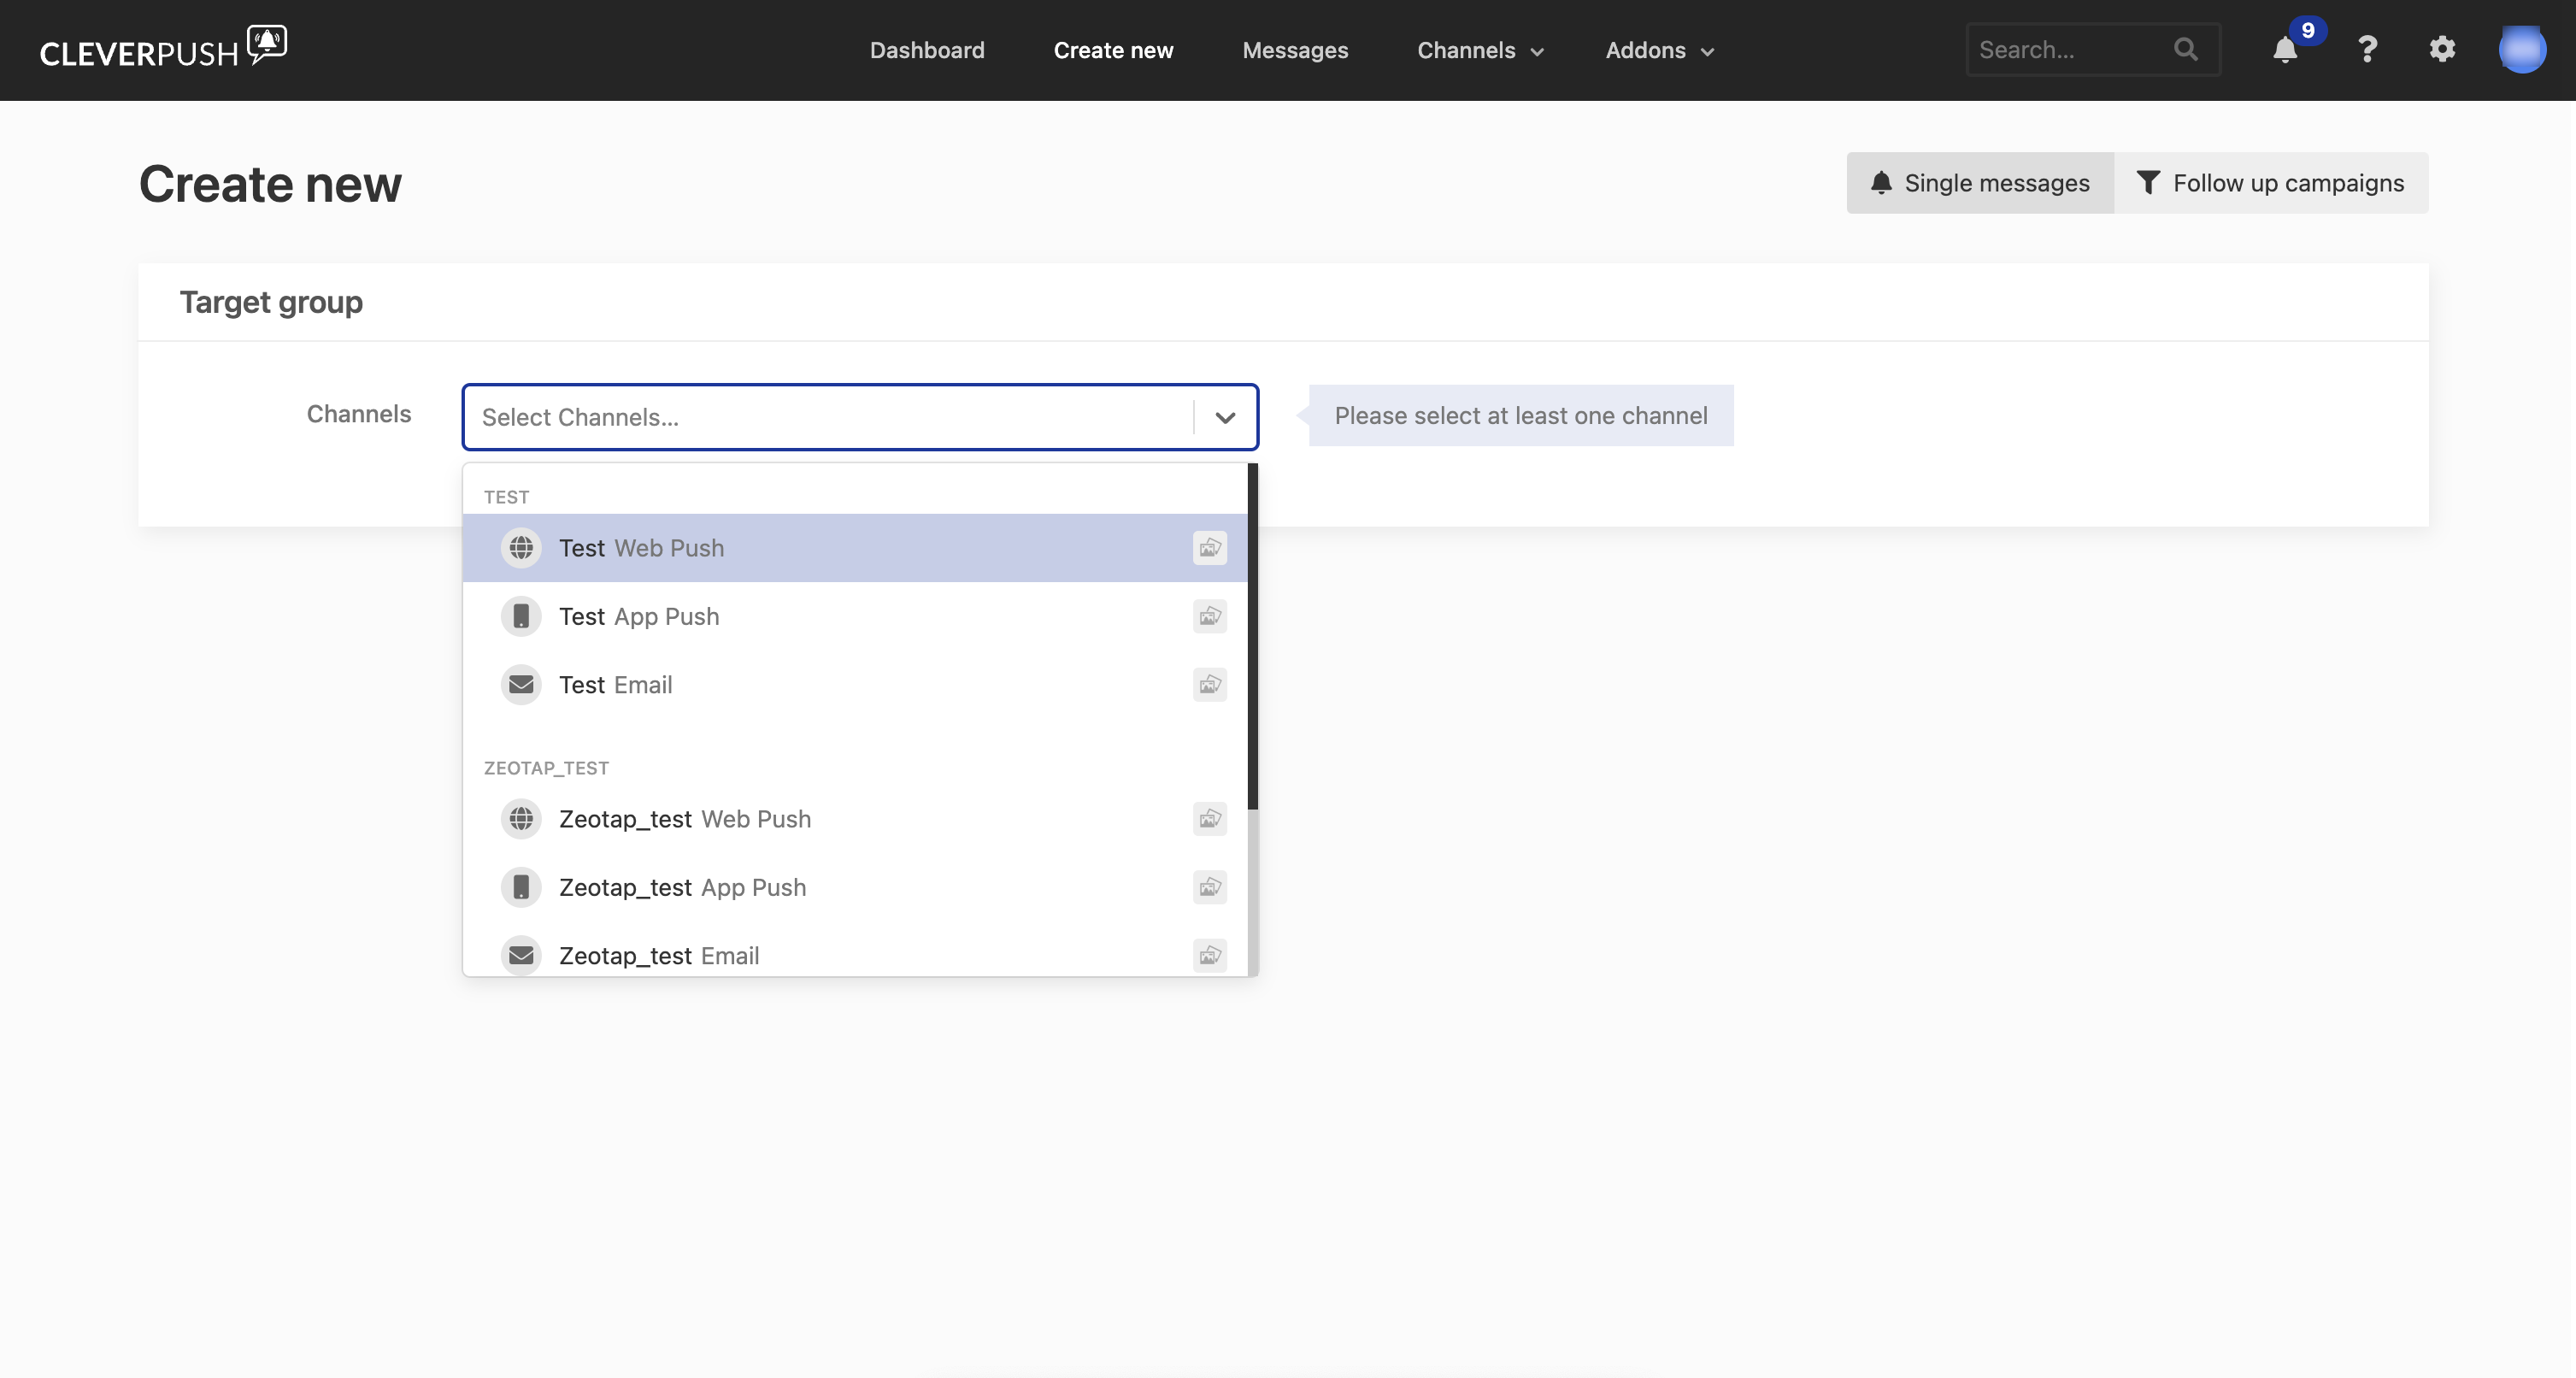
 In the **Channels** drop-down menu, choose the channel you have created depending on the type of push notification that you wish to send. For more information about how to create a new channel in Cleverpush, refer .
 Use the **Tags** drop-down menu to choose the audiences (segments) that you wish to target through Cleverpush.
.png?fit=max&auto=format&n=vhXLMoMLYK9r9Ts7&q=85&s=4c16450f6ab542a4f3a02b6ff0df1c0a) Under **Message**, provide details about the push notification that you want to send to your audiences.
Review all the fields and click **Send notification**.
Under **Message**, provide details about the push notification that you want to send to your audiences.
Review all the fields and click **Send notification**.
.png?fit=max&auto=format&n=vhXLMoMLYK9r9Ts7&q=85&s=159db98af897e35b138c706d4e4cce67)