> ## Documentation Index
> Fetch the complete documentation index at: https://docs.zeotap.com/llms.txt
> Use this file to discover all available pages before exploring further.
# Bird Customer Lists
## Overview
Bird (formerly MessageBird) is a cloud communications platform that enables businesses to communicate with customers across channels like SMS, Voice, WhatsApp, Email, and more through a single API.
It offers tools for omnichannel messaging, customer support automation, and real-time notifications. Bird is known for helping companies streamline communication, improve customer engagement, and build scalable messaging workflows globally.
The Bird integration with Zeotap allows the customer to push the audiences created in Zeotap to the corresponding customer lists in their Bird instance. These customer lists can be used in any of the campaigns created within Bird.
## Supported Identifiers/Attributes
This integration supports **raw email address**, **Phone**, and any other **custom attributes** that you want to send to Bird.
*Note - Event attributes cannot be sent through this destination.*
### Pre-requisites
Before you create an Bird Destination in Zeotap , ensure to have the following details :
1. Access Token
a. The steps to generate the Access token is outlined in the [Authentication](#authentication) section.
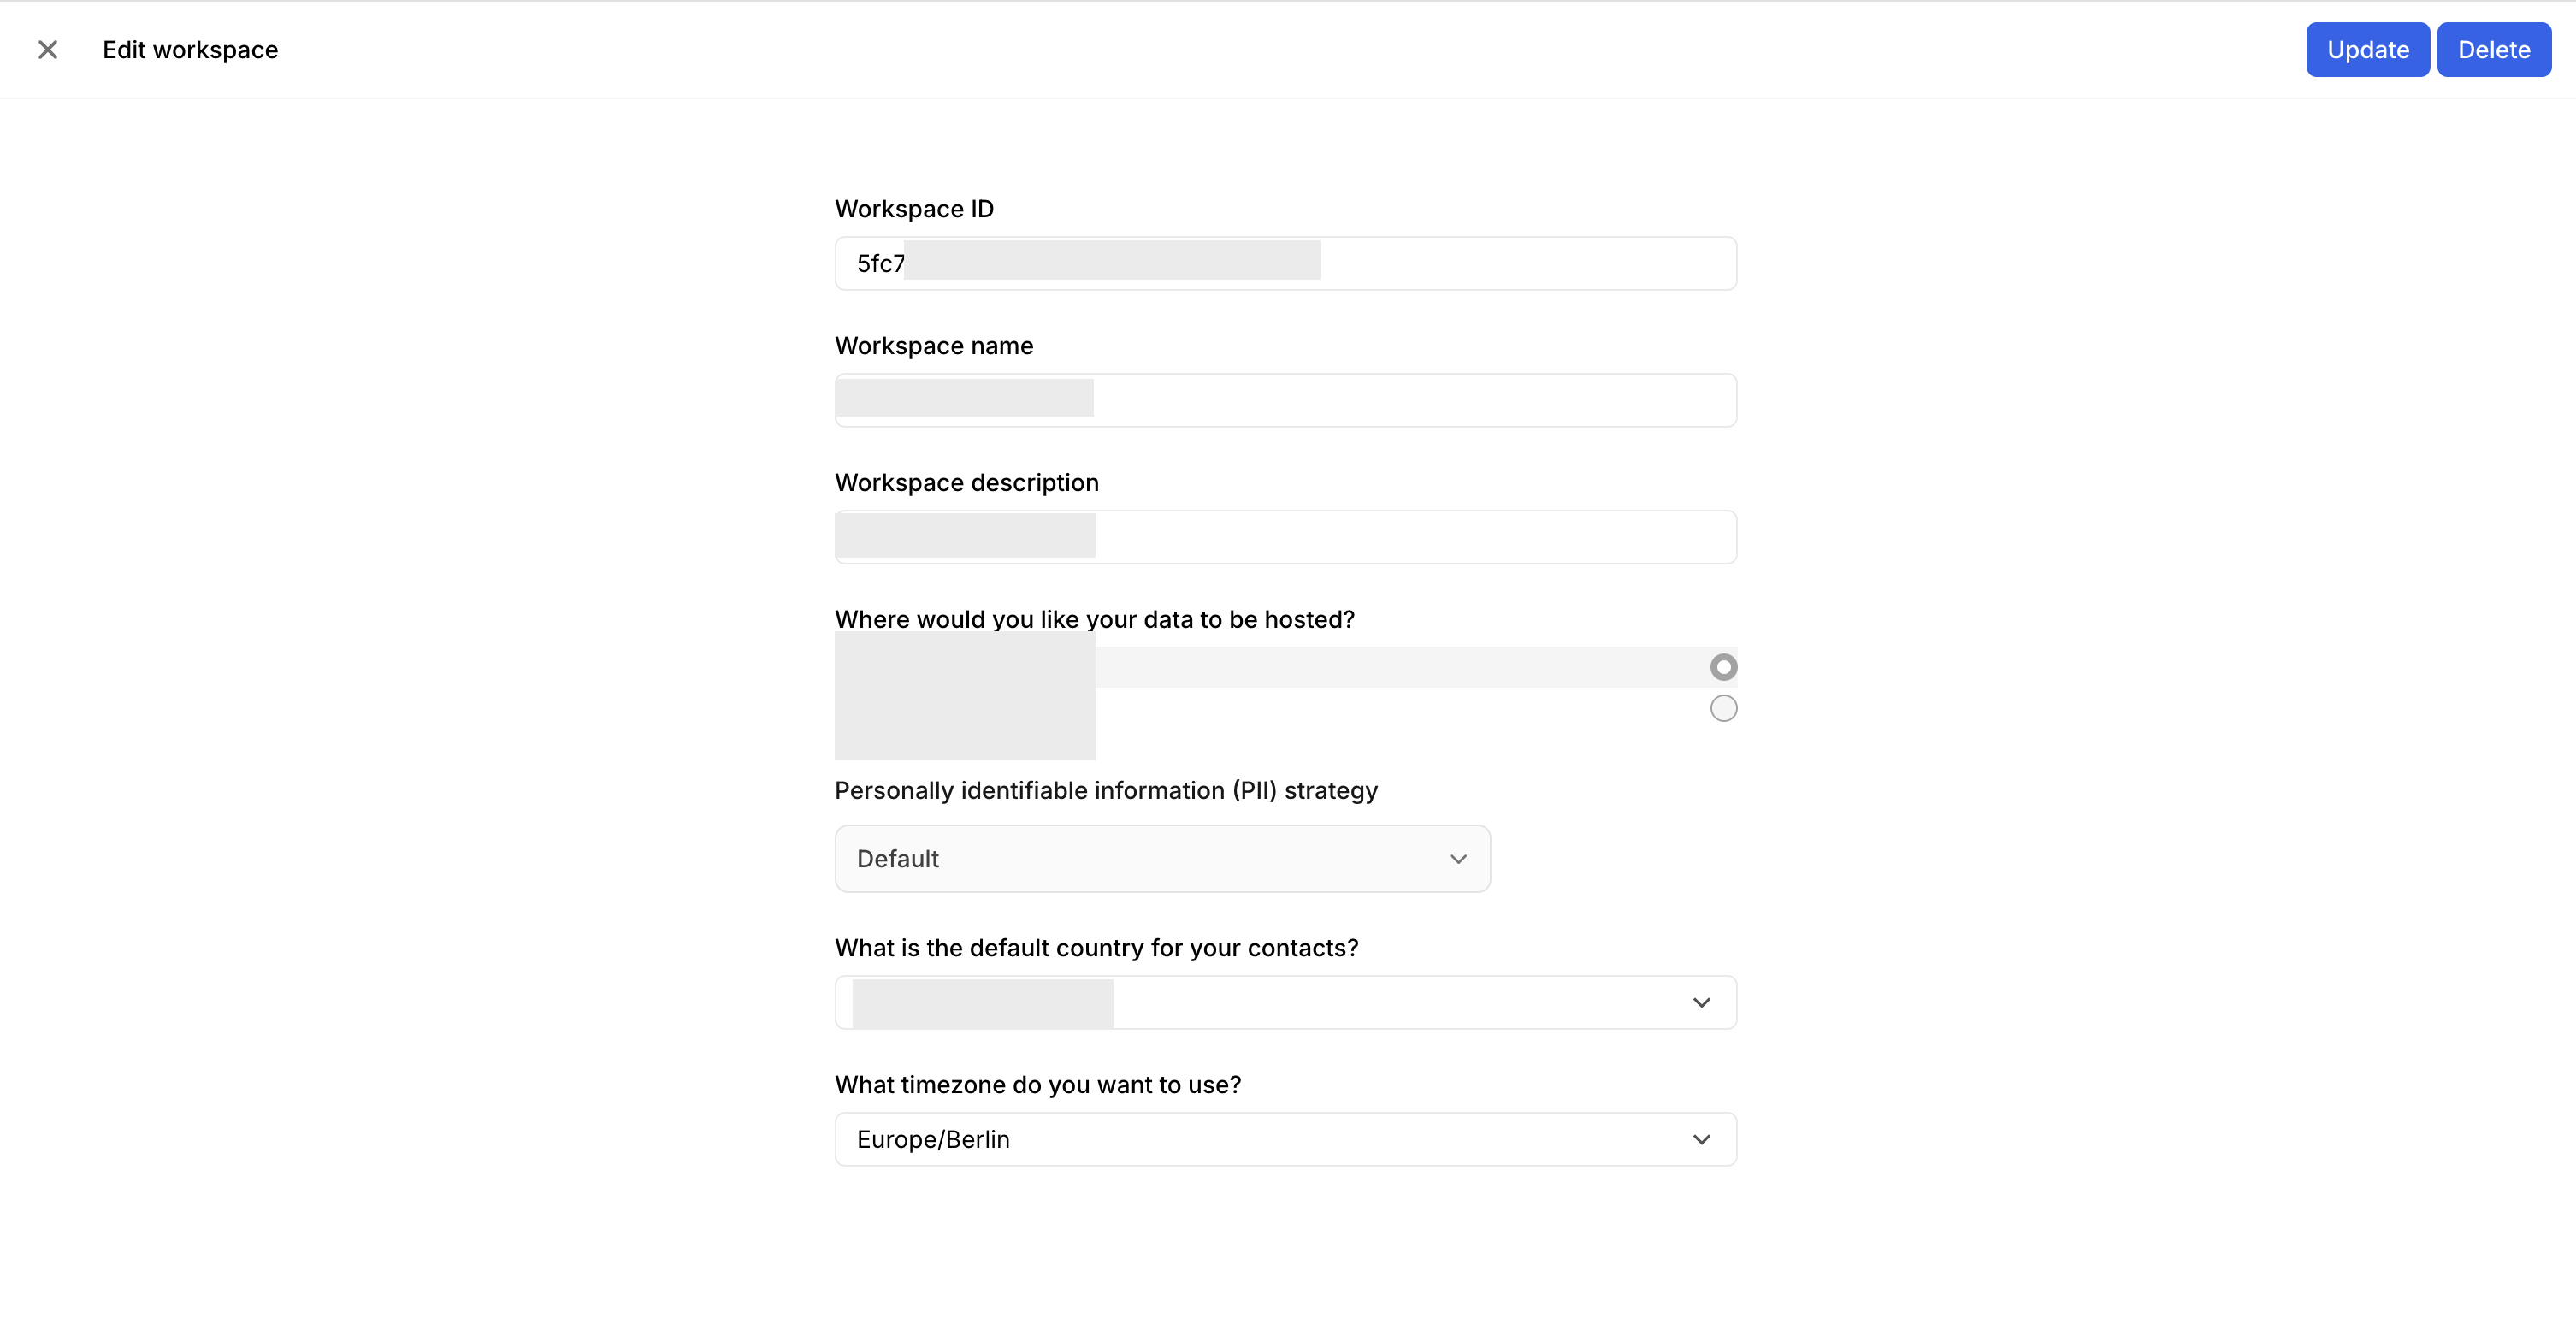
2. Workspace ID
a. Log into your organisation in Bird.
b. In the bottom left-hand corner, click on your name, then click **Admin Console**.
 c. Click **Settings,** and the click on **Workspaces**.
d. Locate the workspace you want to find the ID of, click on the **workspace name.**
e. Make a note of the **Workspace ID**.
c. Click **Settings,** and the click on **Workspaces**.
d. Locate the workspace you want to find the ID of, click on the **workspace name.**
e. Make a note of the **Workspace ID**.
 ## Authentication
HTTP requests can be authorised using access keys. Access keys are attached to roles to limit the scope of what they provide access to.
### Creating an access key
You would need to create access policy and access roles within bird before creating an access key.
1. [Instructions to generate the access policy in Bird.](https://docs.bird.com/api/api-access/access-policies#creating-an-access-policy)
* Log into your organisation in Bird.
* In the bottom left-hand corner, click on your name, then click **Admin Console**.
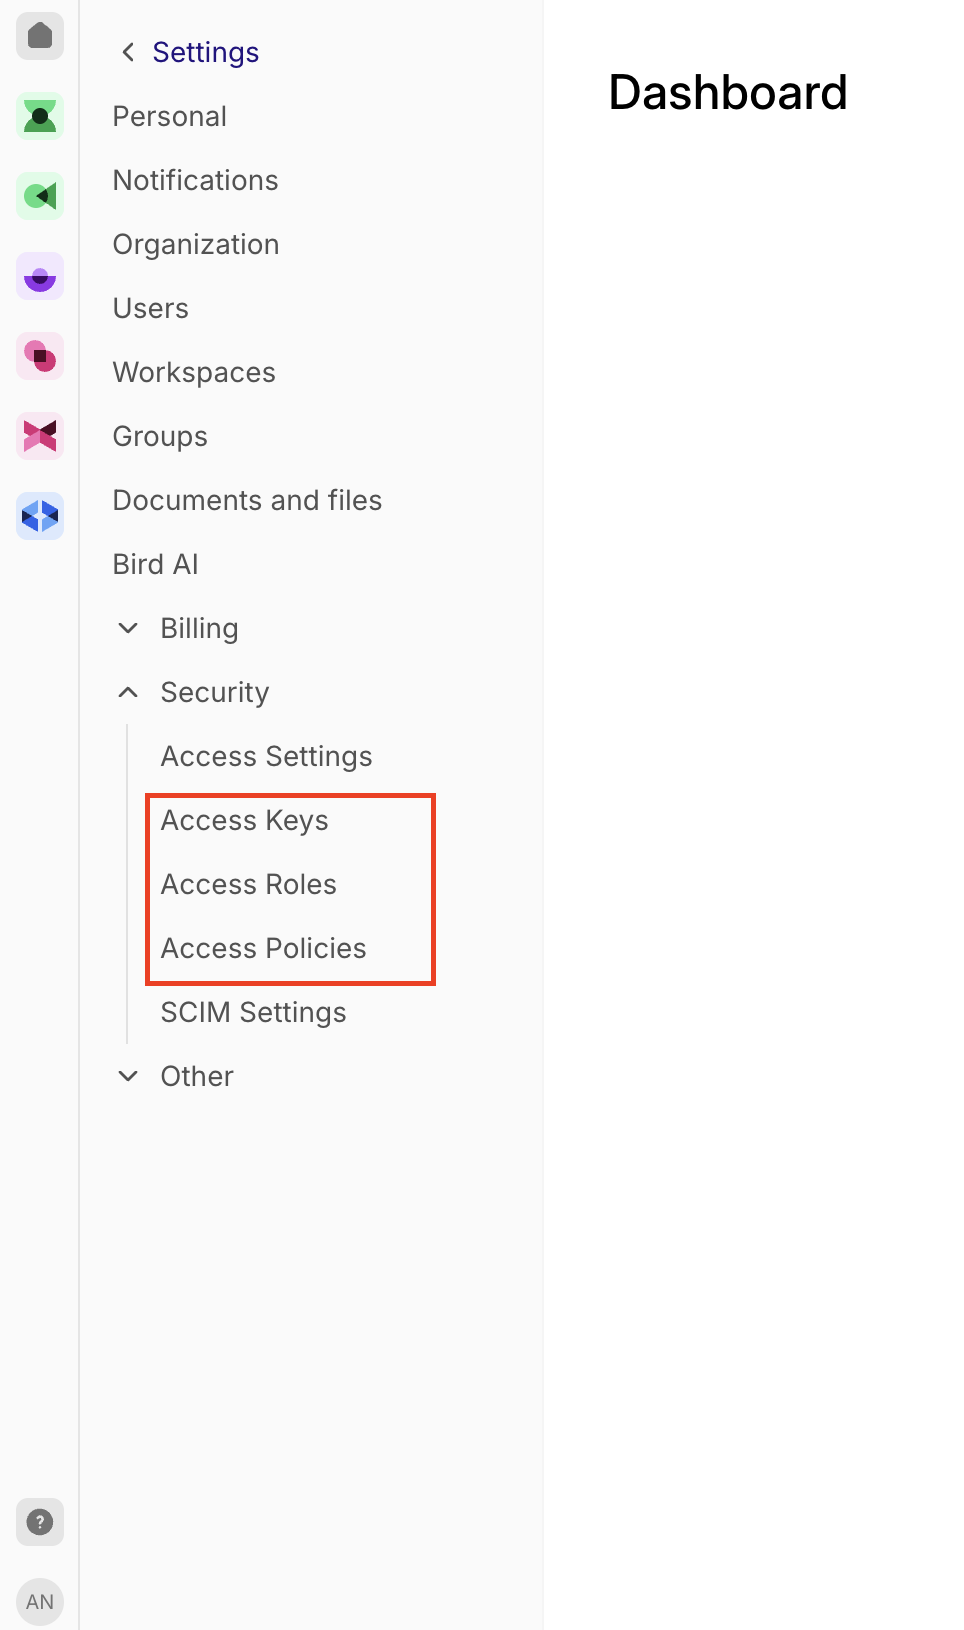
* Click on **Settings** > **Security** > **Access Policies .**
## Authentication
HTTP requests can be authorised using access keys. Access keys are attached to roles to limit the scope of what they provide access to.
### Creating an access key
You would need to create access policy and access roles within bird before creating an access key.
1. [Instructions to generate the access policy in Bird.](https://docs.bird.com/api/api-access/access-policies#creating-an-access-policy)
* Log into your organisation in Bird.
* In the bottom left-hand corner, click on your name, then click **Admin Console**.
* Click on **Settings** > **Security** > **Access Policies .**
 * Click on **Create Custom Policy** button.
* Under the **General** section provide the following values :
* Provide the **name** as **zeotapintegration**
* Under the policy **definition** provide the following values :
* Select **Allow** in the **Effect** field.
* Select **any** in the **Action** field.
* **Enter** the following values in the **Resource** field:
* /workspaces/\*/lists
* Click on **Add Resource** and add the following values in the **Resource** field:
* /workspaces/\*/contacts/identifiers/\*\*
* Click on **Create Custom Policy** button.
* Under the **General** section provide the following values :
* Provide the **name** as **zeotapintegration**
* Under the policy **definition** provide the following values :
* Select **Allow** in the **Effect** field.
* Select **any** in the **Action** field.
* **Enter** the following values in the **Resource** field:
* /workspaces/\*/lists
* Click on **Add Resource** and add the following values in the **Resource** field:
* /workspaces/\*/contacts/identifiers/\*\*
 2. [Instructions to generate the access roles in Bird.](https://docs.bird.com/api/api-access/access-roles)
* Log into your organisation in Bird.
* In the bottom left-hand corner, click on your name, then click **Admin Console**.
* Click on **Settings** > **Security** > **Access Roles .**
* Click on **Create Role** button.
* Provide a **Name** for the role and in the **Permissions** section, scroll down to the **Other permissions** section.
* The policy created in the previous step would appear here. Select the **policy** and click on **Create Role**.
3. Instructions to generate Access Keys.
Once the **access policy** and **access roles are** created using the instructions provided above, follow the steps below to generate the access keys.
* Log into your organisation in Bird.
* In the bottom left-hand corner, click on your name, then click **Admin Console**.
* Click on **Settings** > **Security** > **Access Keys .**
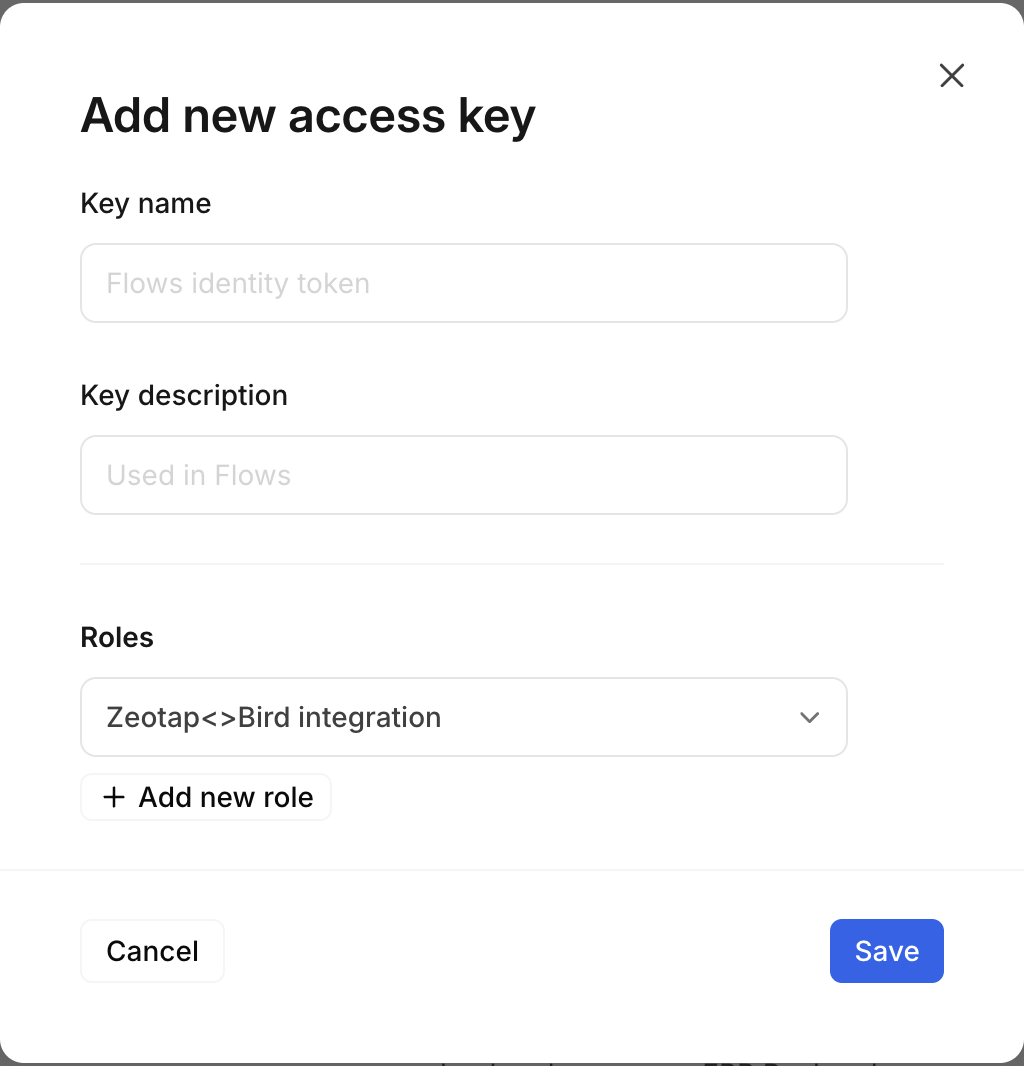
* Click on **Add New Access Key** button.
* Provide a **name** for the **Access key,** and **select the Access Role** created in the previous step in the **Roles** dropdown\*\*.\*\*
2. [Instructions to generate the access roles in Bird.](https://docs.bird.com/api/api-access/access-roles)
* Log into your organisation in Bird.
* In the bottom left-hand corner, click on your name, then click **Admin Console**.
* Click on **Settings** > **Security** > **Access Roles .**
* Click on **Create Role** button.
* Provide a **Name** for the role and in the **Permissions** section, scroll down to the **Other permissions** section.
* The policy created in the previous step would appear here. Select the **policy** and click on **Create Role**.
3. Instructions to generate Access Keys.
Once the **access policy** and **access roles are** created using the instructions provided above, follow the steps below to generate the access keys.
* Log into your organisation in Bird.
* In the bottom left-hand corner, click on your name, then click **Admin Console**.
* Click on **Settings** > **Security** > **Access Keys .**
* Click on **Add New Access Key** button.
* Provide a **name** for the **Access key,** and **select the Access Role** created in the previous step in the **Roles** dropdown\*\*.\*\*
 ## Create a Destination for Bird - Customer Lists
Perform the following steps to create a Destination for Bird - Customer Lists:
Log into the **Zeotap CDP App** and go to the **DESTINATIONS** application.
Click + **Create Destination**.
## Create a Destination for Bird - Customer Lists
Perform the following steps to create a Destination for Bird - Customer Lists:
Log into the **Zeotap CDP App** and go to the **DESTINATIONS** application.
Click + **Create Destination**.
 Under the All Destinations section, search for **Bird - Customer Lists**.
 Click **Bird - Customer Lists.** A screen appears displaying details about the particular destination towards the left. On the right-hand side of the screen find a list of fields that are required for the integration to be established. Enter the required details as mentioned in the following steps:
a. Enter a **name** for the Destination.
b. Enter the **Access token** that you have obtained from your Bird instance. The steps to get the access token is mentioned in the [Prerequisites](#pre-requisites) section of this document.
c. Enter the **Workspace ID** of your Bird instance. The steps to get the workspace ID is mentioned in the [Prerequisites](#pre-requisites) section of this document.
d. Review all the values entered above and then click **Next** to proceed.
Click **Bird - Customer Lists.** A screen appears displaying details about the particular destination towards the left. On the right-hand side of the screen find a list of fields that are required for the integration to be established. Enter the required details as mentioned in the following steps:
a. Enter a **name** for the Destination.
b. Enter the **Access token** that you have obtained from your Bird instance. The steps to get the access token is mentioned in the [Prerequisites](#pre-requisites) section of this document.
c. Enter the **Workspace ID** of your Bird instance. The steps to get the workspace ID is mentioned in the [Prerequisites](#pre-requisites) section of this document.
d. Review all the values entered above and then click **Next** to proceed.
 In the new screen that appears, choose the appropriate [action](/articles/integrate-customer/destinations#actionsanchor) and mapping as explained below. Under **Choose your Action**, choose **Send identifiers and attributes** as the action for activating your audience (segment) on the Audiences module.
a. You can map the following fields
i. Identifier Value
ii. First Name
iii. Last Name
iv. Display Name
v. Any other custom field using the +Add Mapping button
In the new screen that appears, choose the appropriate [action](/articles/integrate-customer/destinations#actionsanchor) and mapping as explained below. Under **Choose your Action**, choose **Send identifiers and attributes** as the action for activating your audience (segment) on the Audiences module.
a. You can map the following fields
i. Identifier Value
ii. First Name
iii. Last Name
iv. Display Name
v. Any other custom field using the +Add Mapping button
 Under the **Additional Settings** section choose the **Identifier type** from the dropdown.
a. You can select either **Email** or **Phone** as the Identifier type.
b. You need to map the value corresponding to this **Identifier type** in the mapping section mentioned above.
Under the **Additional Settings** section choose the **Identifier type** from the dropdown.
a. You can select either **Email** or **Phone** as the Identifier type.
b. You need to map the value corresponding to this **Identifier type** in the mapping section mentioned above.
 Click **Create Destination**. The created Destination gets listed in the Audiences application, which can be linked to an audience/segment.
### Link an Audience to the Bird Destination
For information about how to link an Audience or segment to the created Destination in the **Audiences** application, refer [here](/articles/integrate-customer/link-an-audience-to-the-destination).
**Note:**
The terms *Audiences* and *Segments* are used interchangeably to refer to customer cohorts belonging to a specific category. For example, an Audience or a segment could be a specific group of customers who are over 18 years of age and who have performed an *addToCart* event within the last 30 days.
Click **Create Destination**. The created Destination gets listed in the Audiences application, which can be linked to an audience/segment.
### Link an Audience to the Bird Destination
For information about how to link an Audience or segment to the created Destination in the **Audiences** application, refer [here](/articles/integrate-customer/link-an-audience-to-the-destination).
**Note:**
The terms *Audiences* and *Segments* are used interchangeably to refer to customer cohorts belonging to a specific category. For example, an Audience or a segment could be a specific group of customers who are over 18 years of age and who have performed an *addToCart* event within the last 30 days.