> ## Documentation Index
> Fetch the complete documentation index at: https://docs.zeotap.com/llms.txt
> Use this file to discover all available pages before exploring further.

# Appendix for Sendinblue

This section provides information about how to add custom attributes and new columns for custom attributes on the Sendinblue platform.

## Add Custom Attributes

Perform the following steps to add custom attributes on the Sendinblue (Brevo) platform:

<Steps>
  <Step>
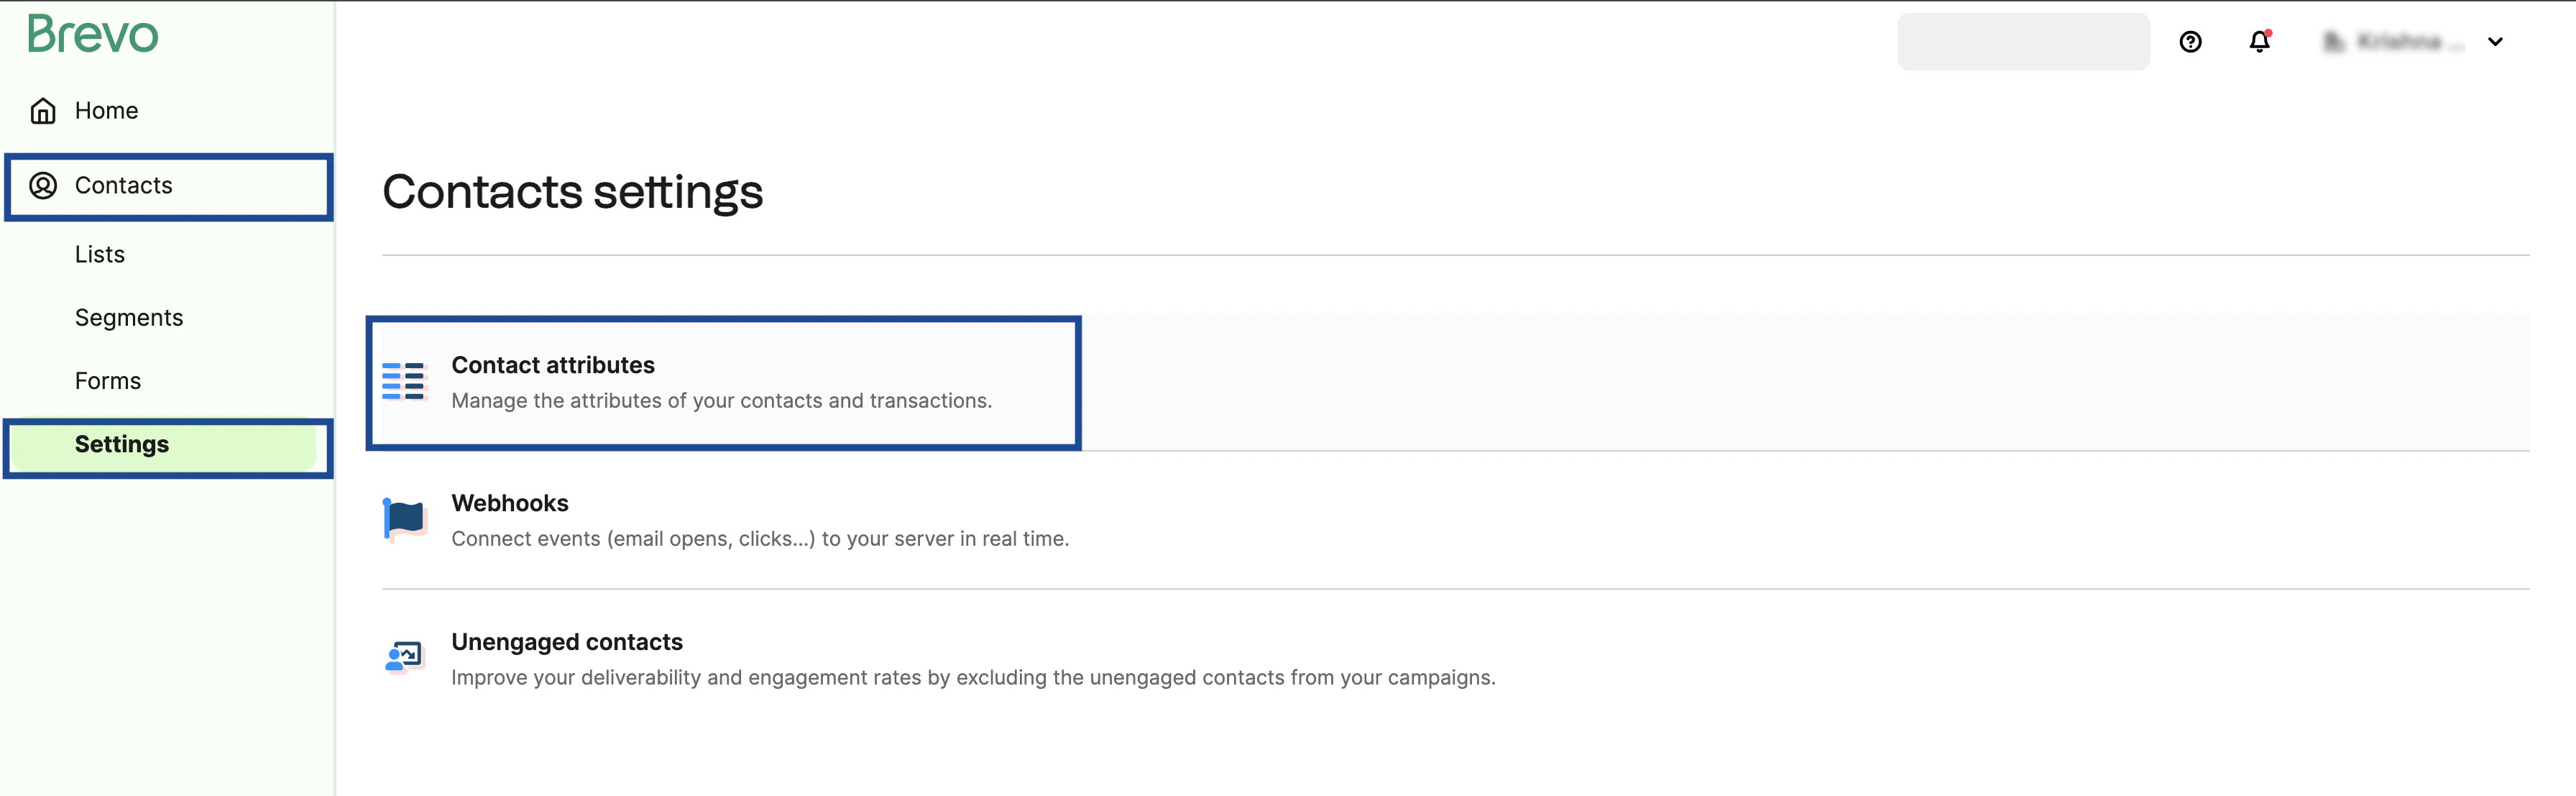
    Log into the Sendinblue (Brevo) console and navigate to **Contacts > Settings**.
  </Step>

  <Step>
    In the **Contacts Settings** screen that appears, click **Contact attributes**.
    <Frame>
      <img src="https://mintcdn.com/zeotap/0tFtKK3bg3ChrHL3/articles/integrate-customer/Storage/integrate-customer/appendix-for-sendinblue/appendix-for-sendinblue-2024-05-06.png?fit=max&auto=format&n=0tFtKK3bg3ChrHL3&q=85&s=f2213b5f0ce2f71194076c7bdad77885" width="3584" height="1107" data-path="articles/integrate-customer/Storage/integrate-customer/appendix-for-sendinblue/appendix-for-sendinblue-2024-05-06.png" />
    </Frame>
  </Step>

  <Step>
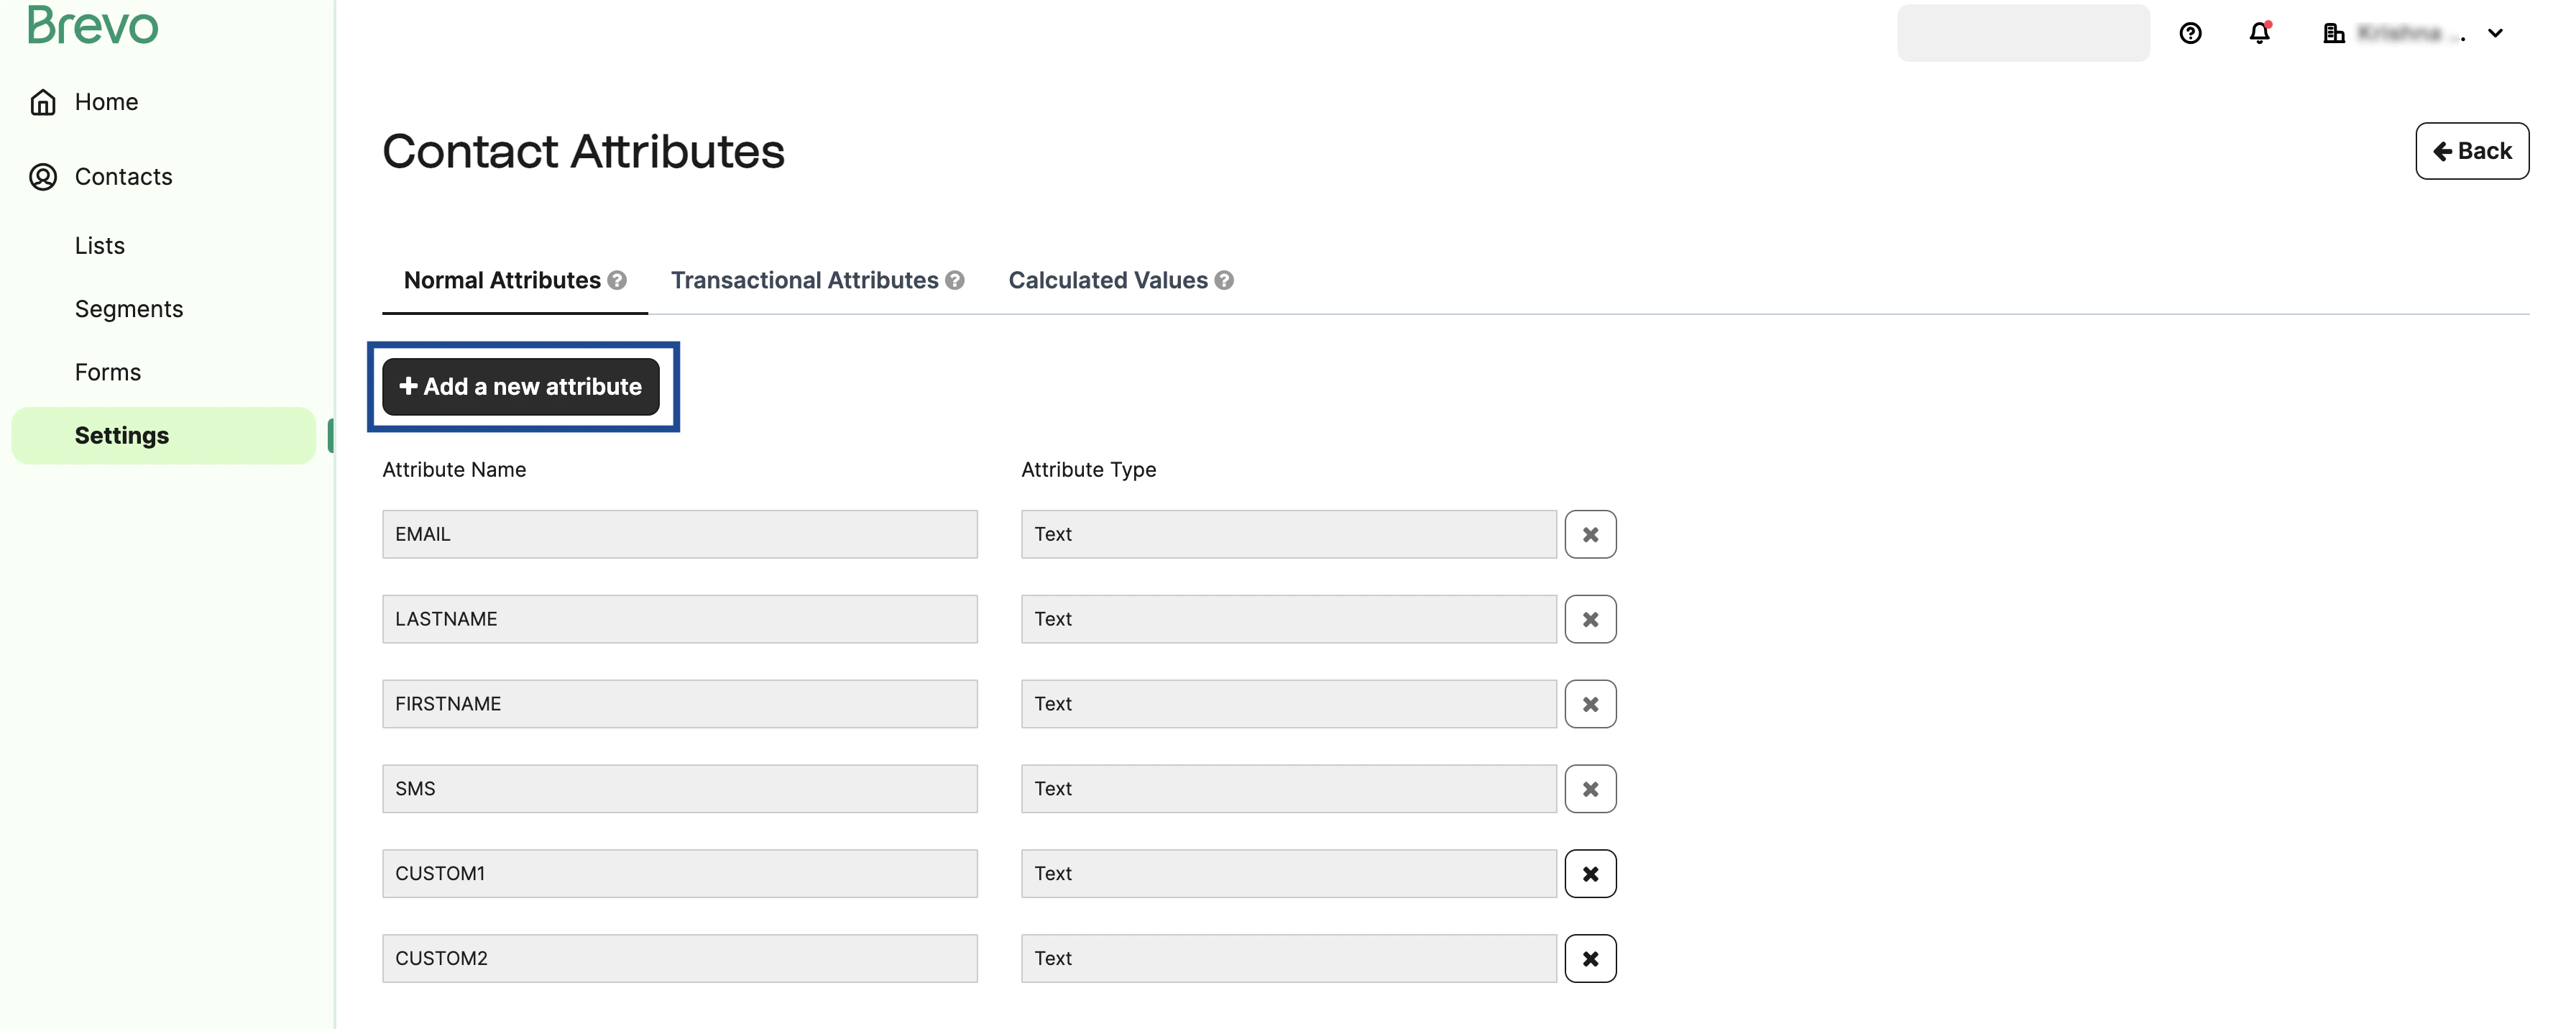
    In the following screen that appears, click **+** **Add a new attribute**.
    <Frame>
      <img src="https://mintcdn.com/zeotap/0tFtKK3bg3ChrHL3/articles/integrate-customer/Storage/integrate-customer/appendix-for-sendinblue/appendix-for-sendinblue-2024-05-06-1.png?fit=max&auto=format&n=0tFtKK3bg3ChrHL3&q=85&s=eddfb57614f442846bbe05a05f334d35" width="3584" height="1431" data-path="articles/integrate-customer/Storage/integrate-customer/appendix-for-sendinblue/appendix-for-sendinblue-2024-05-06-1.png" />
    </Frame>
  </Step>

  <Step>
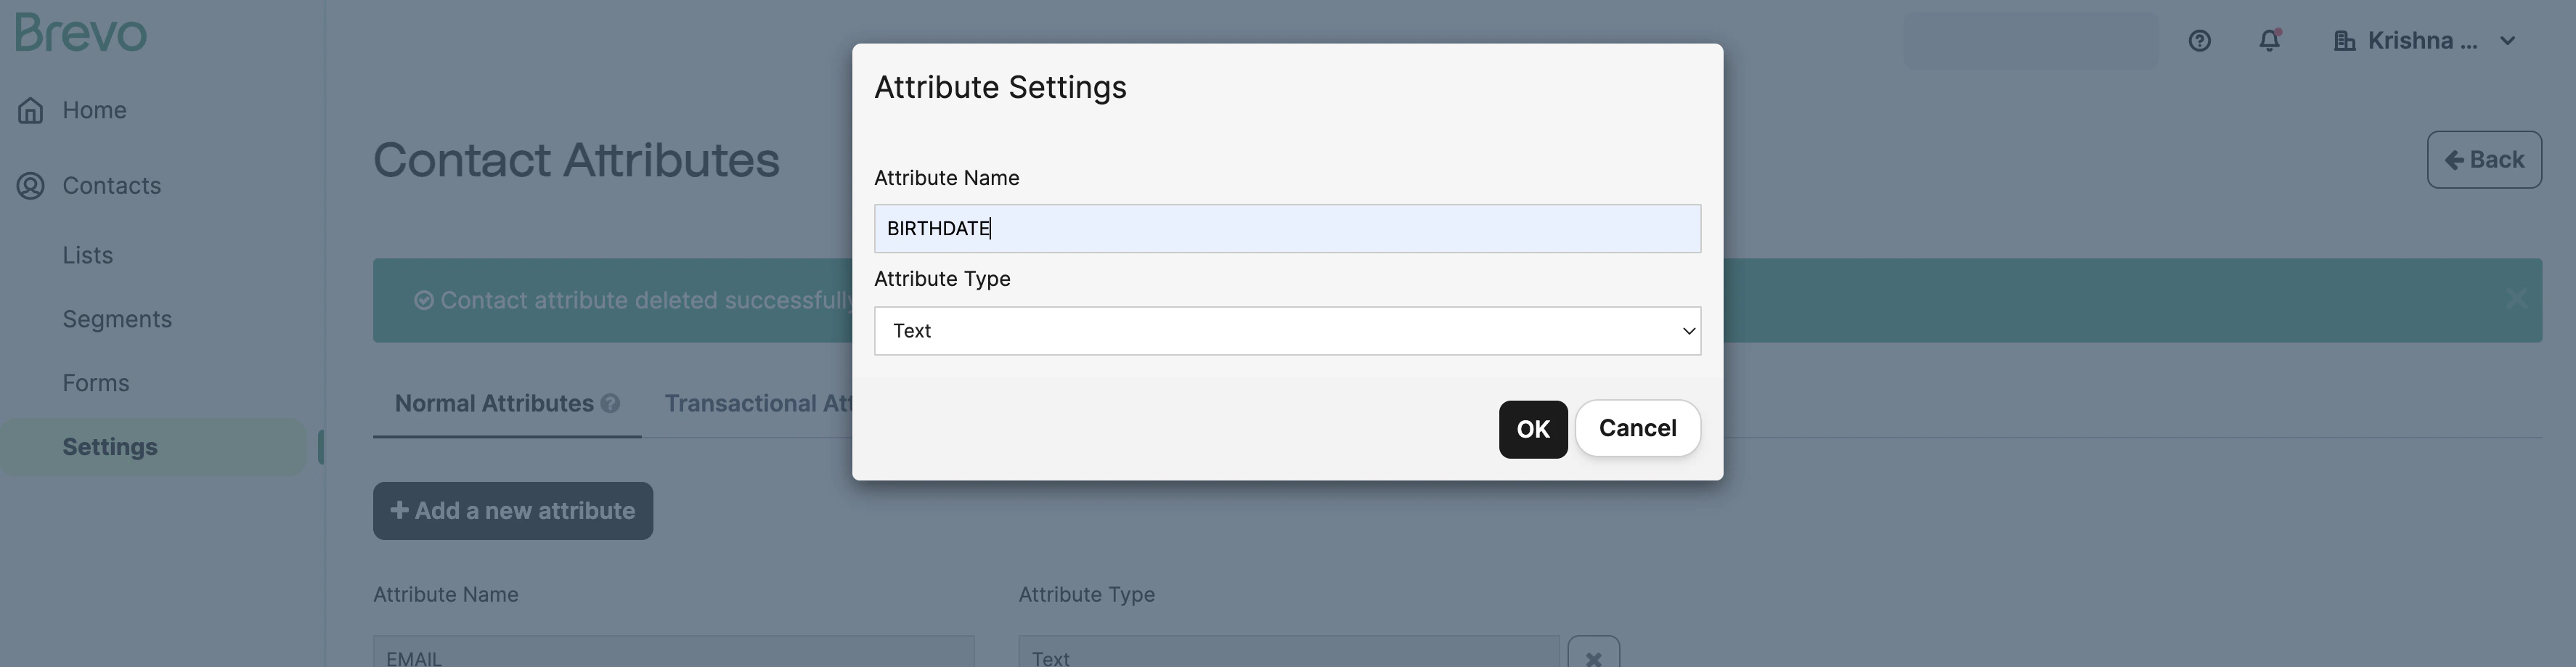
    In the **Attribute Settings** window that appears, provide an **Attribute Name** in capital letters, choose the desired **Attribute Type** from the drop-down list and click **OK.** Note that the attribute type can be **Text**, **Number**, **Category** and **Boolean**.
    <Frame>
      <img src="https://mintcdn.com/zeotap/0tFtKK3bg3ChrHL3/articles/integrate-customer/Storage/integrate-customer/appendix-for-sendinblue/appendix-for-sendinblue-2024-05-06-2.png?fit=max&auto=format&n=0tFtKK3bg3ChrHL3&q=85&s=bebb8e4bec1353ed59df4384c12f69c1" width="3548" height="919" data-path="articles/integrate-customer/Storage/integrate-customer/appendix-for-sendinblue/appendix-for-sendinblue-2024-05-06-2.png" />
    </Frame>
  </Step>

  <Step>
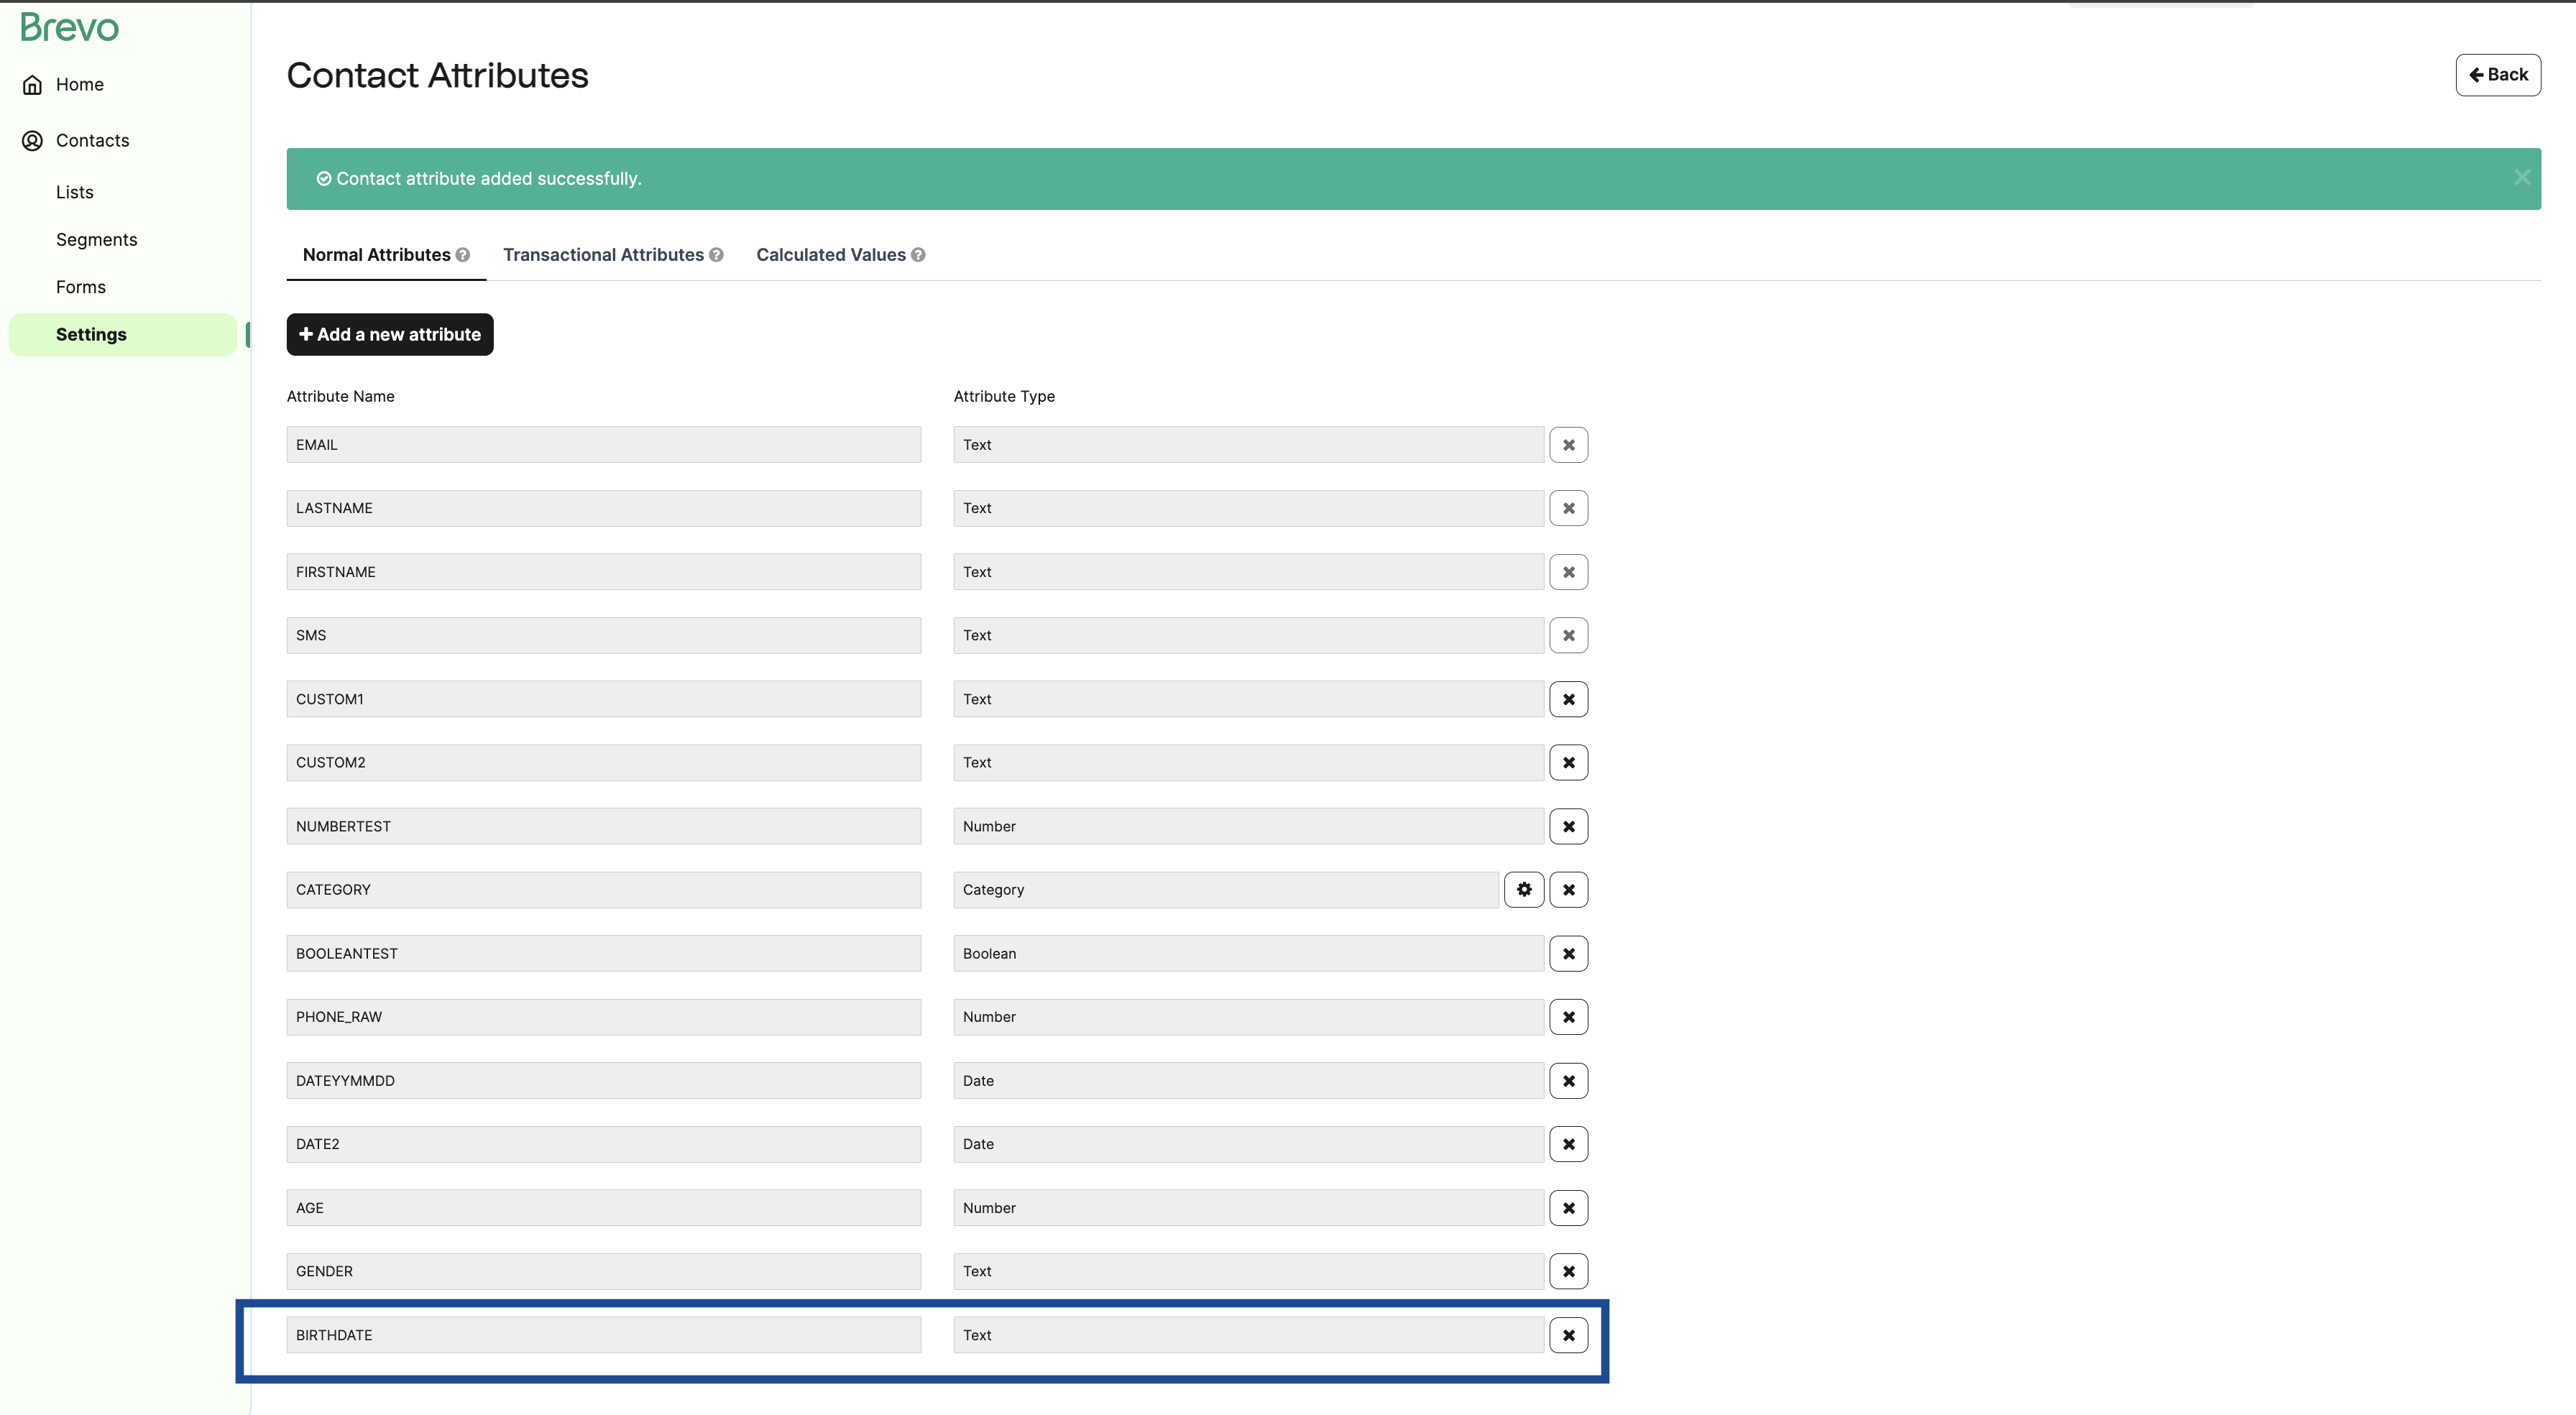
    The custom attribute gets listed in the **Contact Attribute** screen. This custom attribute gets listed under the **Map the Fields** section while creating a Destination in Zeotap CDP.
    <Frame>
      <img src="https://mintcdn.com/zeotap/0tFtKK3bg3ChrHL3/articles/integrate-customer/Storage/integrate-customer/appendix-for-sendinblue/appendix-for-sendinblue-2024-05-06-3.png?fit=max&auto=format&n=0tFtKK3bg3ChrHL3&q=85&s=4f4205bd2d1d71bcdef23842de6b1799" width="3584" height="1969" data-path="articles/integrate-customer/Storage/integrate-customer/appendix-for-sendinblue/appendix-for-sendinblue-2024-05-06-3.png" />
    </Frame>
  </Step>
</Steps>

## Add New Columns for Custom Attributes

Perform the following steps to add new columns for the custom attributes on the Sendinblue (Brevo) platform:

<Steps>
  <Step>
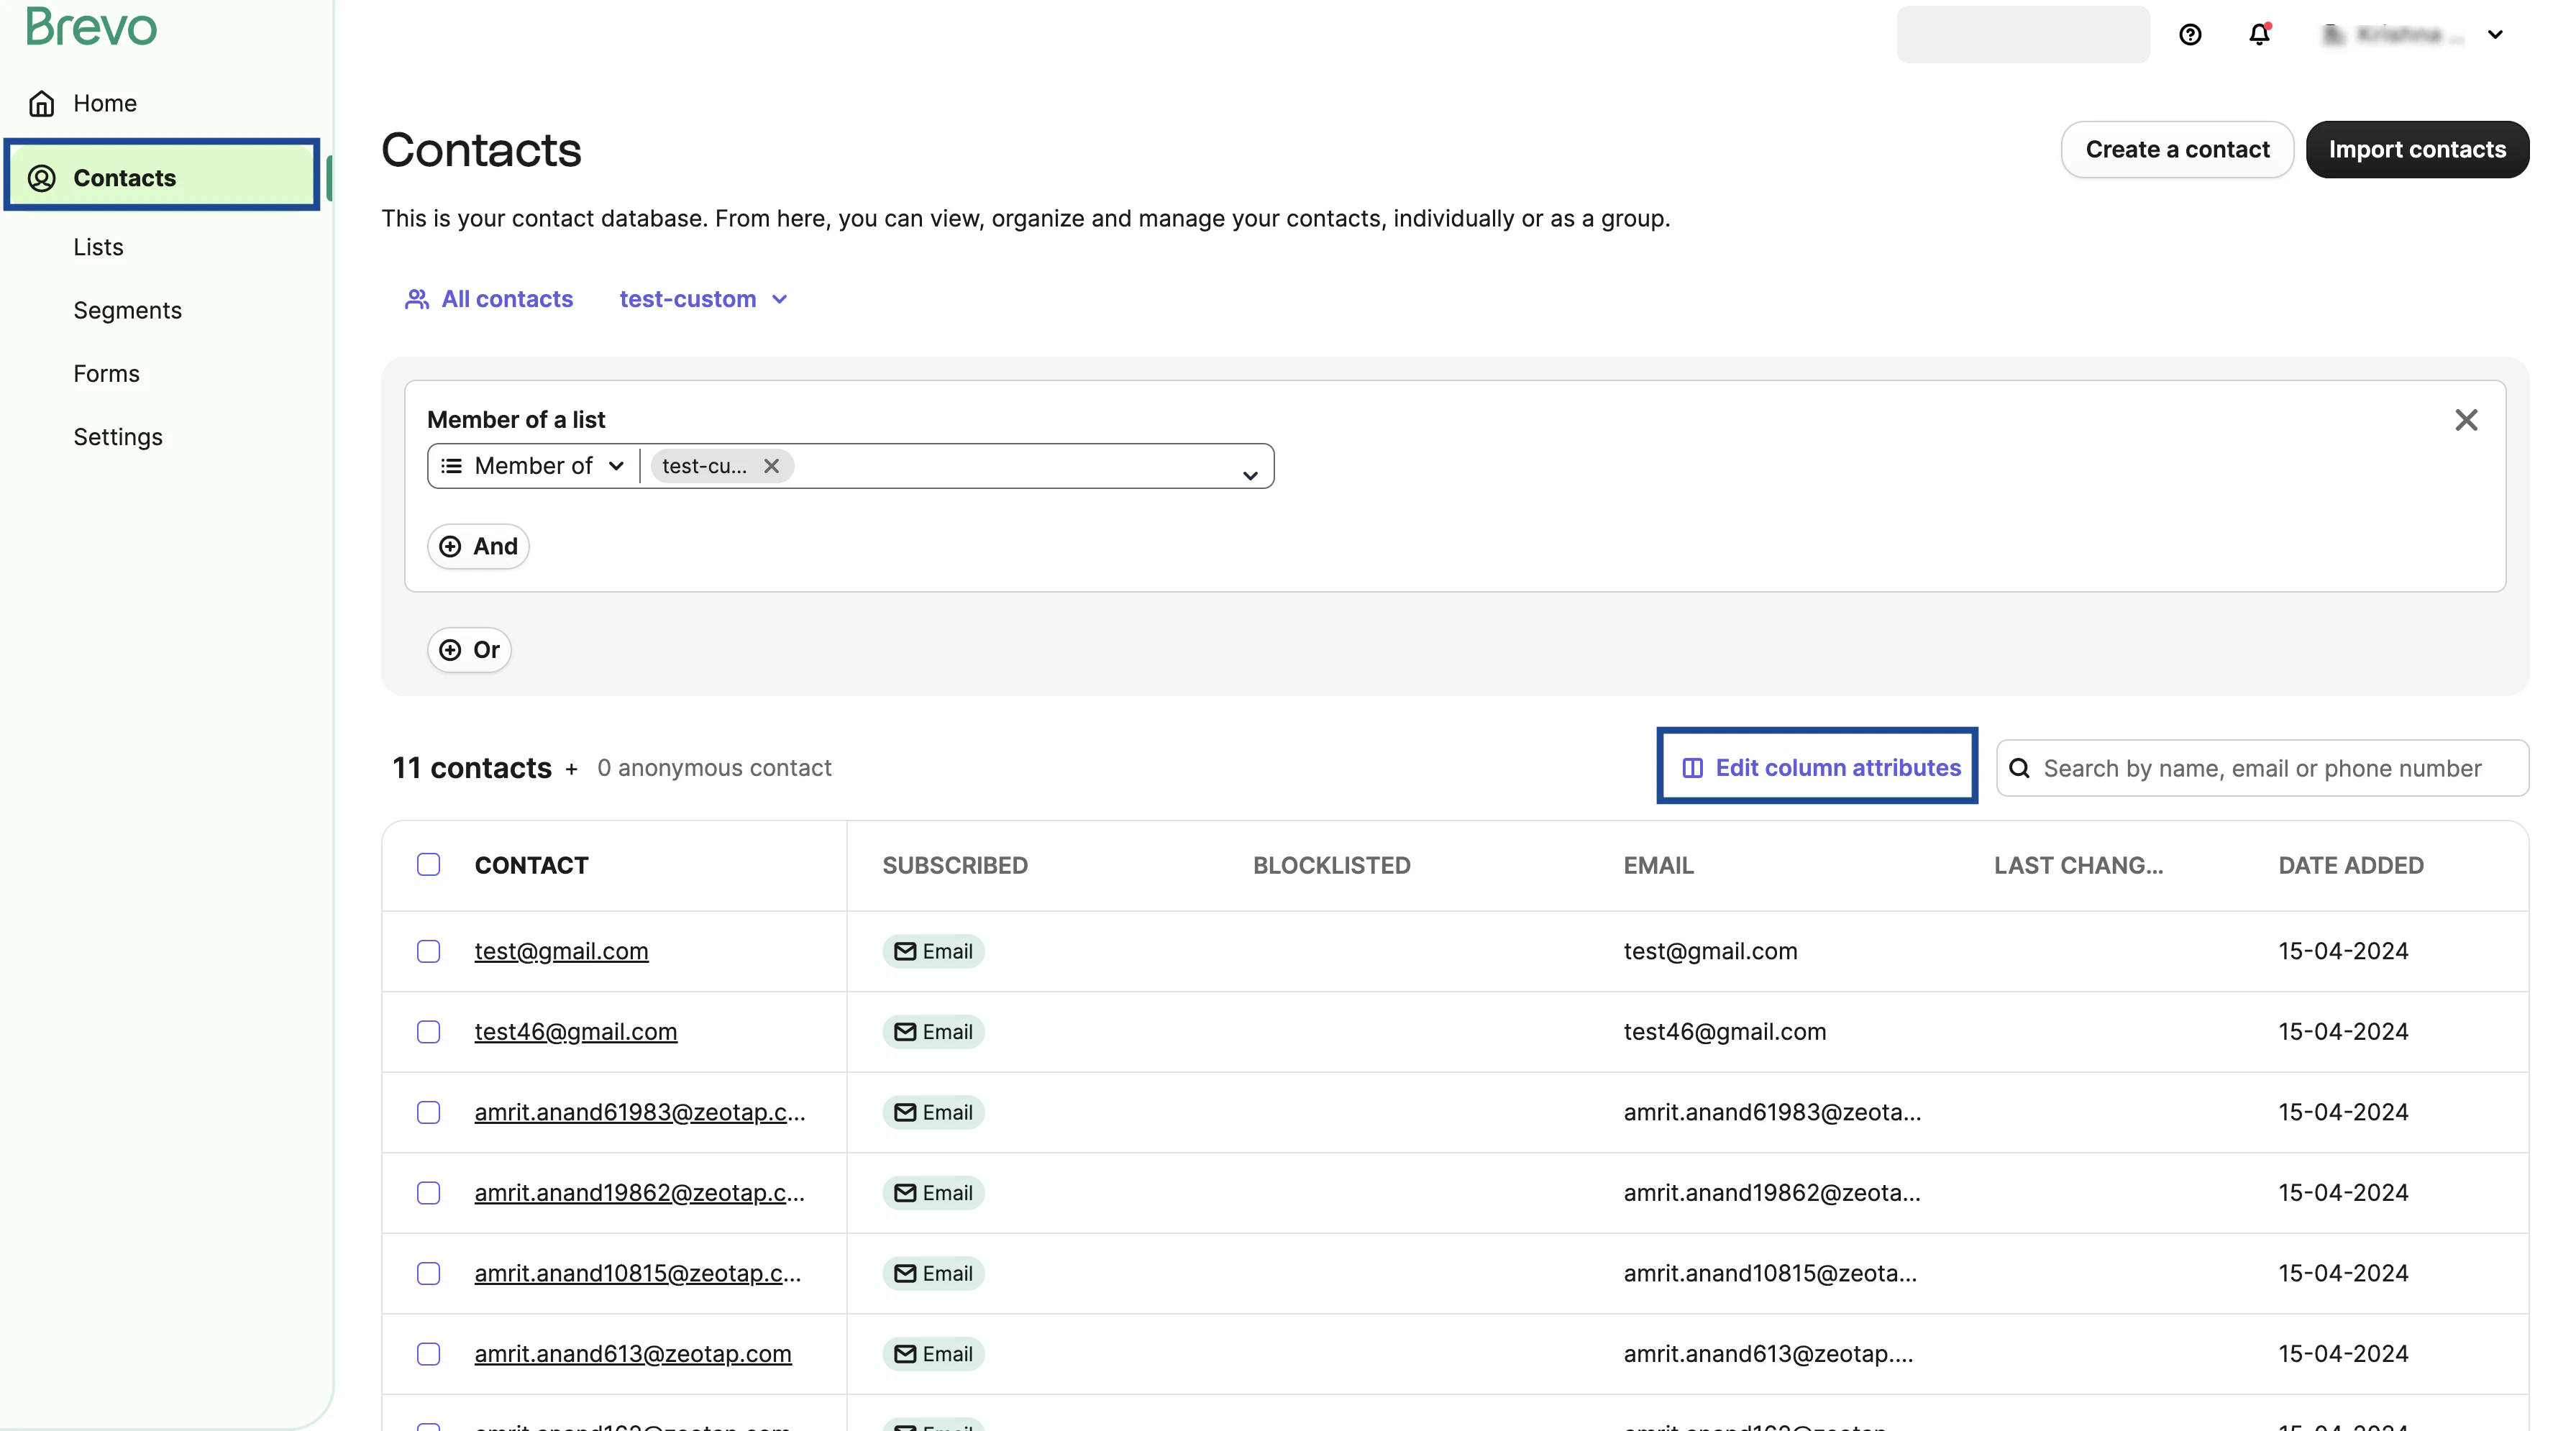
    Log into the Sendinblue (Brevo) platform and navigate to **Contacts > Edit column attributes.**
    <Frame>
      <img src="https://mintcdn.com/zeotap/0tFtKK3bg3ChrHL3/articles/integrate-customer/Storage/integrate-customer/appendix-for-sendinblue/appendix-for-sendinblue-2024-05-06-4.png?fit=max&auto=format&n=0tFtKK3bg3ChrHL3&q=85&s=bc05f35a8fb179415bdde62961affe9a" width="3582" height="1990" data-path="articles/integrate-customer/Storage/integrate-customer/appendix-for-sendinblue/appendix-for-sendinblue-2024-05-06-4.png" />
    </Frame>
  </Step>

  <Step>
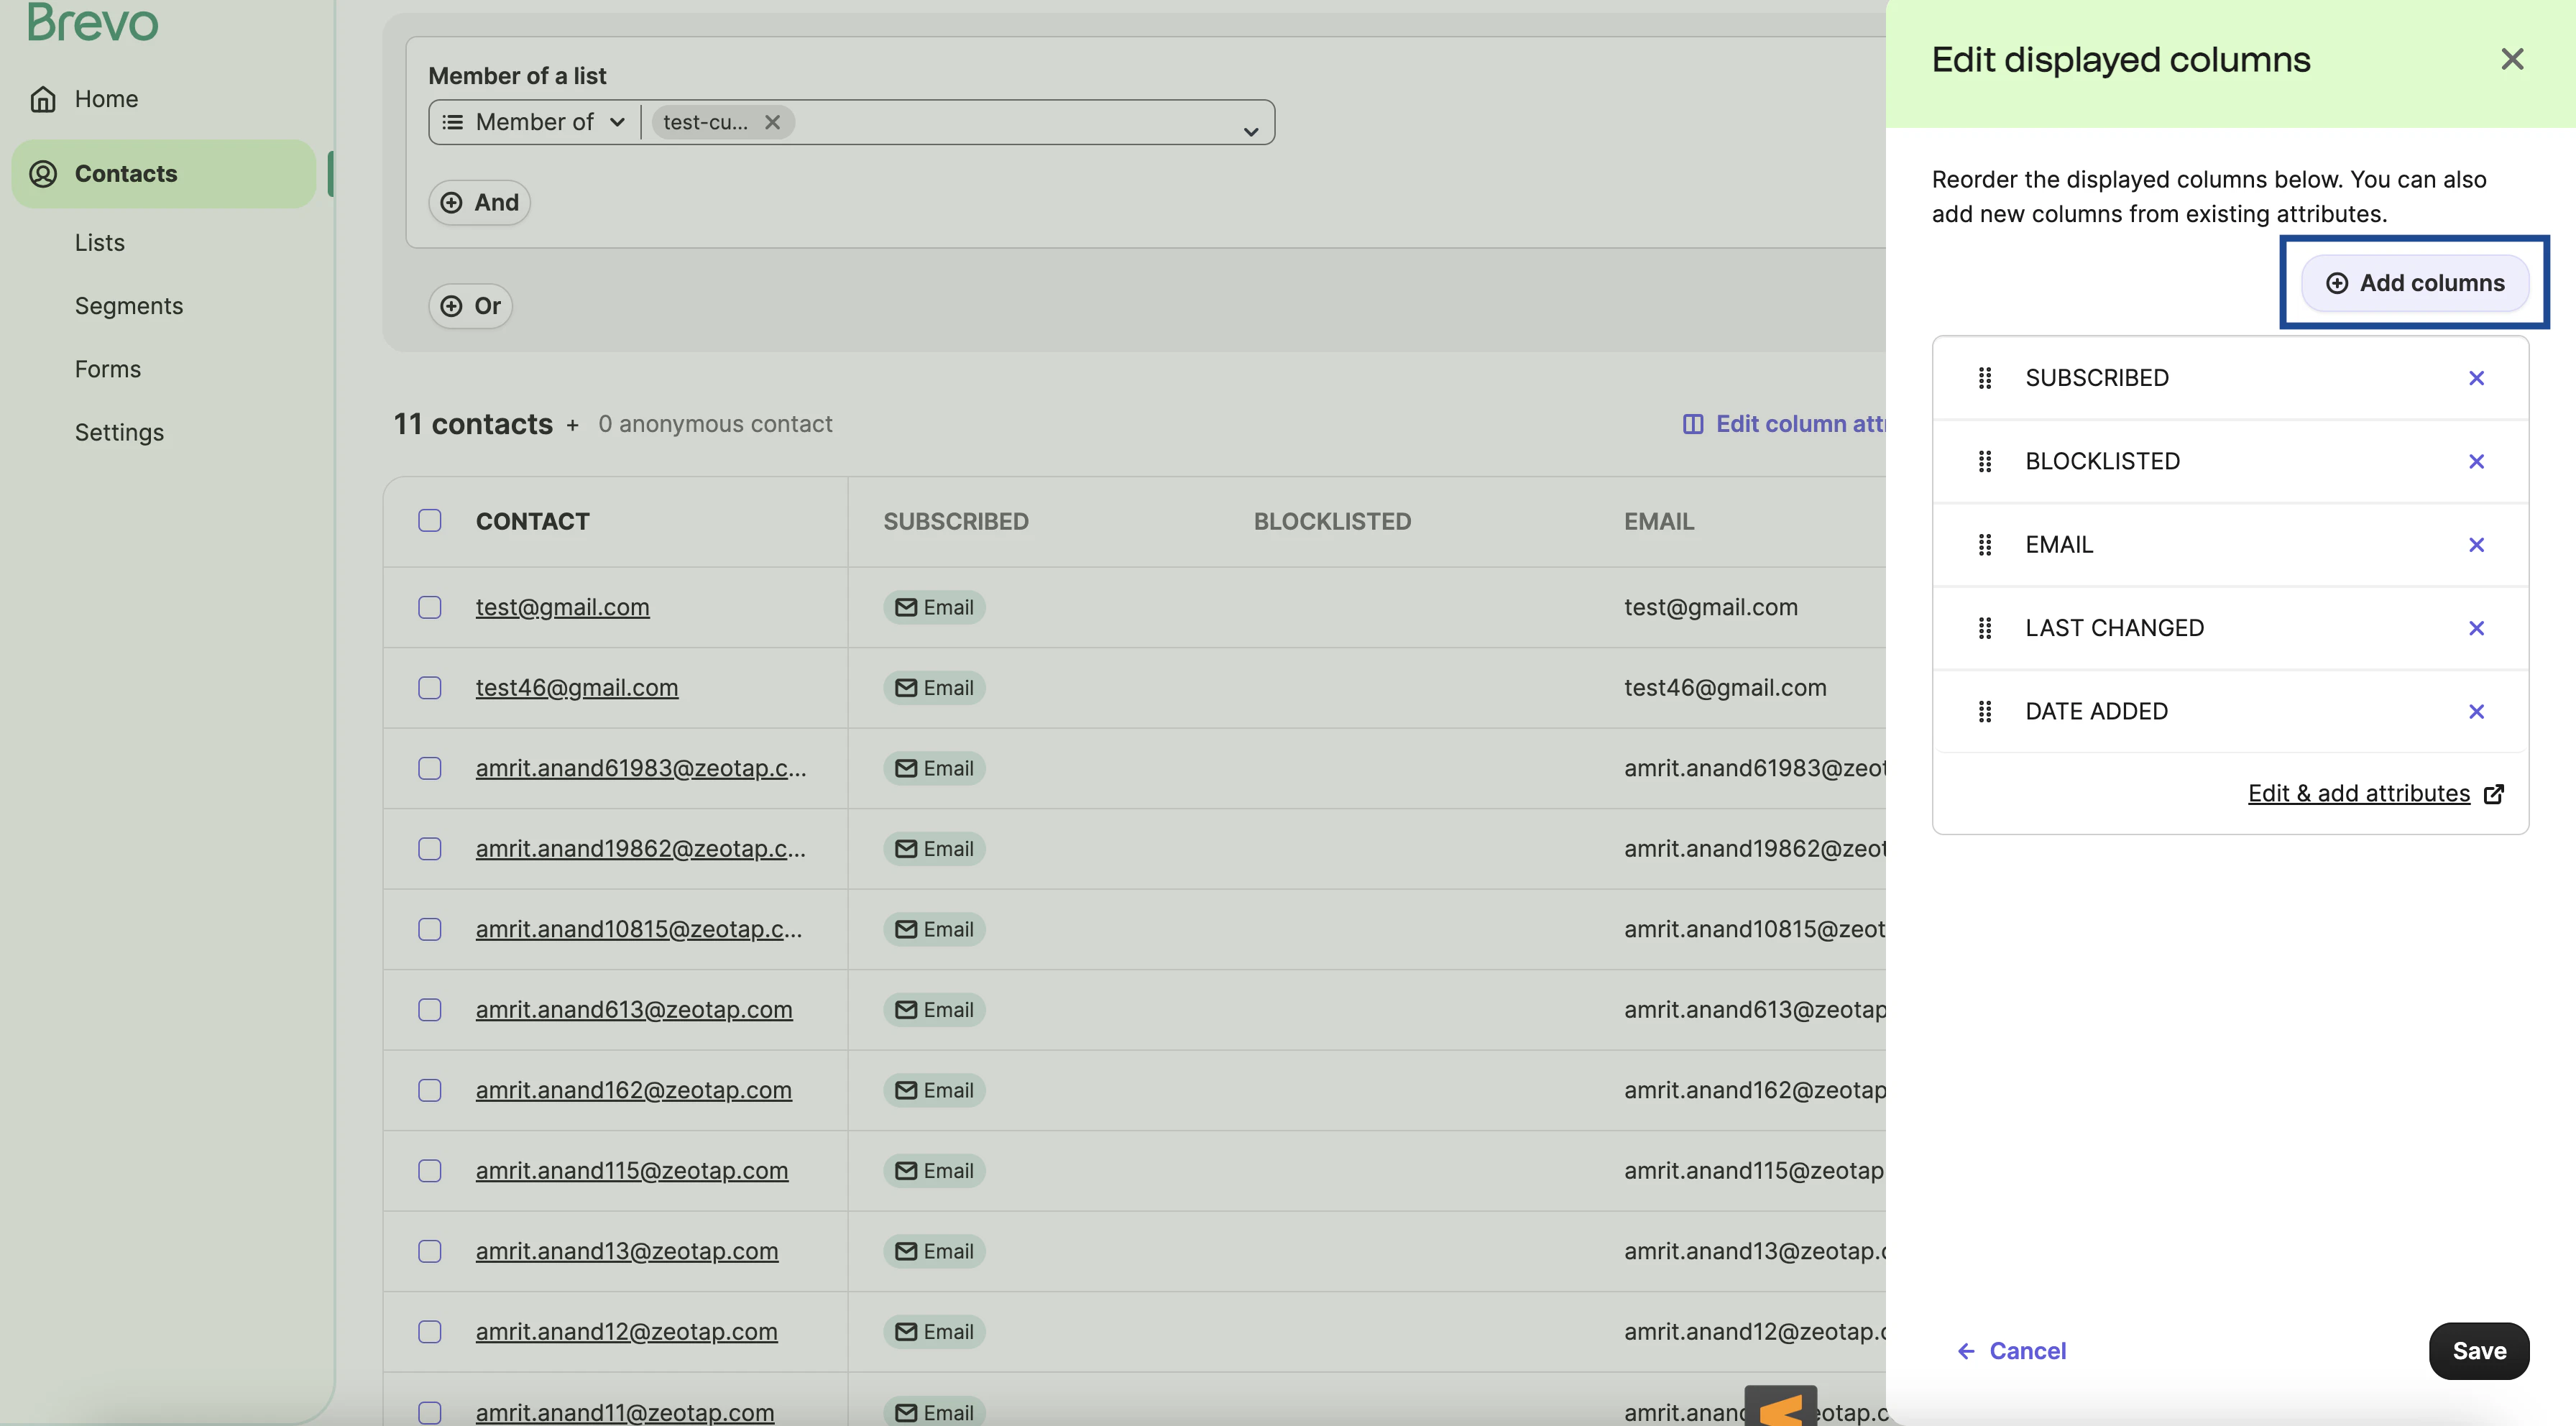
    In the new screen that appears, click **Add columns**.
    <Frame>
      <img src="https://mintcdn.com/zeotap/0tFtKK3bg3ChrHL3/articles/integrate-customer/Storage/integrate-customer/appendix-for-sendinblue/appendix-for-sendinblue-2024-05-06-5.png?fit=max&auto=format&n=0tFtKK3bg3ChrHL3&q=85&s=7bd51874102d212369b14f4a3a7fd690" width="3584" height="1984" data-path="articles/integrate-customer/Storage/integrate-customer/appendix-for-sendinblue/appendix-for-sendinblue-2024-05-06-5.png" />
    </Frame>
  </Step>

  <Step>
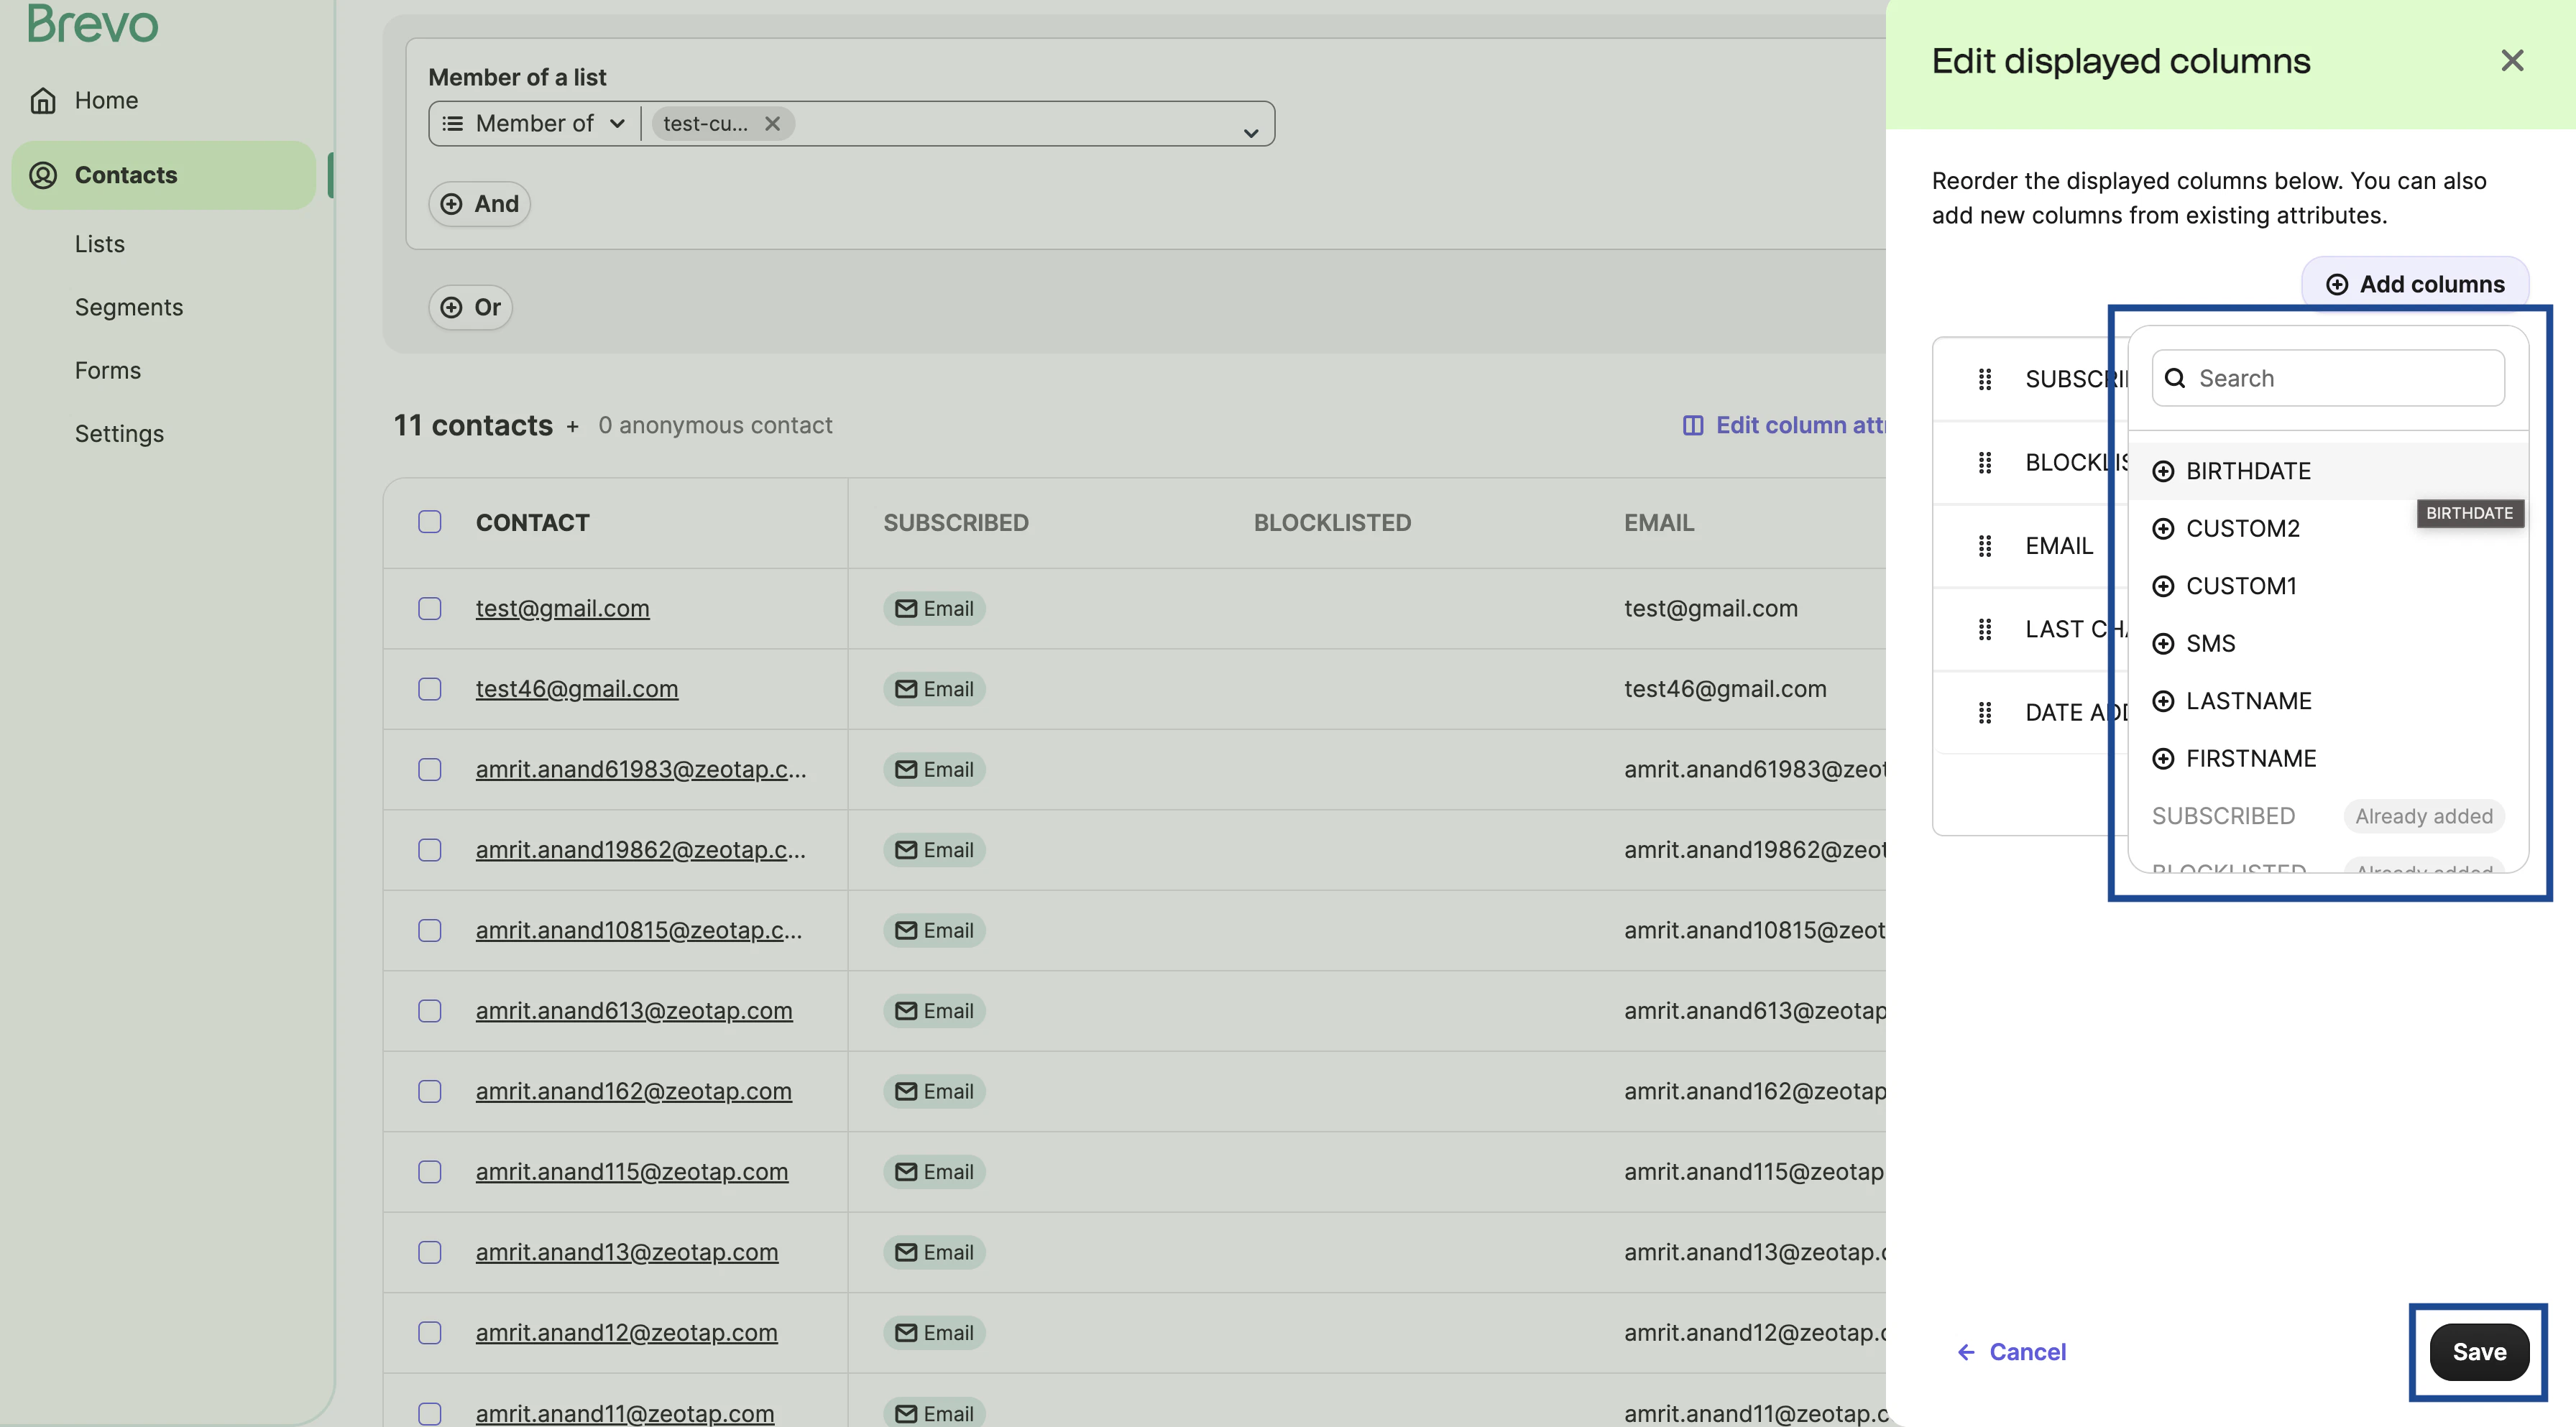
    Search and add the desired custom attributes that you wish to view on the Sendinblue (Brevo) using the drop-down menu and click **Save**.
    <Frame>
      <img src="https://mintcdn.com/zeotap/0tFtKK3bg3ChrHL3/articles/integrate-customer/Storage/integrate-customer/appendix-for-sendinblue/appendix-for-sendinblue-2024-05-06-6.png?fit=max&auto=format&n=0tFtKK3bg3ChrHL3&q=85&s=327ad26b5f79e30a160eeb1c94982587" width="3584" height="1986" data-path="articles/integrate-customer/Storage/integrate-customer/appendix-for-sendinblue/appendix-for-sendinblue-2024-05-06-6.png" />
    </Frame>
  </Step>

  <Step>
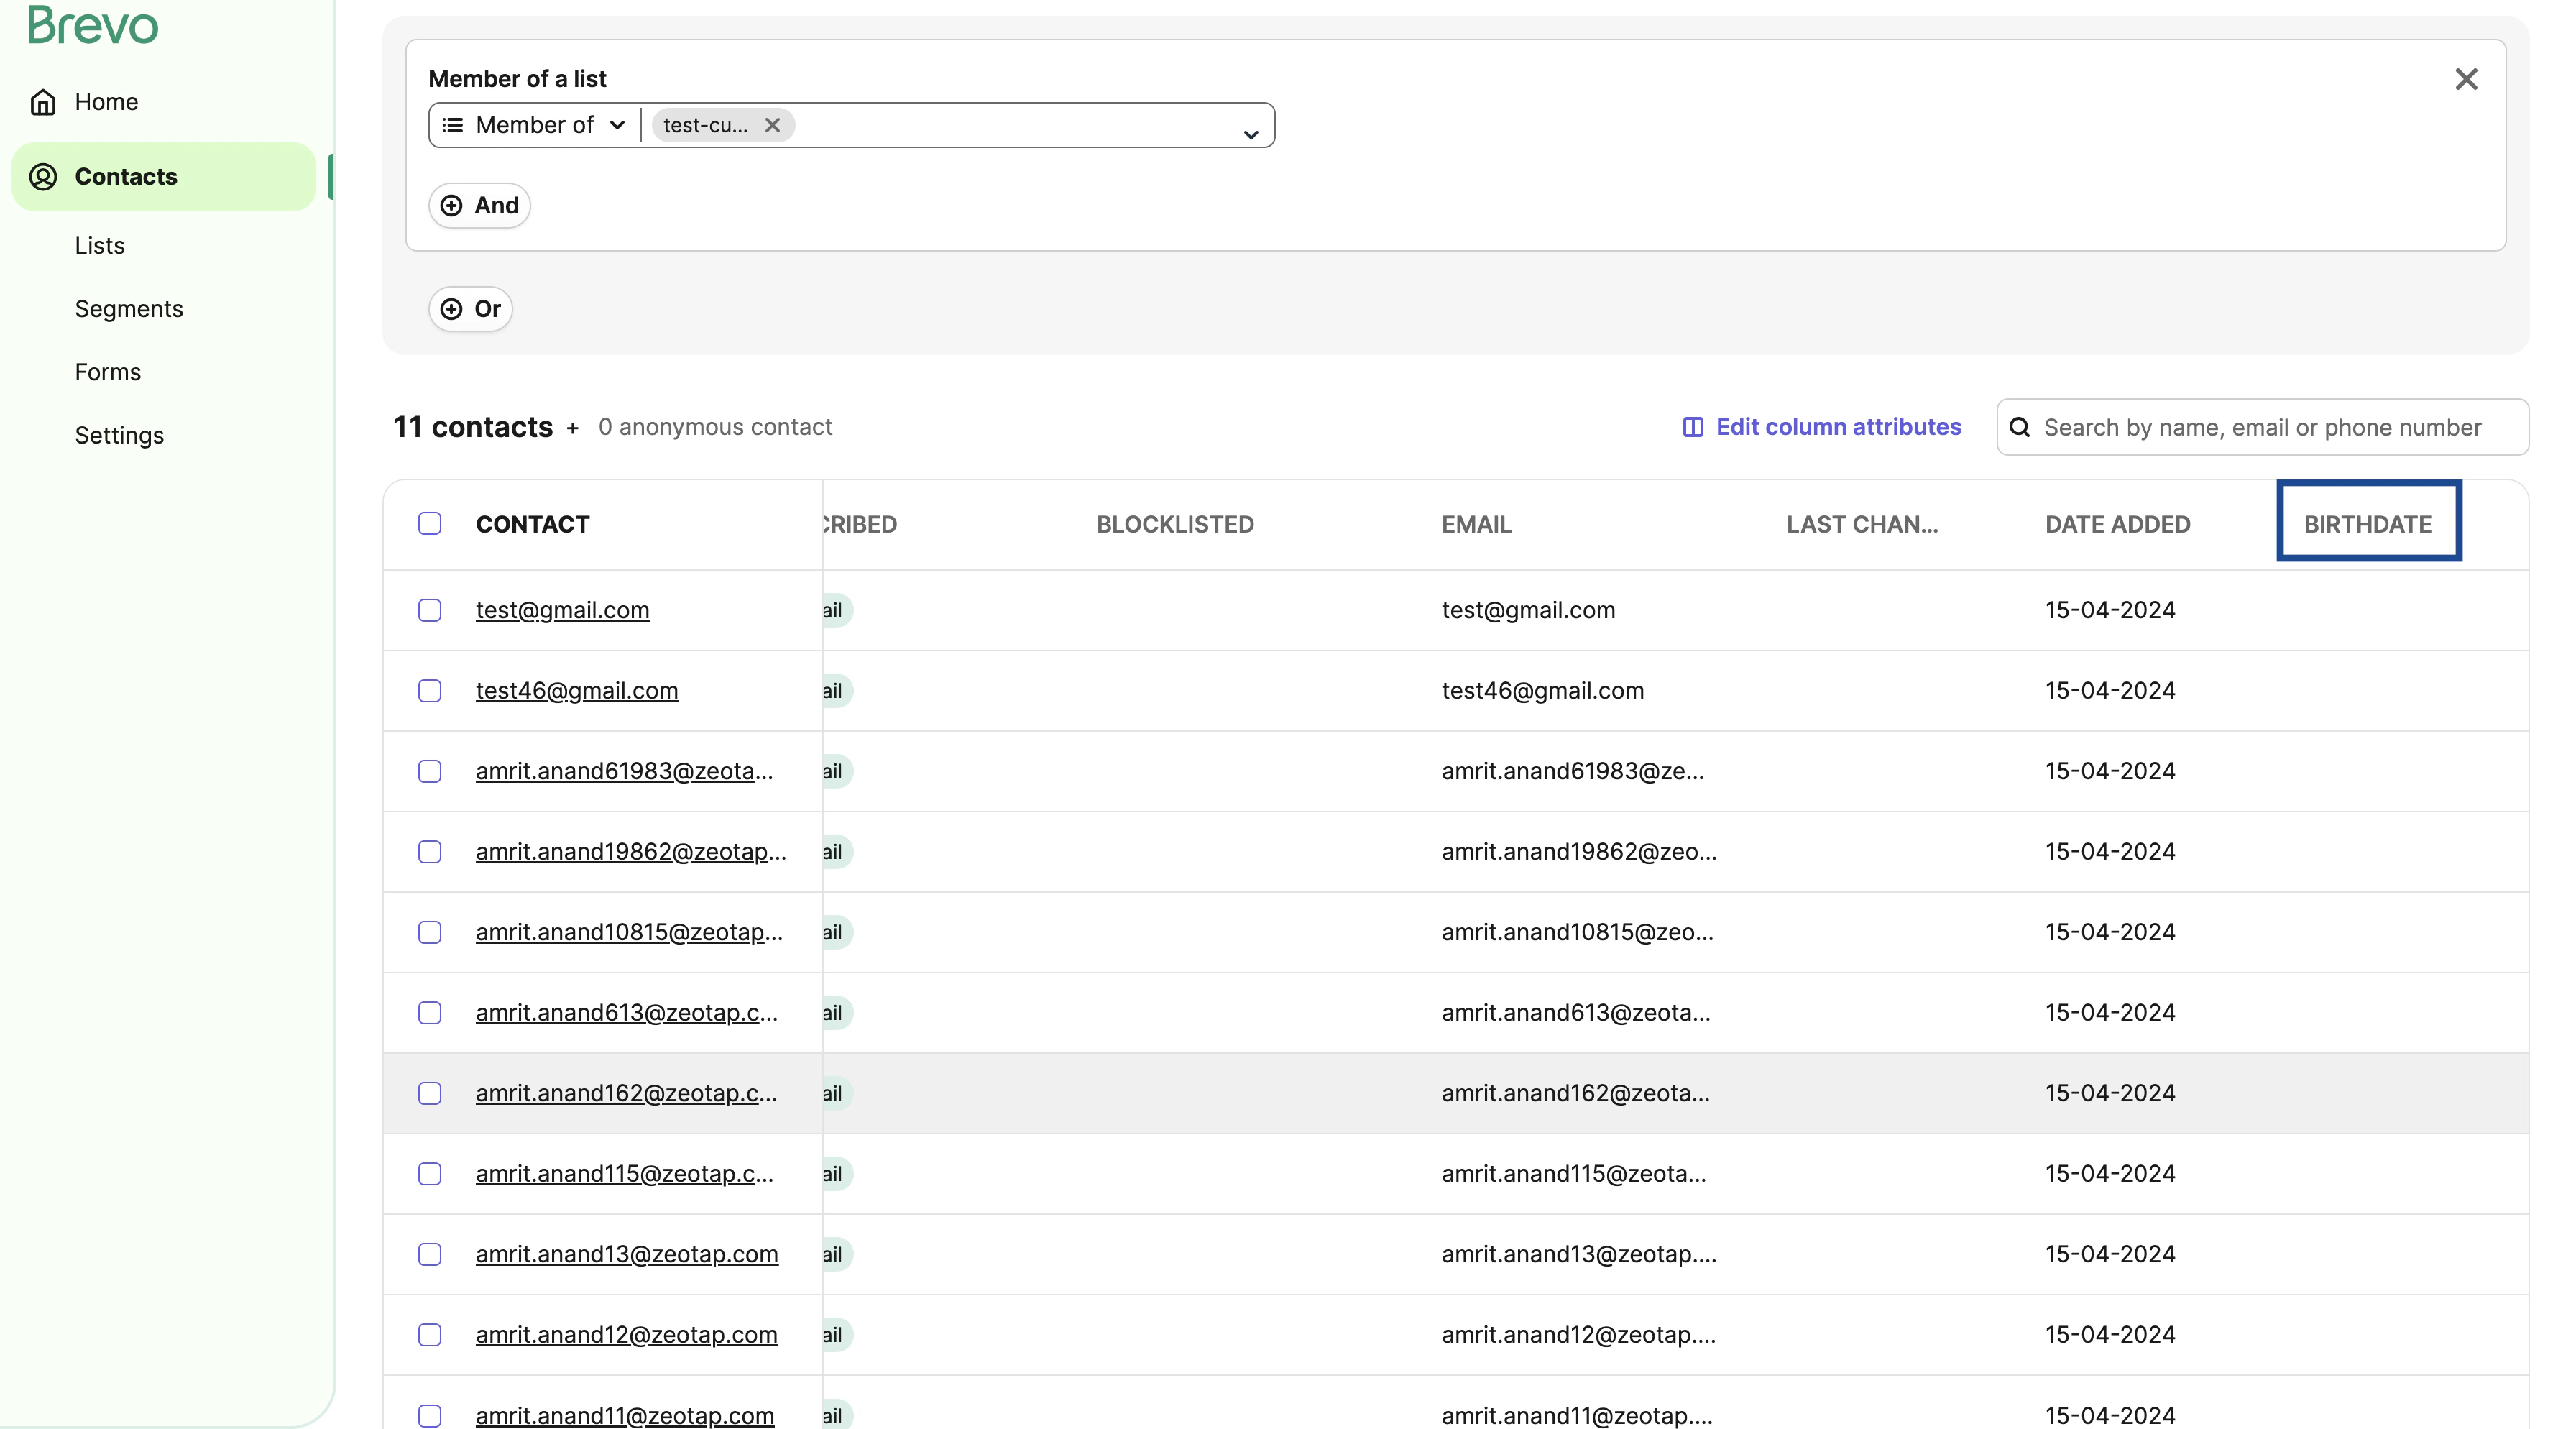
    The newly added custom attribute column is then displayed as shown in the image below.
    <Frame>
      <img src="https://mintcdn.com/zeotap/0tFtKK3bg3ChrHL3/articles/integrate-customer/Storage/integrate-customer/appendix-for-sendinblue/appendix-for-sendinblue-2024-05-06-7.png?fit=max&auto=format&n=0tFtKK3bg3ChrHL3&q=85&s=1888b936e83a22a3c7161e1f822fdb0a" width="3584" height="1988" data-path="articles/integrate-customer/Storage/integrate-customer/appendix-for-sendinblue/appendix-for-sendinblue-2024-05-06-7.png" />
    </Frame>
  </Step>
</Steps>
