> ## Documentation Index
> Fetch the complete documentation index at: https://docs.zeotap.com/llms.txt
> Use this file to discover all available pages before exploring further.
# Adobe Campaign (Audiences)
## Overview
Adobe Campaign is a marketing automation platform that helps businesses manage and deliver targeted email, mobile and social media campaigns. Integrated with Zeotap CDP, you can use segments created in Zeotap CDP to create, test and personalise campaigns across various channels and track your performance and impact.
## Supported Identifiers
This integration supports raw email addresses and Custom IDs.
## Prerequisites
To enable this integration, ensure that you [create an external account in Adobe Campaign](https://experienceleague.adobe.com/docs/campaign-classic/using/installing-campaign-classic/accessing-external-database/external-accounts.html?lang=en#creating-an-external-account) and then, [connect the created external account to your cloud storage](https://experienceleague.adobe.com/docs/campaign-classic/using/installing-campaign-classic/accessing-external-database/configure-fda/connecting-to-database.html?lang=en). Following are the Upload/Connection types that the integration supports:
* **Amazon (AWS) S3**
* **Azure**
## Create a Destination for Adobe Campaign
Perform the following steps to create a Destination for Adobe Campaign:
Log into the Zeotap CDP App and go to the **DESTINATIONS** application.
Click **+ Create Destination**.
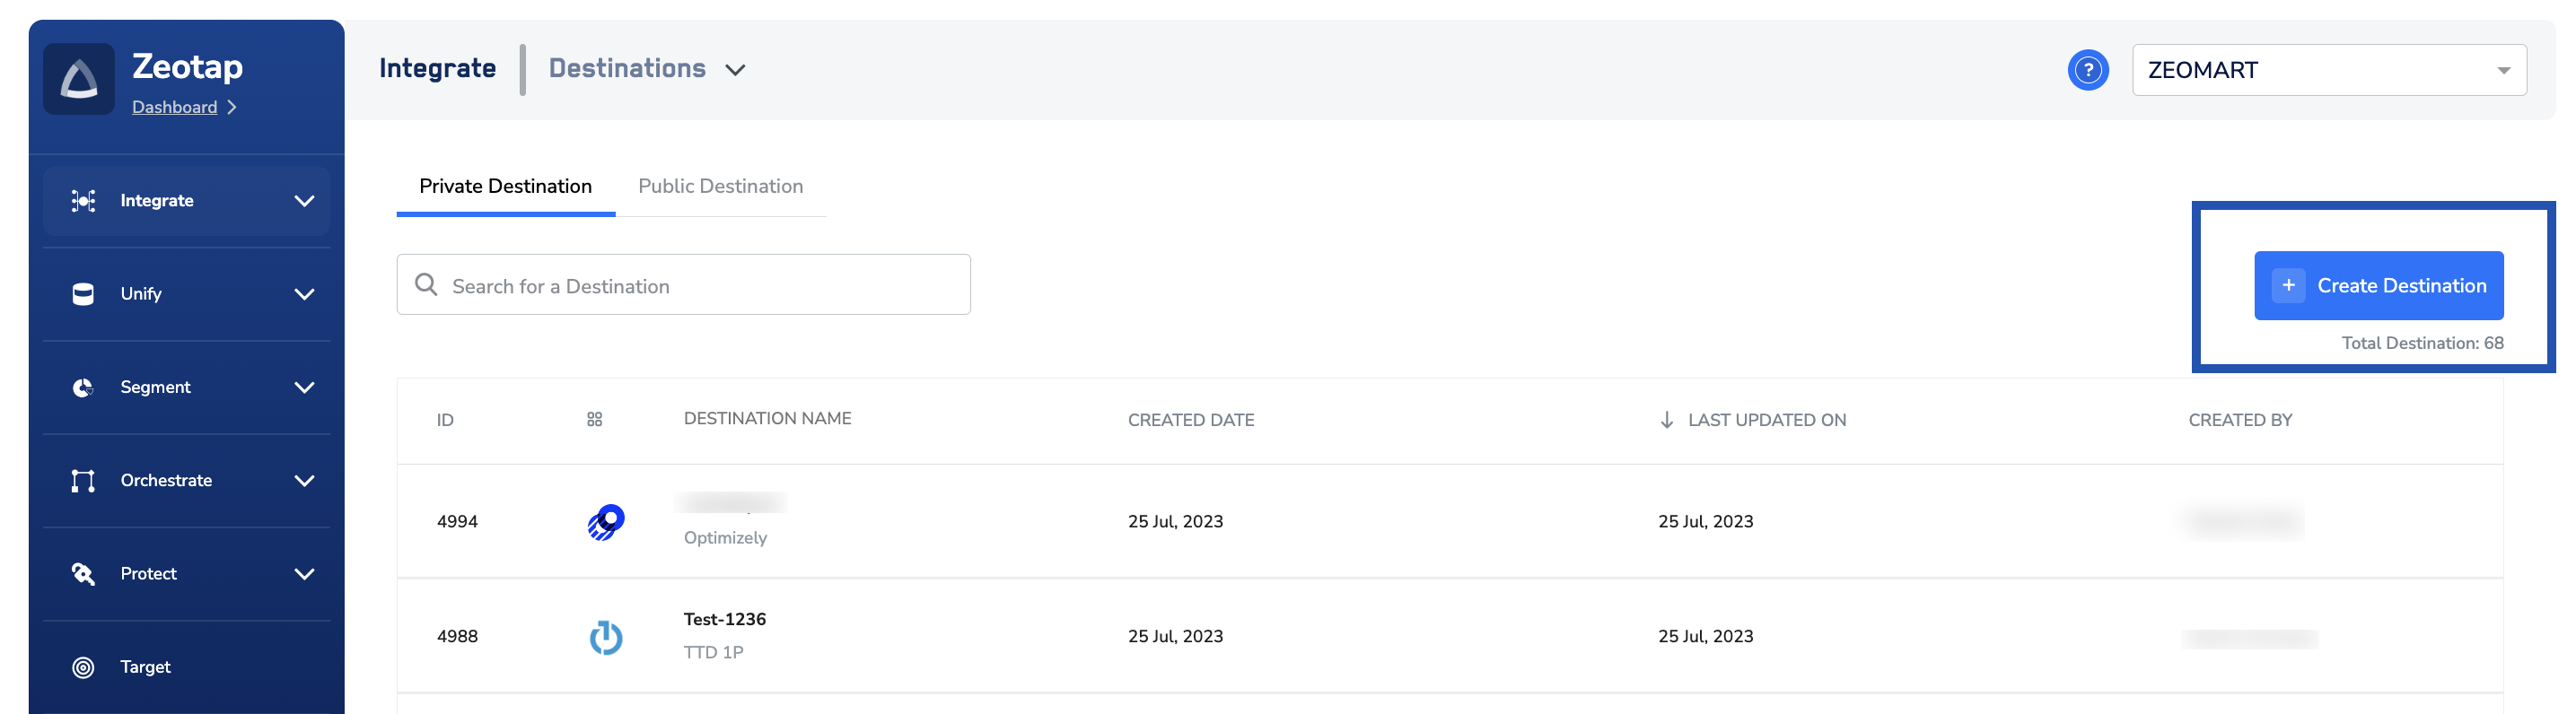 Under the **All Destinations** section, search for **Adobe Campaign**.
Click **Adobe Campaign.** A screen appears displaying details about the particular destination towards the left. On the right-hand side of the screen find a list of fields that are required for the integration to be established. Enter the required details as mentioned in the following steps:
Under the **All Destinations** section, search for **Adobe Campaign**.
Click **Adobe Campaign.** A screen appears displaying details about the particular destination towards the left. On the right-hand side of the screen find a list of fields that are required for the integration to be established. Enter the required details as mentioned in the following steps:
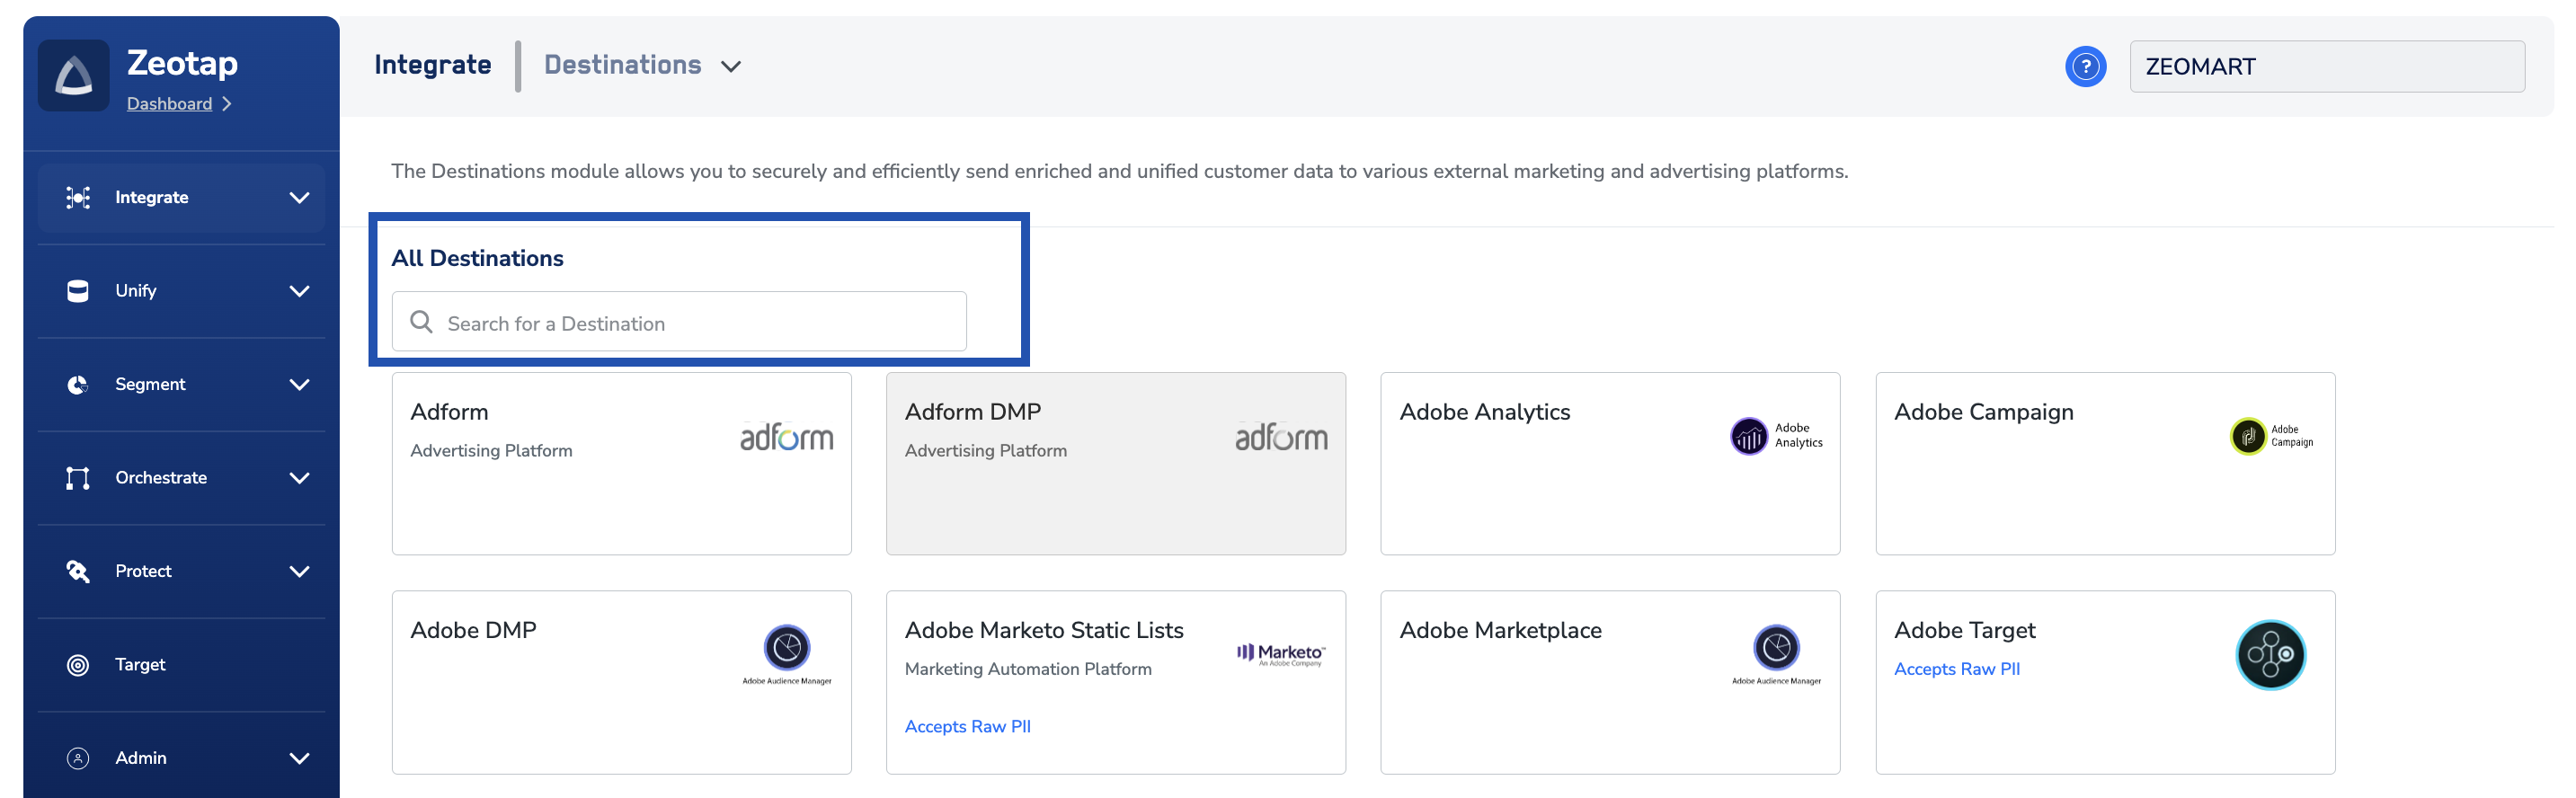 a. Enter a name for the Destination.
b. Provide the **Client Name**.
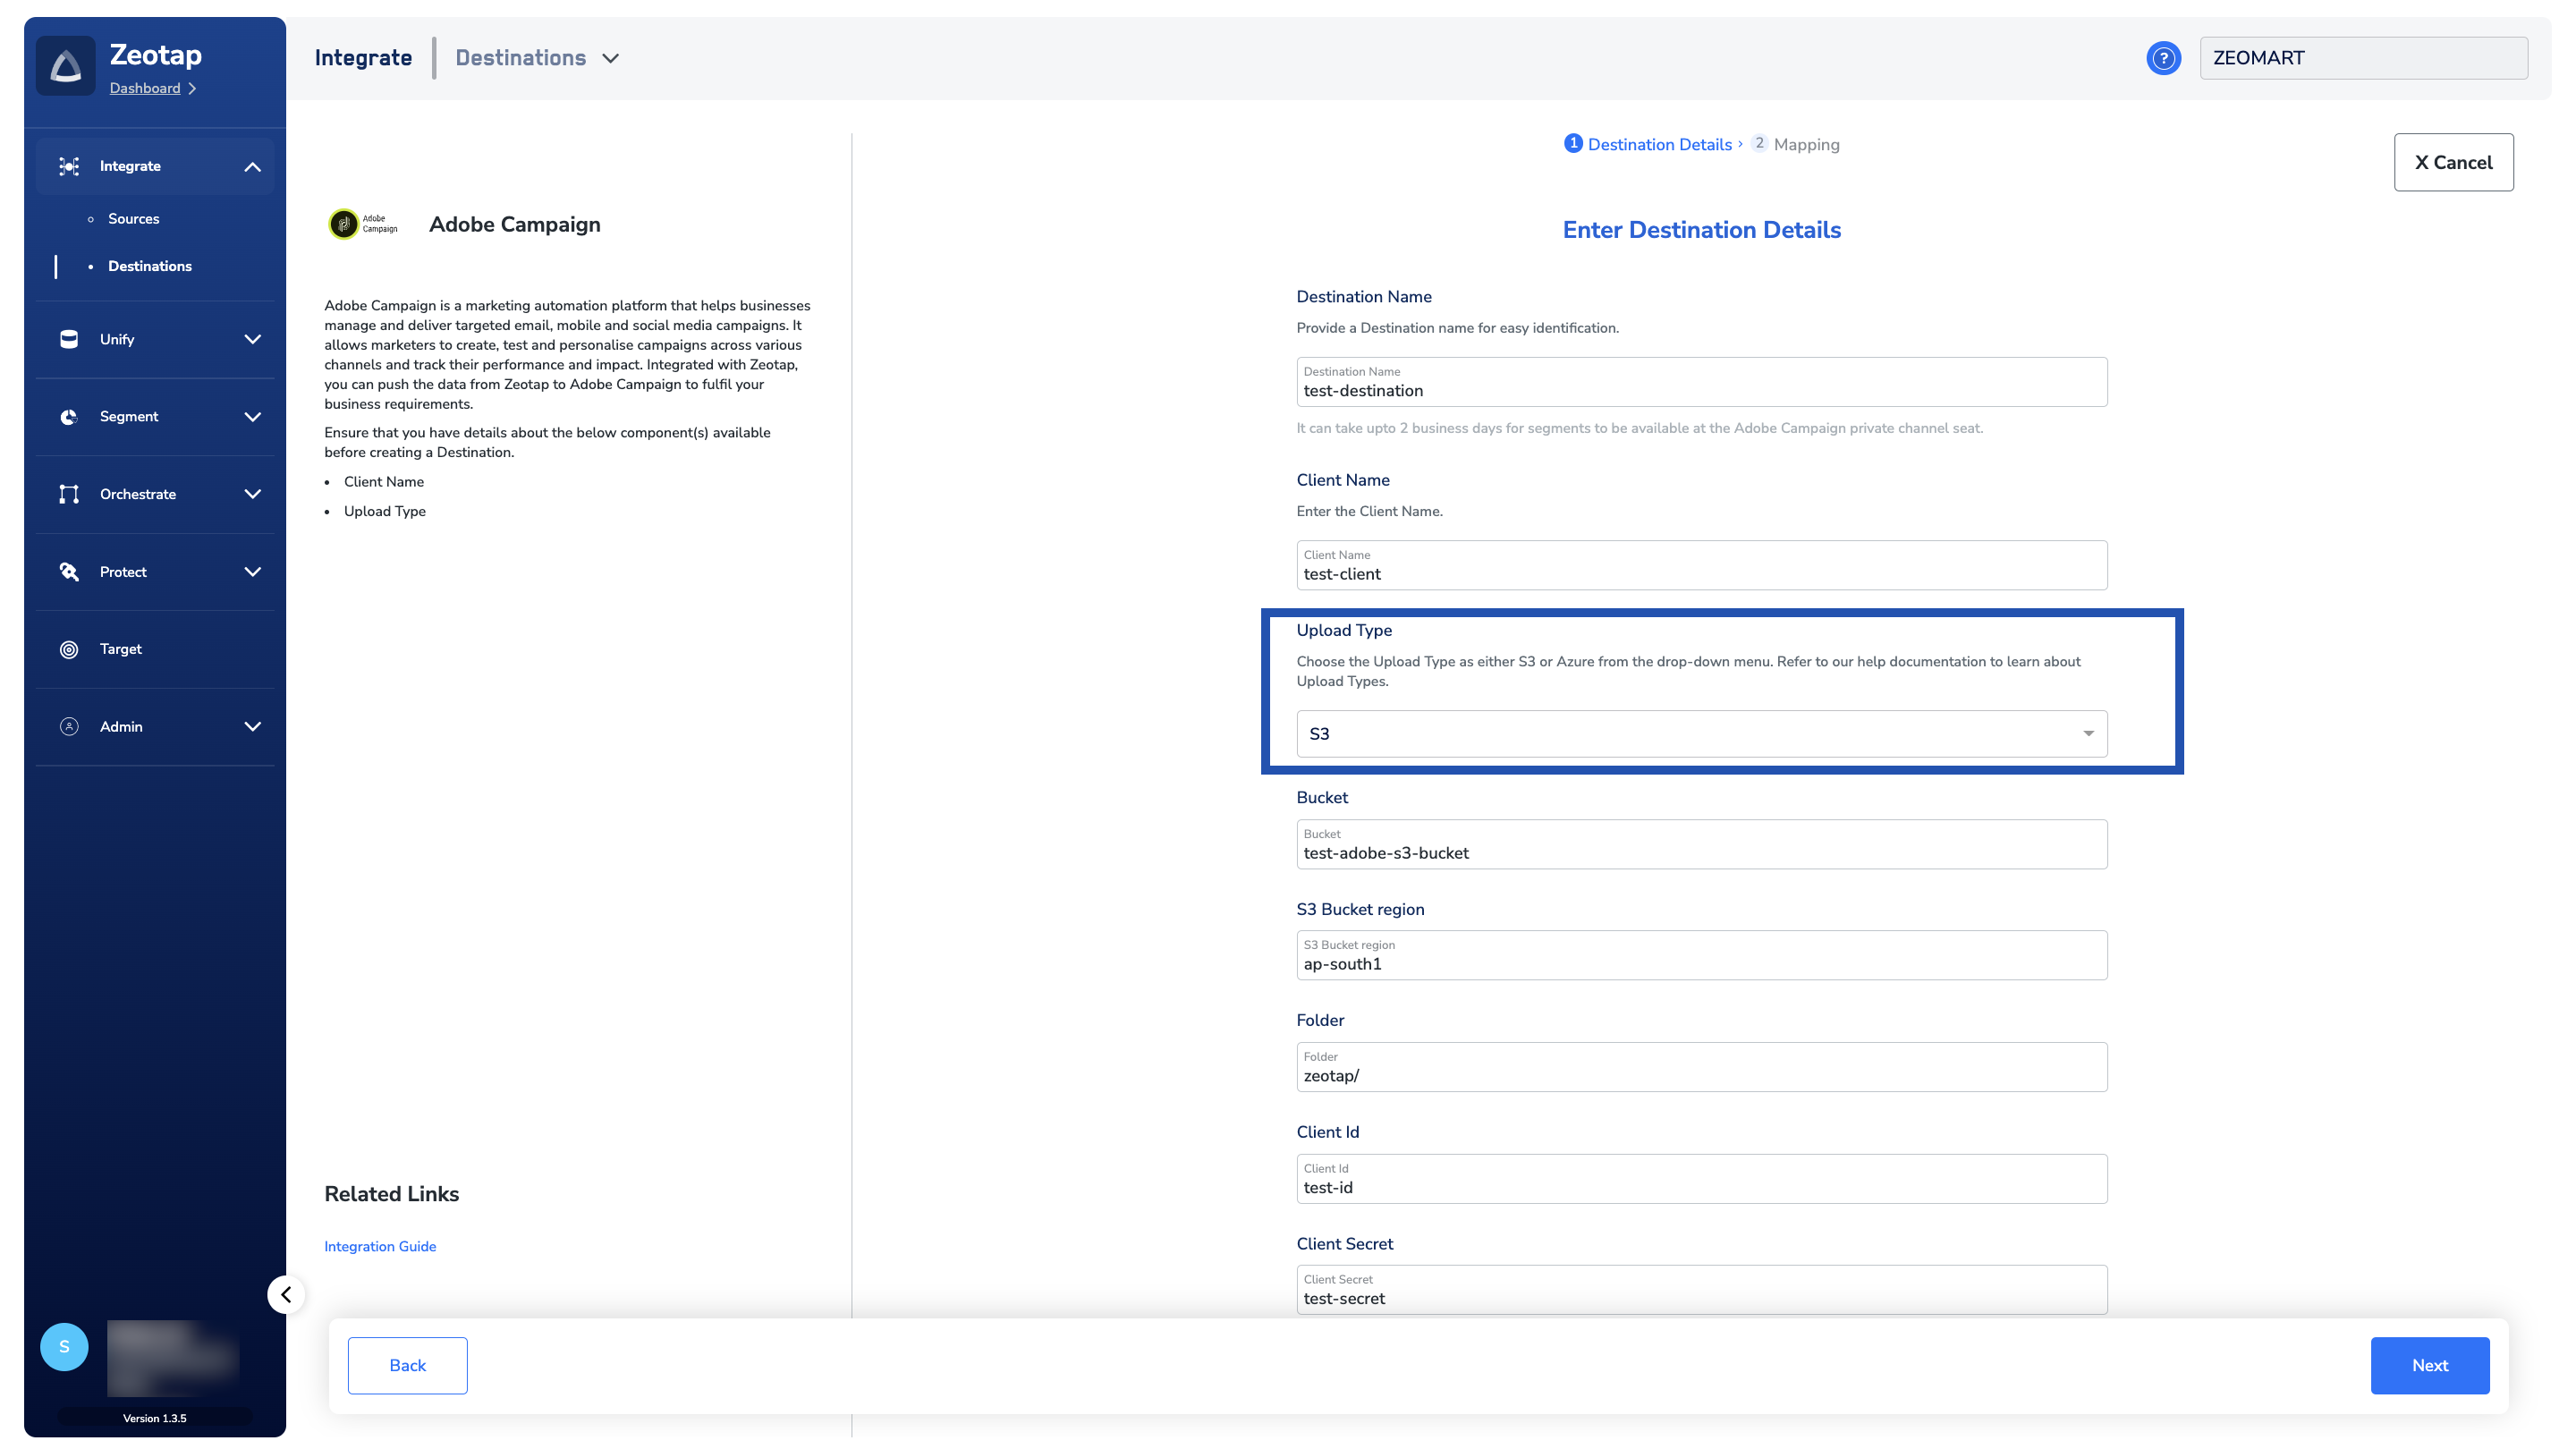
c. Choose the Upload Type from the drop-down menu. This integration supports the following Upload Types:
* If you choose **S3** as your **Upload Type**, then you need to provide the following additional details of your Amazon S3 storage:
* In the **Bucket** field, provide the name of the Amazon S3 Bucket.
* In the **S3 Bucket Region** field, provide the geographical region where your Amazon S3 bucket is available.
* In the **Folder** field, provide the folder path in your storage location where Zeotap CDP can store your exported data.
* Enter the **Client Id** and **Client Secret** obtained from your Amazon S3 account. This is the Access Key ID and Secret Access Key of your S3 storage respectively.
* Under **Filename Prefix,** enter a text value without special characters, such as underscores (\_), spaces, or symbols (`#, @, $, %, &, \*`). Note that the file name follows the format: `{filenamePrefix}{fileNumber}_${channelId}_${timestamp}`.csv, where the timestamp is in epoch format and channelId is the ID associated with your audience (segment) in Zeotap CDP, which is generated by the Zeotap CDP after the audience (segment) is linked to a Destination.
a. Enter a name for the Destination.
b. Provide the **Client Name**.
c. Choose the Upload Type from the drop-down menu. This integration supports the following Upload Types:
* If you choose **S3** as your **Upload Type**, then you need to provide the following additional details of your Amazon S3 storage:
* In the **Bucket** field, provide the name of the Amazon S3 Bucket.
* In the **S3 Bucket Region** field, provide the geographical region where your Amazon S3 bucket is available.
* In the **Folder** field, provide the folder path in your storage location where Zeotap CDP can store your exported data.
* Enter the **Client Id** and **Client Secret** obtained from your Amazon S3 account. This is the Access Key ID and Secret Access Key of your S3 storage respectively.
* Under **Filename Prefix,** enter a text value without special characters, such as underscores (\_), spaces, or symbols (`#, @, $, %, &, \*`). Note that the file name follows the format: `{filenamePrefix}{fileNumber}_${channelId}_${timestamp}`.csv, where the timestamp is in epoch format and channelId is the ID associated with your audience (segment) in Zeotap CDP, which is generated by the Zeotap CDP after the audience (segment) is linked to a Destination.
 * If you choose **Azure** as your **Upload Type**, then you need to provide the following additional details of your Azure storage:
* In the **Container** field, provide the container details that holds your folder path.
* In the **Folder** field, provide the path in your storage location where Zeotap CDP can store your export data as CSV files.
* In the **Key** field, provide the RSA-formatted public key to add encryption with PGP/GPG to your exported files. Ensure that your public key must be written as a Base64 encoded string.
* Under \*\*Filename Prefix,\*\*enter a text value without special characters, such as underscores (\_), spaces, or symbols (`#, @, $, %, &, \*`). Note that the file name follows the format:
`{filenamePrefix}{fileNumber}_${channelId}_${timestamp}`.csv, where the timestamp is in epoch format.
* If you choose **Azure** as your **Upload Type**, then you need to provide the following additional details of your Azure storage:
* In the **Container** field, provide the container details that holds your folder path.
* In the **Folder** field, provide the path in your storage location where Zeotap CDP can store your export data as CSV files.
* In the **Key** field, provide the RSA-formatted public key to add encryption with PGP/GPG to your exported files. Ensure that your public key must be written as a Base64 encoded string.
* Under \*\*Filename Prefix,\*\*enter a text value without special characters, such as underscores (\_), spaces, or symbols (`#, @, $, %, &, \*`). Note that the file name follows the format:
`{filenamePrefix}{fileNumber}_${channelId}_${timestamp}`.csv, where the timestamp is in epoch format.
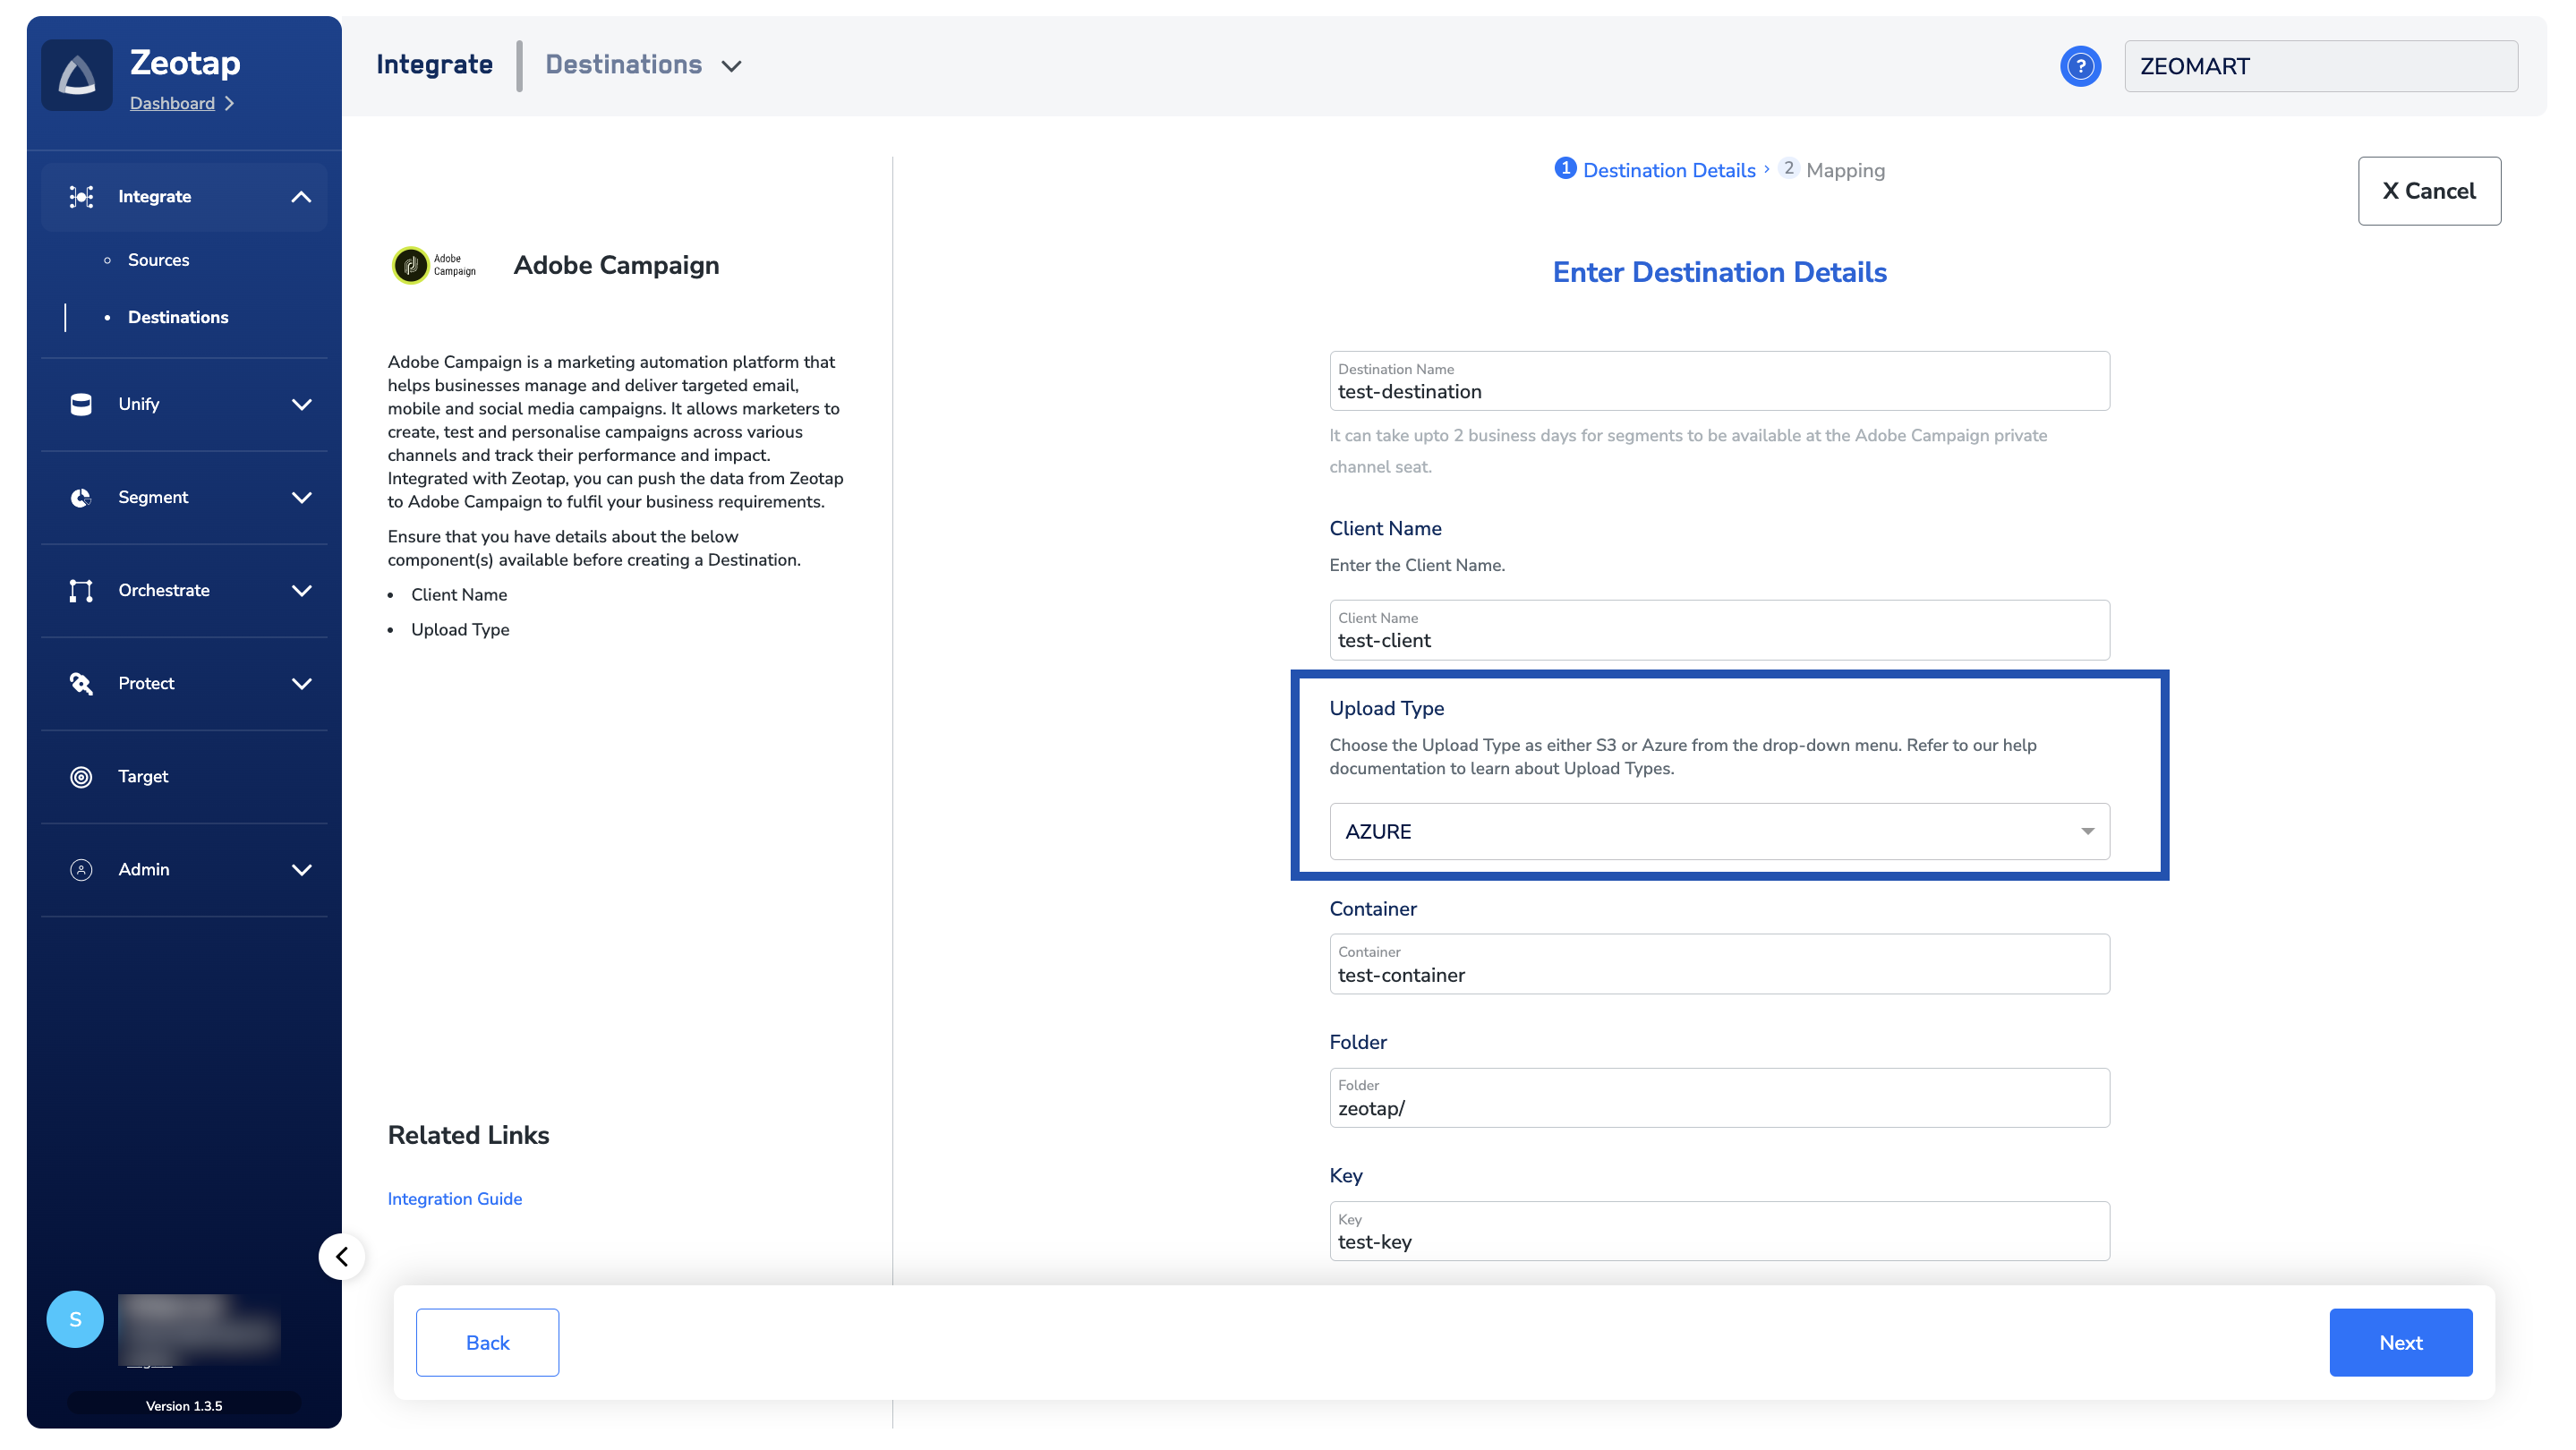 d. Review all the values entered above and then click **Next** to proceed.
In the new screen that appears, choose the appropriate [action](/articles/integrate-customer/destinations#actionsanchor) and mapping as explained below. Under **Choose your Action**, you can either choose **Send identifiers to Adobe Campaign** or **Send multiple identifiers to Adobe Campaign** as the action for activating your audience (segment) in *Audiences*.
a. If you choose **Send identifiers to Adobe Campaign** as your action, then you can send raw email addresses to Adobe Campaign.
d. Review all the values entered above and then click **Next** to proceed.
In the new screen that appears, choose the appropriate [action](/articles/integrate-customer/destinations#actionsanchor) and mapping as explained below. Under **Choose your Action**, you can either choose **Send identifiers to Adobe Campaign** or **Send multiple identifiers to Adobe Campaign** as the action for activating your audience (segment) in *Audiences*.
a. If you choose **Send identifiers to Adobe Campaign** as your action, then you can send raw email addresses to Adobe Campaign.
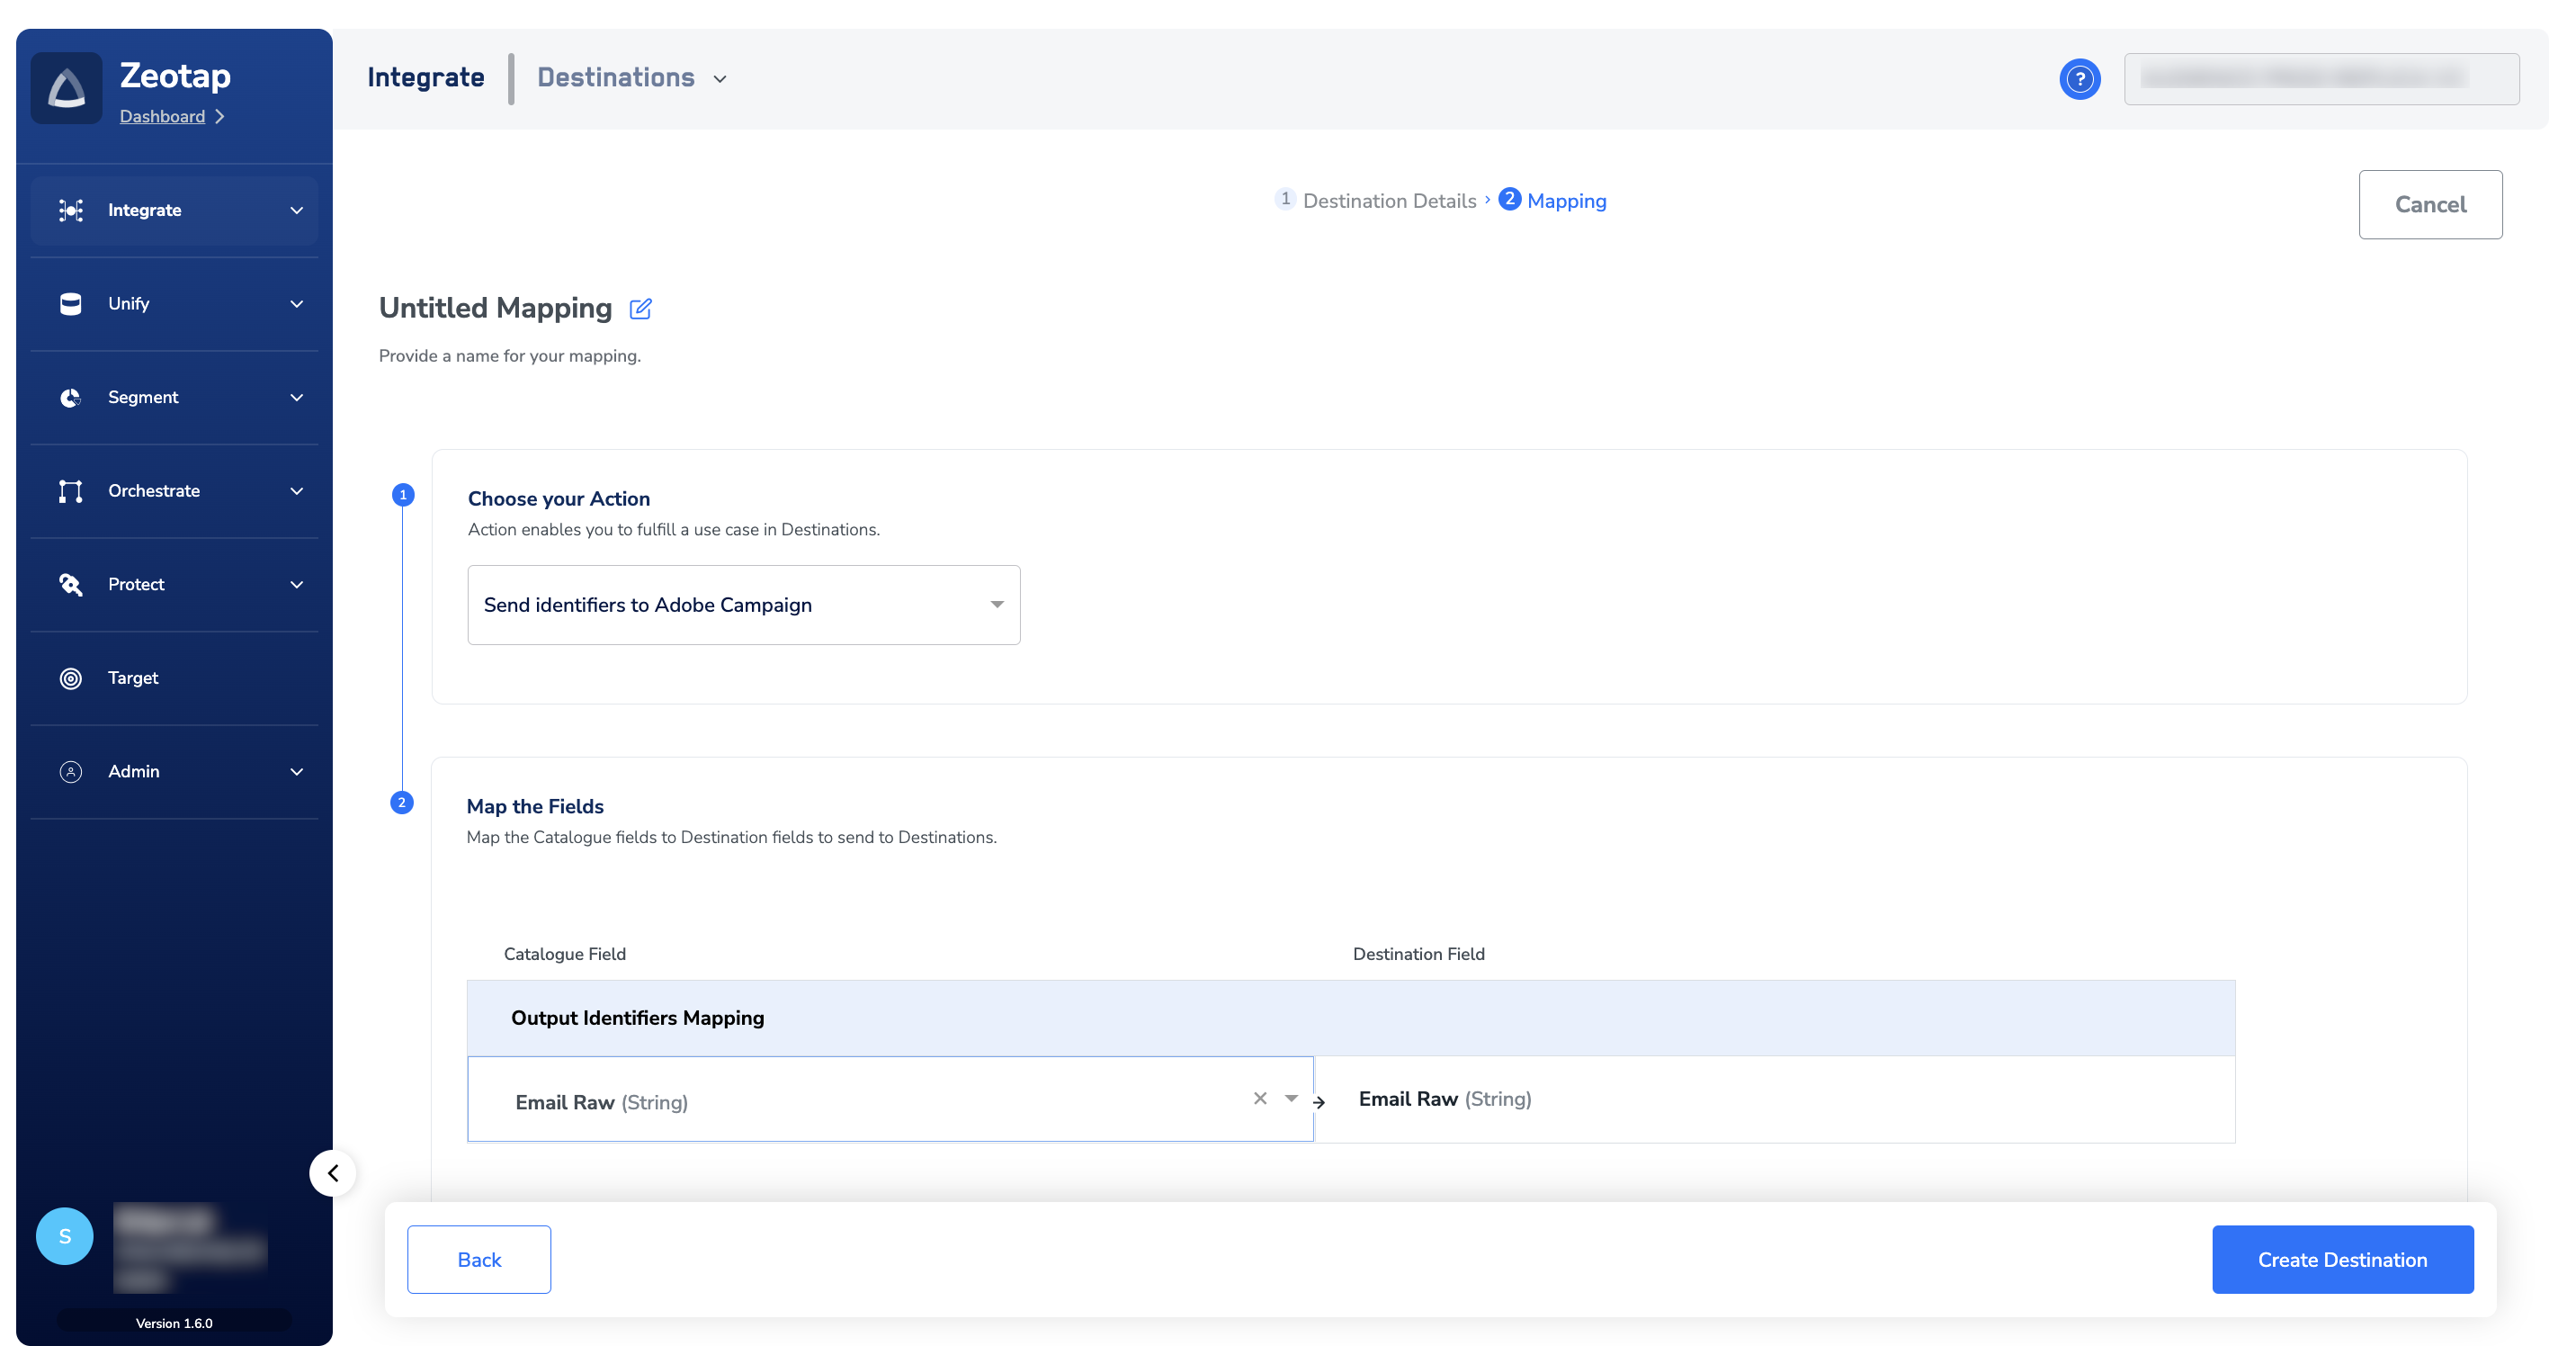 b. If you choose **Send multiple identifiers to Adobe Campaign** as your action, then you can send raw email addresses and Custom IDs to Adobe Campaign. Note that you can map up to five fields while sending custom IDs to Adobe Campaign.
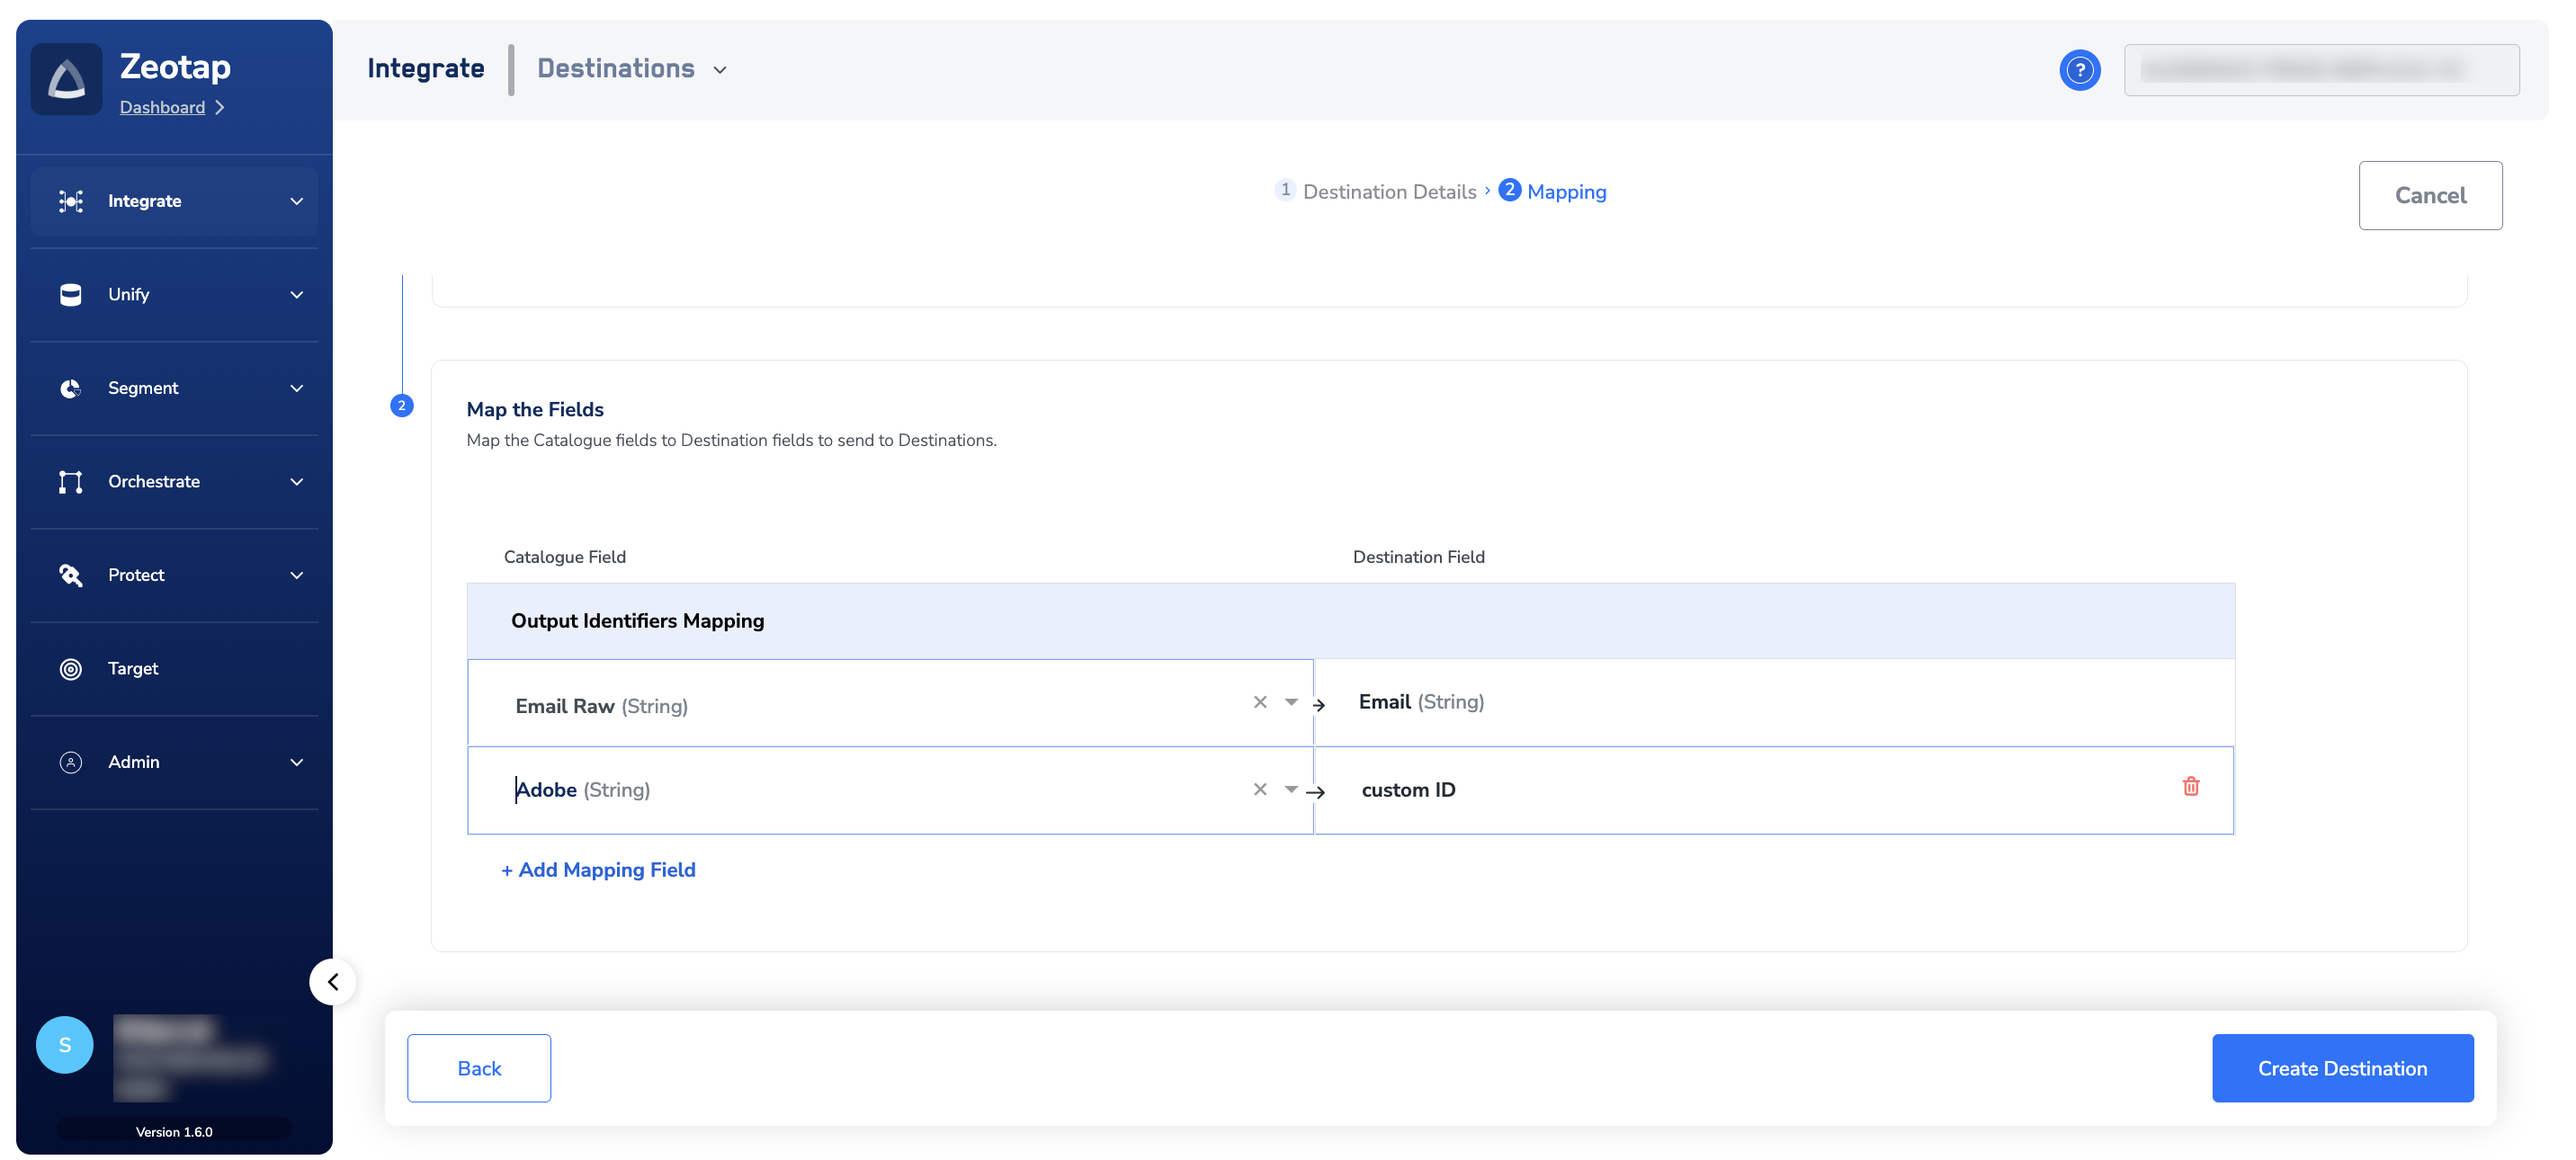 Click **Create Destination**. The created Destination gets listed in the Audiences application, which can be linked to an audience/segment.
## Link an Audience/Segment to the Adobe Campaign Destination
For information about how to link an Audience or segment to the created Destination in **Audiences** application, refer [here](/articles/integrate-customer/link-an-audience-to-the-destination).
**Note:**
Ensure that you take care of the following points while linking an Audience (segment) in Adobe Campaign:
* The terms *Audiences* and *Segments* are used interchangeably to refer to customer cohorts belonging to a specific category.
* When working with Adobe Campaign, ensure each file contains a maximum of one million email IDs and custom IDs together. If your list surpasses this limit, divide it into smaller files. For example, if your CSV file contains 3 million email IDs and custom IDs, partition it into three parts, generating three separate files, each accommodating a maximum of 1 million records.
* After an Audience is linked to a Destination, Zeotap CDP generates segment files in CSV format with the following naming convention: `Segment Name_PartNumber_Timestamp.csv` For example, `Adobe-Campaign-Test_Part1_20231117092450237.csv`
## Download Files from the Cloud Storage to Adobe Campaign
Once you push the Audiences/segments from Zeotap CDP, they are stored in the cloud storage (S3/Azure) that you have specified in the Destination. You can then download the data from the storage to Adobe Campaign by following the outlined steps:
1. [Add a Folder](#step-1-–-add-a-folder)
2. [Create a Workflow in Adobe Campaign](#step-2-create-a-workflow-in-adobe-campaign)
### Step 1 – Add a Folder
Log into **Adobe Campaign Classic**.
Under **Explorer**, navigate to **Profiles and Targets** > **Add new folder** > **Database > Recipients.**
**Note:**
For easy identification, provide a name for the folder with the Audience/Segment name.
Click **Create Destination**. The created Destination gets listed in the Audiences application, which can be linked to an audience/segment.
## Link an Audience/Segment to the Adobe Campaign Destination
For information about how to link an Audience or segment to the created Destination in **Audiences** application, refer [here](/articles/integrate-customer/link-an-audience-to-the-destination).
**Note:**
Ensure that you take care of the following points while linking an Audience (segment) in Adobe Campaign:
* The terms *Audiences* and *Segments* are used interchangeably to refer to customer cohorts belonging to a specific category.
* When working with Adobe Campaign, ensure each file contains a maximum of one million email IDs and custom IDs together. If your list surpasses this limit, divide it into smaller files. For example, if your CSV file contains 3 million email IDs and custom IDs, partition it into three parts, generating three separate files, each accommodating a maximum of 1 million records.
* After an Audience is linked to a Destination, Zeotap CDP generates segment files in CSV format with the following naming convention: `Segment Name_PartNumber_Timestamp.csv` For example, `Adobe-Campaign-Test_Part1_20231117092450237.csv`
## Download Files from the Cloud Storage to Adobe Campaign
Once you push the Audiences/segments from Zeotap CDP, they are stored in the cloud storage (S3/Azure) that you have specified in the Destination. You can then download the data from the storage to Adobe Campaign by following the outlined steps:
1. [Add a Folder](#step-1-–-add-a-folder)
2. [Create a Workflow in Adobe Campaign](#step-2-create-a-workflow-in-adobe-campaign)
### Step 1 – Add a Folder
Log into **Adobe Campaign Classic**.
Under **Explorer**, navigate to **Profiles and Targets** > **Add new folder** > **Database > Recipients.**
**Note:**
For easy identification, provide a name for the folder with the Audience/Segment name.
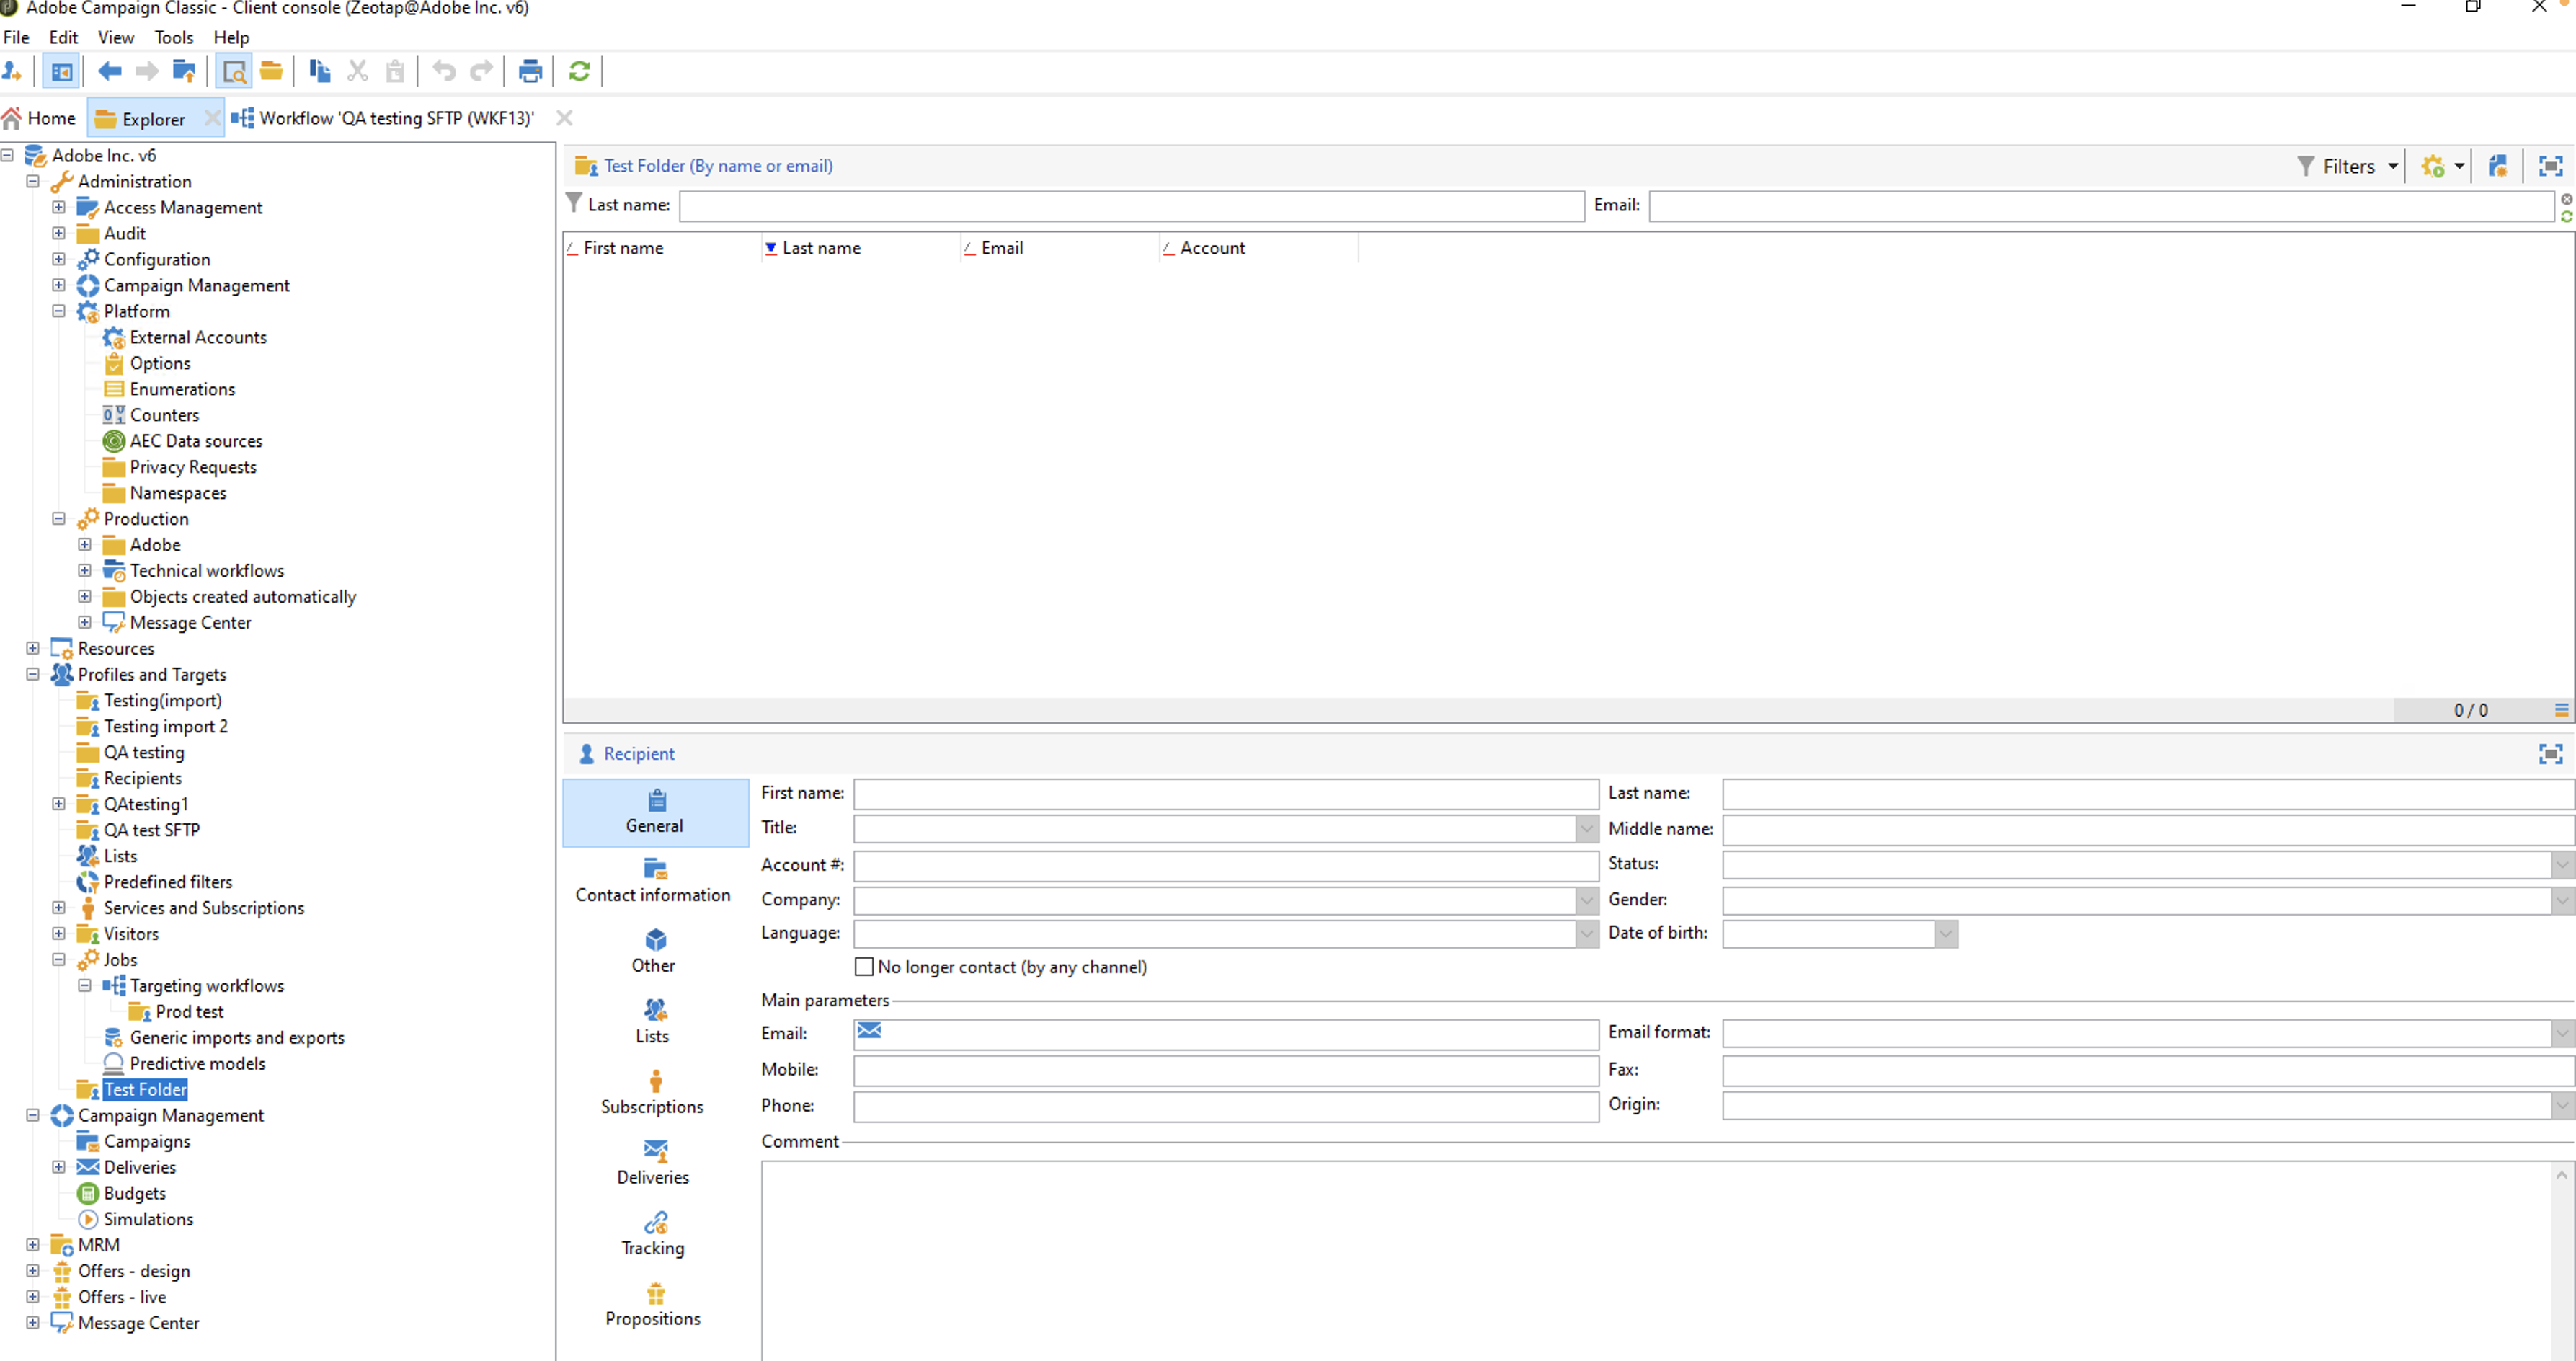
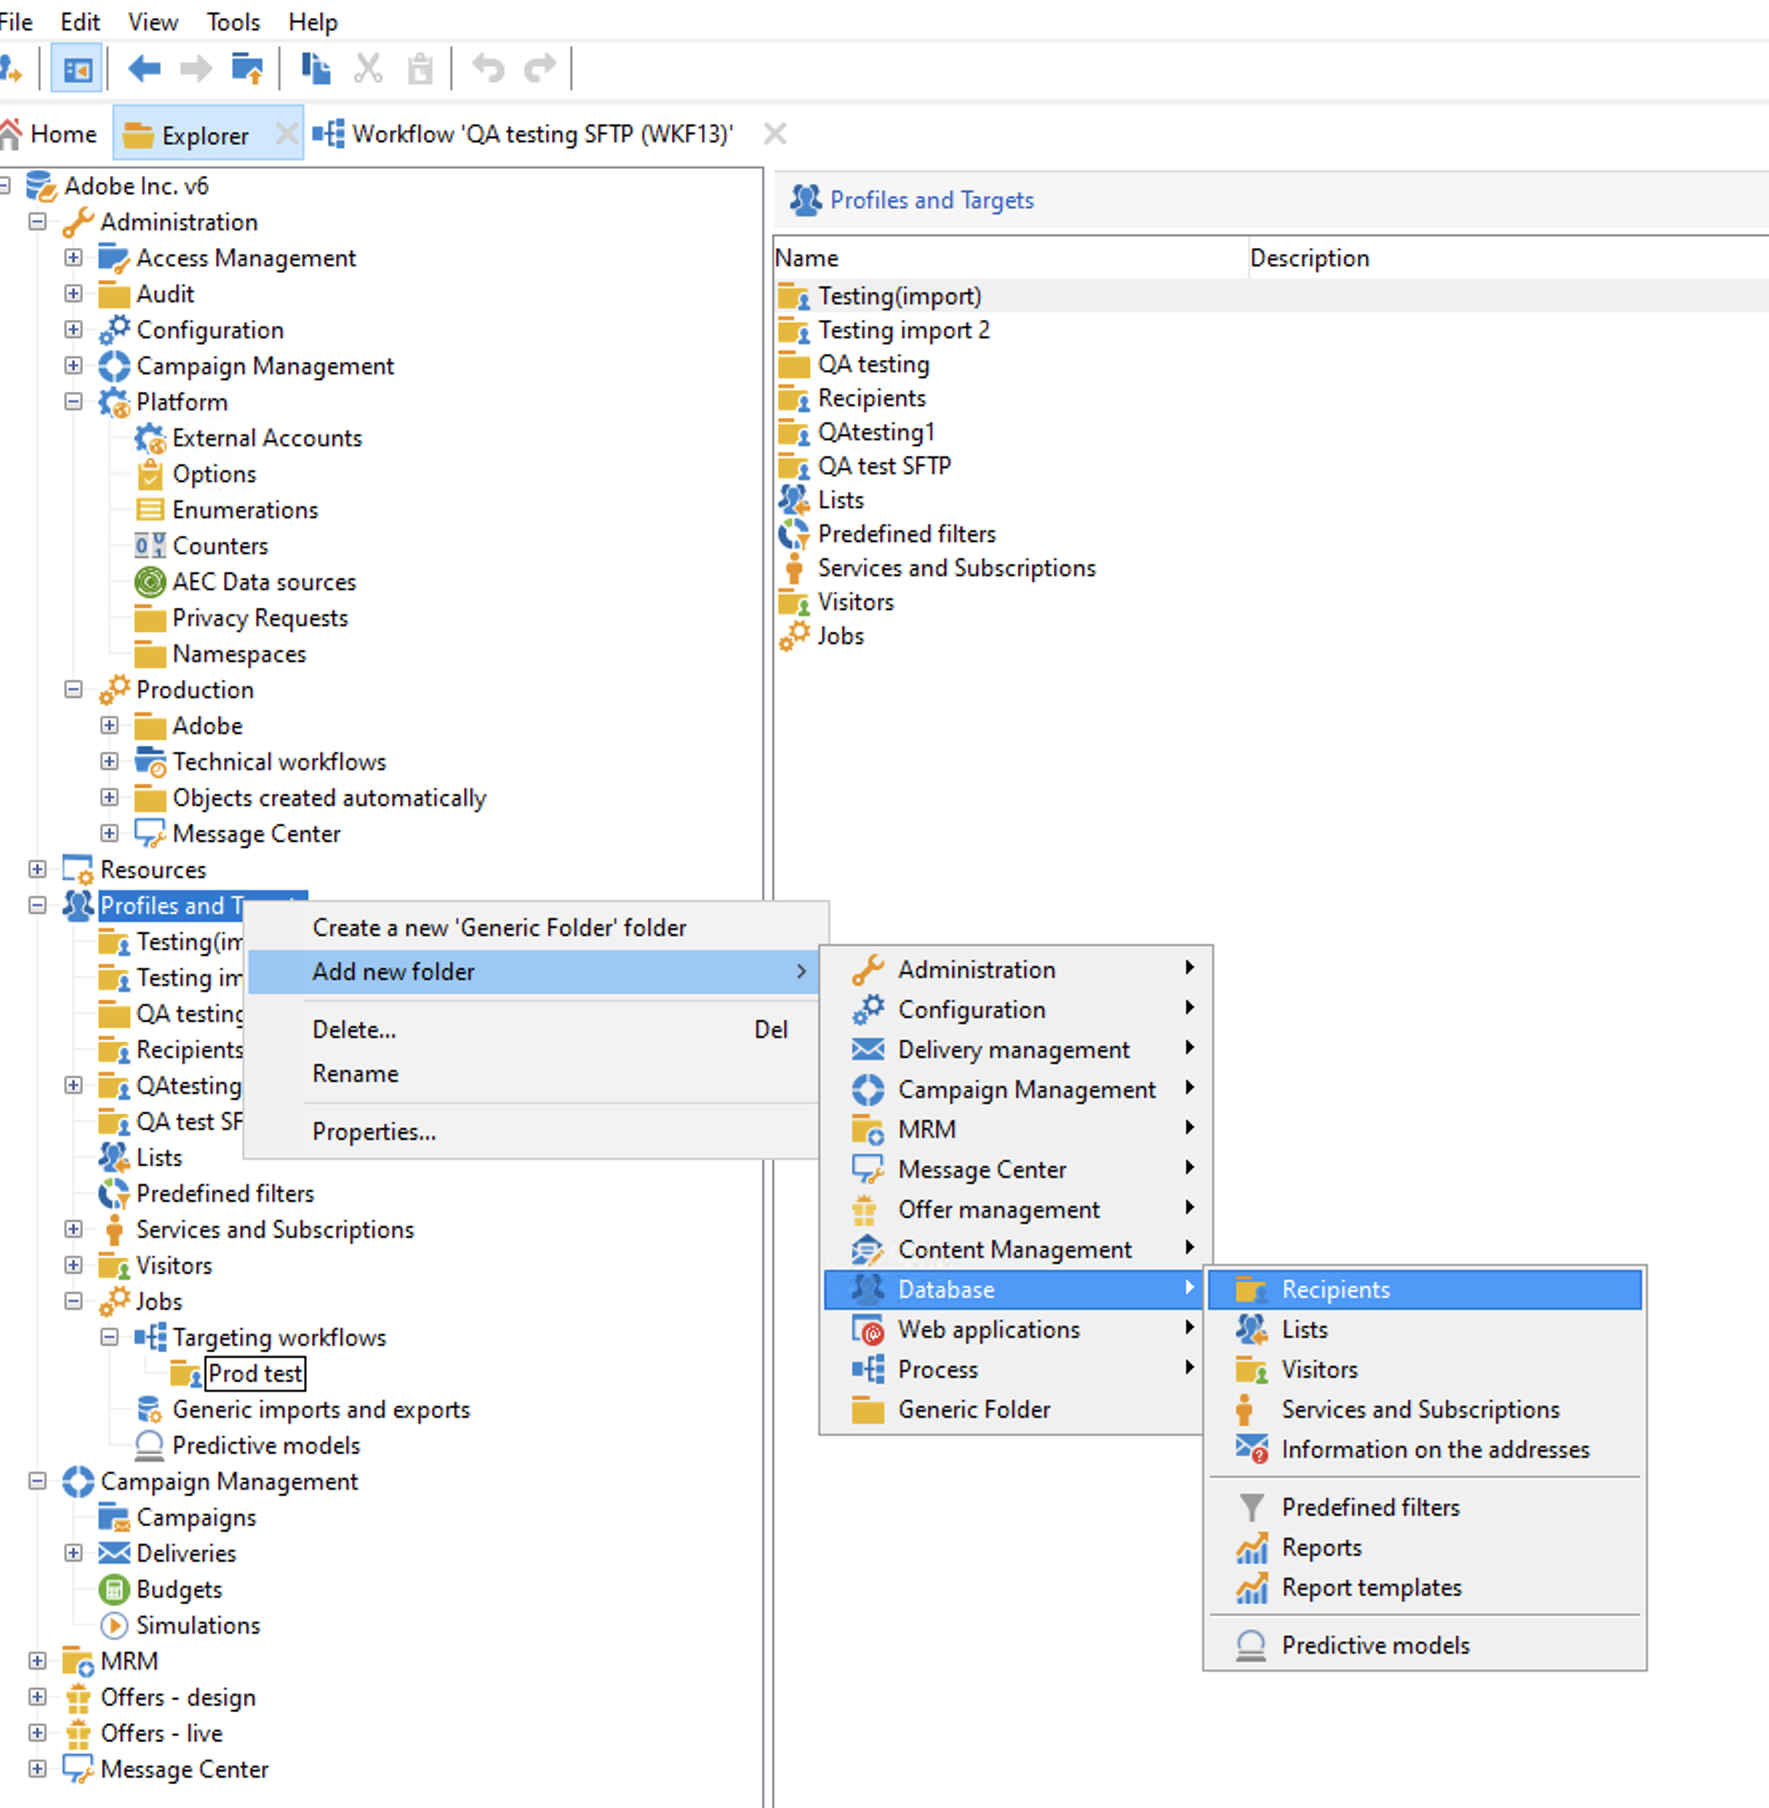 The new folder is created as shown below.
 ### Step 2 - Create a Workflow in Adobe Campaign
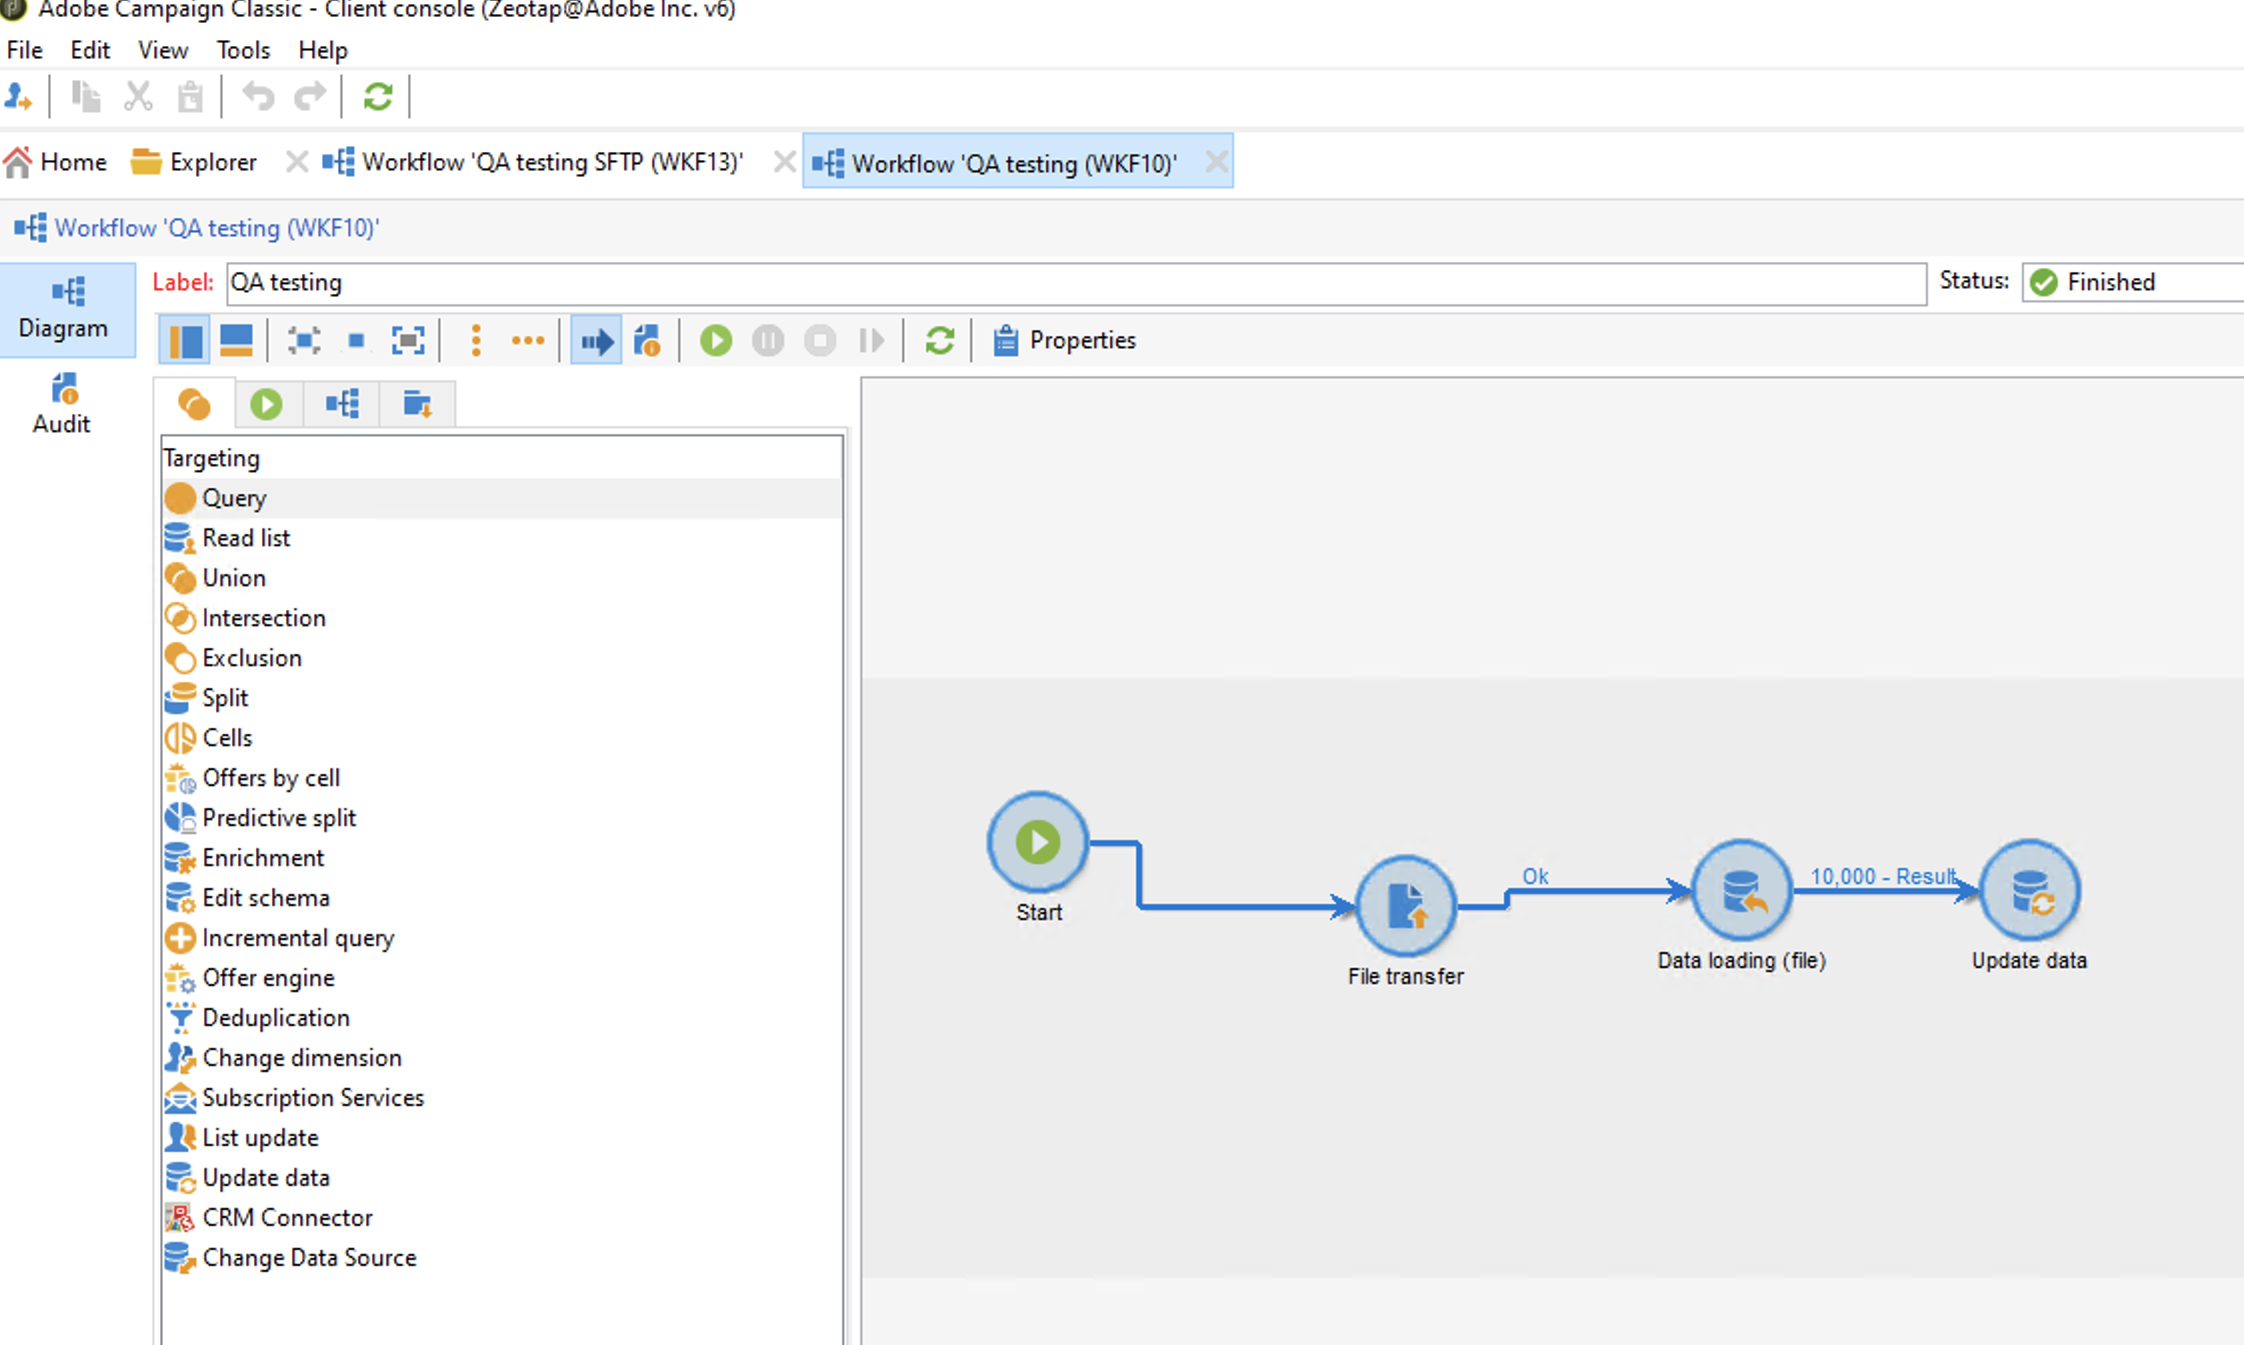 A workflow in Adobe Campaign is a series of steps or tasks designed to automate and optimise marketing processes. For more information about how to create a workflow and design the workflow diagram, refer [here](https://experienceleague.adobe.com/docs/campaign/automation/workflows/introduction/build-a-workflow.html?lang=en).
The followings are the necessary activities in a workflow:
1. [File Transfer](#file-transfer)
2. [Data Loading (File)](#data-loading-file)
3. [Update Data](#update-data)
Note that you have to configure each activity individually by clicking on them. To do so, refer to the individual topics as detailed below.
#### File Transfer
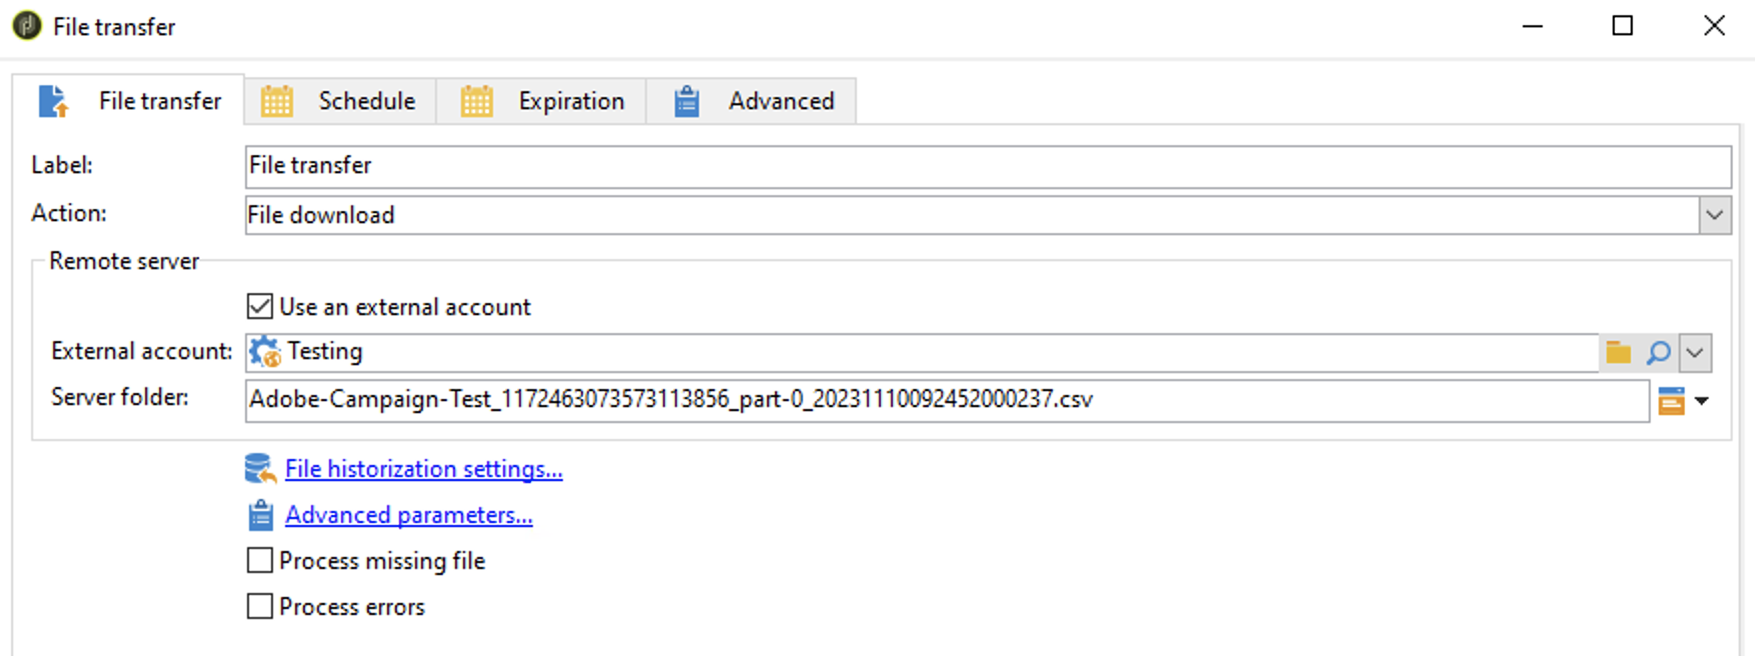
Click **File transfer** on the workflow diagram shown above and perform the following configurations in the **File Transfer** tab:
Choose **Action** as **File download** using the drop-down menu.
Under **Remote server,** ensure that the **Use an external account** checkbox is selected.
a. Choose the desired **External account** using the drop-down menu.
A workflow in Adobe Campaign is a series of steps or tasks designed to automate and optimise marketing processes. For more information about how to create a workflow and design the workflow diagram, refer [here](https://experienceleague.adobe.com/docs/campaign/automation/workflows/introduction/build-a-workflow.html?lang=en).
The followings are the necessary activities in a workflow:
1. [File Transfer](#file-transfer)
2. [Data Loading (File)](#data-loading-file)
3. [Update Data](#update-data)
Note that you have to configure each activity individually by clicking on them. To do so, refer to the individual topics as detailed below.
#### File Transfer
Click **File transfer** on the workflow diagram shown above and perform the following configurations in the **File Transfer** tab:
Choose **Action** as **File download** using the drop-down menu.
Under **Remote server,** ensure that the **Use an external account** checkbox is selected.
a. Choose the desired **External account** using the drop-down menu.
b. Update the **Server folder** path as shown in the image below and click **Ok**.
 #### Data Loading (file)
**Use case 1- Loading data containing only email addresses**
Click **Data loading (file)** on the workflow diagram and perform the following configurations in the **Data** tab:
Provide the path of the sample CSV file, which contains sample email addresses from your local drive.
Select the **Use as sample file on the local computer** and **Use a line number as identifier** checkboxes.
Under **Name of the file to load**, select **Specified in the transition** checkbox.
Under **Target database**, select **Default** checkbox.
Click **Ok**.
**Note**
You can preview the data in the sample file under the **Preview** section.
#### Data Loading (file)
**Use case 1- Loading data containing only email addresses**
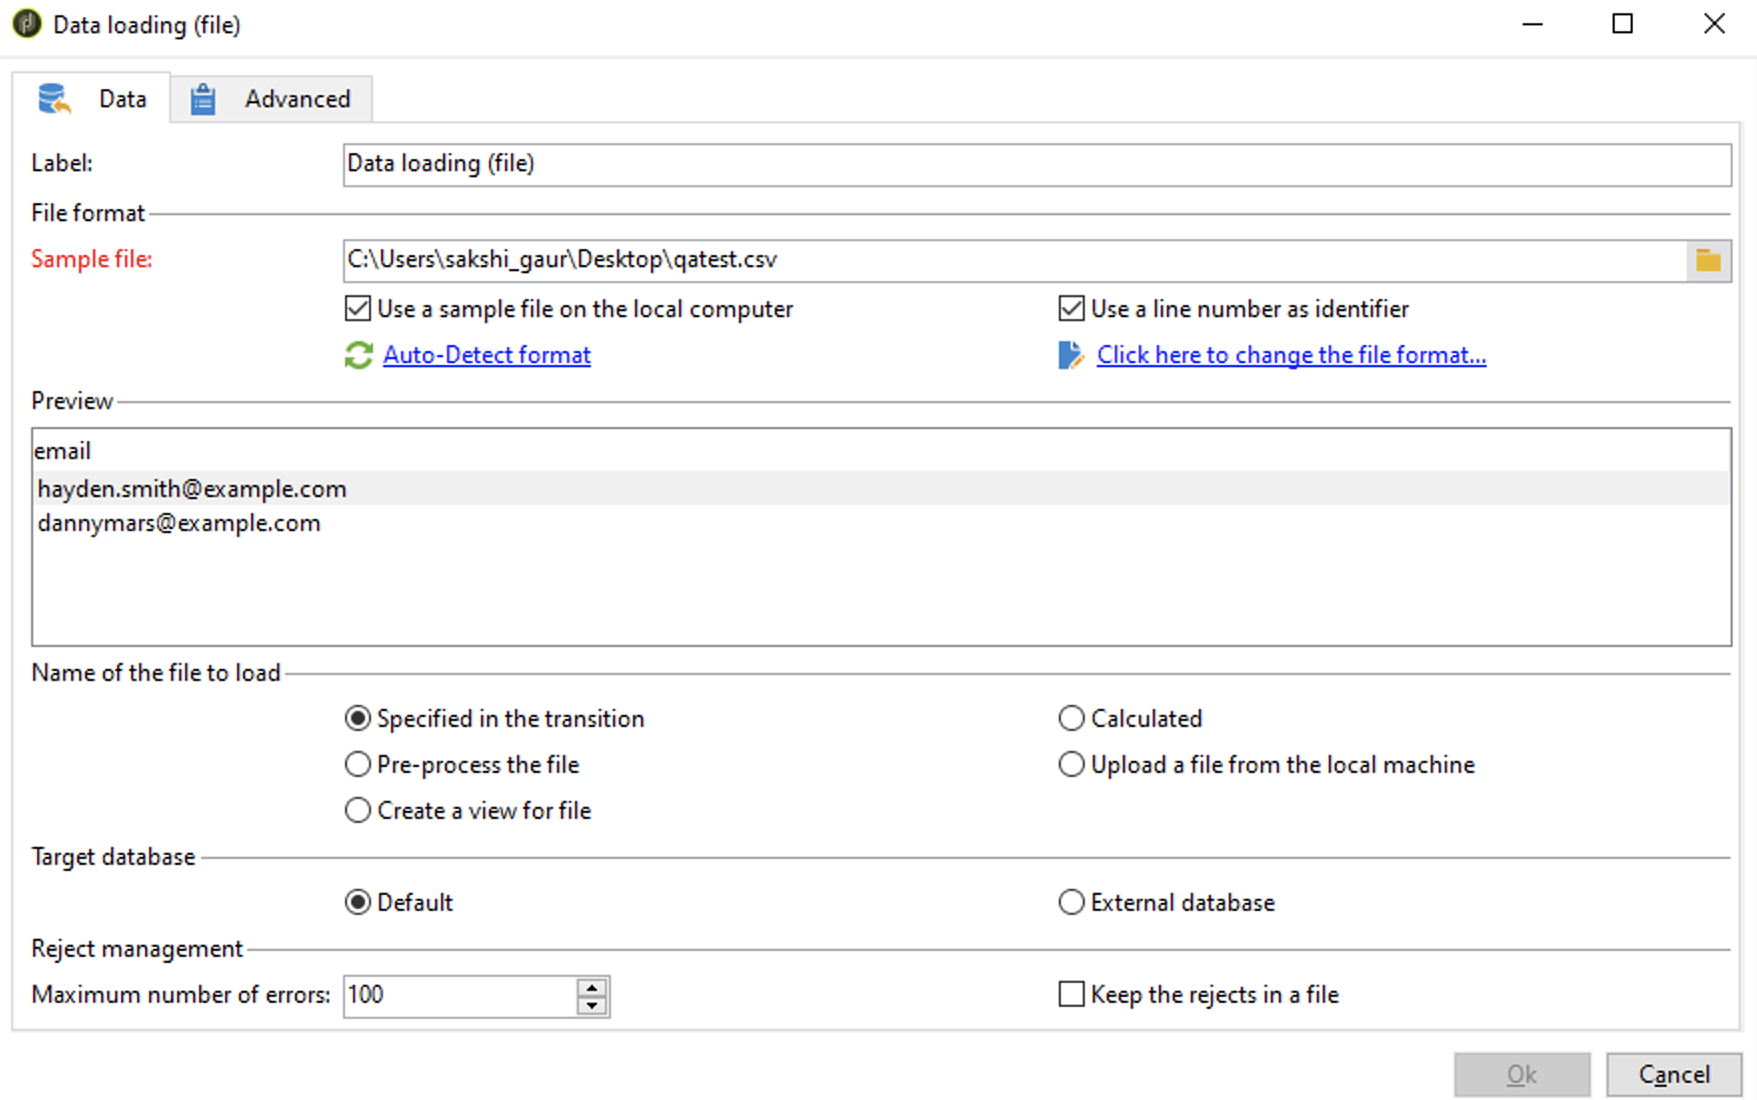
Click **Data loading (file)** on the workflow diagram and perform the following configurations in the **Data** tab:
Provide the path of the sample CSV file, which contains sample email addresses from your local drive.
Select the **Use as sample file on the local computer** and **Use a line number as identifier** checkboxes.
Under **Name of the file to load**, select **Specified in the transition** checkbox.
Under **Target database**, select **Default** checkbox.
Click **Ok**.
**Note**
You can preview the data in the sample file under the **Preview** section.
 **Use case 2 - Loading data containing both email addresses and custom IDs.**
Click **Data loading (file)** on the workflow diagram and perform the following configurations in the **Data** tab:
Provide the path of the sample CSV file, which contains sample email addresses and custom IDs from your local drive.
Select the **Use as sample file on the local computer** and **Use a line number as identifier** checkboxes.
Click **Auto-Detect Format** to preview the uploaded sample file.
Under **Name of the file to load**, select **Specified in the transition** checkbox.
Under **Target database**, select **Default** checkbox.
Click **Ok**.
**Note:**
You can preview the data in the sample file under the **Preview** section.
**Use case 2 - Loading data containing both email addresses and custom IDs.**
Click **Data loading (file)** on the workflow diagram and perform the following configurations in the **Data** tab:
Provide the path of the sample CSV file, which contains sample email addresses and custom IDs from your local drive.
Select the **Use as sample file on the local computer** and **Use a line number as identifier** checkboxes.
Click **Auto-Detect Format** to preview the uploaded sample file.
Under **Name of the file to load**, select **Specified in the transition** checkbox.
Under **Target database**, select **Default** checkbox.
Click **Ok**.
**Note:**
You can preview the data in the sample file under the **Preview** section.
.png?fit=max&auto=format&n=YNdtFkydSZ-00_Bc&q=85&s=7a7ea9a90a024fc365a7c2d6b9e7b8c0) #### Update Data
**Use case 1 - Updating data containing only email addresses.**
Click **Update Data**on the workflow diagram and perform the following configurations in the **Update data** tab:
Choose the appropriate **Operation type** using the drop-down menu.
Choose the **Batch size** as 1000,000 (1 million).
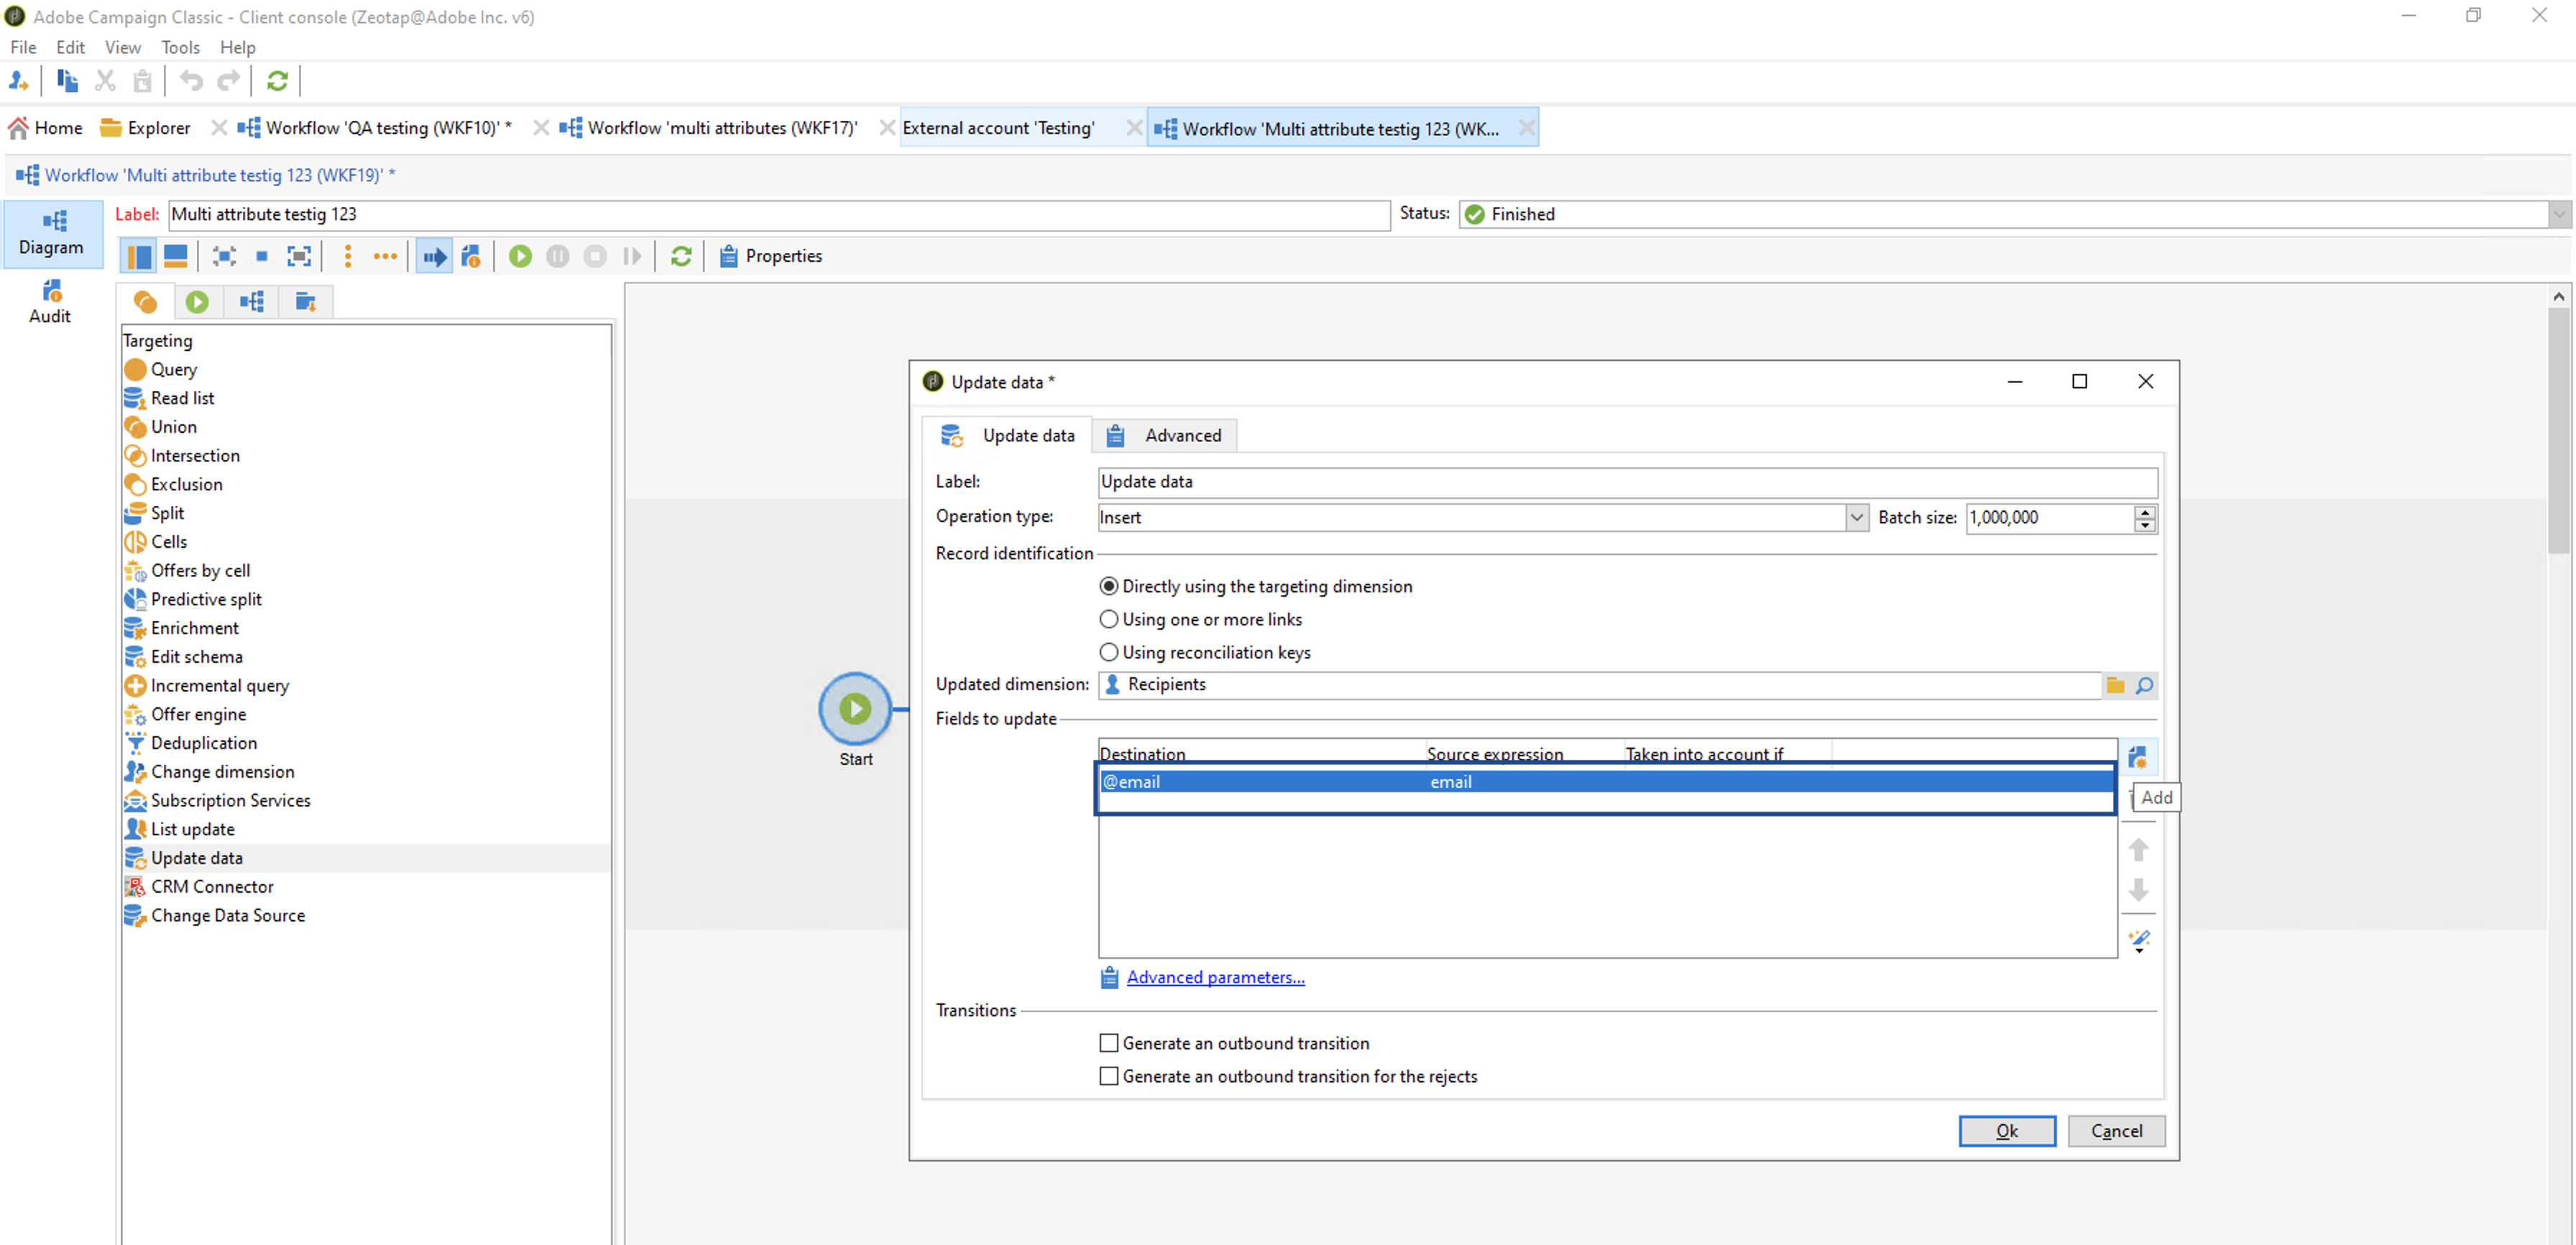
Under **Fields to update**, add the email addresses and folders. To do so, use the **New** icon shown in the image below.
Once you are done with your configurations, click **Ok.**
#### Update Data
**Use case 1 - Updating data containing only email addresses.**
Click **Update Data**on the workflow diagram and perform the following configurations in the **Update data** tab:
Choose the appropriate **Operation type** using the drop-down menu.
Choose the **Batch size** as 1000,000 (1 million).
Under **Fields to update**, add the email addresses and folders. To do so, use the **New** icon shown in the image below.
Once you are done with your configurations, click **Ok.**
.png?fit=max&auto=format&n=5uegGRTZnAzLL6tY&q=85&s=17c1b15129b18b47ab6156446fb19bb2) **Use case 2- Updating data containing email addresses and custom IDs.**
Click **Update Data** on the workflow diagram and perform the following configurations in the **Update data** tab:
Choose the appropriate **Operation type** using the drop-down menu.
Choose the **Batch size** as 1000,000 (1 million).
Under **Fields to update**, click **Add** to add a new row.
**Use case 2- Updating data containing email addresses and custom IDs.**
Click **Update Data** on the workflow diagram and perform the following configurations in the **Update data** tab:
Choose the appropriate **Operation type** using the drop-down menu.
Choose the **Batch size** as 1000,000 (1 million).
Under **Fields to update**, click **Add** to add a new row.
_nw_(1).png?fit=max&auto=format&n=5uegGRTZnAzLL6tY&q=85&s=d26f36798d1885cc813882f3904fd2d7) a. In the new row added, perform the following steps to map email addresses:
i. Click **Edit expression** under **Destination** (LHS of the row).
a. In the new row added, perform the following steps to map email addresses:
i. Click **Edit expression** under **Destination** (LHS of the row).
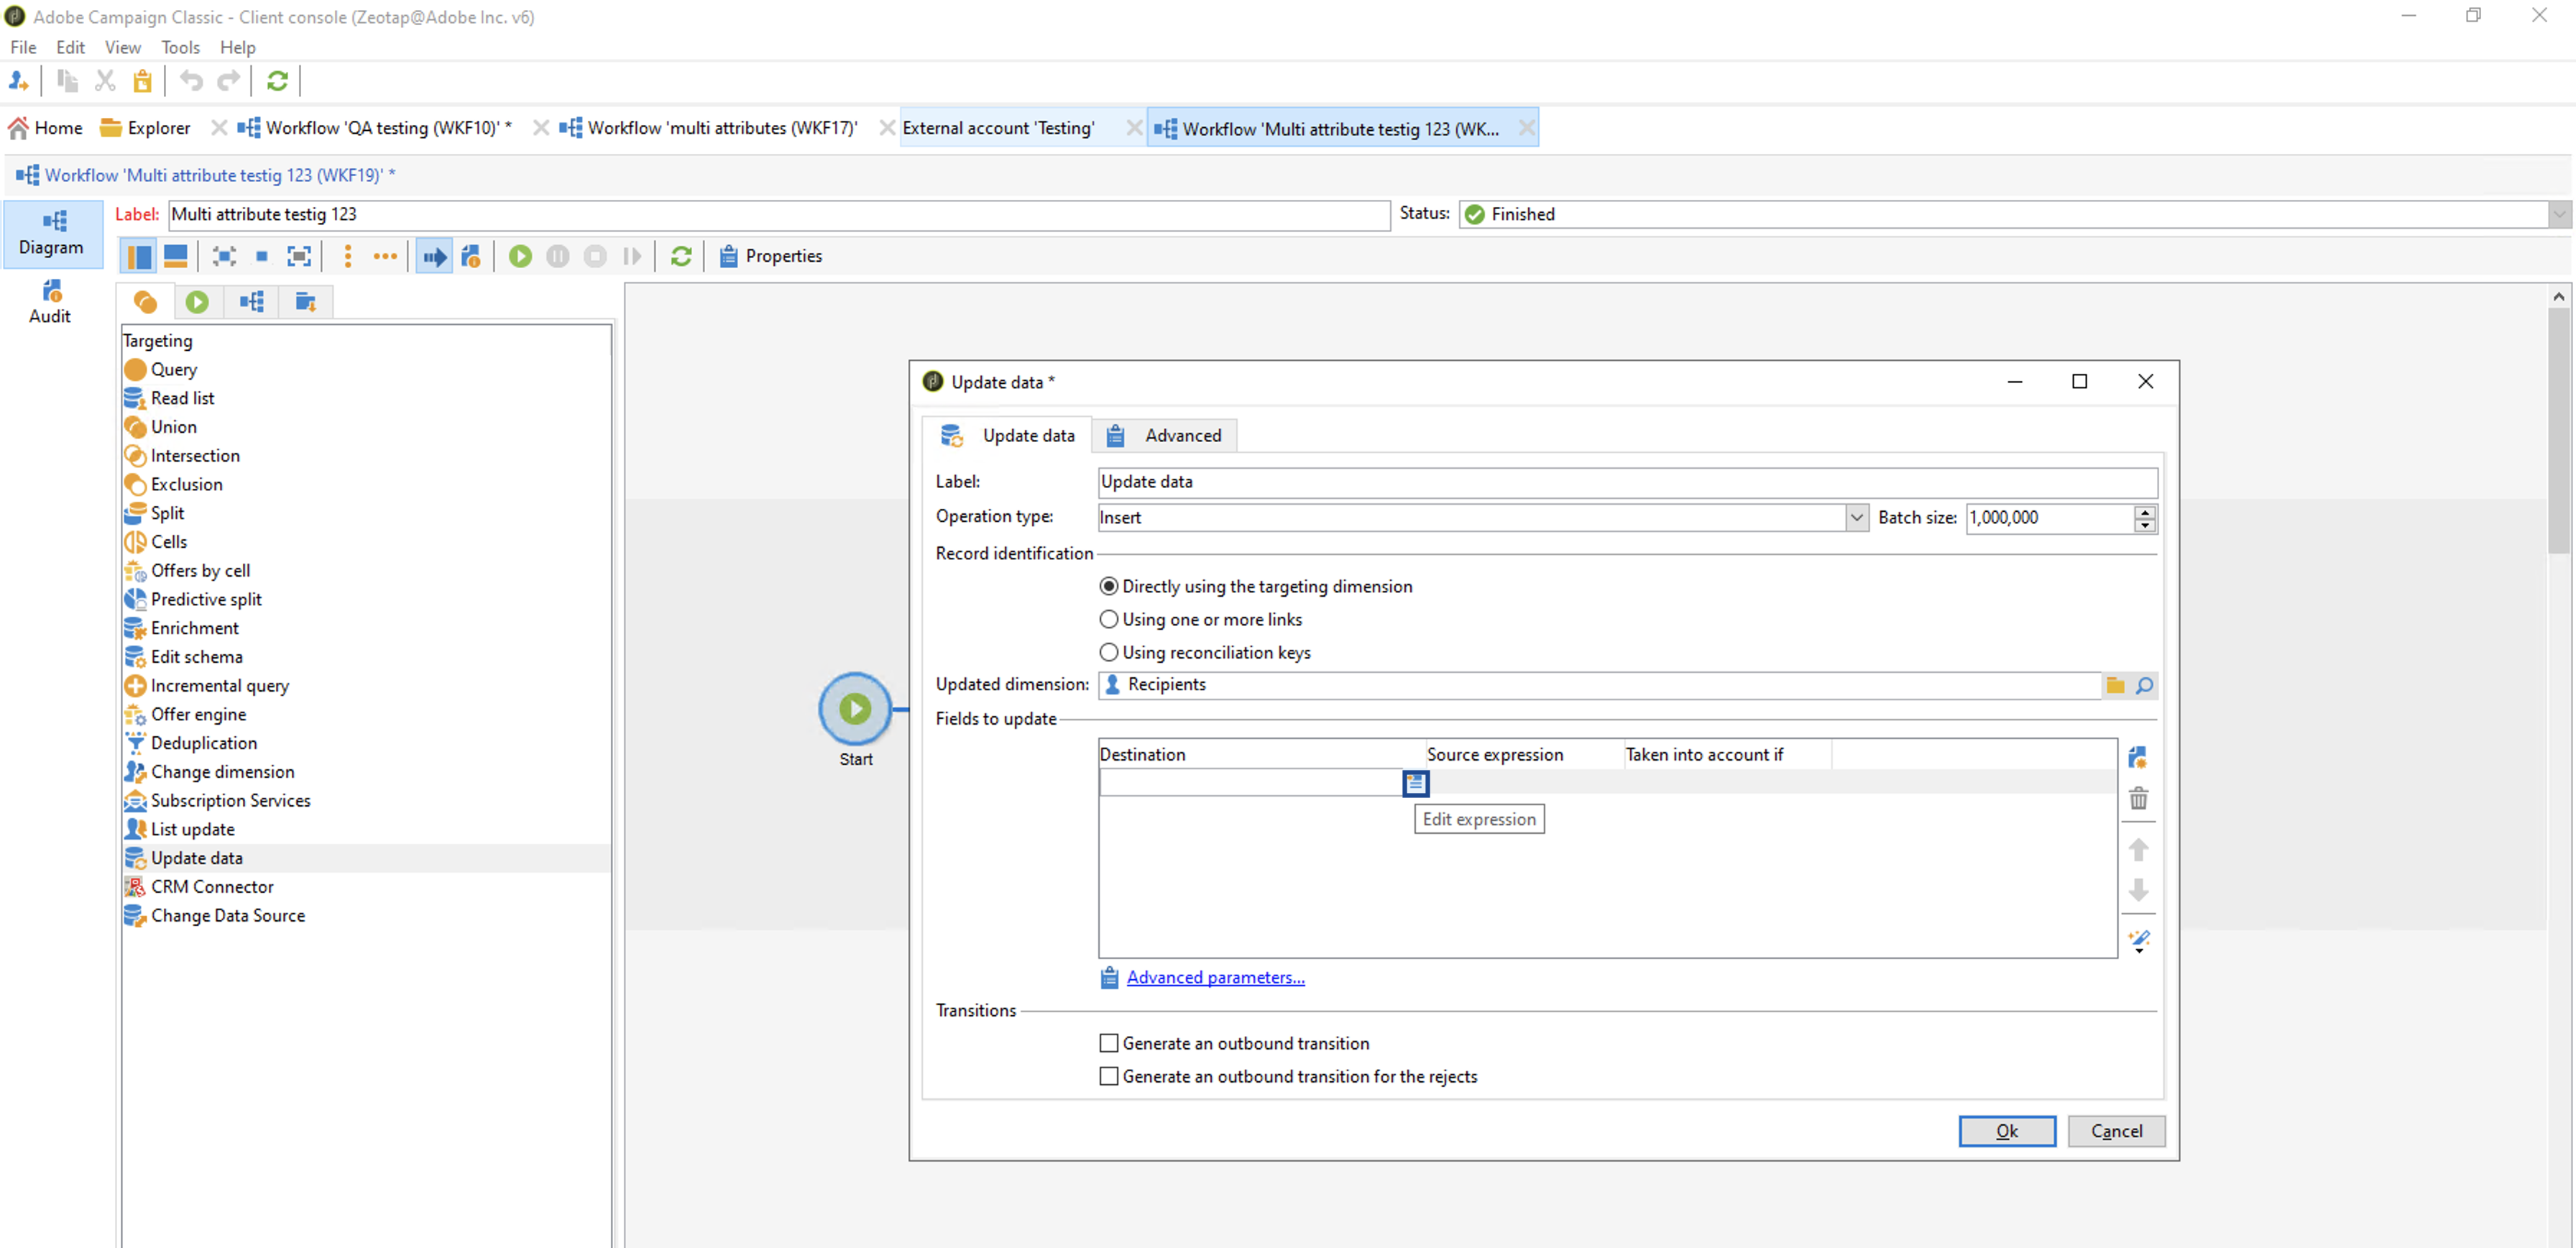 ii. In the following **Select a field from document Recipients** window that appears, under **Available fields** search for Email. Choose **Email (@email)** and click **OK**.
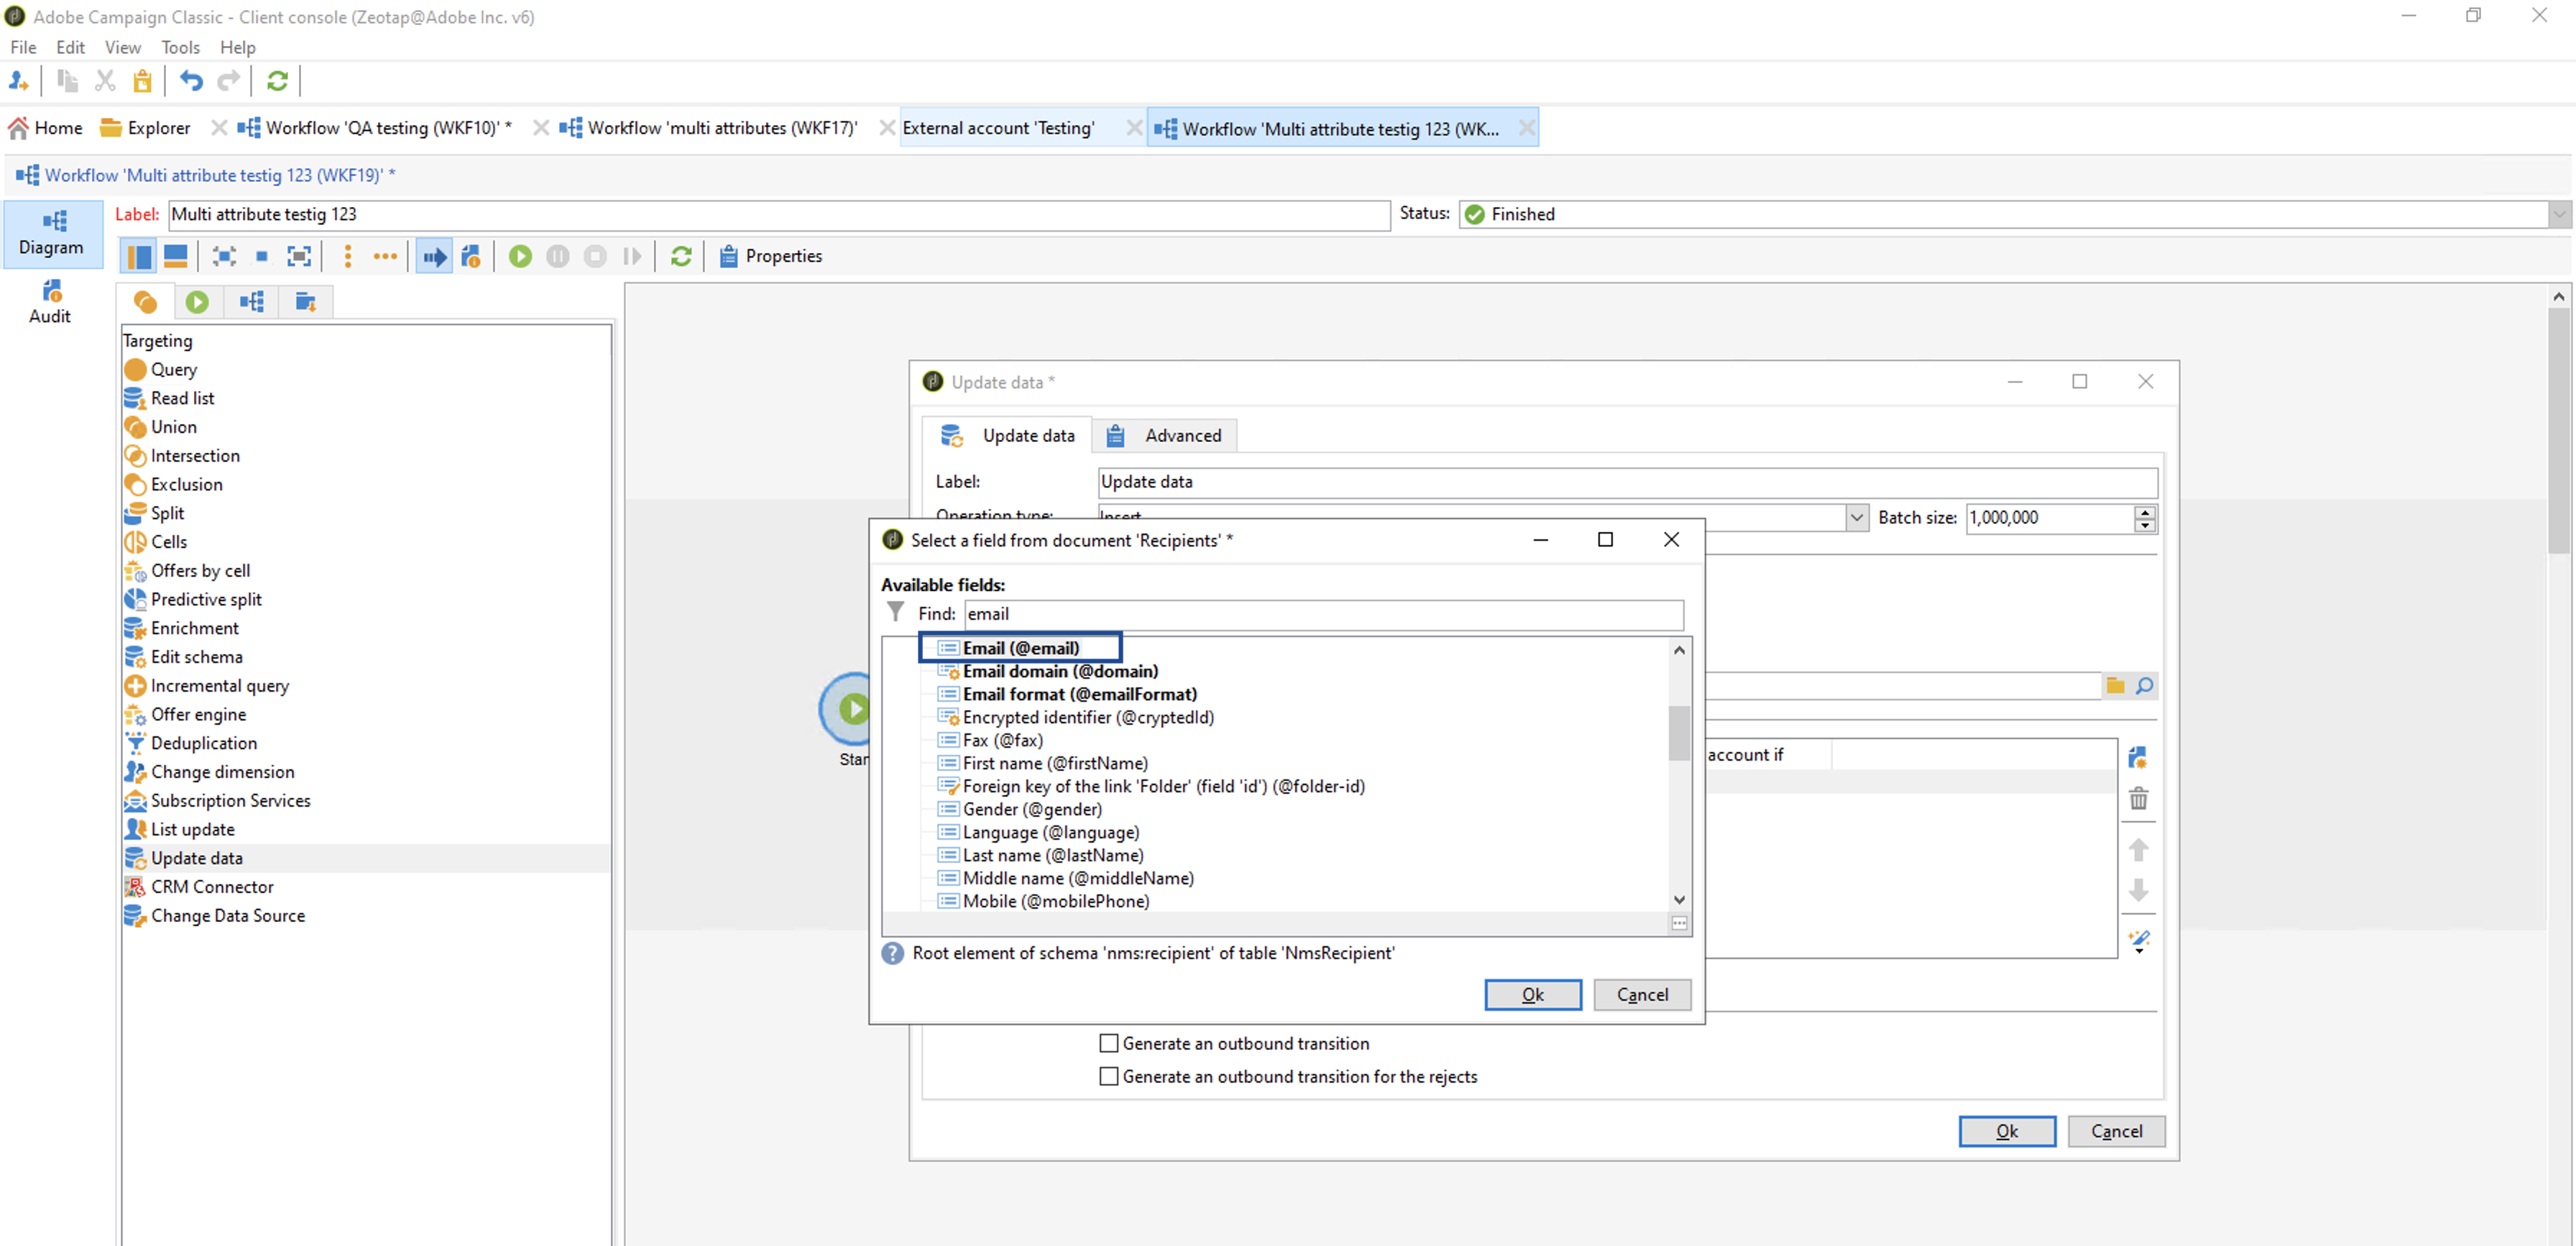 iii. Under **Source expression** (RHS of the row), click **Edit expression**.
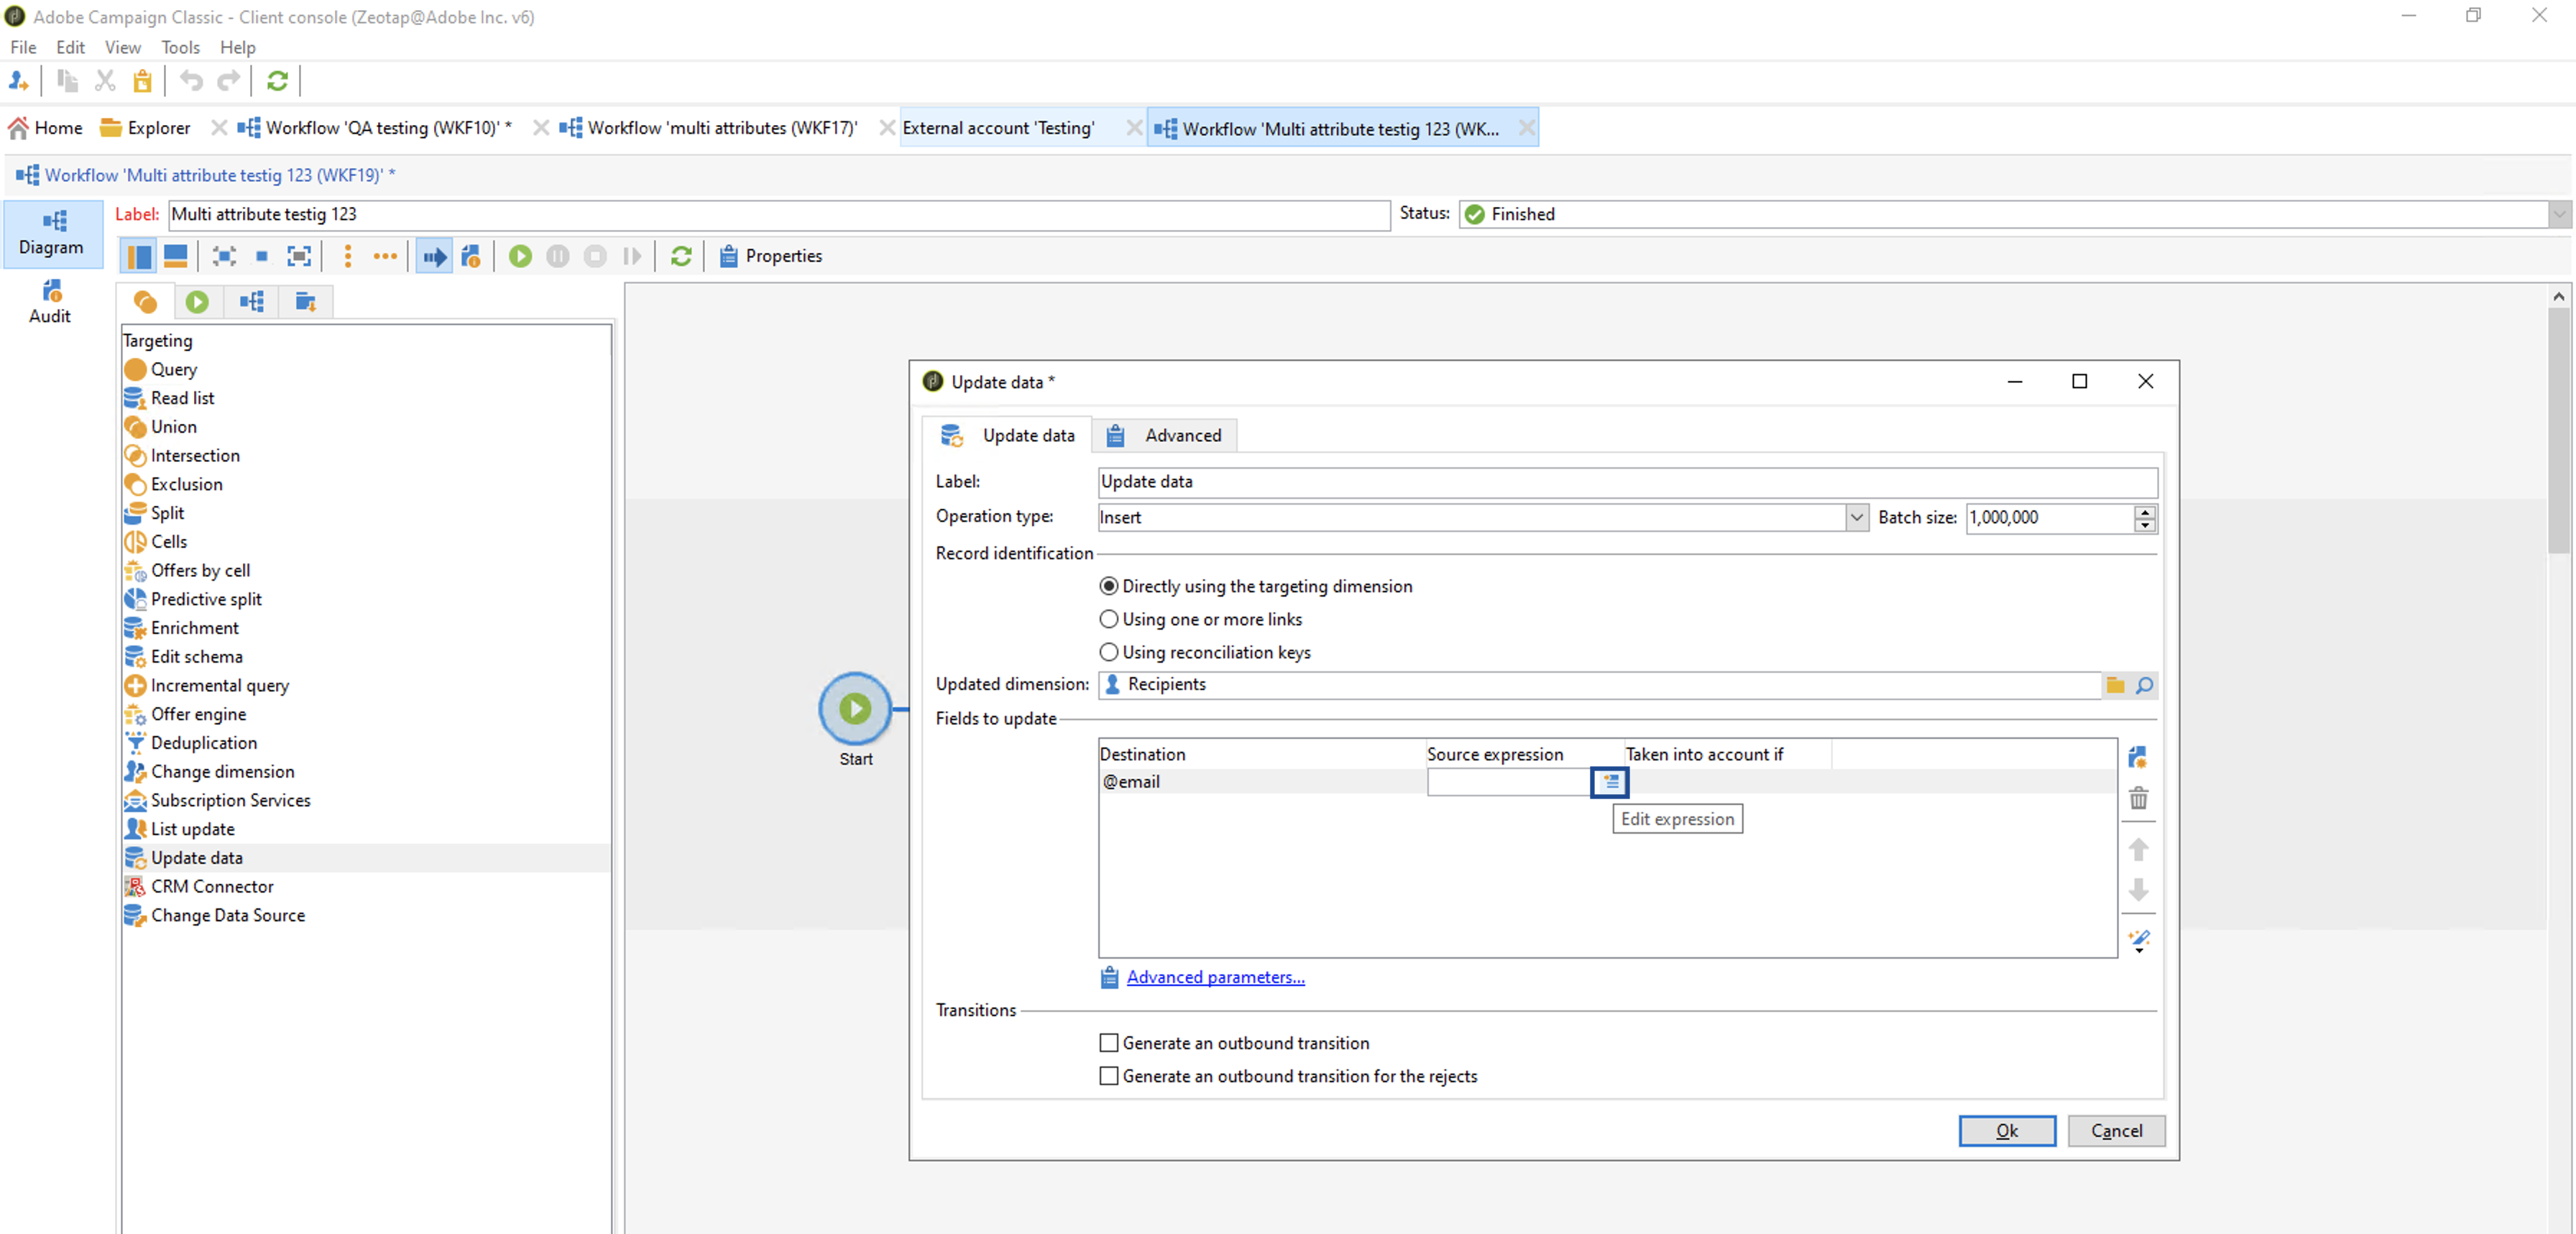 iv. In the following **Select an expression** window that appears, under **Available fields** search for email, double click **email** and click **Finish**.
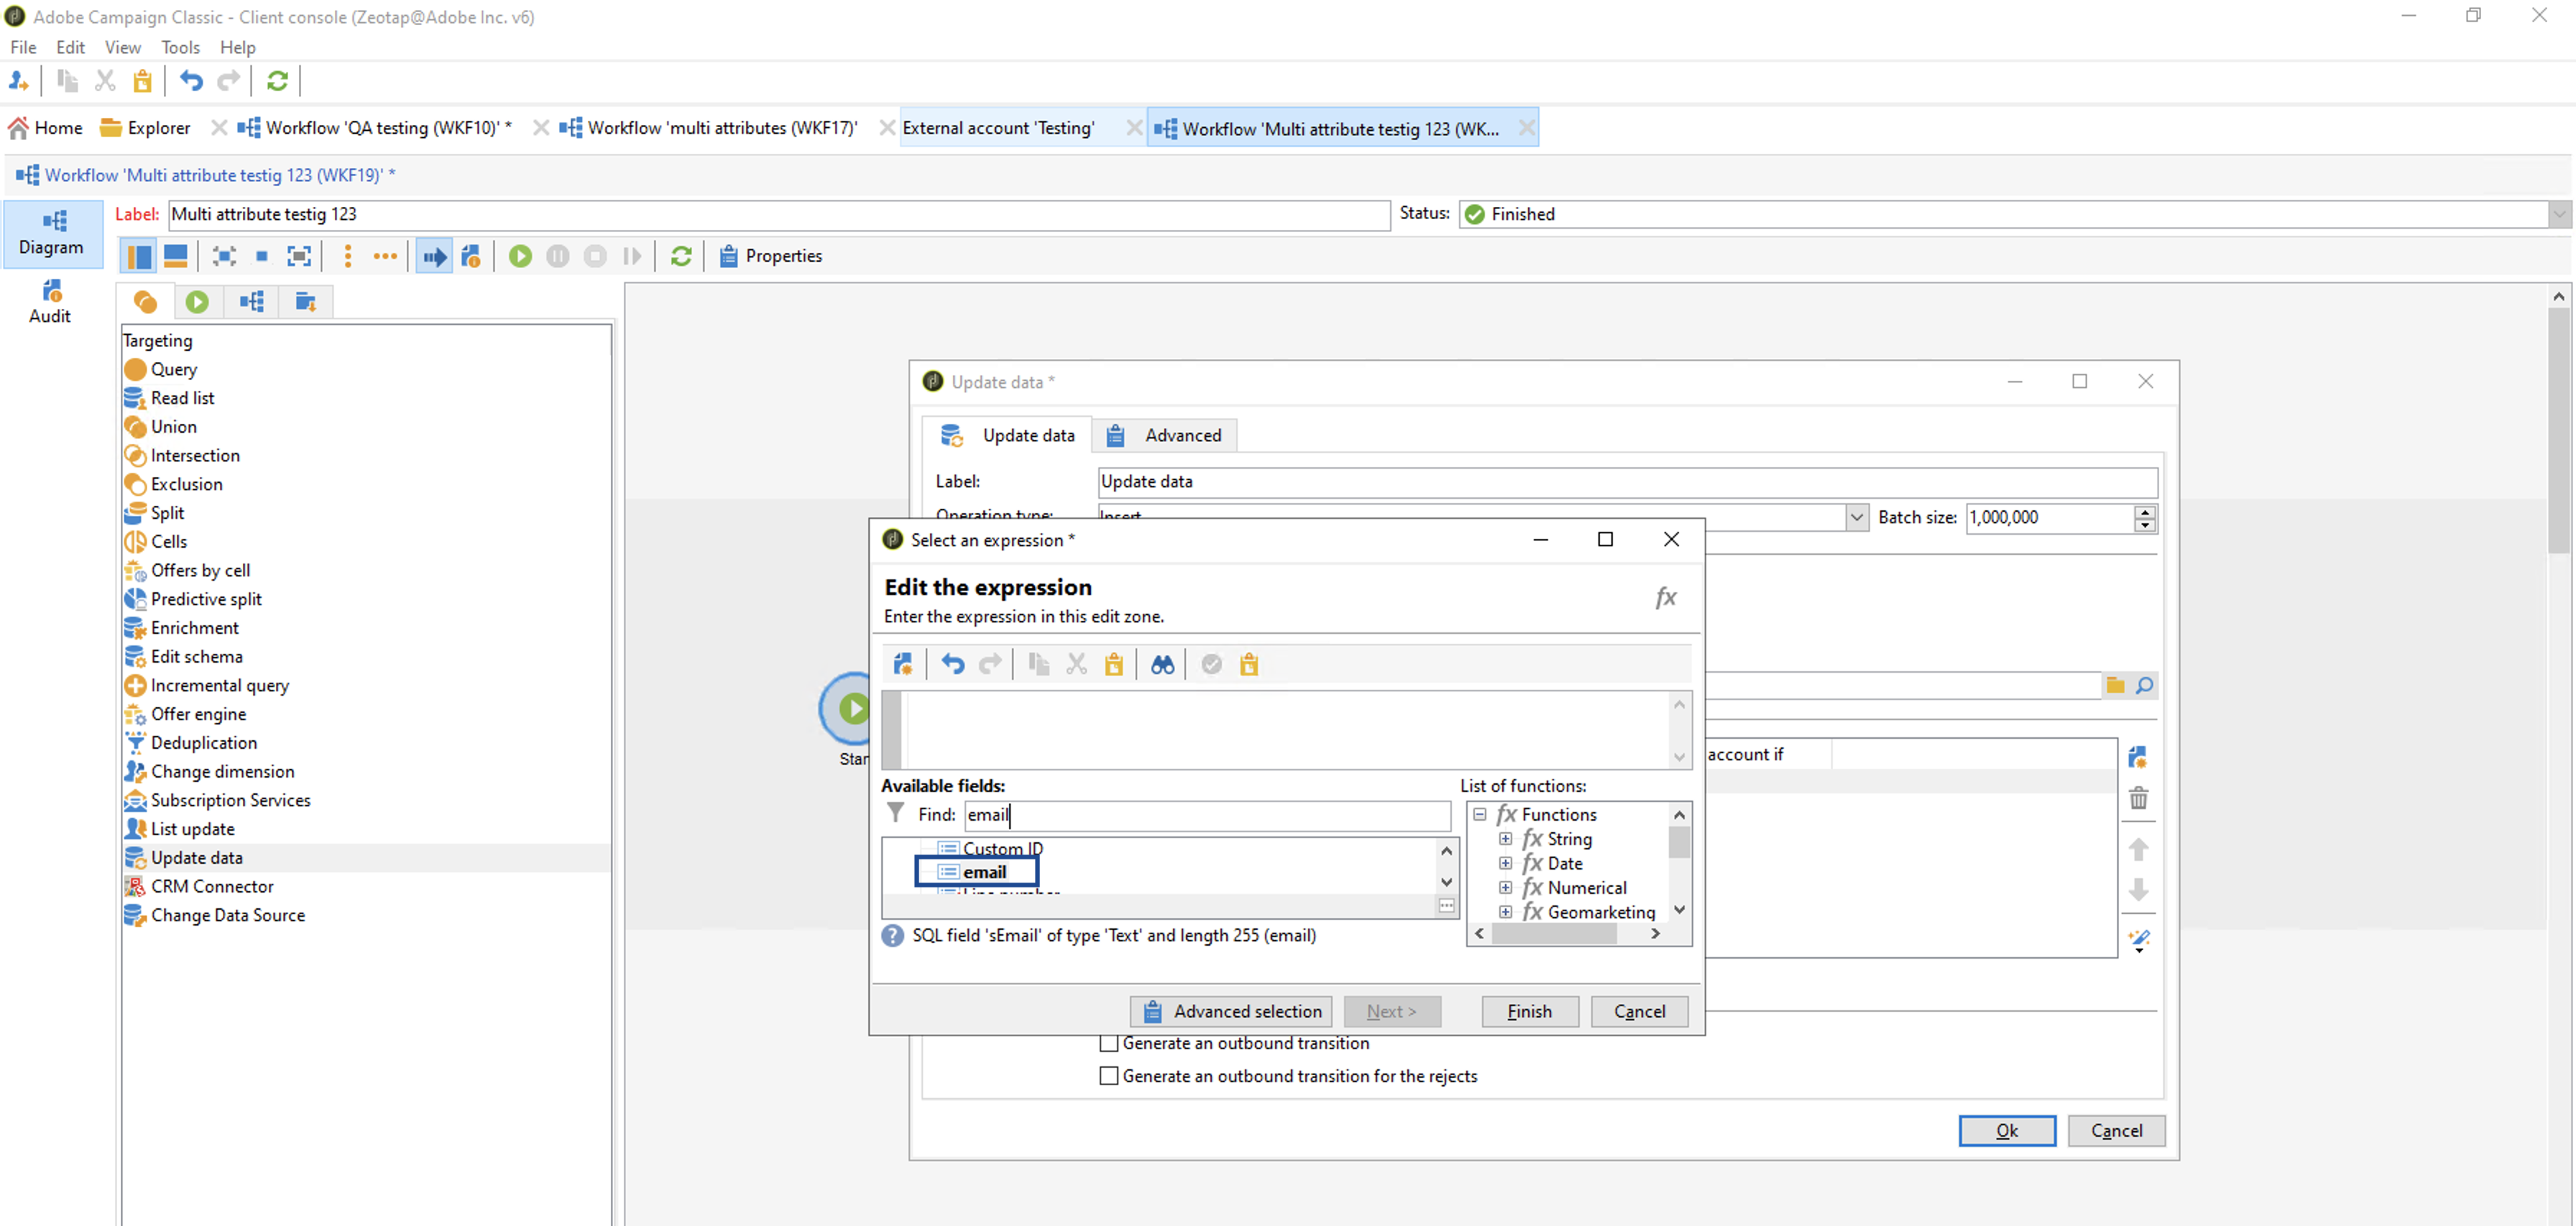 v. After the mapping is completed, email appears in the UI as shown below. Click **OK**.
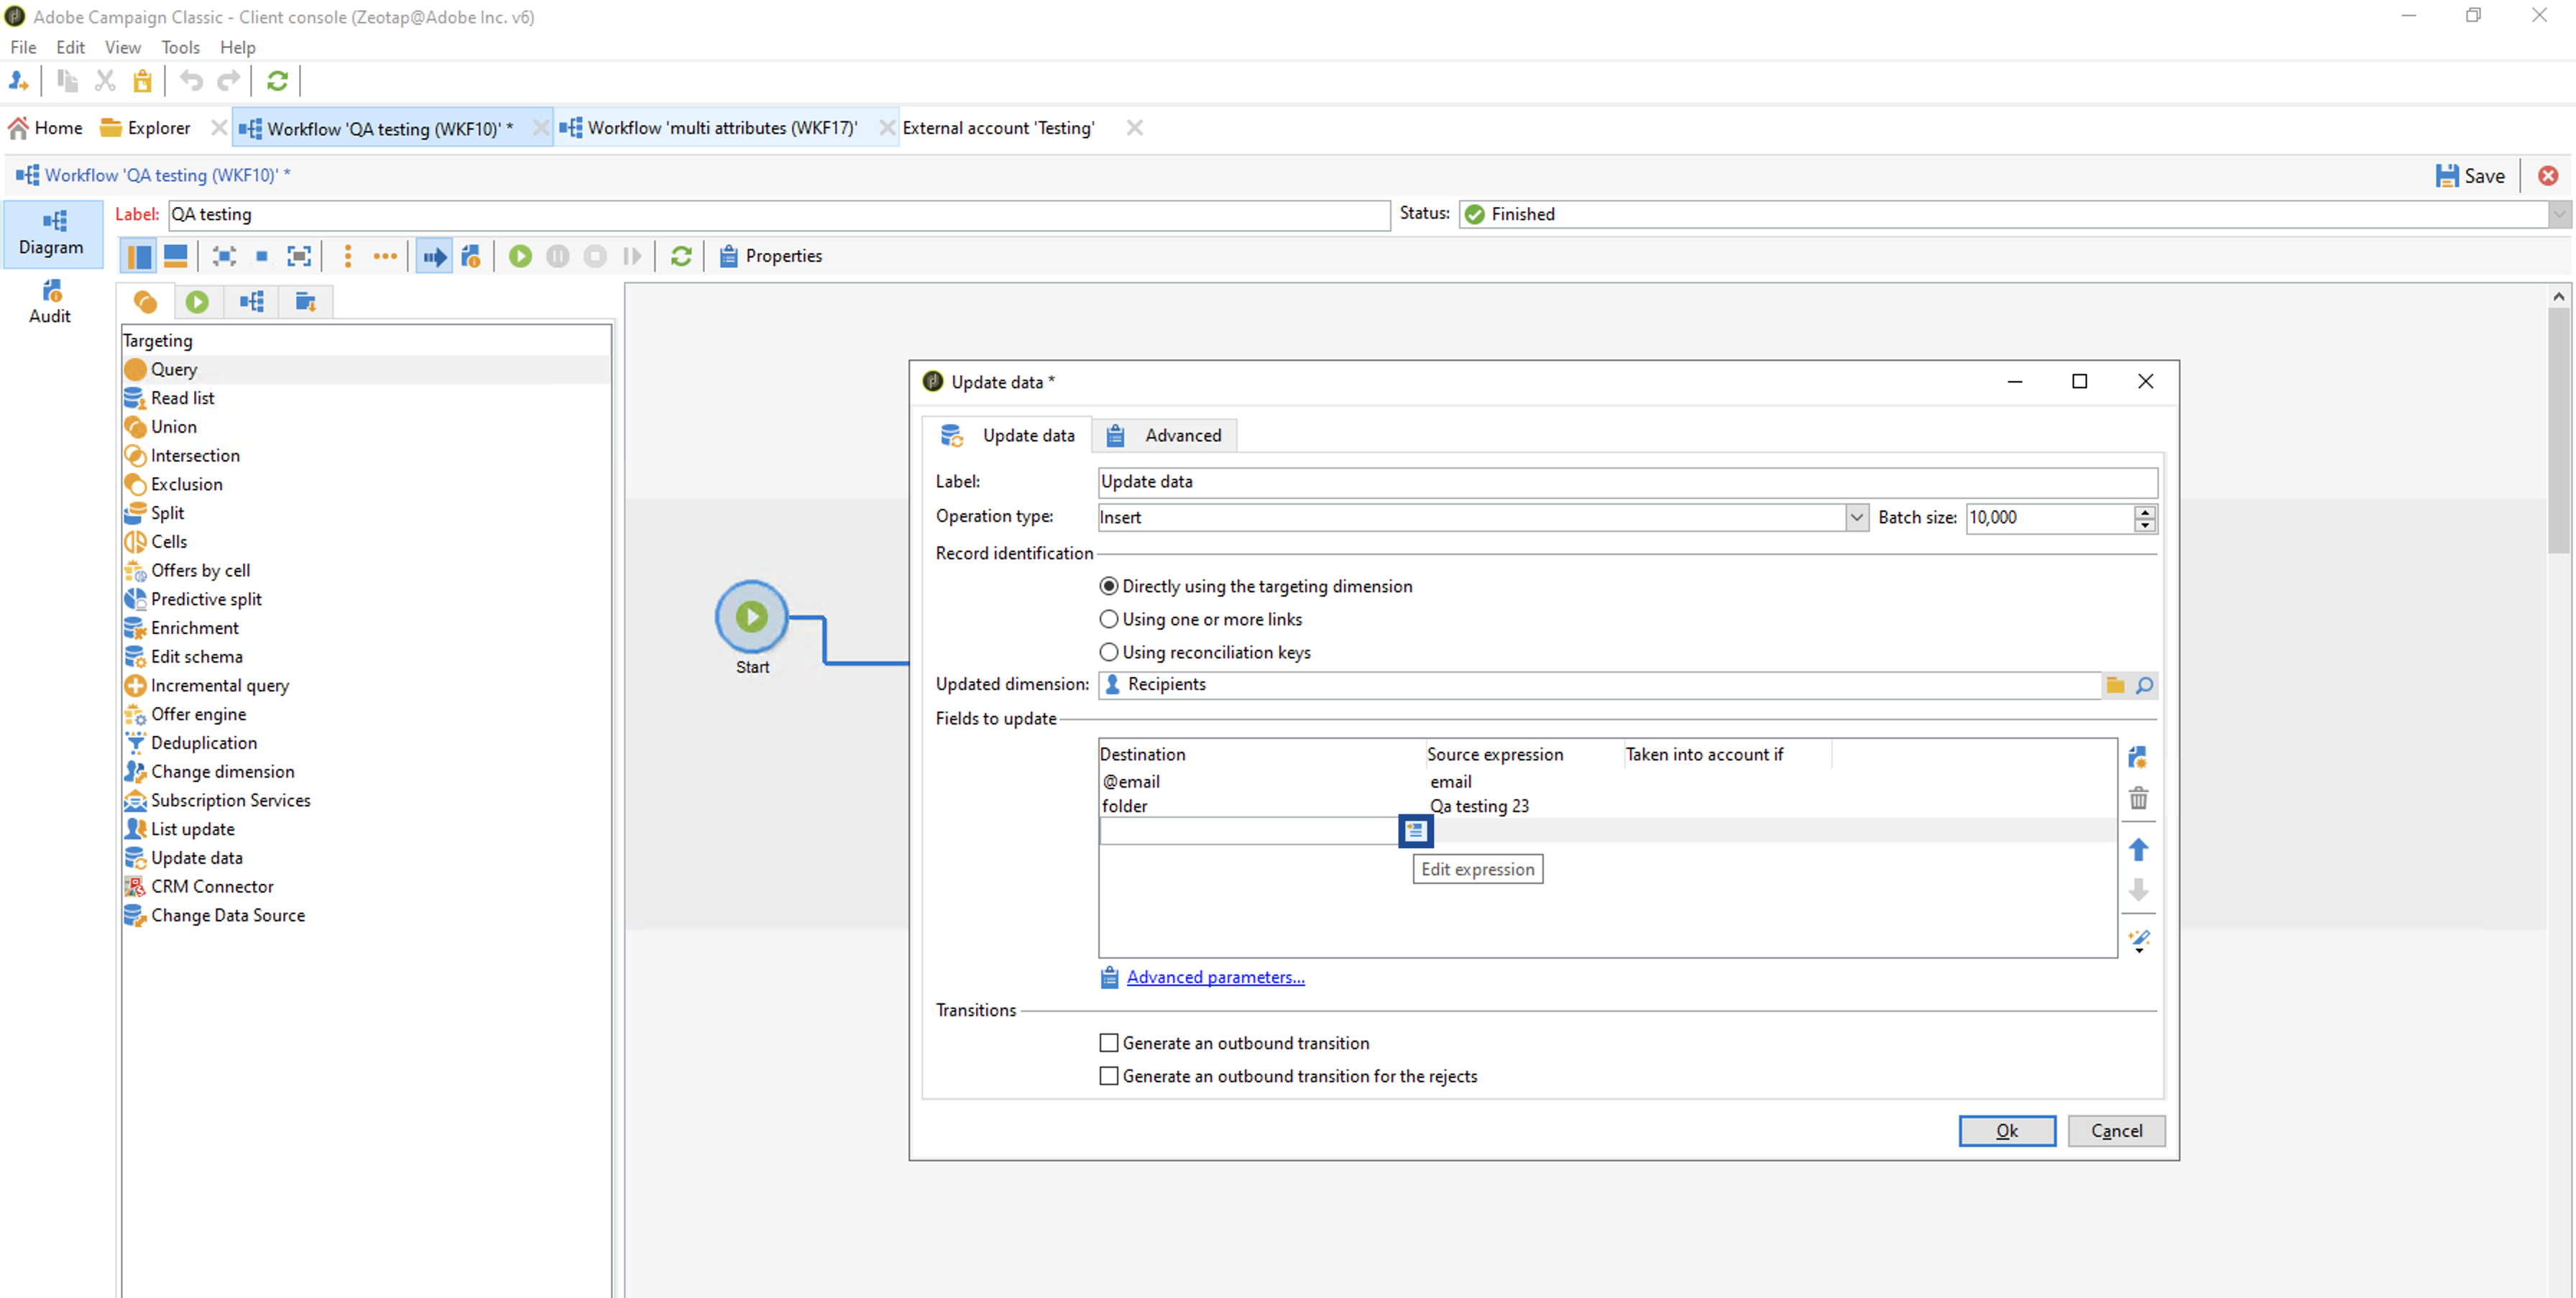
 b. Add another row for mapping the custom ID. In the new row that is added, perform the following steps to map custom IDs:
i. Click **Edit expression** under **Destination** (LHS of the row).
b. Add another row for mapping the custom ID. In the new row that is added, perform the following steps to map custom IDs:
i. Click **Edit expression** under **Destination** (LHS of the row).
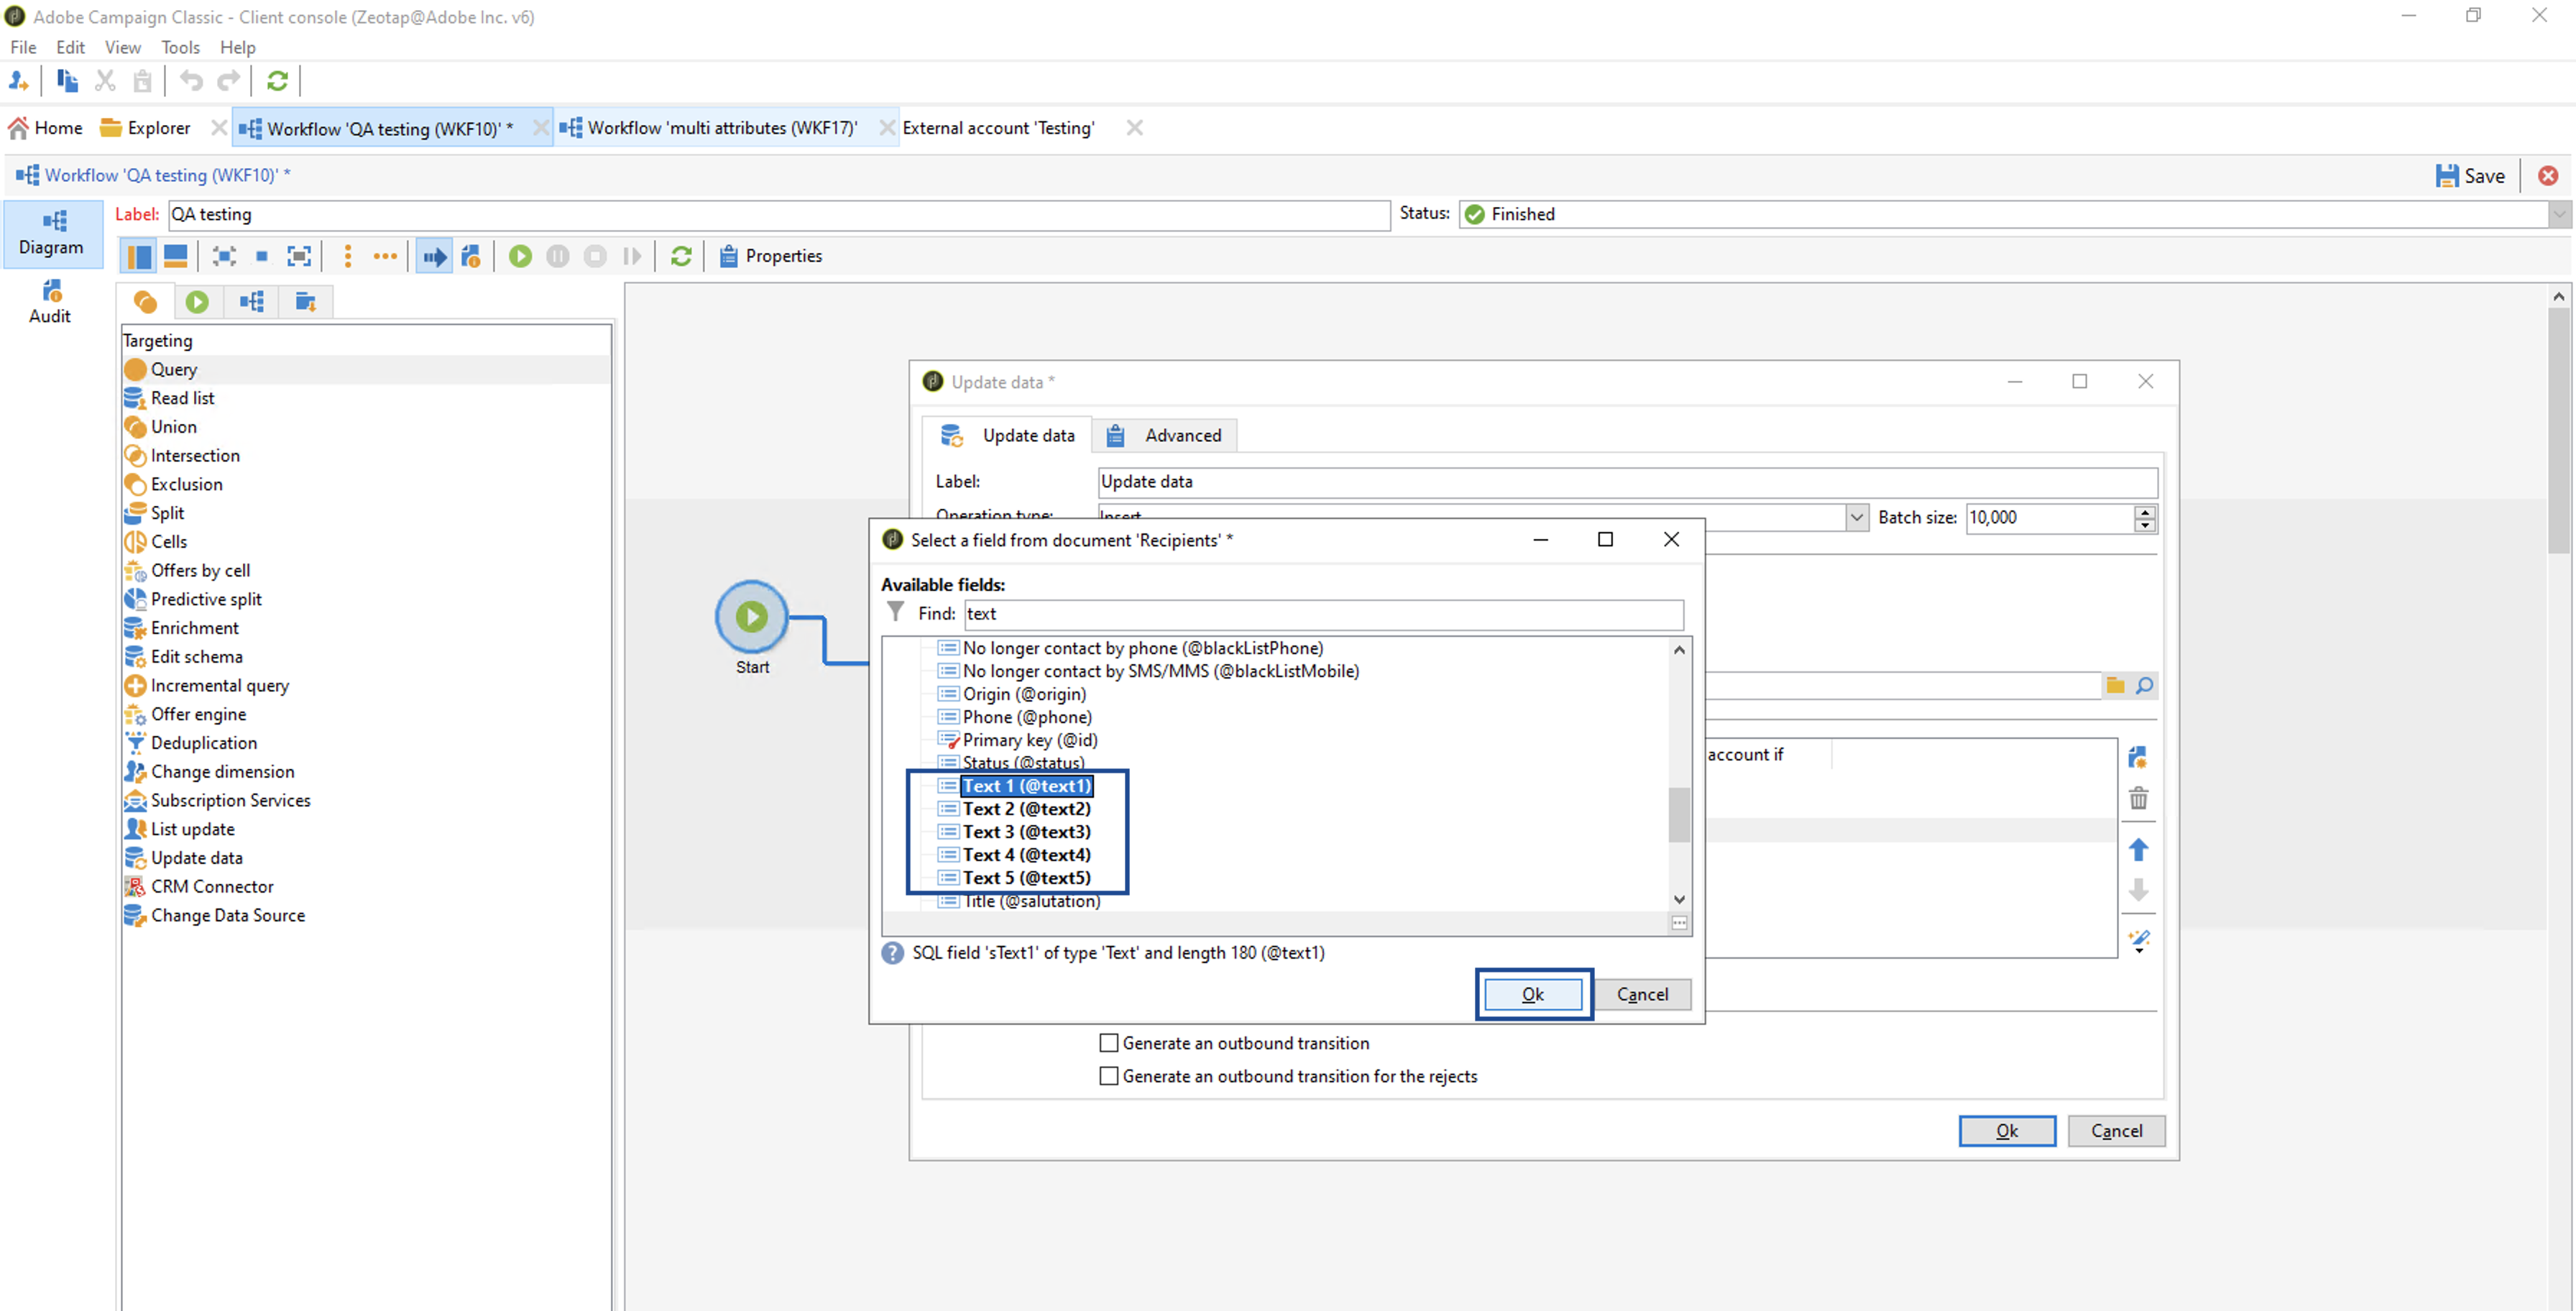
 ii. In the following **Select a field from document Recipients** window that appears, under **Available fields** search for **Text**. Note that you can choose any option from **Text 1** to **Text 5** for successful mapping of custom ID. After the choosing the Text, click **OK**.
 iii. Under **Source expression** (RHS of the row), click **Edit expression**.
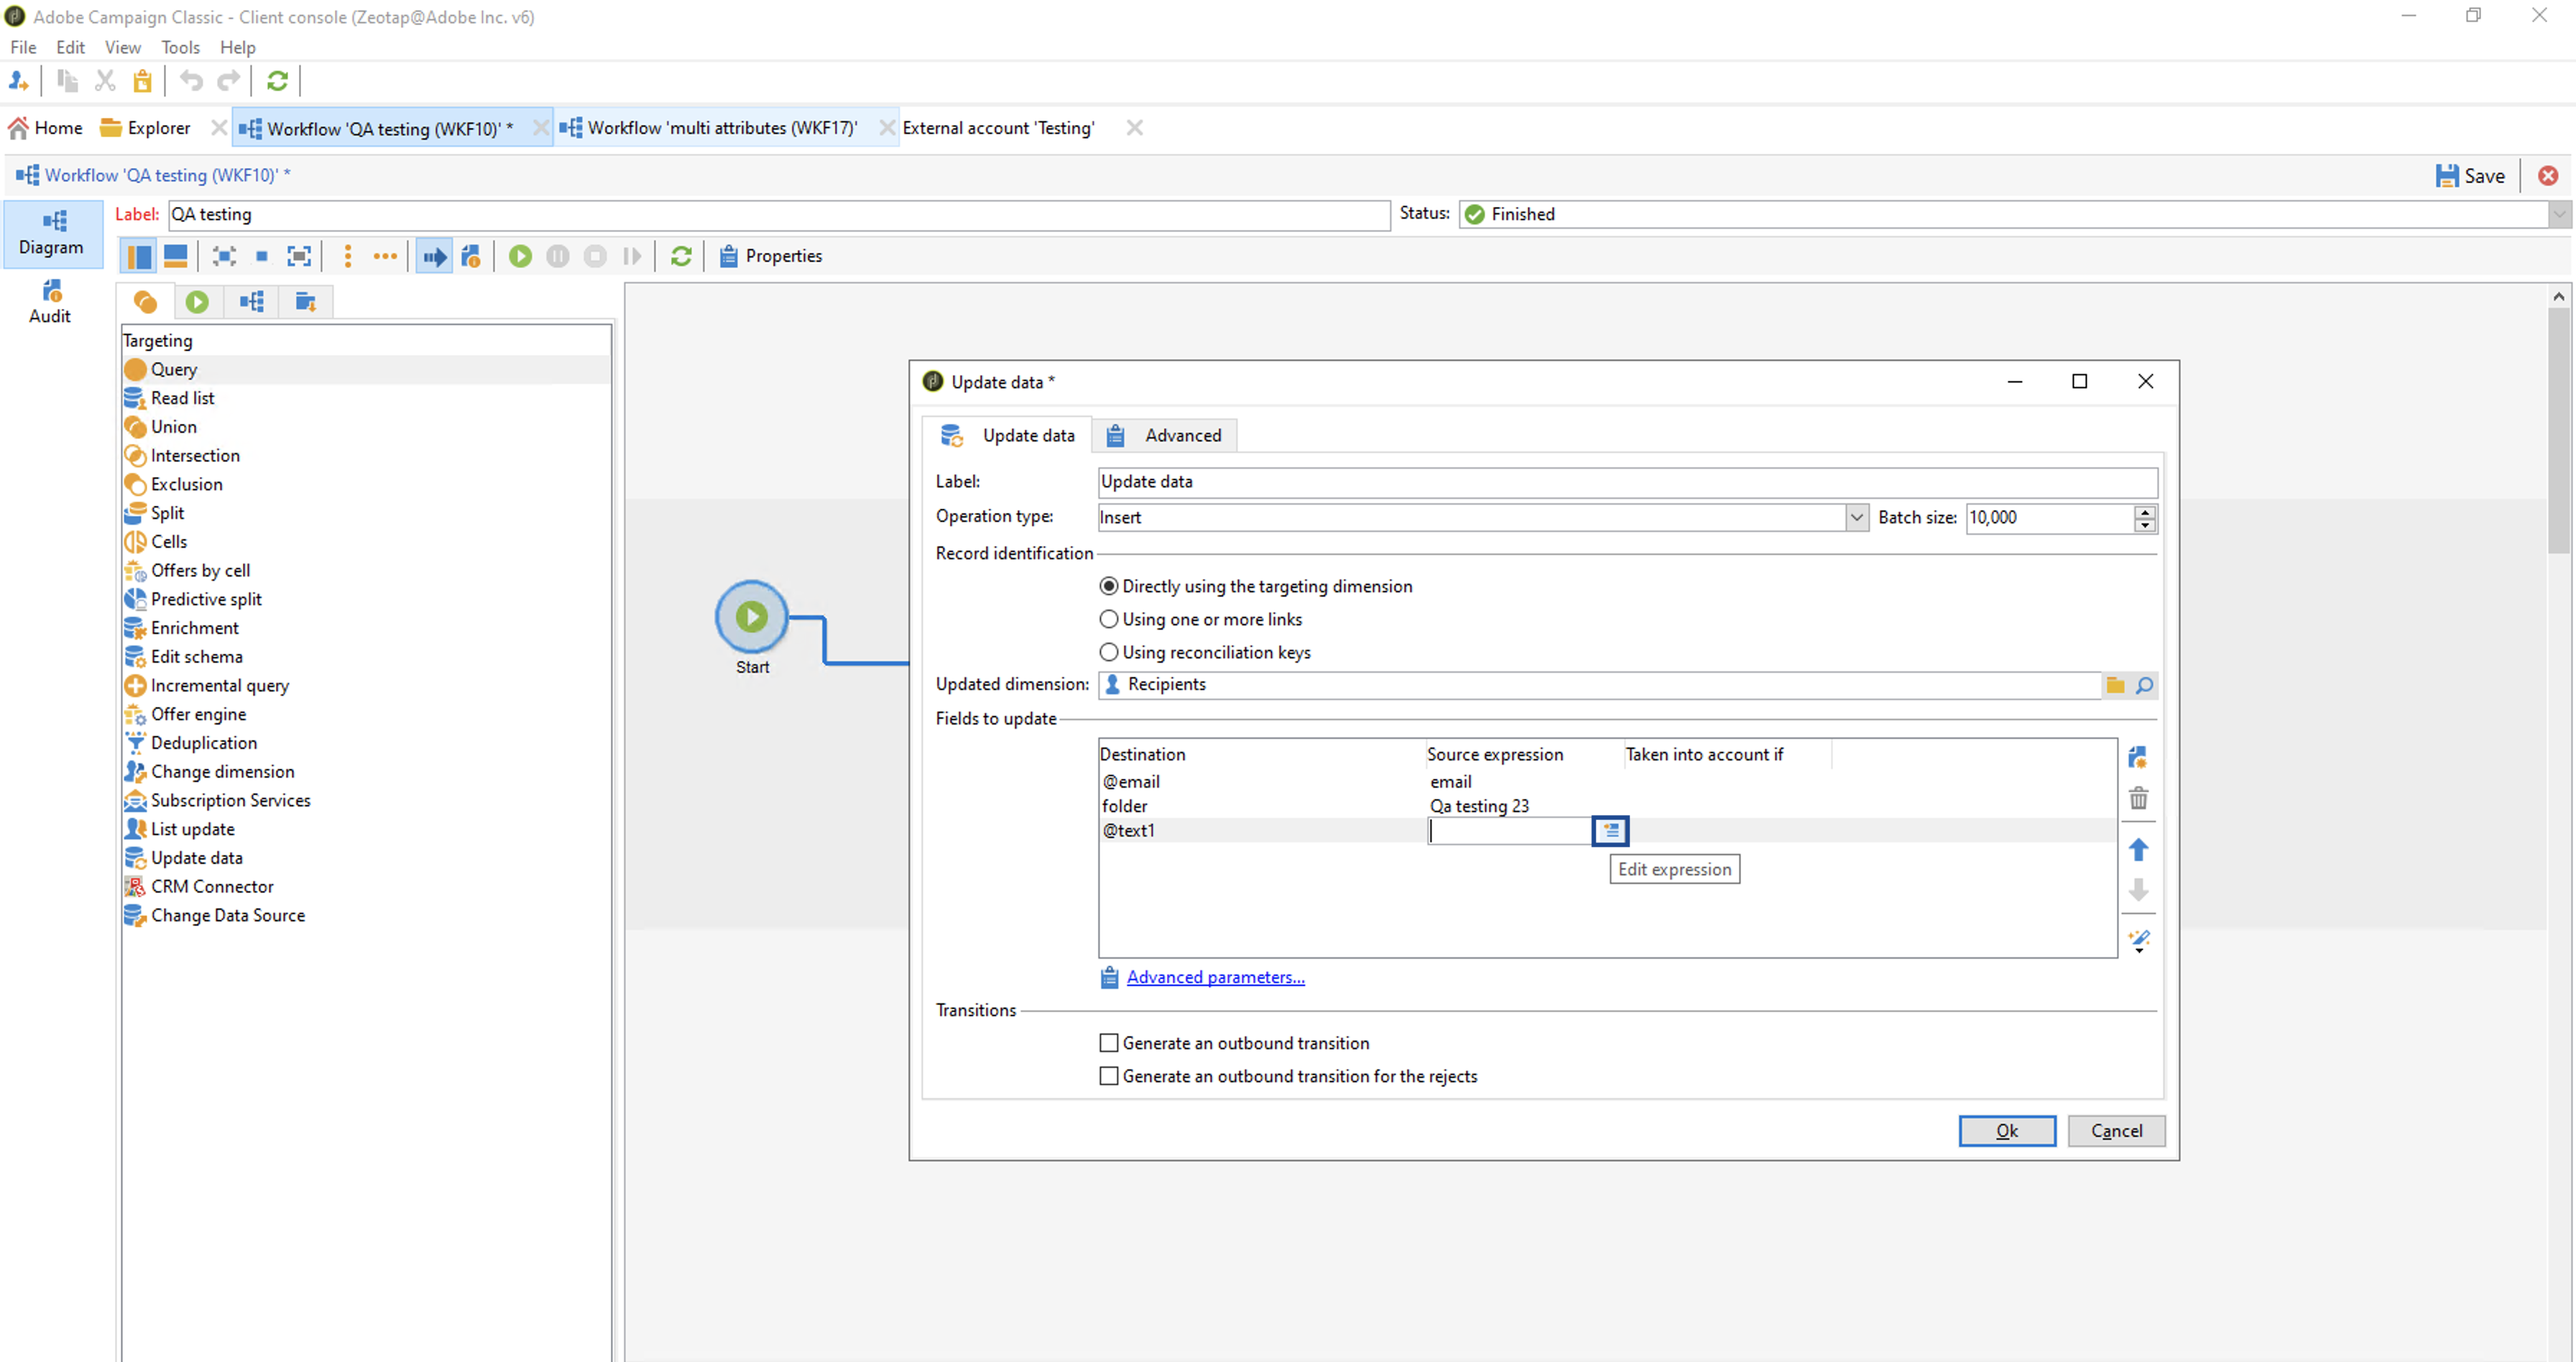 iv. In the following **Select an expression** window that appears, under **Available fields** search for custom ID, double click the **custom ID** and click **Finish**. Note that this custom ID should be exactly same as the custom ID provided while creating destination in Zeotap CDP.
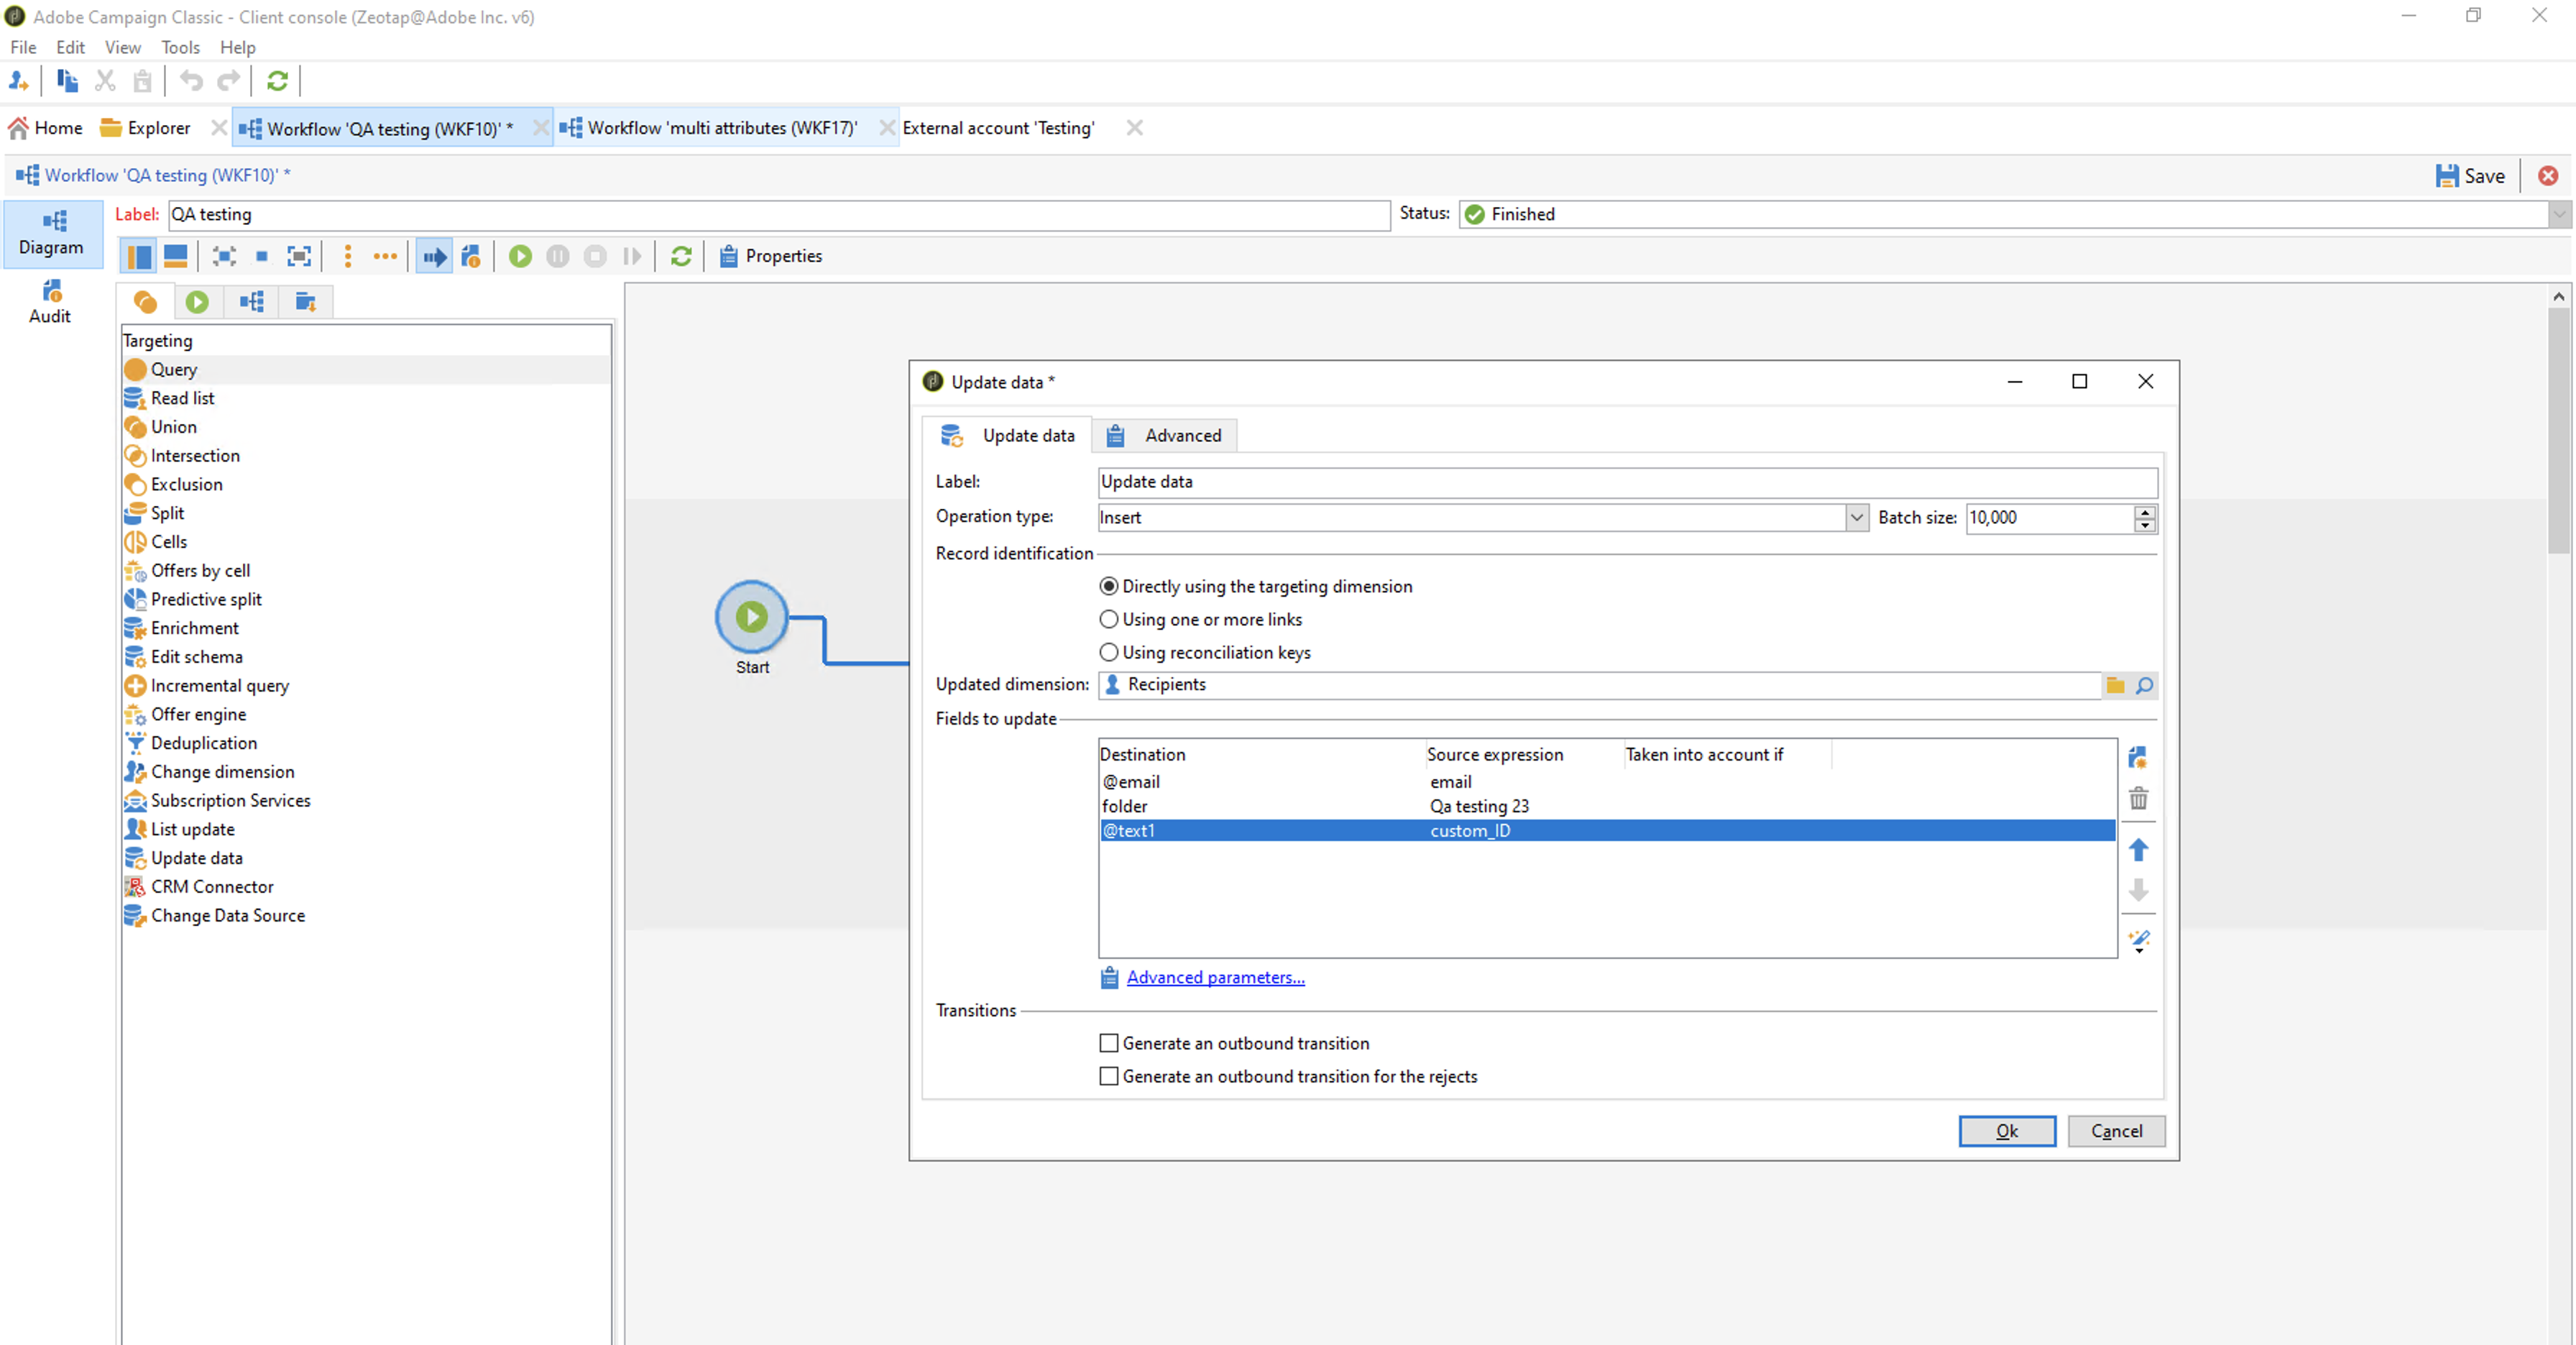 v. After the mapping is completed, custom ID appears in the UI as shown below. Click **OK**.
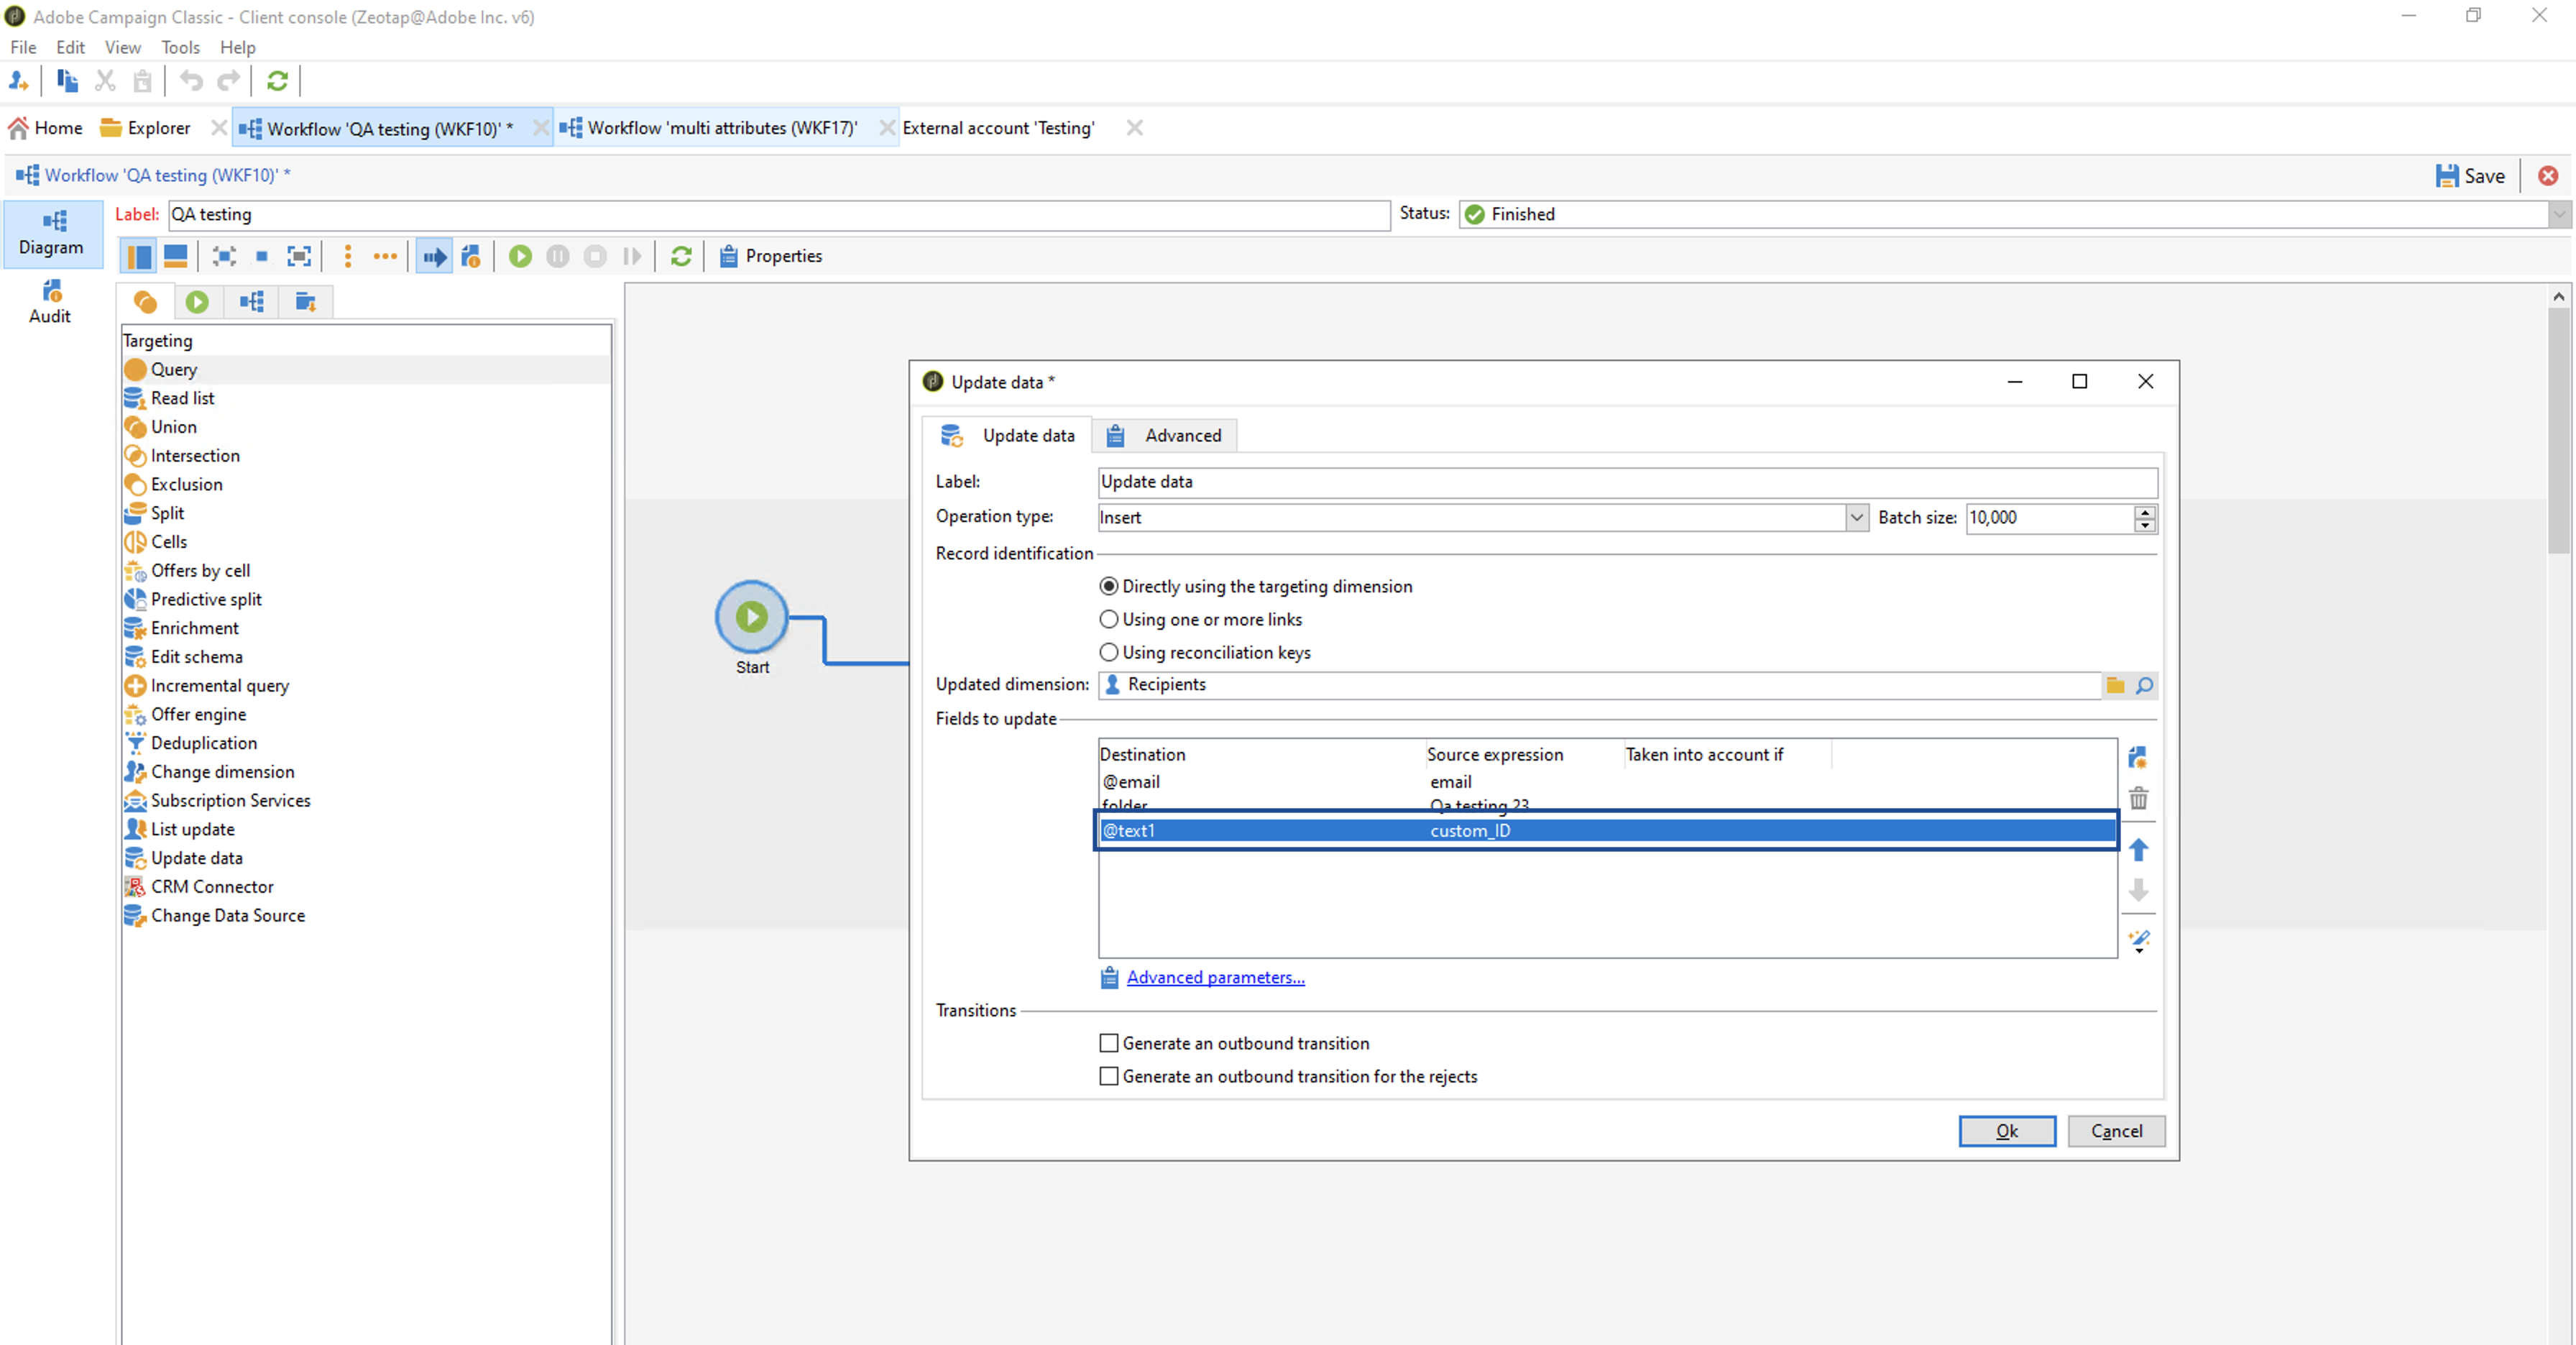 c. Add another row for mapping the folder. In the new row that is added, perform the following steps to map folder:
i. Click **Edit expression** under **Destination** (LHS of the row).
c. Add another row for mapping the folder. In the new row that is added, perform the following steps to map folder:
i. Click **Edit expression** under **Destination** (LHS of the row).
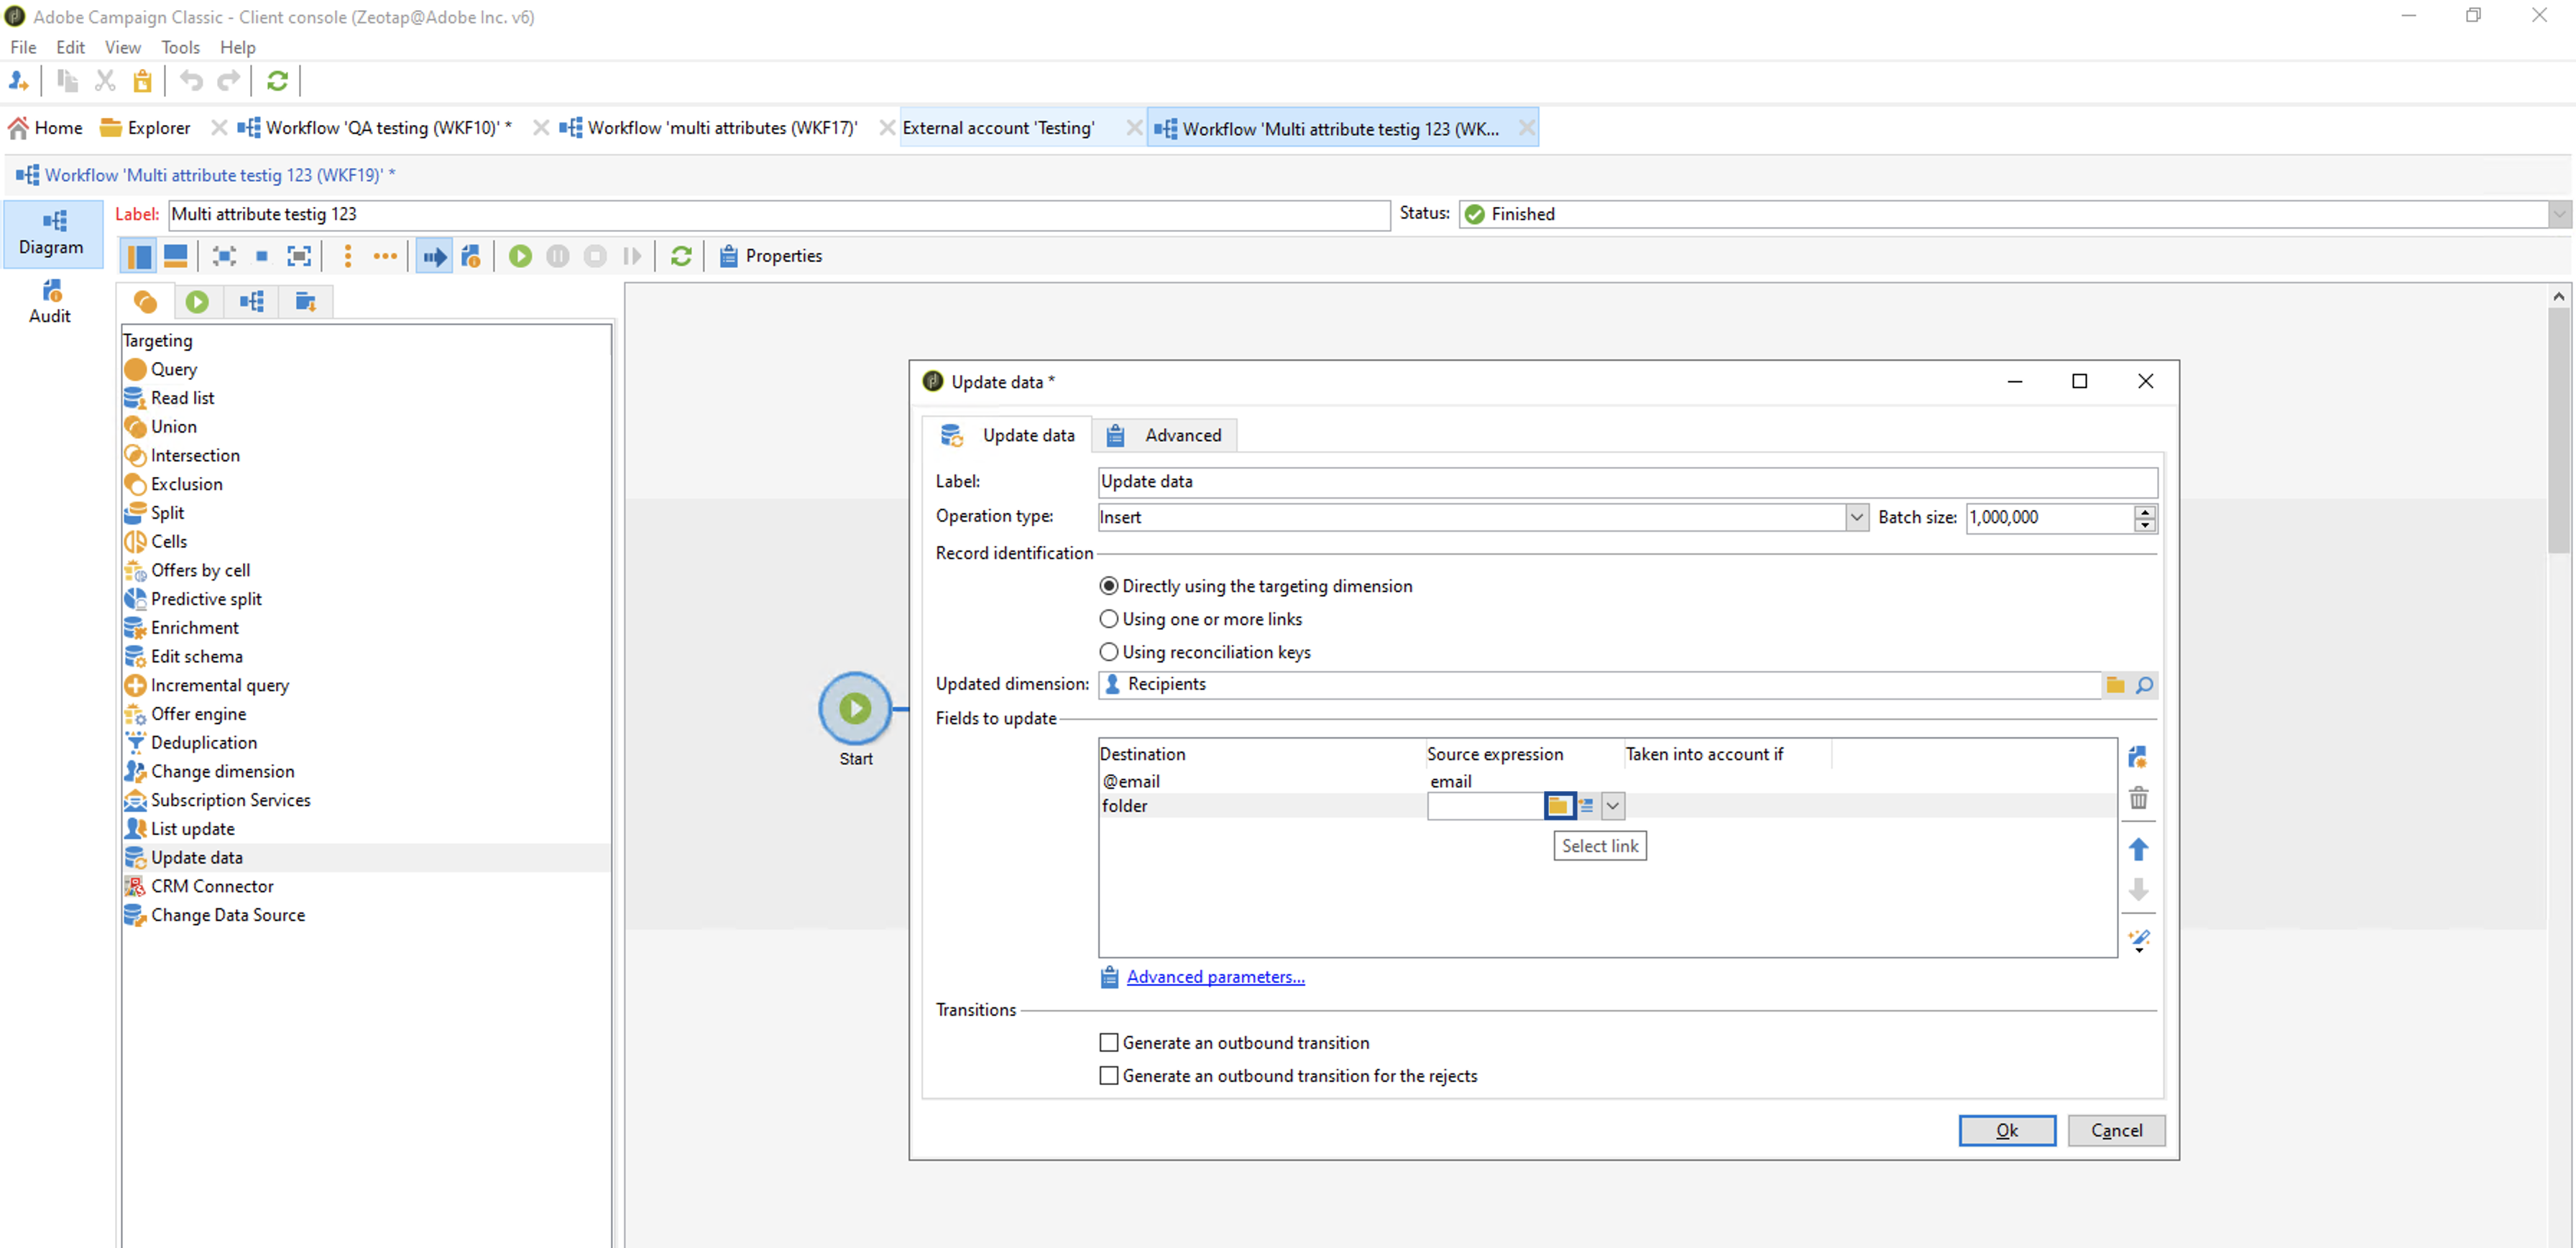
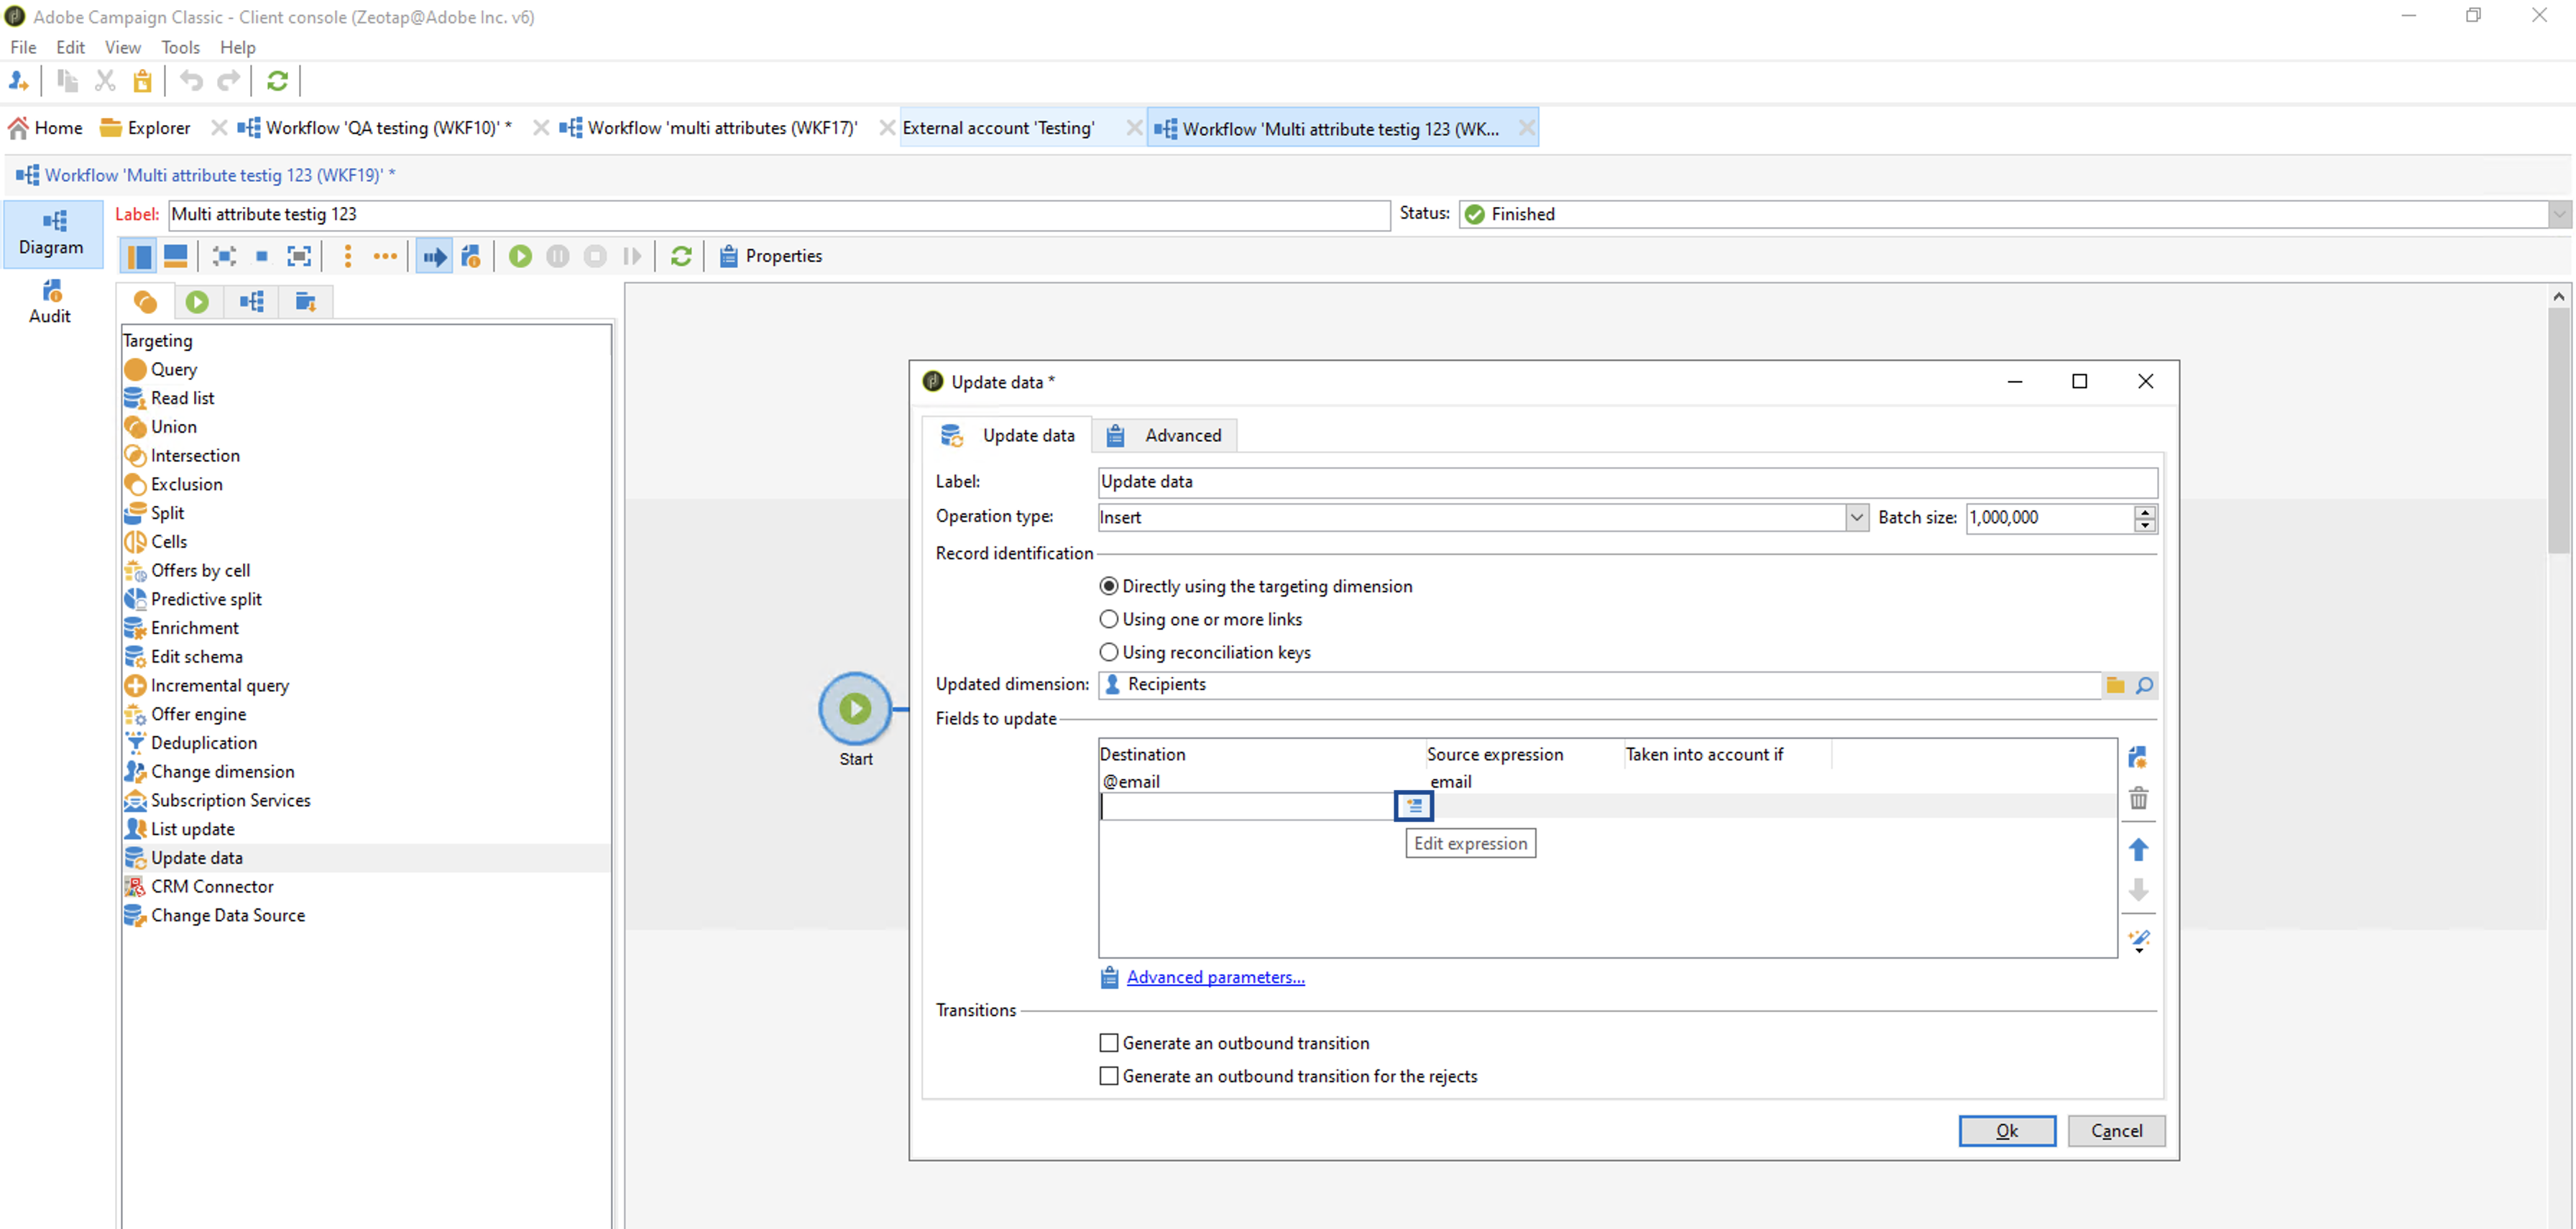 ii. In the following **Select a field from document Recipients** window that appears, under **Available fields** search for folder. Choose **Folder** **(folder)** and click **OK.**
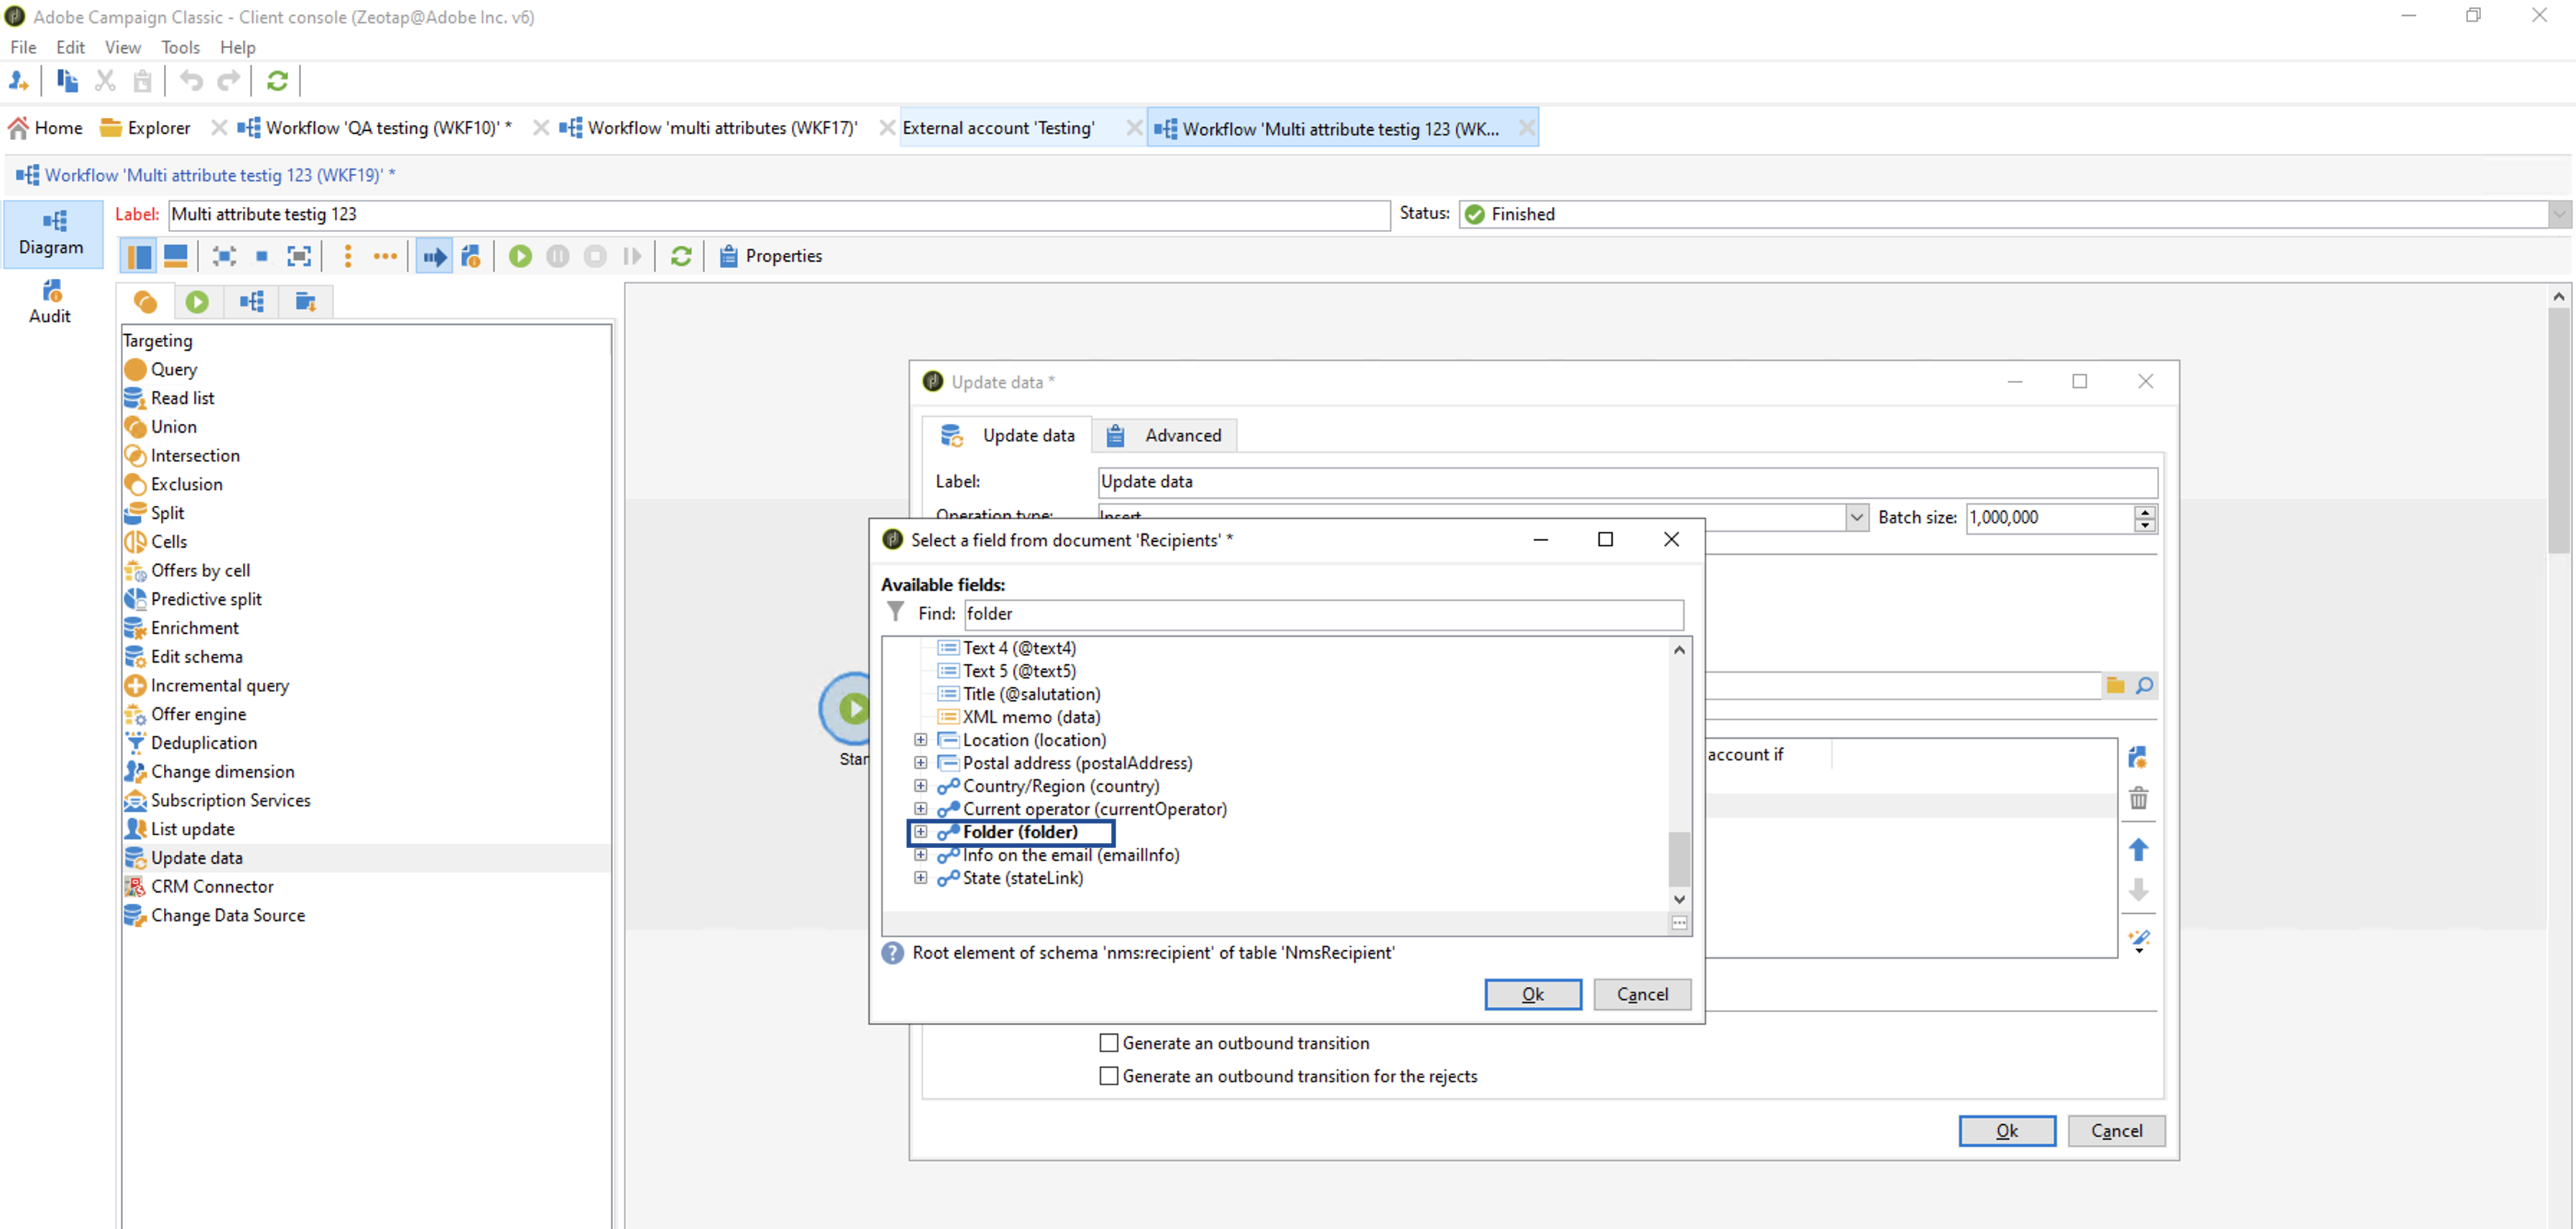 iii. Under **Source expression** (RHS of the row), click **Select Link**.
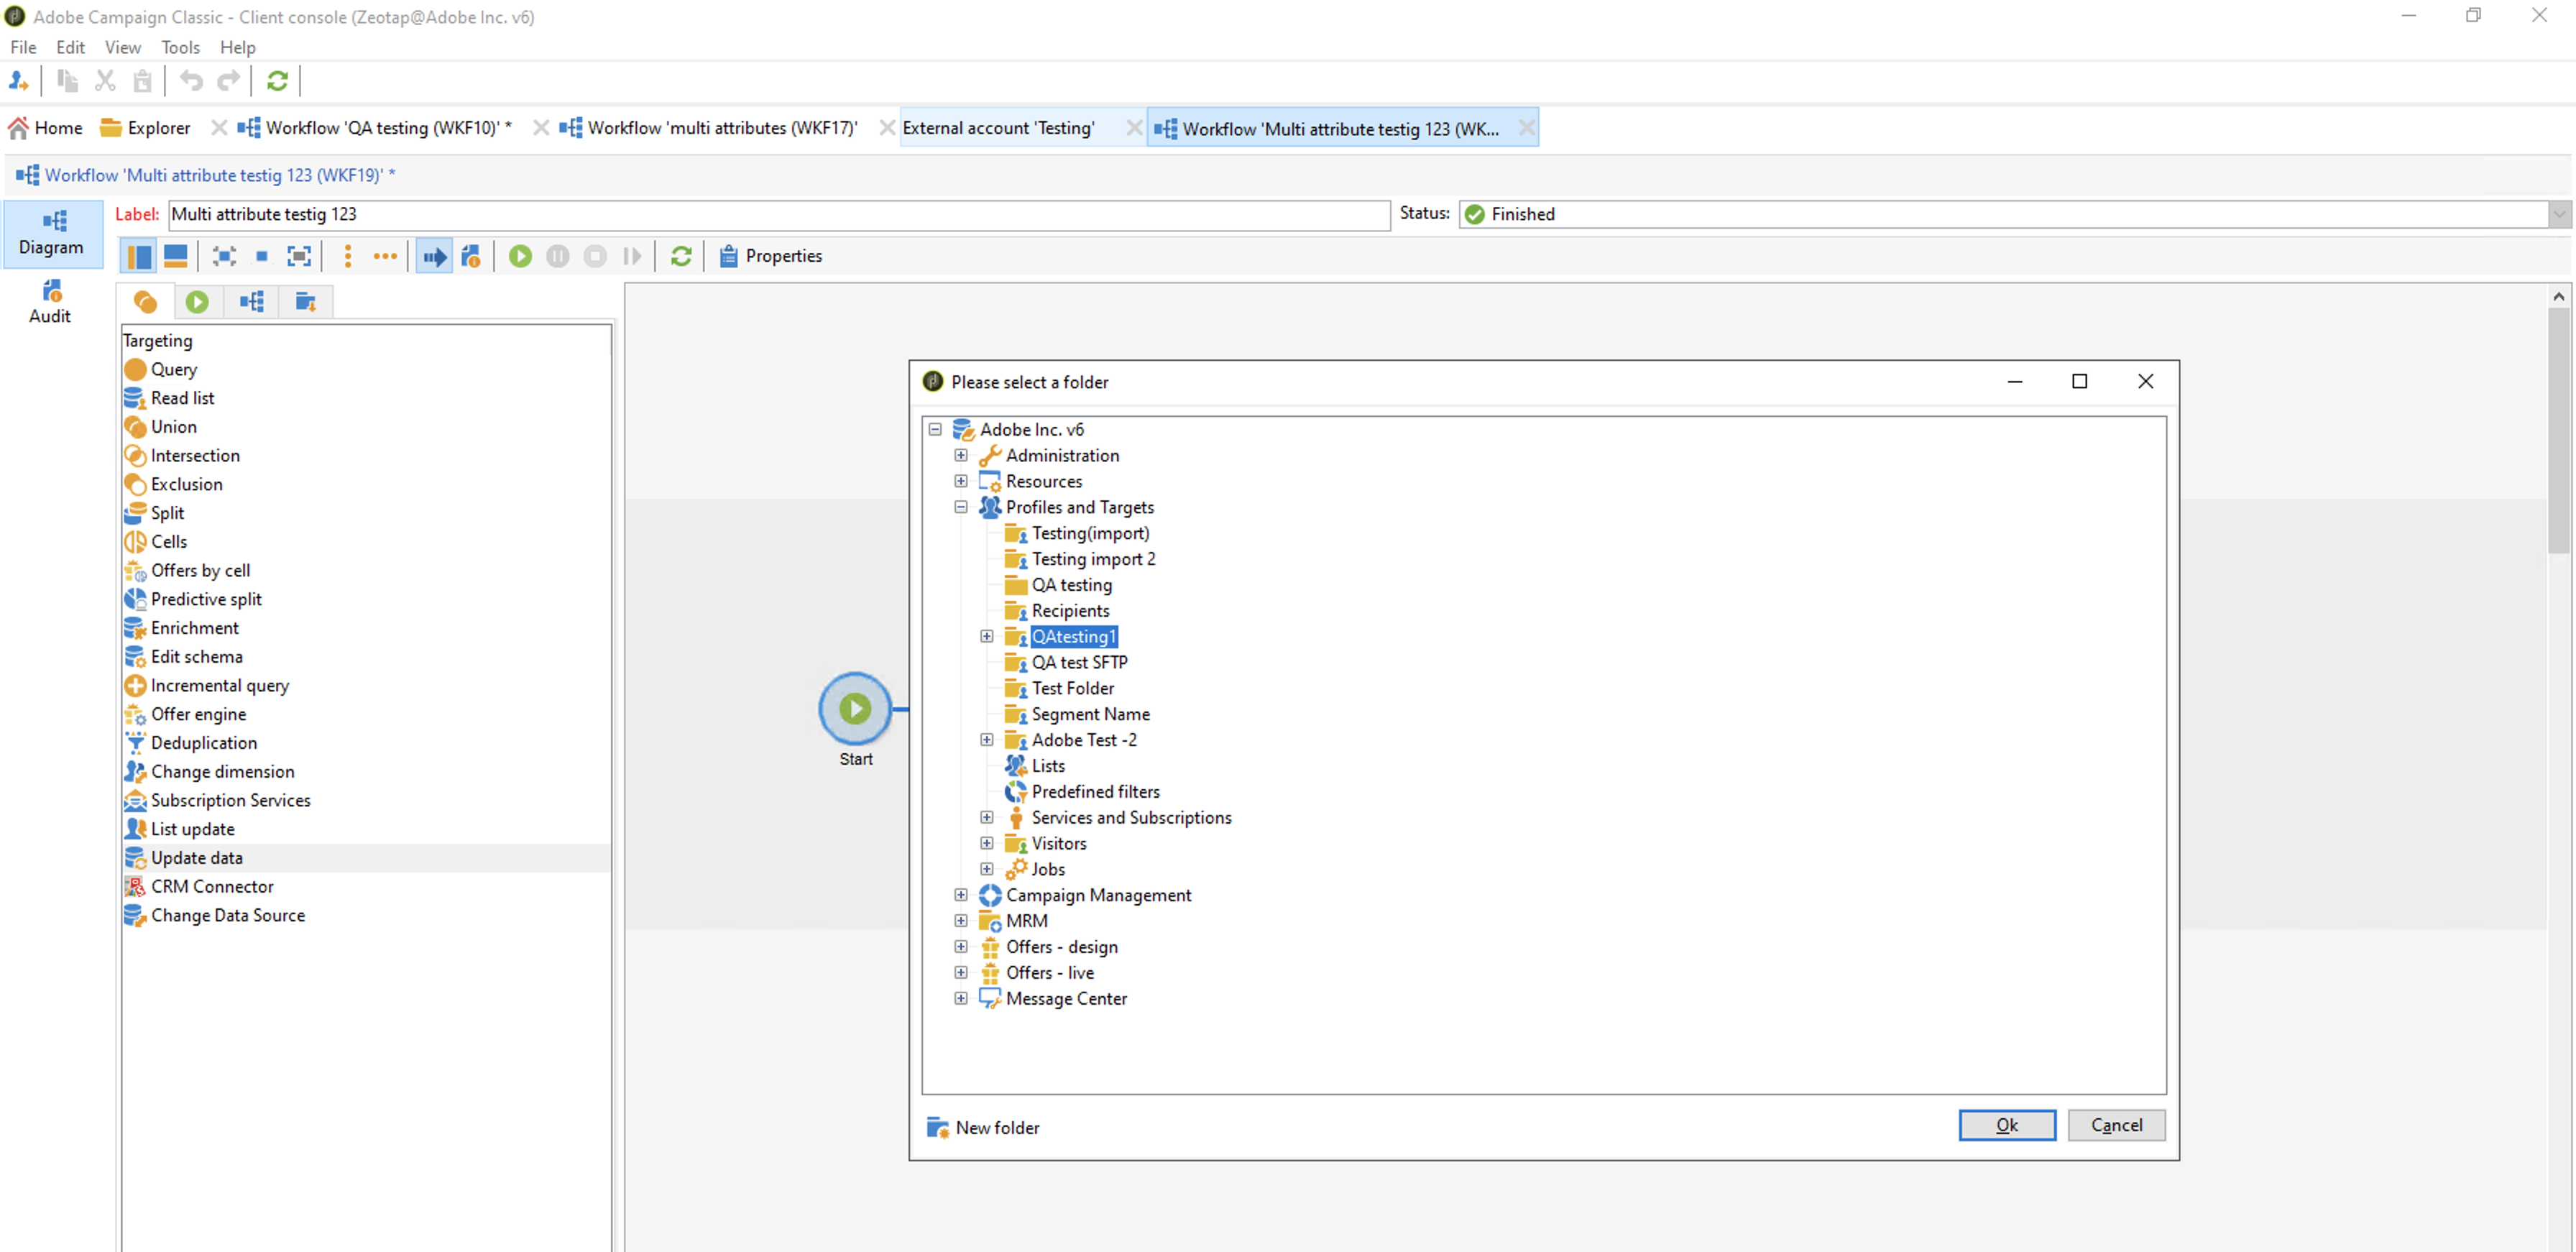
 iv. In the following screen that appears, select the folder which you have created in Step -1. This folder contains the segments pushed from Zeotap CDP.
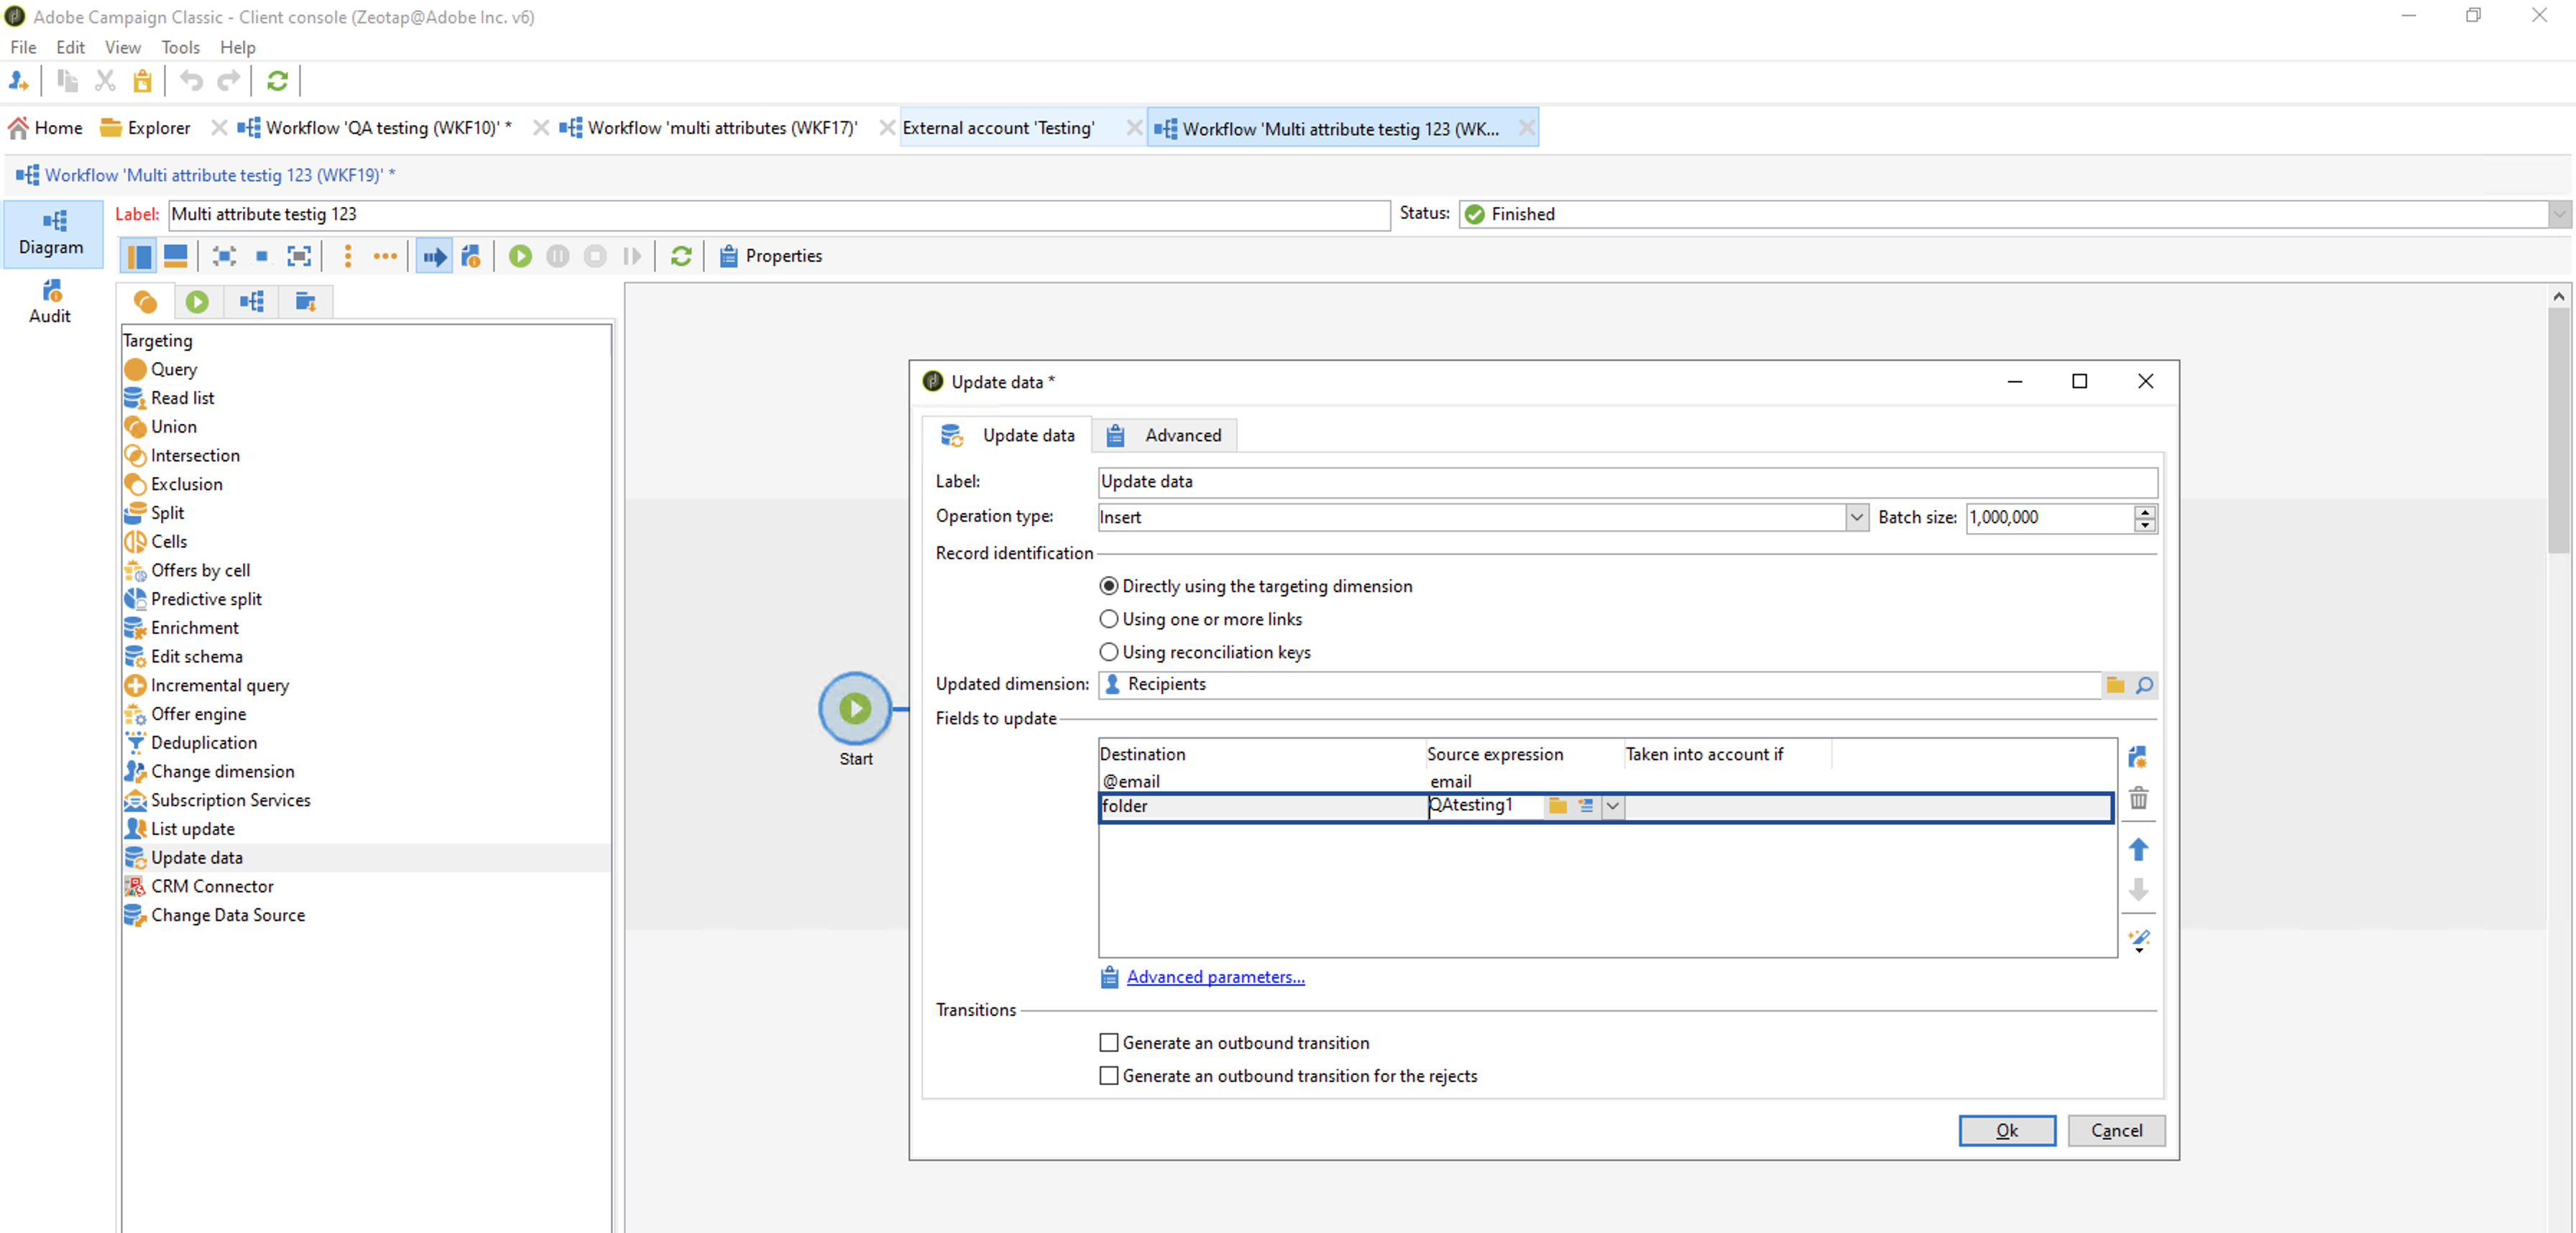
 v. After the mapping is completed, folder appears in the UI as shown below. Click **OK**.
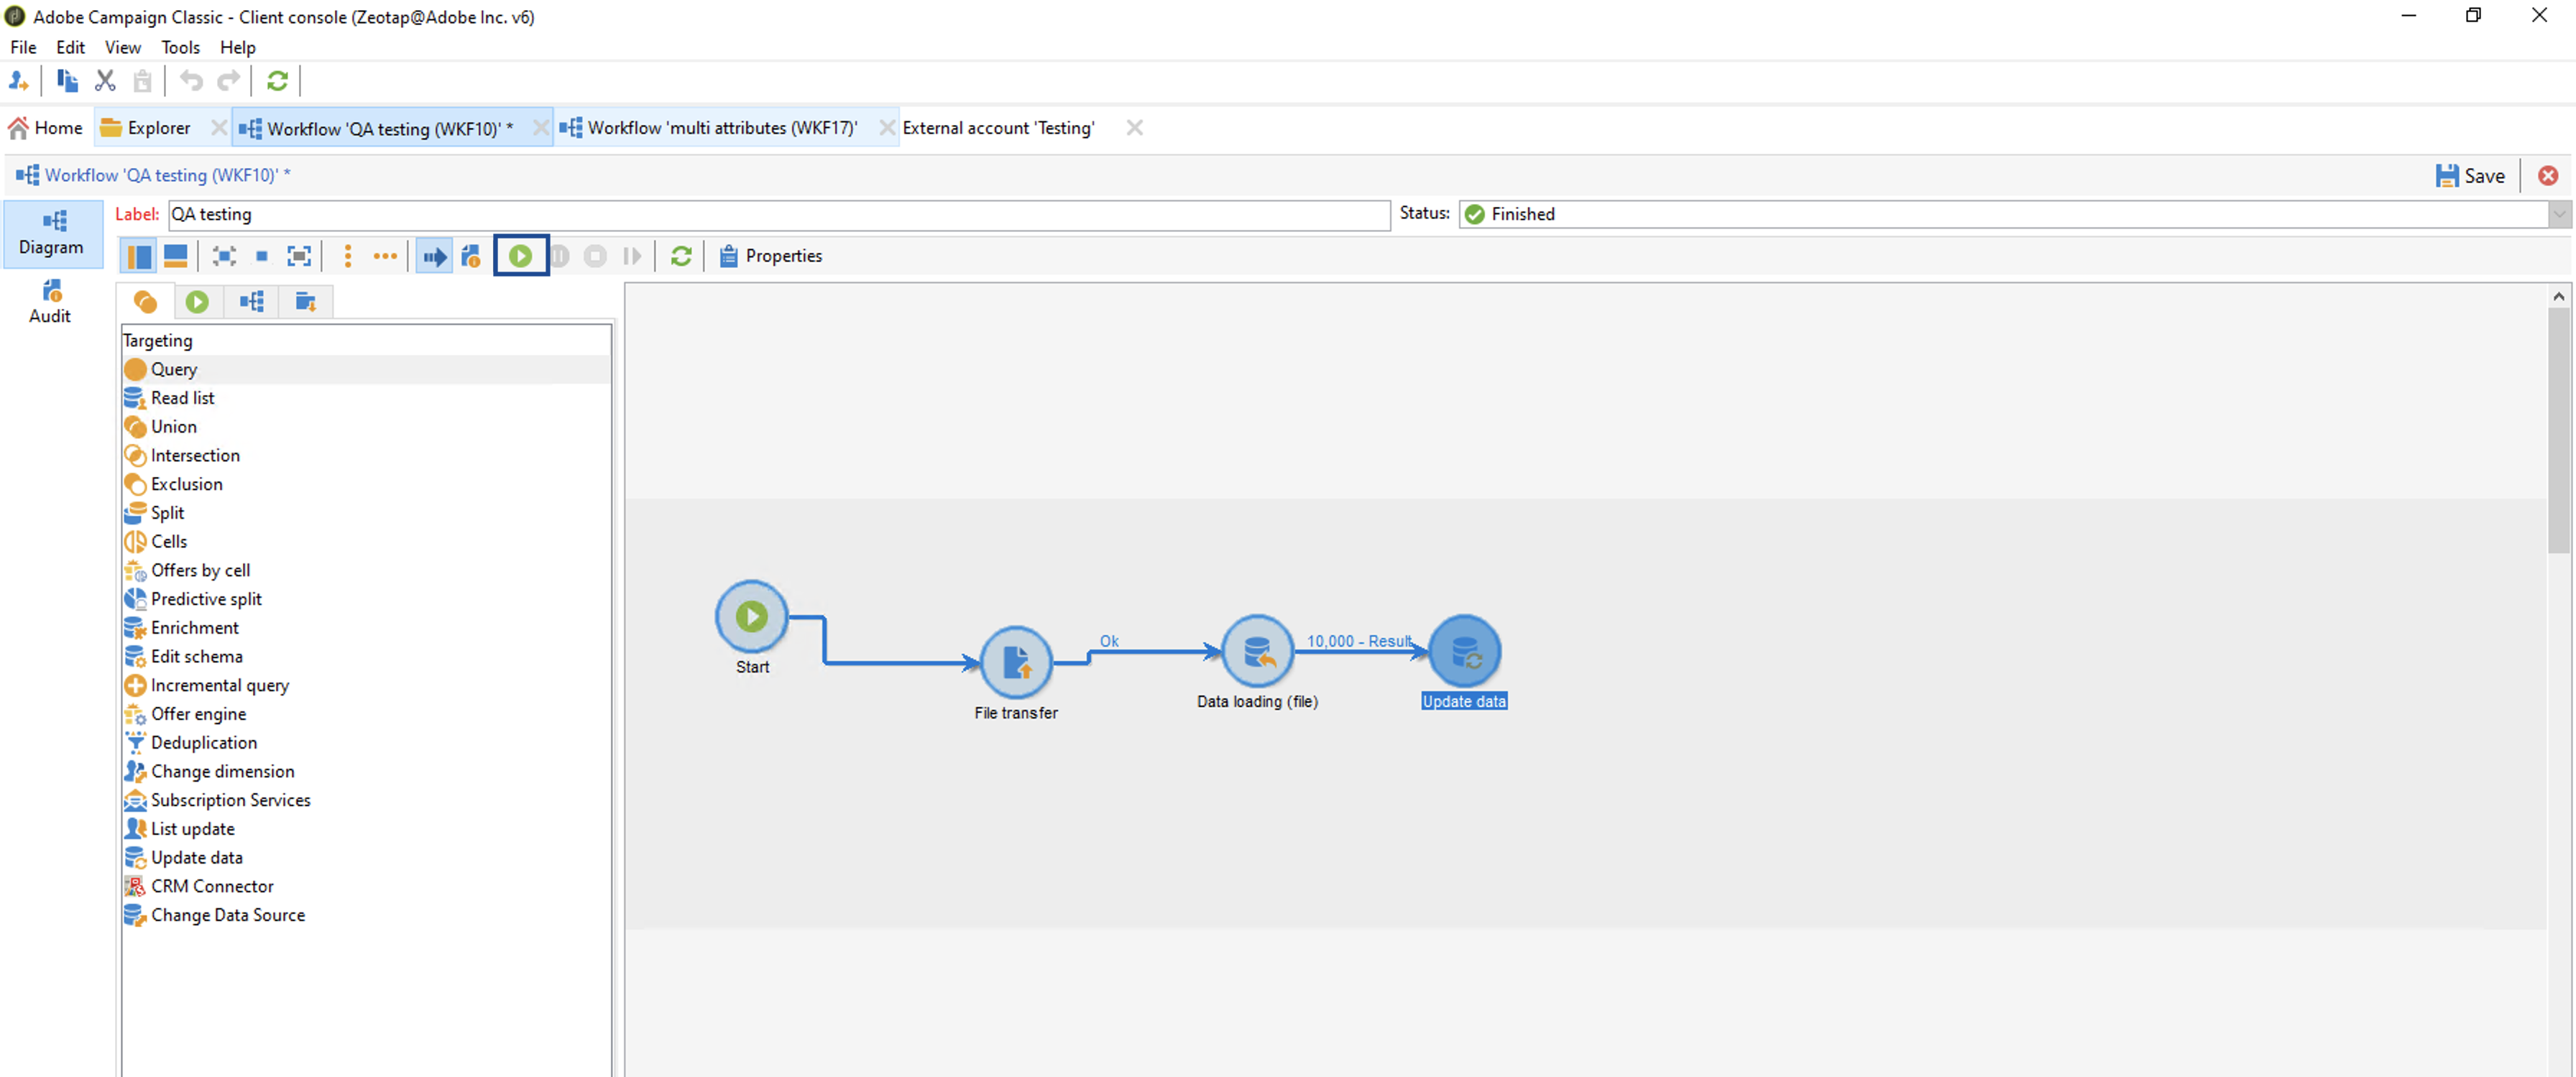
 After all the desired fields are mapped, click **Run** to run the workflow.
 ## View Segments on Adobe Campaign
Perform the following steps to view the pushed Audiences (segments) on the Adobe Campaign platform:
Log into **Adobe Campaign Classic**.
Under **Explorer**, select the segment folder you have created in Step - 1.
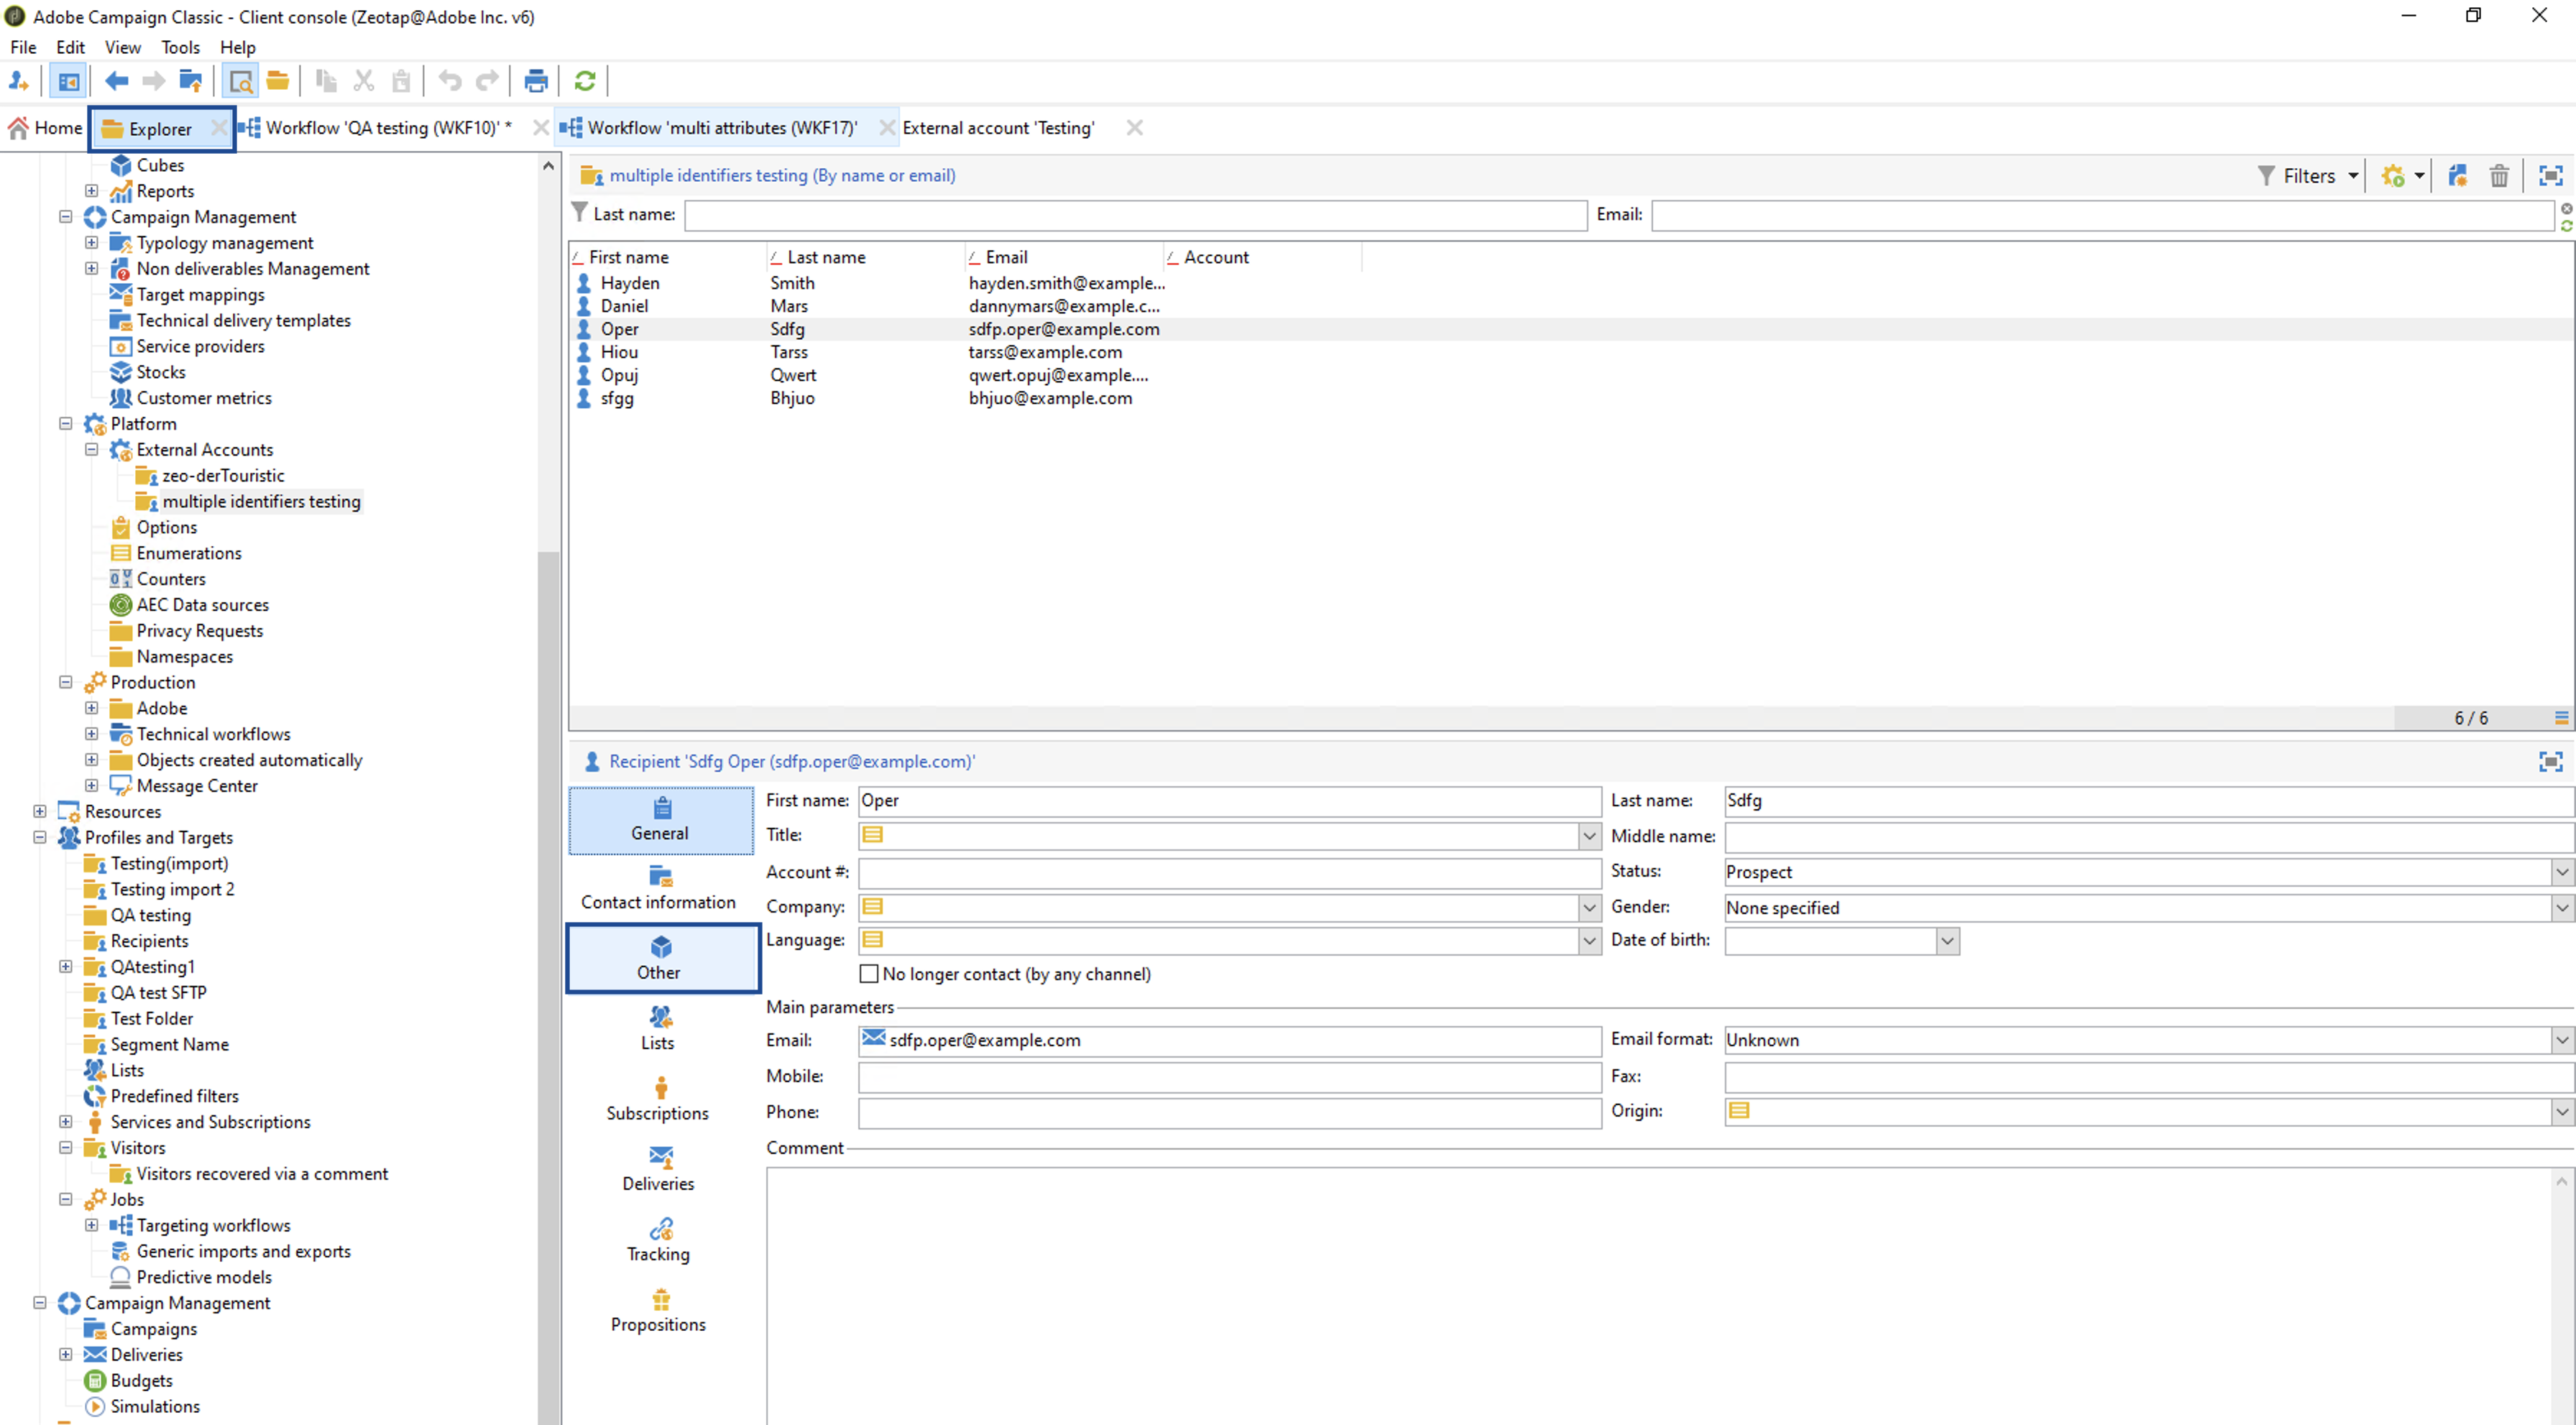
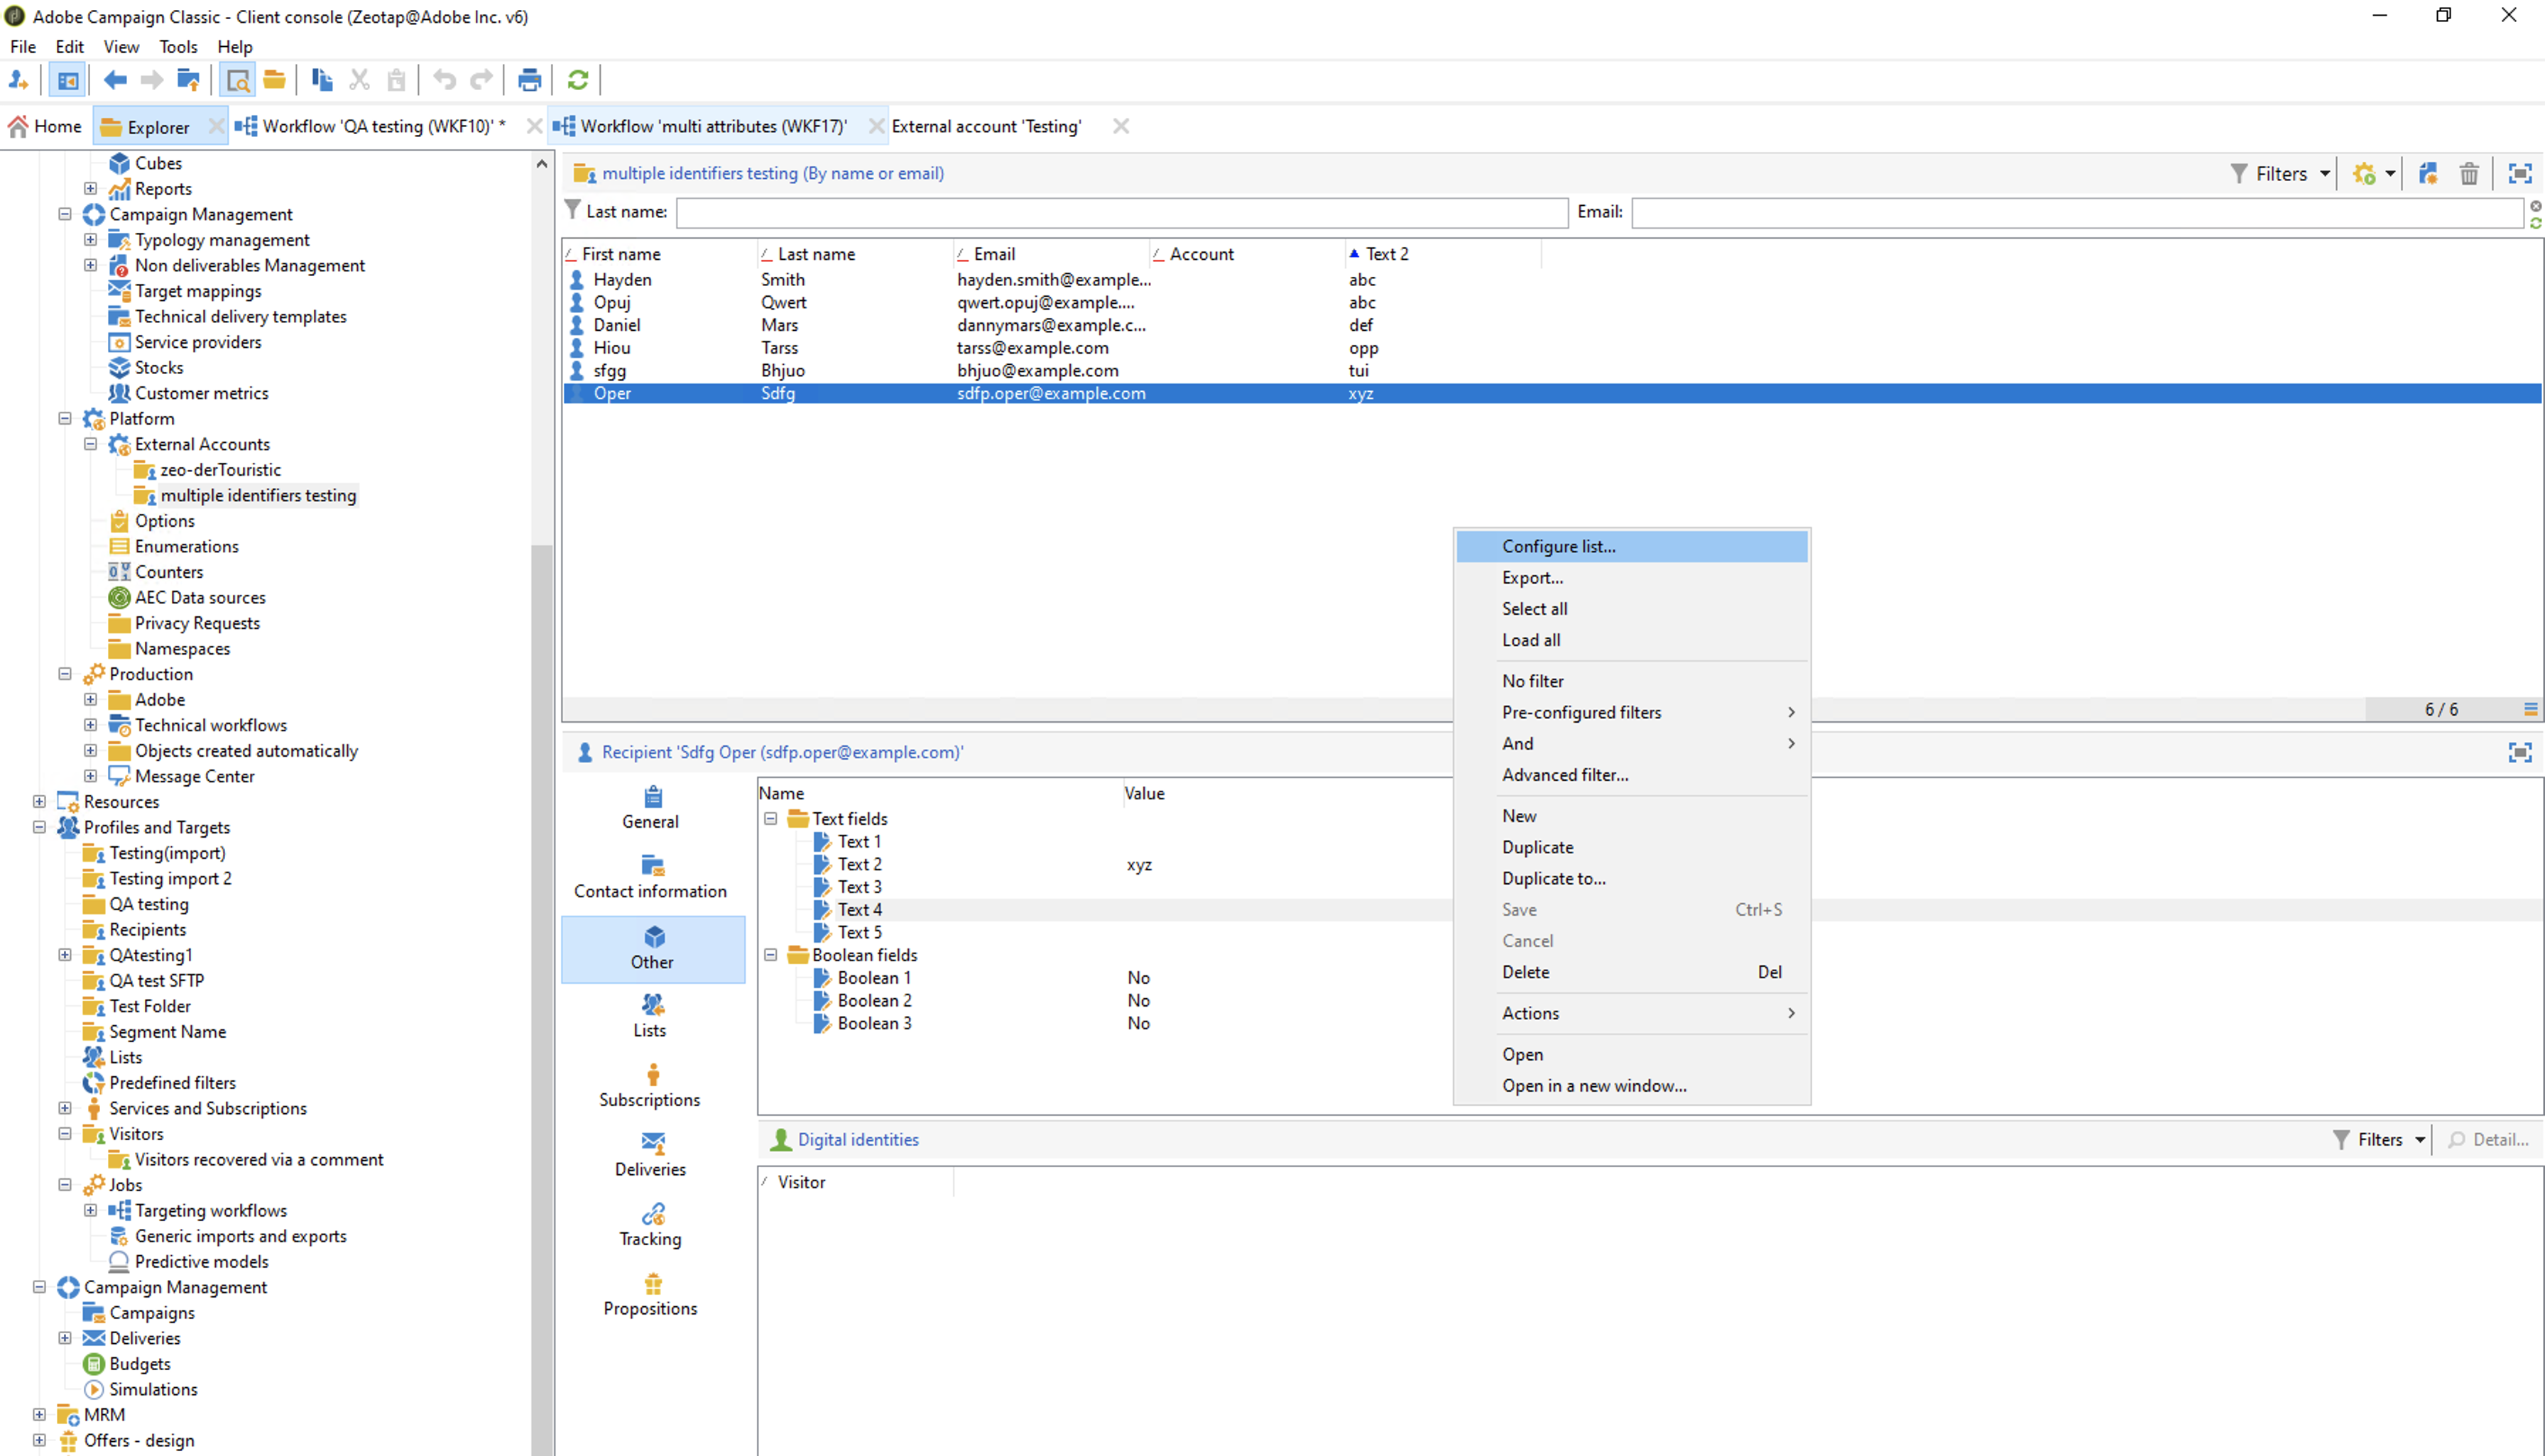
In the following screen that appear, click **Other**.
## View Segments on Adobe Campaign
Perform the following steps to view the pushed Audiences (segments) on the Adobe Campaign platform:
Log into **Adobe Campaign Classic**.
Under **Explorer**, select the segment folder you have created in Step - 1.
In the following screen that appear, click **Other**.
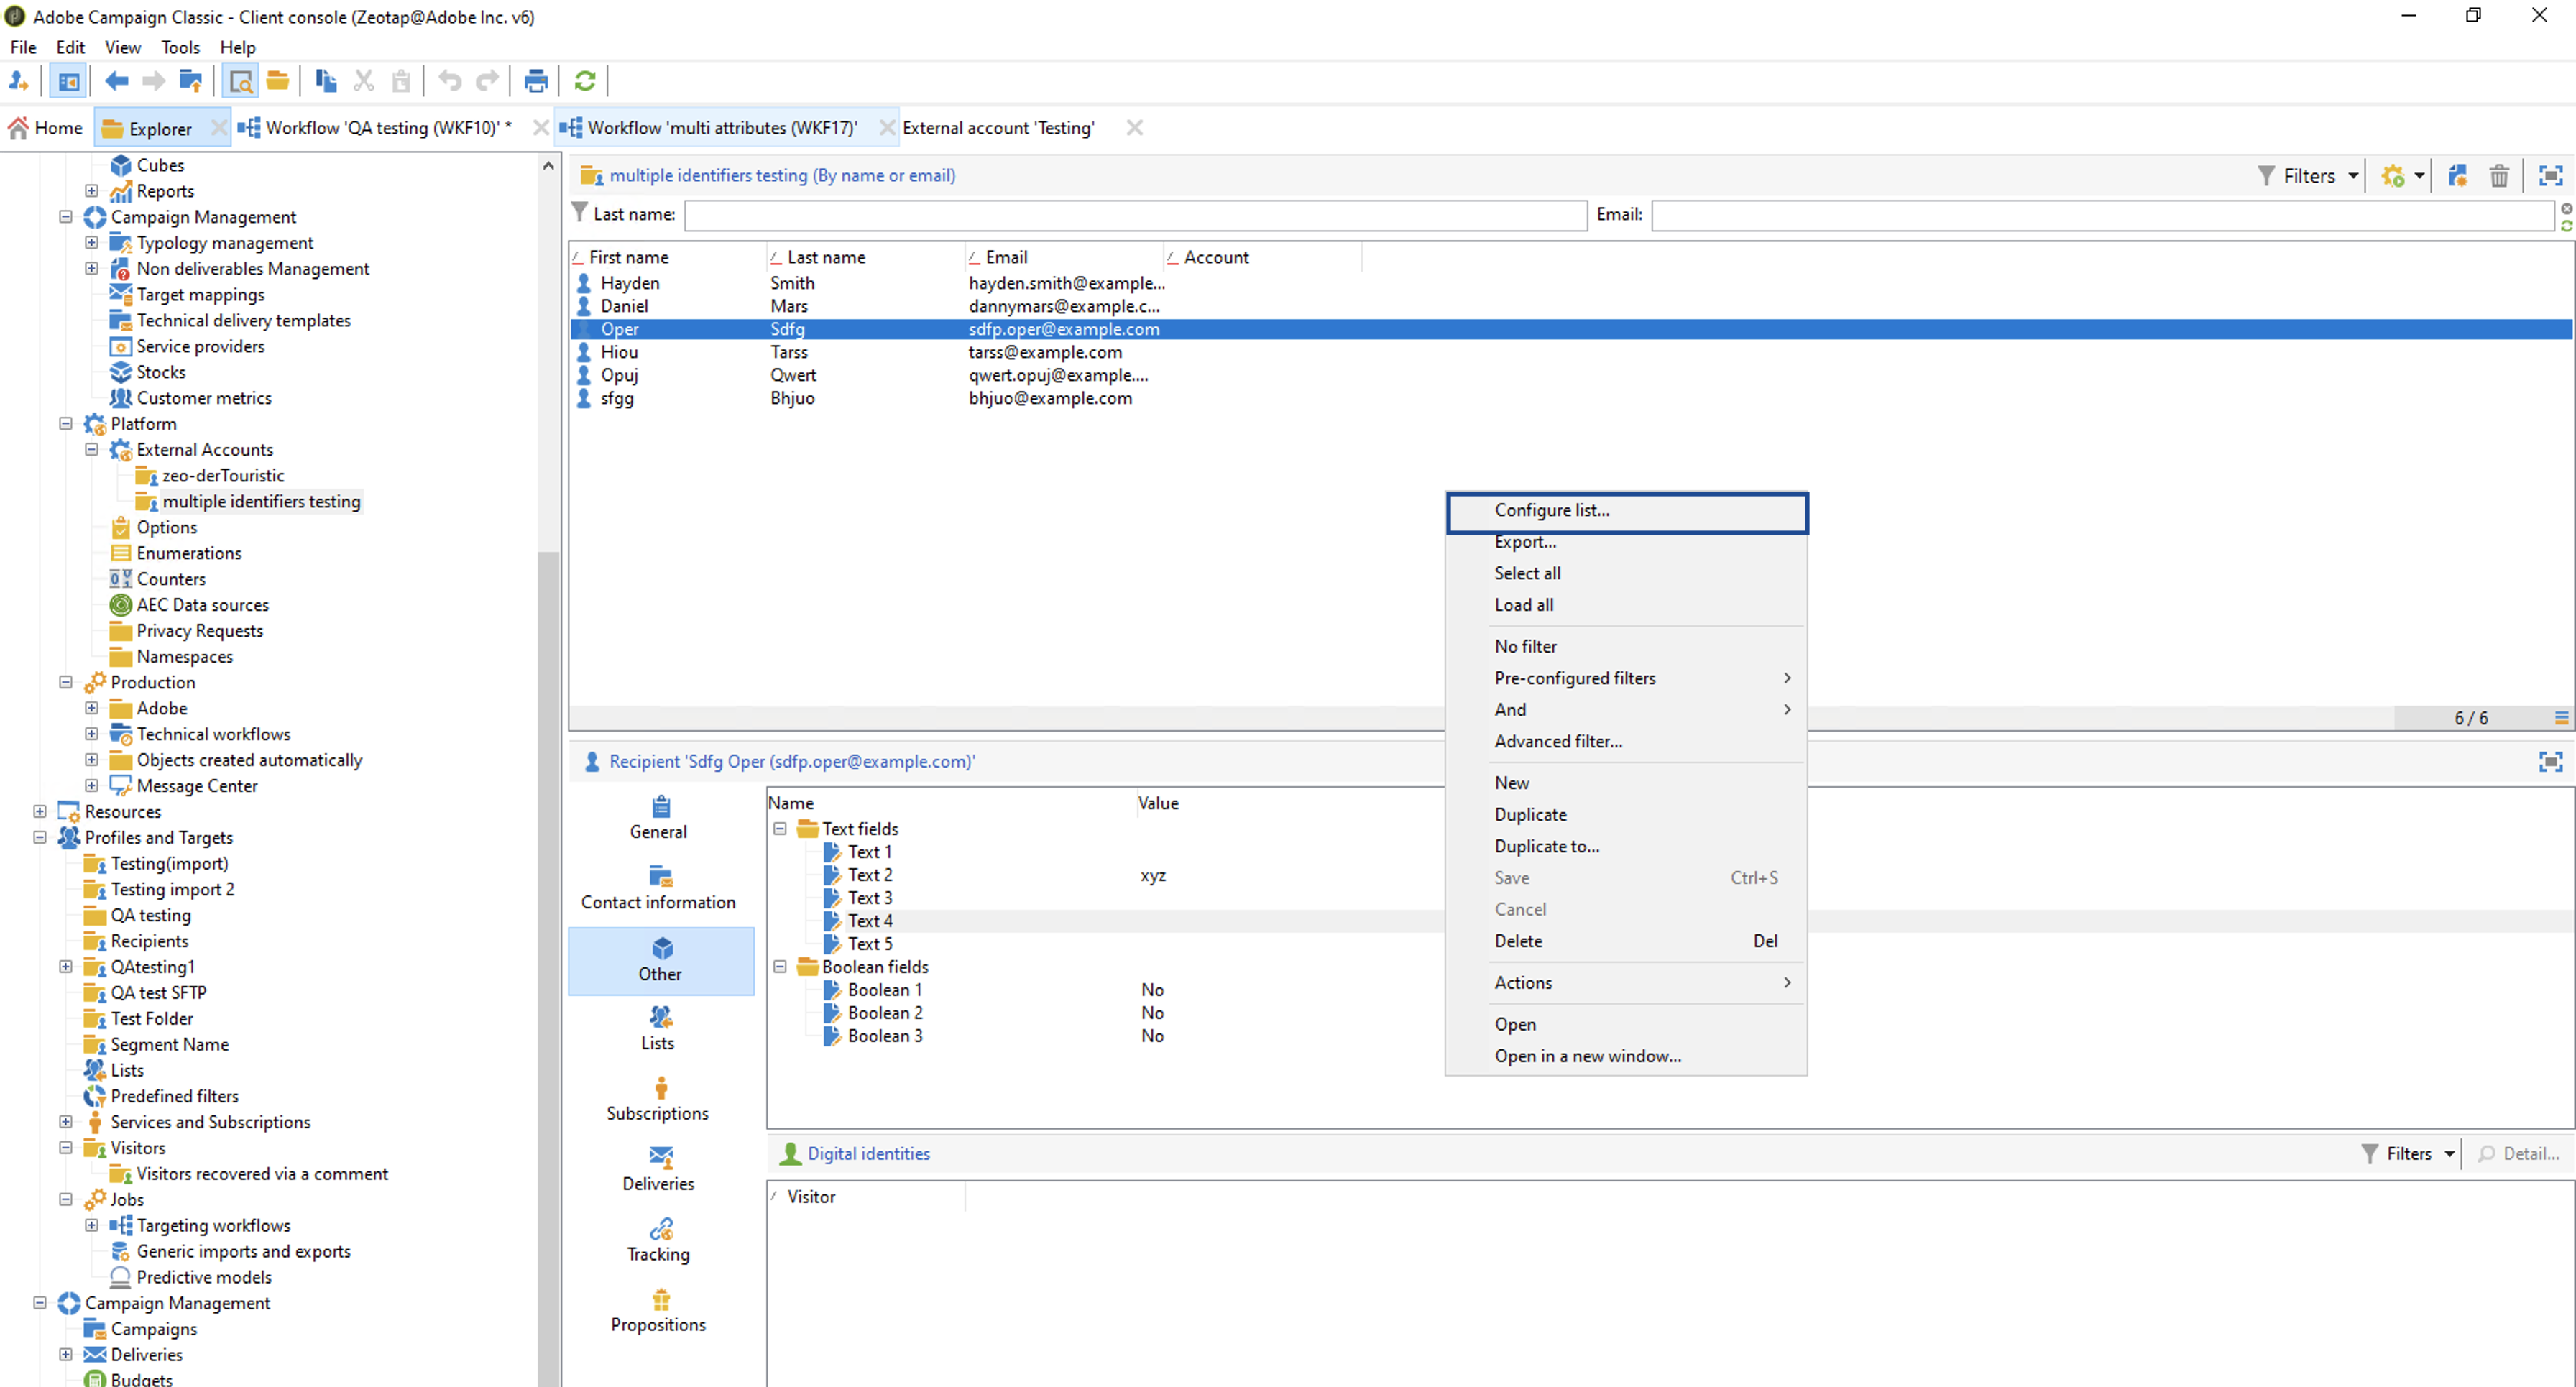
 Right-click on the screen. In the menu that appears, click **Configure list**.
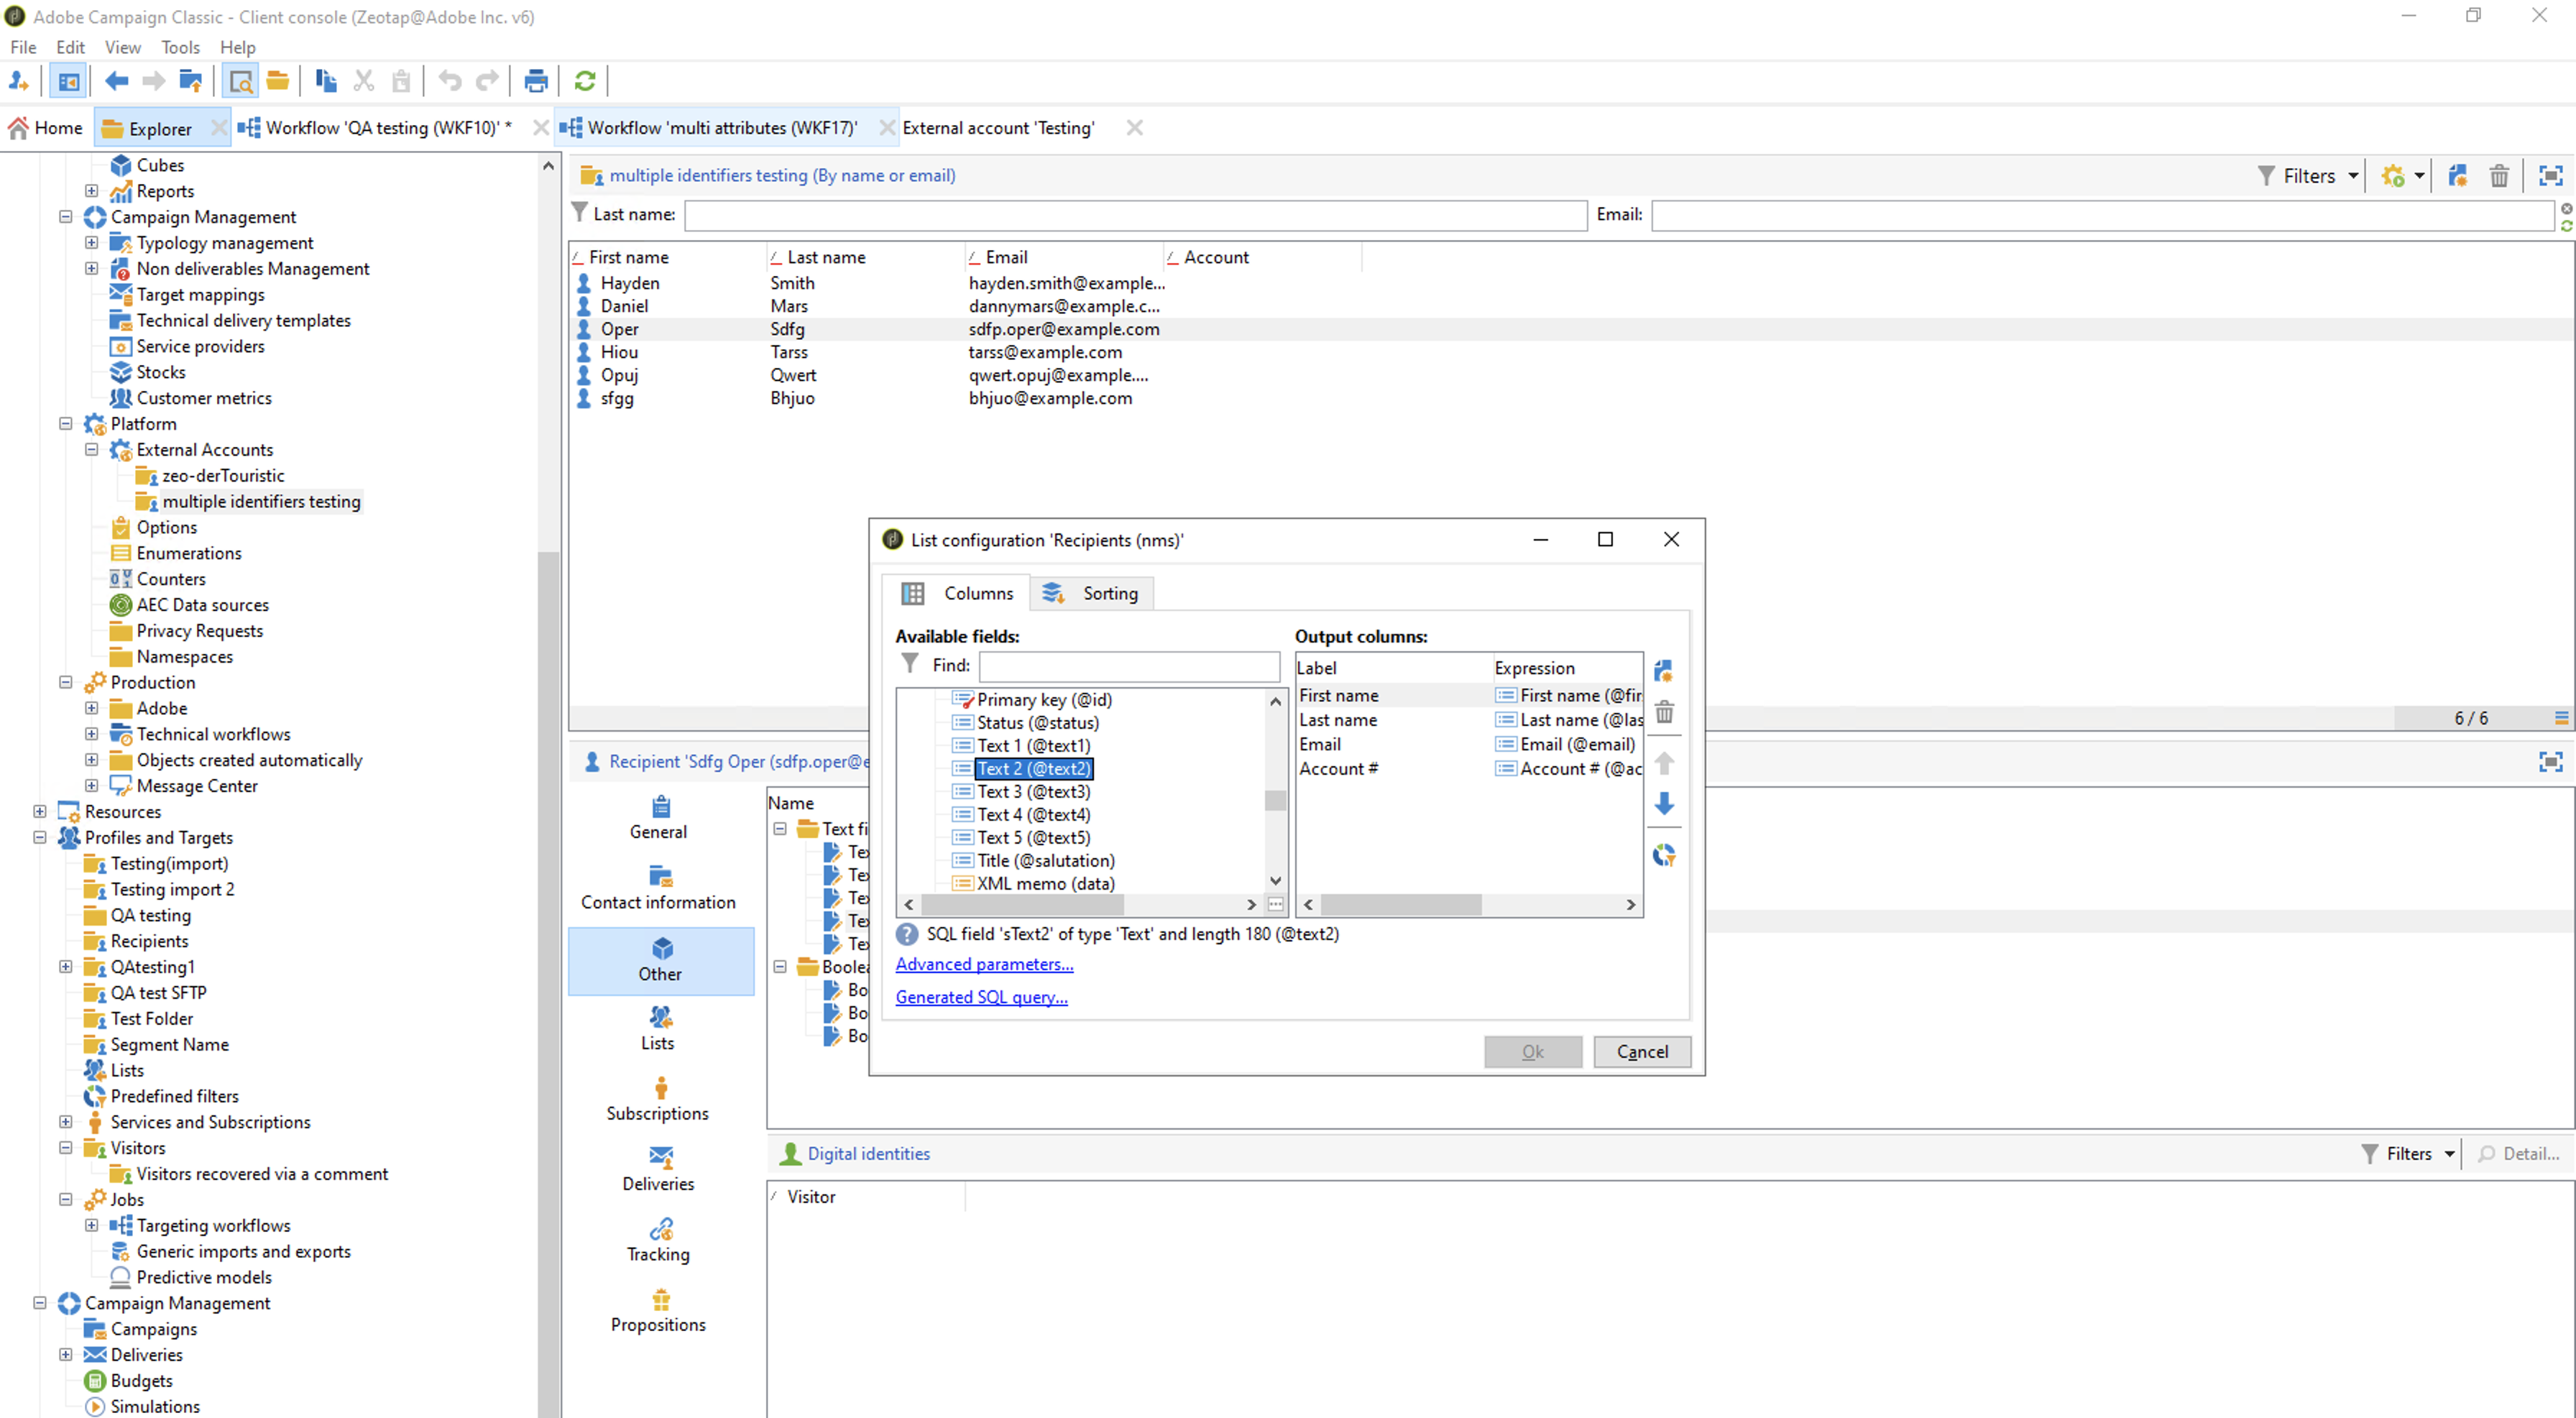
 In the following **List Configuration** window that appears, choose the mapped text field to be displayed in the UI and click **OK**.
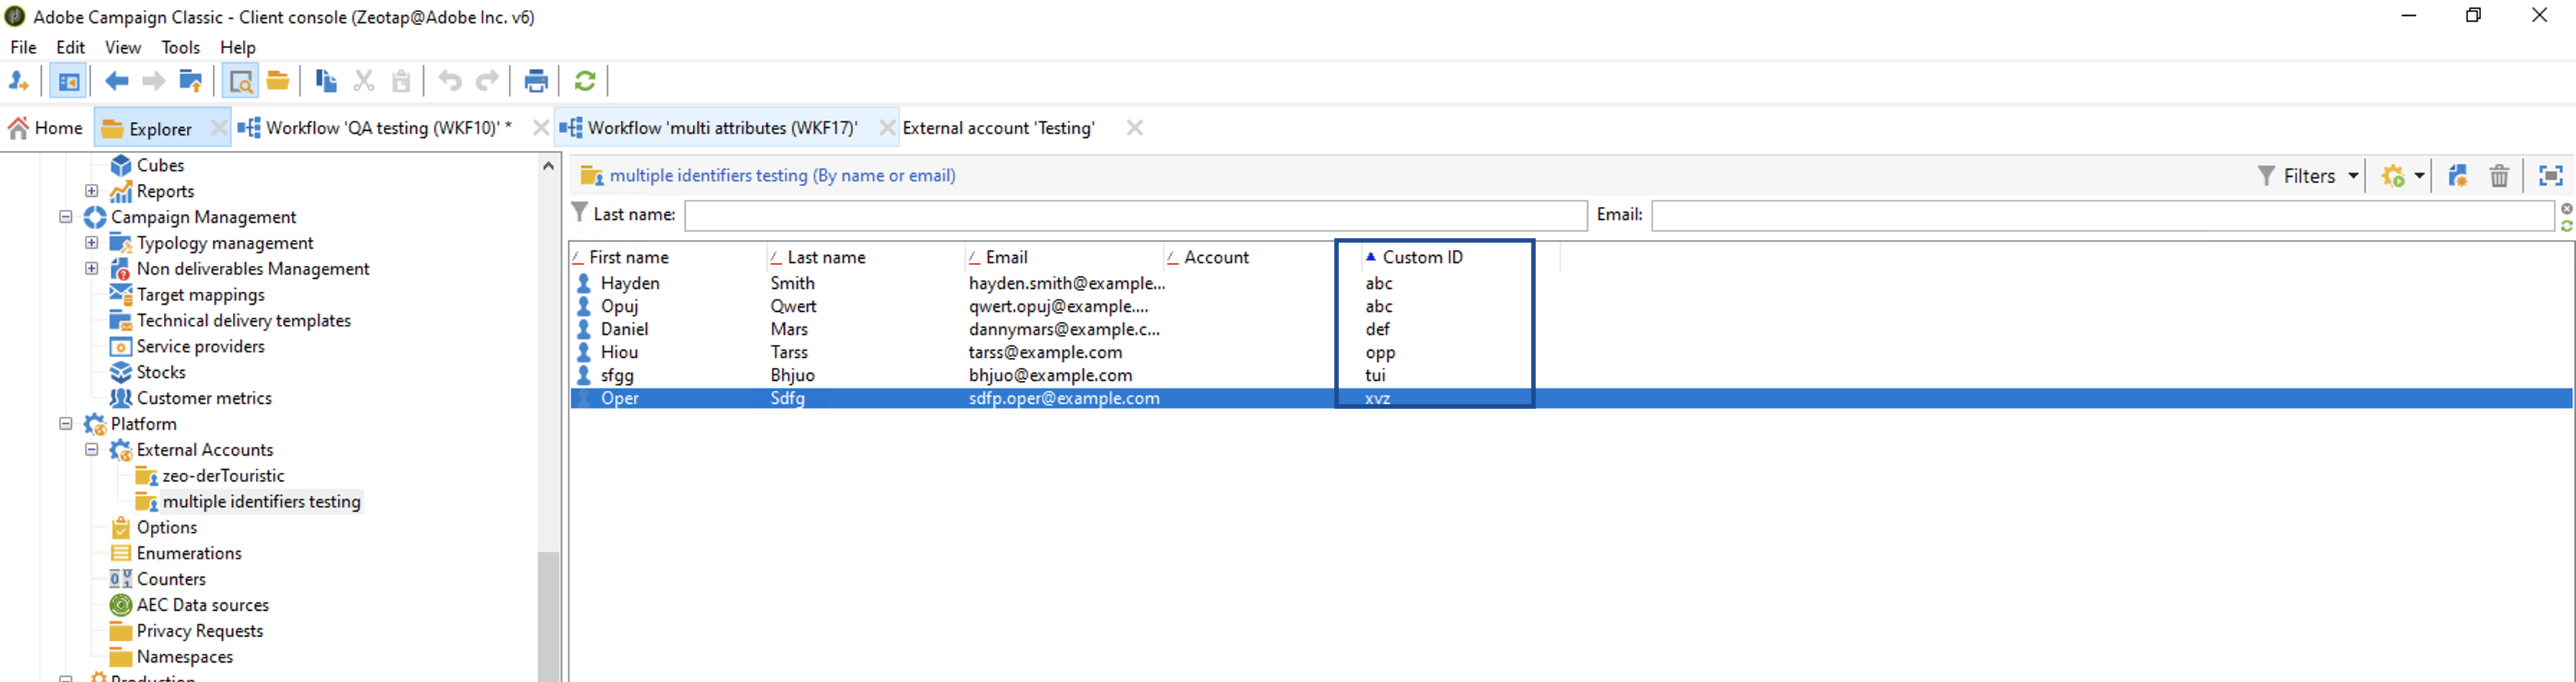
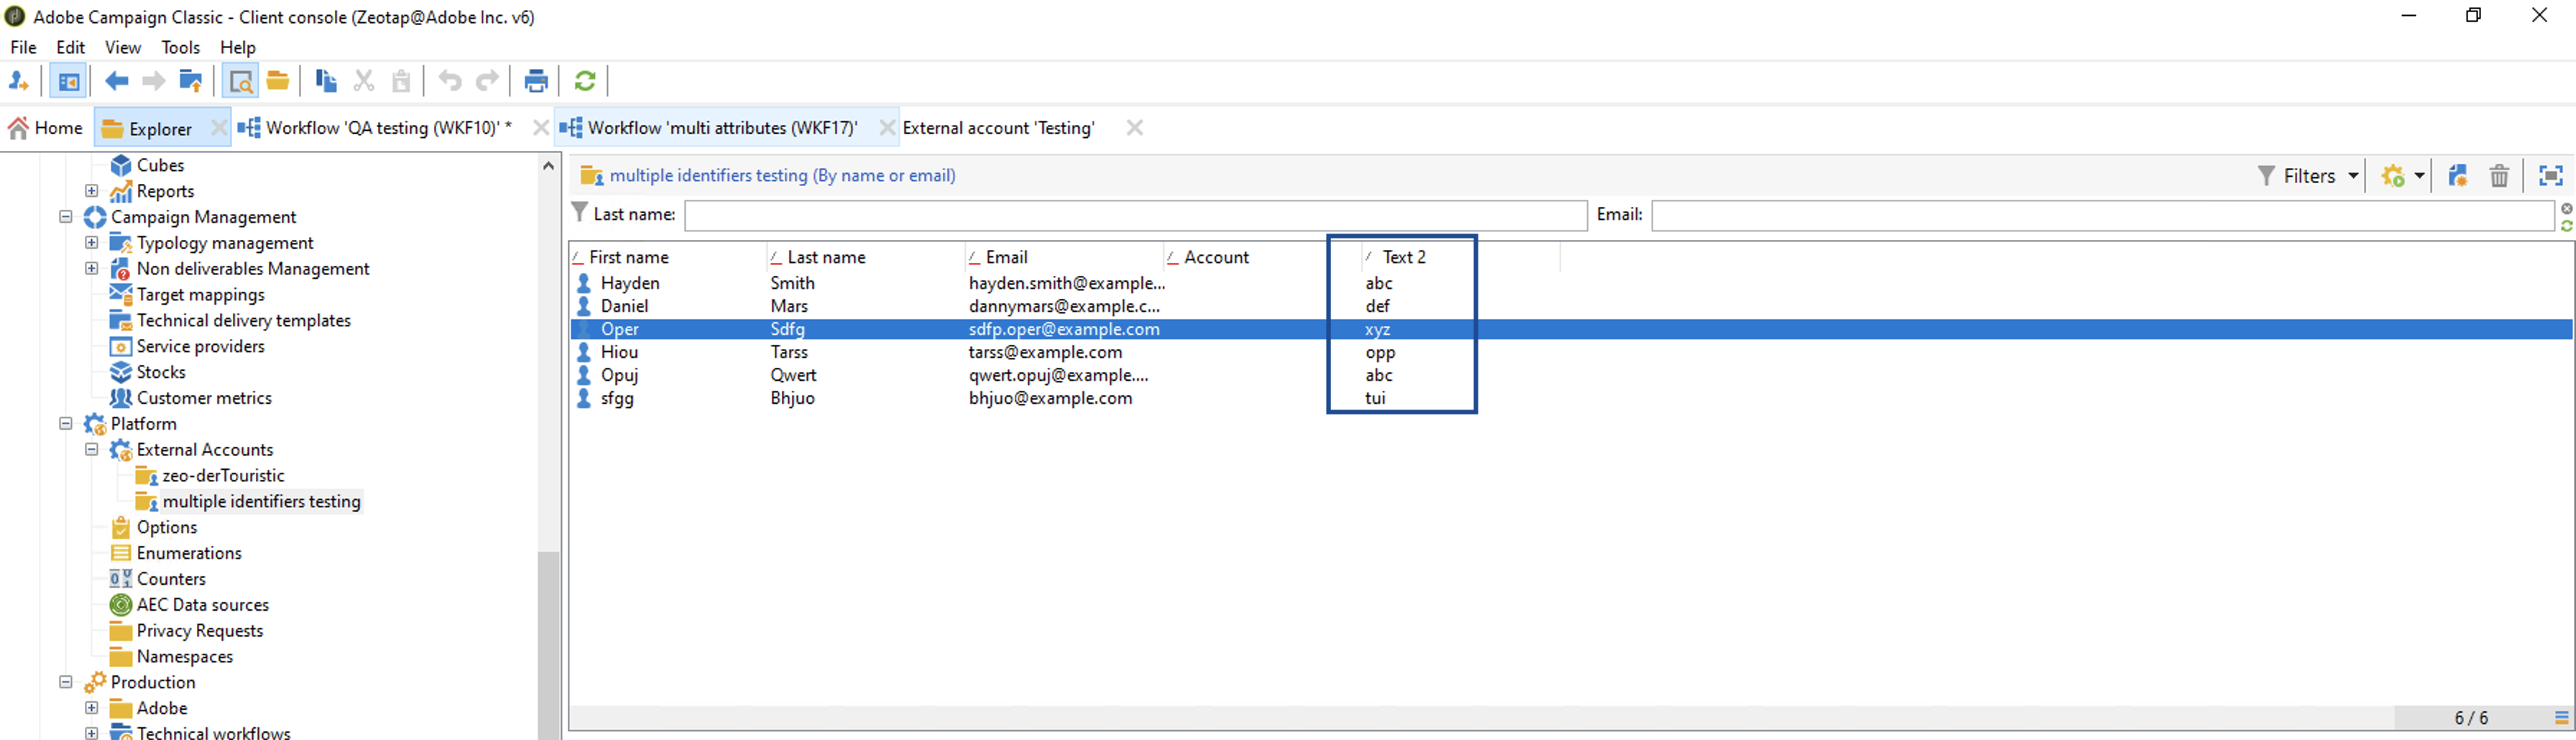
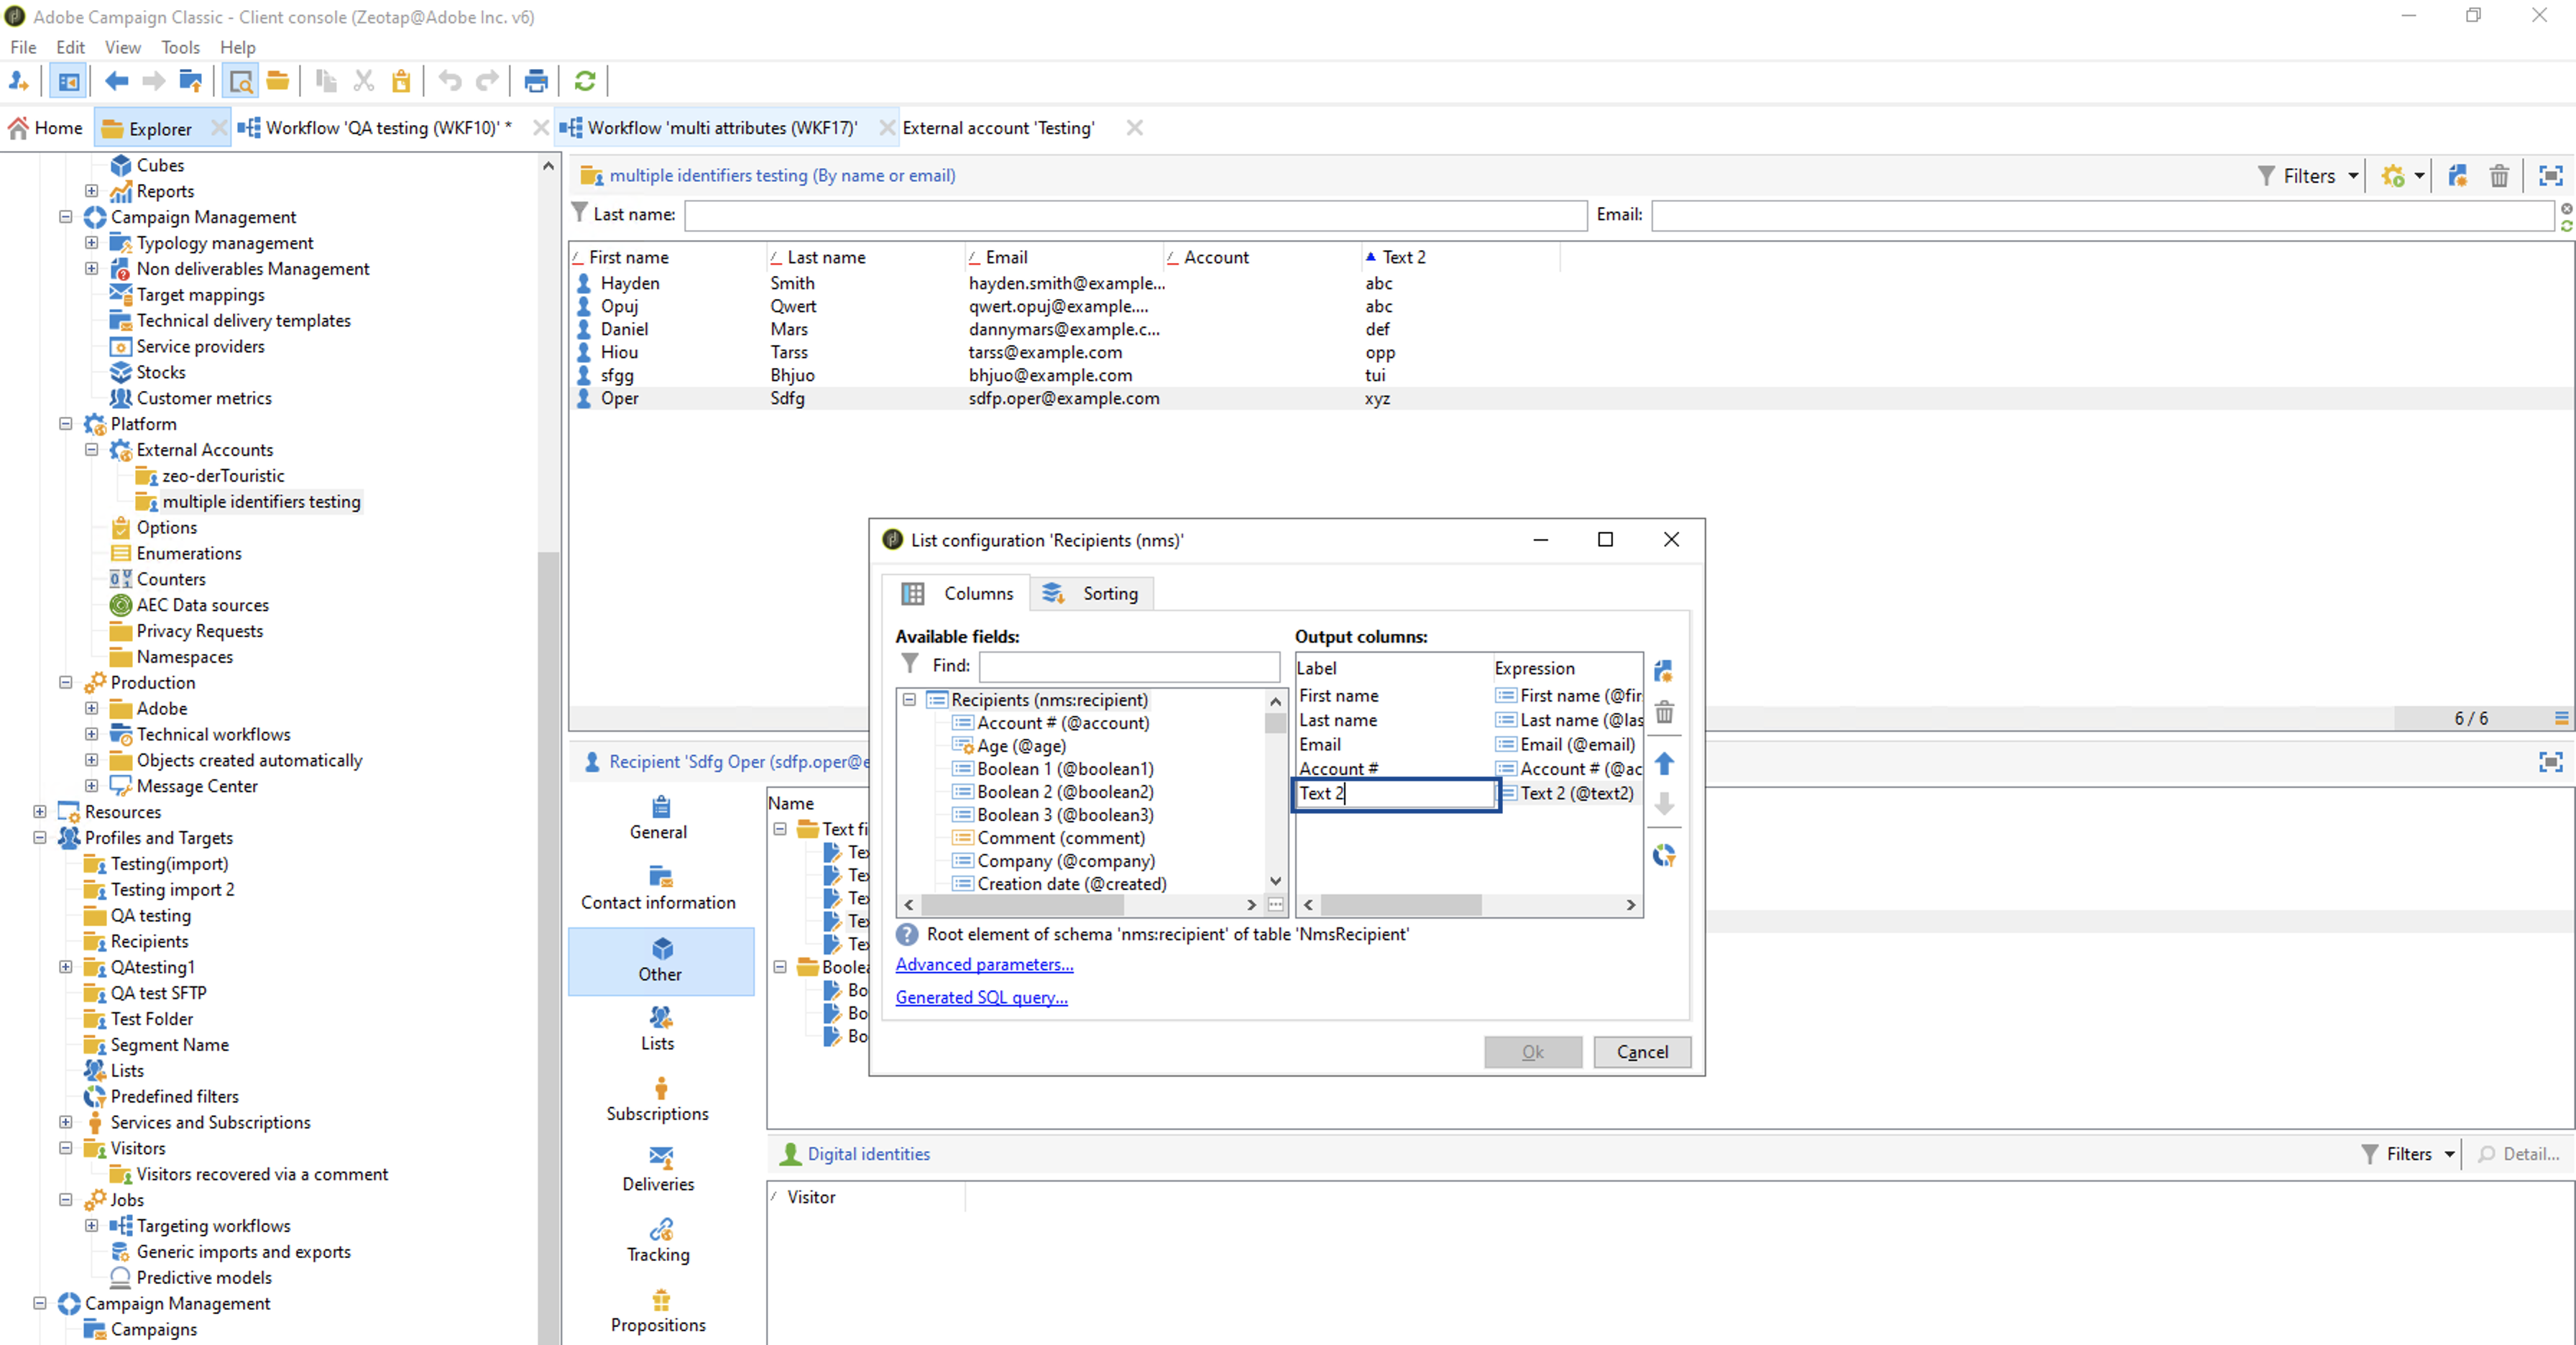
 The custom IDs appears under the mapped text column. Ensure to rename the column to custom ID. Note this custom ID should be same as the custom ID provided while creating Destination in Zeotap CDP. Perform the following steps to rename the column to custom ID:
 a. Right-click on the screen. In the menu that appears, click **Configure list**.
 b. Click and edit the mapped text field under **Label**.
 c. Rename to **Custom ID** and click **OK**.
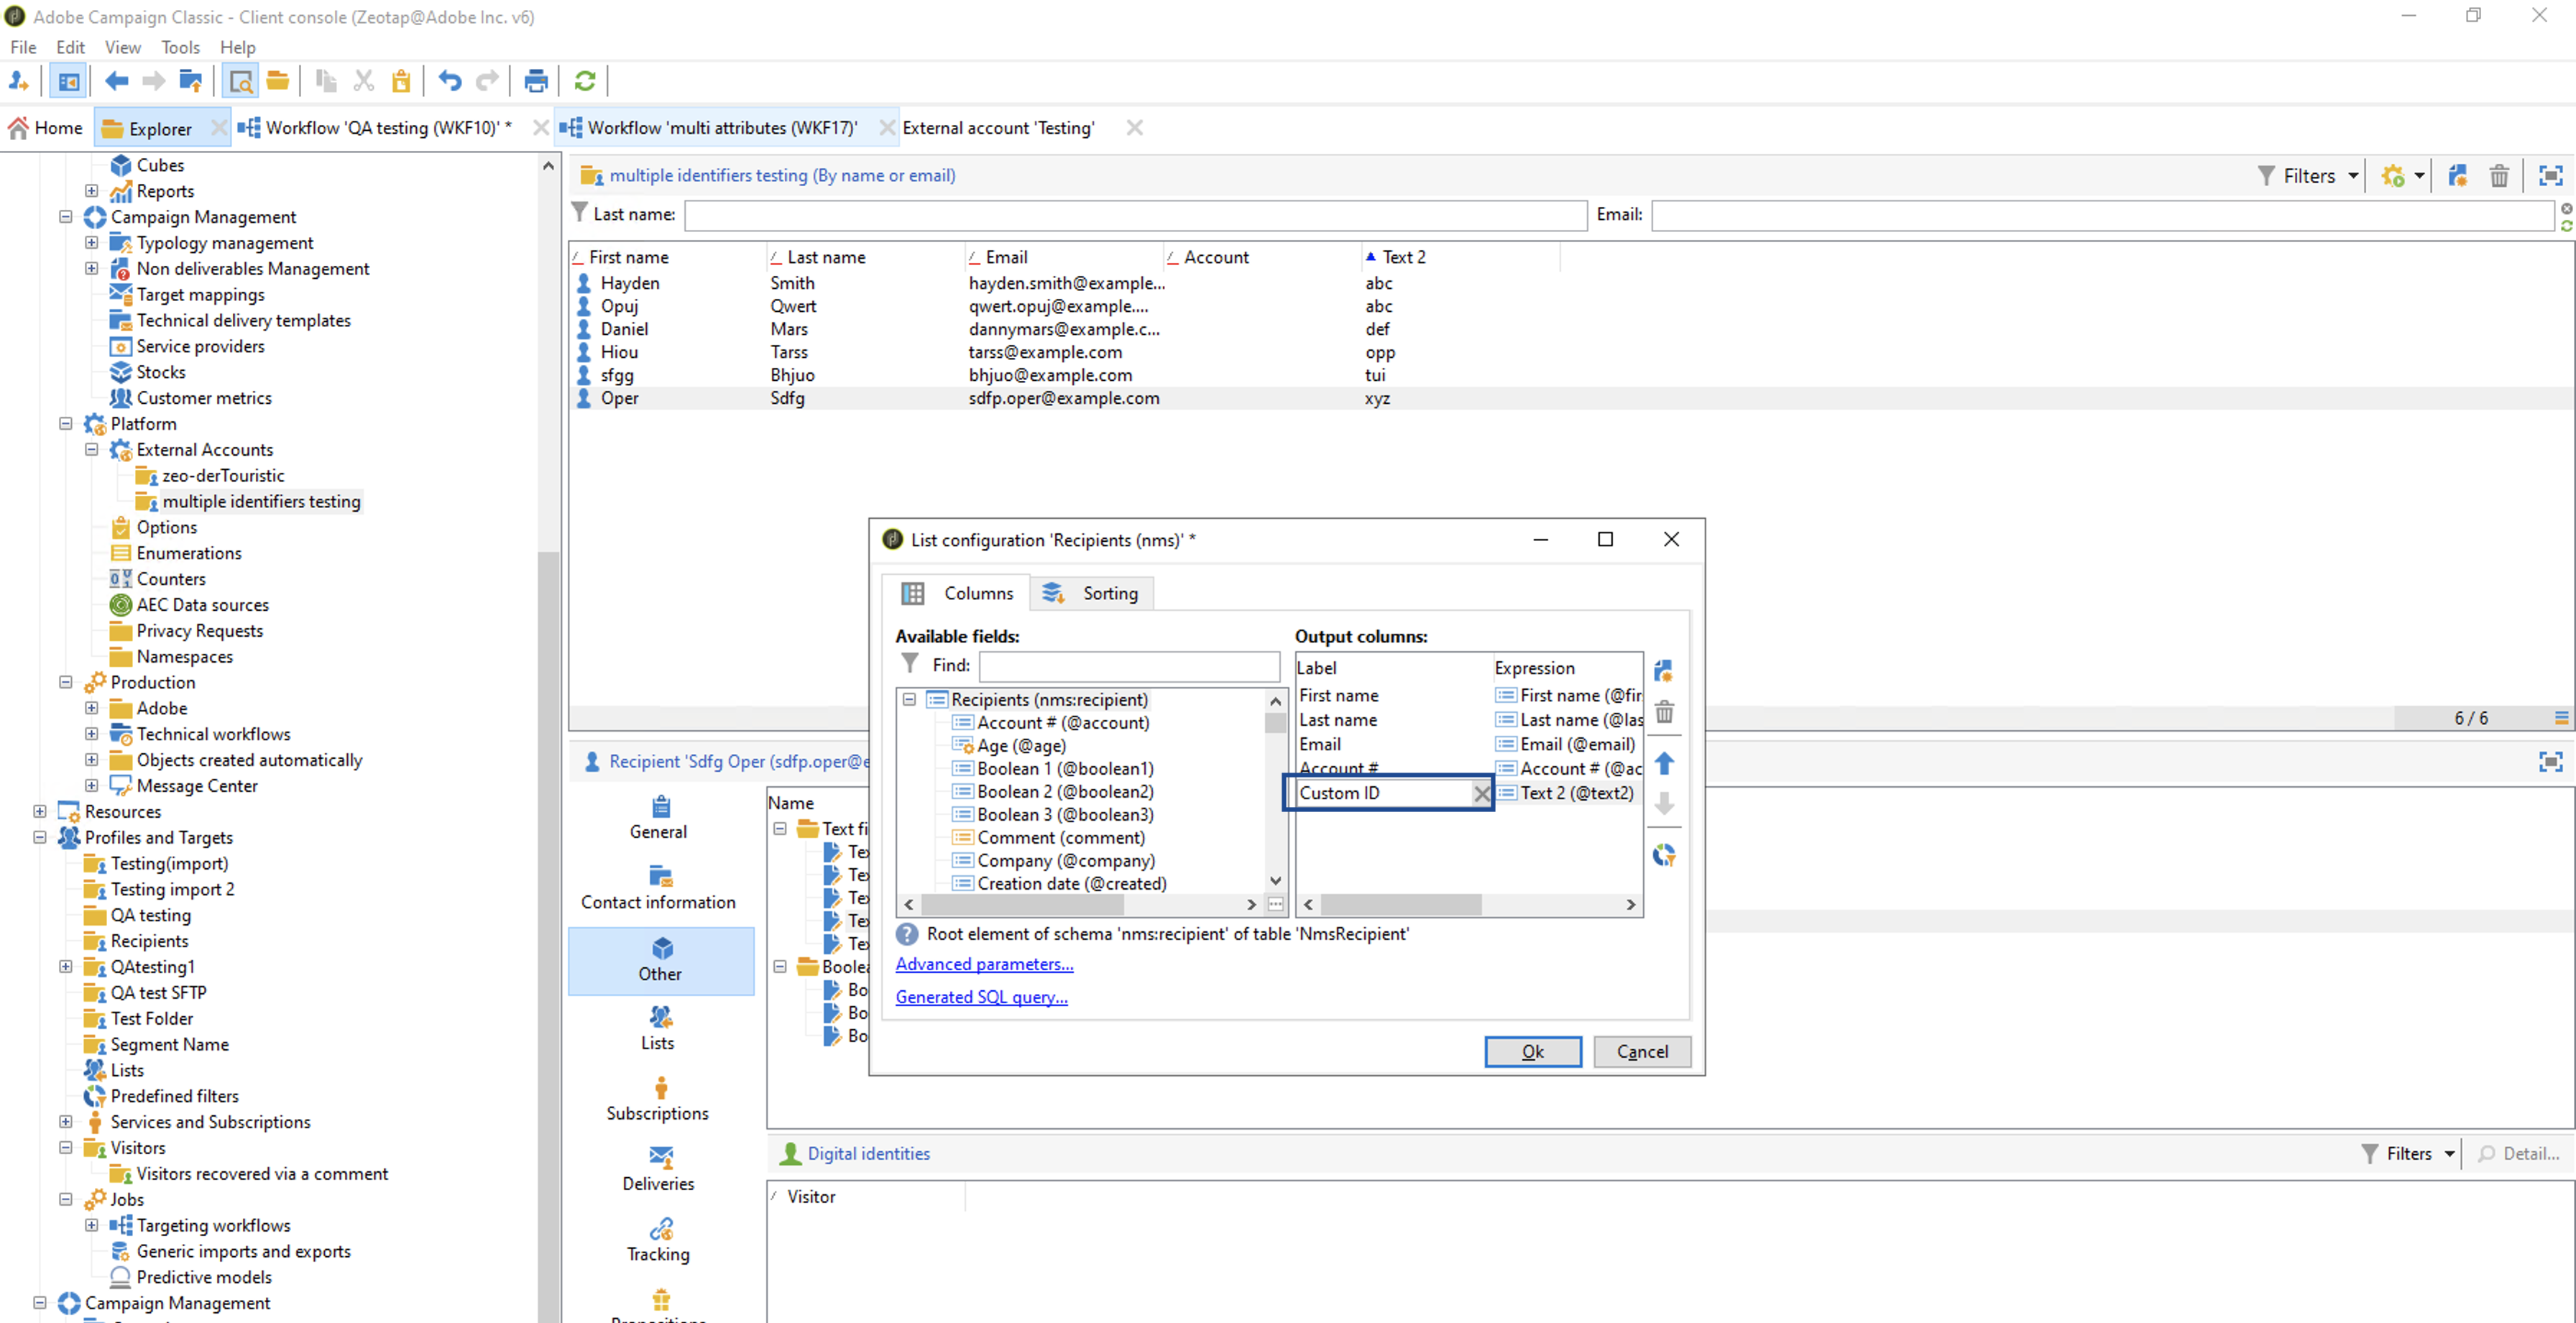 The audience/segments gets displayed as shown on the image below.